Cequent 13908 User manual

Pet Barrier
13908 / 20045
Date of Purchase: ___________________
These Instruction Sheets contain
IMPORTANT safety information. Please
read and keep for future reference.
The user must read and understand these Instruction Sheets and the Warranty.
Installation is the end user’s responsibility and beyond Cequent Consumer Products control. Therefore,
Cequent Consumer Products exclusively limits its Warranty to the repair or replacement of a defective
product. Damage to your vehicle, your cargo or any person or property is excluded.
•Your Pet Barrier must be inspected for signs of wear, corrosion and fatigue before each use.
•Do not use your Pet Barrier for purposes other than those for which it was designed. DO NOT use with
children. DO NOT use for personal restraint.
•Your Pet Barrier will not prevent property damage that may result from improper loading, securing, or
driving.
•Do not attempt to drill, weld, or modify your Pet Barrier or any of the system components.
Review all Warnings, Instructions, and Warranty information carefully. Failure to follow these warnings and
instructions instructions will void the Warranty.
Call Cequent Consumer Products Technical Services at (800) 234-6992 or go to ReeseBrands.com, if you
have any questions regarding the use or the limits of your Pet Barrier.
Rev B 12/16/2014
For assistance with this product or to order
replacement parts, please contact:
Cequent Consumer Products, Inc.
29000-2 Aurora Road
Solon, OH 44139
Questions? (800) 234-6992
ReeseBrands.com
Before Using Your Pet Barrier
Part
Description QTY
A Molded Foot 4
B Threaded Rod Assembly 2
C Vertical Support Tube 2
D Barrier Bar Assembly 2
E Panhead Screw (not shown) 4
Parts List
A
B
C D

Assembly and Installation
1. Remove the Molded Foot Insert from the Molded Foot and place on both ends of the threaded rods. Fig. 1
2. Force the small end of the vertical support tube through each of the plastic tubes on both of the barrier
bar’s. Press the molded feet onto the vertical support tubes and threaded rod ends. Fig. 1
3. Push the threaded rod assembly into the bottom of the open ends of the vertical support tubes. Fig. 1a
4. Place the assembled unit into your vehicle with the threaded rod components on the floor. Extend the
upper assembly toward the ceiling until it presses against the roof. Rotate the wing nuts until unit is
securely fixed in place. Once barrier is installed securely, move the barrier bar assemblies up/down and
in/out to optimize barrier coverage. Fig. 2
5. After adjusting the barrier to the desired area to cover place a screw into each of the plastic tubes and
tighten the screw. Fig. 2a
Fig. 1
Place insert on
threaded rod
Fig. 2
B
Fig. 1a
Fig. 2a
Cut Here
Insert
A
D
D
The proper attachment of this product in accordance with the enclosed instructions is critical to its proper
performance. Cequent Consumer Products, Inc. has no control over, or responsibility for, the attachment
or the installation. Cequent Consumer Products, Inc. is NOT responsible nor will be held liable for any
damage resulting from its attachment or improper use. Cequent Consumer Products, Inc. shall not be
liable for any claims of any kind greater than the purchase price of the product. Warranty information
available at www.trimascorp.com/terms.
THIS WARNING IS GIVEN IN COMPLIANCE WITH CALIFORNIA PROPOSITION 65
WARNING: This product contains chemicals known to the state of California to cause cancer, birth defects or other reproductive harm.
To Prevent Serious Injury, Death and Property Damage:
•INSPECT for signs of wear, corrosion, and fatigue BEFORE each use. DO NOT use if bent
or deformed.
•DO NOT use with children. DO NOT use for personal restraint.
•FREQUENTLY check pet and pet barrier are secure and safe.

Barrera para Mascotas
13908 / 20045
Date of Purchase: ___________________
El usuario debe leer y comprender estas Hojas de instrucciones y la Garantía.
La instalación es responsabilidad del usuario final y está fuera del control de Cequent Consumer Products.
Por lo tanto, Cequent Consumer Products limita exclusivamente su Garantía a la reparación o reemplazo de
un producto defectuoso. Se excluyen los daños a su vehículo, su carga, o a cualquier persona o propiedad.
•Su Barrera para Mascotas debe ser inspeccionada antes de cada uso, para comprobar si muestra señales
de desgaste, corrosión o fatiga.
•No use la Barrera para Mascotas para propósitos diferentes de aquellos para los que se la diseñó. NO use
con niños. NO use para restricción personal.
•Su Barrera para Mascotas no evitará los daños materiales que puedan resultar de una carga, sujeción o
manejo del vehículo incorrectos..
•No intente perforar, soldar ni modificar su Barrera para Mascotas ni ninguno de los componentes del
sistema.
Examine cuidadosamente todas las advertencias, las instrucciones y las informaciones sobre la Garantía. Si
no observa estas advertencias e instrucciones, podría anularse la Garantía.
Si tiene preguntas respecto al uso o los límites de la Bandeja de carga, llame a Servicios Técnicos de Cequent
Consumer Products al (800) 234-6992, o ingrese en ReeseBrands.com.
Para obtener ayuda con este producto o para pedir
repuestos, comuníquese con:
Cequent Consumer Products, Inc.
29000-2 Aurora Road
Solon, OH 44139 –EE. UU.
¿Preguntas? (800) 234-6992
ReeseBrands.com
Antes de utilizar su barrera para mascotas
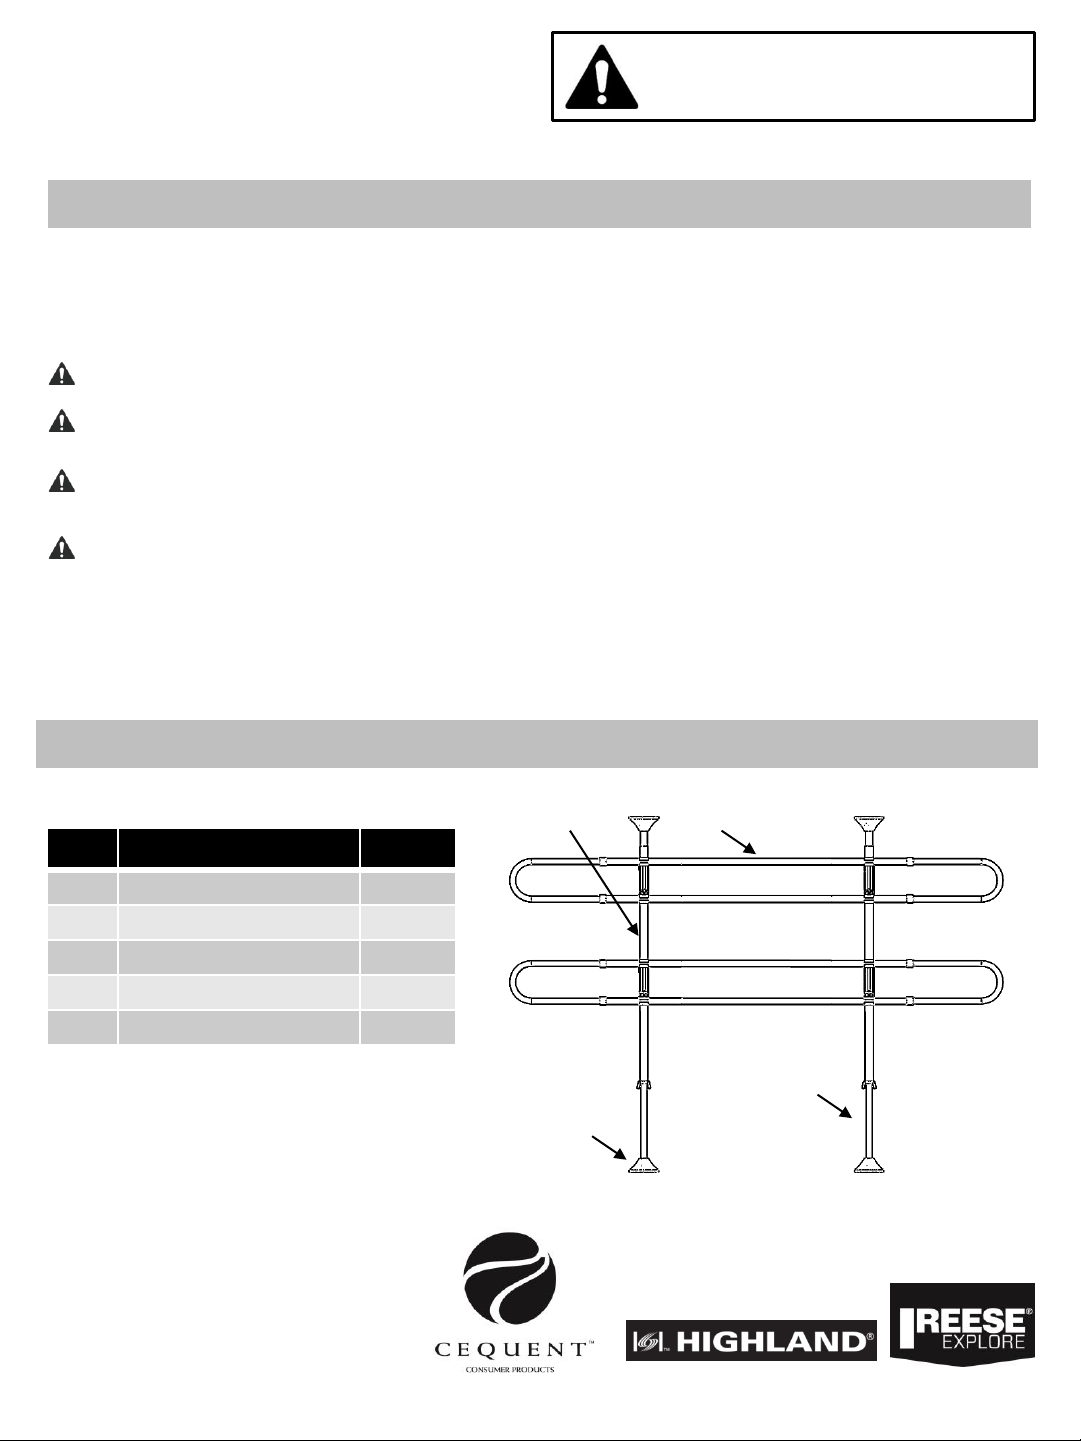
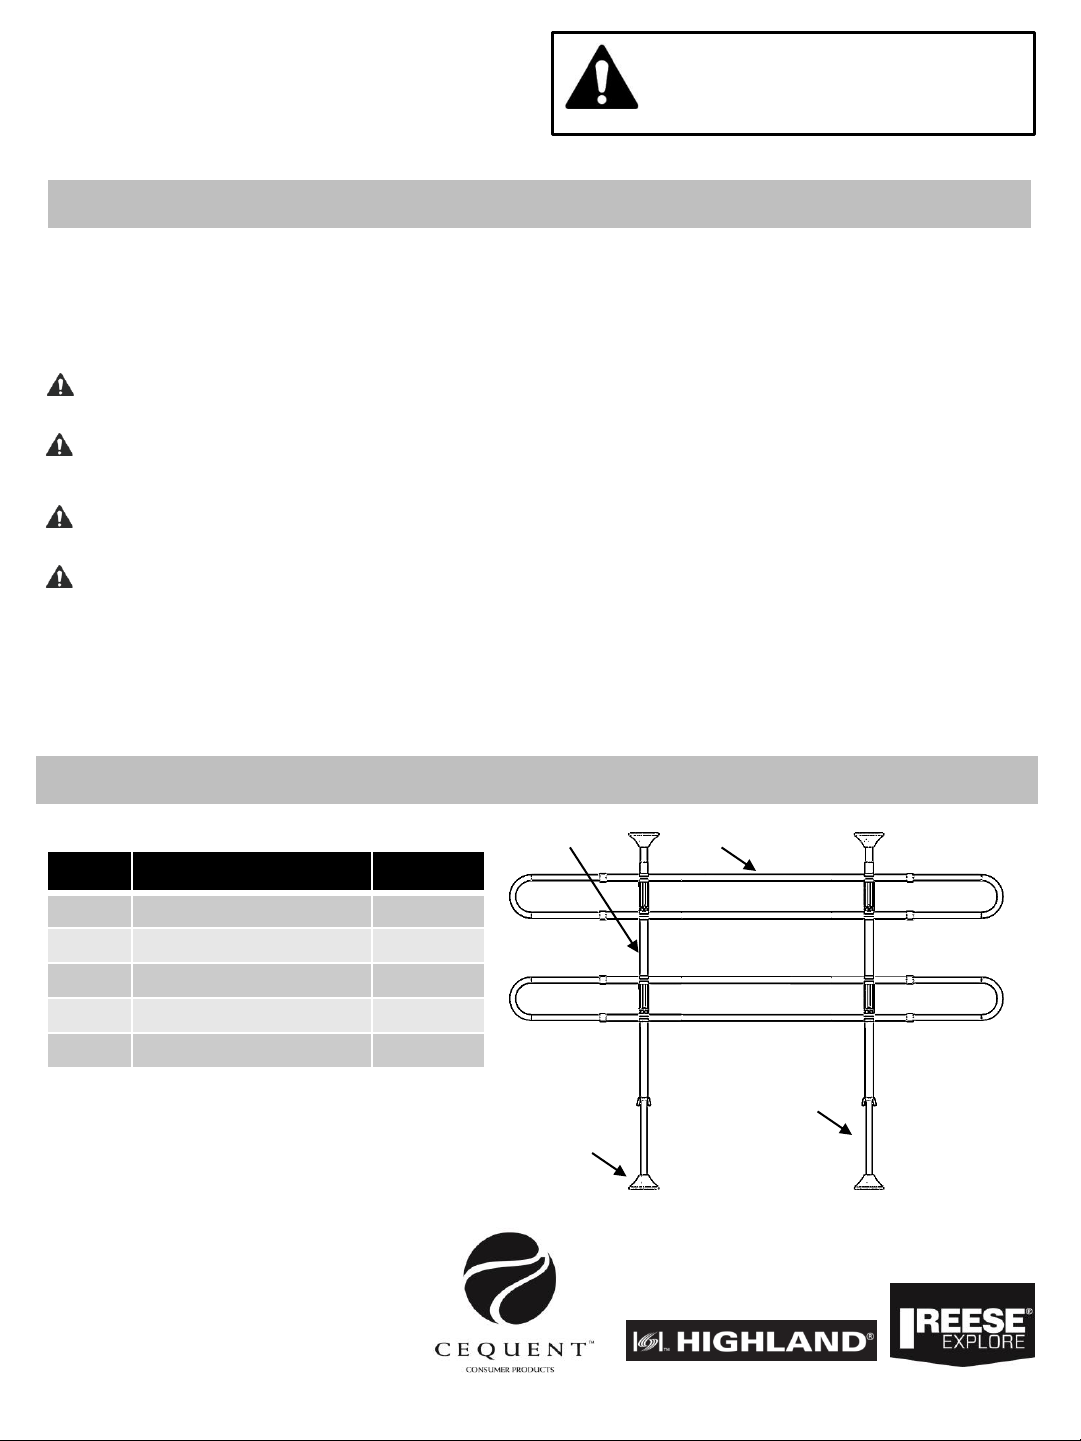
Pieza
Descripción Cantidad
A Foot moldeado 4
B Rod rosca 2
C Tubo de soporte vertical 2
D Barra de barrera Asamblea 2
E Moldeado pie de insertar 4
Lista de piezas
A
B
C D
Estas hojas de instrucciones contienen
información de seguridad IMPORTANTE.
Léala y consérvela para consultas en el
futuro.

Instrucciones de instalación
1. Quite el pie insertar de moldeado la pie de moldeado y el lugar en ambos extremos de las varillas de
rosca. Fig. 1
2. Fuerza el extremo pequeño del tubo vertical de apoyo a través de cada uno de los plásticos de tubos en
el ensamblado de barra de barrera presione los pies moldeados en los tubos de soporte vertical y rosca
de la articulación. Fig. 1
3. Presione el ensamblaje de varilla roscada en cada uno de los extremos abiertos de los tubos de soporte
vertical. Fig. 1a
4. Coloque la unidad montada en su vehículo con los componentes de la varilla de rosca en el piso. Ampliar
el conjunto superior hacia arriba hasta que presione contra el techo. Rotar las tuercas de ala hasta unidad
de forma segura es fijo en su lugar. Una vez que la barrera se instala de forma segura, mover los
conjuntos de barra de barrera hasta/hacia abajo y in/out para optimizar la cobertura de la barrera. Fig. 2
5. Después de ajustar la barrera para el área deseada para cubrir coloque un tornillo en cada uno de los
tubos de plásticos y apriete el tornillo. Fig. 2a
Fig. 1
Fig. 2
B
Fig. 1a
Fig. 2a
cortada
insertar
A
D
D
ESTA ADVERTENCIA SE HACE EN CUMPLIMIENTO DE LA PROPOSICIÓN 65 DE CALIFORNIA
ADVERTENCIA: Este producto contiene sustancias químicas reconocidas por el estado de California, EE. UU., como causantes de cáncer y
defectos de nacimiento u otros daños reproductivos.
.
Para prevenir lesiones graves o la muerte:
•INSPECCIONE para comprobar si hay signos de desgaste, corrosión o fatiga ANTES de
cada uso. NO use el producto si observa doblez o deformación.
•NO use con niños. NO use para restricción personal.
•FRECUENTES comprobar mascota y barrera para mascotas son seguros y protegidos.
La fijación correcta de este producto de acuerdo con las instrucciones que se acompañan es esencial para su
correcto funcionamiento. Cequent Consumer Products, Inc. no tiene control sobre la fijación ni la instalación, ni
responsabilidad por ellas. Cequent Consumer Products, Inc. NO es ni se hará responsable de ningún daño
resultante de su instalación o su uso incorrecto. Cequent Consumer Products, Inc. no será responsable de ninguna
reclamación de ninguna clase que sea mayor que el precio de compra del producto. La información de garantía está
disponible en www.trimascorp.com/terms.
ADVERTENCIA

Barrière Animal
13908 / 20045
Date of Purchase: ___________________
Pièce
Description QTY
A Foot moulée 4
B Rod fileté 2
C Tube de support vertical 2
D Barre de barrière
Assemblée 2
E Insertion de foot moulées 4
Liste de pièces
A
B
C D
Cette fiche d’instructions contient des
informations de sécurité
IMPORTANTES. Veuillez la lire et la
conserver comme référence ultérieure.
L’utilisateur doit lire et assimiler ces fiches d’instruction et la garantie.
L’installation est de la responsabilité de l’utilisateur final, et hors du contrôle de Cequent Consumer Products. De ce
fait Cequent Consumer Products limite sa garantie à exclusivement la réparation ou le remplacement d’un produit
défectueux. Des dommages à votre véhicule, à la cargaison, ou à toute personne ou tout bien en sont exclus.
•Votre barrière animal doit être inspecté pour déceler des signes d’usure, de corrosion et de fatigue avant chaque
utilisation.
•N’utilisez pas votre barrière animal pour des finalités autres que celles pour lesquelles il a été conçu. NE PAS
utiliser avec les enfants. NE PAS utiliser à la retenue personnelle.
•Votre barrière animal n’empêchera pas les dégâts matériels résultant d’une faute de chargement, de fixation ou
de conduite.
•N’essayez pas de percer, souder ou modifier votre barrière animal ni aucun des composants du système.
Passez soigneusement en revue toutes les mises en garde, les instructions et les informations de garantie. Le non-
respect de ces avertissements et instructions annulerait la garantie.
Appelez les services techniques de Cequent Consumer Products au (800) 234-6992, ou allez sur ReeseBrands.com,
pour toutes questions relatives à l’utilisation ou aux limites de votre barrière animal.
Pour de l’assistance ou des pièces de rechange sur ce
produit, veuillez contacter :
Cequent Consumer Products, Inc.
29000-2 Aurora Road
Solon, OH 44139, USA
Des questions ? (800) 234-6992
ReeseBrands.com
Avant d’utiliser votre barrière animal

Instructions d’installation
1. Retirez les insérer de foot moulé du foot moulé et place aux deux extrémités des tiges filetés. Fig. 1
2. Force la petite extrémité du tube vertical de prise en charge à travers chacune du plastique tubes sur
l'assemblage de barre de barrière, appuyez sur les pieds moulés sur les tubes de soutien vertical et
embouts filetés. Fig. 1
3. Poussez l'assemblage de la tige fileté dans chacune des extrémités ouvertes des tubes support vertical.
Fig. 1a
4. Placer l'unité Assemblée dans votre véhicule avec les composants de la tige fileté sur le sol. Étendre
l'assemblage supérieur vers le haut jusqu'à ce qu'il appuie sur contre le toit. Faites pivoter les écrous aile
jusqu'à ce que l'unité est fixée solidement en place. Une fois la barrière est installé en toute sécurité,
déplacer les assemblages de barre de barrière/vers le bas en entrée/sortie pour optimiser la couverture
de la barrière. Fig. 2
5. Après avoir réglé la barrière à la zone souhaitée pour couvrir les placer une vis dans chacun des tubes en
plastique et serrer la vis. Fig. 2 bis
Fig. 1
Lieu insert sur la
tige filetée
Fig. 2
B
Fig. 1a
Fig. 2a
couper ici
insérer
A
D
D
La bonne fixation de ce produit en conformité avec ces instructions est critique pour sa bonne
performance. Cequent Consumer Products, Inc. n’a aucun contrôle ni responsabilité sur la fixation et
l’installation. Le constructeur n’est donc PAS responsable et n’assume aucun engagement quant à des
dommages résultant de sa fixation ou de son mésusage. Cequent Consumer Products, Inc. n’aura
aucune responsabilité pour des réclamations quelconques qui dépasseraient le prix du produit.
Des informations sur la garantie sont disponibles sur ww.trimascorp.com/terms.
CET AVERTISSEMENT EST DONNÉ EN CONFORMITÉ AVEC LA PROPOSITION 65 DE LA CALIFORNIE.
AVERTISSEMENT : Ce produit contient des composants chimiques reconnus par l’État de Californie comme cause de cancers, anomalies
congénitales ou autres atteintes à la reproduction.
.
Pour éviter des blessures graves voire mortelles :
•CHERCHER des signes éventuels d’usure, corrosion ou fatigue AVANT chaque utilisation.
N’utilisez PAS le produit en cas de courbure ou déformation.
•NE PAS utiliser avec les enfants. NE PAS utiliser à la retenue personnelle.
•Vérifiez fréquemment animal de compagnie et barrière animal sont sûr et sécuritaire.
AVERTISSEMENT
This manual suits for next models
1
Table of contents
Languages:
Popular Pet Care Product manuals by other brands

TRU-BLU
TRU-BLU K9000 2.0 Operator's manual

Trixie
Trixie REPTILAND Directions for use

Exo Terra
Exo Terra PT2464 operating instructions

Royal Exclusiv
Royal Exclusiv Bubble King Double Cone 130 Operating and maintenance manual

Tellur
Tellur TLL331471 user manual

Drinkwell
Drinkwell AVALON-AU-17 operating guide

Omlet
Omlet stak manual

Red Sea
Red Sea Prizm Pro Skimmer Installation and operation manual

GLA-WEL
GLA-WEL DOG-Sport Operating, Maintenance and Caretaking Instructions

Premier Pet
Premier Pet Zip Automatic Cat Laser Toy product manual

Bissell
Bissell BARKBATH user guide

SportDOG
SportDOG NoBark 10R operating guide