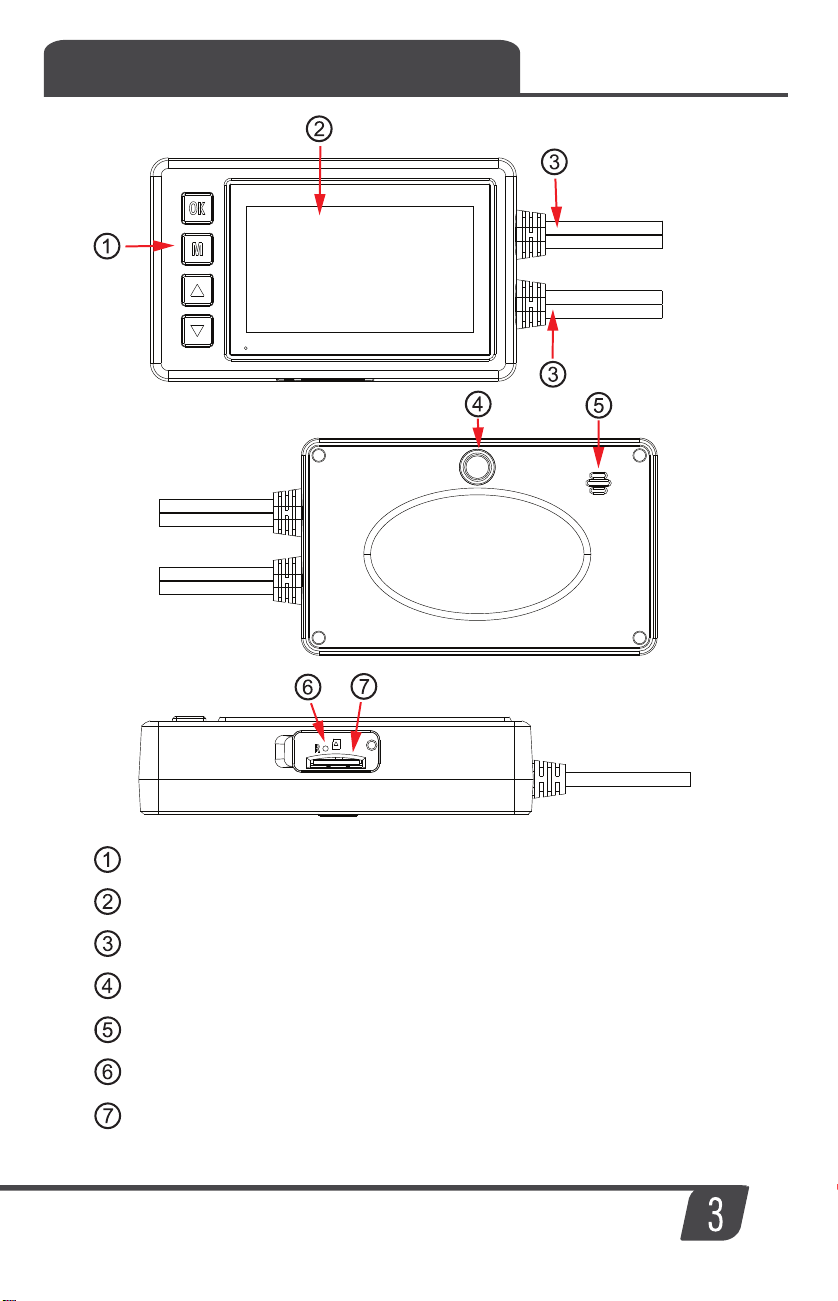
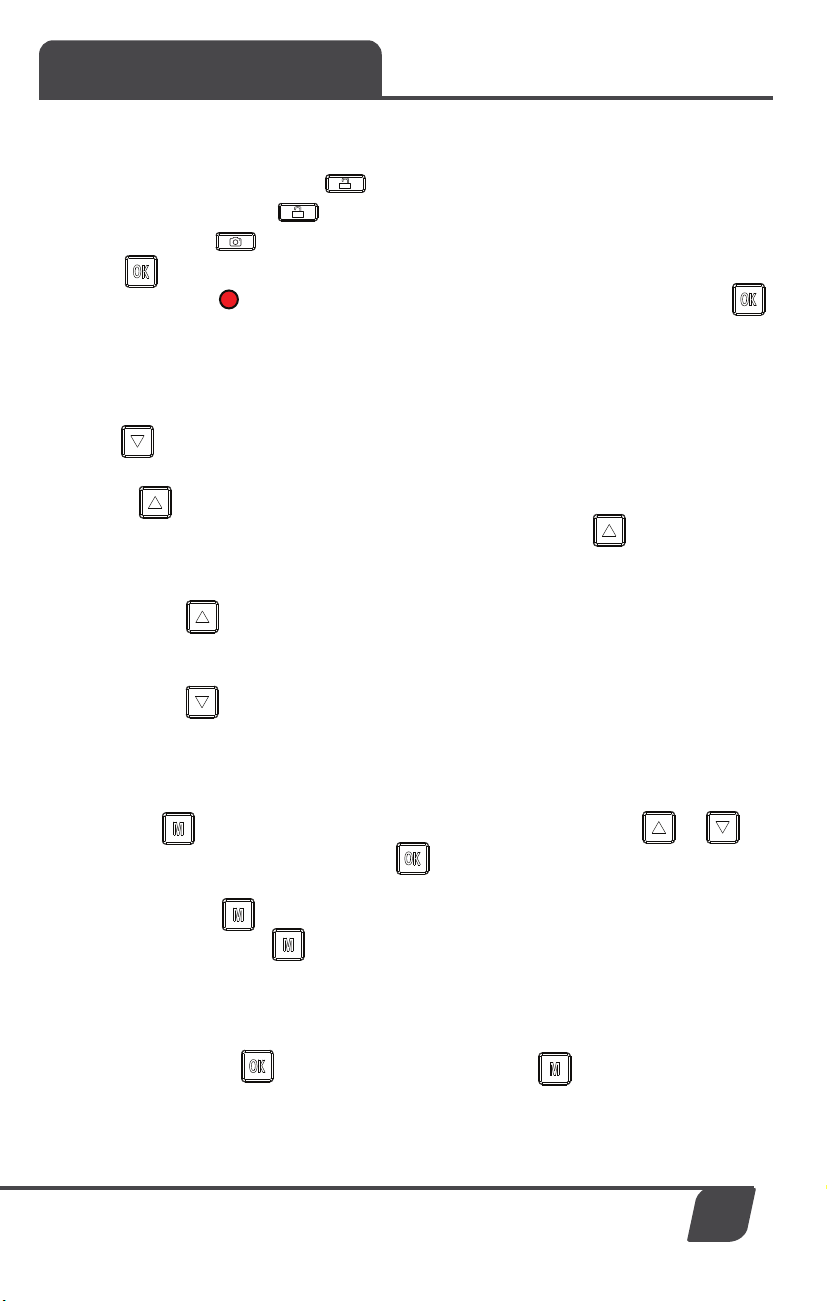
Cerwin-Vega C480 User manual

Motor Sport DVR
MANUAL
C480

We reserve the right to change the products and specifications at any time without notice.
Images may or may not include optional equipment.
Cerwin Vega Mobile Enthusiasts:
Thank you for purchasing a Cerwin Vega Mobile product for your
mobile/marine/powersport audio system. You have chosen Cerwin
Vega Mobile because you deserve the best!
Cerwin Vega Mobile products are designed and engineered to the
highest quality standards in the industry to create the ultimate
listening experience. For optimal performance of this product, it is
highly recommended that you have it installed by on authorized
Cerwin-Vega Mobile dealer.
Our authorized dealers have the necessary experience and
installation equipment to ensure that your Motor Sport DVR
will deliver maximum performance and explain all the details
pertaining to our warranty coverage as well.
If you decide to install the product by yourself, please thoroughly
read through this manual before getting it installed. This manual
will help familiarize yourself with this Motor Sport DVR and guide
you through the installation process and procedures.
Please contact your local authorized Cerwin Vega Mobile dealer
if you have any questions regarding the instructions in this manual
or the products operational capabilities. If you require additional
assistance, please contact the Cerwin-Vega Mobile Technical
Support Department during business hours (PST) at 213-212-3187.

Operation / Installation Overview
Control Panel
Display
Connection Ports
Mounting Hole
Speaker
Reset Button
Micro SD Card Slot

Installation
4
Please install according to the specific motorcycle environment and connect the
power cable. The installation diagram is show as below:
1. Memory card (micro SD card or micro SDHC card) not included. Please use the
high-speed Micro SD card (over U1), with a capacity of 8GB to 128GB.
2. Insert memory card into card slot and press in with finger til it clicks in.
3. To remove the memory card, press in the card and let it slide out, remove with
fingers gently.
4. Micro SD Card must be formatted before use.
Turn on/off
1. Short press button for 1 second to turn on system.
2. Long press button for 3 seconds to turn off system.
Selection of Memory Card
A. Main Unit
B. Front and Rear
Cameras
C. Power Harness
(Red: Swith Power,
Yellow: Battery +,
Black: Ground or Battery)
D. Remote Control Panel
E. GPS Antenna

Instructions
5
• During recording, press the button on the remote control to lock the current
recording file. Press the button again to unlock the locked video in the current
recording. Press to take a photo.
Press button to start recording, and the upper left side of LCD would show
a recording mark and the red mark would flashes during recording. Press
button again to stop recording, and the recording mark would disappear accordingly.
Note: During recording, the red light of cable control would flash.
Press down button, to turn display off while recording. Press it again to turn the
screen back on.
• Press up key to turn off voice recording function. When the voice recording
is off, there will be no audio recorded in the video. Press the up button again
to turn voice recording back on.
• Long press up key for 3 seconds to switch the display picture of front and
rear cameras.
• Long press down key for 3 seconds to turn on the WIFI, press it again for 3
seconds to turn off the WIFI.
Note:Due to the camera’s default setting, of automatically recording when
powered on, press to stop recording. Then press button to enter the menu.
System Setting
Press the button for 3 seconds to enter viewing mode. Press or to
choose the “picture” or “video” press key to view.
Press menu key to return to the menu.
Then press menu key to return to the camera screen.
Viewing mode
Video mode

Operation
6
1. Language setting, press the menu button
Enter the system setting menu, Press up key or down key to enter "Language
Selection", press button to select the language. Press to exit.
2. Time and time zone settings:
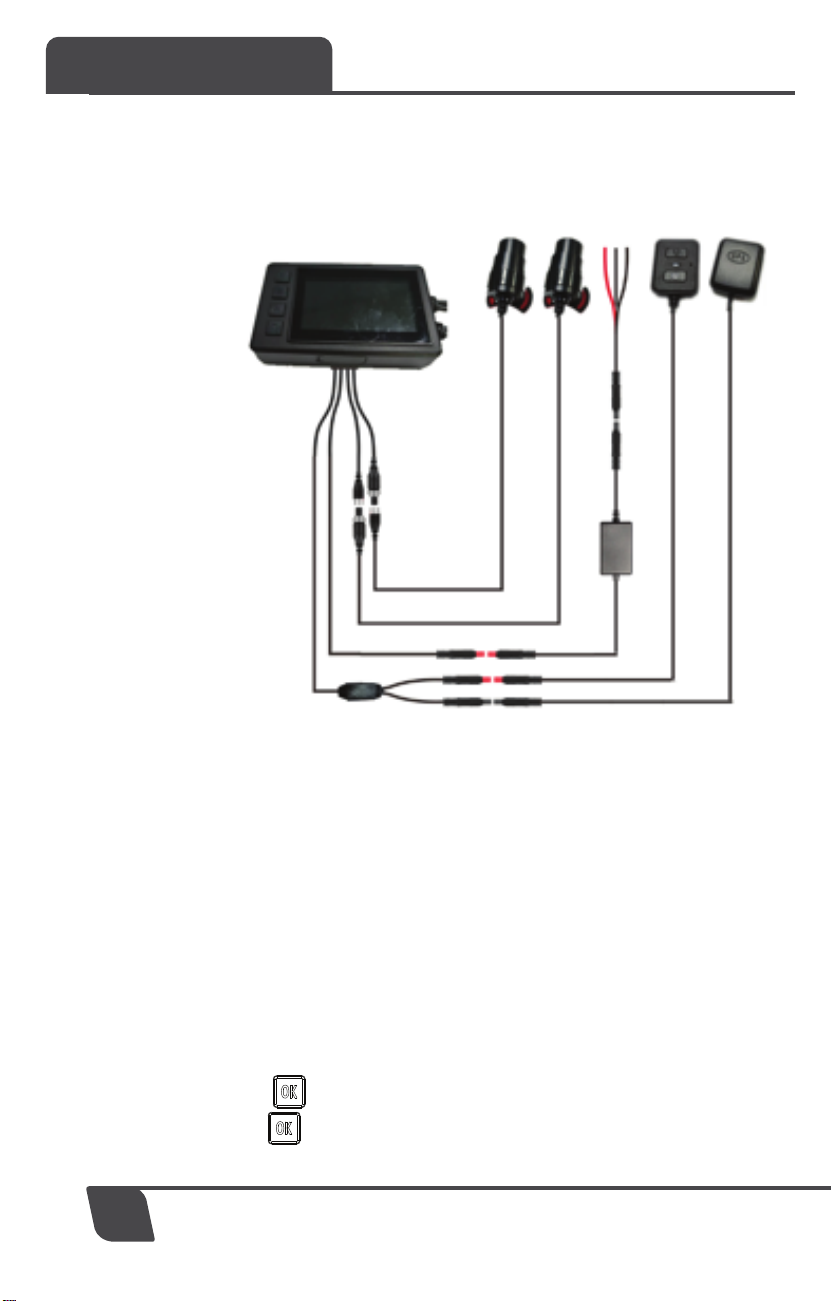
For first use, please first go to system menu and access to “clock setting” option to set the
current date and time or connect the GPS module to automatically synchronizes the time.
3. Other personalized settings can be done in the system menu.
Video mode: 1920x1080 FHD 30fps
Film cutting time: 3 minutes, 5 minutes, 10 minutes.
Voice recording: on/off
Explanatory note: record the sound simultaneously when the video is recorded.
When the voice recording is closed, it can ensure the video shot is silent.
Movie Mode
Key tone: on/off
Auto off: Never, 1 minute and 5 minutes
When set to 1 minute or 5 minutes the system will shut down automatically after no
motion for this duration of time.
Clock setting: Set the current date and time
Date Format: Set how you want the date to appear
Stamp: on/off
Note: the left bottom will display the set date and time when recording or taking
a picture.
Flicker frequency: 50Hz and 60 Hz
LCD Power Save: off, 1 minute or 3 minutes
Explanatory note: after the camera is not operated for X minutes, the camera will
turn off the LCD screen. Press any key to display LCD screen.
Power Save Mode: Black/Time
Note: when set to time display will show the date and time.
Protect Level: closed, high, middle and low.
Note: the vibration video is locked, the greater the grade, the higher the sensitivity.
Time Zone Select: select current time zone (GMT+/-)
System reset: confirm and cancel
Note: after the system is reset, the function of camera will return to default state.
Format SD card: confirm and cancel
Note: confirm to format SD card in the camera.
General Settings
Language

Connection
7
Please use your mobile phone to connect the camera’s WIFI
(1)Long press down key for 3 seconds to turn on the WIFI;
Camera’s WIFI name: CV-C480-XXXX ;
Password: 1234567890
(2)After connecting the camera’s WIFI, users could set the camera’s
setting on APP---CAR_DVR
Connecting to WIFI
(3)Scan the below QR Code for download the APP:

GPS
8
GPS Location and Application
Plug the GPS, the display would show the red GPS mark , when the GPS
locates successfully,the mark would turn to green and the time would be
synchronized automatically.
Video Player
1.Please download the player by below link:
Google :
https://drive.google.com/open?id=1Igs5EHaCsY5kkyYMKSmogYC6J5HtqrdA
MediaFire Share
http://www.mediafire.com/file/ca199784cl7xdsz/GVP_GPS_Player_English.msi/file

Specifications
9
LCD
Front cam
Language
Video
Video Format
1080P-AHD
English (Default)
Spanish
Russian
Chinese
1080P 30fps
MOV
Technical Specications
2.7” (16:9) TFT LCD
Mic/Speaker Built-in
Light Source
Frequency 50Hz/60Hz
GPS External
Power Supply 5V 2A
Rearcam 1080P-AHD
Battery Built-in Super capacitor.
Notes: the design and specification of the product are subject to the change
without notice. If there is any inconsistency, in kind shall prevail.

10
Notes

We reserve the right to change the products and specifications at any time without notice.
Images may or may not include optional equipment.
Please Ship All Warranty Claims With Pre-Authorized RA Number To:
CV&DA Holdings, Inc.
ATTN: Customer Service Department
3761 S. Hill St.
Los Angeles, CA 90007 USA
Please Contact Customer Service for Further Warranty Information:
U.S.A.
Tel: 213-261-4161 / Fax: 213-947-4767
11

3761 South Hill Street
Los Angeles 90007, USA
P 213-261-4161 / F 213-947-4767
2021 Cerwin Vega Mobile All rights reserved.
(a division of CV & DA Holdings, Inc.)
Table of contents
Popular DVR manuals by other brands

XtendLan
XtendLan NVR-1602F user manual

Magnavox
Magnavox MDR868H quick start

DIGIFUSION
DIGIFUSION FVRT100 user guide

Panasonic
Panasonic WJHD500A - Digital Disk Recorder operating instructions

Horizon Fitness
Horizon Fitness DVR quick start guide

Crest Electronics
Crest Electronics CDVS-4100 Series Setup and user's manual