Check to make sure you have a good ground connection.
Check that there is at least 12v on the battery (+) terminal
Check that the Remote Input (Turn-On) has at least 10VDC.
Check that the green power LED is lit
Check all fuse, replace if necessary.
Make sure that the Protection LED is not illuminated. If it is lit, shut off
the amplifier briefly, and then Power Cycle (reset).
T
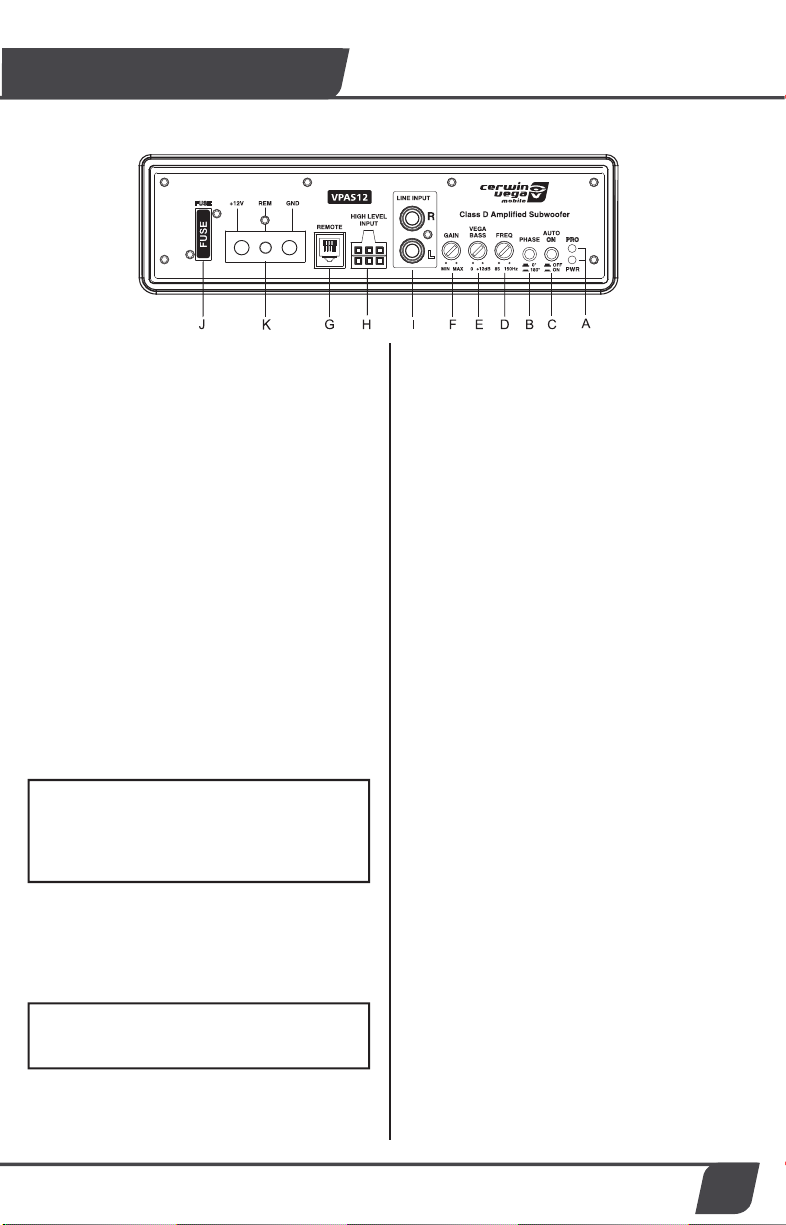
A.POWER STATUS LED
B.PHASE SWITCH
Use this switch to help compensate for time
alignment problems in the system. Such
problems usually result from having the
subwoofer at a different distance from the
listener than the other speakers in the system.
C.AUTO POWER ON
he AUTO POWER ON (ON/OFF) is for high
level (speaker-level) connections. When the
switch is in the “ON” position, the subwoofer
will AUTO POWER ON when signal is detected.
If the amplifier detected no signal input, the
amplifier will auto turn off. If you prefer to use
the remote turn on/off connection, the switch is
in the OFF position.
D.LOW PASS FILTER
This control permits you to define the frequency
range you want the subwoofer amplifier to
receive. The subwoofer will reproduce all sound
BELOW the frequency you set.
F.INPUT GAIN CONTROL
After you have installed your system, turn this
GAIN control to minimum (counter-clockwise).
Turn the head unit on and adjust the head unit
volume to a comfortable listening level.
Slowly turn up the subwoofer input gain control
until you hear a small amount of distortion. Then
reduce the level until the distortion is completely
gone. Level the control at this setting.
G.REMOTE LEVEL CONTROL PORT
If you are going to use the REMOTE BASS
control, attach the included remote level control
BEFORE setting gain and “pre-set” it to about
the 12 o’clock position.
.
H.HIGH LEVEL (speaker level) INPUTS
If your head unit does not have RCA outputs
you can use the speaker outputs for the audio
source for the subwoofer. Use the supplied
cable and wire harness and connect the
outputs properly as shown in the connection
diagram in this manual (FIG2, PG4)
I.LOW LEVEL RCA INPUTS
Low level inputs are the recommended way
to introduce the audio signal to the subwoofer
IF RCA outputs are present on your head unit
or other signal source (such as a sound
processor - see FIG 1, PG4).
J.FUSE
K.POWER INPUT TERMINAL
There is a GREEN “power” LED that glows
green when power is on and no problems are
present. If the protection circuit (PRO) comes
on, it will illuminate the other LED RED
Do not use a fuse with a different value
and NEVER replace the fuse with a wire
or coin. The fuse is there to protect the vehicle
NOT the amplifer/subwoofer.
T
E.BASS BOOST
he BASS BOOST feature will increase the
sound level in the bass frequencies.
Note: Please connect the remote terminal
to the remote output of head unit as in
Fig.4. When you hear the unit turn ON/OFF
there should be a very slight POP noise
from the subwoofer.
Note: The low pass filter frequency can be
higher or lower than the marked Frequency.
There is a +/-20% tolerance.
Panel controls and features
3
Features/Functions
Use 8 guage COPPER wire!! NOT CCA type
cheap-o deluxe wire kits!!!!
This is usually caused by poor quality RCA cables, which can pick up
radiated noise. Use only the best quality cables, and route them away
from power cables.
Check that the RCA grounds are not shorted to the vehicle chassis
Check that the head unit is properly grounded.