Chamberlain GPS1000 User manual

1
INTRODUCTION
The Chamberlain Garage Power Station gives you the convenience of power, air, and lighting directly within
your reach. It mounts neatly to your ceiling and reaches anywhere in the garage with a 25 foot utility cord!
The Chamberlain Garage Power Station’s smart design will turn your garage into an efficient work area.
GARAGE POWER STATION
MODEL GPS1000
TOOLS
• Tape measure
• Stud finder
• Pencil or marker
• Drill
• 3/16" Drill bit
• #3 Phillips
screwdriver
• 7/16" socket wrench
• 6" socket extension
(optional)
• Garage Power Station
• Rubber Isolators - large (2), small (2)
• Washers (2)
• ¼" x 2 ½" Lag Screws (2)
SPECIFICATIONS
Voltage........................................................120 Vac
PSI Rating ............................. 100 psi max pressure
Hose .................. 25 foot 1/4" OD polyurethane hose
Locking tire chuck and pressure gauge
Utility Cord........................... 25 feet SJTW 16 AWG
Amps .................................................................... 13
Inflator.............................switches on below 85 psi,
switches off at 100 psi
Task Light Bulbs .......... MR16 GU10 120 V Halogen
bulbs (50 watts maximum)
Auto Shutoff........................................................Yes
CARTON INVENTORY
Cord Stop
Utility Cord
Work Light
Assembly Quick-Connect
Locking Inflator
Task Light

2
IMPORTANT SAFETY INFORMATION
To reduce the risk of SERIOUS INJURY or DEATH:
• READ AND FOLLOW ALL INSTALLATION
WARNINGS AND INSTRUCTIONS.
• FOR INDOOR USE ONLY.
• To avoid SERIOUS PERSONAL INJURY or
DEATH from electrocution, disconnect ALL
electric power BEFORE performing ANY service
or maintenance.
• DO NOT OVERLOAD RECEPTACLE. Maximum
current is 10 amps.
• DO NOT immerse cords, plugs or product in
water or other liquid.
• DO NOT operate appliance with a damaged
cord or plug or after the appliance malfunctions
or has been damaged in any way. Return
appliance to nearest authorized service facility
for examination, repair or adjustment.
• The use of accessory attachments NOT
recommended by the appliance manufacturer
may result in fire, electric shock or INJURY to
persons.
• DO NOT let inflator head touch hot surfaces.
• DO NOT use appliance for other than intended
use.
• Connect to a properly grounded outlet.
• DO NOT use a 3 – 2 prong adapter.
• DO NOT use above hazardous locations or
areas where water can accumulate or in rain or
mist.
• NEVER USE the inflator as a toy.
• NEVER permit children to operate or play with
the Garage Power Station. KEEP OUT OF
REACH OF CHILDREN.
• Keep inflator away from flammable areas/
liquids at ALL times.
• DO NOT handle work light or try to plug
something into receptacle when your hands are
wet or when standing on a wet or damp
surface.
• This appliance MUST ALWAYS BE USED in
accordance with all local electrical and building
codes.
• The Garage Power Station MUST be RIGIDLY
fastened to structural support on ceiling.
• Arcing parts. Keep the compressor/motor/work
light at least 20 feet away from explosive
vapors.
To avoid personal INJURY or DAMAGE to
property and to reduce the risk of electric shock
and fire:
• DO NOT use this cord reel in explosive
atmospheres, near flammable liquids or where
explosion proof equipment is required.
• DO NOT direct air stream at body.
• Use ONLY recommended air-handling parts
acceptable for air pressure.
• DO NOT over-inflate.
• This inflator is designed to inflate car tires, ATV
tires, motorcycle tires, bicycle tires, sports
equipment, air mattresses, beach toys and
other inflatables.
• Allow inflator to cool down 10 minutes after
each 10 minutes of continuous use.
• Use safety glasses. Use facemask or dust mask
if operation is dusty.
• DO NOT allow cord reel to retract the cord by
itself as DAMAGE or INJURY may occur from
excessive rewind speed.
• BEFORE cleaning product, unplug from the
power source.
• DO NOT use solvents such as gasoline,
turpentine, etc. to clean unit. Keep cord reel
clean to assure smoothest operation. To clean,
simply pull cord to its full length and allow to
retract through a dampened rag. DRY
thoroughly BEFORE plugging back into outlet.
• PULL out cord to full length when using the
receptacle.
• Disconnect ALL electrical power BEFORE
replacing bulbs.
• Use ONLY 50 watt or smaller bulb.
• For Light Duty Use ONLY.

3
INSTALLATION
IMPORTANT NOTE: The Garage Power Station MUST be RIGIDLY fastened to structural support on ceiling
using lag screws. The Garage Power Station can be mounted to a single joist or across two joists.
1. Select a mounting location for the Garage Power Station within 6 feet of an electrical outlet.
2. Use a stud finder to locate the joists where the Garage Power Station will be mounted. Mark the center
of each joist. NOTE: Mounting holes for the Garage Power Station are 16" apart. If the distance between
each joist is 24" on center, mount the Garage Power Station to a single joist.
3. Mark the mounting holes 16" apart and drill 3/16" pilot holes in the center of the joist(s).
4. Remove the screws on the task light covers and remove the covers. Unplug the green ground wire from
the terminal on each task light cover. NOTE: If you do not have a 6" socket extension, remove the
Garage Power Station cover (4 screws) to access the mounting holes (Figure 1).
5. Place a washer and small rubber isolator on each lag screw. Insert each lag screw through the
mounting holes of the mounting plate.
6. Place a large rubber isolator on each of the lag screws behind the mounting plate.
7. Position the Garage Power Station over the joist(s). Insert each lag screw into the pilot holes and
tighten lag screws with a 7/16" socket wrench with extension (do not over tighten).
8. Insert a light bulb (not provided) into the light socket and turn it clockwise to secure. Slide the light
bulb into the retainer ring on the task light cover.
Screws
Task Light Cover
Lag Screw
Lag
Screw
Washer
Washer
Small
Rubber
Isolator Small
Rubber
Isolator
Large
Rubber
Isolator
Joists
Joists
Screws
FIGURE 1
Large
Rubber
Isolator

4
9. Reattach the ground wires onto the task light covers.
10. Reinstall the task light covers, insert the bottom tabs, press into place, and secure with the screws.
11. Plug the Garage Power Station into the electrical outlet. NOTE: The excess power cord may be wrapped
around the back of the mounting plate.
Task Light
Cover
Retainer
Ring
Light Bulb
Ground Wire
Light Socket
GROUNDING INSTRUCTIONS
This product must be grounded. In the event of an electrical short circuit, grounding reduces the risk of
electric shock by providing an escape wire for the electric current. This product is equipped with a cord
having a grounding wire with an appropriate grounding plug. The plug must be plugged into an outlet that
is properly installed and grounded in accordance with all local codes and ordinances.
WARNING: Improper installation of the grounding plug is able to result in a risk of electric shock. When
repair or replacement of the cord or plug is required, do not connect the grounding wire to either flat blade
terminal. The wire with insulation having an outer surface that is green with or without yellow stripes is the
grounding wire. Substitution of the signal word “DANGER” for “WARNING” is not prohibited when the risk
associated with the product is such that a situation exists which if not avoided will result in death or
serious injury. Check with a qualified electrician or serviceman when the grounding instructions are not
completely understood, or when in doubt as to whether the product is properly grounded. Do not modify
the plug provided; if it does not fit the outlet, have the proper outlet installed by a qualified electrician.
This product is for use on a nominal 120-V circuit and has a grounding plug similar to the plug illustrated
in sketch A in figure below. Only connect the product to an outlet having the same configuration as the
plug. Do not use an adapter with this product.
Use only a 3-wire extension cord that has a 3-blade grounding
plug, and a 3-slot receptacle that accepts the plug on the product.
Make sure your extension cord is not damaged. When using an
extension cord, be sure to use one heavy enough to carry the
current your product draws. For lengths less than 25 ft, 16 AWG
extension cords shall be used. An undersized cord results in a
drop in line voltage and loss of power and overheating.
(A)
Grounding Pin
Grounded Outlet
Grounded Outlet Box

5
OPERATION
Pull the work light assembly down to a position where the reel prevents the cord from being retracted and
release to activate the Garage Power Station. The task lights will turn on and power will be supplied to the
electrical outlet on the work light assembly. Power will be supplied to the compressor and will run for 3 – 5
seconds to fill air hose to cutoff pressure. (The work light assembly should be pulled from the garage
power station at no more than a 45 degree angle to either side.)
WORK LIGHT
Turn the work light on by pressing the on/off button on the work light assembly. Press the on/off button
again to turn the work light off.
INFLATOR
To inflate vehicle or bicycle tire:
1. Pull the work light assembly to the tire and make sure the utility cord does not automatically retract
when released.
2. Remove the air hose from the retainer on the work light assembly.
3. Press the lever on the quick-connect locking inflator and press the tire chuck onto the end of the valve
stem. Release the lever to lock onto the valve stem. The tire will immediately start to inflate.
4. Monitor the tire pressure using the pressure gauge on the work light assembly.
5. Press the lever on the quick-connect locking inflator and remove from the valve stem once the desired
pressure is reached. The inflator will shut off.
6. Secure the air hose in the retainer.
7. Pull and release the work light assembly, the work light assembly automatically retracts and the Garage
Power Station will shut off.
Air
Hose
Hook
Work Light
On/Off
Button
Pressure
Gauge
FRONT BACK
Outlet
Retainer
Quick-Connect
Locking Inflator
Fill Nozzle/
Inflation
Needle

6
OPERATION CONTINUED
To inflate an object with the inflation accessory:
1. Tethered to the air hose at the quick-connect locking inflator is a combination fill nozzle and inflation
needle. Remove rubber nozzle adapter to use inflation needle.
2. Insert the fill nozzle/inflation needle into the object to be inflated.
3. Remove the air hose from the retainer on the work light assembly.
4. Press the lever on the quick-connect locking inflator and push over the end of the fill nozzle/inflation
needle.
5. Release the lever to lock onto the fill nozzle/inflation needle. The inflator will immediately turn on.
6. Monitor the pressure using the pressure gauge on the work light assembly.
7. Pull the fill nozzle/inflation needle out of the object when desired pressure is reached.
8. Press the lever on the quick-connect locking inflator and pull the fill nozzle/inflation needle out of
quick-connect locking inflator. The inflator will shut off.
9. Secure the air hose in the retainer.
10. Pull and release the work light assembly, the work light assembly automatically retracts and the Garage
Power Station will shut off.
HOOK
Pull the hook out of the top of the work light assembly and hang at desired location. Before storing, return
the hook to the original position making sure it snaps into place.
TASK LIGHTS
To turn on the task lights, pull the work light assembly down slightly to a position where it does not retract
automatically and release. To turn off the task lights, pull the work light assembly to the fully retracted
position.
To Turn off the task lights, pull the work light assembly and allow it to fully retract back to the Garage
Power Station.
CORD STOP
The cord stop acts as a stop for the retractable work light assembly and activates a switch to turn off the
system. The cord stop can be adjusted to allow the work light assembly to hang at different heights.
Loosen the four screws on the cord stop, slide the cord stop along the cable, then tighten the screws at the
desired position.

7
REPLACEMENT PARTS
Task Light Cover . . . . . . . . . . . . . . . . . . . . A7009000
Garage Power Station Cover . . . . . . . . . . . A7009001
Motor/Pump. . . . . . . . . . . . . . . . . . . . . . . . A7009002
TROUBLESHOOTING
THE GARAGE POWER STATION WILL NOT TURN ON.
Possible causes:
• The Garage Power Station is not plugged in. Plug the Garage Power Station into a working 120 Vac
electrical outlet.
• The circuit breaker is tripped. Reset circuit breaker.
• The Garage Power Station has overheated. Unplug the Garage Power Station and wait until it has
cooled, plug back in.
TASK LIGHTS WILL NOT TURN ON.
Possible causes:
• The Garage Power Station is not plugged in. Plug the Garage Power Station into a working 120 Vac
electrical outlet.
• The circuit breaker is tripped. Reset circuit breaker.
• The light bulbs have burned out. Replace bulbs.
TASK LIGHTS WILL NOT TURN OFF.
Possible causes:
• The cord stop on the cable/air hose has not engaged the switch. Pull and release again to make sure
the cord stop engages the switch.
THE WORK LIGHT WILL NOT TURN ON OR NO POWER AT OUTLET IN WORK LIGHT ASSEMBLY.
Possible causes:
• The Garage Power Station is not plugged in. Plug the Garage Power Station into a working 120 Vac
electrical outlet.
• The circuit breaker is tripped. Reset circuit breaker.
THE INFLATOR KEEPS RUNNING WHEN DISCONNECTED FROM TIRE OR INFLATOR ACCESSORIES.
Possible causes:
• The pin valve in the tire chuck is stuck open. Use a small screwdriver to push in pin valve and release
to stop airflow.
• There is an air leak in the system. Find the leak and repair.

8
WARRANTY
CHAMBERLAIN ONE YEAR LIMITED WARRANTY
TWO-YEAR MOTOR/PUMP LIMITED WARRANTY
The Chamberlain Group, Inc.®(“Seller”) warrants to the first retail purchaser of this product, for the residence
in which this product is originally installed, that it is free from defects in materials and/or workmanship for a
period of one year from the date of purchase and that the motor/pump is free from defect in materials and/
or workmanship for a period of two years from the date of purchase. The proper operation of this product is
dependent on your compliance with the instructions regarding installation and operation. Failure to comply
strictly with those instructions will void this limited warranty in its entirety.
If, during the limited warranty period, this product appears to contain a defect covered by this limited
warranty, call 1-800- 528-9131, toll free, before dismantling this product. You will be advised of disassembly
and shipping instructions when you call. Then send the product or component, pre-paid and insured, as
directed to our service center for warranty repair. Please include a brief description of the problem and a dated
proof-of-purchase receipt with any product returned for warranty repair. Products returned to Seller for
warranty repair, which upon receipt by Seller are confirmed to be defective and covered by this limited
warranty, will be repaired or replaced (at Seller’s sole option) at no cost to you and returned pre-paid.
Defective parts will be repaired or replaced with new or factory rebuilt parts at Seller’s sole option. [You are
responsible for any costs incurred in removing and/or reinstalling the product or any component.] Any parts
sent by the retail purchaser of the product which are replaced by the Seller become the sole property of the
Seller.
ALL IMPLIED WARRANTIES FOR THE PRODUCT, INCLUDING BUT NOT LIMITED TO ANY IMPLIED
WARRANTIES OF MERCHANTABILITY AND FITNESS FOR A PARTICULAR PURPOSE, ARE LIMITED IN
DURATION TO THE APPLICABLE LIMITED WARRANTY PERIOD SET FORTH ABOVE FOR THE RELATED
COMPONENT(S), AND NO IMPLIED WARRANTIES WILL EXIST OR APPLY AFTER SUCH PERIOD. Some
states do not allow limitations on how long an implied warranty lasts, so the above limitation may not
apply to you. THIS LIMITED WARRANTY DOES NOT COVER NON-DEFECT DAMAGE, DAMAGE CAUSED BY
IMPROPER INSTALLATION, OPERATION OR CARE (INCLUDING, BUT NOT LIMITED TO ABUSE, MISUSE,
UNAUTHORIZED REPAIRS OR ANY ALTERATIONS TO THIS PRODUCT), LABOR CHARGES FOR
REINSTALLING A REPAIRED OR REPLACED UNIT, REPLACEMENT OF CONSUMABLE ITEMS (E.G. FLOOD
LAMPS), OR UNITS INSTALLED FOR NON-RESIDENTIAL USE. THIS LIMITED WARRANTY DOES NOT
COVER ANY PROBLEMS WITH, OR RELATING TO STUD FRAMING OR CEILING TRUSSES. THIS LIMITED
WARRANTY ALSO DOES NOT COVER ANY PROBLEMS CAUSED BY INTERFERENCE. UNDER NO
CIRCUMSTANCES SHALL SELLER BE LIABLE FOR CONSEQUENTIAL, INCIDENTAL OR SPECIAL DAMAGES
ARISING IN CONNECTION WITH USE, OR INABILITY TO USE, THIS PRODUCT. IN NO EVENT SHALL
SELLER’S LIABILITY FOR BREACH OF WARRANTY, BREACH OF CONTRACT, NEGLIGENCE OR STRICT
LIABILITY EXCEED THE COST OF THE PRODUCT COVERED HEREBY. NO PERSON IS AUTHORIZED TO
ASSUME FOR US ANY OTHER LIABILITY IN CONNECTION WITH THE SALE OF THIS PRODUCT.
Some states do not allow the exclusion or limitation of consequential, incidental or special damages, so the
above limitation or exclusion may not apply to you. This limited warranty gives you specific legal rights, and
you may also have other rights, which vary from state to state.

1
INTRODUCCIÓN
La central de fuerza motriz para garaje Chamberlain brinda la practicidad de tener electricidad, aire comprimido e
iluminación directamente a su alcance. Se instala en el cielo raso ¡y llega a cualquier lugar con un cordón de servicio de
25 pies! El diseño ingenioso de la estación de fuerza motriz Chamberlain convertirá el garaje en un eficiente lugar de
trabajo.
ESTACIÓN DE FUERZA MOTRIZ
MODELO GPS1000
HERRAMIENTAS
• Cinta métrica
• Detector de vigas
• Lápiz o marcador
• Talador
• Broca de 3/16 de pulg.
• Destornillador Phillips
N° 3
• Llave tubo de 7/16 de
pulg.
• Prolongador de llave
tubo de 6 de pulg.
(opcional)
• Estación de fuerza motriz
• Aisladores de caucho – 2 grandes y 2 pequeños
• Arandelas (2)
• Tornillos tirafondo de ¼ de pulg. x 2 ½ de pulg. (2)
ESPECIFICACIONES
Voltaje....................................................................120 Vca
Presión......................................................100 psi máximo
Manguera.................... 25 pies, 1/4 de pulg. de diám. ext.,
de poliuretano
Mandril de neumáticos con soporte
Cordón de servicio......................... 25 pies SJTW 16 AWG
Amperes..........................................................................13
Inflador................................. se activa a menos de 85 psi,
se desactiva a 100 psi
Lámparas de servicio .....MR16 GU10 halógenas de 120 V
(50 Vatios máximo)
Apagado automático....................................................... Sí
CONTENIDO DE LA CAJA
Tope del cordón
Luz de servicio
Conjunto de la
luz de trabajo Acople rápido
soporte inflador
Cordón de servicio

2
INFORMACIÓN IMPORTANTE DE SEGURIDAD
Para reducir el riesgo de LESIONES GRAVES o incluso
FATALES:
• LEER Y OBSERVAR LAS INSTRUCCIONES Y
ADVERTENCIAS DE INSTALACIÓN.
• PARA USO EN INTERIORES ÚNICAMENTE.
• Para evitar LESIONES PERSONALES e incluso
FATALES por electrocución, desconectar TODA
alimentación eléctrica ANTES de realizar reparaciones
o mantenimiento.
• NO SOBRECARGAR EL RECEPTÁCULO. Corriente
máxima: 10 amperes.
• NO sumergir cordones, enchufes ni el producto en
agua ni otros líquidos.
• NO usar el artefacto si el cordón eléctrico ó el
enchufe estuviera dañado, no después de haberse
presentado una falla o cualquier tipo de avería.
Devolver el artefacto al un servicio autorizado para
que lo revisen, reparen o calibren.
• El uso de acceosrios NO recomendados por el
fabricante podría causar incendio, electrocución o
accidentes LESIVOS personales.
• NO dejar que el cabezal del inflador haga contacto
con superficies calientes.
• NO usar el artefacto para fines ajenos a su propósito
y diseño.
• Conectar el artefacto a un tomacorriente con puesta
a tierra.
• NO usar un adaptador de enchufe sin pata de
conexión a tierra.
• NO usar el artefacto en lugares peligrosos o donde
se acumule agua, vapor o llueva.
• NUNCA usar el inflador como juguete.
• NO permitir que los niños usen o jueguen con la
estación de fuerza motriz. MANTENER ALEJADO DEL
ALCANCE DE LOS NIÑOS.
• Mantener el inflador alejado de líquidos y otros
materiales/inflamables, en TODO momento.
• No use la luz de trabajo ni enchufar algo cuando
tenga las manos mojadas o esté parado en una
superficie mojada.
• Este artefacto DEBE USARSE SIEMPRE según los
códigos/normas eléctricos y edilicios vigentes.
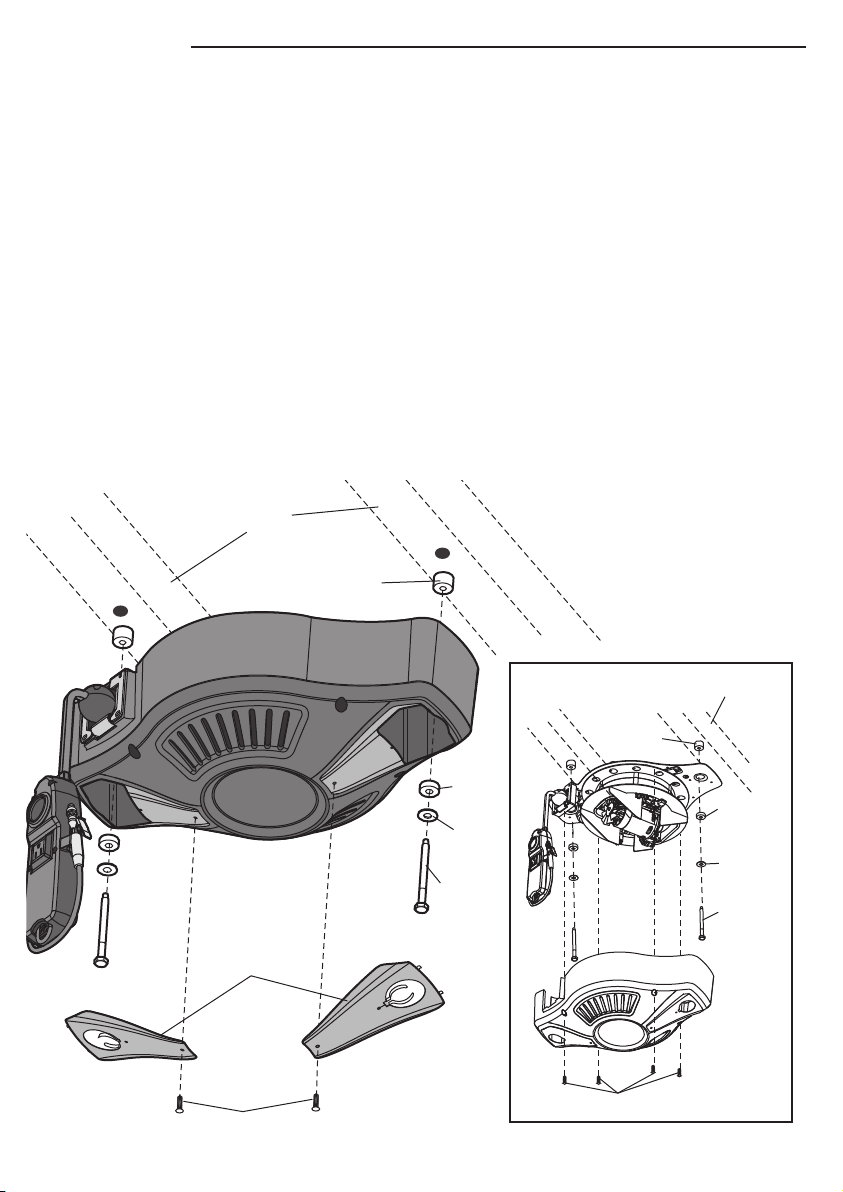
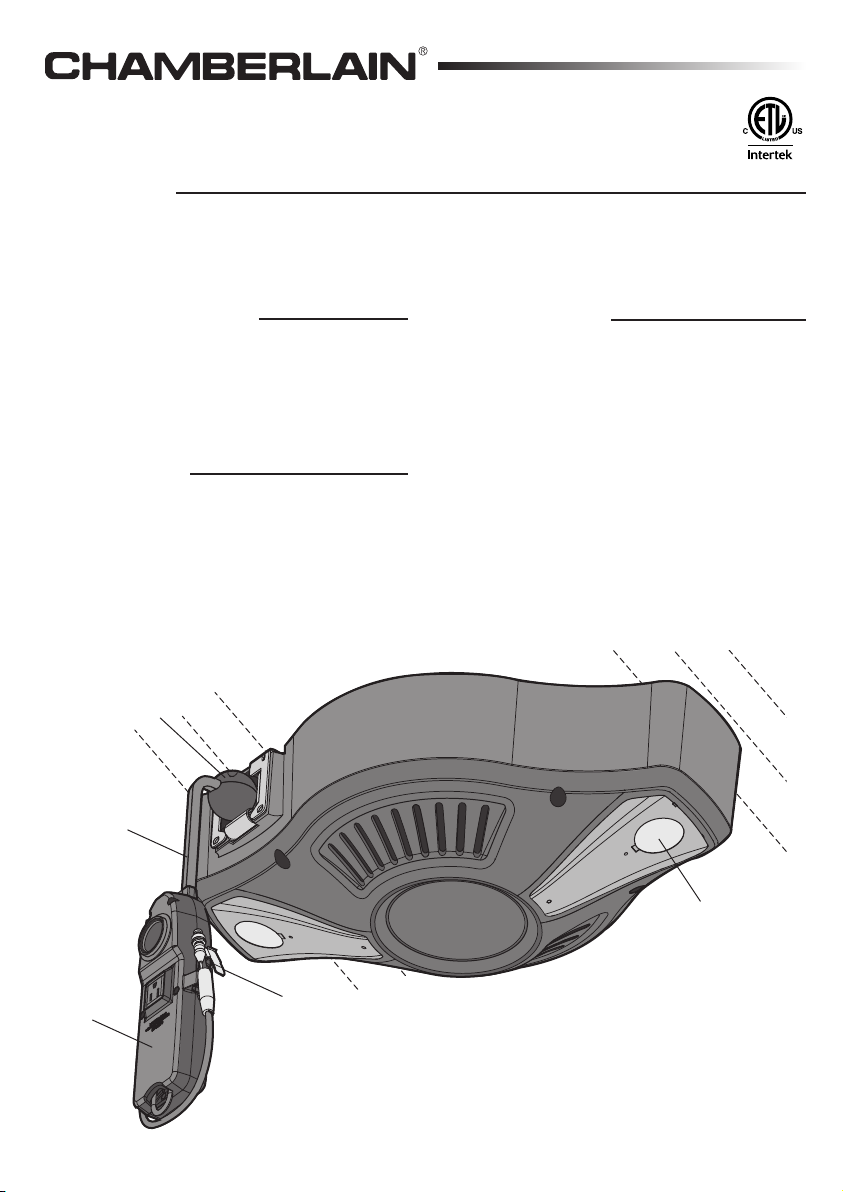
• La estación de fuerza motriz para garaje DEBE estar
FIRMEMENTE fijada a un soporte estructural en el
techo.
• Piezas que forman arcos eléctricos. Mantenga el
compresor / motor / luz de trabajo al menos a 6.1 m
(20 pies) de los vapores explosivos.
PRECAUCIÓN
ADVERTENCIA
ADVERTENCIA
ADVERTENCIA
ADVERTENCIA
ADVERTENCIA
Para evitar accidentes LESIVOS personales y DAÑOS
materiales, y reducir el riesgo de electrocución e
incendio:
• NO usar este cordón en atmósferas explosivas, cerca
de líquidos inflamables o donde sea necesario
trabajar con equipos a prueba de explosiones.
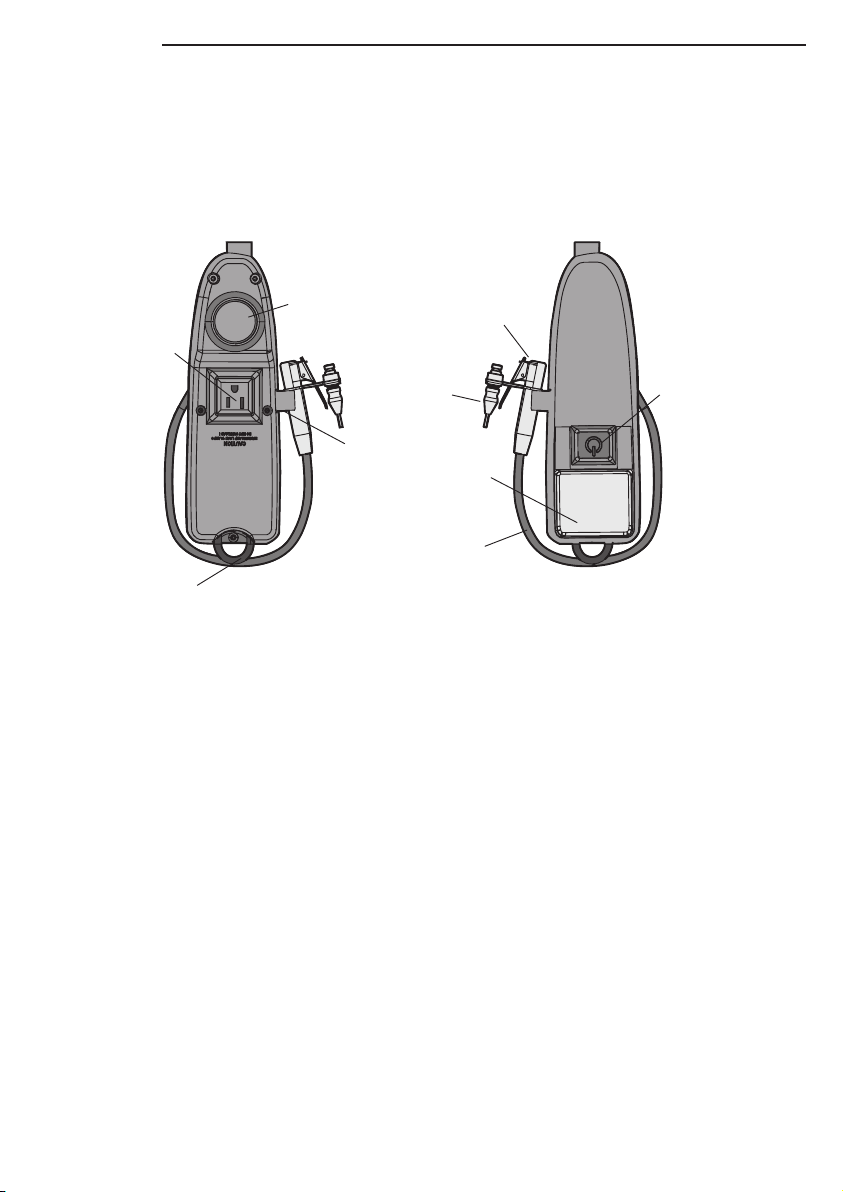
• NO dirigir la salida de aire hacia el cuerpo.
• Usar ÚNICAMENTE las partes recomendadas para
aire comprimido y para la presión de servicio.
• NO infle en exceso.
• Este inflador es para inflar neumáticos de
automóviles, vehículos todo terreno, motocicletas,
bicicletas, artículos deportivos, colchones de aire y
otros artículos inflables.
• Después de 10 minutos de usar el inflador, dejar que
se enfríe durante 10 minutos antes de volver a
usarlo.
• Usar gafas de seguridad. Usar máscara o mascarilla
para polvo si el trabajo levanta mucho polvo.
• NO dejar que el cable se retraiga solo en el carretel,
ya que la velocidad excesiva de enrollado podría
causar LESIONES o DAÑOS materiales.
• ANTES de limpiar el producto desenchufarlo de la
alimentación eléctrica.
• NO usar disolventes tales como gasolina, aguarrás,
etc. para limpiar la unidad. Mantener el carretel del
cable limpio para que funcione óptimamente. Para
limpiarlo, desenrolle totalmente del cordón y vuelva
enrollarlo pasándolo por un trapo húmedo. SECARLO
bien ANTES de enchufar el cable.
• Para enchufarlo en un tomacorriente, desenrolle toda
la longitud del cable.
• Desconectar la alimentación eléctrica ANTES de
cambiar las lámparas.
• Usar ÚNICAMENTE lámparas de 50 Vatios o menos.
• Para servicio liviano ÚNICAMENTE.
PRECAUCIÓN
PRECAUCIÓN
ADVERTENCIA
ADVERTENCIA
ADVERTENCIA
ADVERTENCIA

3
INSTALACIÓN
NOTA IMPORTANTE: La estación de fuerza motriz para garaje DEBE estar FIRMEMENTE fijada a un soporte estructural
en el techo, mediante tornillos tirafondos. La estación puede montarse sobre una sola viga o a través de dos vigas.
1. Instalar la estación de fuerza motriz a una distancia máxima de 6 pies de un tomacorriente.
2. Usar un detector de vigas para determinar el lugar de montaje de la unidad. Marcar el centro de cada viga. NOTA: La
separación de los agujeros de montaje de la estación debe ser de 16 pulgadas. Si la distancia entre vigas es de 24
pulgadas entre centros, instalar la estación de fuerza motriz sobre una sola viga.
3. Marcar los agujeros de montaje con 16 pulgadas de separación y hacer orificios de inicio de 3/16 de pulg. en el
centro de la viga.
4. Quitar las tapas de la luz de servicio. Desenchufar el conductor verde de puesta a tierra de su terminal en cada tapa.
NOTA: Si no posee una prolongación de 6 pulgadas, quite la tapa de la estación de fuerza motriz (tiene 4 tornillos)
para llegar hasta los agujeros de montaje (Figura 1).
5. Colocar una arandela y un aislador pequeno de caucho en cada tornillo. Pasar cada tornillo por el agujero de montaje
en la placa de montaje.
6. Colocar un aislador grande de caucho en cada tornillo, detrás de la placa de montaje.
7. Colocar la estación de fuerza motriz sobre las vigas. Introducir los tornillos tirafondo en los agujeros de inicio y
ajustarlos con una llave tubo de 7/16 de pulg. usando el prolongador (no ajustar excesivamente).
Aislador
grande
de caucho
Aislador
pequeño
de caucho
FIGURA 1
Aislador
grande
de caucho
Aislador
pequeño
de caucho
Tornillos
Tornillos
Tapa de luz de
servicio
Tornillo
tirafondo Tornillo
tirafondo
Vigas
Vigas
Arandela
Arandela

4
INSTRUCCIONES DE PUESTA A TIERRA
Este producto debe conectarse a tierra. En caso de un cortocircuito eléctrico, la puesta a tierra reduce el riesgo de
descargas eléctricas proporcionando un cable de escape para la corriente. Este producto está equipado con un cordón
que tiene un cable de puesta a tierra con un enchufe de tierra apropiado. El enchufe debe conectarse a una puesta a
tierra que esté debidamente instalada y puesta a tierra según todos los códigos y las ordenanzas locales.
ADVERTENCIA: La instalación indebida del enchufe de tierra puede ocasionar un riesgo de descarga eléctrica. Cuando
sea necesario reparar o reemplazar el cordón o el enchufe, no conecte el cable de tierra a ningún terminal de hoja plana.
El cable con aislamiento que tenga una superficie exterior verde con o sin franjas amarillas es el cable de tierra. La
sustitución de la palabra de señal “ADVERTENCIA” for “PELIGRO” no está prohibida cuando el riesgo relacionado con el
producto es tal que existe una situación que de no evitarse ocasionará la muerte o lesiones graves. Compruebe con un
electricista o técnico capacitado cuando no se entiendan completamente las instrucciones de puesta a tierra, o cuando
esté en duda si el producto está debidamente conectado a tierra. No modifique el enchufe proporcionado; si no se adapta
a la toma, pida a un electricista capacitado que instale la toma apropiada.
Este producto es para usar en un circuito nominal de 120 V y tiene un enchufe similar al enchufe ilustrado en el esquema
A de la figura de abajo. Conecte solo el producto a una toma que tenga la
misma configuración que el enchufe. No use un adaptador con este producto.
Use solamente un cordón de alargamiento trifilar con un enchufe de tierra de 3
hojas, y un receptáculo de 3 ranuras que acepte el enchufe en el producto.
Asegúrese de que su cordón de alargamiento no esté dañado. Al usar un
cordón de alargamiento, asegúrese de usar uno que sea lo suficientemente
pesado para transportar la corriente absorbida por su producto. Para tramos
de más de 25 pies, se deben usar cordones de alargamiento de calibre 16
AWG. El uso de un cordón demasiado pequeño ocasiona una reducción del
voltaje de línea, además de una pérdida de potencia y un recalentamiento.
8. Enroscar una lámpara (no suministrada con la unidad) en el receptáculo. Introducir la lámpara en el retén en la tapa
de la luz de trabajo.
9. Volver a conectar los conductores de tierra a las tapas.
10. Colocar las tapas de la luz, introducir las pestañas inferiores y fijar con los tornillos.
11. Enchufar la estación de fuerza motriz a un tomacorriente. NOTA: La longitud sobrante del cordón puede envolverse
en la parte posterior de la placa de montaje.
Tapa de Luz
de Servicio
Receptáculo
Cable de Tierra
Receptáculo
Retén
Lámpara
(A)
Terminal a tierra
Salida a tierra
Caja de salida a tierra

5
OPERACIÓN
Para activar la estación de fuerza motriz tirar de la luz de trabajo a una posición en que el cable no se retraiga y soltarla.
Las luces de trabajo se encenderán y el tomacorriente recibirá energía eléctrica. Se encenderá también el compresor de
furante 3 a 5 segundos hasta llegar a la presión de corte. (La luz de trabajo no debe tirarse a más de 45 grados en
cualquier dirección con respecto a la estación de fuerza motriz.)
LUZ DE TRABAJO
Pulsar el botón de encendido/apagado para encender la luz de trabajo. Pulsar nuevamente el botón para apagarla.
INFLADOR
Para inflar los neumáticos de un vehículo o una bicicleta:
1. Tirar la luz de trabajo hasta el neumático y asegurarse de que el cordón no retroceda automáticamente al soltarlo.
2. Quitar la manguera de aire del retén en la luz de trabajo.
3. Presionar la palanca en el inflador de acople rápido y presionar el cabezal de inflado sobre la válvula. Soltar la
palanca para bloquear el cabezal en la válvula. El neumático comenzará a inflarse inmediatamente.
4. Observar la presión alcanzada en el manómetro que se encuentra en la luz de trabajo.
5. Presionar la palacna del inflador y quitarlo de la válvula cuando se alcance la presión necesaria de inflado. El inflador
de cerrará solo.
6. Colocar la manguera nuevamente en el retén.
7. Tirar de la luz para que se retraiga automáticamente. La estación de fuerza motriz se apagará.
FRENTE ATRÁS
Tomacorriente
Boquilla / Aguja
de Inflado
Manguera
Aire
Botón de
Encendido
Luz de trabajo
Retén
Gancho
Inflador de
Acople Rápido
Manómetro

6
USO DE LA UNIDAD (CONTINUACIÓN)
Para inflar un objeto con el accesorio de inflado:
1. Junto a la manguera de aire hay un accesorio que es una combinación de boquilla de carga y aguja de inflado.
Quitar el adaptador de goma de la boquilla para usar la aguja.
2. Introducir la boquilla/aguja en el objeto a inflar.
3. Quitar la manguera de aire del retén en la luz de trabajo.
4. Presionar la palanca del acople rápido y empujar sobre el extremo de la boquilla/aguja de inflado.
5. Soltar la palanca para bloquear en posición la boquilla/aguja. El inflador comenzará a funcionar inmediatamente.
6. Observar la presión alcanzada en el manómetro que se encuentra en la luz de trabajo.
7. Al alcanzar la presión deseada, tirar de la boquilla/aguja de inflado para quitarla del objeto.
8. Presionar la palanca del acople rápido y tirar de la boquilla/aguja para extraerla del acople. El inflador de cerrará
solo.
9. Colocar la manguera nuevamente en el retén.
10. Tirar de la luz para que se retraiga automáticamente. La estación de fuerza motriz se apagará.
GANCHO
Tirar del gancho para quitarlo de la luz de trabajo y colgarlo en el lugar deseado. Volver a colocar el gancho en su lugar
original y asegurarse de que quede bien insertado.
LUCES DE SERVICIO
Para encender las luces de servicio tirar hacia abajo la luz de trabajo hasta una posición en que no se retraiga y soltarla.
Para apagar las luces de servicio tirar de la luz de trabajo hasta la posición totalmente retraída.
Para apagar las luces de servicio tirar de la luz de trabajo y dejar que se retraiga hasta la estación de fuerza motriz.
TOPE DEL CORDÓN
El tope del cordón actúa como tope del mecanismo retráctil de la luz de trabajo y activa un relé para apagar el sistema. El
tope del cordón puede regularse para que la luz de trabajo quede colgada a diferente altura. Aflojar los cuatro tornillos
del tope, deslizar el mismo a lo largo del cable y ajustar los tornillos en la posición deseada.

7
REPUESTOS
Tapa de lámpara de servicio . . . . . . . . . . . . . . . . .A7009000
Tapa de la Estación de fuerza motriz . . . . . . . . . . .A7009001
Bomba/Moto . . . . . . . . . . . . . . . . . . . . . . . . . . . . .A7009002
DIAGNÓSTICO DE FALLAS
LA ESTACIÓN DE FUERZA MOTRIZ NO SE ENCIENDE.
Posibles causas:
• La unidad no está enchufada. Enchufar la unidad en un tomacorriente de 120 Vca.
• El interruptor se ha disparado. Reponer el interruptor a su estado normal.
• La unidad se ha sobrecalentado. Desenchufar la unidad y esperar hasta que se enfríe antes de volver a enchufarla.
LUCES DE SERVICIO NO SE ENCIENDEN.
Posibles causas:
• La unidad no está enchufada. Enchufar la unidad en un tomacorriente de 120 Vca.
• El interruptor se ha disparado. Reponer el interruptor a su estado normal.
• Las lámparas de han quemado. Cambiar las lámparas.
LUCES DE TRABAJO NO SE ENCIENDEN.
Posibles causas:
• El tope del cordón no ha activado el relé. Tirar del cordón y soltarlo para asegurarse de que el tope active el relé.
LUZ DE TRABAJO NO SE ENCIENDE O NO HAY VOLTAJE EN EL TOMACORRIENTE.
Posibles causas:
• La unidad no está enchufada. Enchufar la unidad en un tomacorriente de 120 Vca.
• El interruptor se ha disparado. Reponer el interruptor a su estado normal.
EL INFLADOR CONTINÚA EN FUNCIONAMIENTO DESPUÉS DE QUE SE LO HA QUITADO DEL NEUMÁTICO O DE SUS
ACCESORIOS.
Posibles causas:
• La válvula en el cabezal quedó trabada en la posición abierta. Mover la válvula con un destornillador pequeño para
detener la circulación de aire.
• Hay una fuga de aire comprimido en el sistema. Detectar la fuga y repararla.

114A4571
GARANTÍA
GARANTÍA LIMITADA POR UN AÑO Y
GARANTÍA LIMITADA POR DOS AÑOS PARA MOTOR/BOMBA DE CHAMBERLAIN
The Chamberlain Group, Inc.®(“Vendedor”) garantiza al primer comprador minorista de este producto y para la residencia
en la que se instala originalmente, que el mismo está libre de defectos de materiales y/o mano de obra por un período de
un año a partir de la fecha de compra, y garantiza el motor/bomba por defectos de materiales y/o mano de obra por un
período de dos años a partir de la fecha de compra. El funcionamiento apropiado de este producto dependerá del
cumplimiento de las instrucciones de instalación y de uso. El incumplimiento de dichas instrucciones anulará totalmente
los términos de esta garantía limitada.
Si durante el período de garantía este producto presentara un defecto reconocido por la misma, llamar al 1-800- 528-9131
(llamada gratuita) antes de desmontarlo. Al llamar, usted recibirá instrucciones sobre el desmontaje y el envío de la unidad.
Luego enviar el producto o uno de sus componentes con franqueo pagado y seguro al centro de servicios de reparaciones
por garantía que le hayan indicado. Incluir en la devolución una descripción breve del problema y un recibo de compra del
producto enviado para reparación. Los productos devueltos que el Vendedor determine que tienen un defecto y el mismo
esté cubierto por esta garantía limitada, serán reparados o cambiados (a discreción del Vendedor) sin costo alguno para
el propietario. Serán enviados con el franqueo pagado. Los componentes defectuosos serán reparados o cambiados con
partes nuevas o reconstruidas en fábrica, a entera discreción del Vendedor. [Usted, el propietario, afrontará todo costo
relacionado con el desmontaje y la instalación del producto o uno de sus componentes]. Toda parte enviada por el
comprador del producto, que sea cambiada por el Vendedor, será propiedad del mismo.
TODA GARANTÍA IMPLÍCITA DE ESTE PRODUCTO, INCLUYENDO GARANTÍA IMPLÍCITA DE APTITUD COMERCIAL O
APTITUD PARA UN PROPÓSITO PARTICULAR, QUEDA LIMITADA AL PERÍODO DE VALIDEZ DE LA GARANTÍA
ANTERIORMENTE OFRECIDA. DESPUÉS DE DICHO PERÍODO NO EXISTIRÁ NI SE OFRECERÁ NINGUNA OTRA GARANTÍA
IMPLÍCITA. En algunos Estados no se permite limitar el período de validez de una garantía implícita, por lo cual lo
mencionado anteriormente podría no aplicarse a su caso. ESTA GARANTÍA LIMITADA NO CUBRE DAÑOS QUE NO SEAN
DEFECTOS DE FABRICACIÓN, DAÑOS CAUSADOS POR INSTALACIÓN, USO O MANTENIMIENTO INCORRECTO (ELLO
INCLUYE MALTRATO, USO INDEBIDO, REPARACIONES Y ALTERACIONES NO AUTORIZADAS DEL PRODUCTO), COSTO
DE MANO DE OBRA DE LA INSTALACIÓN DE UN PRODUCTO REPARADO O CAMBIADO, EL CAMBIO DE ARTÍCULOS
CONSUMIBLES POR EJEMPLO, LÁMPARASZ), NI UNIDADES INSTALADAS PARA USO NO RESIDENCIAL. ESTA
GARANTÍA LIMITADA NO CUBRE PROBLEMAS RELACIONADOS CON VIGAS NI OTROS COMPONENTES DE LA
EDIFICACIÓN. ESTA GARANTÍA LIMITADA TAMPOCO CUBRE PROBLEMAS CAUSADOS POR INTERFERENCIA. BAJO
NINGUNA CIRCUNSTANCIA EL VENDEDOR SERÁ RESPONSIBLE DE PERJUICIOS DIRECTOS, INDIRECTOS NI
ESPECIALES EMERGENTES DEL USO O EL MAL USO DE ESTE PRODUCTO. EN NINGÚN CASO LA RESPONSABILIDAD
DEL VENDEDOR POR INCUMPLIMIENTO DE GARANTÍA, DE CONTRATO O NEGLIGENCIA SERÁ SUPERIOR AL COSTO DEL
PRODUCTO GARANTIZADO. NINGUNA PERSONA ESTÁ AUTORIZADA A ACTUAR EN NUESTRO NOMBRE PARA OFRECER
CUALQUIER OTRO TIPO DE GARANTÍA/RESPONSABILIDAD EN RELACIÓN CON LA VENTA DE ESTE PRODUCTO.
En algunos estados no se permite la exclusión ni la limitación de perjuicios directos, indirectos o especiales, por lo cual las
limitaciones o exclusiones mencionadas anteriormente podrían no aplicarse a su caso. Esta garantía limitada le confiere
ciertos derechos, pero usted podría tener otros derechos que varían de un estado a otro.
1-800-528-9131
www.chamberlain-diy.com
© 2013, The Chamberlain Group, Inc.
All Rights Reserved
Todos los Derechos Reservados
Table of contents
Languages:
Other Chamberlain Power Supply manuals