CHCNAV AlphaAir 450 User manual

Make your work more efficient
CHCNAV AlphaAir 450
User Manual
Version 2.0
Mobile Mapping | Nov 2021

Table of Content
CHCNAV ALPHAAIR-450 USER MANUAL | 2021-10 P a g e | 2
Table of Content
Table of Content...............................................................................................................2
1Reading Tips..............................................................................................................4
1.1 Symbol Description...........................................................................................4
1.2 Recommendations............................................................................................4
1.3 Service & Support.............................................................................................4
1.4 Disclaimer ........................................................................................................5
2Using Requirements ..................................................................................................6
2.1 Using Environment ...........................................................................................6
2.2 Tips Before Using..............................................................................................6
2.3 Tips During Using..............................................................................................6
2.4 Tips After Using ................................................................................................6
3Product Description ...................................................................................................7
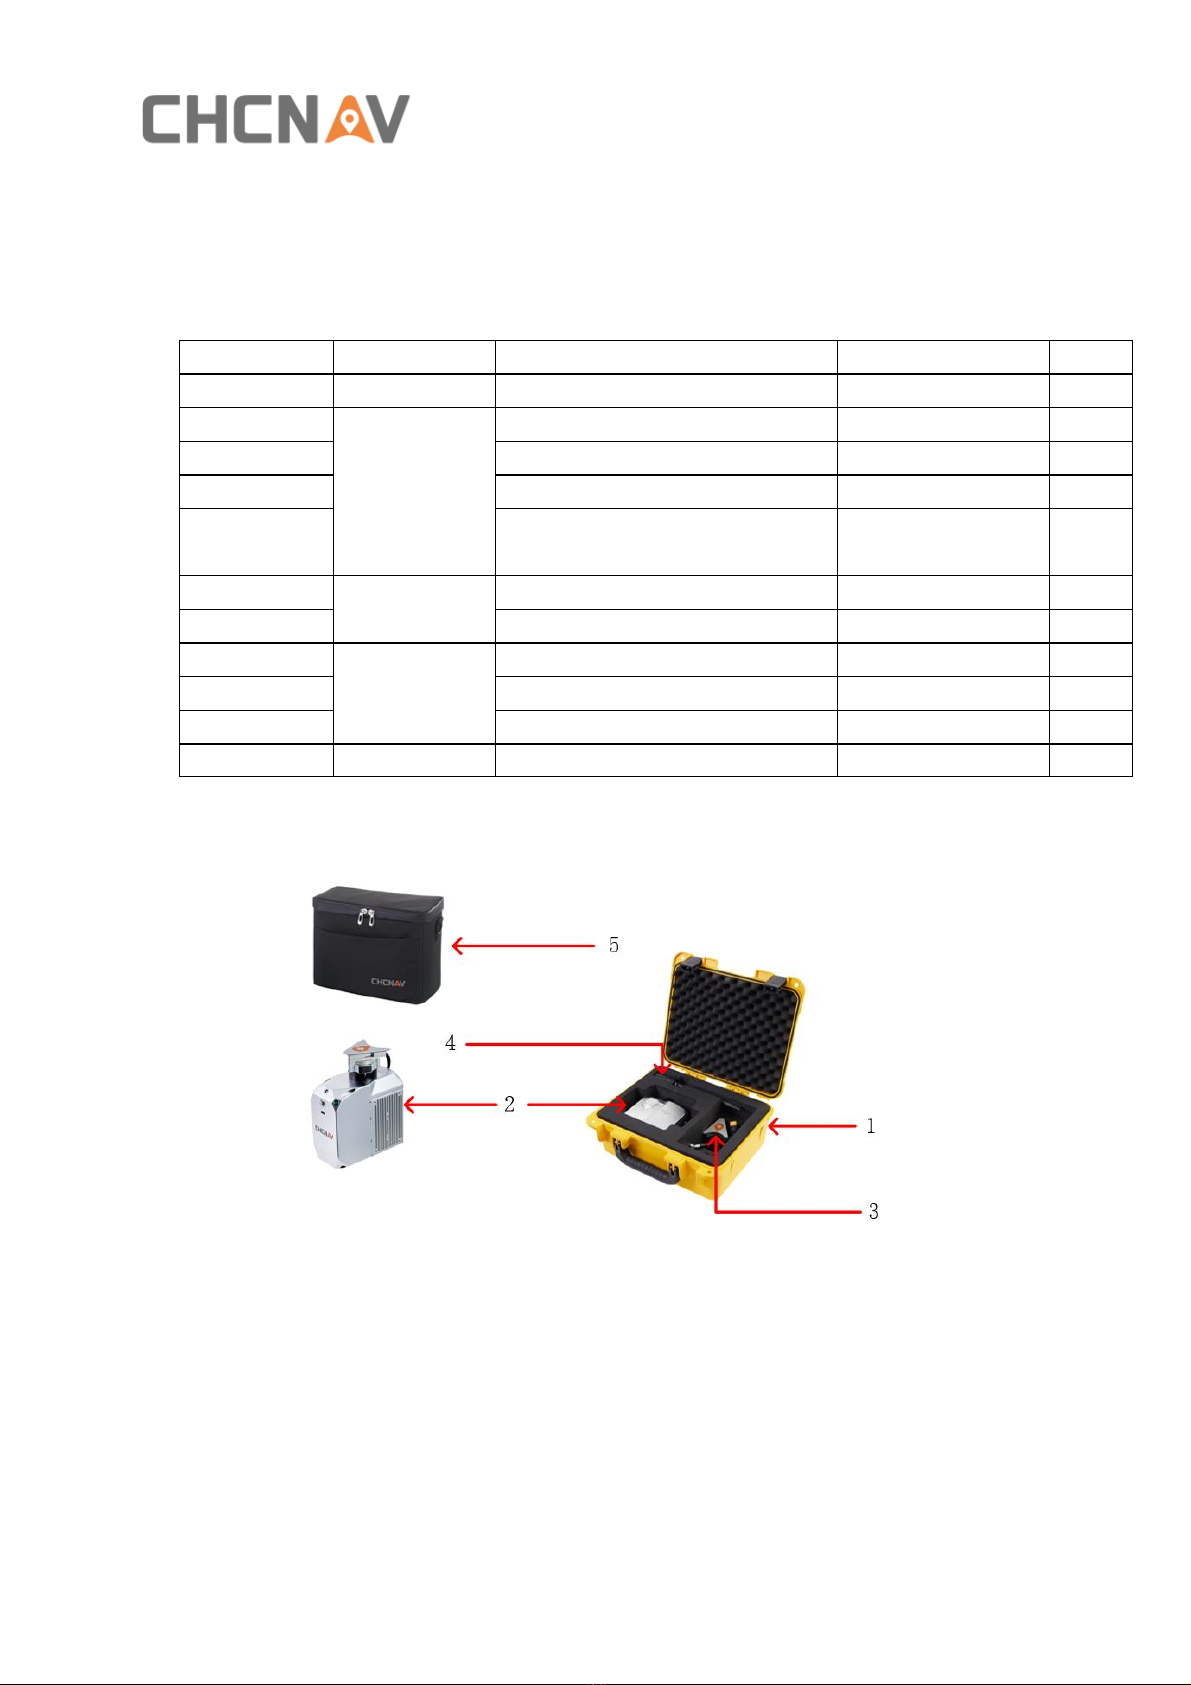
3.1 Equipment List..................................................................................................7
3.2 Delivery of Equipment and Materials .................................................................7
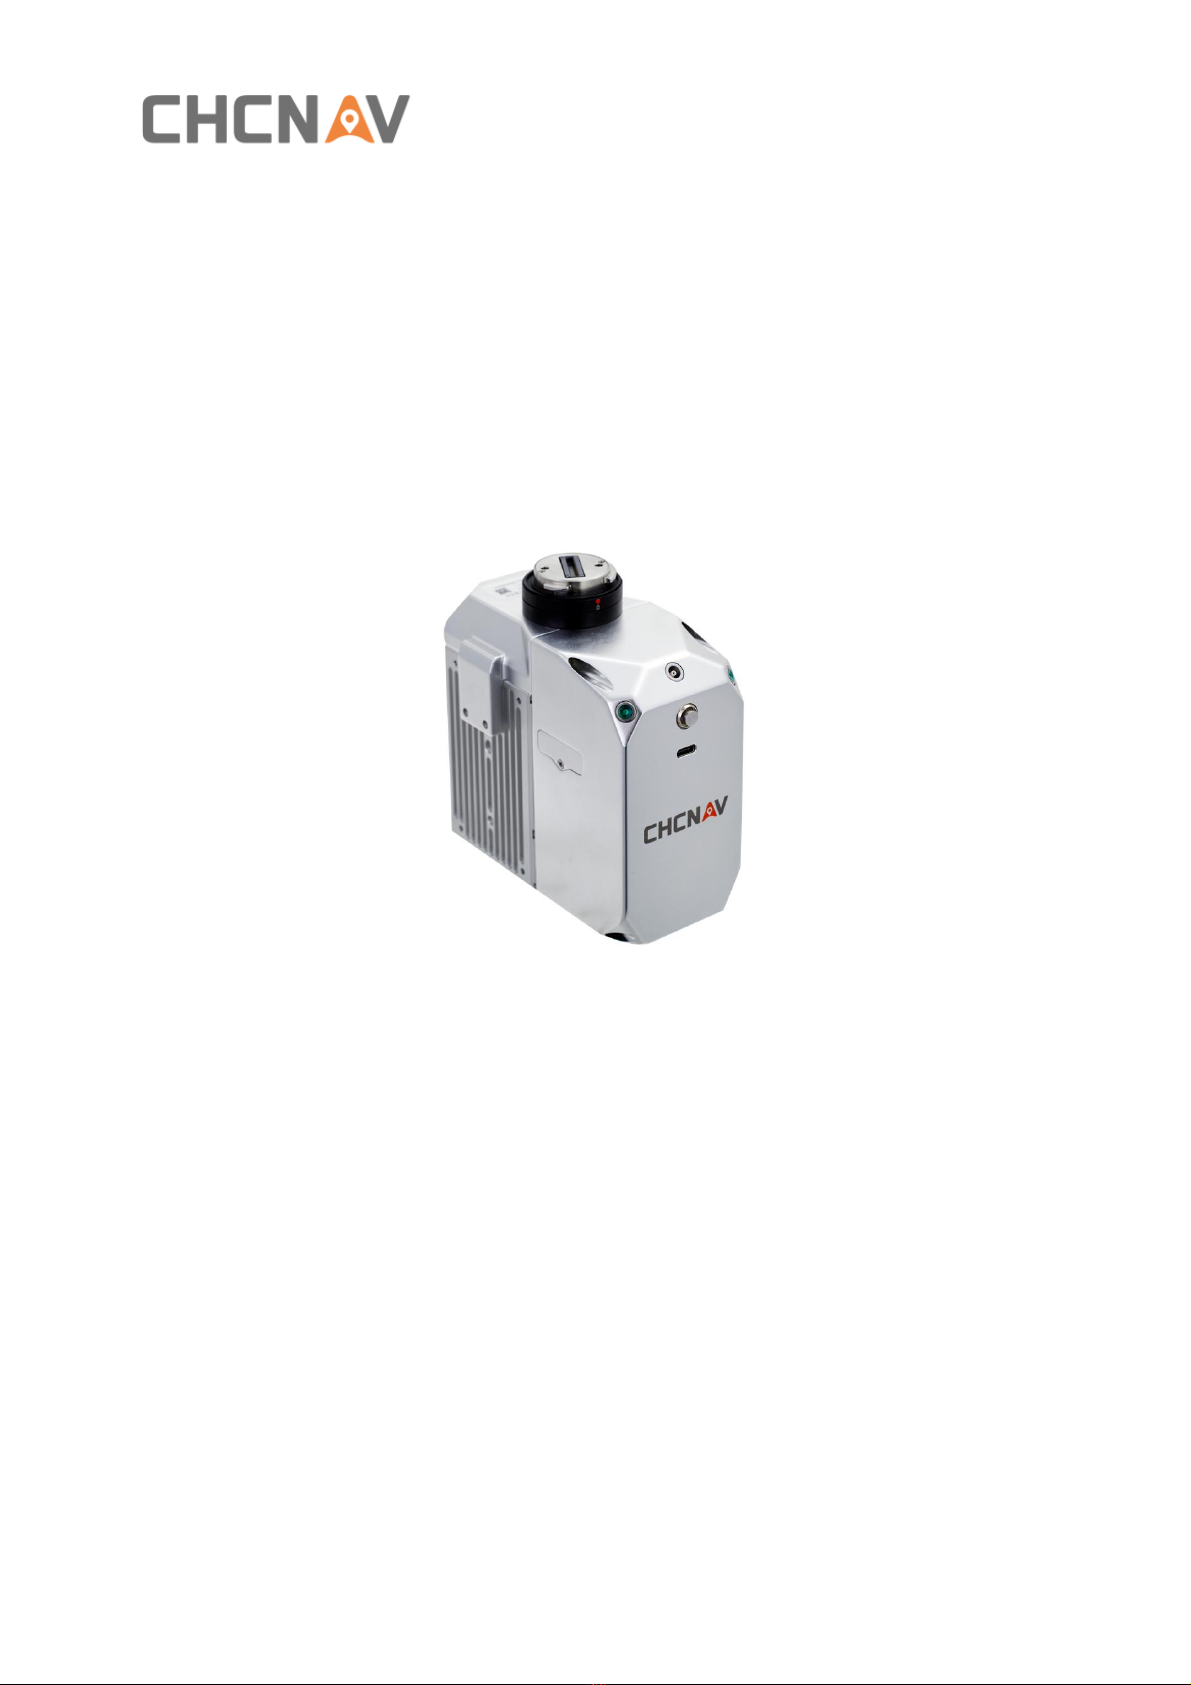
3.3 Product Introduction.........................................................................................8
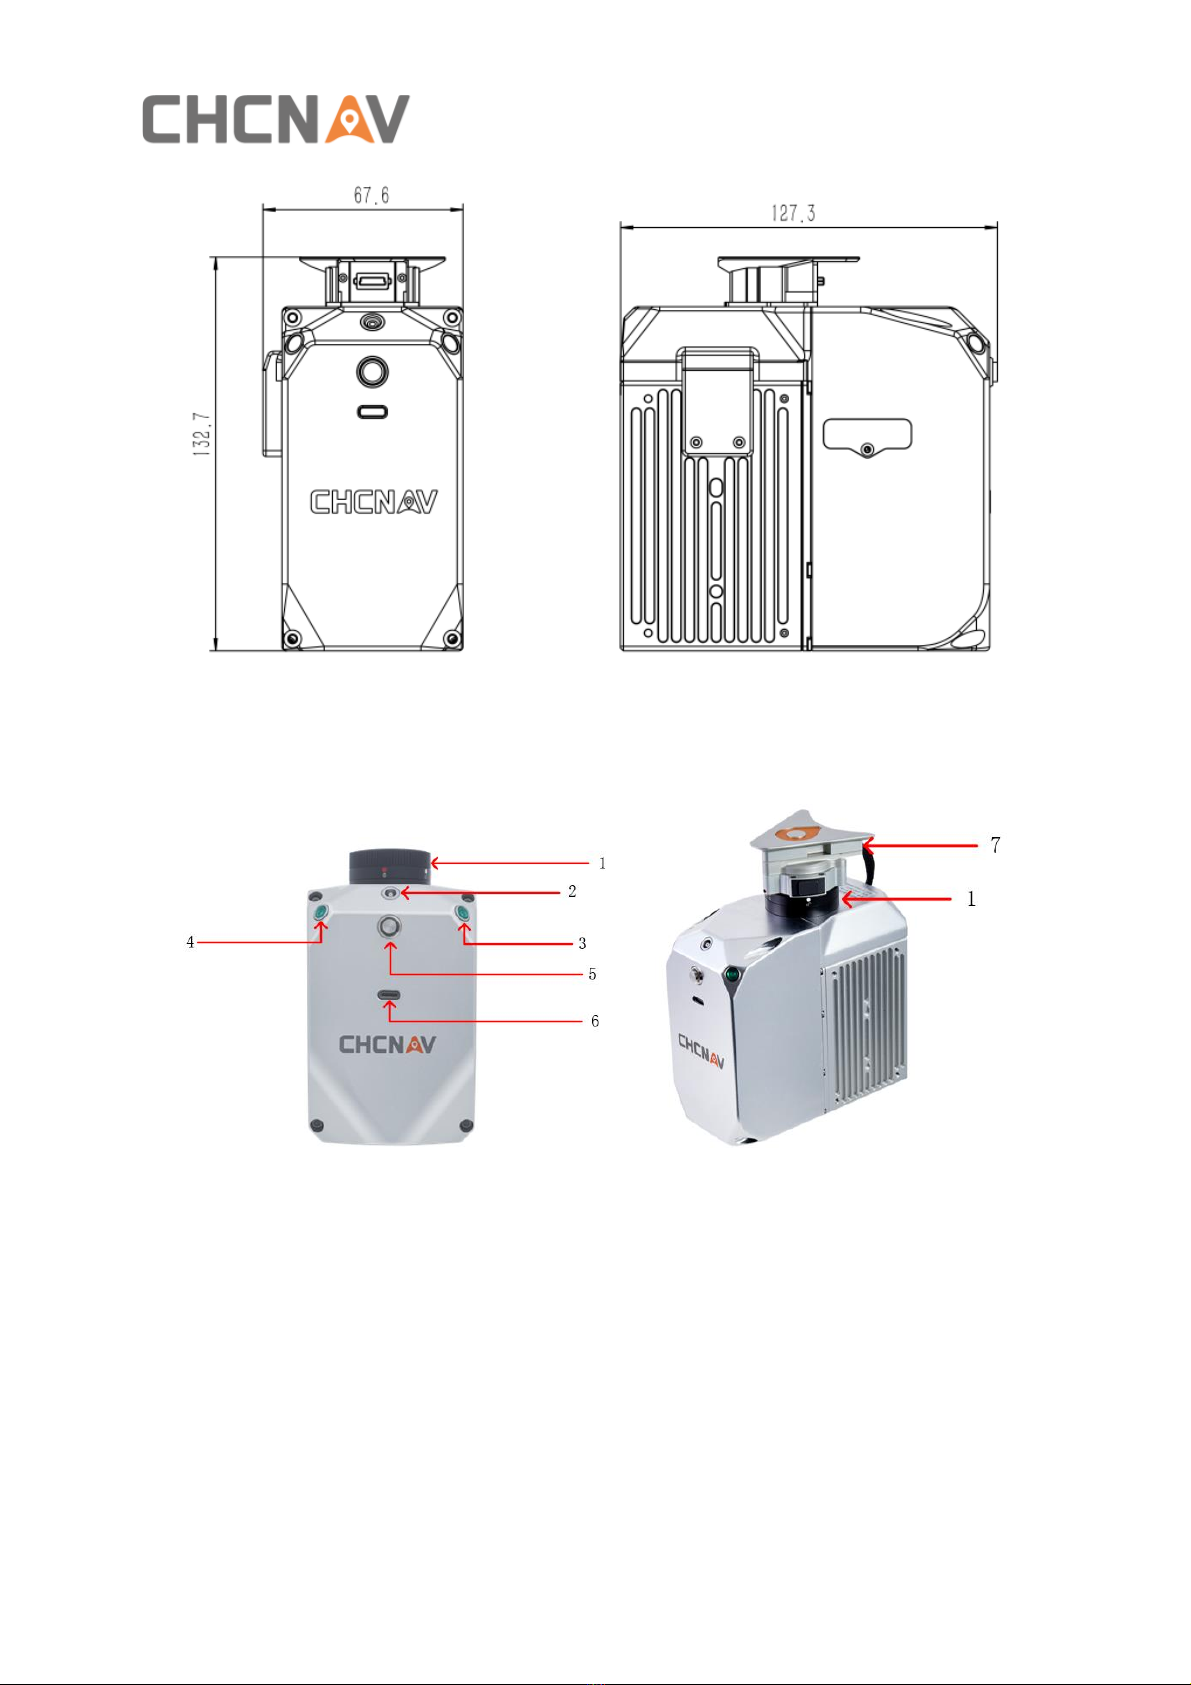
3.4 Equipment Size.................................................................................................9
3.5 Device interface description ............................................................................ 10
3.6 Electrical Characteristics.................................................................................. 11
3.7 Airborne Platform (M300) ............................................................................... 11
3.7.1 Airborne install steps .......................................................................... 11
3.7.2 Airborne disassemble steps ................................................................. 12
3.8 Airborne Platform (BB4).................................................................................. 12
3.8.1 Airborne install steps .......................................................................... 12
3.8.2 Airborne disassemble steps ................................................................. 13
4Product Using.......................................................................................................... 13
4.1 Advance Preparation....................................................................................... 13
4.2 Equipment Installation .................................................................................... 13
5Data Acquisition ...................................................................................................... 14
5.1 One-Key Control Flow ..................................................................................... 15
5.2 DJI M300 Remote Control Flow........................................................................ 17
5.2.1 Introductions...................................................................................... 17
5.2.2 Camera Parameters Setting ................................................................. 18
5.2.3 Data Acquisition ................................................................................. 19
6Data Copy ............................................................................................................... 20
6.1 Introduction of the data .................................................................................. 20
6.2 Automatically data copy.................................................................................. 20
6.3 Data structure ................................................................................................ 26
7Data preprocessing in Copre .................................................................................... 27

Table of Content
CHCNAV ALPHAAIR-450 USER MANUAL | 2021-10 P a g e | 3
7.1 AA450 Data Processing Flow............................................................................ 27
7.2 New item ....................................................................................................... 28
7.2.1 Item Name ......................................................................................... 29
7.2.2 Select Time Reference......................................................................... 30
7.2.3 Select Units ........................................................................................ 30
7.2.4 Select Item Path ................................................................................. 31
7.2.5 Select Project Data.............................................................................. 32
7.2.6 Item Info ............................................................................................ 33
7.2.7 Complete the New Item ...................................................................... 33
7.3 POS Processing............................................................................................... 34
7.3.1 Place Base Station File......................................................................... 34
7.3.2 POS Processing ................................................................................... 35
7.4 Flow1-Solve to result ...................................................................................... 37
7.4.1 Display and select pos trajectories ....................................................... 37
7.4.2 Parameter Setting............................................................................... 39
7.4.3 Custom Coordinate System.................................................................. 41
7.4.4 Point cloud coloring Settings ............................................................... 42
7.4.5 Generate results ................................................................................. 43
7.4.6 Point cloud results browsing................................................................ 43
7.5 Flow2-Pretreatment........................................................................................ 44
7.5.1 Pretreatment...................................................................................... 44
7.5.2 Adjust ................................................................................................ 46
7.5.3 Generate results ................................................................................. 49
8FAQ and Solutions ................................................................................................... 50
9Matters Need Attention ........................................................................................... 52
9.1 Important Notes ............................................................................................. 52
9.2 Product Transportation ................................................................................... 52
9.3 Using Tips....................................................................................................... 53
9.4 Storage Tips.................................................................................................... 53

Reading Tips
CHCNAV ALPHAAIR-450 USER MANUAL | 2021-10 P a g e | 4
1 Reading Tips
1.1 Symbol Description
Forbid
Warning
Important note
Operate & Using tips
1.2 Recommendations
CHCNAV provides below documents for user:
▪Product configuration list
▪AlphaAir 450 mobile mapping system user manual
It is recommended for user to read above documents before first time using.
1.3 Service & Support
CHCNAV website: http://www.chcnav.com
Service Hotline: 400-620-6818
Wechat public:

Reading Tips
CHCNAV ALPHAAIR-450 USER MANUAL | 2021-10 P a g e | 5
1.4 Disclaimer
▪The customer should use and maintain the equipment in accordance with the
requirements of the manual. If the service life of equipment is affected due to improper
use or maintenance, even broken, CHCNAV will not bear the relevant responsibility. All
repairs and maintenance services resulting from this will be charged at standard prices.
▪During the transportation, if the equipment is damaged due to improper logistics
operation, CHCNAV will not bear the relevant responsibility.
▪During equipment using time, if customer disassembles and assembles the equipment
without CHCNAV’s suggestions & permission, and resulting in damage, CHCNAV will not
bear the relevant responsibility.
▪Customer should use default batteries and accessories. If use non-dedicated batteries,
the charger may cause unexpected situations like explosions, fires etc. The use of non-
original accessories is not eligible for warranty; if occur accident, the manufacturer will
not bear the corresponding responsibility.

Using Requirements
CHCNAV ALPHAAIR-450 USER MANUAL | 2021-10 P a g e | 6
2 Using Requirements
2.1 Using Environment
▪It is not recommended to use in rainy, snowy, or foggy weather for safety.Also the point
cloud data will have more noise.
▪It is not recommended to frequently use in dusty environment, which will affect the
service life of equipment.
▪It is forbidden to expose the device and accessories under extreme temperature. The
environment temperature must not be lower or higher than the specification
temperature.
▪When the equipment is transferred from a cold environment to a warm environment,
water may condense on certain components inside the scanner. To avoid this, it is
recommended to place the scanner in a sealed plastic bag before transferring. When the
condensate is evaporated, then turn on the plastic bag.
2.2 Tips Before Using
▪Check whether the laser glass is normal, if there is dust exist, please use the cleaning kit
to clean it.
▪Check whether the ports are clean, and whether the pins are normal.
▪Check whether the connecting cables are reliable and stable, and whether the GPS cable
is stable and normal.
2.3 Tips During Using
▪When using, make sure all cables and ports are connected correctly.
▪Place equipment at an open sky area with good GPS signal during powered on.
▪If the buzzer sounds abnormally during the capture process, please check immediately
whether the equipment status is normal.
▪Before start work, check the remaining capacity of the scanner memory card. If the
remaining capacity is less than 10% or does not meet the current collection capacity
requirements, the laser data file need to be deleted in advance.
2.4 Tips After Using
▪After using, unplug the cable first, then place the equipment into equipment case.
▪During transportation, take care the equipment and try to avoid bump.

Product Description
CHCNAV ALPHAAIR-450 USER MANUAL | 2021-10 P a g e | 7
3 Product Description
3.1 Equipment List
AlphaAir 450 mobile mapping system configuration list is shown below:
Serial number
Classification
Name
Model
N
1
AlphaAir 450
LiDAR system
AlphaAir 450
1
2
Standard
Accessories
Type-c to USB Data cable
1
3
8G USB flash
1
4
Clean suits
1
5
Transport container
(Portable Bag)
1
6
Standard
Software
CoCapture license
1
7
CoPre license
1
8
M300 Standard
Accessories
2.5mm cross screwdriver
1
9
M300 antenna mount
1
10
Rod antenna
1
11
Other optional
CHC Alphaport
1
3.2 Delivery of Equipment and Materials
1- Transport Container
2- AA450 Unit
3- CHC Alphaport adapter
4- Rod Antenna
5- Portable Bag

Product Description
CHCNAV ALPHAAIR-450 USER MANUAL | 2021-10 P a g e | 8
3.3 Product Introduction
AlphaAir 450 pocket lidar measurement system, the whole device is based on the lightweight
and high integration design concept, carried on the BB4 or 3rd party UAV like DJI M300, can
obtain longer endurance. As an emerging means of 3D data acquisition, it can quickly acquire
terrain surface data, ground feature, power line information, etc., which can realize high-
precision 3D terrain data and high-density 3D data acquisition of transmission lines. In addition,
based on the image acquisition by the built-in camera, DOM, DSM, true color point cloud and
other results can be generated, and road sections, power lines, vegetation and other results
can be automatically extracted for analysis, and the inspection report can be output.
The product is shown below:
CHCNAV AA450 unit

Product Description
CHCNAV ALPHAAIR-450 USER MANUAL | 2021-10 P a g e | 9
3.4 Equipment Size
▪The product diagrams are shown below:
▪Weight: 950 g
▪Length, width and height are shown below
M300 interface (DJI Skyport)

Product Description
CHCNAV ALPHAAIR-450 USER MANUAL | 2021-10 P a g e | 10
BB4 interface (CHC Alphaport)
3.5 Device interface description
1- DJI Skyport Interface: Power supply and communication for M300
2- GNSS Antenna Interface: Receive GNSS signal for positioning and timing
3- LED Indicator (4-LED Indicator): Device status indicator, blinking synchronously with the
ON/OFF indicator
4- ON/OFF Key: Turn on/off the equipment and one-button acquisition control button
5- TYPE-C Data Cable Interface: Connect AA450 to Computer for data coping
6- Alphaport Interface: Power supply and communication for BB4

Product Description
CHCNAV ALPHAAIR-450 USER MANUAL | 2021-10 P a g e | 11
3.6 Electrical Characteristics
Input voltage
DC 12~24 V
Rated power
32 W
Working temperature
-20 °C to +50 °C
Storage temperature
-20 °C to +65 °C
Humidity
<80%, non-condensation
3.7 Airborne Platform (M300)
3.7.1 Airborne install steps
▪Press the Skyport unlock button to remove the protective cover.
▪Align the white dot on the AA450 Skyport interface with the red dot on the M300
interface and embed it in the installation location.

Product Description
CHCNAV ALPHAAIR-450 USER MANUAL | 2021-10 P a g e | 12
▪Rotate the AA450 Skyport interface to the locked position (red dots align red dots) to be
fixed.
▪Insert the rod antenna into the M300 antenna mount and tighten it. Connect the other
end of the GNSS feeder to the GNSS interface of the AA450.
3.7.2 Airborne disassemble steps
▪Take out the GNSS feeder from the AA450 GNSS interface, rotate the GNSS antenna
counterclockwise and take it out from the antenna fixing bracket.
▪Hold the bottom of the AA450 with your left hand, press the Skyport unlock button with
your right hand, and remove the device by turning the quick-release connector clockwise.
3.8 Airborne Platform (BB4)
3.8.1 Airborne install steps
▪Push the slider of scanner into the quick-release clamp which on the bottom of the
airborne load plate in the direction of the arrow until hear a fix sound.
▪Tighten the side screw bolts to make it stable and finally finished the installation.
a
b

Product Using
CHCNAV ALPHAAIR-450 USER MANUAL | 2021-10 P a g e | 13
3.8.2 Airborne disassemble steps
▪Hold the bottom of scanner with left hand and turn the handle bolt on the side of the
quick release fixture counterclockwise with right hand until the threaded part of the
handle bolt disengages.
▪Pull the handle bolt back to the maximum position with the right hand and keep it. The
left hand can translate the scanner to the head direction to complete the separation of
the scanner and quick-release.
4 Product Using
4.1 Advance Preparation
▪Take out the equipment from the container before using. Install it on the corresponding
platform and connect all cables. Meanwhile, set up the base station at an open sky area.
Turn on the equipment after the base station start recording static.
▪Before data collection, it is necessary to check the remaining capacity of Alpha_LAS and
Alpha_CAM memory cards. If the remaining capacity is less than 10% or does not meet
the demand of current collection capacity, the data in card should be deleted in advance.
4.2 Equipment Installation
▪First, install the equipment on the platform and lock it with screws. Remember to remove
the camera protective cover.
▪Connect both power supply cable and GPS feeder cable of equipment and start power on.
▪Put the equipment at an open sky area and turn on LiDAR.
a
b

Data Acquisition
CHCNAV ALPHAAIR-450 USER MANUAL | 2021-10 P a g e | 14
5 Data Acquisition
For the convenience of users, provide two methods of data collection, One-Key Control and
DJI M300 Remote Control.
***DJI M300 Remote Control "has a higher priority than" One-Key Control ***.
AA450 One-Key Control Flow

Data Acquisition
CHCNAV ALPHAAIR-450 USER MANUAL | 2021-10 P a g e | 15
DJI M300 Remote Control Flow
5.1 One-Key Control Flow
The AA450 is embedded with one-key acquisition software, equipped with one button
(including a buzzer and LED indicator) and two auxiliary LED indicators, the AA450 can be
controlled by a single key to complete data collection.
▪Before power on, check all cables are connect correctly and power supply is normal.
▪M300 Power On: Short press the power button, then long press it within 3 seconds to
power on the M300.Indicator light is always on after power on.
▪LiDAR Power On: Long press the device’s “ON/OFF key”,the indicator lights up and the
buzzer sounds ,the indicator light flashes which means the lidar is powered on
successfully. Keep the device stationary and try not to touch the device.
▪Device initialization: About one minute after lidar is powered on, the indicator light is
normal on which means device initialization successfully completed!

Data Acquisition
CHCNAV ALPHAAIR-450 USER MANUAL | 2021-10 P a g e | 16
▪Start project: After successfully initializing the device, short press the device’s “ON/OFF
key”, the indicator status changed from normal on to sharp-flash, POS data collecting start.
After standing still for 10 seconds, the device automatically enters the acquisition state,
at this time, both the laser and the camera start to work ,the LED indicator changes from
sharp-Flash to slow- flash.
▪Stop project: When the collection is over, short press the device’s “ON/OFF key”, the laser
and camera will stop working, the LED indicator changes from slow- flash to sharp-flash.
Long press the “ON/OFF key” after standing still for 10 seconds, the device will stop the
project, the LED indicator normal on.
▪LiDAR Power Off : Long press ON/OFF Key to turn off.
Description of LED indicator
LED quick-flash——LED on 0.1s, off 0.1s, on 0.1s, off 0.1s, on 0.1s, off 0.1s…
LED sharp-flash——LED on 0.1s, off 0.1s, on 0.1s, off 1.3s, on 0.1s, off 0.1s, on 0.1s, off 1.3s…
LED slow-flash——LED on 1s, off 1s, on 1s, off 1s, on 1s, off 1s…
Short press——More than 0.2s but less than 3s.
Long press——More than 3s (When the button is pressed, the buzzer rings. After 3s, the
buzzer rings three times at a frequency of 5 HZ after that, the buzzer does not ring).
Long press——More than 10s (After 10 seconds, the buzzer rings and the green light blinks
slowly).

Data Acquisition
CHCNAV ALPHAAIR-450 USER MANUAL | 2021-10 P a g e | 17
5.2 DJI M300 Remote Control Flow
5.2.1 Introductions
▪POS: Shows the IMU status, project date and the total number of satellites. When the POS
status is unknown, it means that the device initialization unsuccessfully, and when it is OK,
it means that the device initialization successfully.
▪Laser: Shows the laser state and residual capacity of SD card. The memory of SD card is
256GB. Please empty it in time if the remaining capacity is insufficient.
▪Camera: Shows how many photos the camera took and how many missed .
▪Storage: Shows storage status and project duration.
▪Status: Shows the system state and the duration of the current state.

Data Acquisition
CHCNAV ALPHAAIR-450 USER MANUAL | 2021-10 P a g e | 18
5.2.2 Camera Parameters Setting
▪You can set the camera's ShutterSpeed, ISO, PhotoMode, PhotoGap.The default
PhotoGap is 2000ms.
Note: PhotoMode must be set as Timing, otherwise the camera won't take pictures.

Data Acquisition
CHCNAV ALPHAAIR-450 USER MANUAL | 2021-10 P a g e | 19
5.2.3 Data Acquisition
▪LiDAR Power On: Long press the device’s “ON/OFF key”,the indicator lights up and the
buzzer sounds ,the indicator light flashes which means the lidar is powered on
successfully. Keep the device stationary and try not to touch the device.
▪Device initialization: About one minute after lidar is powered on, the indicator light is
normal on which means device initialization successfully completed!
▪After confirming that all device states are OK, click "New Project" to start POS data
collection.
▪After starting the project, the device need to be still for 10 seconds, then click "Start" to
start the laser and camera data collection.
▪After the project is completed, click "Stop" and the laser and camera will stop working.
▪The device need to be still for 10 seconds , then click "Close project" to end the project.
▪LiDAR Power Off : Long press ON/OFF Key to turn off.
Note: To click "Start"/"Stop"/"Close project"/, you need to click the unlock icon on the
screen and complete the operation within 3 seconds.

Data Copy
CHCNAV ALPHAAIR-450 USER MANUAL | 2021-10 P a g e | 20
6 Data Copy
6.1 Introduction of the data
▪ALPHA_CAM: The photos are stored in the DCIM.
▪ALPHA_LAS: The data is grouped according to the collection date,For example, 20210820
indicates the data collected on August 20, 2021.
▪A complete project consists of four files:
xxxxxx_I.imr, IMU data.
xxxxxx_S. cil, Synchronizes data.
xxxxxx_T.gps,GNSS data.
xxxxxx_L.pcap, Reserved data interface, for DMI data.
▪xxxxxx.CP: Camera calibration file.
▪xxxxxx.EP: Laser calibration file.
6.2 Automatically data copy
▪Connect the device to the computer with type-c to USB data cable, the computer will pop
up two SD cards ALPHA_LAS and ALPHA_CAM
Other manuals for AlphaAir 450
1
Table of contents
Other CHCNAV Drone manuals