Potensic D58 User manual

Operation Guidance
D58 GPS Drone
This product supports GPS positioning and is recommended for outdoor flight!
* This drone's WiFi camera is 5G signal , please make sure that your phone are compatible with it.


2
Catalog
Overview of drone and transmitter 3
Parts install and disassemb 7
Check list before flight 11
Flight steps 11
Function introduction 14
Know your APP 18
To take photo and record video 18
Spare parts 19
Troubleshooting 21
http://www.ipotensic.com

3
Overview of drone and transmitter
Drone
Propeller A
Left Right
Front
Rear
Power Switch
Propeller B
Propeller B
Propeller A
Camera
Battery Back Cover
Front Light
(Green)
Front Light
(Green)
Rear Light
(Red)
Rear Light
(Red)
Landing Gear
Drone Cover
Main parameter
Drone size
Drone weight
Propeller diameter
423x423x160mm
230 g
190mm
Transmission distance
and radius
About 200 mins
Camera resolution 1920x1080PFlying time About 16 mins
Drone battery 7.4V 1000mAh
Transmission type 5.8GHz
Drone control mode 2.4GHz
Battery charging time
Flight distance and radius About 150 m (Without
interference)
About 150 m (Without
interference)
http://www.ipotensic.com
4
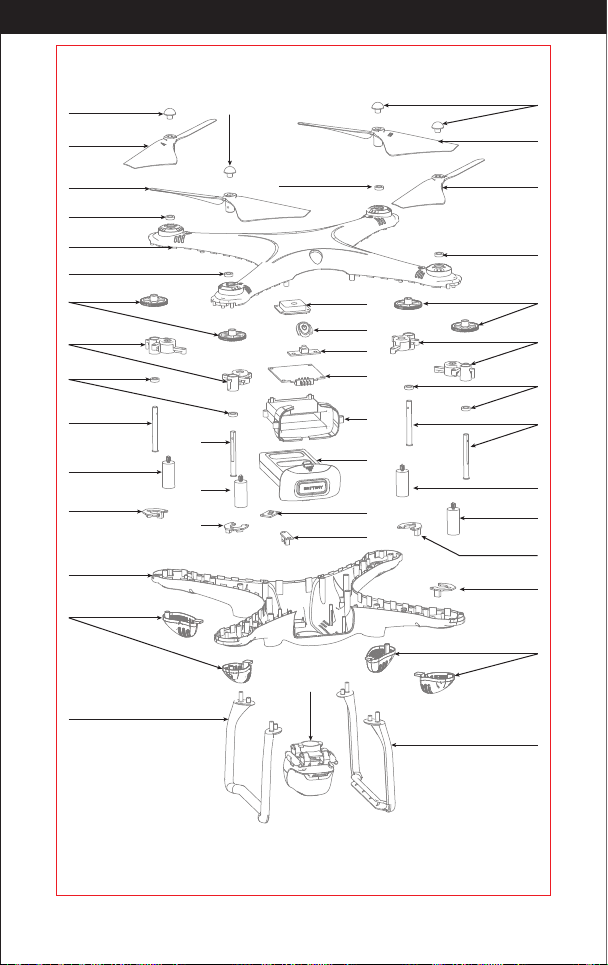
Exploded view
1
2
1
4
3
5
6
4
4
7
4
8
8
10
12
9
11
13
14
15
16
1
3
2
4
19
20
21
22
23
24
25
26
6
7
4
8
10
9
17
18
14
15
http://www.ipotensic.com
5
16
15
Landing gear
14
Lamp shade
No. NAME No. NAME
1
Propeller plug
17
Camera box
2
Propeller A
18
Right front LED board(green light/red plug)
3
19
Right rear LED board(red light/white plug)
4
Propeller B
20
GPS module
5
Bearing
21
Power button
6
Drone cover
22
Power button board
7
Gear
23
Receiver board
8
Motor holder
24
Battery holder
9
Shaft
25
Lipo battery
10
A propeller motor
(black and white cable/white plug)
B propeller motor
(red and blue cable/red plug)
26
Magnetic board
11
Left front LED board
(green light/white plug) Camera adapter
12
Left rear LED board
(red light/red plug)
13
Drone bottom
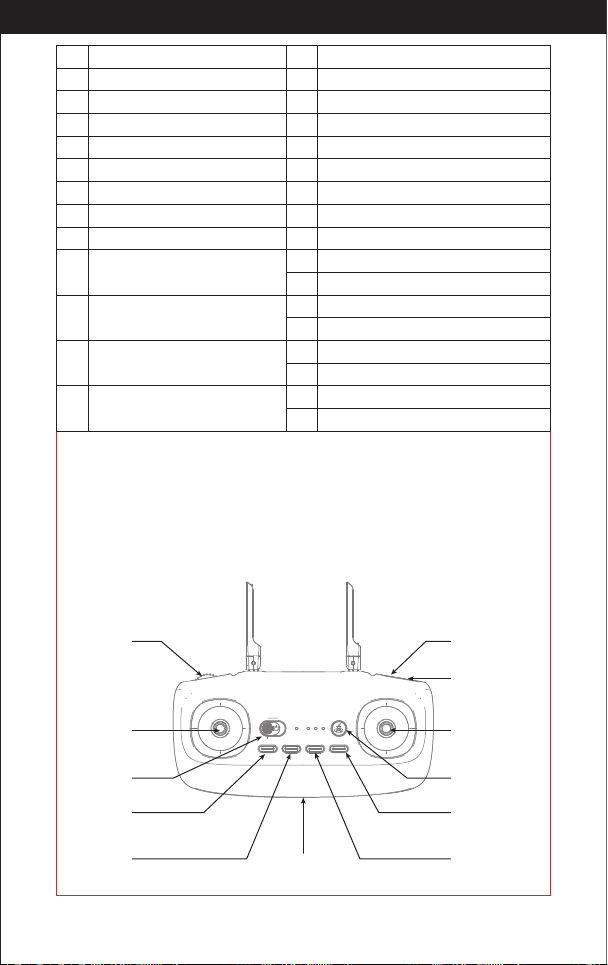
Transmitter
Video
Throttle stick
(Press down
to trim)
GPS switch
Direction stick
Power switch One button return
High/medium/low
speed mode
Phone holder
Following
mode
Encircling mode
Gimbal
adjustment
Photo
http://www.ipotensic.com
6
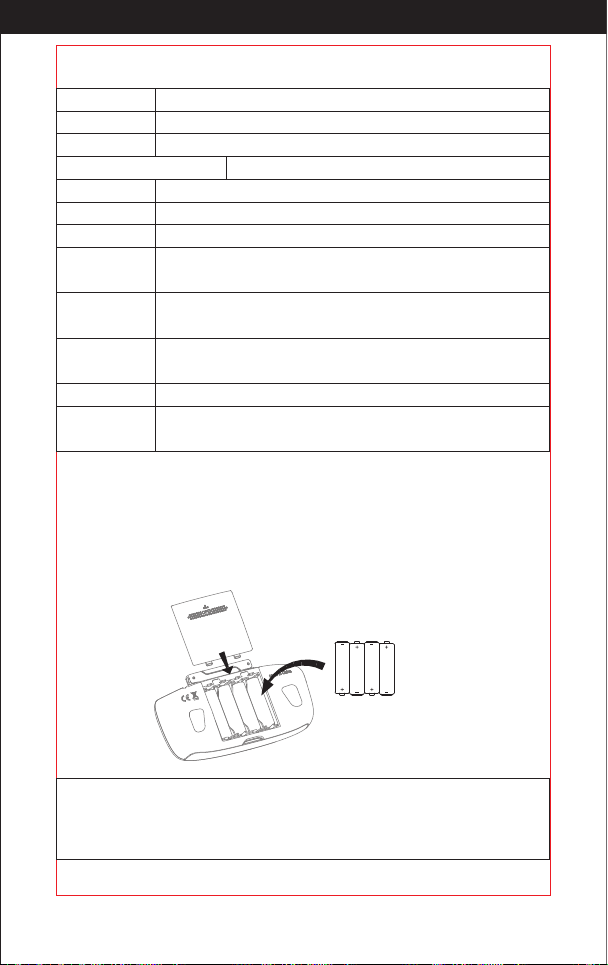
Battery installation
Open the battery cover on the back side of the transmitter and put 4 * AA
batteries(not included)into the box in accordance with electrode instructions,
showing as picture 1
Picture 1
showing as picture 1
4*1.5V
Alkaline Batteries
High / middle /
low speed Short press the key to switch the high/ middle/low speed mode.
GPS switch Click the key to turn on/off the function of GPS.
Key function
Left stick
Right stick
Trimmer
mode key
Power switch
To control the drone up / down / turn left / turn right.
To control the drone forward / backward / left side flying / right side flying.
Press down the key, pull the stick to the direction that needs trimming,
then it can turns to the direction you want. Release to exit.
Push power switch from left to right to turn on the drone.
Video Click this button once, it starts to record, and click again to exit.
Encircling key Click the key to enter encircling function, click again to exit.
Gimbal adjustment key Slide the key to adjust the camera angle up and down.
The following key Click the key to enter following function, click again to exit.
One key return When GPS mode, click this button, then the drone starts to return.
During returning and click this button again to exit from returning.
Photo Click this button once to a photo. Click this button constantly, it takes
several photos.
1. Make sure the electrodes are correct.
2. Do not mix up the new batteries with
the old ones.
3. Do not mix different kinds of batteries.
4. Do not charge the non rechargeable battery.
Notice:
http://www.ipotensic.com

7
The installation methods of mobile phone
Hold the bottom buckle of transmitter; Pull down the holder until it can fit the
mobile phone; Put on the phone and release the holder; and then the phone
is fixed well.
(Picture 2/3)
Notice: Don’t clamp the buttons of the phone.
Picture 2 Picture 3
Charging Instruction for Drone Battery
Parts install and disassemb
* For faster charging, it is recommended to use an adapter with 5V 2A output current
(not included) to charge the battery
1. Connect the drone battery with USB cable first and then choose one of the
methods as below pictures shown to connect with USB plug.
2. The red USB indicator light keeps bright when charging for drone battery and
the light turns green when the battery is fully charged.
Drone Battery
Power BankPhone Charger
Computer Charging Car Charger
Li-Po Battery Disposal & Recycling
Wasted Lithium-Polymer batteries must not be placed with household
trash. Please contact local environmental or waste agency or the
supplier of your model or your nearest Li-Po battery recycling center.
http://www.ipotensic.com
8
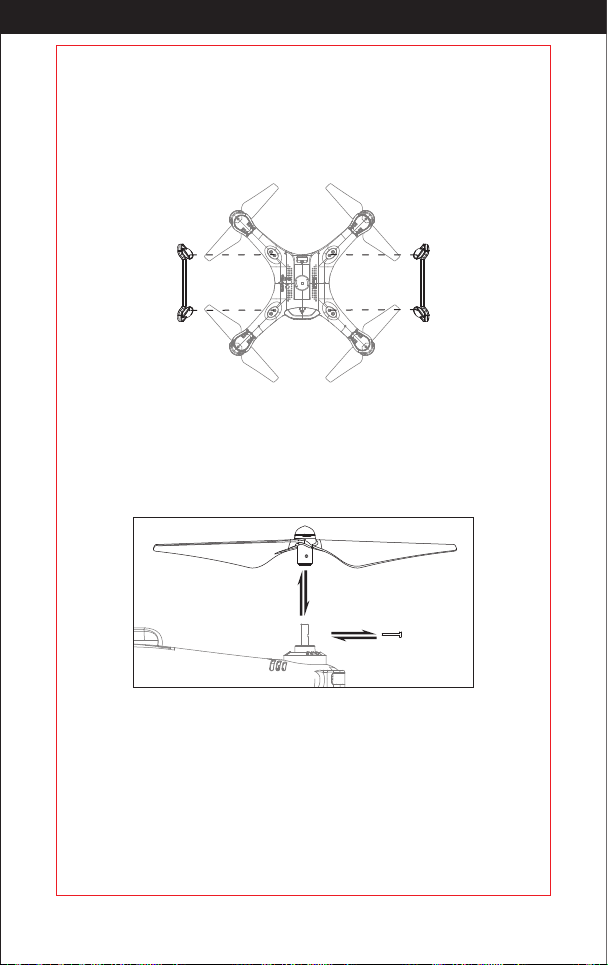
Landing gear install and disassemb
As the diagram shows, aim the landing gear pillar to the body hole and press
down, then tighten the screws on the landing gear. When disassembling, loose
the screws and pull out the landing gear(Picture 4).
Note: Make the landing gear close to the drone level,otherwise it will be
unstable and affect the stability of the drone.
Picture 4
Propeller install and disassembly
Notice: When installing, please make sure the right installation, or the drone
can not fly normally.
Picture 5
1. Use the screw driver counter-clockwise to off the screw and then lift out
the damaged propeller (picture 5).
2. Replace with the same new rotating direction propeller, aim at the screw hole to
install it, then tighten the screw in clockwise.
http://www.ipotensic.com

9
Warning: Please take care and do not to damage the LED board when
taking out the motor.
Diagram of motor replacement
Notice: Please make sure the motor you install is the same rotating direction
as the original one. Otherwise, your drone will not fly normally.
Suggestions for motor using:
It’s normal that after using for a period of time, the motor performance will
decrease, so please purchase a new one for replacement.
Picture 6
1. Remove the screw and the lampshade with a screwdriver counter-clockwise,
and remove the damaged motor after disconnect the motor terminator.
2. Replace with the same new motor, connect the motor wire, put on the
lampshade, then tighten the screws in clockwise.
http://www.ipotensic.com
Table of contents
Other Potensic Drone manuals

Potensic
Potensic Dreamer 4K User manual

Potensic
Potensic D88 User manual

Potensic
Potensic A20 User manual

Potensic
Potensic ATOM SE User manual

Potensic
Potensic A30 User manual

Potensic
Potensic T25 User manual

Potensic
Potensic D60 User manual

Potensic
Potensic F186 DH User manual

Potensic
Potensic U47 User manual

Potensic
Potensic Dreamer Mini User manual


 user manual")


