CHEE SIANG INDUSTRIAL M100 Series User manual

INSTRUCTION MANUAL
INSTRUCTION MANUAL
使用说明书
M100 系列
伺服马达
M100 SERIES
M100 SERIES
AC SERVO MOTOR
AC SERVO MOTOR
为了安全地使用,请您在使用之前仔细阅读本使用说明书。
另外,请您注意保管本使用说明书,以便随时查阅。
Read safety Instructions carefully and understand them before using.
Retain this Instruction Manual for future reference.
No:M100A01
No:M100A01
GOLDEN WHEEL
CONTENTS 目录
Page
1.Safety Precautions・・・・・・・・・・・・・・・・・・・・・・・・・・・・・・・・・・・・・ 1
安全上的注意事项
2.Installation and Adjustment 安装与调整
2.1 Adjustment on the belt cover・・・・・・・・・・・・・・・・・・・・・・・・・・・・・・・ 3
皮带护盖上的调整
2.2 Install and adjust the synchronizer ・・・・・・・・・・・・・・・・・・・・・・・・・・・・ 3
定位器的安装与调整
2.3 Speed control unit adjustment ・・・・・・・・・・・・・・・・・・・・・・・・・・・・・ 4
速度控制器的调整
3.Power Connection and Grounding 接线与接地
3.1 Single phase connection・・・・・・・・・・・・・・・・・・・・・・・・・・・・・・・・ 4
单相电源的接法
3.2 How to connect a 1 Ø / 220 V power from a 3 Ø / 380 V power source ・・・・・・・・・・・・ 5
电源为三相 380V 时,如何连接使用单相 220V 的接线方式
4.Operation 操作说明
4.1 Operation of the front panel of Control box
控制箱面板的操作
4.1.1 How to access【Normal Mode】・・・・・・・・・・・・・・・・・・・・・・・・ 6
如何进入【一般模式】操作界面
4.1.2 Key functions in the【Normal Mode】・・・・・・・・・・・・・・・・・・・・・・ 6
主要功能【一般模式】
4.1.3 How to change the display in【Normal Mode】・・・・・・・・・・・・・・・・・・ 7
如何改变显示内容【一般模式】
4.1.4 How to access【Parameter Mode A】・・・・・・・・・・・・・・・・・・・・・・ 8
如何进入【参数模式 A】
4.1.5 How to access【Parameter Mode B】・・・・・・・・・・・・・・・・・・・・・・ 9
如何进入【参数模式 B】
4.1.6 Key functions in the【Parameter Mode A and B】・・・・・・・・・・・・・・・・・ 9
主要功能【参数模式 A和B】
4.1.7 How to access the parameter value and adjust the setting・・・・・・・・・・・・・・ 10
如何进入参数区进行调整设定
4.1.8 How to change the sewing pattern・・・・・・・・・・・・・・・・・・・・・・・・ 11
(Free sewing / Pocket sewing / Label sewing / Constant stitch sewing / Bar-tack sewing)
如何进入缝制模式(自由缝/口袋缝/标签缝/定寸缝/连续回缝)
4.2 How to change the sewing speed 如何调整车缝速度
4.2.1 How to change the Maximum sewing speed・・・・・・・・・・・・・・・・・・・・ 12
如何调整车缝时的最高运转速度
4.2.2 How to change the Start back-tacking speed・・・・・・・・・・・・・・・・・・・・ 12
如何调整起始回缝时的速度
4.2.3 How to change the End back-tacking speed・・・・・・・・・・・・・・・・・・・・ 13
如何调整终止回缝时的速度
GOLDEN WHEEL

4.3 Setting the back-tack and pattern sewing 设定回缝功能和缝制模式
4.3.1 Setting the Start / End back-tacking ・・・・・・・・・・・・・・・・・・・・・・・ 13
起始回缝/终止回缝的设定
4.3.2 Setting the Bar-tack sewing・・・・・・・・・・・・・・・・・・・・・・・・・・・ 14
连续回缝的设定
4.3.3 Setting the Constant stitch sewing・・・・・・・・・・・・・・・・・・・・・・・・ 15
定寸缝的设定
4.3.4 Setting the Pocket sewing ・・・・・・・・・・・・・・・・・・・・・・・・・・・ 15
口袋缝的设定
4.3.5 Setting the Label sewing ・・・・・・・・・・・・・・・・・・・・・・・・・・・・ 16
标签缝的设定
4.4 Setting the direction of motor rotation・・・・・・・・・・・・・・・・・・・・・・・・・・ 17
马达运转方向的设定
4.5 Setting the counter function・・・・・・・・・・・・・・・・・・・・・・・・・・・・・・ 18
计数功能的设定
4.6 Operation of the external panel 操作面板的操作
4.6.1 The function of each operation key・・・・・・・・・・・・・・・・・・・・・・・・ 20
每个按键的功能
4.6.2 How to access【Parameter Mode A】for Simple Panel・・・・・・・・・・・・・・・・ 24
如何进入【参数模式 A】简易面板
4.6.3 How to access【Parameter Mode B】for Simple Panel・・・・・・・・・・・・・・・ 25
如何进入【参数模式 B】简易面板
5.General Parameter List 一般参数目录
5.1 【Parameter Mode A】list ・・・・・・・・・・・・・・・・・・・・・・・・・・・・・・・ 26
【参数模式 A】目录
5.2 【Parameter Mode B】list ・・・・・・・・・・・・・・・・・・・・・・・・・・・・・・・ 32
【参数模式 B】目录
6.Error Code / Alarm Code
错误代码/报警代码
6.1 Error Code list ・・・・・・・・・・・・・・・・・・・・・・・・・・・・・・・・・・・・ 39
错误代码
6.2 Alarm Code list・・・・・・・・・・・・・・・・・・・・・・・・・・・・・・・・・・・・ 42
报警代码
Appendix A : Connector Diagram・・・・・・・・・・・・・・・・・・・・・・・・・・・・・・・・・ 44
附录 A:端子座配置图
REFERENCE : 7-Segment Display Characters Compare Table
参考:七段显示器字符表格对照
GOLDEN WHEEL

- 1 -
1. Safety Precaution
安全措施
Please read this manual carefully, also with related manual for the machine head before use.
使用前请详细阅读本技术资料与所搭配的缝制机械的说明书,配合正确使用。
For perfect operation and safety, installing and operating this product by trained personnel is required.
并须由专业人员来安装和操作。
Also the following precaution must be taken.
还必须采取以下防护措施。
・Turn off the power, unplug the cord and wait 10 minutes before any installing, mounting, or opening the
control box cover.
关掉电源,拔掉插头等待十分钟后,可安装或打开电控箱。
・This product is designed for use with specified sewing machines and must not be used for other purposes.
本产品设计用于指定的缝纫机不得用于其他用途。
・Only use Power Voltage indicated on the name plate of the M100 in ±10 % ranges.
供电电压必须符合标示在马达与控制箱铭牌上的指定电压 ±10 %内。
・To avoid the false operation, please keep the product away from the high electromagnetic machinery or
electro pulse generator.
避免错误操作,请保持产品远离高电磁机械装置或者电子脉冲发生器。
・Don’t operate in direct sun light, outdoors area and the room temperature is 40°C above or 0°C under.
不要直接在阳光下及室内温度 40°C 以上或 0°C 以下的场所运作。
・Don’t operate near the heater, dew area and the humidity is 20 % less or 80% more.
不要在暖气(电热器)旁及露水区域和湿度小于 20%或大于 80%的场所运作。
・Don’t operate in dusty, evaporate, combustible gas area, and stay away from corrosive material.
不要在有灰尘的地方操作,可燃气体挥发区域操作,远离腐蚀性物质。
・Avoid power cord being applied by heavy objects or excessive force, or over bend.
避免电源线被外物压住或过度扭曲。
・Power cord must keep 3 cm or above distance to the V-belt and the pulley.
安装电源线时,电源线应距离三角皮带和皮带轮 3厘米以上。
・To avoid the static interference and current leakage, all grounding must be done correctly.
避免静电干扰和漏电,必须得正确接地。
・Use the correct connector and extension wire when connecting ground wire to Earth and secure it tightly.
电源线的接地线以适当大小的导线和接头连接到生产工厂的系统地线,此连接必须永久固定。
・Turning on the machine in the first time, use low speed to operate and check the correct rotation direction.
第一次开电后,请以低速操作缝纫机并检查转动方向是否正确。
・During machine operation, don’t touch any moving parts.
机器运转时,请勿触摸运转的部件。
・All moving parts must use the protective device to avoid the body contact and objects insertion.
全部的运动部件必须使用防护设备以避免身体接触和物体插入。
・Maintenance and repairs must be done by the specially trained personnel.
维护和修理必须由专门的人员来操作。
・Don’t cover up motor’s ventilation, it can cause motor overheated.
不要掩盖马达的通风设备,以免引起马达过热。
GOLDEN WHEEL

・Don’t us
e
请不要以
・
A
ll spare
所有维修
Danger
a
e
any object
s
不适当物体,
如
parts for re
p
用的零件,须
由
a
nd cautio
n
Risk
s
this
s
这个
标
性的
地
This
这个
标
s
or force to
h
如
铁锤…等
敲
p
air must be
a
由
本公司提
供
n
signs :危
险
s
that may
c
s
ymbol in th
e
标
示符号表
示
地
方会有此
标
symbol indi
c
标
示符号表
示
h
it or ram th
e
敲
击本产品。
a
pproved or
供
或认可,方
可
险
警告标志!
c
ause perso
n
e
instructio
n
示
机器安装
时
标
示。
c
ates electri
示
有高压电,
电
- 2 -
e
product.
supplied by
可
使用。
n
al injury or
n
manual.
时
,如有错误
cal risks an
d
电
气方面有
危
the manufa
c
risk to the
m
恐
会伤害到
人
d
warnings.
危
险性的地
方
c
turer.
m
achine are
人
体或机器
受
方
会有此标
示
e
marked wi
t
受
到损坏,所
示
。
t
h
以机器方面
有
有
危险
GOLDEN WHEEL
- 3 -
2.Installation and Adjustment
安装与调整
2.1 Adjustment on the belt cover
皮带护盖上的调整
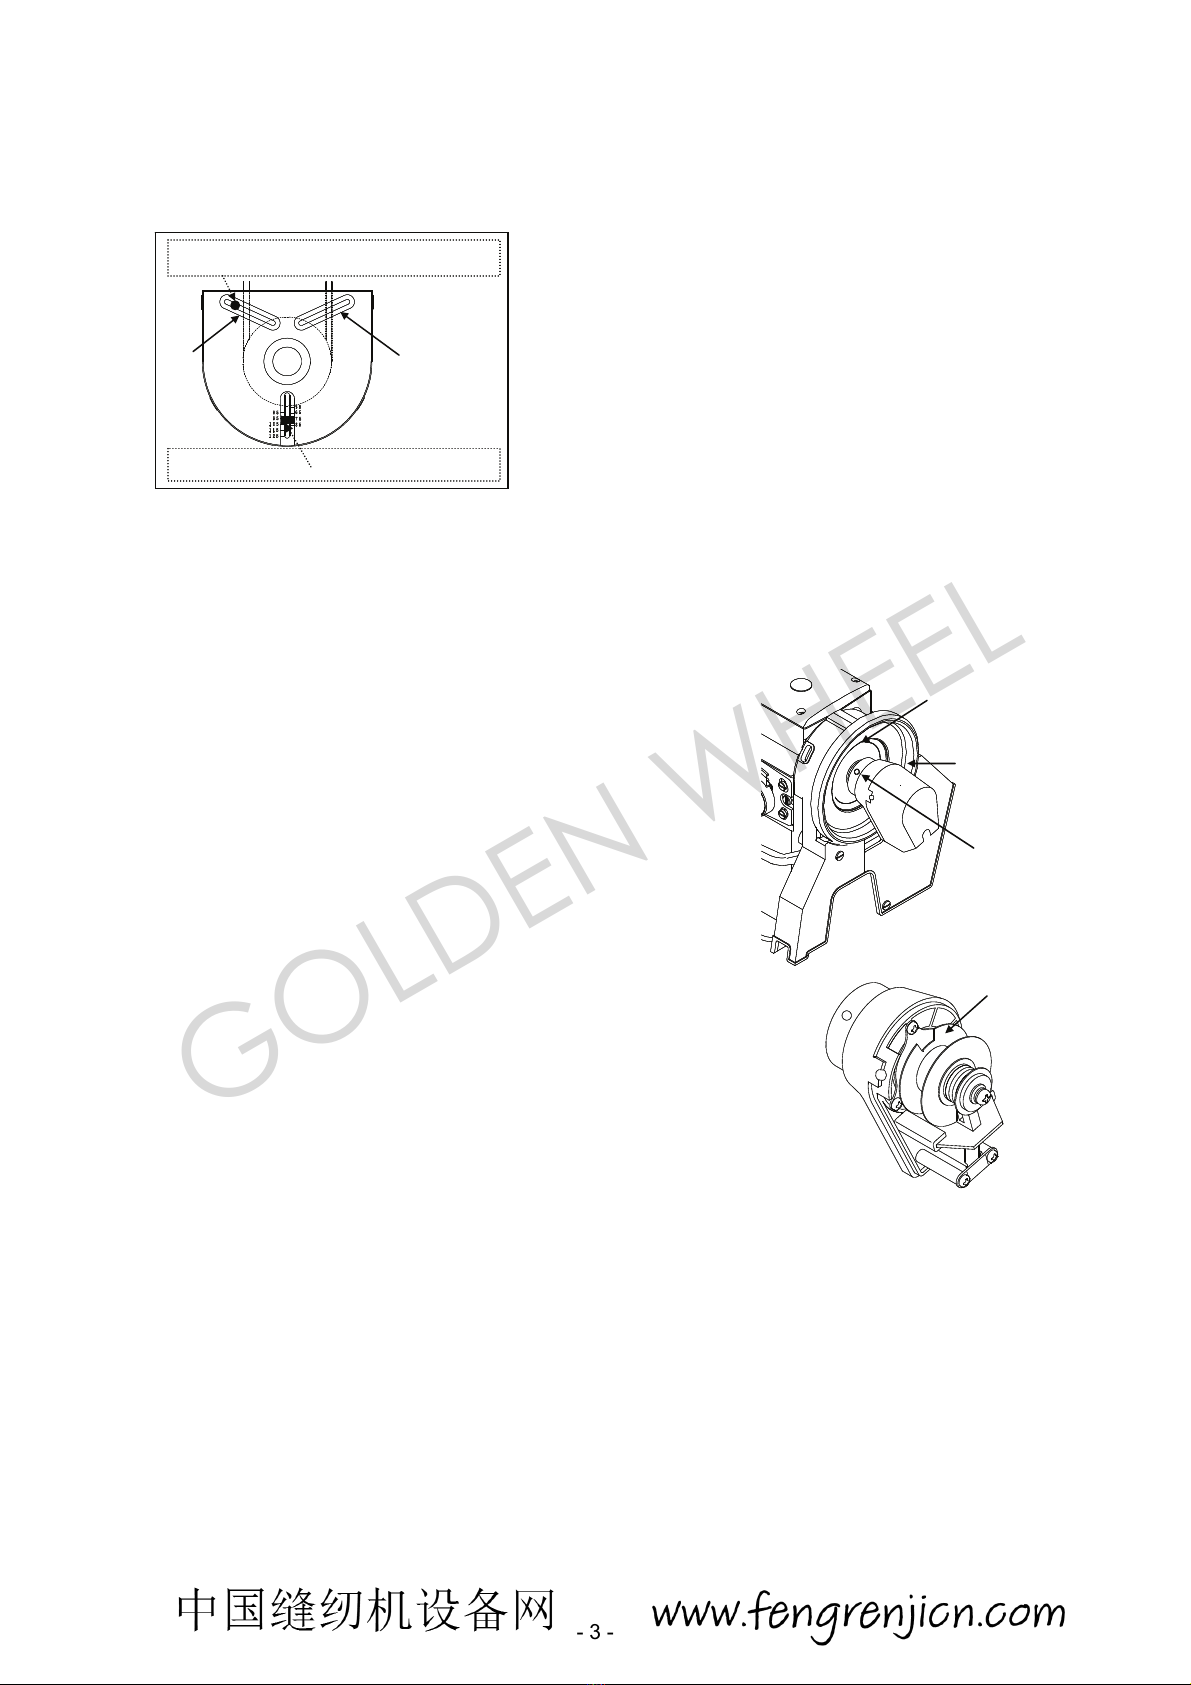
2.2 Install and adjust the synchronizer (sensor)
定位器的安装与调整(外挂式定位器/传感器)
a ) Synchronizer installation:Mounting the Synchronizer onto the flange of machine pulley and fasten the
rotor by setting screws.
定位器的安装:将定位器套入车头皮带轮心轴或对接器(转接头)上固定锁紧。
b ) Synchronizer adjustment 定位器的调整
Adjust this position with the detector installed onto the sewing
machine and while stopping at the UP and DOWN positions.
For safety, disconnect the connector for the sewing machine.
为了安全起见,调整检测器安装在缝纫机的上下停车位置时,
请断开与缝纫机的连接。
Adjustment of UP position 上停车位置的调整
Loosen the two set screws on the detector joint, and set the
stop position by turning the detector joint.
松开检测器连接处的两个固定螺丝,转动检测器,使检测器的停止
位置与缝纫机的上停位置对应时,固定连接螺丝。
Adjustment of DOWN position 下停车位置的调整
When changing the DOWN position, remove the detector cover,
and turn only the DOWN position detector plate to adjust to the
designated stop position.
当改变了下停车位置时,请取下检测器盖子,转动下定位感应片到
指定的停车位置。
(The cross-recessed screw does not need to be loosened at this time.)
Always replace the cover after adjustment.
(在调整下定位时,请勿松开感应片的十字型固定螺丝)
调整好后,请装好检测器的盖子。
Note. The relation of the DOWN position and UP position will differ
according to the model
下停车位置和上停车位置取决于各缝纫机的机型。
Sewing machine pulley
缝纫机手轮
detector joint
检测器的连接
Setting screw 定位螺旋
(two screws)(两个螺丝)
a ) Adjust the belt stopper (A) properly and leave about 5~10 mm space
from V-belt.
调整皮带止落挡片(A) 距离皮带 5~10MM。
b ) Please attach【Finger guard】according to the direction which a motor
rotates.
请依照马达旋转的方向安装【手指保护柱】。
For rotation of counterclockwise,【finger guard 】is set at position (B).
For rotation of clockwise,【finger guard 】is set at position (C) .
反时针运转方向时,【手指保护柱】安装在位置(B)。
顺时针运转方向时,【手指保护柱】安装在位置(A)。
【Finger guard】手指保护柱
A
Belt sto
pp
e
r
皮带
止
落
挡片
B C
DOWN position
detector plate
下定位感光片
GOLDEN WHEEL
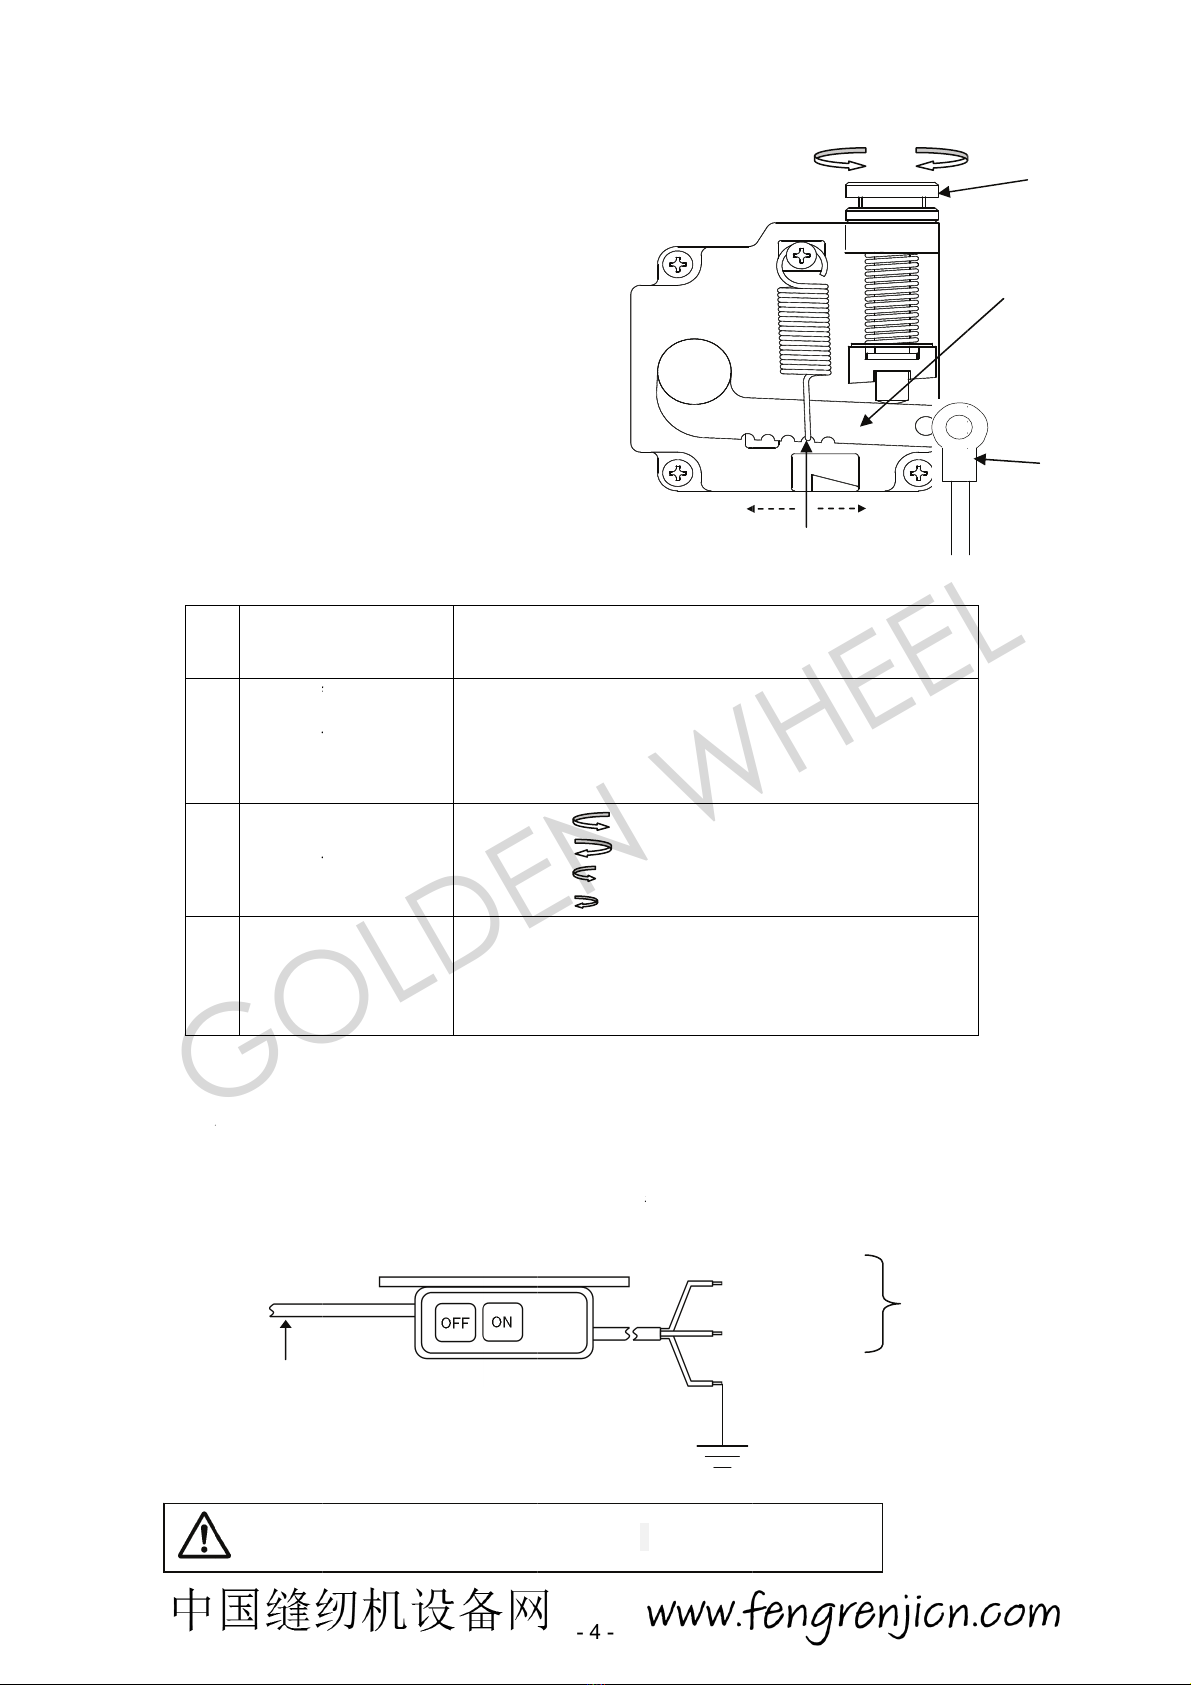
2.3 Sp
e
速
度
Comp
o
控速器
A:
S
前
B:
B
后
C:
T
踏
D:
P
脚
1
2
3
3.Power
C
Plea
s
请检
查
3.1 Sin
Gree
n
e
ed control
u
度
控制器的
调
o
nents of sp
e
各部位名称:
S
pring for to
e
前
踏力量弹簧
B
olt for heeli
n
后
踏力量的调
T
readle / Pe
d
踏
板/踏板臂
P
itman rod f
o
脚
踏板吊杆
Term of
调整需
求
Toeing
f
force ad
j
踏板前
踏
力量的
调
2
Heeling
force ad
j
踏板后
踏
力量的
调
3
Treadle
A
djustm
踏板行
程
C
onnection
s
e check th
e
查
马达和面
板
gle phase c
n
/yellow wir
e
Green
/
To control
接至控制
箱
u
nit adjust
m
调
整
e
ed control
u
如图示
e
ing forward
的调整
n
g backwar
d
整
d
al arm
o
r Treadle /
P
adjustment
求
f
orward
j
ustment
踏
调
整
backward
j
ustment
踏
调
整
stroke
ent
程
调整
and Groun
d
e
motor and
t
板
的控制箱,
并
onnection
e
is the grou
n
/
Yellow wire
box
箱
m
ent
u
nit : see fig
u
force adjust
m
d
force adjus
t
P
edal
A
djustm
调整结
果
Spring
A
Spring
A
弹簧 A
移
弹簧 A
移
Bolt B t
u
Bolt B t
u
螺栓 B
向
螺栓 B
向
Rod D s
Rod D s
当吊杆
D
当吊杆
D
d
ing 电源
接
t
he face plat
e
并
使用正确的
单相接法
n
d wire. 黄
色
must do th
e
- 4 -
u
re
m
ent
t
men
t
ent resul
t
果
A
move to rig
A
move to le
ft
移
动到右边=
力
移
动到左边=
力
u
rn =
u
rn =
向
上时,
力
向
下时,
力
ecure at rig
h
ecure at left
D
往右侧孔
锁
D
往左侧孔
锁
接
线与接地
e
of control
b
电源。
色
/绿色是接
地
e
grounding.
ht = force in
c
ft
= force de
c
力
量愈重
力
量愈轻
force decre
a
force increa
s
力
量愈轻
力
量愈重
h
t = stroke is
= stroke is
s
锁
装时=行程
较
锁
装时=行程
较
b
ox, and us
e
地
线。
绿/黄色线
必
B
棕
B
蓝
G
绿
decrease
减
c
reased
c
reased
a
sed
s
ed
longer
s
horter
较
长
较
短
e
with the rig
h
必
须接地
B
rown wire
棕
色线
B
lue wire
蓝
色线
G
reen/Yellow wi
绿
/黄色线
A
decrease 减
小
减
小 inc
r
h
t power su
p
re
Conne
c
to a p
o
连接电
源
小
increa
s
r
ease 增大
p
ply.
c
t these leads
o
wer supply.
源
B
C
D
s
e增大
GOLDEN WHEEL
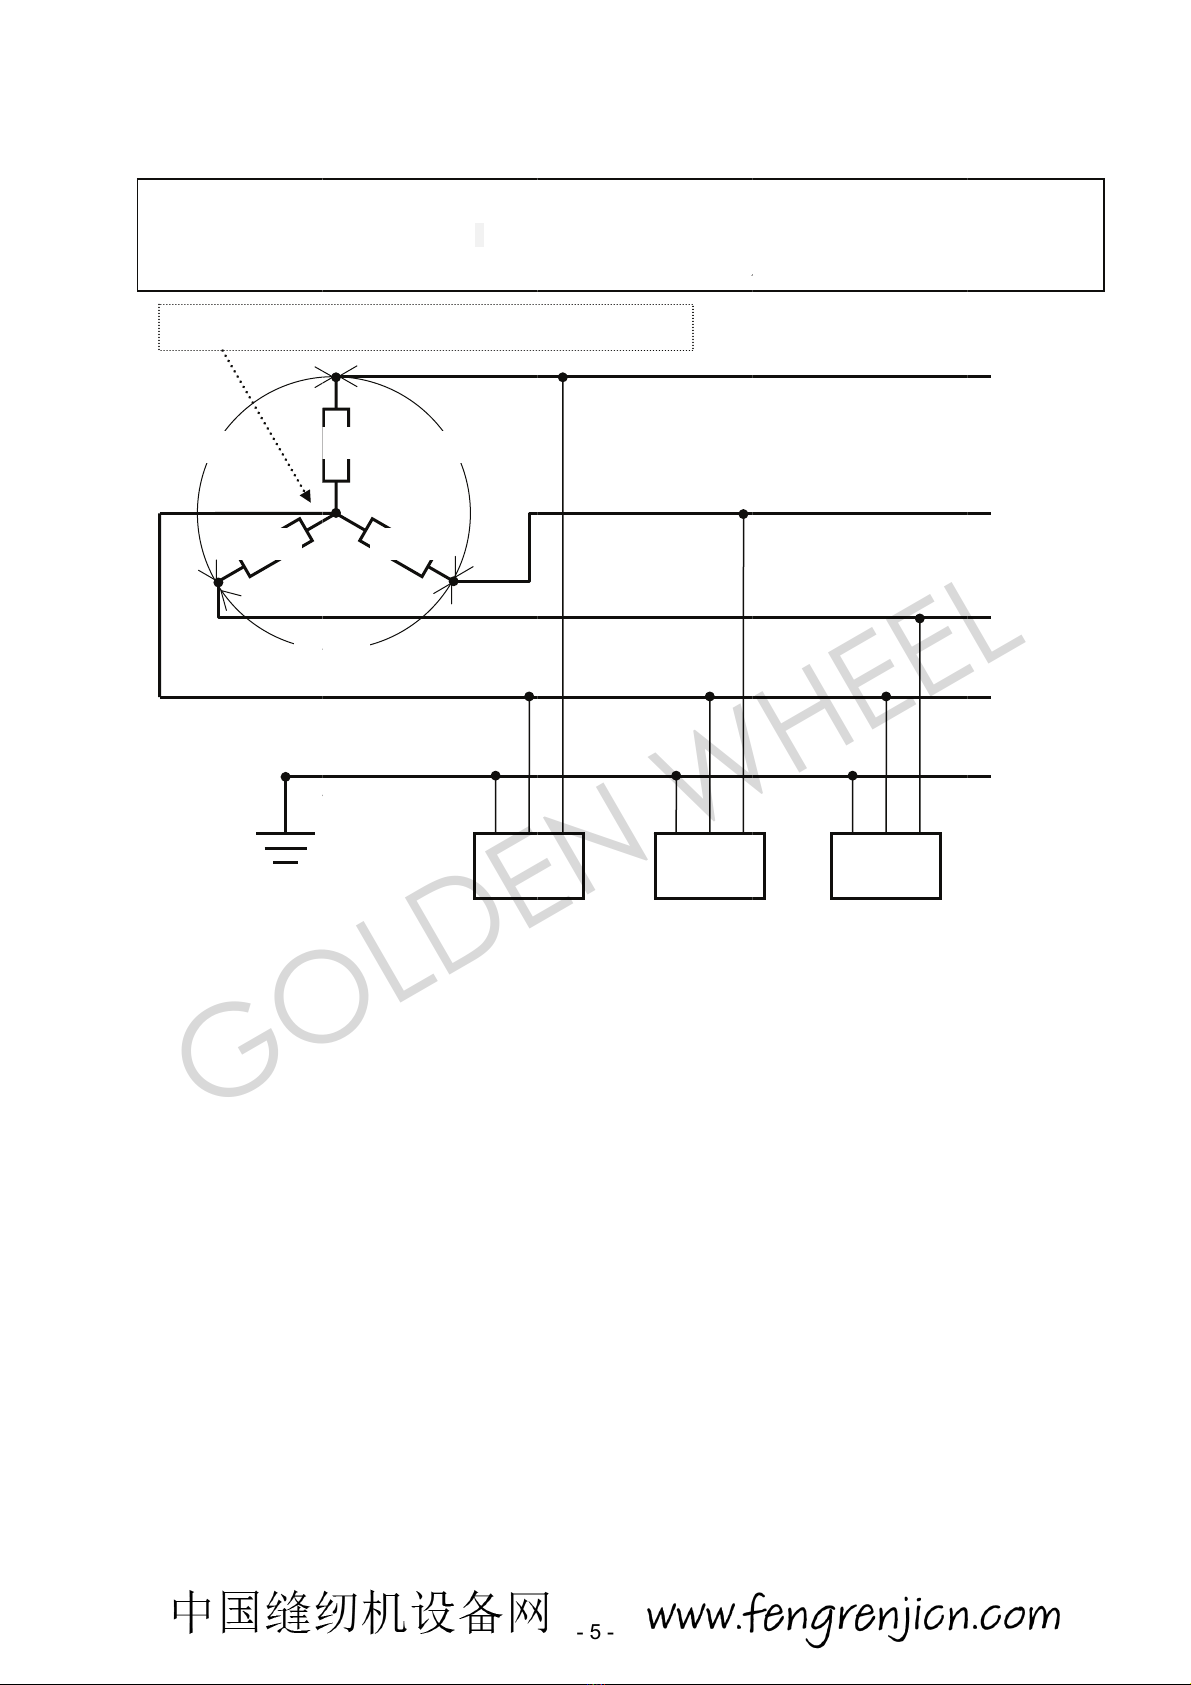
3.2 Ho
w
电
源
3
8
Neutra
l
中性(
点
Caut
i
w
to connec
源
为三相 380
V
Caution:
警告:如
果
2
220V
8
0V
3
8
G
r
l
点
)线
i
on:Must ha
v
t a 1 Ø/ 22
0
V
时,如何连
接
If the powe
this conne
c
果
电源没有
中
2
20V
220V
8
0V
r
ounding syste
m
接地系统
v
e a neutral p
o
0
V power f
r
接
使用单相
2
r source ha
v
c
tion.
中
性(点)线
时
380V
1
Ø
2
2
Mot
o
m
L1
G
o
int 注意:
必
- 5 -
r
om a 3 Ø
/
3
2
20V 的接线
方
v
e no neutr
a
时
,本伺服马
2
0V
o
r
L2
必
须有中性(点
)
3
80 V powe
方
式
a
l point, the
n
达是不适合
在
1
Ø
220V
Motor
L1
G
)
线
r source
n
this servo
在
此场所使
用
1
L2
L
G
motor is no
t
用
。
Ø
220V
Motor
L2
1
t
suitable fo
r
R
S
T
N
PE
r
GOLDEN WHEEL
- 6 -
4.Operation 操作
4.1 Operation of the front panel of Control box 控制箱前的操作面板
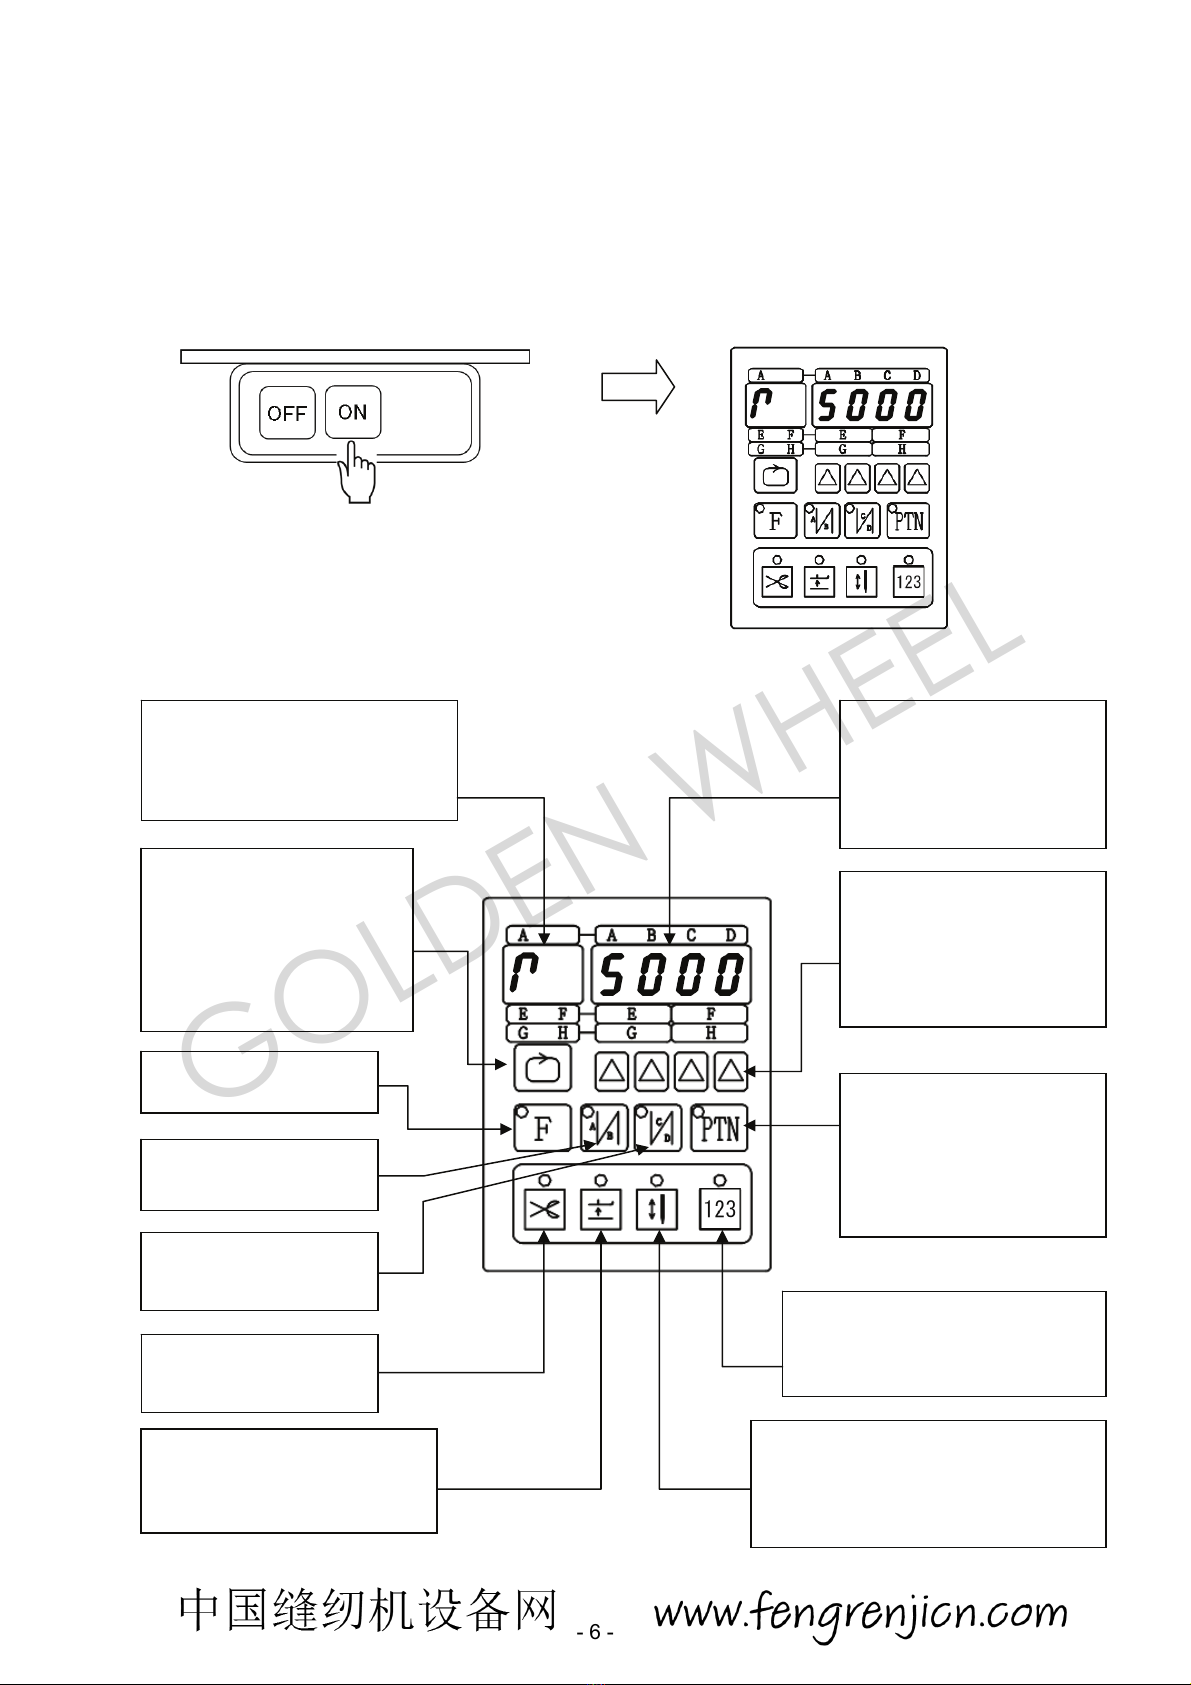
4.1.1 How to access 【Normal Mode】如何进入【一般模式】
Turn on the power and you can access【Normal Mode】
打开电源,你可以进入【一般模式】
Turn ON the power switch Display in the【Normal Mode】
打开电源开关 将显示【一般模式】
4.1.2 Key functions in the 【Normal Mode】按键功能【一般模式】
Display change key
功能切换键
(See 4.1.3 How to change
the display in【Normal Mode】)
(见 4.1.3 如何改变显示内容【一般
模式】)
Parameter mode key
进入参数区功能键
Trimmer
ON / OFF
切线功能键 开/关
Presser Foot goes up
after trimming
ON/OFF
切线完成后自动抬压脚 开/关
Needle UP / Down at machine stop
机器停止时针停位置设定键 针上/针下
LED ON :Needle UP 打开:针上
LED OFF:Needle DOWN 关闭:针下
Counter key
计数器键
Get the present counter value display
获取当前的计数器数值显示
Start Back-Tacking
ON / OFF
起始回缝 开/关
End Back-Tacking
ON / OFF
终止回缝 开/关
Sewing pattern change key
车缝模式切换键
(See 4.1.8 How to change
the sewing pattern)
(见 4.1.8 如何切换车缝模式)
Value set key 数值设置键
(See 4.1.3 How to change
the display in【Normal Mode】)
(见 4.1.3 如何改变显示器内容
【一般模式】)
Contents display 功能显示
(See 4.1.3 How to change
the display in【Normal Mode】)
(见 4.1.3 如何改变显示内容【一般模式】
Value display 数值显示
(See 4.1.3 How to change
the display in【Normal Mode】)
(见 4.1.3 如何改变显示内容【一
般模式】)
GOLDEN WHEEL

- 7 -
4.1.3 How to change the display in 【Normal Mode】如何改变显示内容【一般模式】
Press key to change
『Maximum sewing speed display』
按键转换成『最高车缝速度显示』
Press key to change
『Number of stitches GH display』
按键改变『GH 段针数显示』
Press key to change
『Number of stitches EF display』
按 键转换成 EF 段显示
Press key to change
『Number of stitches ABCD display』
按 键转换成 ABCD 段显示
Motor rotation
direction icon
马达旋转方向图标
Maximum sewing speed display
最高车缝速度显示
Maximum sewing speed setting
(Setting ranges differ depending
on the sewing machine model.)
最高车缝速度设置
设置范围取决于缝纫机机型
『Maximum sewing speed display』最高车缝速度显示
『Number of stitches ABCD display』针数 ABCD 显示器
『Number of stitches EF display』EF 段针数显示
『Number of stitches GH display』针数 GH 显示器
※When the sewing pattern is
「Free sewing」,the display returns to
『Maximum sewing speed display』
当选择「自由缝制模式」时,显示转换为
『最高车缝速度』
Character "A" display
字符 A 显示
※When the sewing pattern is
「Constant stitch sewing / Bar-tack sewing」,
the display returns to
『Maximum sewing speed display』
当缝制模式为定寸缝/连续回缝时,显示
会转换成最高车速显示
Number of stitches A
A段针数
Number of stitches setting
针数设置
Setting range :0~9 stitches
范围设置:0~9针
Number of stitches E, F setting
EF段针数设置
Setting range :0~99 stitches
设置范围:0~99 针
(Depending on the sewing pattern,
the display may be only E.)
(根据缝制模式,显示可能只是 E)
Number of stitches G, H setting
Setting range :0~99 stitches
G,H 段针数设置
设置范围:0~99 针
Number of stitches B
B段针数
Number of stitches D
D段针数
Character "EF" display
字符 EF 显示
Number of stitches E display
E段针数 Number of stitches F
F段针数
Character "GH" display
字符 GH 显示
Number of stitches G
G段针数
Number of stitches H
H段针数
Number of stitches C
C段针数
GOLDEN WHEEL
- 8 -
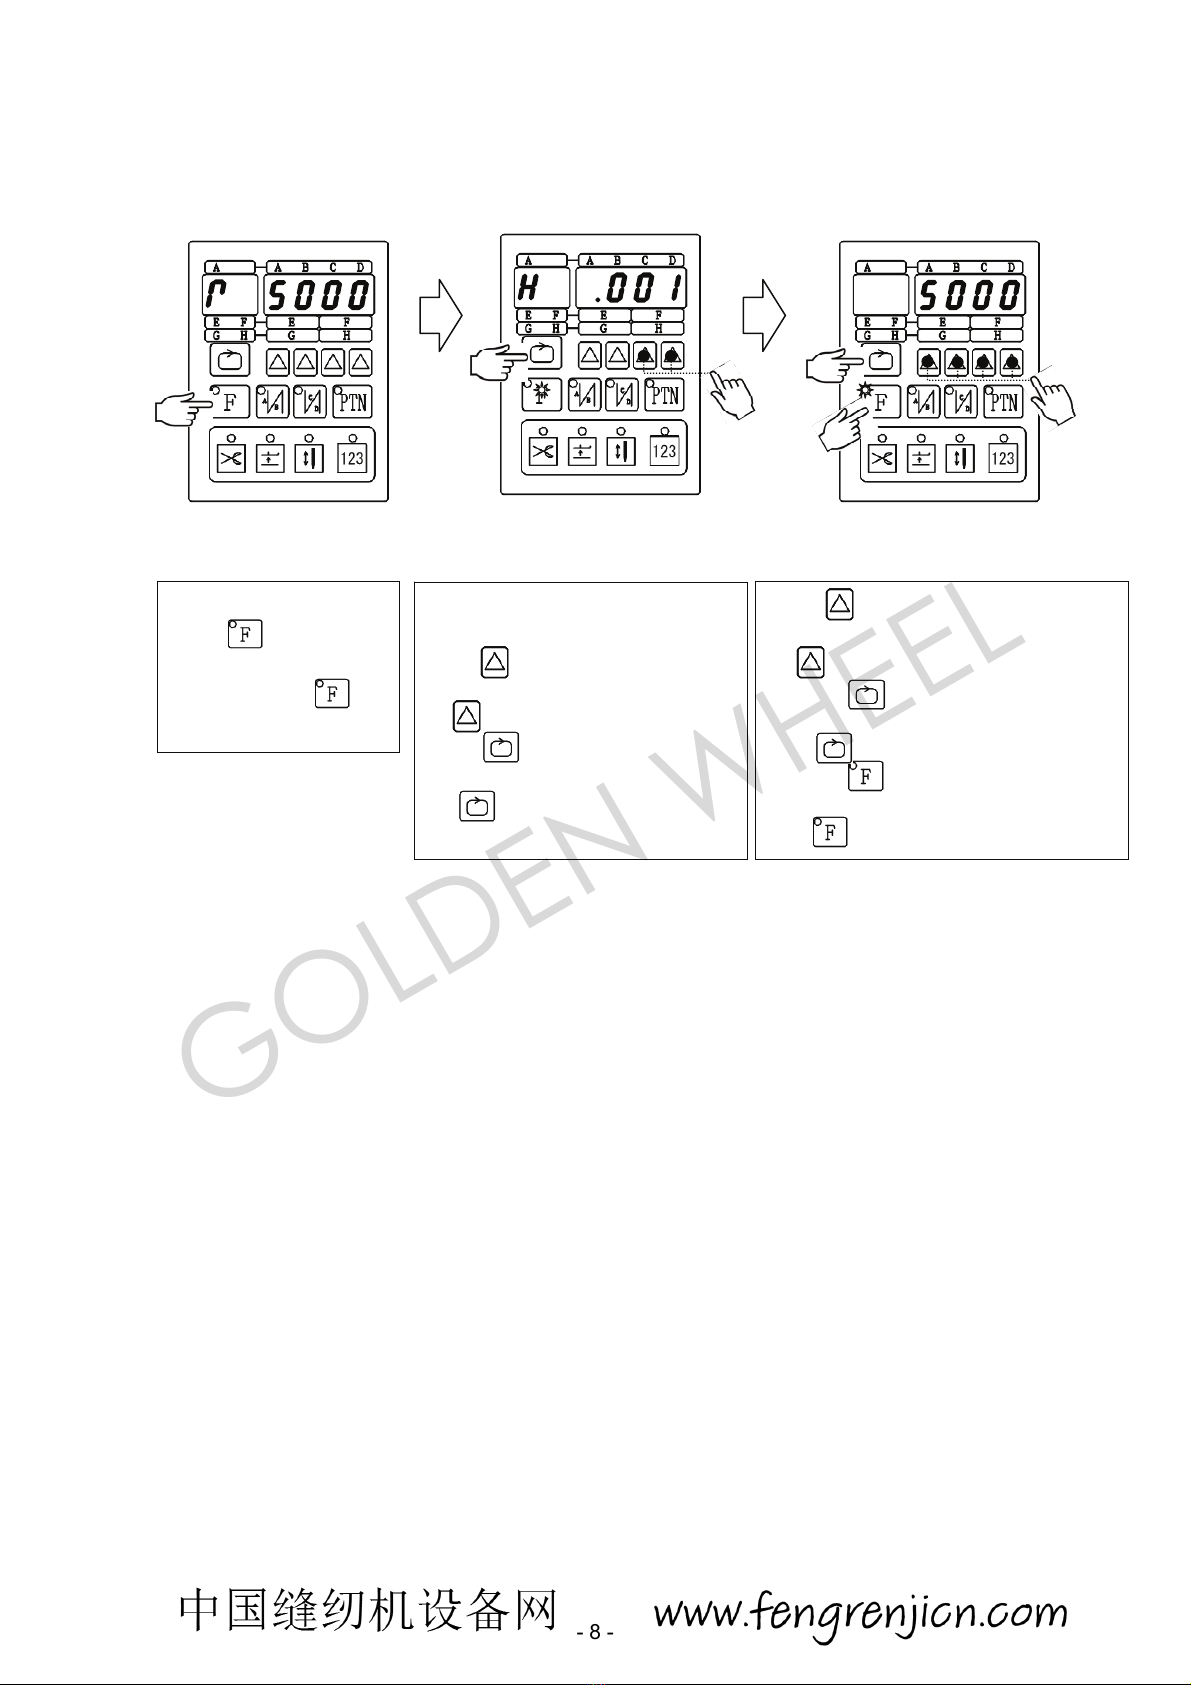
4.1.4 How to access【Parameter Mode A】(parameter codes:001~069)
如何设置模式 A的参数,参数码:001~069
Press key to make value adjustment.
After change of the value,
按键调整参数值。
(1) When key is pressed, it will display
the parameter codes.
按键显示参数。
(2) When key is pressed, it will go
back to【Normal mode】.
按 键返回到一般模式。
In the【Parameter Mode A】,
模式 A。
press key to get the parameter
code you need.
按按键得到需要的参数代码。
Press key will display the
value of the parameter.
按键会显示参数值。
In the【Normal mode】,
Press key to set in.
the【Parameter Mode A】.
在一般模式中按 键,
设置模式 A的参数。
1
2
GOLDEN WHEEL
- 9 -
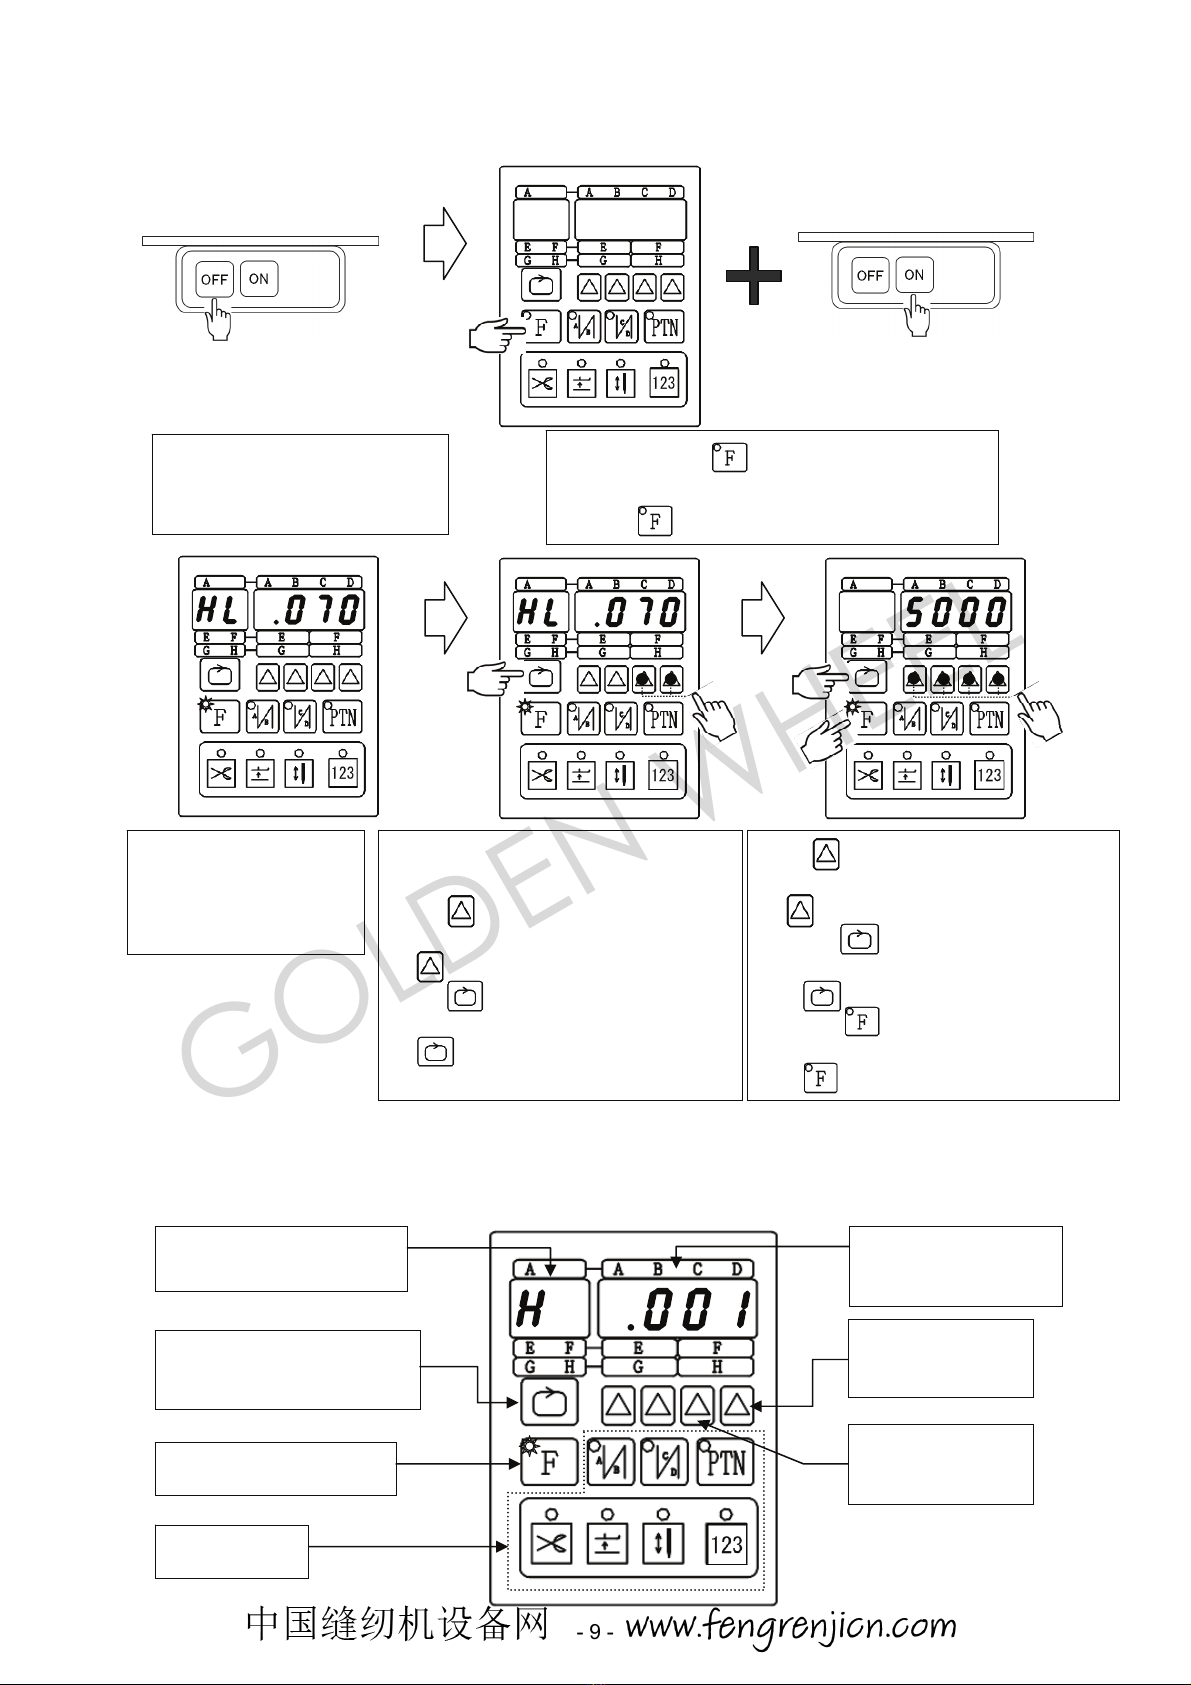
4.1.5 How to access【Parameter Mode B】(parameter codes:070~149)
如何进入模式 B的参数。(参数值:070~149)
4.1.6 Key functions in the【Parameter Mode A and B】: ( example as the following )
模式 A和B参数的主要功能
Press key to make value adjustment.
After change of the value,
按键调整参数值。
(1) When key is pressed, it will display
the parameter codes.
按键显示参数代码。
(2) When key is pressed, it will go
back to【Normal mode】.
按 键返回一般模式。
In the【Parameter Mode B】,
模式 B
press to get the parameter
code you need.
按键输入需要的参数代码
Press key will display the
value of the parameter
按 键.显示参数值。
Press and hold key and turn on the power.
『HL.070』is displayed.
按住按键 不要松开,打开电源。
If machine ON, Power OFF first.
如果机器在开启状态下,请首先关
闭电源。
Display change key 转换按键
(parameter codes/value)
Parameter mode key
参数模式按键
No Function
无功能
Parameter codes display
显示参数代码
Parameter No.& value
Display
显示参数
Parameter codes
decrement key
按键参数代码减少
Parameter codes
increment key
按键参数代码增加
The【Parameter Mode B】
is displayed
显示模式 B
1
2
GOLDEN WHEEL

- 10 -
4.1.7 How to access the parameter value and adjust the setting
如何进入参数和调整设置
Step1:Confirm the parameter code you want to make adjust. ( see 5.General Parameter List )
确定需要调整的参数(参照 5号主参数表)
Step 2:Display the parameter value in the Parameter Mode. 显示参数值。
Step 3:Press key to make value adjustment. 按键调整数值。
Step 4:Press key to set the parameter value. 按键设置参数。
Step 5:Press key to go back to【Normal mode】. 按键返回。
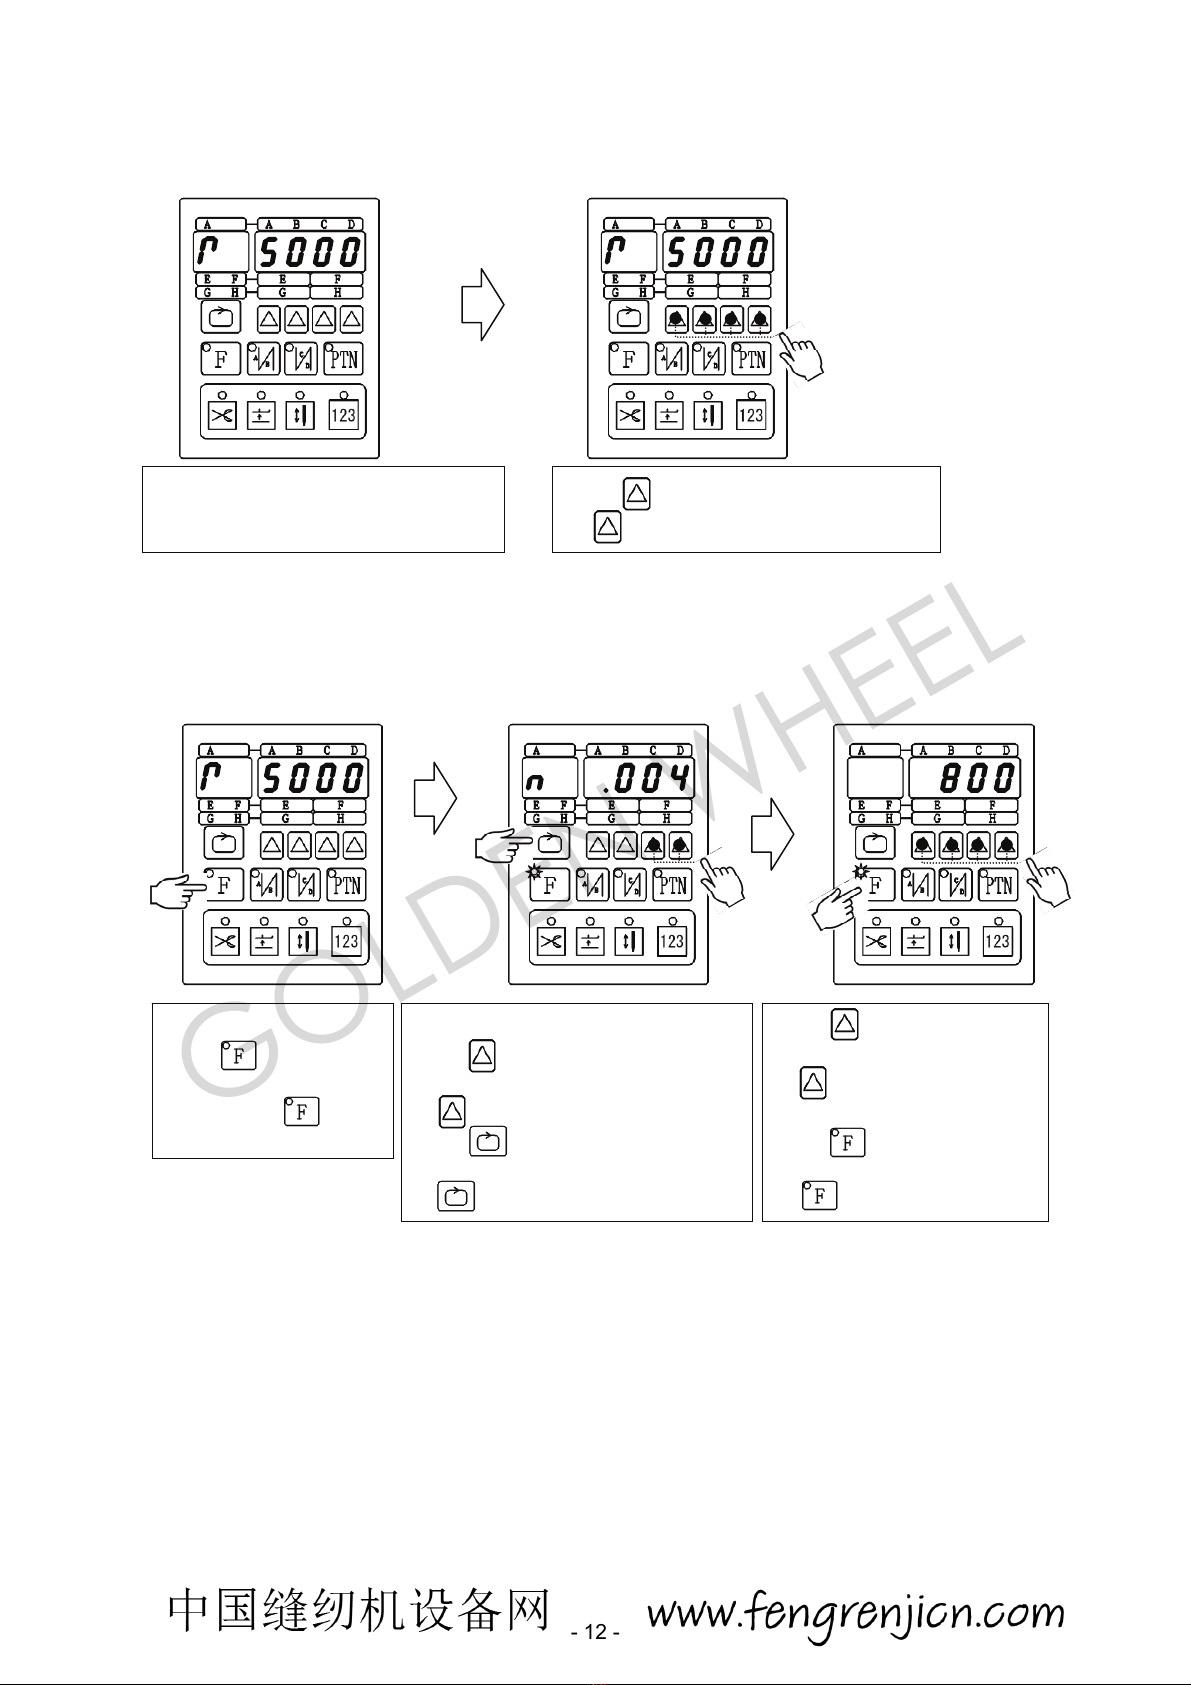
Example.【001.H】:Maximum sewing speed setting『5000』decrease to『3000』。
例子. 【001.H】:最高缝制速度,设定 5000 降低到 3000。
See 4.1.4, 4.1.5 to display the parameter value in the Parameter Mode.
按4.1.4,4.1.5,显示参数数值。
Press key.
按键
Press (100th) key to
increase the value to 3000.
按键设置为 3000。
Press key to set
the parameter value
按 键。确认
Press (1000th) key to
Increase the value.
按键减小数值。
Press (1000th) key to
increase the value to 3200.
按设置为 3200。
【5000】
Maximum sewing speed display
显示最高缝制速度。
The value is set to
200.
设置为 200。
Go back to
parameter codes display.
返回参数码显示。
Go back to【Normal Mode】.
返回一般模式。
GOLDEN WHEEL
- 11 -
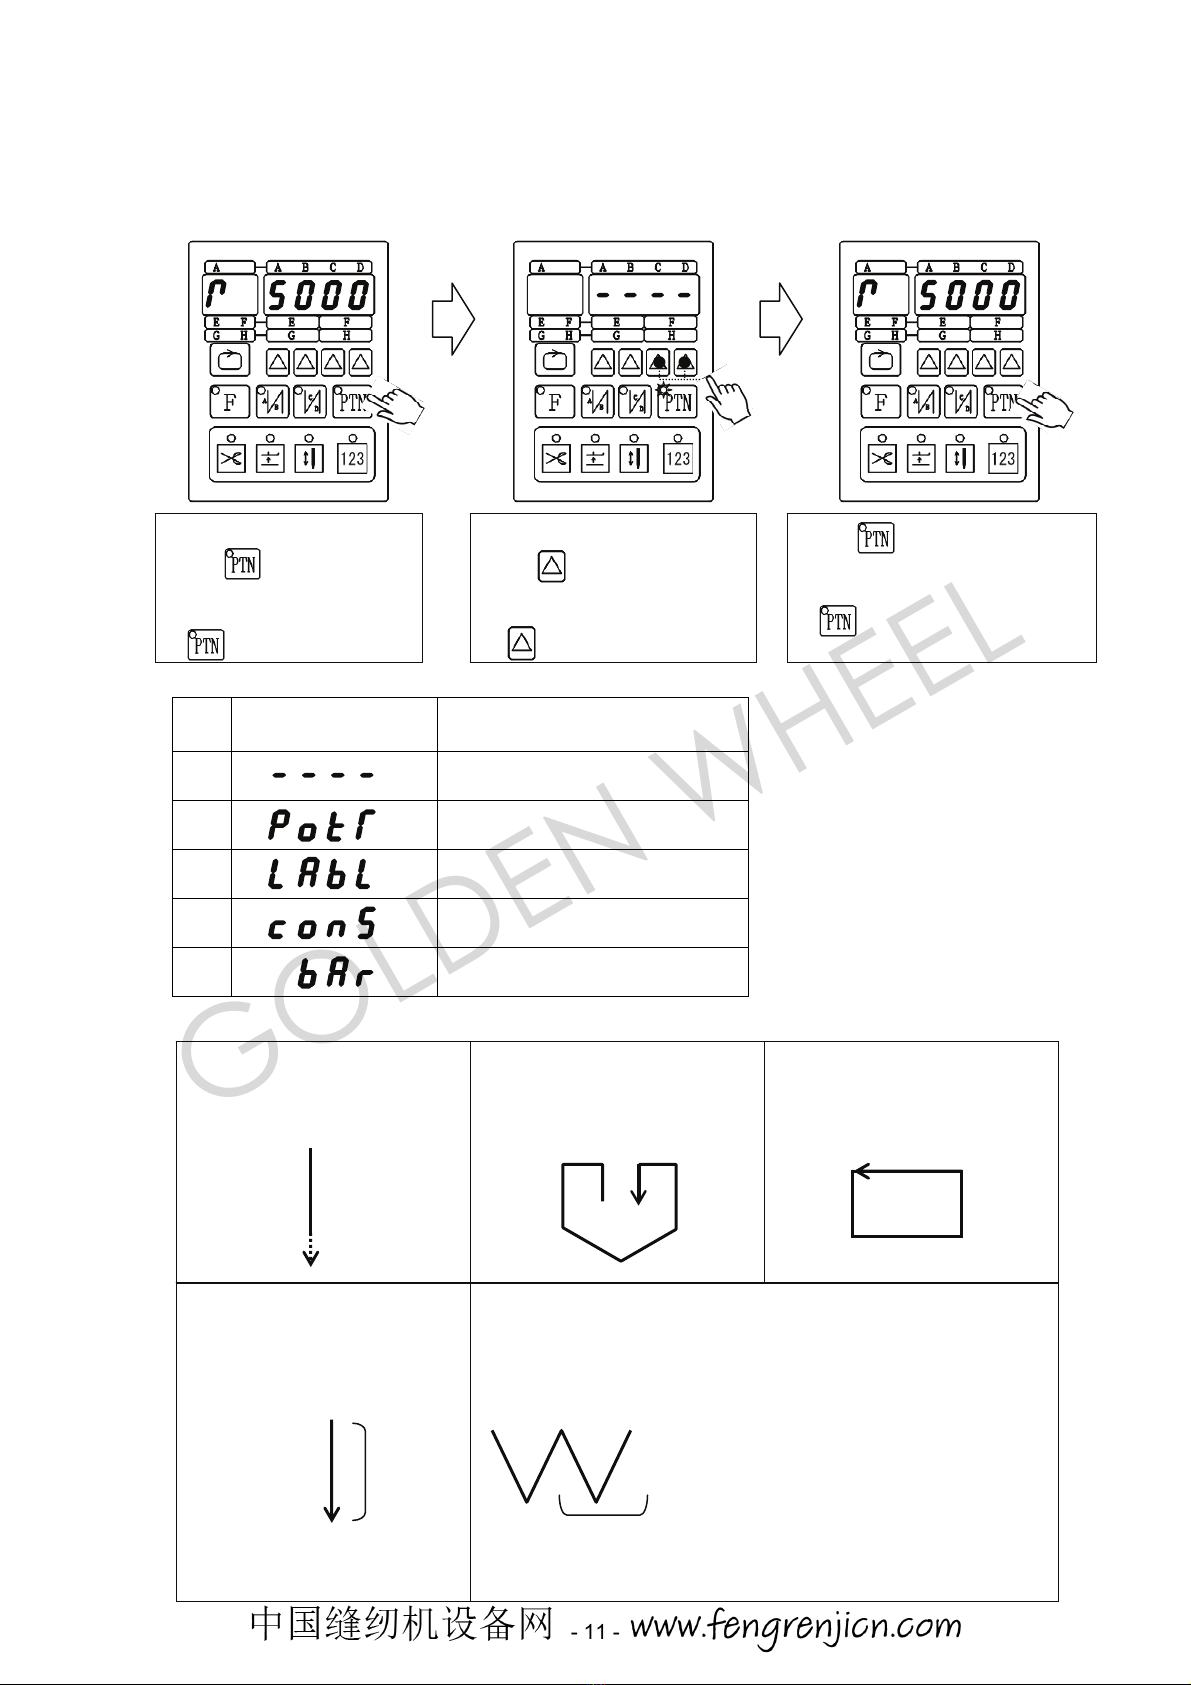
4.1.8 How to change the sewing pattern
如何更改缝制图案模式
(Free sewing / Pocket sewing / Label sewing / Constant stitch sewing / Bar-tack sewing)
(自由缝制 / 口袋缝 / 标签缝 / 定寸缝 / 连续回缝)
Display characters of the sewing pattern 图案模式的显示标志.
Display Characters
显示
Sewing Pattern
图案
①
Free sewing
自由缝
②
Pocket sewing
口袋缝
③
Label sewing
标签缝
④
Constant stitch sewing
定寸缝
⑤
Bar-tack sewing
连续回缝
The kind of sewing pattern 图样种类
When key is pressed,
the sewing pattern will be set
and return to the 【Normal mode】.
按键确定,并返回一般模式。
In the【Pattern select mode】,
press key to change the
sewing pattern
在图案选择模式
按键更改图案模式。
In the【Normal mode】,
Press key to set in
the【Pattern select mode】.
在一般模式
按键进入选择图案介面。
①Free sewing 自由缝
When the treadle is toeing down,
machine carries out sewing.
踏下踏板机器开始缝制。
② Pocket sewing 口袋缝
The setup number of stitches
E, F, G and H are sewn.
设定 E,F,G 和H阶段的缝制针数。
③ Label sewing 标签缝
The setup number of stitches
E, F, G and H are sewn.
设定 E,F,G 和H阶段的缝制针数。
⑤Bar-tack sewing 连续回缝
The setup number of stitches A, B, C and D
设定 A,B,C,D 的针数和 E的阶段的来回次数。
( the number of times E of a repetition ) are sewn.
④Constant stitch sewing
定寸缝
The setup number of stitches
E are sewn.
设定针数。
F F
E E
G G
H H
E G
H
F
E A D
B C
E
The number of times of a repetition:
来回次数:
The one section is counted with 1 time.
一来一回算一次。
The sewing is repeated as
A→B→C→D→C→D→…
GOLDEN WHEEL
- 12 -
4.2 How to change the sewing speed 如何更改缝制速度
4.2.1 How to change the Maximum sewing speed 如何更改最高缝制速度
4.2.2 How to change the Start back-tacking speed 如何更改起始回缝速度
Press key to make value
Adjustment.
按键修改参数值。
After change of the value
press key to go back
to【Normal mode】.
按键返回。
In the【Parameter Mode A】,模式 A
press key to get the parameter
code『n.004』.
按键设置参数『n.004』。
Press key will display the
value of the parameter.
按键显示参数。
In the【Normal mode】,
press key to set in
the【Parameter Mode A】.
一般模式中按 键进入
模式 A参数设置。
Press key to make value adjustment.
按键调整参数。
In the【Normal mode】, to set in the
『Maximum sewing speed display』
在一般模式,设置最高缝制速度。
(See 4.1.3 How to change the display in【Normal Mode】)
(请参照 4.1.3 如何改变显示内容在【一般模式】)
GOLDEN WHEEL

- 13 -
4.2.3 How to change the End back-tacking speed 如何修改结束回缝速度
4.3 Setting the back-tack and pattern sewing 设置回缝图样及缝制模式
4.3.1 Setting the Start / End back-tacking 设置起始/结束回缝
Press key to set
the『Number of stitches ABCD display』.
按键显示 ABCD 针数。
Press key to set the number of stitches C,D.
按键设置 CD
针
数。
In the【Normal mode】,
when key is pressed,
『End back-tacking』set to ON.
按键设置结束回缝。
Press key to set
the『Number of stitches ABCD display』.
按键显示 ABCD 针数。
Press key to set the number of stitches A,B.
按键设置 A,B针数。
In the【Normal mode】,
when key is pressed,
『Start back-tacking』set to ON.
按键设置起始回缝。
Press key to make value
Adjustment.
按键修改参数值。
After change of the value
press key to go back
to【Normal mode】.
按键返回。
In the【Parameter Mode A】,模式 A
press key to get the parameter
code『v.005』.
按键进入参数(v.005)。
Press key will display the
value of the parameter.
按键显示参数值。
In the【Normal mode】,
Press key to set in
the【Parameter Mode A】.
按键设置模式 A参数。
A B
D C
GOLDEN WHEEL

- 14 -
4.3.2 Setting the Bar-tack sewing 设置连续回缝
( 1 ) Set the pattern to Bar-tack sewing. 进入连续回缝模式
( 2 ) Set the number of stitches and the number of times of repetition. 设置针数和来回往复次数。
Press key to set
按键显示 EF 针数
the 『Number of stitches EF display』.
Press key to set the number of
times of repetition E.
按键设置 E往复次数。
In the【Normal mode】,
press key to set
按键显示 ABCD 针数
the『Number of stitches ABCD display』.
Press key to set the number of
stitches A,B,C,D.
按键设置 ABCD 针数。
When key is pressed,
『Bar-tack sewing』will be set
and return to the 【Normal mode】.
按键确认后,并返回一般模式。
In the【Pattern select mode】,
press key to change the
display『bAr』.(『bAr』:Bar-tack
sewing)
在图案选择模式下,按键选
择『bAr』。(连续回缝模式)
In the【Normal mode】,
Press key to set in
the【Pattern select mode】.
在一般模式下 按键进入图选择
模式。
A D
B C
E
GOLDEN WHEEL

- 15 -
4.3.3 Setting the Constant stitch sewing 设置定寸缝
( 1 ) Set the pattern to Constant stitch sewing. 进入定寸缝模式.
( 2 ) Set the number of stitches. 缝制针数设置
4.3.4 Setting the Pocket sewing 口袋缝制模式设置
( 1 ) Set the pattern to Pocket sewing. 进入口袋缝制模式
When key is pressed,
『Pocket sewing』will be set
and return to the 【Normal mode】.
按键确认后,返回一般模式。
In the【Pattern select mode】,
press key to change the
display『PoKT』.
(『PoKT』:Pocket sewing)
在图案选择模式下按 键
选择『PoKT』口袋缝制模式。
In the【Normal mode】,
Press key to set in
the【Pattern select mode】.
在一般模式下,按键进入
图案选择模式。
In the【Normal mode】, 在一般模式
Press keytoset 按键设置
the『Number of stitches EF display』. EF段针数显示
Press key to set the number of stitches E. 按键设置 E段针数。
When key is pressed,
『Constant stitch sewing』will be set
and return to the 【Normal mode】.
按键确认并返回一般模式。
In the【Pattern select mode】,
press key to change the
display (『 conS 』: Constant stitch
sewing)
在图案选择模式下,按 键选择
『conS』定寸缝制模式。
In the【Normal mode】,
Press key to set in
the【Pattern select mode】.
在一般模式下,按 键进入图案选
择模式。
E
Sewing of the number of stitch
E is carried out, and it stops.
E段是从缝制开始到结束的针数
GOLDEN WHEEL
- 16 -
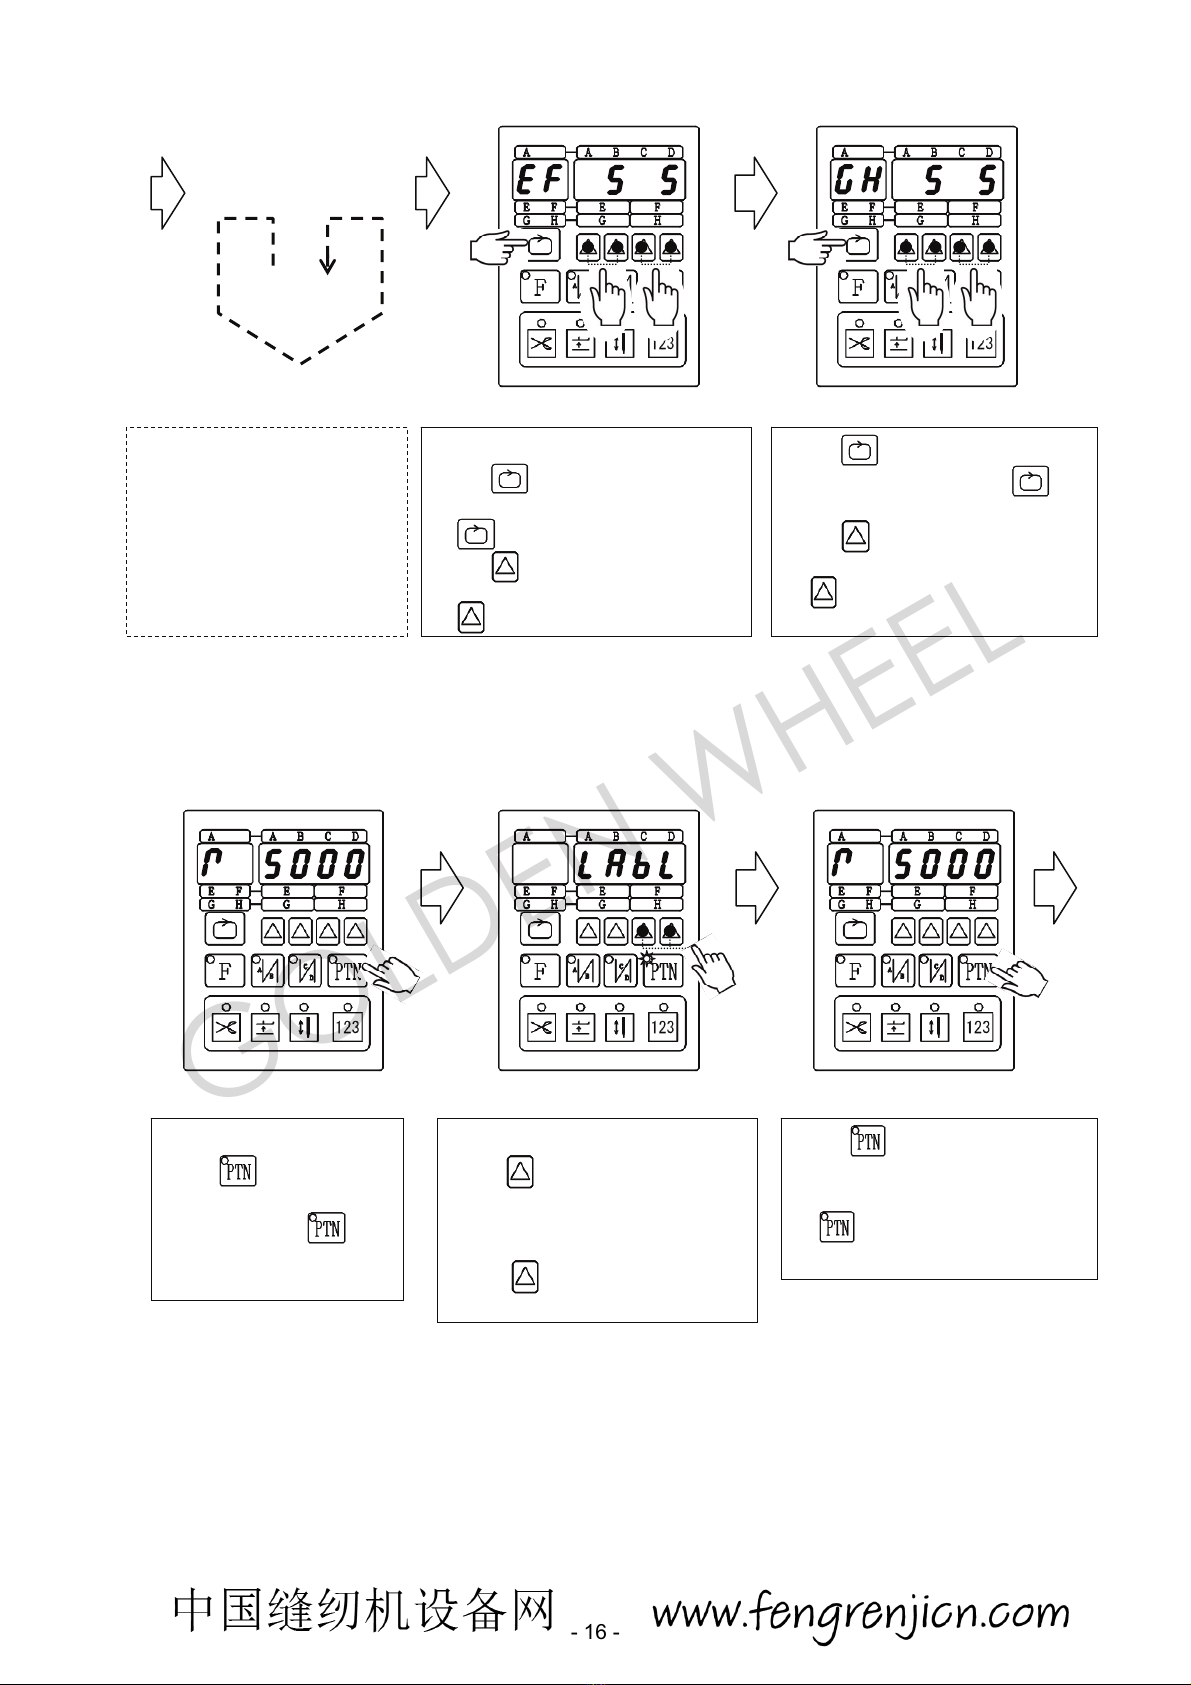
( 2 ) Set the number of stitches. 针数设置
4.3.5 Setting the Label sewing 设置标签缝制模式
( 1 ) Set the pattern to Label sewing. 进入标签缝制模式
In the【Normal mode】,
Press key to set in
the【Pattern select mode】.
在一般模式下,按键进
入图案选择模式。
In the【Pattern select mode】,
press key to change the
display『LAbL』.
(『LAbL』:Label sewing)
图案选择模式,
切换按 键设置『LAbL』标签缝制
模式。
When key is pressed,
『Label sewing』will be set
and return to the 【Normal mode】.
按键确认后返回到一般模式。
Press key to set the『Number
of stitches GH display』. 按 键进
入GH 段针数设置模式
Press key to set the number of
stitches G, H.
按键设置 G,H段针数。
In the【Normal mode】,一般模式下
Press key to set the『Number of
stitches EF display』.
按 键进入 EF 段针数设置模式.
Press key to set the number of
stitches E, F。
按键设置 E,F段针数。
Sewing is carried out to the
order of section
E→F→G→H
→H→G→F→E.
缝制按 E→F→G→H
→H→G→F→E段进行缝制
Sewing stops for every section.
每段缝制时都可以停车
E E
F F
G G
H H
GOLDEN WHEEL

- 17 -
( 2 ) Set the number of stitches. 针数设置
4.4 Setting the direction of motor rotation 马达旋转方向设置
Press and hold key and turn on the power.
按住 键再打开电源开关。
The【Parameter Mode B】is displayed.
进入参数 B模式。
In the【Parameter Mode B】, 在参数 B模式下,
press key to get the parameter
code『dir.071』. 按键选择参数代码『dir.071』。
Press key will display the
value of the parameter. 按键显示参数值。
Press key to select CCW or CW.
按键选择CCW或CW。
After change of the value
press key to go back to【Normal mode】.
按键确认后,返回一般模式。
In the【Normal mode】,
Press key to set
the『Number of stitches EF display』.
Press key to set the number of
stitches E,F.
在一般模式下, 按键进入。
E,F段针数设置模式。按 键进行
E,F段针数设置。
Press key to set
the 『Number of stitches GH display』.
Press key to set the number of
stitches G,H.
按键进入 G,H段针数设置模式,
按键设置 G,H段针数。
If machine ON, Power OFF first.
如果机器开启的状态下,请首先关闭
电源。
Sewing is carried out to the
order of section
E→F→G→H
缝制按 E→F→G→H进行缝
制。
Sewing stops for every
section.
每段缝制时都可以停车。
E G
H
F
GOLDEN WHEEL
Table of contents
Popular Engine manuals by other brands

KUKJE MACHINERY
KUKJE MACHINERY A1000 Service manual

Schartec
Schartec Tube FE Installation and operating instructions

Piusi
Piusi V100 Instructions for installation, use and maintenance manual

Standard Pump
Standard Pump SP-430EX Operations & parts manual

Lister Petter
Lister Petter GW3 Operator's handbook

BRP
BRP ROTAX ACE 130 Operator's guide


