Cheerlux C50 User manual

The content of this manual are subject to change without notice
- 1 -
SAFETY PRECAUTIONS
Read these safety instructions before using your device and store them for
possible future reference.
If the cord is damaged, have it repaired by the manufacturer, it’s service or a
similarly qualified person in order to avoid any hazard.
The cord should always be readily accessible.
The apparatus shall not be exposed to dripping or splashing of water or liquids
and that no objects filled with liquids such as flowers vases shall be placed on
the product.
The normal ventilation of the product shall not be impended for intended use.
Always leave a minimum distance of 10 cm around the unit to ensure sufficient
ventilation.
Open flame sources, such as candles, should not be placed on top of the
device.
The device is intended for use only in a temperate climate.
The ventilation should not be impeded by covering the ventilation openings
with items, such as newspapers, table-cloths,curtains, etc
CAUTION: to avoid accident, this appliance must be fixed properly on the floor
or on the wall according to instructions for installation.
CAUTION: Danger of explosion if batteries are incorrectly replaced or not
replaced by the same type or equivalent.
Don't look straight into the light from the projector lens.
Direct burst of intensive light can harm your eyes and cause severe damage
to eyes of infants.
INTERFERENCE All wireless devices are susceptible to interference
which may affect their performance.
AUTHORIZED PERSONNEL Only qualified people are authorized to
install or repair this product.

The content of this manual are subject to change without notice
- 2 -
ACCESSORIES Only use batteries, chargers and other accessories
which are compatible with this equipment. Do not connect incompatible
products.
CONTENTS
►VISUAL INSTRUCTIONS..........................................................................................03
• Top View......................................................................................................................03
• Bottom View................................................................................................................ 04
• Side View.....................................................................................................................05
• Rear View.................................................................................................................... 06
• Remote Control.......................................................................................................... 07
►Projection Distance and Size................................................................................ 08
►How to Use..................................................................................................................09
Before Starting.............................................................................................................. 10
Power Plug.....................................................................................................................10
Power Button................................................................................................................. 11
Keystone and Focus.................................................................................................... 12
Multimedia Connection................................................................................................ 13
►ACCESSORIES LIST................................................................................................ 19
►Multimedia File Specification................................................................................ 14
►WARRANTY CARD................................................................................................... 20

The content of this manual are subject to change without notice
- 3 -
Manual Focus
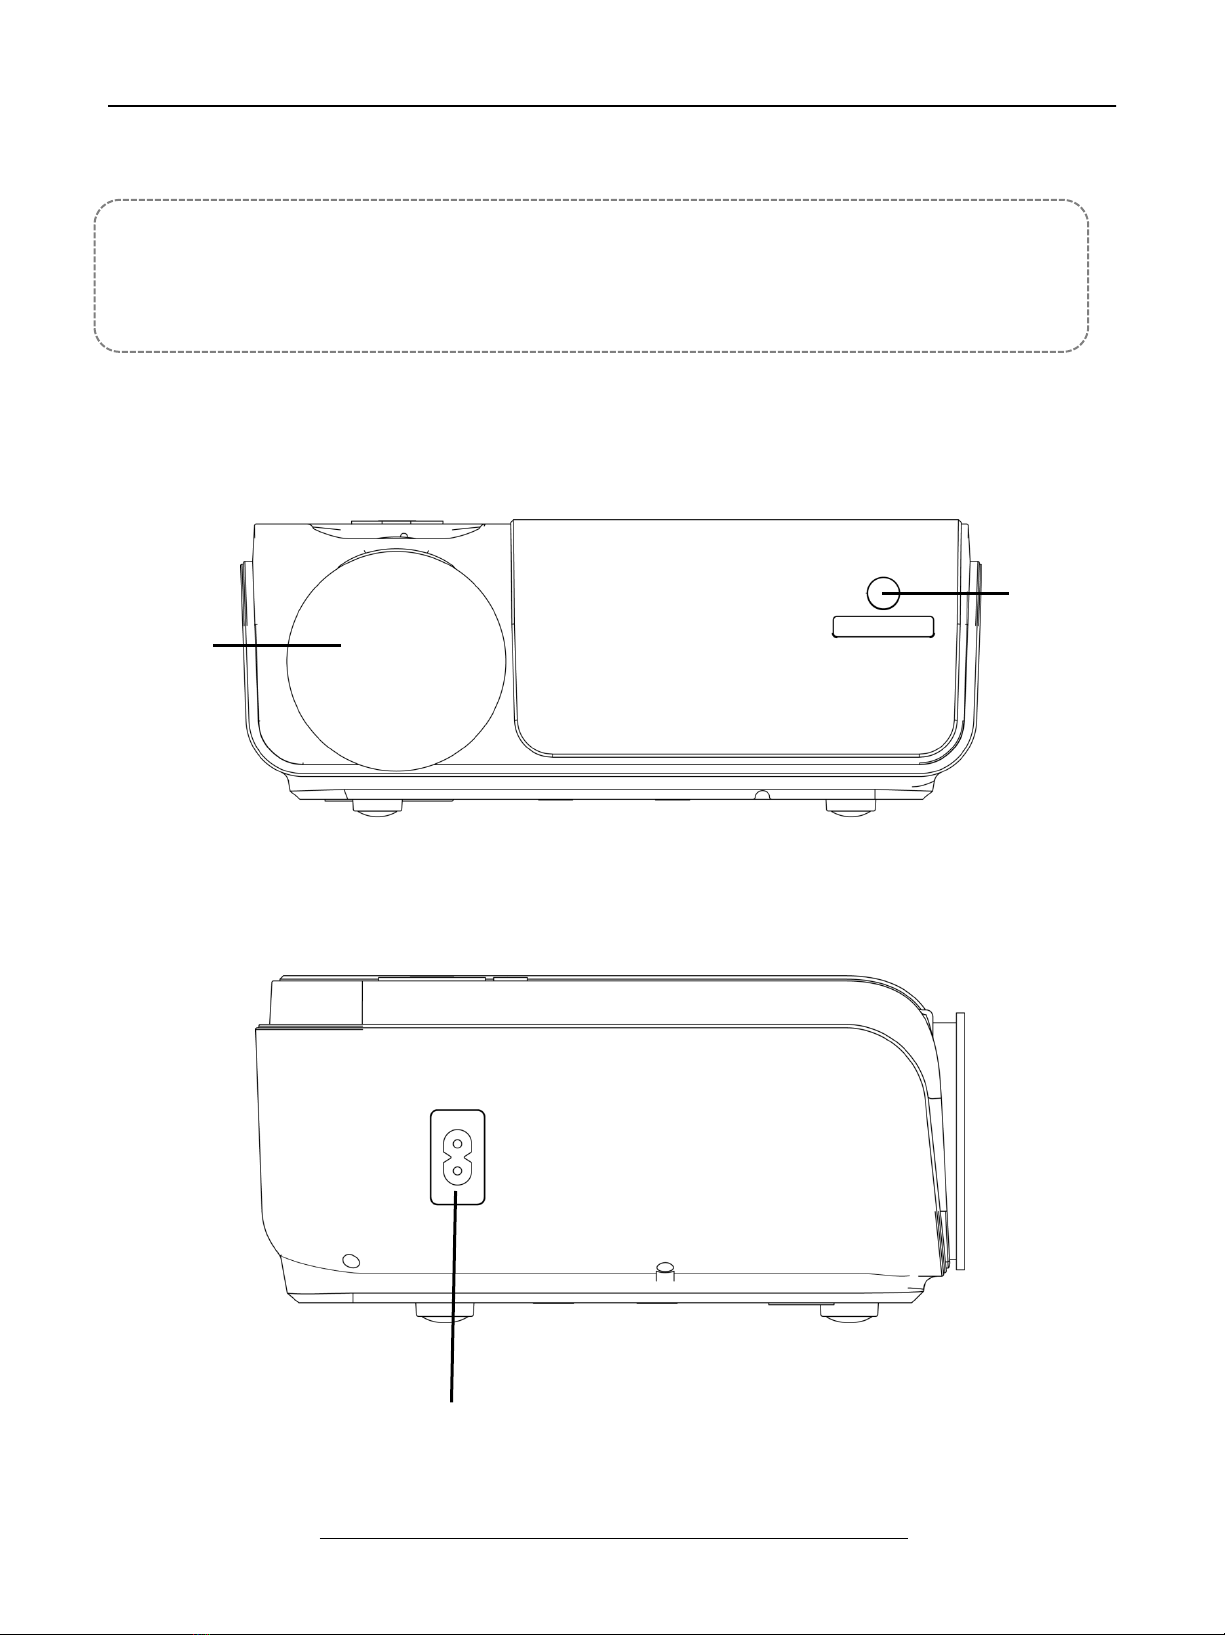
► VISUAL INSTRUCTIONS
• Top View
Control Panel
Keystone Correction knob

The content of this manual are subject to change without notice
- 4 -
Support Base thread
• Control Panel
•
Bottom View
❶❷ -- For Ceiling Mount
Power / Return
Indicator Light
Menu / Up
OK Button ( Select/confirm/enter)
Source / Down
Left / Volume +
Right / Volume -
❶
❷
The content of this manual are subject to change without notice
- 5 -
Remark:
The adjustable support base can assure the max projection angle by 15°,
The best display effect will be obtained by projection angle ranges of 0° - 8°.
•
Front View
•
Side View
A. Left Side
Lens
IR Receiver
Power cable Socket
The content of this manual are subject to change without notice
- 6 -
❸
B. Right Side
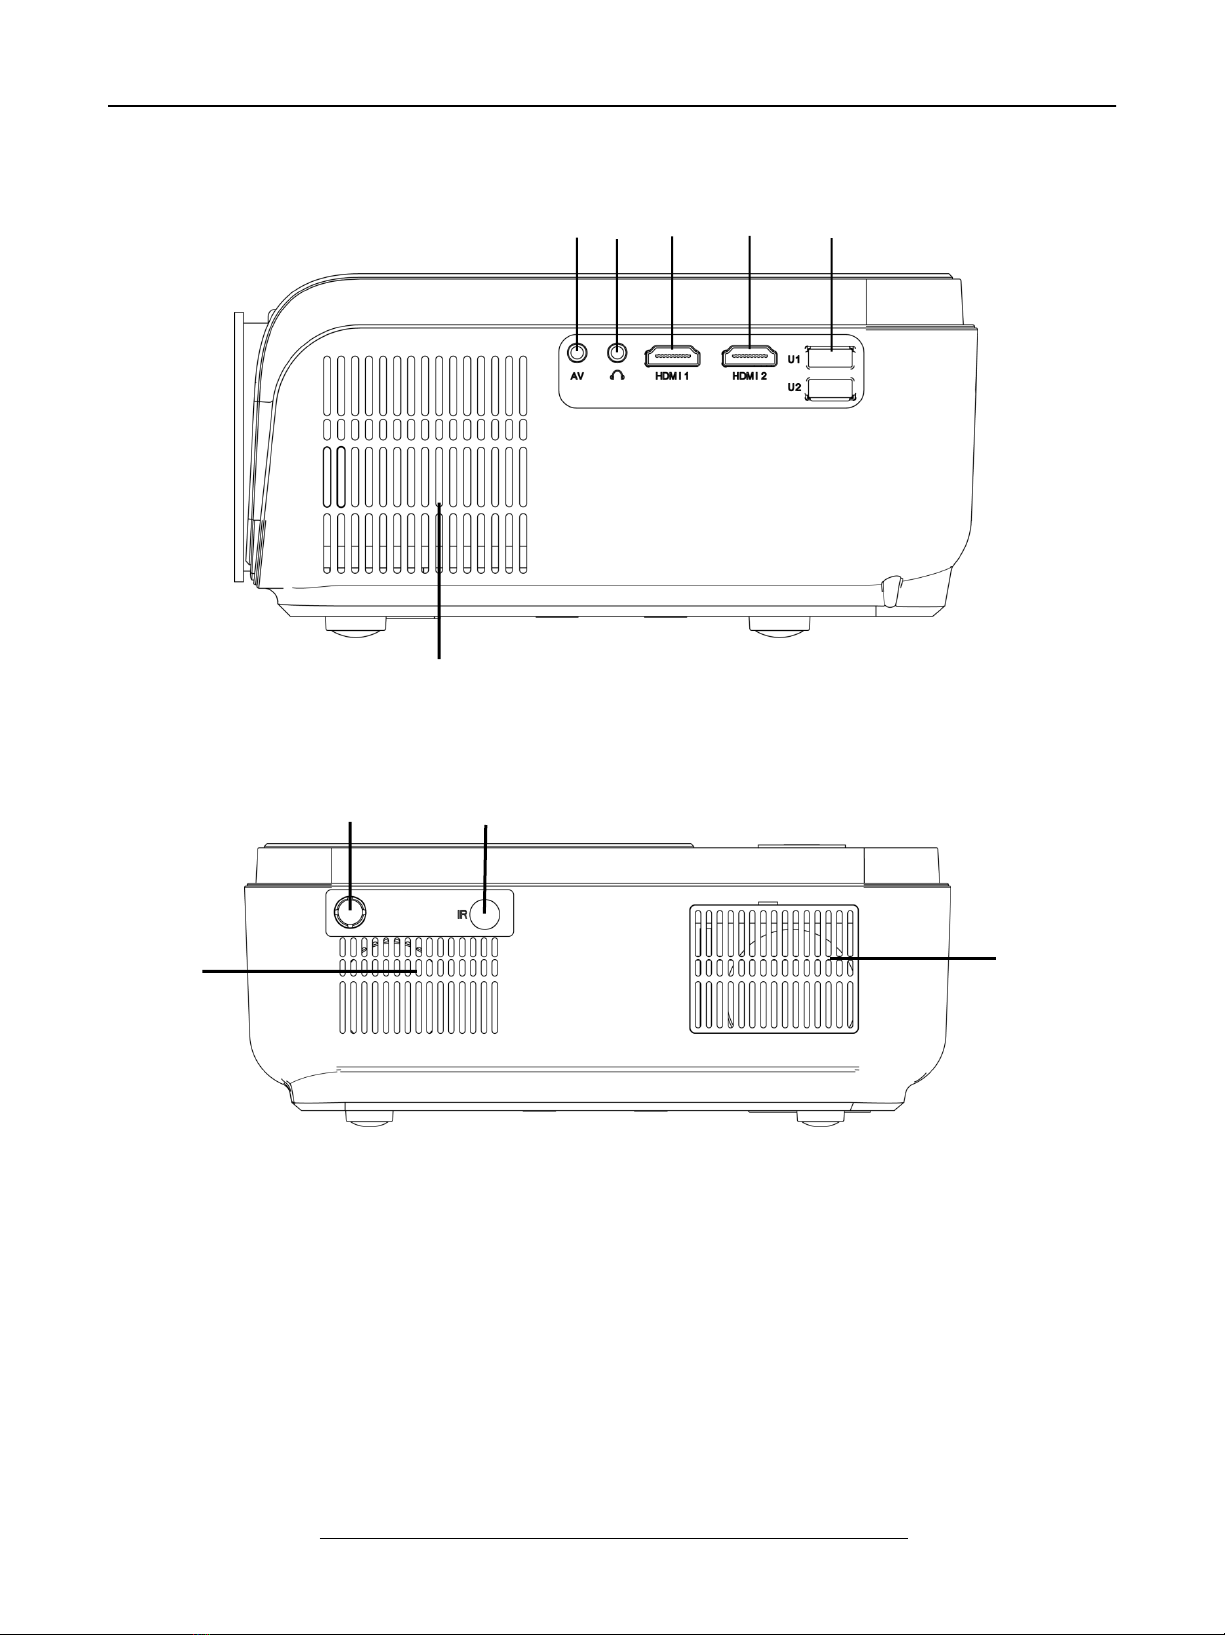
•
Rear View
❶ AV Input ❷ Headphone Output ( 3.5mm )
❸ HDMI 1 Input ❹ HDMI 2 Input
❺ USB ( 2.0 ) Input x 2 ❻ Analog TV Tuner ( Optional Function )
❼ IR Receiver ❽ Ventilation Inlet
❾ Speaker ❿ Ventilation Outlet
❶
❷
❹
❺
❻
❼
❽
❾
❿
The content of this manual are subject to change without notice
- 7 -
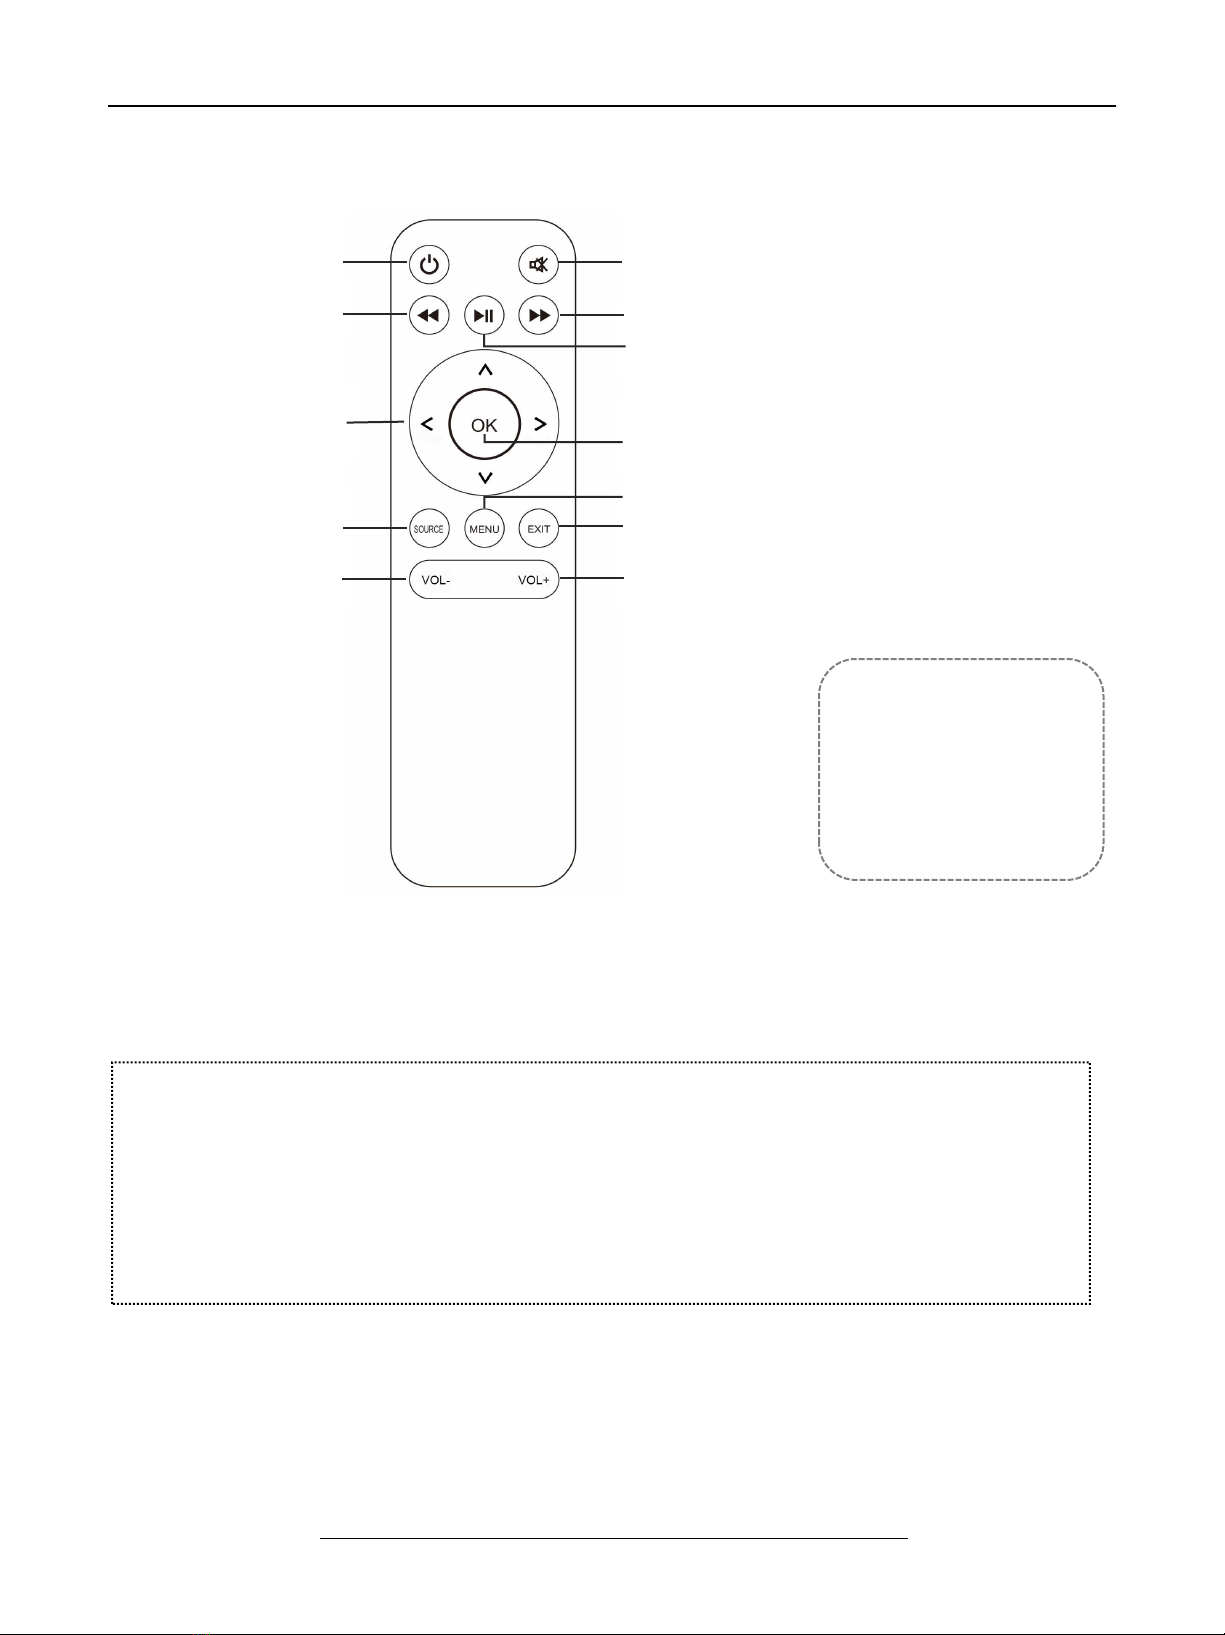
Note: While using
the remote control,
point it toward IR
receiver.
•
Remote Control
Power Button
Mute
Backward
Home / Play
Arrow Keys
Enter
Source
Return
Menu
Voice -
Voice +
Forward
Installation And Mounting
Before using your device, select an appropriate spot for the projector, Brightness of the
room is crucial to quality of the image projected, Reduce the external brightness Follow
instructions and hints below for optimum usage.
The content of this manual are subject to change without notice
- 8 -
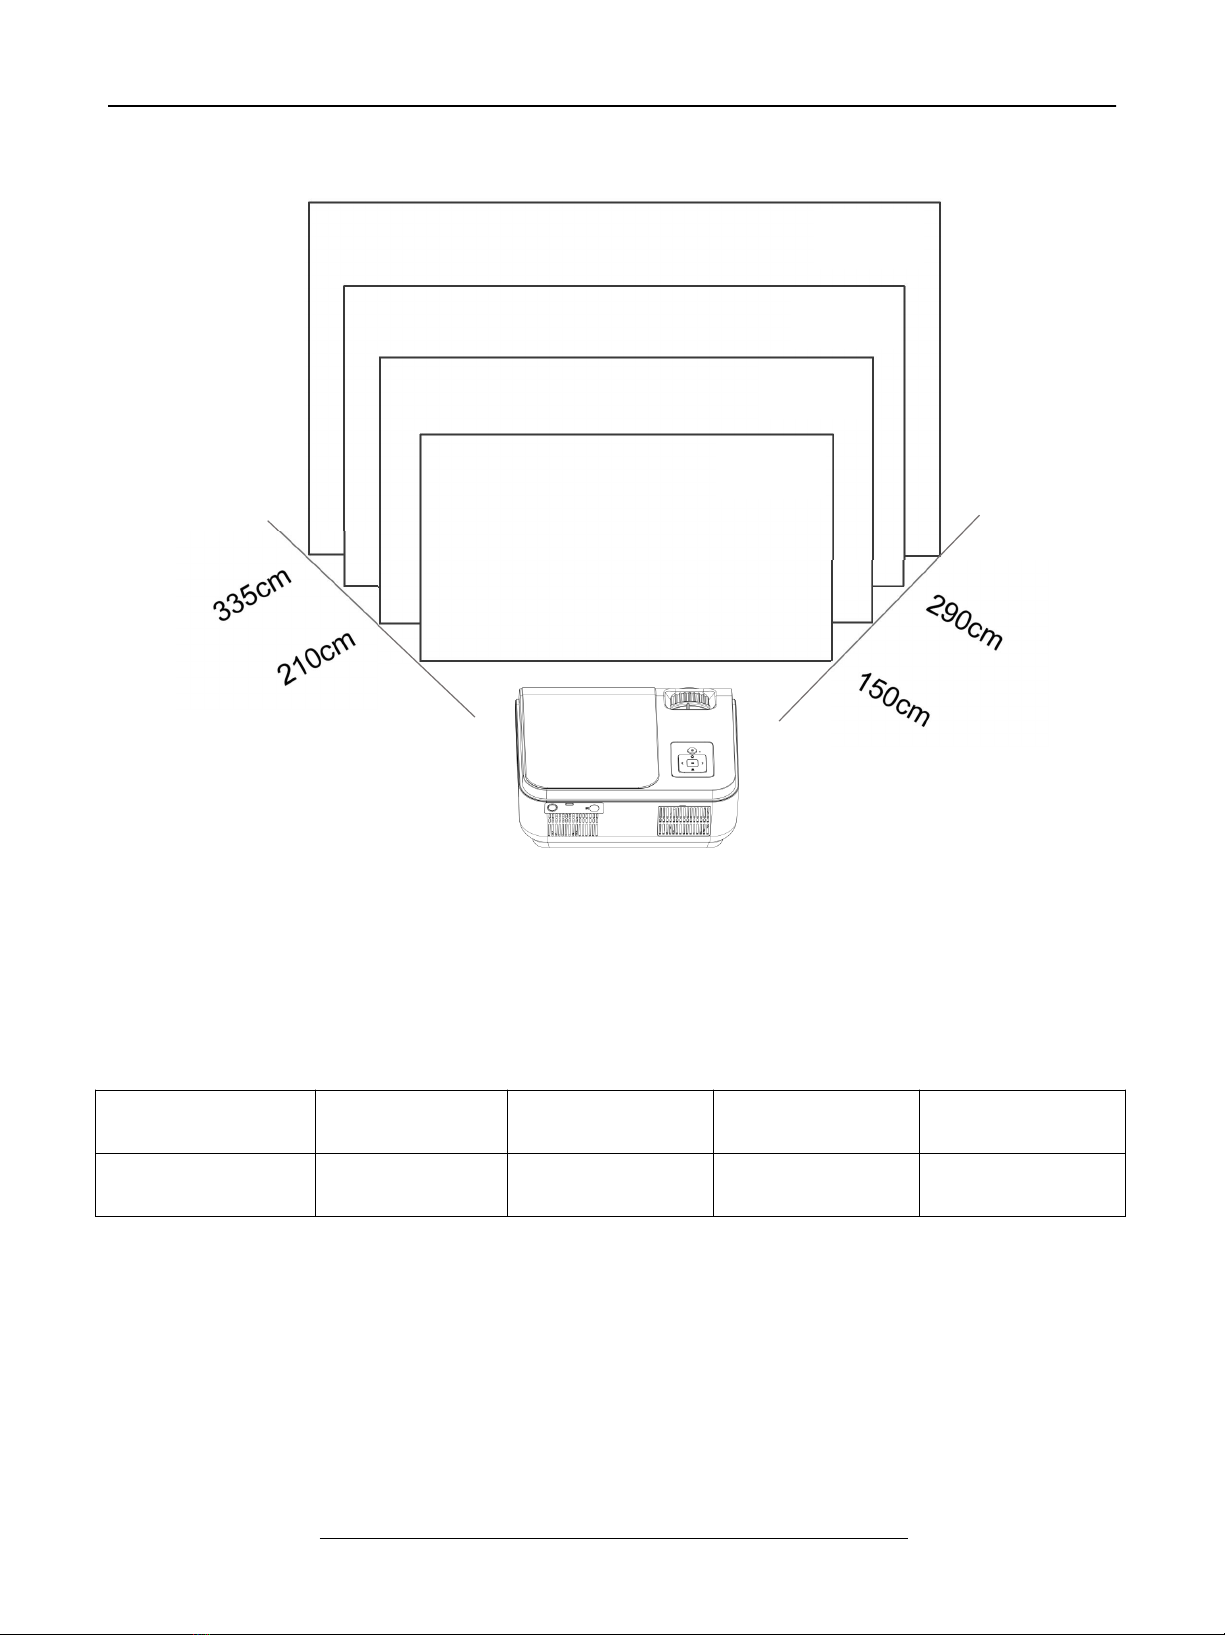
► Projection Distance and Size
( Aspect Ratio: 16 : 9, Default )
Please follow the data in chart below, to adjust the image size and the distance.
Distance provided is measured from lens to projected surface.
The image size depends on the distance between projector and screen,
there may be 3% deviation among above listed data. Different
settings cause
various distances.
Projection size
50 inch
72 inch
100 inch
120 inch
16 : 9
1.50 m
2.10 m
2.90 m
3.35 m
50˝
120˝
100˝
72˝

The content of this manual are subject to change without notice
- 9 -
► How to Use
①Before starting up the projector. Follow figure below to adjust trapezoid
correction. Keep the projector vertical with projector screen and keep it on the
same level.
For Ceiling Mount : Select display image rotation, options available are : front (on desk),
rear, front / ceiling, rear / ceiling, see picture below: Before that. You needs compatible
mount, and for rear projection, it required a special projection screen.
,
I
I
.
`
I
I

The content of this manual are subject to change without notice
- 10 -
②Connect the power plug as following picture, connect with the electricity, The
indicator light will turn to red.
Note: Pictures are only for your reference, different countries got different
power plug, please contact your supplier for more details, better connect the
projector first.
The content of this manual are subject to change without notice
- 11 -
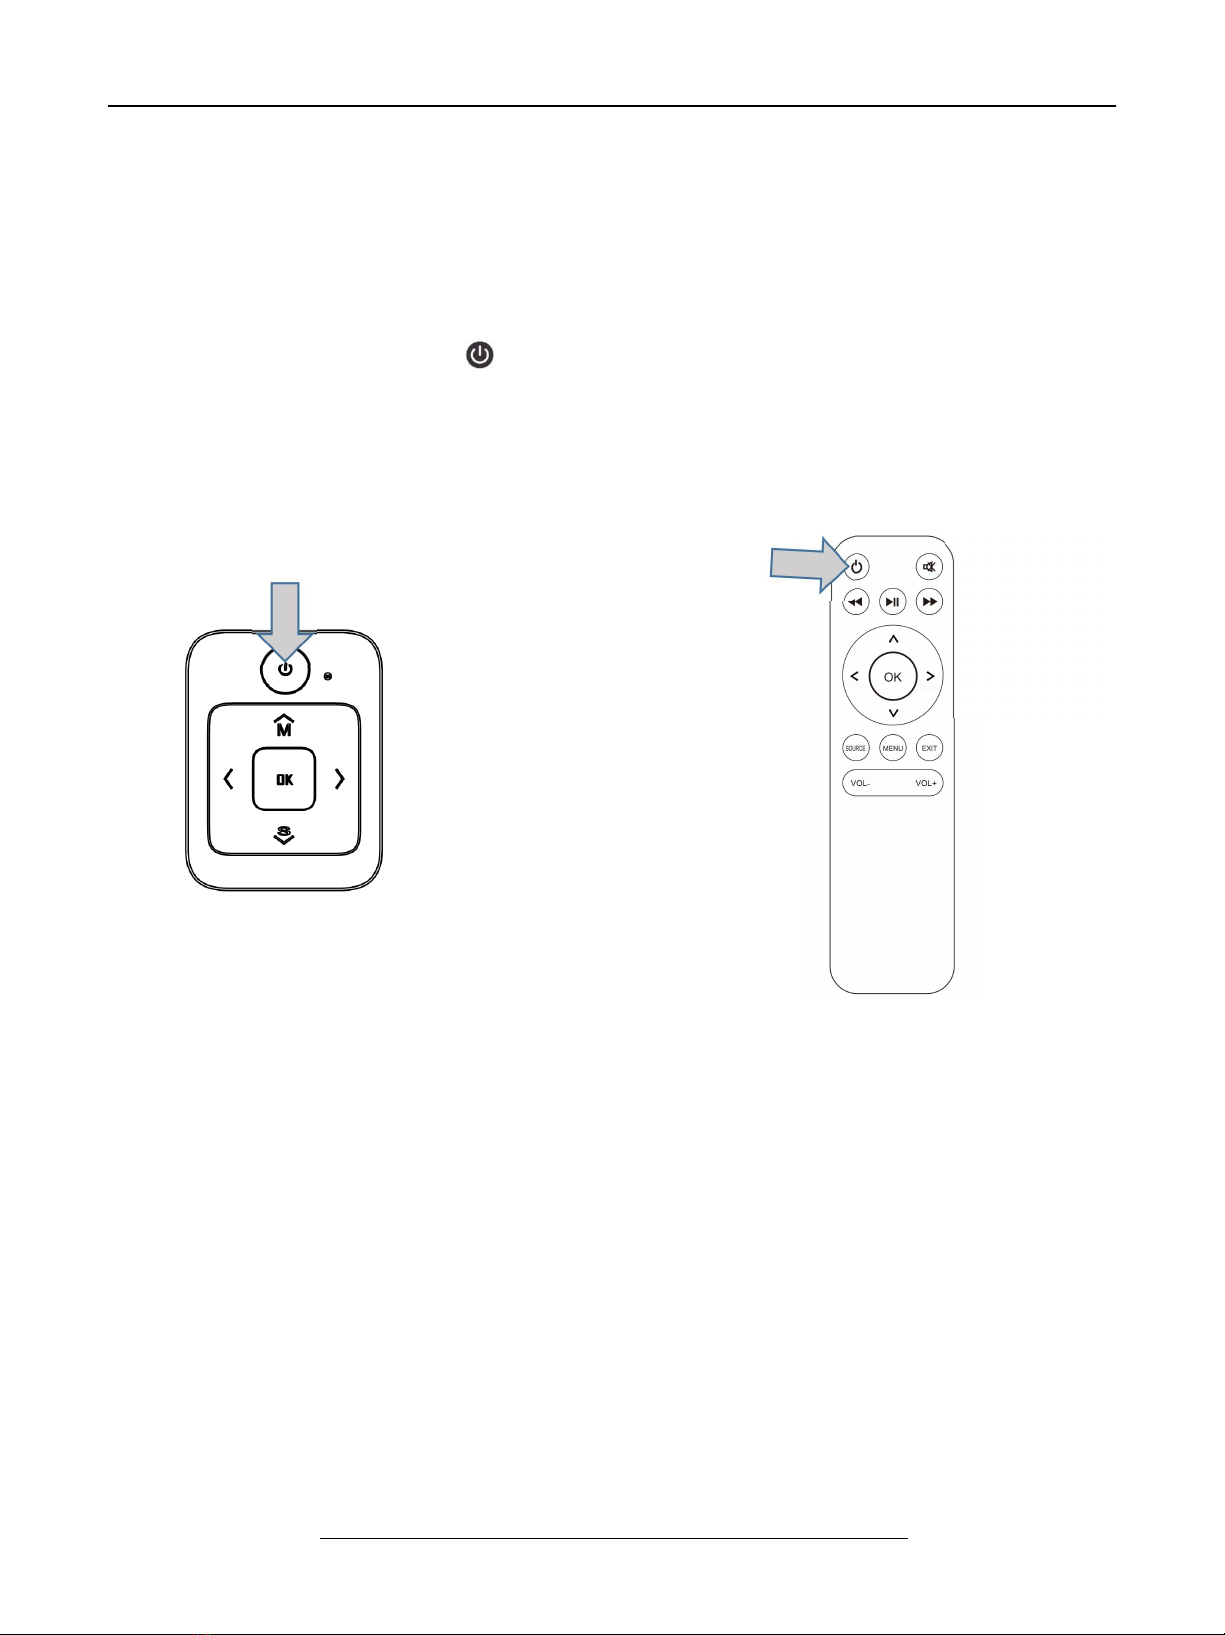
③Connect the power cable to the projector and into the power supply socket, the
indicator light will turn red, then the projector is in standby mode, take off the lens
cover.
Press the “ power ” button ( ) on the control panel or remote control to turn on
the projector.
A. On the control panel B. On the remote control
Note: do not guarantee compatibility with every external device !

The content of this manual are subject to change without notice
- 12 -
④Keystone and Focus
A. If the projected image is in a trapezoidal shape, it can be resolved by Keystone
correction. ( Do Manual Keystone Correction )
Note: If the Keystone correction fail to resolve image shape, please reduce the
vertical height of the projector in relation to the center of the screen.
B. the projected image may be blurry or difficult to see, this is due to lack of
Focus adjustment with the lens, please follow the processes below to adjust the
Focus. ( Do Manual Focus, find the most sharpness picture on the screen )
Note: It is normal when sharpness in the central, blur in the edge.
Keystone Correction
Manual Focus
The content of this manual are subject to change without notice
- 13 -
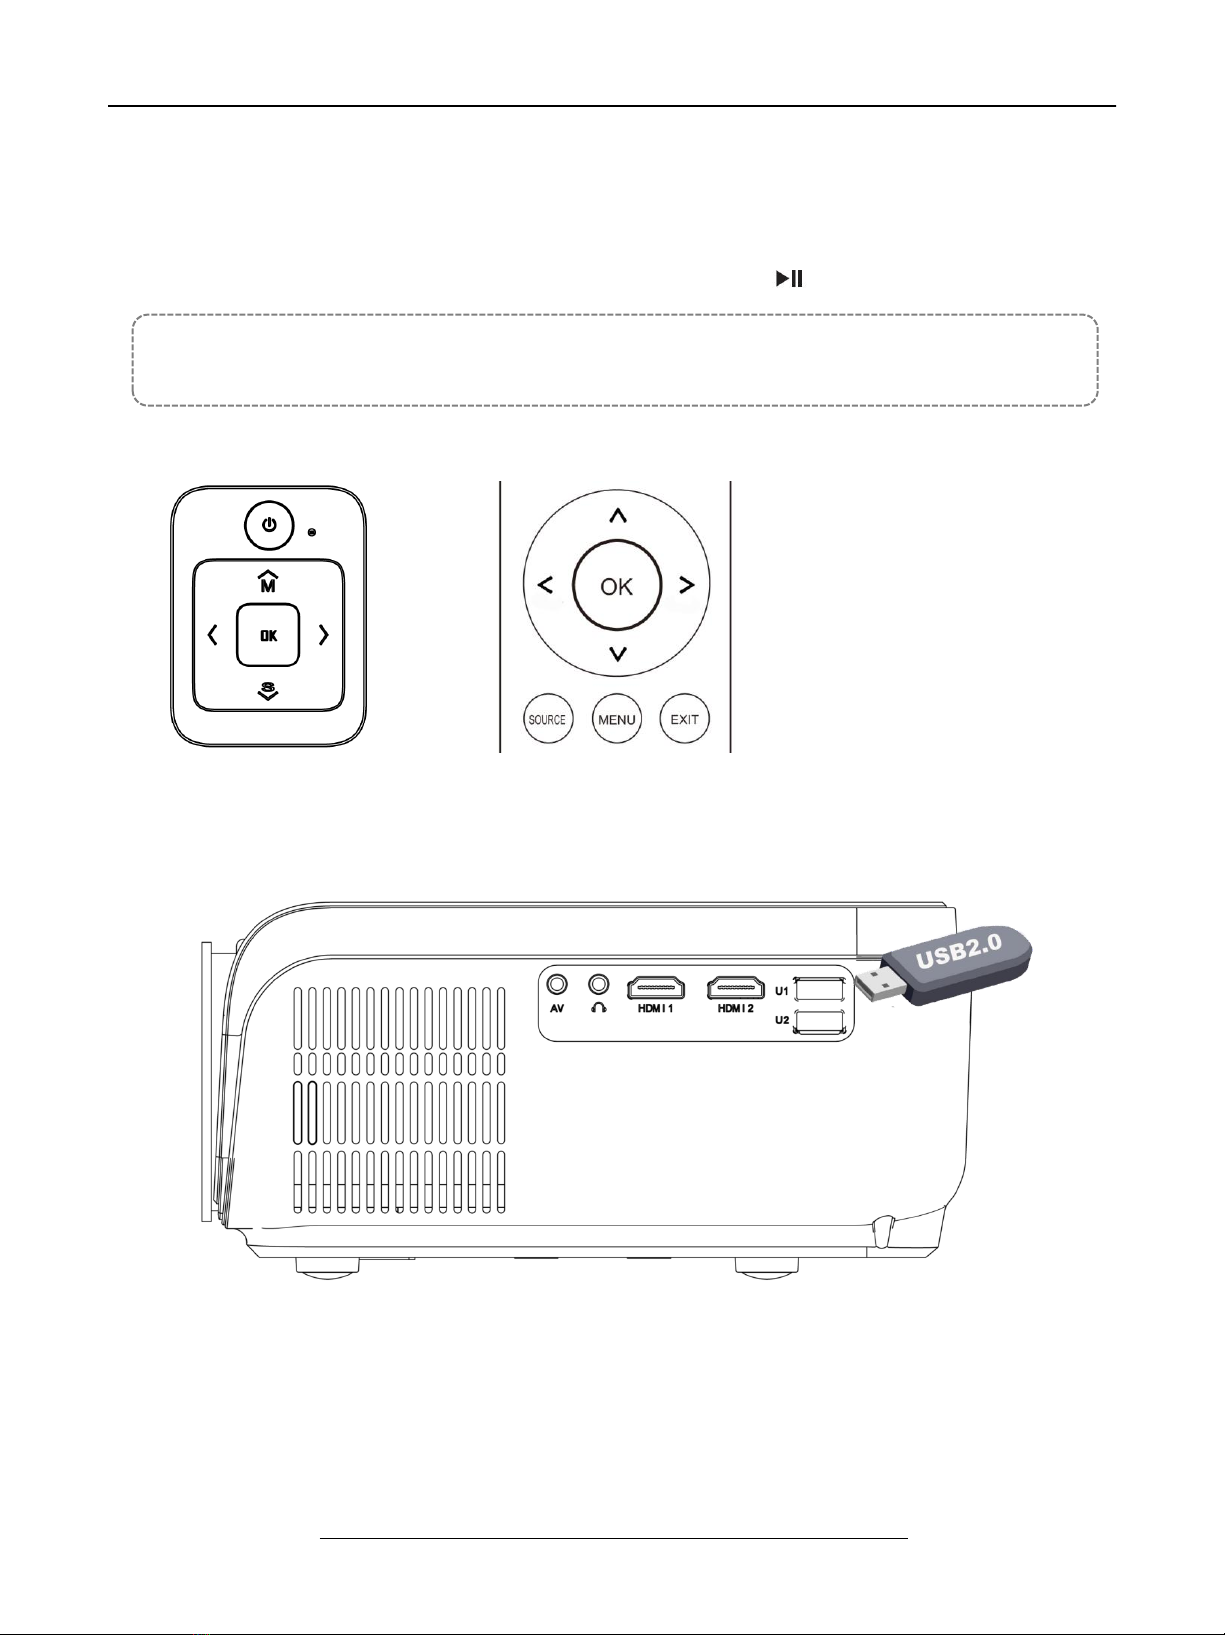
⑤Multimedia Connection:
A. Insert the USB flash driver into the USB port and choose the right
signal source, then press Play / Pause button ( ) to display or stop.
( Press “ Source” on the remote control or “ S” on the control panel, then there is
“ Input Source” on the screen, choose “ USB “ )
or
The content of this manual are subject to change without notice
- 14 -
► Multimedia File Specification
Image Format
Support
File Extension
JEPG, PNG, BMP
.jpg / .png / .bmp
Audio Format
Support
File Extension
MPEG1, MPEG2, LPCM, MP3
.avi / .ts / .dat / .vob / .wmv / .mkv / .mp3 / .mp4
/ .m4a
Doesn’t Support : Dolby AC3 / AAC, DTS, WMA, DivX, VC1, RM, RMVB, FLV, etc
Video Format ( Bit Rate up to 30~40 Mbs )
Support
File Extension
MPEG1, MPEG2, H.263, H.264, AVS,
VC1, MJPEG, RV30, RV40, HEVC
.dat / .ts / .mp4 / .mpg / .mpeg / .avi
/ .mkv / .mov / .asf / .flv / .3gp. / .3gpp
/ .tp
Doesn’t support : MSVC / CRAM , MP42, GMC, IV32, RLE, cvid, RV20, DivX, RM,
RMVB, VC1, FLV , etc.

The content of this manual are subject to change without notice
- 15 -
B. HDMI Connection
Support most device with HDMI slot. Press "Source" on the remote control,
then choose the right signal source “ HDMI “.
Support the Devices which have HDMI Port ( Eg: Laptop. DVD Player, Computer , etc. )

The content of this manual are subject to change without notice
- 16 -
C. AV Connection
Use AV cable for connecting as follows, choose the “AV” source input.
D. Audio Out Connection
User can connect the projector to an external speaker or headphones via headphone jack.
The content of this manual are subject to change without notice
- 17 -
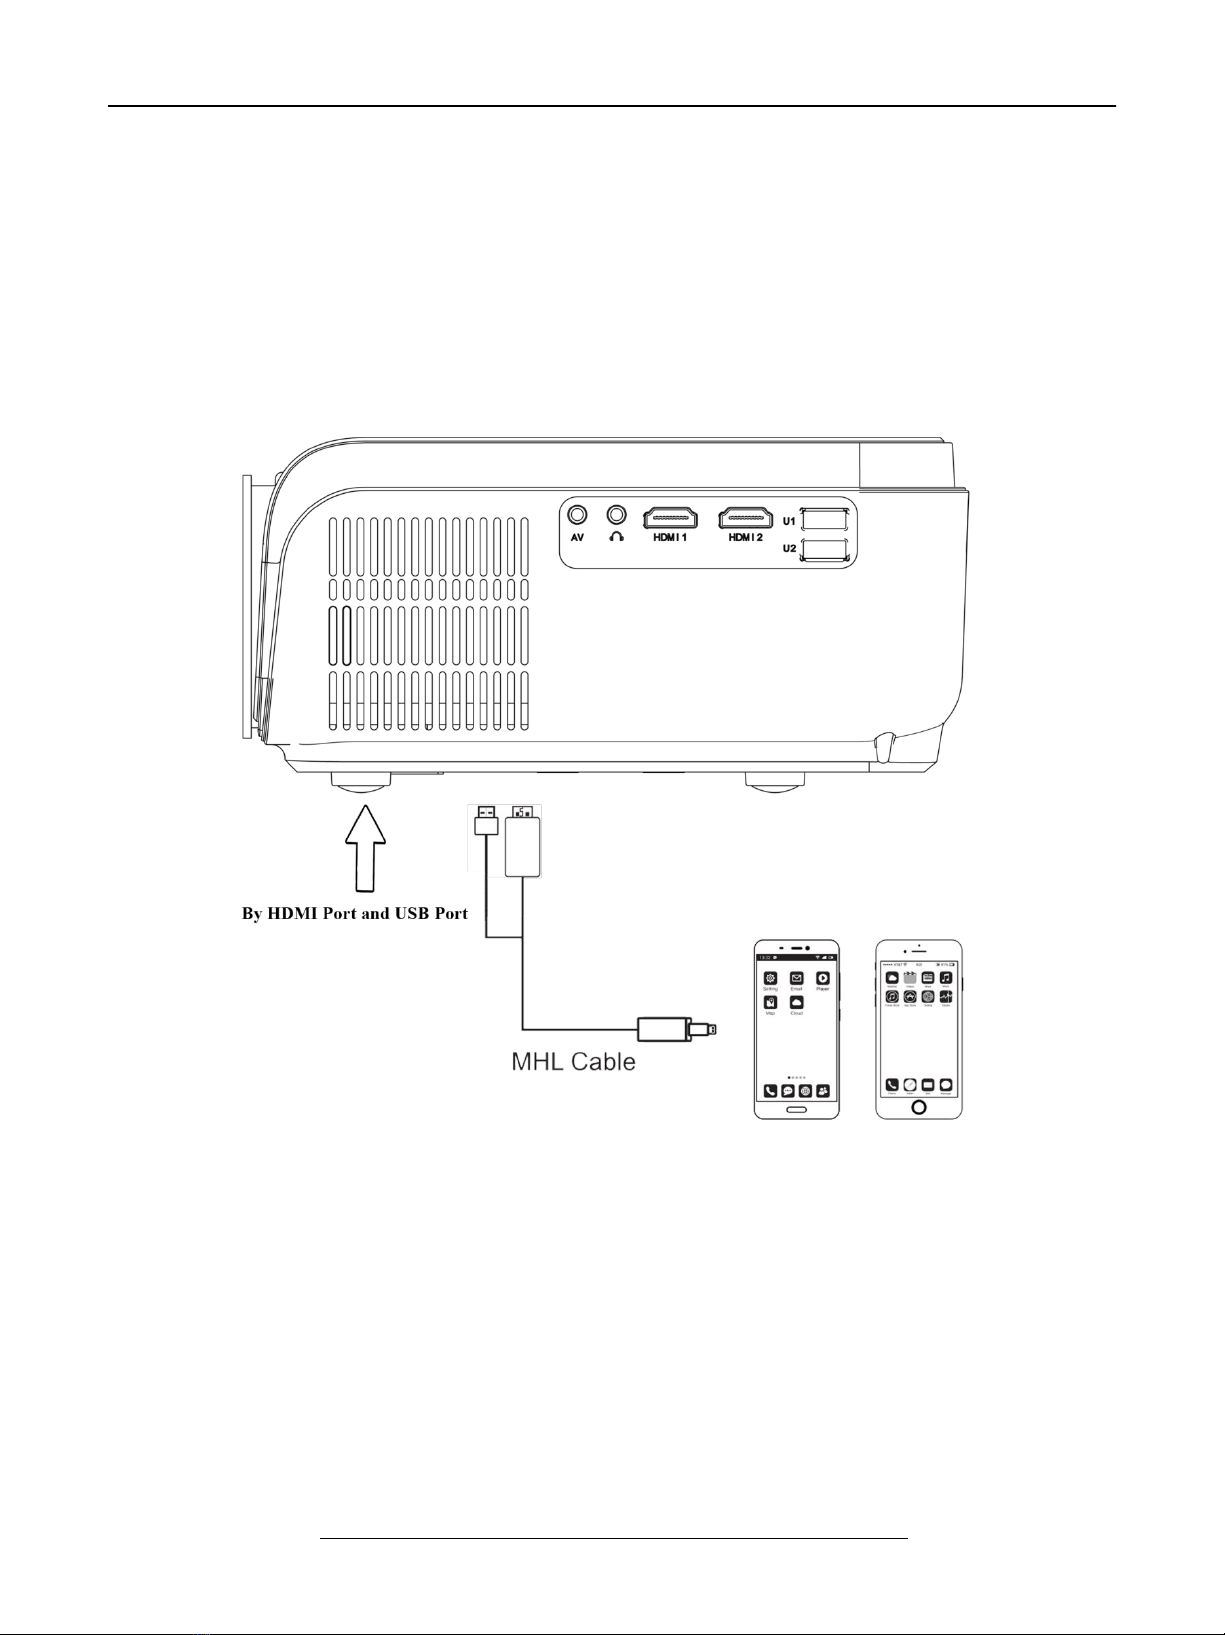
E. MHL Function
Only for MHL compatible devices
The content of this manual are subject to change without notice
- 18 -
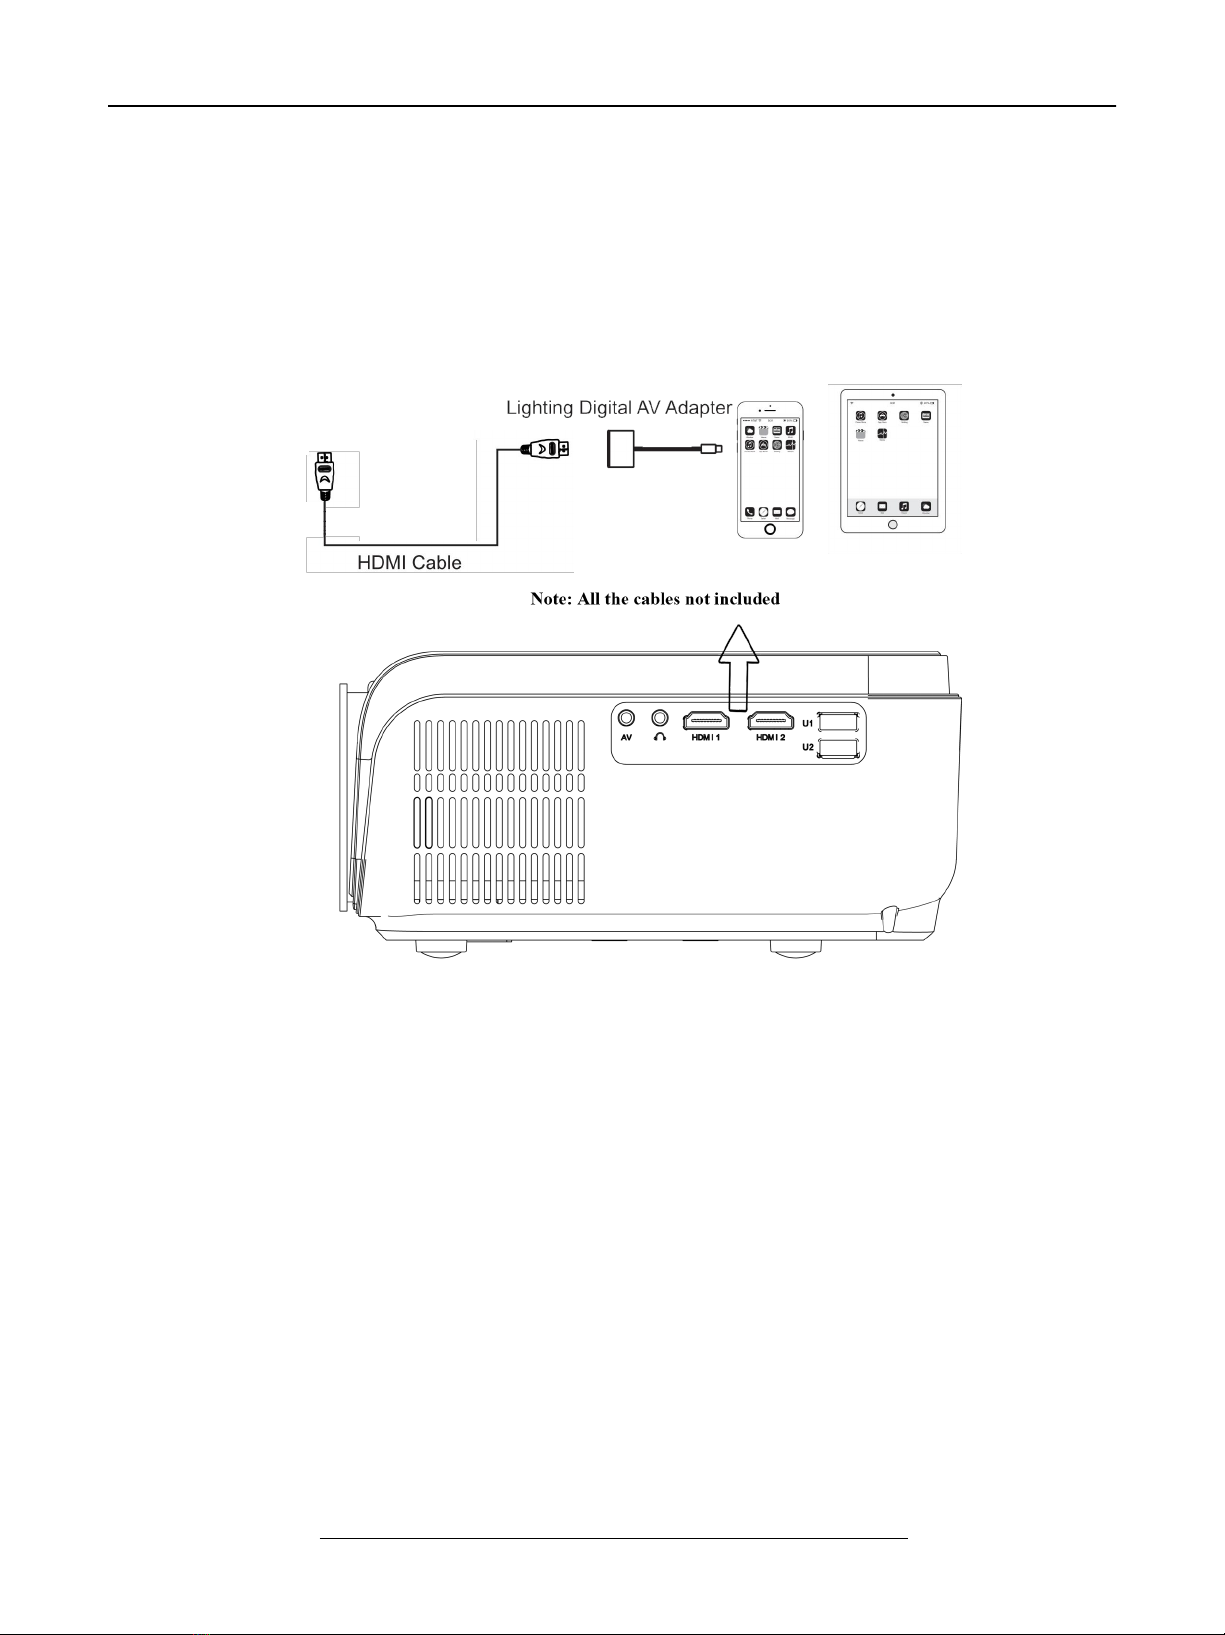
F. Use Lighting Digital AV Adapter. Support iPhone, iPad, Choose Input
Source “HDMI”.

The content of this manual are subject to change without notice
- 19 -
► ACCESSORIES LIST
While unpacking the package, please check and confirm all the accessories are
accounted for.
Note: Pictures only for your reference, different countries got different power
plug, please contact your supplier for more details.

The content of this manual are subject to change without notice
- 20 -
► WARRANTY CARD
Thank you for purchasing our product ! Please read our warranty policy
listed below:
①Projector by product Manual under normal working conditions for the
use of, we provide you with a one-year warranty service. (Projector lamp is
6 months warranty) .
②The warranty period is from the date when you purchased our product.
③Product warranty relating to the specific matters concerned, please
contact dealers around.
④The shipping cost is not included in warranty, Buyer is responsible for
shipping cost After-Sale service.
Warranty Policy
Please package properly if you need to return or need service, Buyer
responsible for any damage or loss in transit. In the 1
st
year warranty period,
the occurrence of the following items, we reserve the right to refuse service
if below applied :
(1) Product failure or damage caused by improper use
(2) Electric shock or burn accident due to improper installation
(3) Non-maintenance service by damage overhaul
(4) Product label is damaged
User Information
Customer Name :
Product Number :
Serial Number :
Purchase Date:
Table of contents
Other Cheerlux Projector manuals


Popular Projector manuals by other brands

Sony
Sony SXRD VPL-VW100/P Specifications

Epson
Epson EB-G6900WU datasheet

Mitsubishi Electric
Mitsubishi Electric WL6700LU supplementary guide

Sharp
Sharp XG-P25X - Conference Series XGA LCD... Operation manual

Kodak
Kodak Slide Projector operating manual

Hitachi
Hitachi CPX265 - XGA LCD Projector user manual


