FAVI Rio HD User manual

Rio HD™ LCD Projector
User Guide
Downloaded from ProjectorsManual.com Manuals

F A V I E N T E R T A I N M E N T
Rio HD™ User Guide
Yakel Holdings LLC
Downloaded from ProjectorsManual.com Manuals

Table of Contents
Introduction.............................................................................. 1
Technical Specifications..................................................................1
Safety (Must Read)..........................................................................2
Quick Start Guide..................................................................... 4
Step 1 – Connecting Your Rio.........................................................4
DVD Player..............................................................4
TV............................................................................4
PC/Laptop................................................................5
Step 2 – Turning on Your Rio..........................................................6
Step 3 – Focusing............................................................................6
Accessing the Filter.................................................................. 6
Lamp Replacement.................................................................. 8
Downloaded from ProjectorsManual.com Manuals

R I O H D
1
11
1
Introduction
ntroducing the world's first HD-Ready LCD projector with Illumi right™ Lamp
Technology! FAVI's new Rio HD™ combines all the great features of the
previous FAVI projectors but now includes an HDMI input for
720p/1080p/1080i compatibility, a zoom function, Picture in Picture, new Rio
Image Enhancement Chip™, and reverse imaging for rear projection!
Technical Specifications
Model Rio HD
Lamp life 6,000-8,000 hours
Lamp type 150W Illumi right™
Image Size 60”—150”
Net weight 6.8 lbs.
Inputs HDMI, Composite A/V, YPbPr/YCbCr,
S-Video, S-Cart, VGA
Outputs Composite Audio
Pr ject r N ise 30 db
Native Res luti n 640 x 480
C mpatible Res luti n 1080i, 720p, 480i, XGA, SVGA
C ntrast Rati 600:1
Speakers 2 x 5w
Chapter
1
I
Downloaded from ProjectorsManual.com Manuals

R I O H D
2
22
2
P wer Supply 110V-120V or 210V-240V
Access ries Spare Illumi right Lamp, Remote
Control, VGA Cable, Composite AV
Cable, Lens Cleaner Tissue, Power Cable
Safety
Please read below before operating:
•Do not look directly into the lens or open the case while the projector is
running. This could cause severe injury to your eyes.
•Please keep the projector away from liquids. This could cause electric
shock and damage your projector.
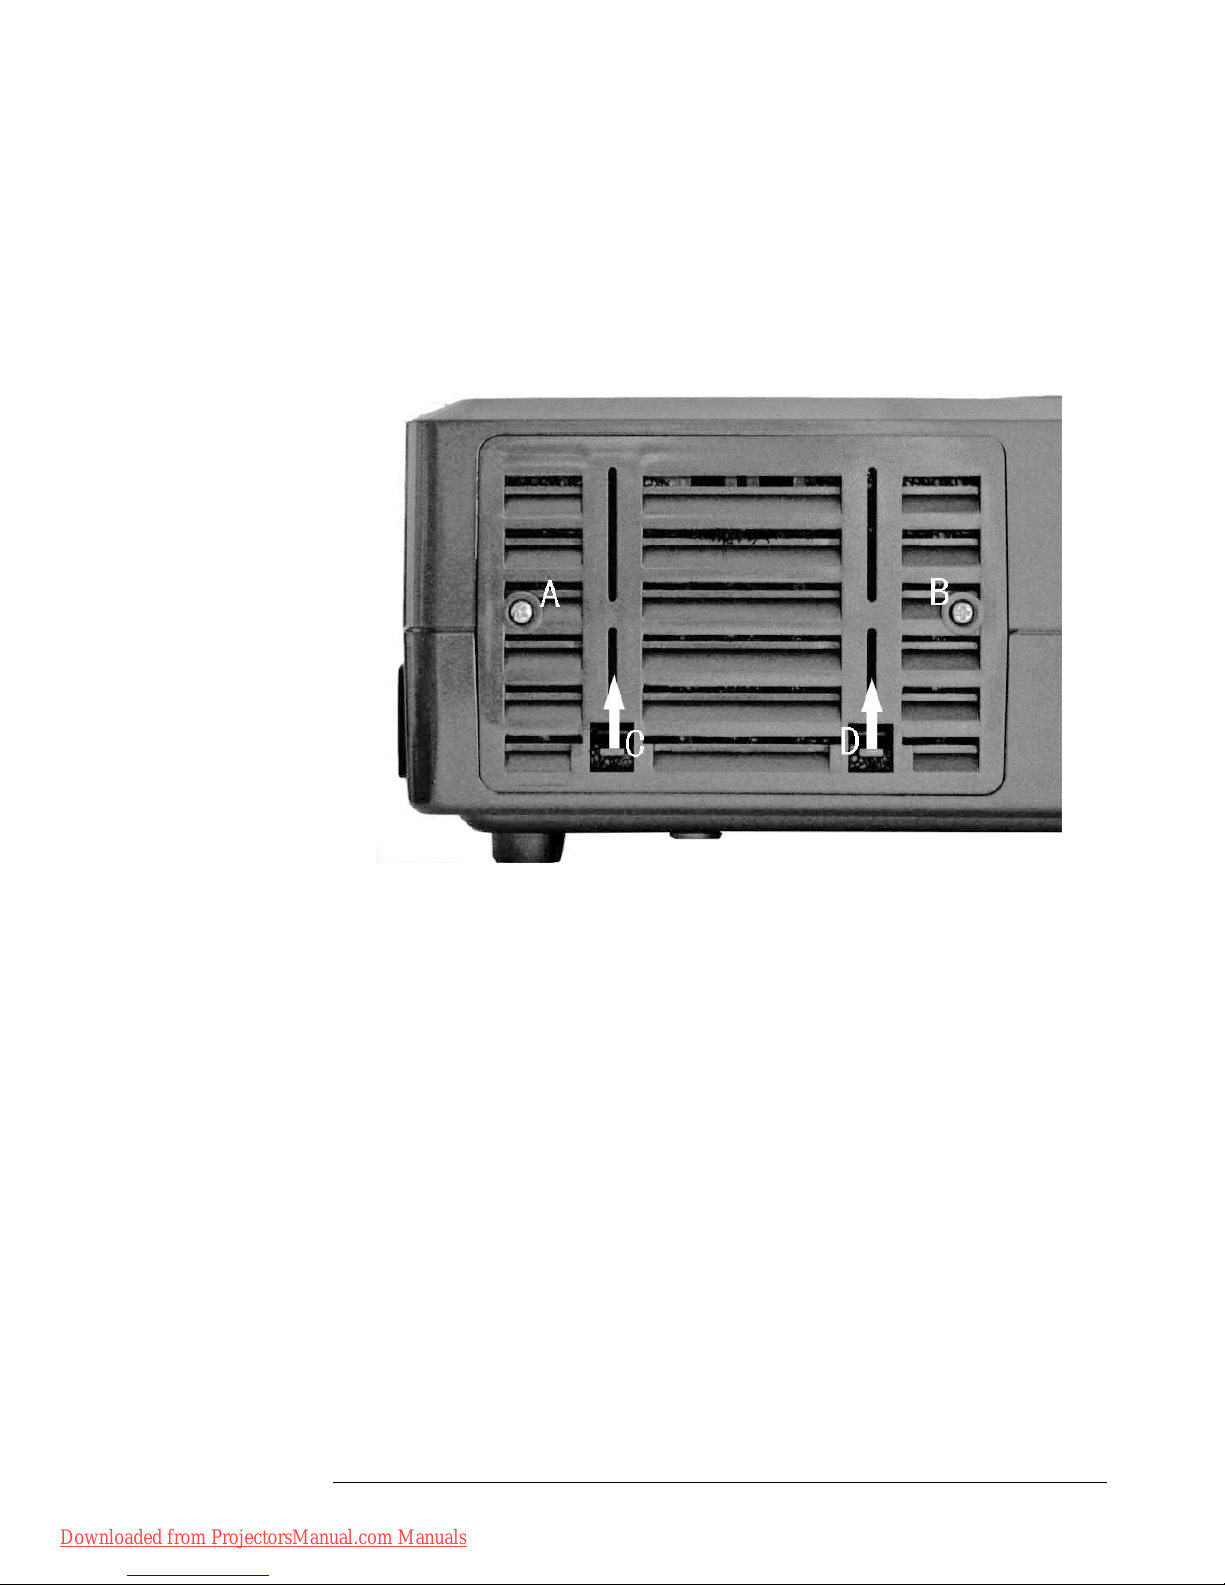
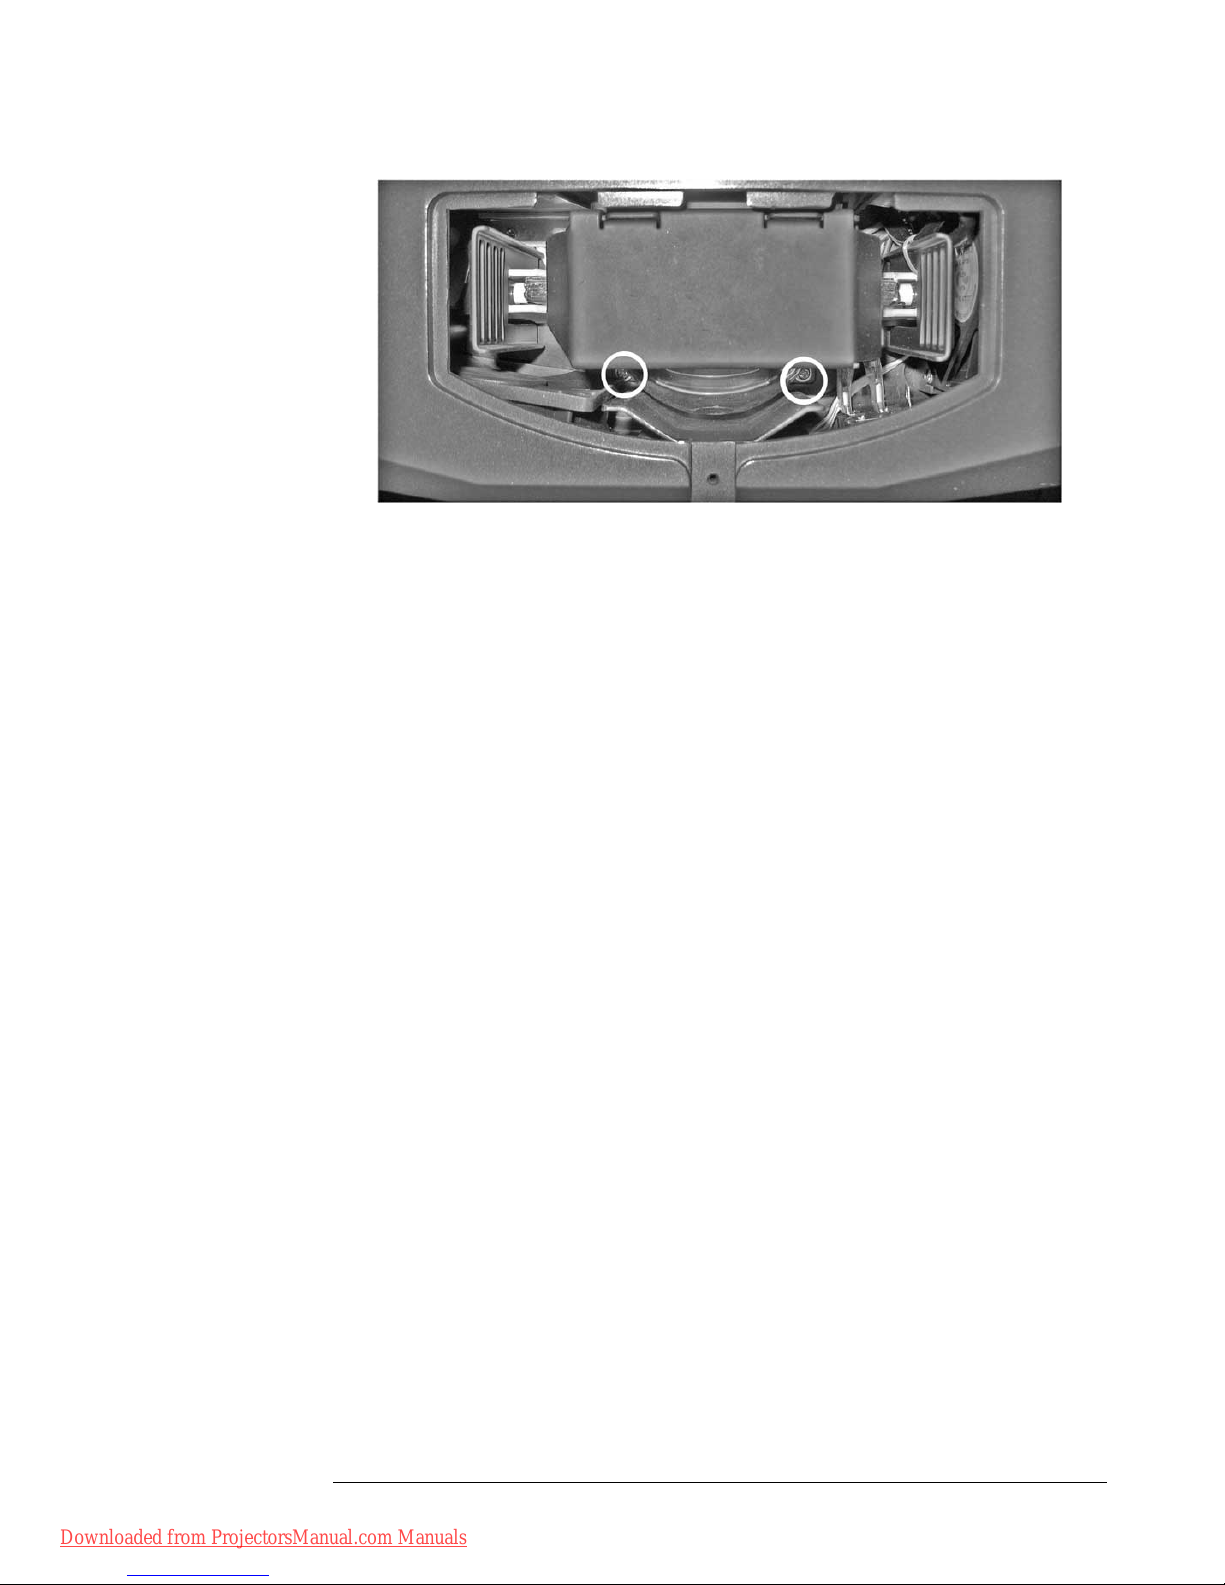
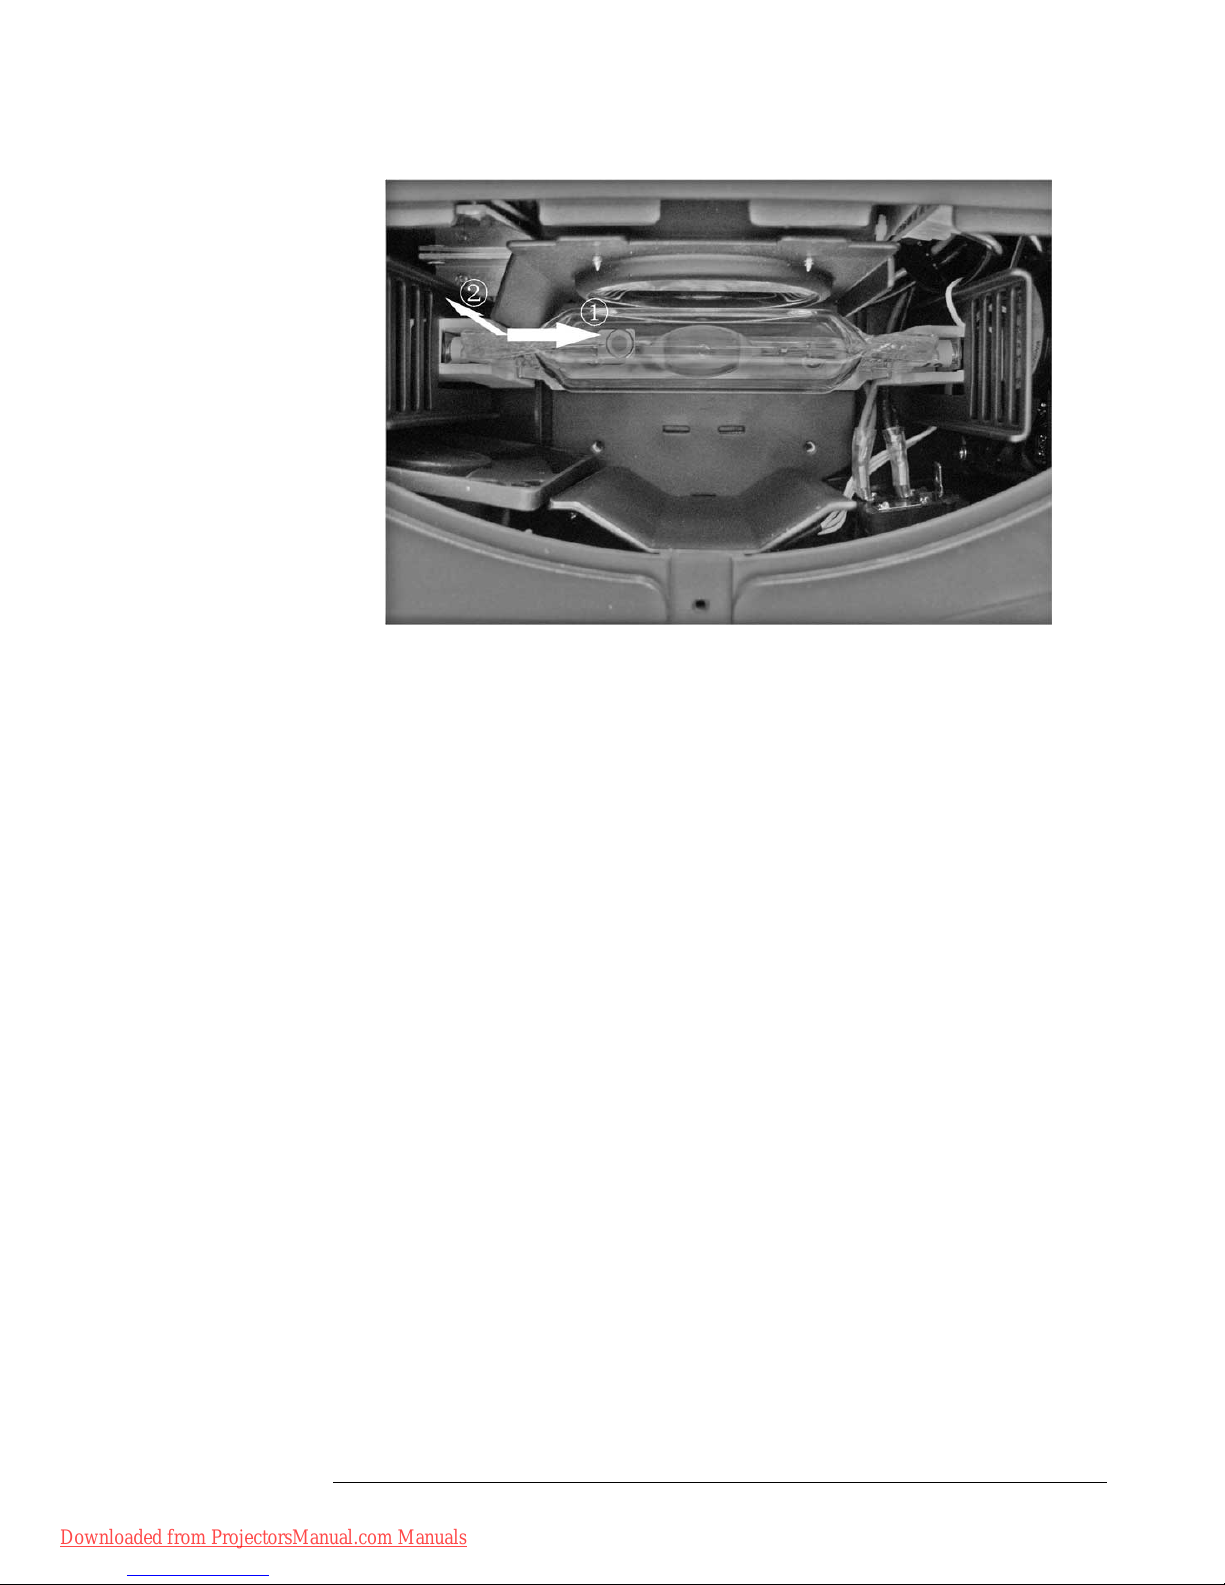
•Do not attempt to change the lamp while the projector is running or soon
after it has been turned off. If you need to change the lamp please consult
the “Lamp Replacement” section at the end of this user guide.
•After you turn off the projector please wait 15 minutes before turning it
back on. Failing to wait 15 minutes will decrease the life of the lamp and
the projector.
•Please only use the unit or remote power button to turn off the projector.
Do not unplug the unit while it’s running or turn the unit off using the
main power switch. This will cause severe damage to the lamp and the
projector.
• Do not cover any of the projector vents.
•There are protective circuits and alarming devices located inside the
projector. When the internal temperature rises caused by an improper
environment or blocked vents, the projector will automatically shut down.
We strongly recommend you keep the projector in a cool room. This will
prolong the overall life of the projector.
•Please keep the projector where the temperature does not exceed 85 °F
(29.4 °C). The LCD inside the projector will develop black spots if left in
warm environments. This heat damage will not be covered under
warranty.
Downloaded from ProjectorsManual.com Manuals

R I O H D
3
33
3
•Please leave the projector in a ventilated environment. Do not enclose
your projector when mounting. This could cause heat damage.
•Avoid using the projector in a high temperature, dusty, and or dirty
environment.
•Do not touch the projector lens with your hands. If the projector is left
unused for long periods of time please cover the lens with the cap
provided.
•When you are done using the projector and the fan has shut off, please
turn off the main power switch and remove the plug. This will avoid
damage from voltage waves.
•The projector is composed of many precise electronic and optical
components. Other than changing the lamp there are no parts that should
be serviced by the owner. If you attempt to open the projector yourself
any warranty will be null and void. FAVI’s warranty provides 90 days on
labor and 1 year on parts. Please contact your FAVI dealer for any
warranty claim.
Downloaded from ProjectorsManual.com Manuals

R I O H D
Quick Start Guide
efore turning on the projector please read the entire safety section. Failing to do so
could cause severe injury to you and damage the projector.
Step 1 – Connecting
DVD Player
•Composite Audio/Video – Take your composite cable (red/white/yellow)
and connect it to the corresponding output on your DVD player. Then
connect to the composite inputs on your projector.
•S-Video – Connect the S-Video cable to the output on the DVD player
and then connect to the projector S-Video input. Next connect a red and
white audio composite cable to the output of the DVD player and then to
the audio composite projector inputs.
•Component Video - Connect the component video cable (green/blue/red)
to the output on your DVD player and then to the corresponding colored
projector inputs. Next connect a red and white audio composite cable to
the output of the DVD player and then to the red and white audio
composite input on the projector.
TV
•HDMI - Connect a HDMI cable to your HD cable or satellite box output
and the free end to the projector’s HDMI input.
•Composite Audio/Video – Connect your composite audio/video cable
(red/white/yellow) to the corresponding outputs on the cable box. Then
connect to the corresponding colored inputs on the projector.
•S-Video – Connect the s-video cable to the s-video output on your cable
box and then connect to the s-video input on the projector. Next connect
Chapter
2
Downloaded from ProjectorsManual.com Manuals

R I O H D
5
55
5
a composite audio cable (red/white) to the corresponding cable box
outputs and then to audio composite inputs (red/white) on the projector.
•Component Video - Connect your green/blue/red to the output on your
cable box and then connect to the green/blue/red projector inputs. Next
connect a red and white composite audio cable to the output of your cable
box and then to the red/white composite audio inputs on the projector.
Laptop / PC
Your VGA cable should first be connected to your PC or Laptop then to the
projector. Please ensure the cable is screwed tightly in place on both ends. Then set
your source button on the projector to “PC”. If you do not see your computer screen
projecting you will need to consult your computer manual for the correct VGA setting.
Usually the correct key combination to read the VGA signal is to hold down the
“function” key and press ”f4”. The key combinations vary with the PC/laptop make
and model.
Step 2 - Turning on Your Rio
Place the projector in the proper viewing position and plug in the power cord.
Once the status indicator light turns red press the power button on top of the
projector or on the remote. To turn off the projector you will need to press the
power button twice. The status indicator light should then turn to orange. The
fans will continue to run for 7 minutes. The power supply should not be cut off
when the fan is running. Cutting the power while the fan is running could cause
damage to the lamp and the projector.
Step 3 - Focusing
The zoom function can be used when the projector is on the s-video or aux
setting. Otherwise the image size can only be adjusted by moving the projector.
Once you have the correct image size you can focus the unit manually by turning
the lens. If the image is distorted please use the keystone correction knob on the
side. Please do not force the knob in either way.
Downloaded from ProjectorsManual.com Manuals

R I O H D
6
66
6
Accessing the Filter
Warning: Please turn off the projector and pull the plug from the outlet before
cleaning. See the diagrams below for accessing the filter.
Figure 1. Please unscrew the 2 bolts at A & . Next lift up at C & D and pull outward
gently to remove the filter cover.
Downloaded from ProjectorsManual.com Manuals

R I O H D
7
77
7
Figure 2. Please reattach the cover to the points above.
Downloaded from ProjectorsManual.com Manuals

R I O H D
8
88
8
Lamp Replacement
Figure 3. Unscrew at point 9 and remove the lamp compartment cover.
Downloaded from ProjectorsManual.com Manuals

R I O H D
9
99
9
Figure 4. Unscrew the 2 bolts and pull out the lamp protector assembly.
Downloaded from ProjectorsManual.com Manuals

R I O H D
10
1010
10
Figure 5. Take one end of the bulb and follow in the direction of arrow 1. Then
lift the lamp up and move in the direction of arrow 2. Please note when installing
make sure to have the lamp’s glass lip facing downward.
Downloaded from ProjectorsManual.com Manuals
Other manuals for Rio HD
1
Table of contents
Other FAVI Projector manuals

FAVI
FAVI RioHD-LED-K1 User manual

FAVI
FAVI E3-LED-PICO User manual

FAVI
FAVI B1-LED-PICO User manual

FAVI
FAVI RioHD-LED-2 User manual

FAVI
FAVI E3-LED-PICO User manual

FAVI
FAVI Pico+ J6-LED-PICO User manual

FAVI
FAVI LED-2 User manual

FAVI
FAVI A3 User manual

FAVI
FAVI Entertainment RioHD-LED-3 User manual

FAVI
FAVI RioHD-LED-3T User manual

FAVI
FAVI RioHD-LED-3T User manual

FAVI
FAVI RioHD-LED-4T User manual

FAVI
FAVI J7-LED-PICO User manual

FAVI
FAVI RioHD-LED-3T User manual

FAVI
FAVI 1500 User manual

FAVI
FAVI Pico+ J6-LED-PICO User manual

FAVI
FAVI BLED3TPPWM3HD100-BH User manual

FAVI
FAVI Rio HD User manual

FAVI
FAVI RioHD-LED-3T User manual

FAVI
FAVI RioHD-LED-4 User manual