ChefsTemp Quad XPro User manual

ChefsTemp Quad XPro Alarm Thermometer
Operating Instruction
Alarm Thermometer
Quad XPro
Large LCD
display
Backlight
Magnetic
Back
°C/°F
Switchable
Preset
Temp
4 Probes
Remote Range
500 Feet/150M
Temperature
Alarm

Content
1.ChefsTemp Quad XPro Info Sheet…………………… 01
1.1 Overview …………………………………………… 01
1.2 Package Content ………………………………… 01
1.3 Product Specication……………………………… 02
1.4 Button and Interface Introduction ……………… 03
2. Operating Instruction ………………………………… 09
2.1 Getting Started …………………………………… 09
2.2 Main Unit Basic Setting …………………………… 10
2.3 Main Unit Temperature Setting…………………… 10
2.4 Receiver Setting …………………………………… 11
3. Temperature Alarm Function ………………………… 12
3.1 Main Unit …………………………………………… 12
3.2 Receiver …………………………………………… 12
4. Low-battery Reminder Mode ………………………… 13
4.1 Main Unit …………………………………………… 13
4.2 Receiver …………………………………………… 13
5. How to Sync Main Unit and Receiver Manually …… 14
6. Probe Ring Installation Instruction ………………… 14
7. Calibration Guide ……………………………………… 16
8. Use & Maintenance …………………………………… 17
9. Trouble Shooting ……………………………………… 18
10. Contact Us …………………………………………… 20
11. Chef-recommended Meat Temperature …………… 21

01
1. ChefsTemp Quad XPro Info Sheet
1.1 Overview
1.2 Package Content
Monitoring temperature from your yard or house has been made easier with ChefsTemp Quad XPro BBQ Alarm Thermometer.
The Quad XPro allows you to stay connected and track real-time cooking temperatures of your food with a transmission distance
up to 500 feet/150 meters (1m above the ground), ensuring that your food is at the right temperature and perfectly smoked every
time. If the temperature is over the high or low target settings, the Quad XPro will sound and send signals to the Receiver. It's
eective 4 channel splash proof casing, and RF remote function make it a cooking device you can't go without. Experience the
convenience of ChefsTemp Quad XPro, making your cooking process more seamless than ever before.
The Quad XPro can also be used for a wide range of cooking methods, including smoking, barbecuing, roasting, and more.
Achieving the right temperature is crucial to achieving outstanding results when it comes to smoking-making an eective remote
alarm thermometer an essential culinary tool for monitoring cooking temperature when cooking any kind of food.
ChefsTemp Quad XPro Main Unit x1
ChefsTemp Quad XPro Receiver x1
Stainless Steel Probe x3
Stainless Steel Ambient Probe x1
Probe Ring x16 (2 packs, 8 per pack)
Probe Clip x1
Hanging Lanyard x1
Instruction Manual x1

02
1.3 Product Specication
Display Size:
ChefsTemp Quad XPro Main Unit: 3.66Hx2.09W inches (93Hx53W mm)
ChefsTemp Quad XPro Receiver: 1.42Hx2.02W inches (36Hx51.3W mm)
Product Size:
ChefsTemp Quad XPro Main Unit: 5.94Hx3.74Wx1.18D inches (150.8Hx95Wx30D mm)
ChefsTemp Quad XPro Receiver: 2.44Hx3.84Wx1.4D inches (62Hx97.5Wx35.5D mm)
Probe Range: -58 to 572°F (-50 to 300°C)
Probe Cable Withstand Temperature: Max 700°F (370°C)
Transmission Distance: 500ft (150m) in rural areas (1m above the ground)
Accuracy:
±0.9°F (±0.5°C) from 32 to 212°F (0 to 100°C)
±1.8°F (±1.0°C) from 212 to 572°F (100 to 300°C)
±1.8°F (±1.0°C) from -58 to 32°F (-50 to 0°C)
Resolution: 0.1°F (°C)
Units: °C/°F switchable
Backlight: 20 seconds
Main Unit and Receiver Waterproof: IP66 splash-proof
Probe Waterproof: IPX7 water-proof

03
Operating Range: 32 to 122°F (0 to 50°C)
Main Unit and Receiver Power Supply: 2 AA size 1.5V batteries (not included)
The Main Unit can be powered by a Type-C cable (not included)
The Main Unit and Receiver include bracket and back-lit magnet
The Receiver has a hanging hole and vibration function
1.4 Button and Interface Introduction
Main Unit (Front)

04
Main Unit Screen

05
Main Unit (Back)
06
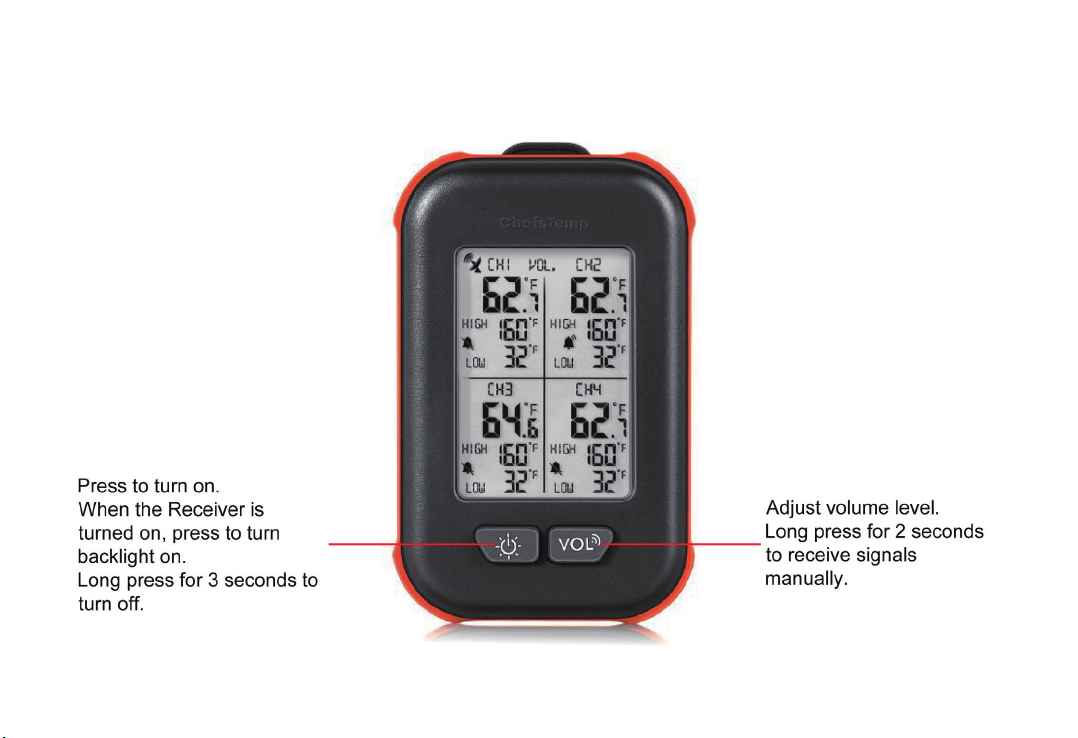
Receiver (Front)

07
Receiver Screen

08
Receiver (Back)

09
2. Operating Instruction
2.1 Getting Started
Step 1: Open the bracket and slide down the Receiver battery cover to insert 2 AA batteries. Once batteries are inserted, the
Receiver will automatically turn on with two beeps and display a backlight, then it will enter the signal receiving state.
Step 2: Insert the probe into the Main Unit, up to 4 can be inserted.
Step 3: Open the back cover of the Main Unit with a screwdriver and insert 2 AA batteries (or plug in the Type-C cable). The
Main Unit will automatically turn on with two beeps and display a backlight, then display the temperature of the inserted probe
and enter the signal transmission state.
Step 4: Once turned on the Main Unit and the Receiver will connect with each other within 30 seconds, the Receiver will display
the information of the Main Unit. If the connection is not successful, the Receiver will not display the information of the Main Unit,
or it will only display "— — —". If this happens, please repeat steps 1-3, or refer to 5. How to Sync Main Unit and Receiver
Manually in the manual.
Note:
Wireless signals can be received within 500ft/150m between the devices in rural areas with no barriers (1m above the
ground), this will be less if transmitting between walls or barriers.
When powered by a Type-C cable, the backlight of the Main Unit will remain on all the time. When powered by batteries, the
backlight will automatically turn o after 20 seconds of no operation.

10
When the Main Unit uses a Type-C cable and batteries at the same time, the Main Unit will not use the power supply of the
batteries. The Type-C cable will not charge batteries inside the Main Unit.
2.2 Main Unit Basic Setting
2.3 Main Unit Temperature Setting
Press to switch between Celsius and Fahrenheit.
Press to adjust the alarm volume level, there are 5 volume levels available.
The volume levels displayed on the device are shown below:
Press to turn the backlight on for 20 seconds, the backlight will turn o after pressing again or if the device is
not operated for 20 seconds.
Long press for 3 seconds to reset the maximum and minimum temperature memory of the selected channel.
Step 1: Press to enter temperature setting mode, the HIGH ALARM digits will begin ashing.
Step 2: Use to adjust the desired HIGH ALARM temperature. Press again to confirm the HIGH
ALARM setting, and the LOW ALARM digits will begin ashing.

11
Step 3: Use to adjust the desired LOW ALARM temperature. Press again (or no operation for 20
seconds) to conrm LOW ALARM setting and exit the temperature setting mode.
Step 4: Press to turn the alarm function on or o for a specic channel. Use "O" to turn o alarm sounds.
Note:
Long press or to quickly set the temperature.
When setting the HIGH ALARM, if there is no operation for 20 seconds, the current setting will be automatically saved and
the setting mode will be exited.
When the device is powered o, the settings will be saved on the device unless the batteries and Type-C cable are removed
or the batteries exhausted and Type-C cable is not inserted.
2.4 Receiver Setting
Press to adjust the alarm volume level, there are 5 volume levels available.
The volume levels displayed on the device are shown below:
Press to turn on the backlight for 20 seconds, the backlight turns o after pressing again or if the device is not
operated for 20 seconds.

12
3. Temperature Alarm Function
3.1 Main Unit
3.2 Receiver
When the alarm function is turned on, and the measured temperature is higher than the HIGH ALARM temperature, or lower
than the LOW ALARM temperature set, the alarm will sound, the backlight will begin ashing, and the measured temperature
digits will ash.
There are 4 kinds of temperature alarm sounds, each channel has a dierent alarm frequency:
CH 1: beep once per second
CH 2: beep twice per second
CH 3: beep 3 times per second
CH 4: beep 4 times per second
Pressing any button on the Main Unit will turn o the alarm.
If multiple channels alarm at the same time, only the last alarm will sound.
When the alarm function is turned on, and the measured temperature is higher than the HIGH ALARM temperature, or lower
than the LOW ALARM temperature set, the alarm will sound, the backlight will begin ashing, the Receiver will be vibrating and
the measured temperature digits will ash.
There are 4 kinds of temperature alarm sounds, each channel has a dierent alarm frequency:

13
4. Low-battery Reminder Mode
4.1 Main Unit
4.2 Receiver
When the power of the Main Unit is low, the screen will only display the ashing symbol, and the alarm will not functioning.
Press any key to end the low battery reminder mode, all displays and functions will return to normal, but the symbol still
ashes.
When the power of the Receiver is low, the screen only displays the ashing symbol, and the alarm will not functioning.
Press any key to end the low battery reminder mode, all displays and functions will return to normal, but the symbol still
ashes.
CH 1: beep once per second
CH 2: beep twice per second
CH 3: beep 3 times per second
CH 4: beep 4 times per second
Pressing any button on the Receiver will turn o the alarm.
If multiple channels alarm at the same time, only the last alarm will sound.

14
5. How to Sync Main Unit and Receiver Manually
6. Probe Ring Installation Instruction
If you need to sync the Main Unit and Receiver manually, please follow the steps below:
Step 1: Hold on the Receiver to enter the signal receiving state. After one beep, all data of the Receiver will be reset
and the icon will begin ashing.
Step 2: Press on the back of the Main Unit to send signals manually. The Icon will begin flashing on the Main Unit
while the Receiver will begin connecting with the Main Unit and receiving data from it.
Note:
When the Receiver loses signal for 30 seconds, the alarm will automatically ring, the backlight will be flashing and the
Receiver will be vibrating. Press any button on the Receiver to turn o the alarm.
If the Receiver fails to receive the signal for 8 minutes, the signal receiving function will be turned o automatically. Press
and hold the button of the Receiver for 2 seconds to restart the signal receiving function.
ChefsTemp Quad XPro has 16 probe rings (including red, yellow, green, blue, 4 rings for each color).
Always attach probe rings by sliding them over the probe tip. Attempting to attach probe rings by sliding them over the probe
jack will cause them to stretch and loosen.

15
First Probe Ring:
Second Probe Ring:
Step 1: Slide the rst of the two matching
probe rings over the probe tip.
Step 1: Holding the second probe ring,
slide probe ring over the probe.
Step 2: Roll the probe ring over the
metal springs of the probe.
Step 2: Roll the probe ring over the
PEEK of the probe.
Step 3: Slide the probe ring down the
cable until it is over the metal springs
of the probe jack. There will be a slight
groove to hold the probe ring in place.
Step 3: Place the probe ring at the point
where the metal spring and the PEEK meet.

16
7. Calibration Guide
ChefsTemp Quad XPro is ready to use. No extra testing or calibration is required before using it. If you need calibration, please
refer to the following steps:
Step 1: Long press for 5 seconds to enter the calibration mode. The measured temperature of channel 1 will display 0.0°F,
and display "CAL".
Step 2: Press to increase or decrease the temperature. Each time you press, the value will be adjusted by 0.1.
Long press or to quickly set the temperature. The available calibration range is ±3.6°F(±2°C).
Step 3: Press again to conrm the settings of channel 1, and enter the settings of channel 2.
Step 4: Repeat steps 2-3 until channel 4 is set. If there is no operation for 20 seconds, the current setting will be automatically
saved and calibration mode will be exited.
Note:
When powered off, the settings will be saved on the device unless the batteries and Type-C cable are removed or the
batteries exhausted and Type-C cable is not inserted.

17
8. Use & Maintenance
Tips for Use:
● Your ChefsTemps Quad XPro's body should not be attached directly to a smoker or grill's lid or left in the smoker or oven. The
high heat will severely damage the plastic housing.
● Insert the cooking probe so that the tip rests at the thickest part of the meat or food. Avoid gristle or bone.
● The round tip probe is an ambient probe. Pinch the probe clip, insert the probe, and attach the clip to the grate. Place the
ambient probe 1-2 inches away from the food, avoiding the sides of the cooker. The clip can be adjusted for dierent-sized BBQ
grates by gently bending it. We recommend leaving the air probe in the clip while adjusting.
● Set your desired alarm temperatures. Chef-recommended doneness temperatures are listed at the end of the manual. If
cooking meat, set the alarm somewhat lower to allow for carryover heat during resting.
Cautions for Probes and Cables:
● Use hot pads or gloves when removing the probe from food. It will be hot. DO NOT pull on the cable. Use the molded mini-
handle.
● The cables can withstand 700°F (370°C) while the transition/handle can withstand 644°F (340°C) for short periods. The probe
tip itself is rated to 716°F (380°C). DO NOT expose probe tip to ames or coals.
● The probe is water-resistant but we do not recommend full immersion of the cable. Clean the probe by wiping it with a damp
cloth and kitchen cleaner.
● Keep the probe cable away from oven elements, ames, coals, grills or oven racks, all of which can reach temperatures far
higher than 700°F (even if an oven is set to a lower temperature).
● When using ovens or smokers, avoid pinching the cable between hot surfaces such as a cast iron grill hood without some
insulating protection. Avoid repeated twisting of the probe cable which can break wires.

18
9. Troubleshooting
Issue Reason Solution
No alarm sound after the
temperature reaches the set
alarm temperature.
The alarm switch of the channel you are
measuring is o.
Press for the channel you want to
measure to turn on the alarm.
The power of the Main Unit or Receiver
is low, and the Main Unit or Receiver has
entered the low-battery reminder mode.
Press any key to end the low-battery reminder
mode, all displays and functions will return to
normal. The or symbols will continue
to ash.
The Receiver cannot receive
the signal of the Main Unit.
The Receiver and the Main Unit are too far
away or there are obstacles between them.
Put the Receiver and the Main Unit in a
position where the signal can be received.
Wireless signals can be received within
500ft/150m between the devices in rural areas
with no barriers (1m above the ground).
The signal transmission function of the
Main Unit is turned o.
Press on the Main Unit to turn on the
signal transmission.
The Receiver did not receive a signal for
8 minutes, the signal receiving function is
automatically turned o.
Hold on the Receiver to enter the signal
receiving state.
Table of contents
Other ChefsTemp Thermometer manuals


