Chemin'Arte 144 User manual
www.cheminarte.com
Instruction manual for ceramic heaters Chemin’Arte
1000/1500W (ref 144 et 145)
Before use :
Check whether the electricity su ly meets the voltage requirement.
• Do not lace the a liance near combustible materials, such as curtains, furniture...
• Do not use outdoors, or on or near direct heat sources.
• The heater must not be used in a bathroom or near a source of water.
• Do not lug in or ull out the ower cable with wet hands.
• Do not o en the housing or attem t to re air the a liance yourself. Should you do so, the safety conce t of the
device may be com romised and the warranty becomes void. Permit only authorised technicians to re air a
defective a liance.
• Do not o erate any a liance with a damaged cord or lug or after the a liance malfunctions or has been
damaged in any manner. Return a liance to the nearest authorized service facility for examination, re air, or
adjustment.
• Do not touch hot surfaces.
• Never use the electric wire to rise, carry or un lug the a liance.
• Do not allow the connection cable to come into contact with the a liance’s hot surfaces.
• To rotect against electric shock, do not immerse cord, lug or a liance in water or any other liquid.
• Un lug from outlet when not in use and before cleaning.
• This a liance is for household use only and only for the ur ose it is made for.
• This a liance should never be left ON or hot without adult su ervision.
• This a liance is not intended for use by ersons (including children) with reduced hysical, sensory or mental
ca abilities, or lack of ex erience and knowledge, unless they have been given su ervision or instruction concerning
use of the a liance by a erson res onsible for their safety.
• Children should be su ervised to ensure that they do not lay with the a liance.
• CAUTION: In order to revent overheating, do not cover the a liance.
• When you use it for the first time, leave the heater on for 2 or 3 hours in the maximum tem erature osition in a
ventilated lace, in order to dis erse the initial “new” smell.
• It is normal to hear some noises caused by the oil heating u or when cooling.
• Do not use the thermal heater directly on the floor without lacing the legs.
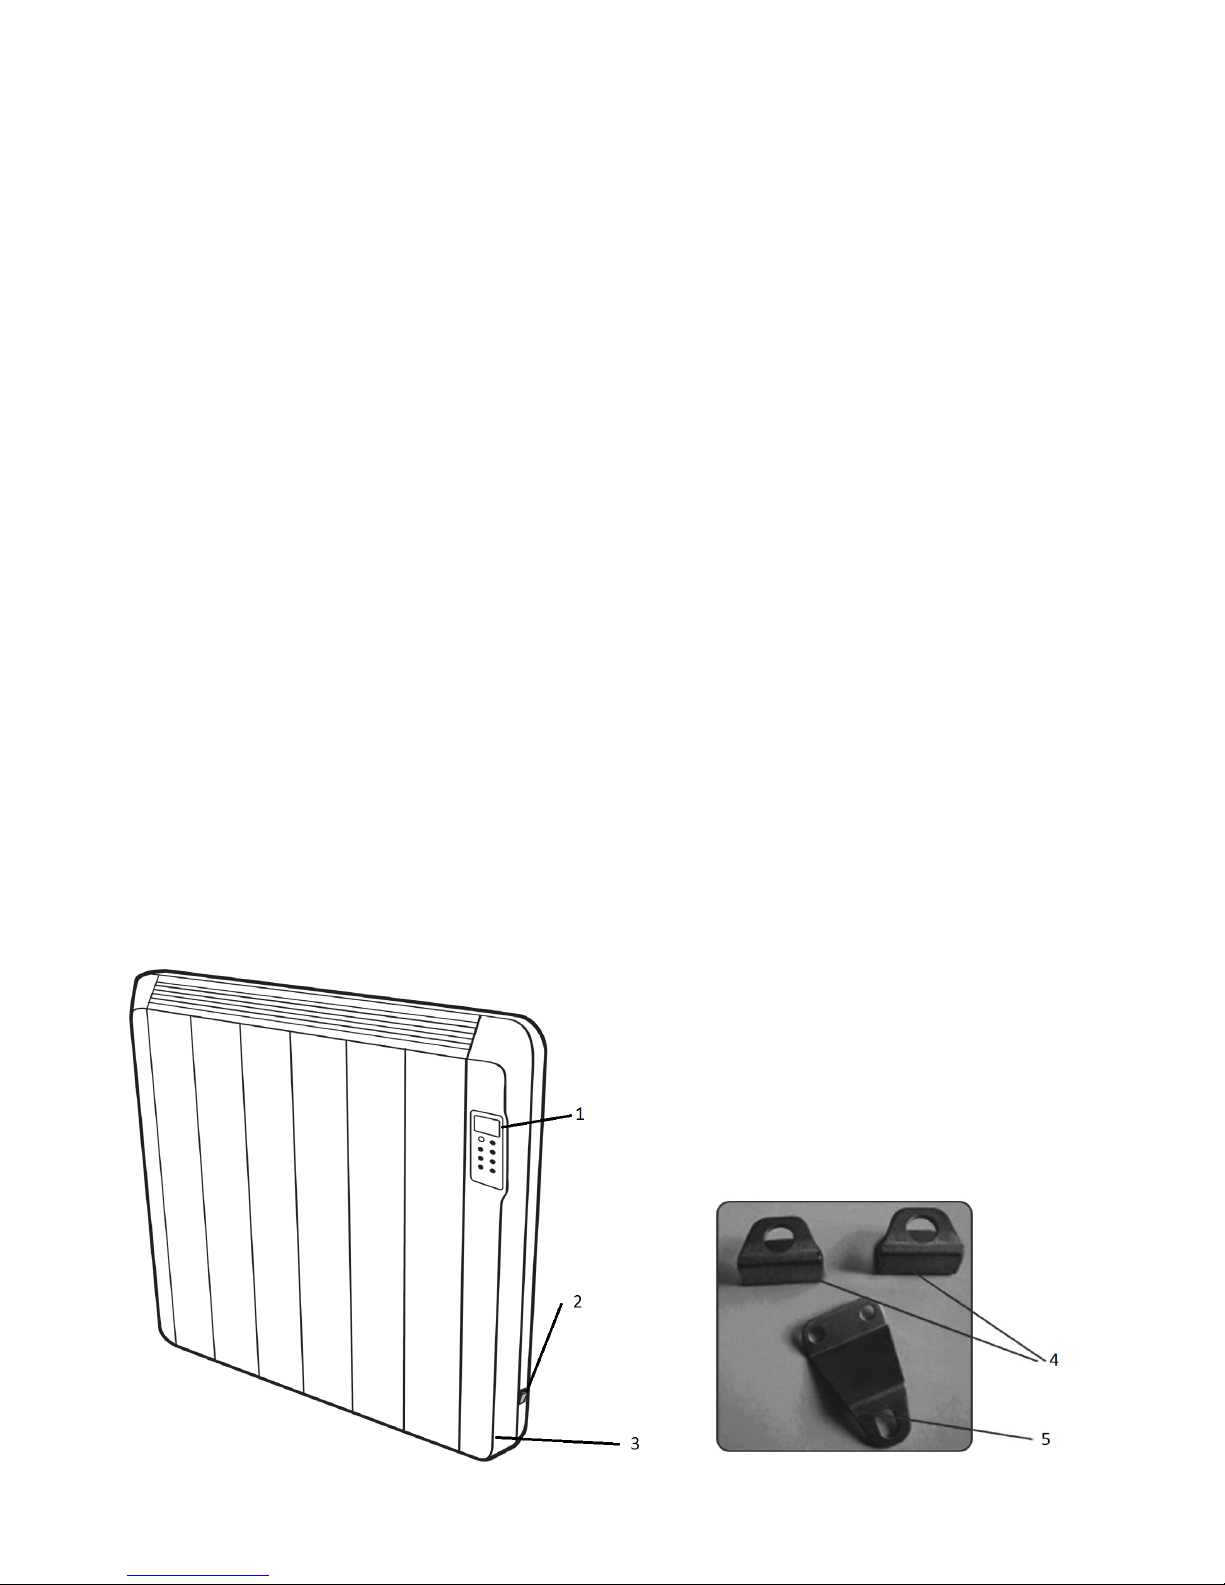
Description:
1. Control anel
2. Main switch
3. Tem erature sensor
4. Wall su orts
5. Wall su ort accessory
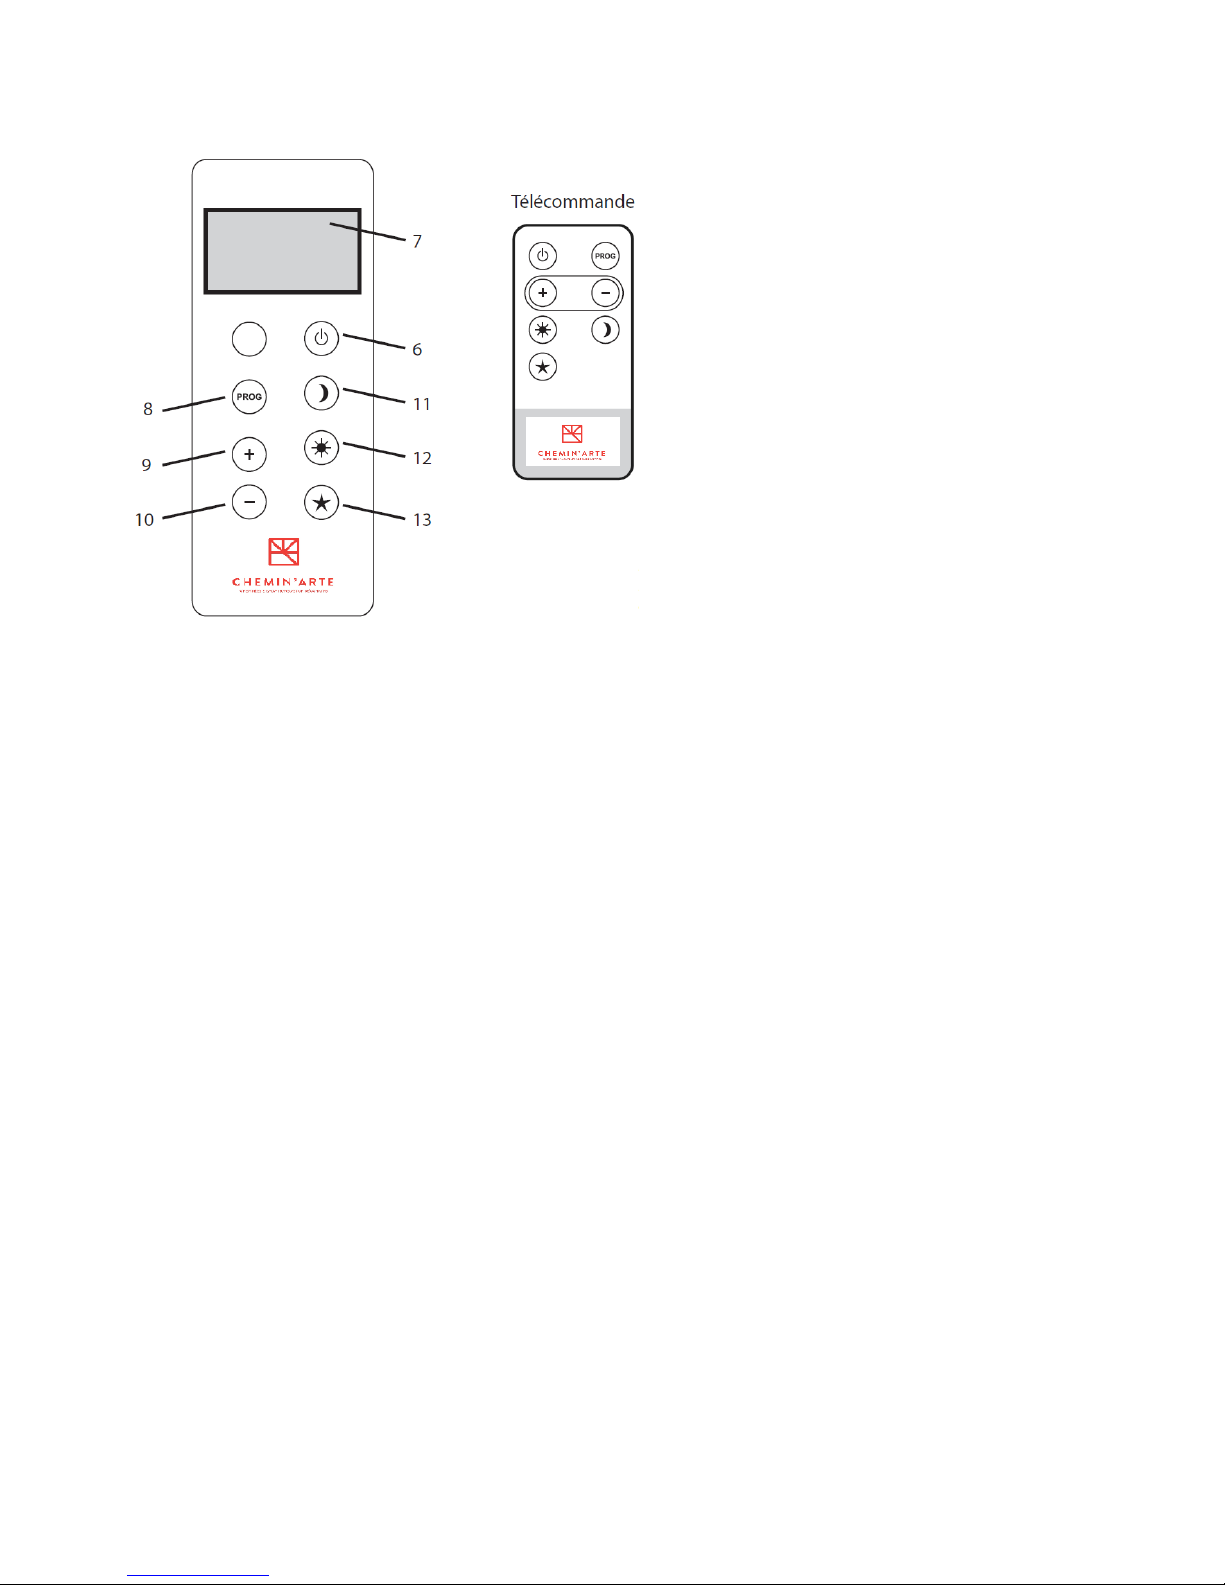
6. ON button
7. Dis lay
8. Program button “PROG”
9. + button
10. - button
11. Day button
12. Night button
13. Anti frost button
Wall mounting installation
• Before fixing on a wall, be sure to check that once installed the unit must be at a minimum distance of 20 cm. from
any obstacle (side walls, shelves or floor).
• Make two holes in the wall bearing in mind that the distances will vary de ending on the ty e of heater that you
have urchased.
Model 1000W (ref 144) : 420mm between holes
Model 1500W (ref 145) : 560mm between holes
Attach the brackets (4) to the wall using the retaining studs and screws enclosed. When carrying out this o eration
bear in mind the smaller diameter side of the brackets should be resting on the wall.
Then screw the wall su ort accessory (5) onto the two holes on the bottom rear of the unit. This o eration must be
erformed so that once the radiator is installed; the ortion of the late with a single hole is leaning against the wall.
Hang the heater on the stands.
Once hung on the wall mark the free hole of the wall su ort accessory (5).
Remove the a liance from the wall, make a hole at the mark and enter the corres onding wad.

Finally hang the a liance on the brackets and screw the mounting late to the wall.
Use:
AUTOMATIC LOCKING
The buttons on the heater become blocked in the dis lay ( ) , if during o eration no key is ushed during one minute.
To unlock them you must ress (-) for 3 seconds.
MANUAL OPERATION
The heater can o erate in three different ways.
1. Day mode: ( ) the tem erature can be set between 5 and 35 º C.
2. Night mode: ( ) the tem erature can be set between 5 and 35 º C.
3. Anti-freezing mode: ( ) the tem erature can be set between 5 and 15 º C..
IMPORTANT: So you can o erate the heater, the tem erature you select should always be above the reference
tem erature of the room.
-The a liance will not work if the rogrammed tem erature is less than the tem erature of the room.
ATTENTION: When selecting a room tem erature, you should choose a few degrees more than the desired
tem erature, as the tem erature recognized by the screen, when it is working, is the exact tem erature beside the
heater and not the room tem erature. For this reason the selection o tion has reference tem eratures u to 35ºC.
Carry out the following ste s to start the o eration:
A.- Connect the a liance to the mains and ush the on switch (2). The screen will flash, then the degrees centigrade
(ºC) which corres onds to the reference tem erature beside the heater and the symbol of ower indicator ( ) will
a ear. If this symbol doesn´t a ear, ress the “ON” button.
B.- Select the corres onding key using the o eration mode: day (), night ( ) or anti-freezing (). The screen will show
the symbol of the selected mode.
C.- Using the + o - key select the desired tem erature for the chosen o eration mode. While choosing the
tem erature, “ºC” will remain flashing.
D.- Once the degrees desired have been selected these will disa ear from the screen and the new ones which
corres ond to the reference tem erature will a ear.
Repeat steps B, C and D for other modes.
• Now select the key corres onding to the mode you want the radiator to function on.
• When the selected tem erature of the a liance have been reached it will disconnect and the ower indicator

() will disa ear from the screen.
• When the tem erature dro s below that rogrammed the device will connect automatically and the ower
indicator
() will rea ear on the screen.
NOTE: The ower indicator () may flash when the reference tem erature is a roaching the oint of connection and
disconnection.
ATTENTION: If the a liance is disconnected from the mains; the main switch is turned off or there is a ower cut,
the selected degree will be stored in the memory. To reset the device (when connected to the network with the
main switch on and energized) unlock must be carried out either with the remote control* by ressing the ower key
3 seconds or switching off or switching on the main switch (2).
RECOMMENDATION:
• Use the remote control for switching on and off. It is more convenient. Remember to use the anel key ad, if this
is locked then the mains switch must be turned on and off (2) while the remote control key ad does not lock. Sim ly
ressing the ower key ( ) on the remote connect will connect it or disconnect it. When disconnected, the (º C)
reference tem erature will remain on the screen.
PROGRAMMED OPERATION
• As in the manual mode, the heater can o erate in three ways: day ( ), night ( ) or anti-freezing ( ) . Therefore,
before setting the time and day of the rogrammer follow the ste s A, B, C, and D in this aragra h.
NOTA: If you erformed a manual o eration and want the rogrammed tem erature to be the same, you do not
need to modify it.
• Once this o eration has been carried out the actual time and day must be set.
• To do this, hold down “PROG” for a few seconds until the dis lay shows “00:00”. The first two digits corres onding
to the time are intermittent and using the + or - keys adjust the current time and ress “PROG” for this time to
remain set.
• Then the digits for the minutes flash. Use the same keys + or - to set the minutes, and “PROG” to set.
• Then the weekly calendar a ears ( 1 is for Monday and 7 Sunday ). Set the day of that week in course using the +
or - keys and ress “PROG” to set.
• Fig. B will a ear in the screen and the first two bars that corres ond to the first hour to set (0 to one in the
morning) flash intermittently. The weekly calendar indicates “1” for Monday (first day to rogrammer).
1. Press the o eration mode key: day ( ), night ( ) or anti-freezing ( ) you wish to have for this time interval. If you
ress night, the symbol ( ) will a ear on the screen and the bar of the u er area will flash (Fig. C). If you ress anti-
freezing the corres onding symbol will a ear ( ) and the bar in the lower area will flash (Fig. D). If you ress day (
),the two bars will remain flashing. The first hour of o eration is already rogrammed.
2.Press + and the bars for the next hour start flashing (one to two in the morning). Select the mode you want for that
time using the keys day ( ), night ( ) or anti-freezing ( ) or ush + when the desired mode is chosen to ass onto the
next time interval.
• Perform the same o erations until hour 24. It is always the same o eration.
First with the: day ( ), night ( ) or anti-freezing ( ) keys chose the o eration mode for the determined time indicated
by the flashing bars and then the + key to move onto the next hour. To return to the revious ress -.
ATTENTION: When arriving at 24 hours and the o erating mode is chosen instead of ressing + ress “PROG”
instead of + to finish the rogram.
The Schedule to day 2 (thuesday). Re eat the rocess 1 and 2 by ressing “PROG” to finish the day’s rogramming.
The calendar date will move to 2 (Tuesday). Re eat ste s 1 and 2 and ress “PROG” to end the day’s schedule.
• Continue this rocess until setting the 7 days of the week. Once the rogramming of the seventh day has finished,
ressing “PROG” the heater is automatically laced at the current day and time and the corres onding rogram
mode.
• This data is stored in the memory as long as the a liance is connected to the network and the mains switch (2) is
in the on osition. In case of a ower outage, if the device is disconnected from the network or switched off the
weekly rogram is maintained but the actual time and day must be set.
RE-SETTING THE TIME AND THE DAY

• Unlocking the a liance. To do this, hold down “PROG” for a few seconds until the dis lay shows “00:00”. The first
two digits corres onding to the time work intermittently. Using the + o - , keys set the actual time and ush “PROG”
so that the time remains set.
• Then the digits for the minutes flash. Use the same keys + o - to adjust the minutes, and “PROG” to set them.
• Then the weekly calendar a ears ( 1 is for Monday and 7 Sunday ). Set the day of that week in course using the +
o - keys and then instead of setting with “PROG” ush the on switch twice. Then ush “PROG” and then the + o - key.
• If the heater is working on the rogrammed mode and we want to move to manual o eration
ush the “ON” key twice on the remote control and then ush “PROG”. Select the mode if necessary using the
corres onding key and ress + o -.
• If you want to re-run rogramming ress the “ON“ key twice on the remote, then ress “PROG”.
• While o erating in the rogram mode using the remote control to connect and disconnect the heater. Press the
“ON” key if you want to disconnect the heater. Press this button again if you want the heater to start o erating.
ATTENTION: When o erational on the rogrammed mode, if you want to change the tem erature mode with which
the heater is running, ress twice the “ON” key on the remote control and then using the + o - keys select the
desired tem erature.
When you change the tem erature, it is stored for that mode of o eration throughout all rogramming, including
the tem erature in this mode during manual o eration.
REMOTE CONTROL
• The remote control works with one battery CR2025.
• Remove the rotection label from the battery for the remote control to work. If necessary, remove the battery
housing lid.
• With the remote control you can rogram the same functions as with the control anel when it is not blocked.
Cleaning:
• Before cleaning the a liance, make sure the a liance is un lugged and allow it to cool.
• Clean it with a dry and smooth cloth.
• Do not use chemical or abrasive roducts, metallic scourers and so on, which may deteriorate the surface, to clean
the a liance.
RETURN PROCEDURE FOR DECORATIVE EATERS
All our heaters are guaranteed for 1 year arts and labor. If during this eriod there were a malfunction of your
roduct, lease follow the return rocedure below (if bought in France) or contact your dealer if bought in any other
Euro ean countries :
- Above all else, call customer service at 0951 634 467 to determine the cause of the roblem and the solution to.
- Package the defective chimney in its original ackaging. Make sure it is ro erly rotected (es ecially at the
corners).
- Attach to the original arcel recei t by circling the date urchase (no hotoco ies will be acce ted) and the name
and the return address of the reci ient.
- Send it at your ex ense, to: EFYDIS, 4 allée de l’olivet, 07300 St Jean de Muzols.
- We will re air or re lace your defective fire lace and return it to you at our ex ense at the adress
mentioned with the ackage (address in France). - We will also return the recei t, dated and buffered to revalidate
the warranty.
DISCARDING WORN HOUSEHOLD DEVICES
The Euro ean directive 2002/96/EC ertaining to electrical and electronic waste rohibits such household goods
from being discarded with local refuse services. Worn devices must be collected se arately to o timize the recovery
and recycling rates of the com onents therein to reduce detrimental effects on the environment and on human
health.
The “crossed out rubbish bin” symbol is affixed to all roducts as a reminder to res ect the waste regulations.
This manual suits for next models
1
Table of contents
Other Chemin'Arte Heater manuals


