CHERRY AUDIO Dreamsynth DS-1 User manual

Cherry Audio Dreamsynth User Guide - 1
Dreamsynth DS-1 is our first all-original virtual instrument. We describe it as
a love letter to the hybrid analog/digital synthesizers that proliferated from
the mid-80s to the early 90s. Innovative instruments like the Ensoniq ESQ-1,
the Kawai "K" series, and the Sequential Prophet VS used various cutting-
edge flavors of digital synthesis, frequently combined with the warmth of
Curtis or SSM analog filter chips, resulted in a really exciting time period for
poly synths that went far beyond the strictly-analog synthesis of the 70s.
Dreamsynth is not a recreation of any particular instrument, but it (excuse
the pun) cherry picks desirable features from some of the best digital/analog
hybrids of the period. Because it's not an emulation of a particular synth, we
were free to create a full-tilt, power synth with massive sound and
modulation capabilities, but as you'll quickly discover, the user interface is
hands-on and super easy to use. If you're comfortable creating sounds with
classic Minimoog/Prophet-style analog synths, you'll be creating killer layered
sounds in a flash.
Dreamsynth User Guide
Last updated 2022.07.28

Cherry Audio Dreamsynth User Guide - 2
Getting back to that "full-tilt, power synth," we weren't kidding -
Dreamsynth's three dual-waveform morphing oscillators include independent
range and detune controls for each waveform, amounting to six
simultaneous virtual analog- or PCM sample-based oscillators (featuring over
400 onboard looping, one-shot, and single-cycle waves) with up to 16 voices
of polyphony. The unique A/B wave mix control can set a static balance
between two waves, or it can be modulated for a myriad of evolving or
rhythmic vector synth-style tones. Dynamically changing oscillator timbres
have never been this easy to create!
Each oscillator includes its own fully modulatable volume and pan controls,
feeding 12 dB/octave multimode stereo filters for super-wide layered and
detuned patches. The stereo filters are a classic OB-style with continuously
variable low- to high-pass curves, as well as a bandpass mode, and all
parameters are CV modulatable.
Did we mention modulation? Dreamsynth includes three powerful, tempo-
syncable LFOs with multiple waveforms, selectable bias, cycling and one-
shot modes, and a free-run or retrigger operation. Each oscillator also
includes a dedicated triangle-wave LFO, so you won't need to "waste" the
main LFOs for oscillator vibrato.
Strings Attached
Dreamsynth also incorporates a beautiful-sounding classic polyphonic string
synthesizer, operating completely independently of the main synthesizer
tone generation. Furthermore, the main synth and string synth sections can
be layered and split across the keyboard, and the arpeggiator and individual
effects are all separately assignable.
Mod Madness
Dreamsynth features tremendous modulation routing capabilities capabilities
with 20 mod sources and over 40 destinations. All of the "standard" mod
sources are here, but we've also included more esoteric mod sources such as
four LFO phase choices, audio-rate oscillator to oscillator FM, arpeggiator
mod, and more. Mod destinations are equally plentiful, including oscillator
A/B wave mixing, panning and level, filter LP to HP curve, and modulation of
all effects parameters. Best of all, the modulation setup couldn't be simpler:
every mod source/destination has a dedicated pop-up source menu and
invertible amount knob - no confusing grids or "hidden" tabs.
Affectation
Cherry Audio Dreamsynth User Guide - 3
Dreamsynth features our most flexible and powerful effects implementation
to date, including distortion, phaser, chorus/flange, delay (including our killer
tape delay algorithm), and reverb with our amazing new "Galactic"
algorithm. Effects can be independently applied to the synth and string
sections and all parameters of all effects are CV controllable.
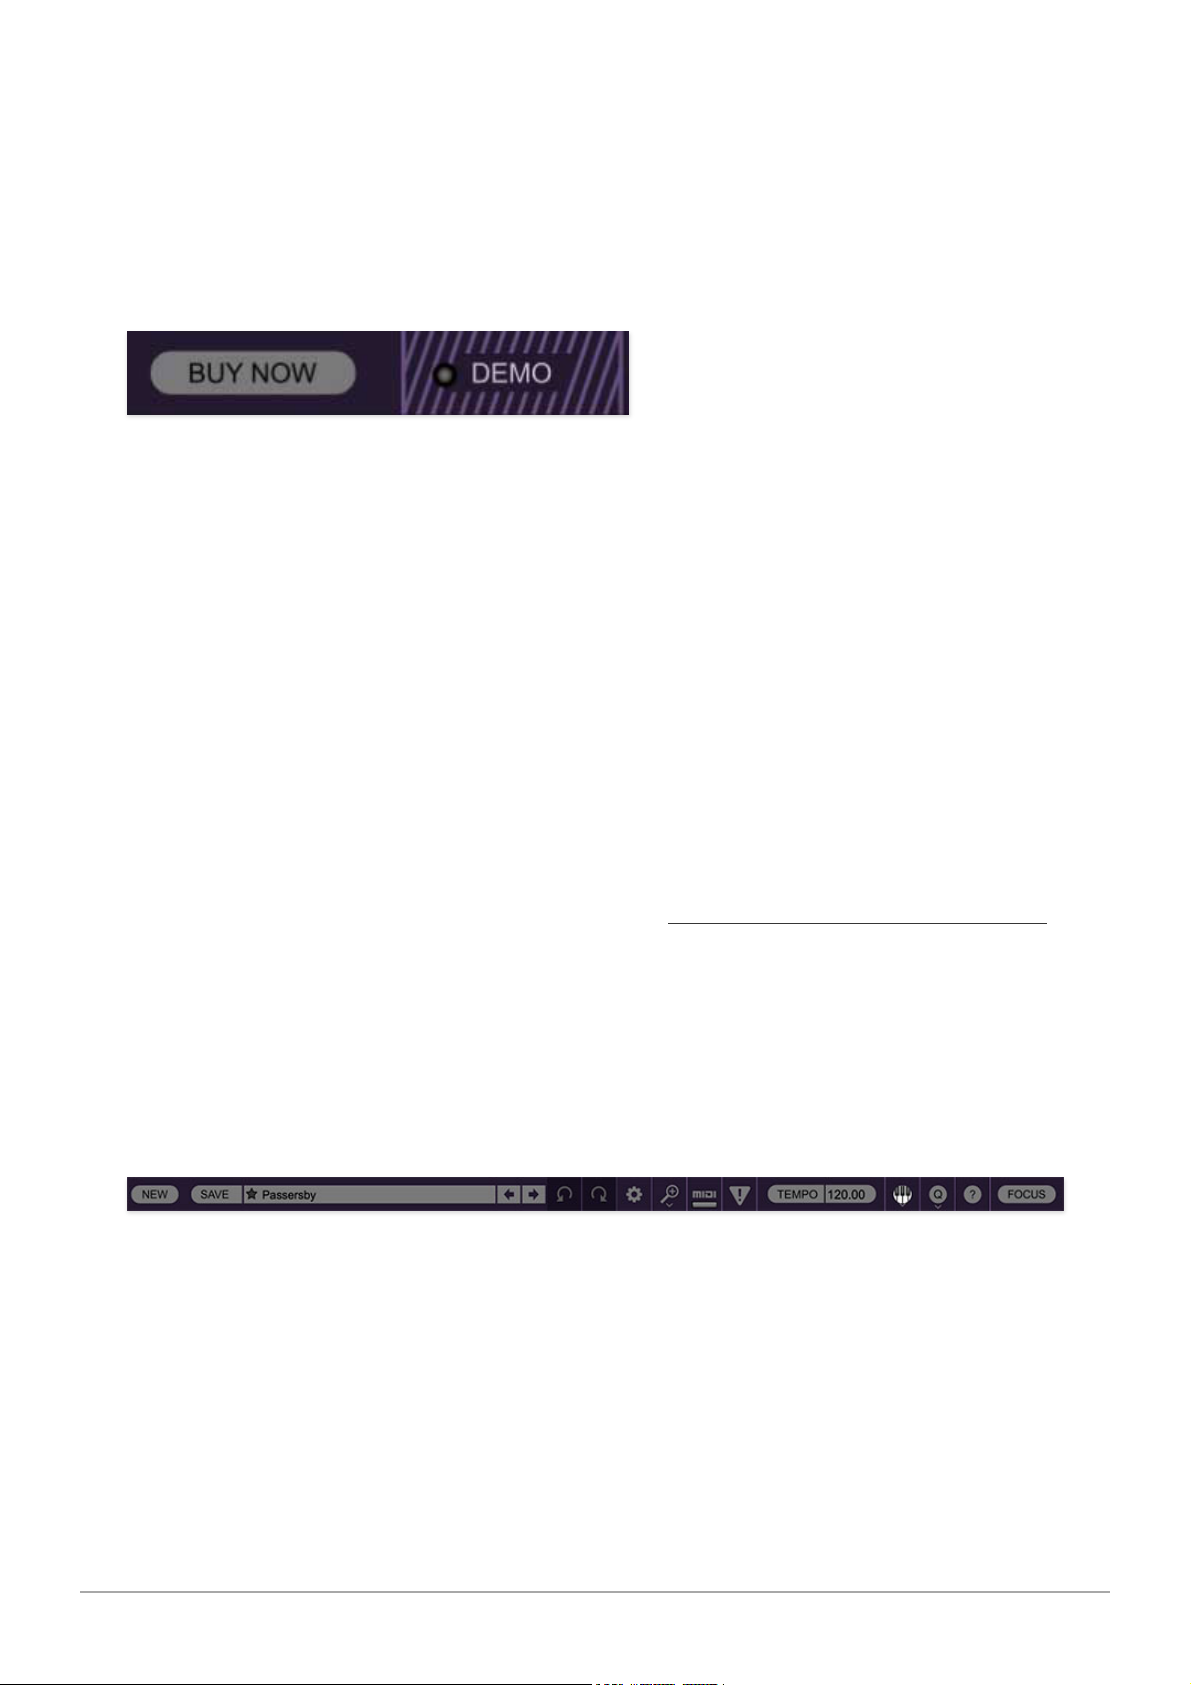
Pre-Purchase Demo Mode
If you haven't purchased the full version of Dreamsynth, it will run in demo
mode. All functions will work, but inharmonic tones will occasionally sound
(the LED next to
Demo
in the top toolbar will illuminate when the ugly tones
are sounding). We've also added a handy button to make purchasing easy, so
you've got no excuse! As you might expect, all this demo nonsense
disappears once Dreamsynth is purchased.
Technical Assistance
Cherry Audio's unique online store and automatic updating should make
operation a smooth experience, but if you run into any issues or have
questions, you can discuss issues online at the Cherry Audio forums at:
https://forums.cherryaudio.com/viewforum.php?f=37
... or you can communicate directly with our grumpy except for the-new guy
outgoing and friendly tech support staff at:
https://cherryaudio.kayako.com/
Top Toolbar and Preset Browser
The purple strip at the top of Dreamsynth's interface is where you’ll load,
save, and create sound presets. It also contains utility functions such as
undo/redo, UI zoom and
Focus
controls, under-the-hood settings, and more.
Let’s go over them:
New- Opens a new blank patch preset. If an unsaved patch is currently open
or you’ve modified an existing saved patch, a dialog asks if you’d like to save
Cherry Audio Dreamsynth User Guide - 4
the patch in its current state. This greatly reduces the possibility of losing an
edited unsaved patch.
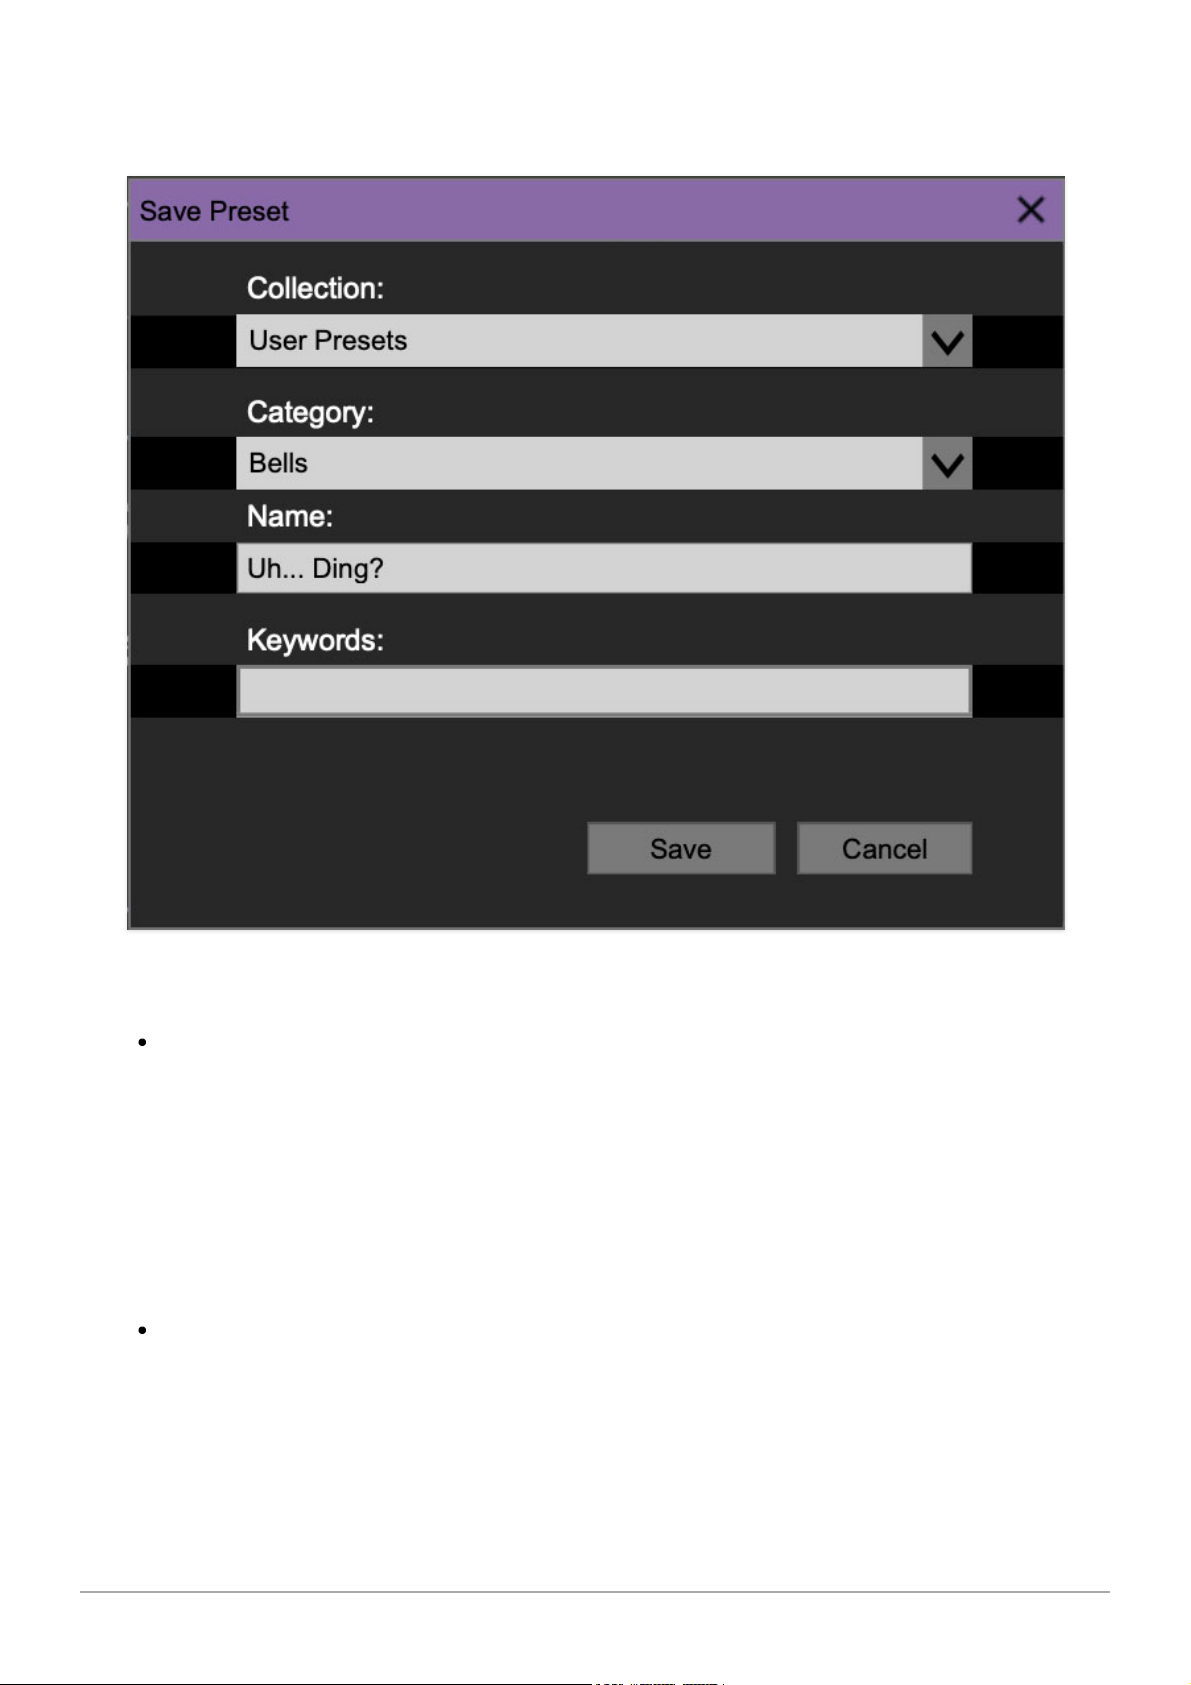
Save- Use this to save patches. There are a couple of levels of hierarchy:
Collection- This is the top level of organization, and contains entire
“sets” of presets. The
Dreamsynth Presets
are the main included
collection. We also include a
User Presets Collection
for storing your own
presets, but you’re free to create your own collections. To create a new
collection, click in the
Collection
text field (where it says
User
Presets
above) and type a name. User-created sounds can be freely saved
to any collection; we like to keep ‘em separated for organizational
purposes.
Categories- Within each
Collection
are a number of sound categories. As
with collections, you’re free to create as many categories as you like. To
create a category, click in the
Category
text field of the
Save
dialog
window and type a new category name.
Cherry Audio Dreamsynth User Guide - 5
Patch- A patch is an individual sound. To save a patch, simply type the
name in the
Name
field and click
Save
.
Keywords- You can add descriptive words such as “stacks,” “noisy,”
“stringy,” etc., to patches to make them appear when terms are typed in
the
Search
field. Use commas to separate multiple keywords entries.
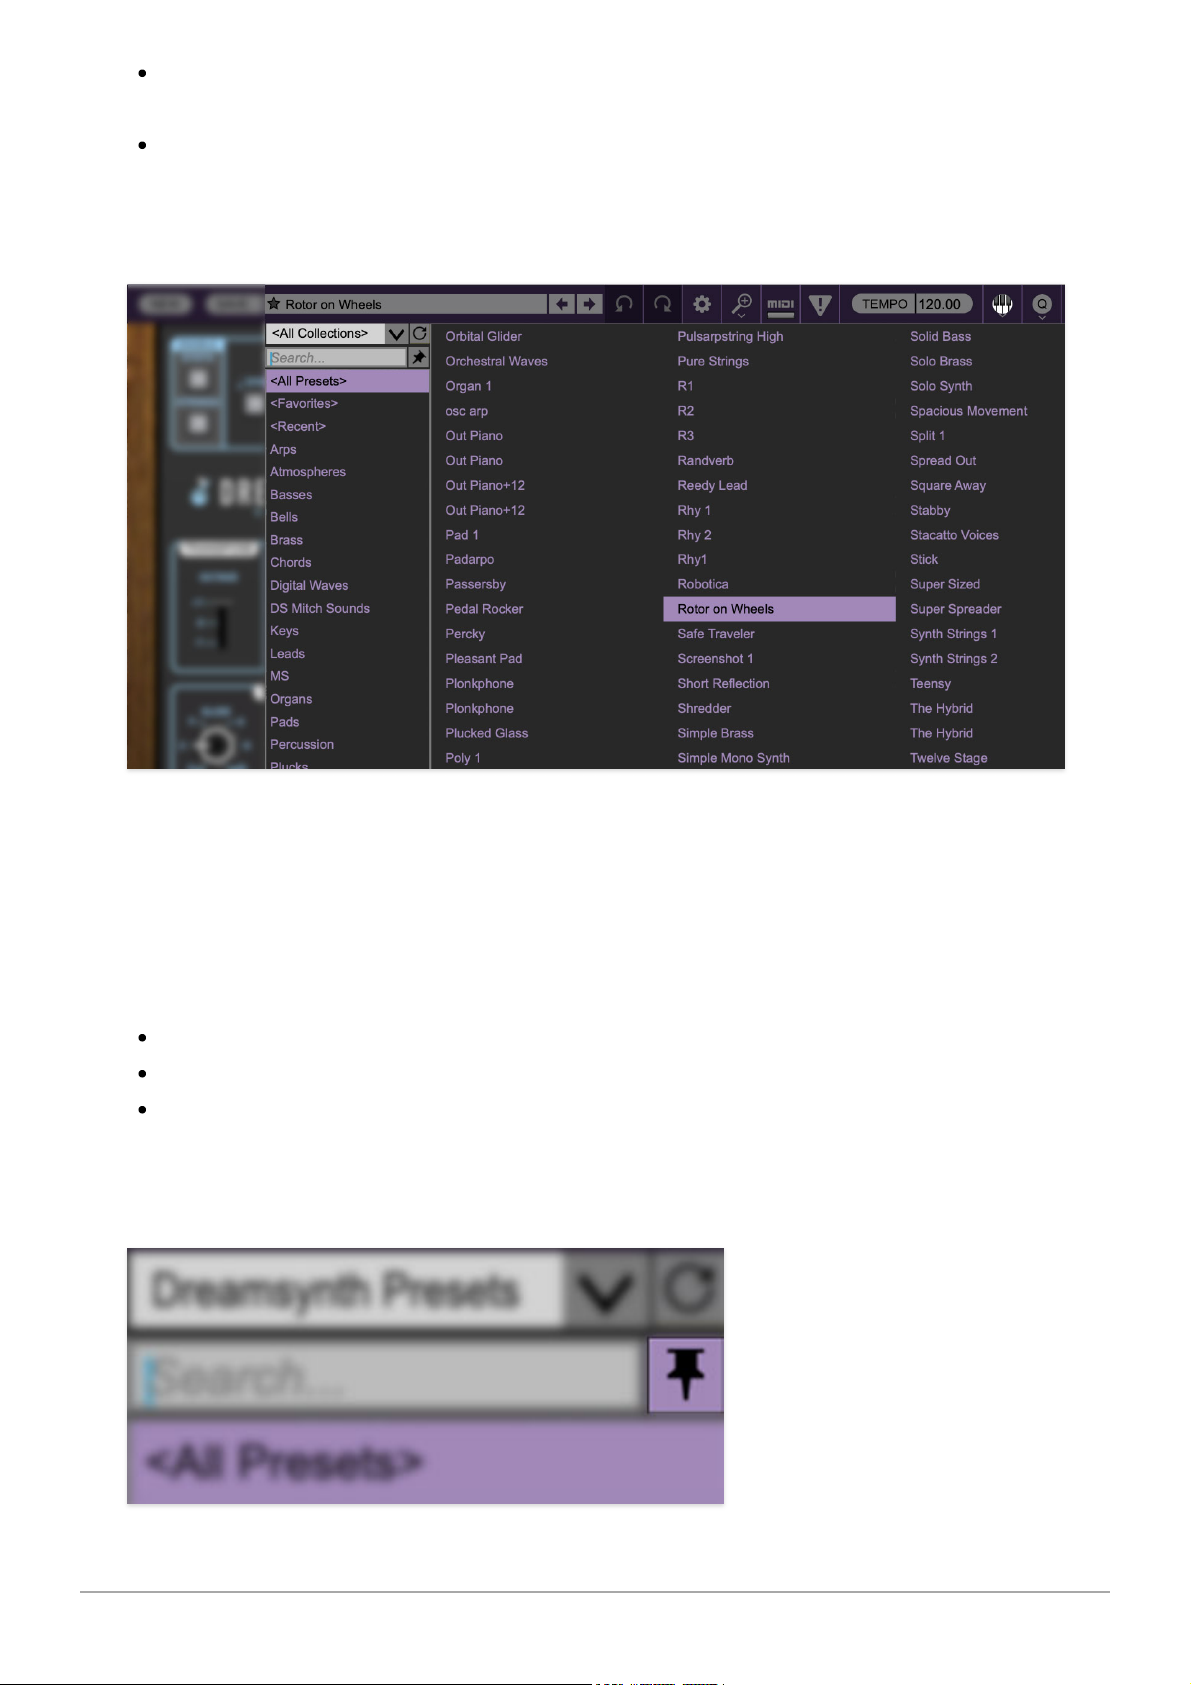
Browsing Patches- Patches can be browsed by clicking the <
Select Preset
>
field. To select a preset collection, click in the area that says <
All
Collections
> or on the downward-facing arrow next to it.
Clicking on the left-side categories narrows down which patches are
displayed.
<All Presets> will show presets from all collections and categories.
<Recent> displays recently used presets.
Refresh- This is the circular arrow button to the right of the downward
arrow; clicking this checks the Cherry Audio server for new or updated
presets.

Cherry Audio Dreamsynth User Guide - 6
Pin
-
Clicking the push-pin icon locks the patch selection list open, allowing
fast and easy browsing and auditioning of patches. Click the icon again to
disable pin mode. when in pin mode, the up and down arrow keys can be
used to select patches.
Preset
- Step Back/Forward Arrows
- These step to the previous or next
preset.
Undo/Redo- These circular arrows will undo or redo the last action. It
remembers many steps, so if you really loused something up, keep on
clickin'...
Settings
-
This is where user preferences for user interface, audio interfaces,
user account, and more are configured. See the Settings section for full
information.

Cherry Audio Dreamsynth User Guide - 7
Zoom Magnifying Glass
-
Click to resize the Dreamsynth interface.
Selecting
100%
returns the user interface to native size.
MIDI Tab
-
Opens the MIDI controllers tab for configuring internal and
hardware MIDI controls. See the MIDI Controllers Setup and MIDI Tab
section for full information.
! (MIDI Panic)
- Click to send an all-notes-off message in case of, "why
won't this thing stop making noise?!?" stuck-note incidents.
Tempo (Standalone Version Only)- Displays Dreamsynth's current
internal tempo setting. Quadra's internal tempo affects the
LFO
,
Echo,
and
Arpeggiator
sections when their corresponding
Sync
switches are enabled.
The tempo setting can be changed by moving the mouse up and down
anywhere in the tempo section, or by double-clicking the number and
entering the desired BPM value.
The tempo display only appears in the standalone version of
Dreamsynth. VST, AU, and AAX plug-in versions receive tempo data
from their host DAW app.
QWERTY Musical Typing Keyboard- Opens an onscreen keyboard allowing
a standard QWERTY computer keyboard to be used for playing music notes.
For more information, see QWERTY Musical Typing Keyboard (MTK)
section.

Cherry Audio Dreamsynth User Guide - 8
Oversampling Quality (Q)- The Q button sets Dreamsynth's internal
oversampling rate; the higher the setting, the better audio fidelity will be,
with the caveat that more computer processing power will be required.
Internal processing can be set to
1x
(same rate as the current sample rate of
the host DAW or in the
Settings>Audio/MIDI
window for the standalone
version) or to
2x
,
3x
, or
4x
the current sample rate. The sample rate is
downsampled at the instrument output stage to match the current host
sample rate.
For example, if the current DAW/instrument sample rate setting is 48 kHz,
and oversampling is set to 2x, Dreamsynth's internal processing runs at 96
kHz, and is then reduced back to 48kHz at the output stage.
If the current DAW/instrument sample rate setting is 192 kHz and
oversampling is set to 4x, Dreamsynth's internal processing will run at 768
kHz, and you will very briefly hear the most ameeeezing synthesizer sound
quality ever experienced by mankind before your computer instantaneously
explodes in a fiery, white-hot supernova blaze. Ok, maybe not.
When oversampling is set to any multiple greater than
1x
, the
Q
button
glows yellow.
Dependent on a number of factors (audio system D/A converter quality,
monitor speakers, the nature of the current Dreamsynth patch, etc.), you
may not hear a big difference with higher settings. Generally speaking,
audible differences may be noticeable when using digital waves with a great
deal of high harmonics (which is pretty much most them!).
Help- Clicking this launches your web browser and opens the help document
you’re currently reading, which is a really meta concept.
Cherry Dreamsynth logo (left side of panel)- Clicking this displays
“about” information, and shows the version number and current registered
Cherry Audio Dreamsynth User Guide - 9
user ID.
Focus Button
If you're using a tiny laptop, the user interface can potentially be hard to see.
With this in mind, the
Focus
button conveniently blows up Dreamsynth's view
to roughly twice its normal size within the current window size. Unlike the
Zoom
"magnifying glass" function,
Focus
doesn't affect the current window
size. By default, the patch panel section fills the current window, but the
view can be scrolled vertically and horizontally with a mouse wheel, track
pad, or Apple Mighty Mouse finger-scrolling
.
Or if you're the last person on
earth still using a single-button mouse, scroll bars will appear at the window
edges when in
Focus
mode. (Drop us a line from your Angel Cities email
account, umkay?)
Using
Focus
mode couldn't be easier - just click the
Focus
button the top
menu bar. To return to standard view, click
Reset
. There's also a superfast
key shortcut - on Mac, hold the ⌘ [COMMAND] key and click the mouse; in
Windows, hold the [OPTION] key and click the mouse. Focus can be reset
with the same key shortcuts.
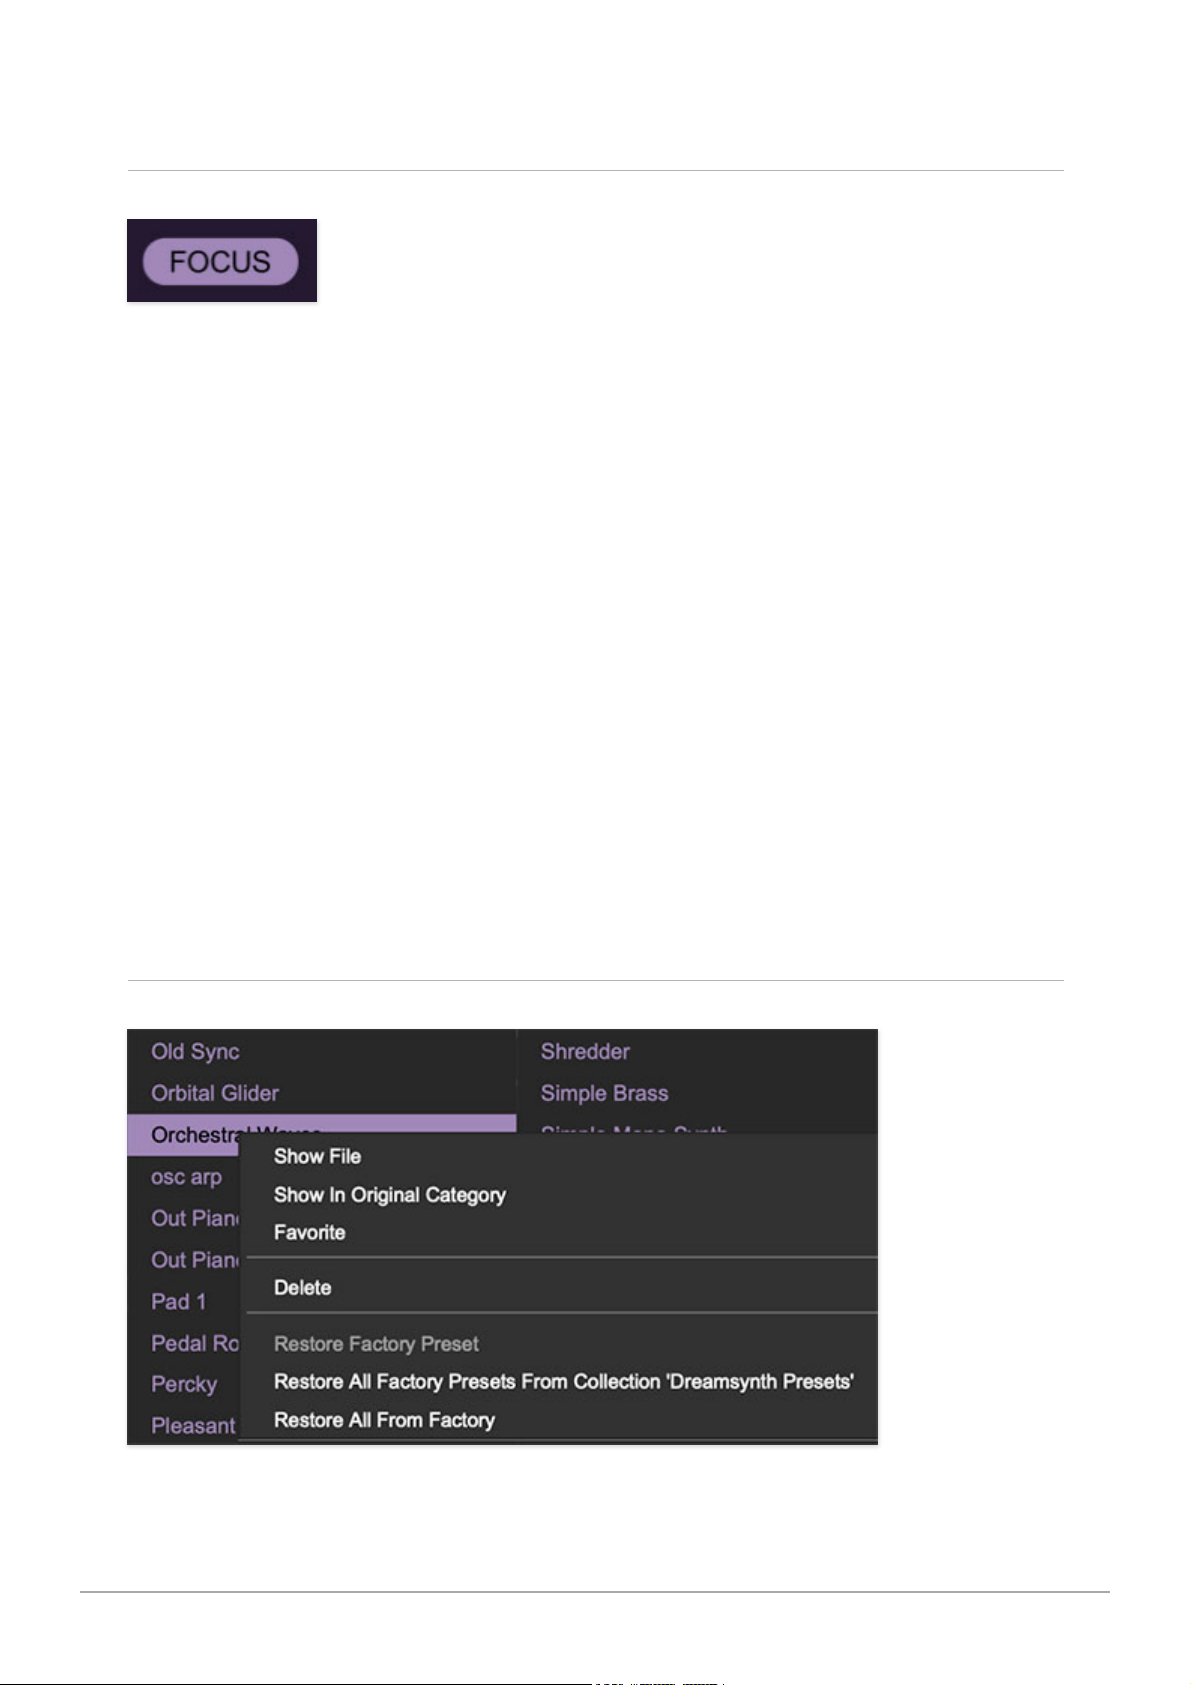
Preset List Right-Click Functions

Cherry Audio Dreamsynth User Guide - 10
Show File-
This displays the selected preset in the Mac or Windows folder
containing it. This is useful for backing up or sending a preset file to another
user.
Show In Original Category
-
Selects the preset within its category, i.e. the
category will highlight in the left preset menu. The
Show In Original Category
command only displays if the preset was selected within the <
All Presets
>,
<
Favorites
>, or <
Recent
> categories.
Favorites- Favorited presets will show in when the <Favorites> category is
selected. A star will display next to the preset name. Right-click on the preset
and reselect
Favorite
to un-favorite it. (Or say something nasty about its
mother.)
Delete
-
Deletes the selected preset.
Restore Factory Preset
-
If one of the factory (i.e. not user) patches is
edited and saved, selecting this command restores the patch to its unaltered
"factory" setting. This menu will be grayed-out for user bank patches.
Restore All Factory Presets From 'Dreamsynth Presets'
-
If any patches
from the "factory" Dreamsynth bank are edited and saved, selecting this
command restores
all
of them to their unaltered "factory" setting.
Restore All From Factory
-
If any patches from the "factory" banks are
edited and saved, selecting this command restores
all
of them to their
unaltered "factory" setting. At the time of writing, the Dreamsynth bank
mentioned above is the only factory bank, so this function and the
Restore
All Factory Presets From 'Dreamsynth Presets'
above have the same effect.
Oscillators
Dreamsynth’s three dual-waveform oscillators are perhaps its most special
component. The basic concept is that each oscillator simultaneously outputs
Cherry Audio Dreamsynth User Guide - 11
two virtual analog or sampled waves, with their blend set either manually, or
CV-controlled via one of Dreamsynth’s numerous mod sources.
The initial inspiration was to allow a simplified, two-plane version of the
morphing “vector” synthesis made famous by the vintage Prophet VS and
Korg Wavestation synthesizers, but once the A/B wave modulation was
implemented, we found this arrangement enabled a tremendous level of
tonal flexibility. In this section, we’ll go over the oscillator controls, and offer
some power user tips and tricks.
With exception of Osc 3’s Lo range setting, controls and operation are
identical for all three oscillators.
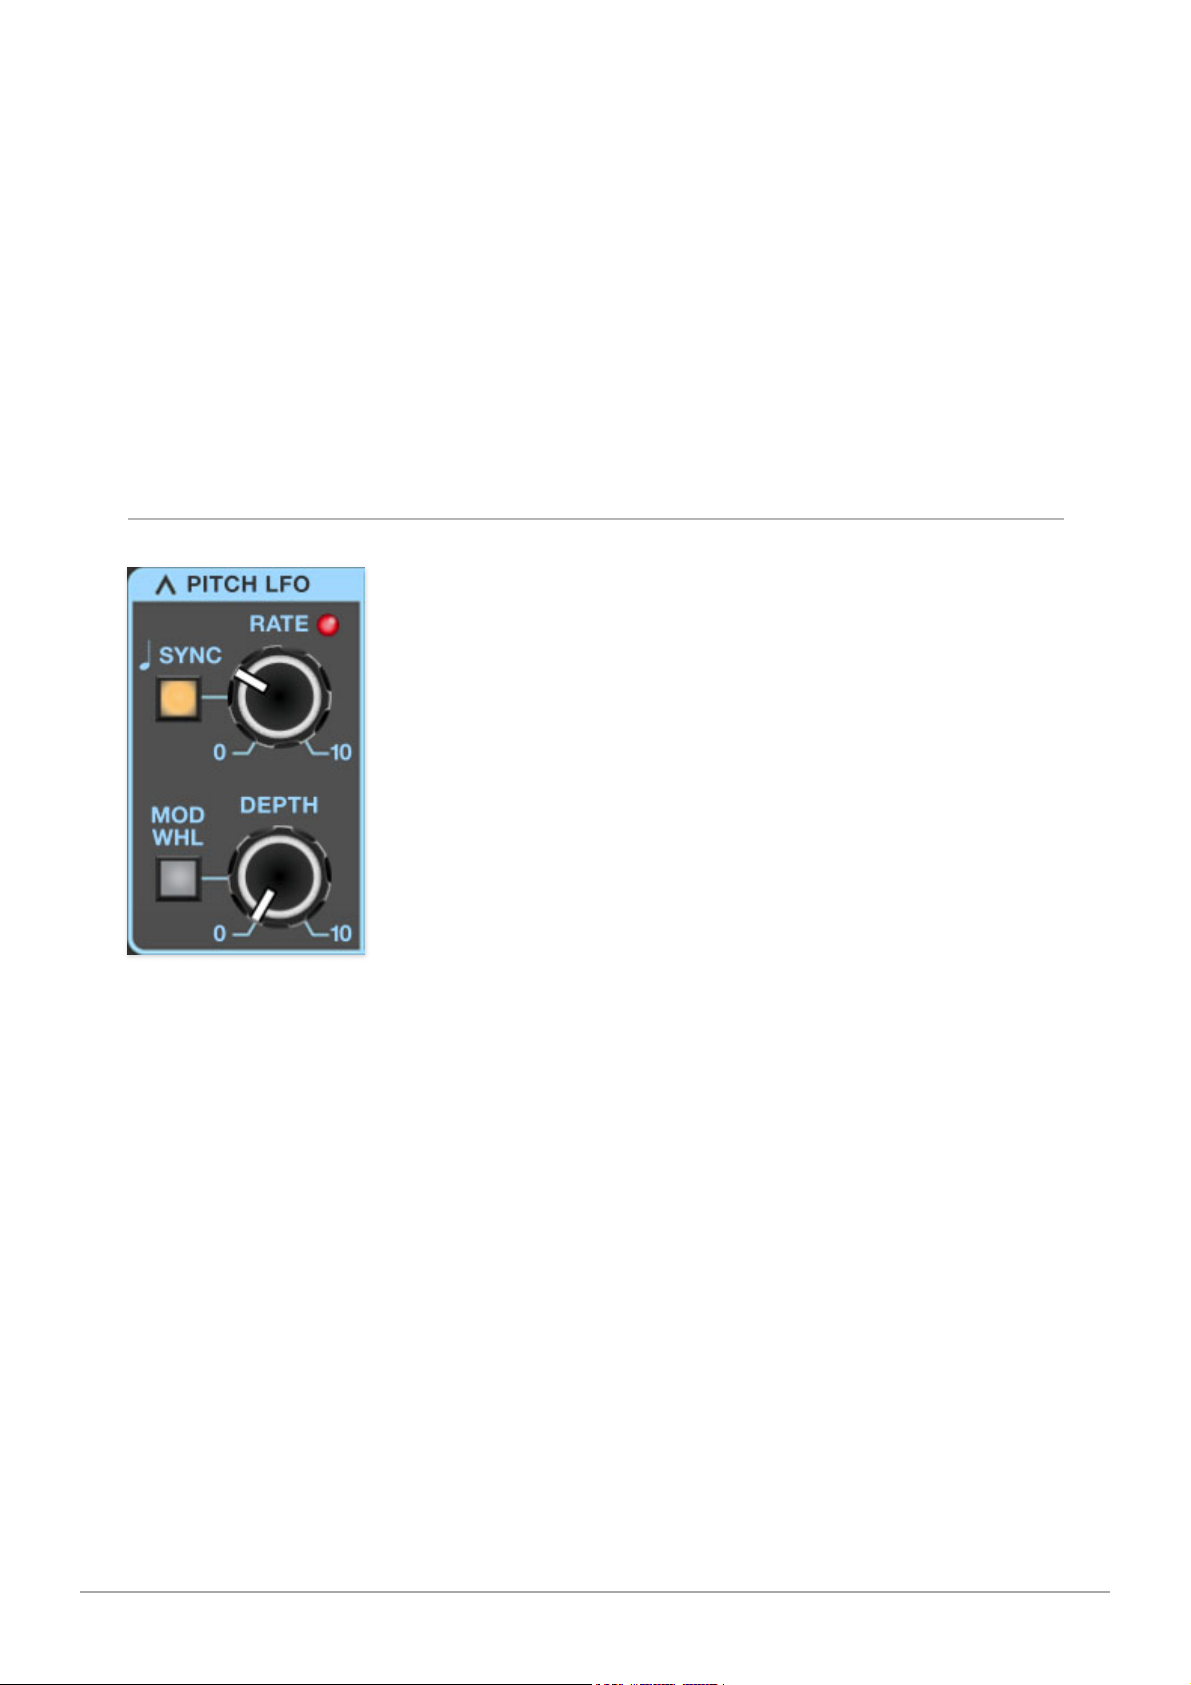
Pitch LFO
Each oscillator has its own dedicated triangle-wave low-frequency oscillator,
hard-wired to oscillator frequency. These let you add oscillator vibrato
without having to "waste" one of the main LFO's (which can be used for more
serious sound mangling!). Note that the Pitch LFO always affects wave A
and B equally.
Rate/Sync- Sets the Pitch LFO rate from 0.01 to 30 Hz. Toggling the
Sync
button locks the rate to host tempo when using Dreamsynth within DAW
software, or to the current tempo in the top menu bar when using the
standalone version. When the Sync button is enabled, the Rate knob snaps
to musically relevant settings ranging from 8 bars to 1/64th-note triplets.
Depth- Sets the depth of pitch modulation from zero up to one octave.
Mod Wheel- Toggling the Mod Whl button routes your MIDI controller's mod
wheel to control depth - this a fast and easy way to set up mod wheel-

Cherry Audio Dreamsynth User Guide - 12
controlled vibrato. When enabled, the maximum amount of mod wheel depth
is set by the
Depth
knob.
Setting Equal Pitch Mod Wheel Depth For Multiple Oscillators:
If you'd like an
equal amount of pitch for all three oscillators, there are some things to be
aware of. The three Pitch LFO's are free-running - in other words, they don't
reset when keys are struck, and though they may be set to the same rate,
they aren't phase locked - that is, each LFO will always be at a different point
in its modulation sweep. If you're modulating all three oscillators with all
three Pitch LFO's this means the pitch of each oscillator will always be a little
different. Depending on the nature of the patch, this may not be a concern,
but if you'd like identical pitch mod for all three oscillators, there are a couple
of ways to accomplish this:
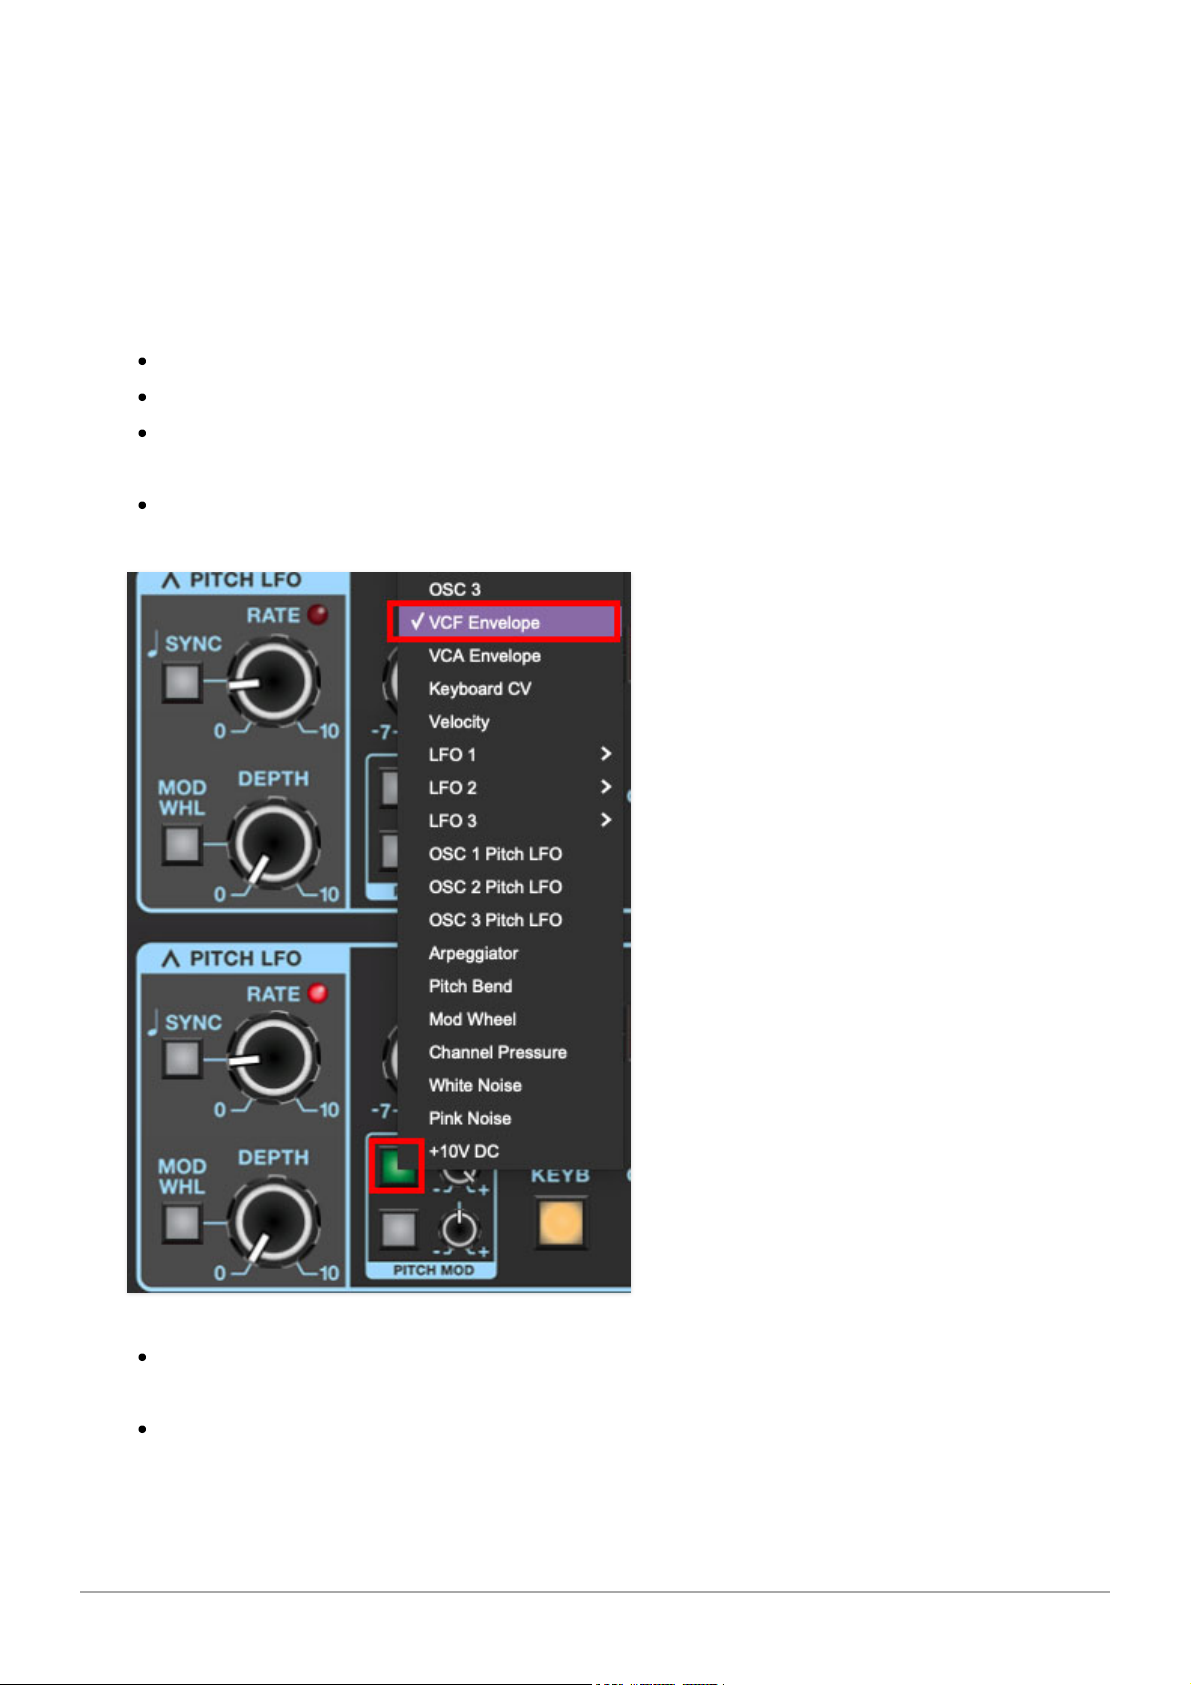
Set the Pitch LFO to the desired settings for one oscillator - in this example,
we'll use Osc 1. Now we'll use Oscillator 1's Pitch LFO to modulate Oscillator
2.

Cherry Audio Dreamsynth User Guide - 13
Click on one of the square mod source buttons in Oscillator 2's Pitch Mod box
(see above image), and select
OSC 1 Pitch LFO.
Make sure both oscillators'
Level knobs are up and increase the mod attenuator knob until the vibrato
depth matches up. This will be easier if both oscillator
Tune
knobs are
zeroed, and the Master section
Analog Drift
knob (at the bottom right) is all
the way down. If you're using the
Mod Whl
button, note that it only needs to
engaged for the one Pitch LFO used. Repeat the above assignment process
for the third oscillator and/or Strings section Pitch Mod.
Another method to get equal pitch mod for all oscillators would be to assign
one of the main LFO's to multiple oscillators' Pitch Mod sections. Mod wheel-
controlled depth can be set up by clicking the LFO's mod source pop-up and
selecting
Mod Wheel
, then turning up its associated attenuator.
Main Oscillator Controls
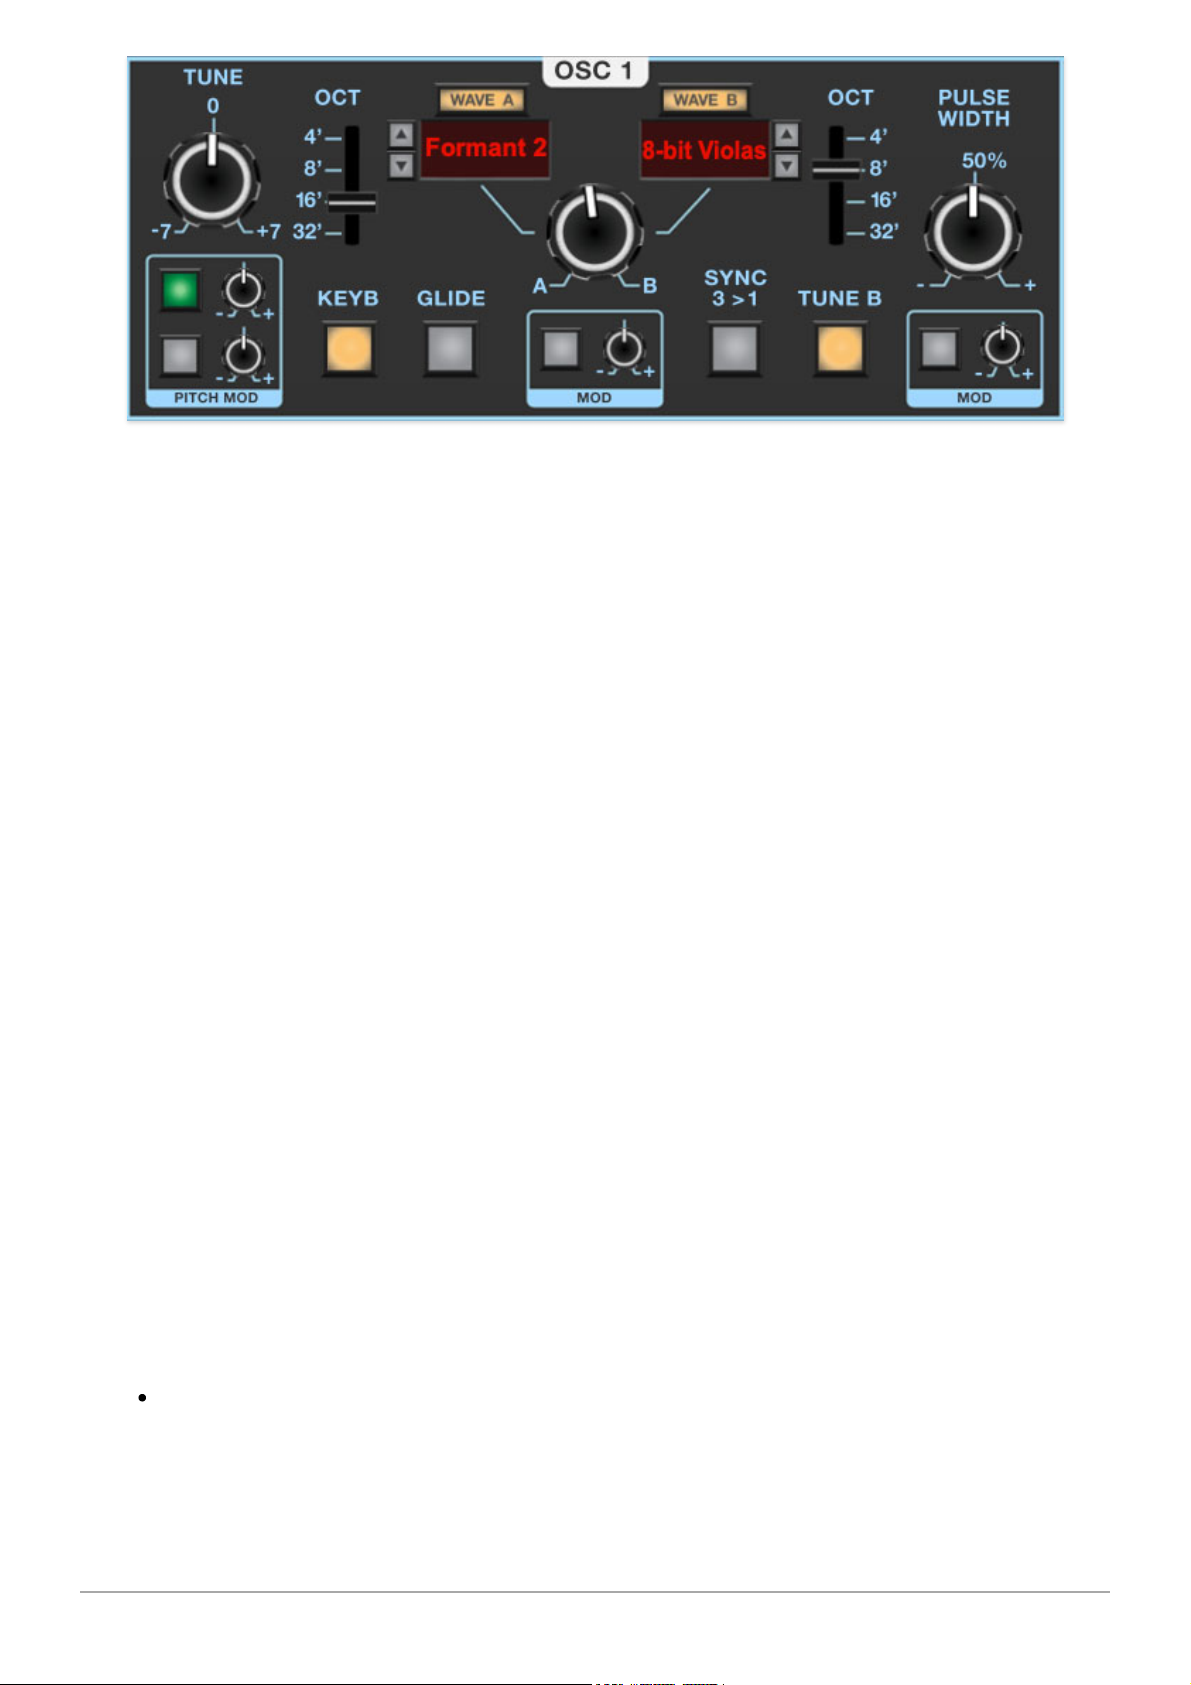
Cherry Audio Dreamsynth User Guide - 14
Tune- Allows fine-tuning of pitch or creating intervals between Wave A and
Wave B. It's also useful for fattening up multi-oscillator patches by detuning
a small amount. Its range is a smidge over a fifth, up or down.
Pitch Mod Source buttons and Attenuator knobs- These allow positive
or inverted modulation of the Tune knob. Clicking one of the small square
buttons opens a pop-up menu where the mod source can be selected. The
attenuator knobs next to buttons set a positive or inverted mod amount for
the selected mod source. To choose a different mod source, click the button
and choose another modulator, or choose
None
to disable modulation. The
button turns green to indicate a mod source is currently active; hovering
over the button displays the current mod source.
(The tooltip pops up relatively slowly by default. To adjust how quickly the
tooltip displays, click the
Settings
gear icon in the top purple menu strip,
select the
Interface
tab, and adjust the
Tooltip Delay
parameter.)
Both Pitch Mod selector buttons and attenuators have the same function, we
just provide two in order to enable two separate pitch mod sources.
Octave- These slide switches independently set the coarse pitch range for
Wave A and Wave B in standard organ footage settings of 32', 16', 8', and 4'.
Wave A/B select buttons- These allow selection of Dreamsynth's over 400
waveforms. Wave A and B always play simultaneously (unless
None
is
selected for one or both). To select a wave from the pop-up menus, click the
Wave A
or
Wave B
button, or on the red name displays beneath the buttons.
Dreamsynth includes the following four different wave types:
Analog- These are modeled virtual analog waves (they are
not
samples).
They're designed to include the aperodicity (dude, check out our big
words) and mojo you'd expect in a vintage analog synth.

Cherry Audio Dreamsynth User Guide - 15
Looped PCM Samples- These comprise the bulk of Dreamsynth's waves,
divided across 11 categories. Following their attack portion, these will loop
infinitely.
Single-Cycle- As their name implies, these are sampled digital waves
that are just one-cycle long. Conceptually, they're similar to analog
waves, but with more complex shapes. Single-cycle waves were used in
the early digital synths such as the Ensoniq ESQ-1 and the Korg DW-
6000/8000, when digital memory was still pricey.
One-Shot- These are also PCM samples, but they play briefly and end
without looping. They're useful for drum, percussion, and transient
sounds.
Wave A/B up/down buttons- Located next to the wave display windows,
these allow quick selection of the previous or next wave in the pop-up wave
menu. Though you won't be able what the next wave is, these are handy for
rapid sound exploration.
Wave A/B mix knob and Mod box- Here's where the magic happens - this
sets the volume balance between Wave A and Wave B. On its own, it's useful
for creating composite waveforms, but it really comes into its own when the
Mod box beneath is used to modulate the mix of two waves, allowing all
manner of evolving or rhythmic vector synth-style tones, or all points in-
between (quite literally).
Keyboard- Shutting this off disconnects the keyboard's control voltage. This
allows the oscillator frequency to remain constant regardless of keys played
on the keyboard. This can be useful in a number of situations:
When an oscillator is playing a drum or transient sound, and you want the
pitch to stay constant across the keyboard.
If an oscillator is being used as a mod source (either in audio range, or in
the case of OSC 3, as a low-frequency oscillator), and you don't want the
mod rate to change as you play up and down the keyboard.
The oscillator is being used as a "drone," that is, to play the same note.
Helpful range trick:
If the
Keyb
button is disabled and the oscillator's pitch
won't go low (or high) enough using the
Octave
and
Tune
controls, set its
Pitch Mod box source to +10V and use the mod attenuator knob to add or
subtract - this will increase the pitch range immensely.
Glide - Also known as "portamento," glide delays the voltage change
between pitches for a sliding effect. Clicking the button enables glide
Cherry Audio Dreamsynth User Guide - 16
independently for each oscillator. Glide speed is set globally using the
Glide
knob in the Synth Voice Assign section at the far left.
Sync 3>1 (
OSC 1 only
)- This causes VCO 1 to force reset the start of VCO
3's waveform to the beginning of its cycle, resulting in the classic Cars “
Let’s
Go
” tearing harmonics sound (or No Doubt’s “
Just A Girl
,” for children of the
90s) when the oscillator 3's pitch is swept.
Quick Sync Sweep Patch Tutorial (no extra charge!)
Enable the
Sync 3>1
switch.
Set Osc 1's
Level
knob to zero, and turn up Osc 3's
Level
knob.
Set Osc 1 and Osc 3's
Wave A
pop-ups to
Analog>Pulse
, and make sure
the
A/B
mix knobs are set to
A
.
Set Osc 1 and Osc 3's
Octave
controls to
16'
.
Click one of Osc 3's Pitch Mod box mod destination buttons, set it to VCF
Envelope, and turn the attenuator knob up to max.
Set the VCF Env controls to
Attack
=0,
Decay
=4,
Sustain
=0,
Release
=0.

Cherry Audio Dreamsynth User Guide - 17
Play A, B, D... D, Db, B, then A on the keyboard. Ponder how cool
The Cars
are/were.
Filter Bypass (
OSC 2 and 3 only
)- As its name implies, this removes the
filter section from the oscillator audio path. This is really useful if, for
example, one oscillator is playing juicy sawtooth waves with a pronounced
filter sweep, but you'd like to layer in a plingy, crystalline bell without its high
frequencies getting squashed by the filter. Similarly, the
Filter Bypass
button
is useful for maintaining the impact of one-shot drum and percussion
samples.
Tune B- The Tune B button disables the Tune knob for Wave B only. This is a
super cool feature because it enables detuning of Wave A and Wave B.
The simplest example would be to disable the
Tune B
button, center the
A/B
mix knob, set
Wave A
and
Wave B
to
Analog>Ramp
, then set the
Tune
knob
to around 0.10 semitones. This results in a classic big, fat dual oscillator
analog synth tone using just one oscillator.
Pulse Width and Mod box- Sets the width or "duty-cycle" of pulse waves
(
Analog>Pulse
), from a perfect square (
50%
) to a very narrow pulse.It has
no effect on other waveforms. The Pulse Width Mod section can be used to
dynamically vary the pulse width.
Oscillator Pan and Level Controls
Pan and Mod box - Sets the oscillator panning position left to right.
Remember that following the oscillators, Dreamsynth's audio path is fully
stereo (including the filter section), so stereo pan positions are maintained.

Cherry Audio Dreamsynth User Guide - 18
The
Mod
box beneath the
Pan
knob allows all manner of modulation of pan
position.
Level and Mod (VCA) box - Sets the overall oscillator volume. The
Mod
box
beneath the
Level
knob allows volume modulation - for all intents and
purposes, this means each oscillator has its own independent voltage-
controlled amplifier (VCA). This enables a lot of functionality, from simple
LFO tremolo affects, to audio-rate amplitude modulation (using one of the
oscillators as a mod source), to elaborate rhythmic layered patches when
modding with LFO rates synced to host tempo.
Solo button- When toggled, the Solo button disables all other oscillators, as
well as the Strings section. It's very useful when programming patches. Note
that the oscillator and Strings section
Solo
buttons can be combined as
desired.
Filter and VCF Envelope
Dreamsynth uses a 12 dB/oct state-variable filter. "State-variable" refers to
its curves - its Notch knob lets you choose lowpass, highpass or anywhere in

Cherry Audio Dreamsynth User Guide - 19
between. The BP button bypasses the Notch knob and enables bandpass
mode. The 12 dB/oct curve gives it a brighter overall tonality than a typical
ladder filter, which works well with Dreamsynth's many brighter, bell-like
digital waves.
If you're not familiar with how filters work, a lowpass filter allows frequencies
below
the cutoff frequency setting to pass through, but blocks frequencies
above
the cutoff frequency. Highpass is the opposite of lowpass mode: high-
frequency content remains, but low frequencies are removed as the cutoff
frequency increases. The
BP
button enables bandpass mode, combining
bothlowpass and highpass modes, leaving sound only "in the middle." The
cutoff frequency lies roughly halfway between the falloff on each side.
Setting the
LP>HP/Notch
knob to its center position (
BP
button disabled)
results in a notch response - this is the opposite of bandpass, i.e. a small
band of the frequency spectrum is removed but all frequencies above and
below pass through. This may not sound very useful, but sweeping the
frequency of a notch filter results in an interesting phaser-like sound.
Frequency- Sets the frequency where frequency attenuation begins. Its
effect dependent upon the currently chosen filter mode (lowpass, highpass,
bandpass, or notch).
Cutoff Frequency and Mod boxes- Sets the frequency where frequency
attenuation begins with its effect dependent upon the currently chosen
lowpass/bandpass/notch/highpass/etc. filter mode. The modulation controls
beneath allow CV control of the cutoff frequency; two identical sets of mod
controls are provided allowing two independent cutoff mod sources.

Cherry Audio Dreamsynth User Guide - 20
Resonance- Emphasizes sound energy at and around the cutoff frequency
by adding feedback from the filter's output back to its input. This is useful for
creating commonly heard synth "wah" tones, especially when the cutoff
frequency is modulated with an envelope generator or one of the LFO's.
Resonance and Mod box- Emphasizes sound energy at and around the
cutoff frequency by adding feedback from the filter's output back to its input.
This is useful for creating commonly heard synth "wah" tones, especially
when the cutoff frequency is modulated. The modulation controls beneath
allow CV control of the resonance
LP>HP/Notch control, BP button, and Mod box- The
Notch
knob
continuously varies the filter response from lowpass to highpass as the knob
is rotated from left to right. The middle position creates a notch response.
Clicking the
BP
button puts the filter in bandpass mode and disables the
LP>HP/Notch
knob - the knob and its markings will dim when the BP switch is
engaged. The modulation controls beneath allow CV control of the
LP>HP/Notch
knob.
BP (bandpass) switch- Alters the filter response to bandpass when
engaged (i.e. combination of lowpass and highpass leaving frequencies "in
the middle." The LP>HP knob disappears when the BP switch is enabled.
Envelope Mod and Mod box- Sets the amount of modulation from the VCF
Env section beneath. Turn clockwise from center for positive modulation, or
counterclockwise from center for inverted modulation. The modulation
controls beneath allow CV control of the amount of envelope mod.
Keyboard Track and Mod box- This causes the cutoff frequency to
increase as ascending notes are played on the keyboard. The idea behind
this is, because actual note frequencies rise as higher pitches are played, the
KB Track
control applies a rising CV to the cutoff frequency in order to
maintain the brightness of notes as higher pitches are played. Turn clockwise
from center for positive modulation (filter gets brighter as higher notes are
played), or counterclockwise from center for inverted modulation (filter gets
duller as notes higher notes are played). The modulation controls beneath
allow CV control of the amount of keyboard tracking.
Filter Envelope Generator
The filter section includes a dedicated envelope generator for control of
cutoff frequency (via the
Envelope Mod
knob). Here's an overview of how an
ADSR envelope generator works:
Table of contents
Other CHERRY AUDIO Music Equipment manuals


Popular Music Equipment manuals by other brands

CARVIN
CARVIN 500W STEREO POWER MODULE - SCHEMA REV G manual

Universal Audio
Universal Audio Apollo Twin Hardware manual

Fisher
Fisher Futura III F50 Operating instructions and warranty

Minarik
Minarik VT8 user manual

Behringer
Behringer ULTRADRIVE PRO DCX2496 quick start guide

Covox
Covox Voice Master user manual


