CHI 11572 User manual

1
USE AND CARE MANUAL
Before operating the garment steamer, please read these
instructions carefully and keep them for future reference.

2
When using electrical appliances, basic safety precautions
should always be followed to reduce the risk of fire, electric
shock, and/or injury to persons, including the following:
1. Read all instructions.
2. This appliance is not intended for use by persons
(including children) with reduced physical, sensory, or
mental capabilities, or lack of experience and knowledge,
unless they are closely supervised and instructed
concerning use of the appliance by a person responsible
for their safety.
3. Close supervision is necessary when any appliance is
used by or near children. Children should be supervised to
ensure that they do not play with the appliance.
4. Only use a garment steamer for its intended use.
5. The garment steamer must not be left unattended while it
is connected to the electric outlet.
6. To avoid the risk of electric shock, do not immerse the
garment steamer in water or other liquids.
7. Always turn the garment steamer to OFF ( ) before
plugging or unplugging the garment steamer from the
electrical outlet. Never pull on the cord to disconnect the
garment steamer from the electrical outlet; instead, grasp
the plug and pull on the plug to disconnect the garment
steamer.
8. Do not let the cord touch hot surfaces. Let the garment
steamer cool completely before putting away. Tuck cord
into base as the garment steamer is collapsed for storage.
9. Always disconnect the appliance from the electrical outlet
before filling the garment steamer with water, emptying
the water from the garment steamer, and when the
garment steamer is not in use.
IMPORTANT SAFETY INSTRUCTIONS

3
SAVE THESE INSTRUCTIONS
10. Do not operate the garment steamer with a damaged
cord or in the event the garment steamer has been
dropped or damaged or there are visible signs of damage
or it is leaking. To avoid the risk of electric shock, do not
disassemble the garment steamer. Take it to a qualified
serviceman for examination and repair. Incorrect assembly
might result in a risk of electric shock when the garment
steamer is used after reassembly.
11. The garment steamer must be hung from a secure hook or
rod rated to hold a minimum of 30 pounds.
12. When hanging the garment steamer, ensure the base is
level.
13. Burns can occur from touching hot metal parts, hot water,
or steam. Keep hands away from steam vents when
appliance is ON ( ). Use caution if you turn the garment
steamer upside down—there might be hot water in the
reservoir.
14. To avoid a circuit overload, do not operate a garment
steamer on the same circuit with another high-wattage
appliance.
15. If an extension cord is absolutely necessary, a cord with an
ampere rating equal to or greater than the maximum rating
of the garment steamer shall be used. A cord rated for less
amperage can result in a risk of fire or electric shock due to
overheating. Care shall be taken to arrange the cord so that
it cannot be pulled or be tripped over.

4
Other Consumer Safety Information
This appliance is intended for household use only.
wWARNING Electrical Shock Hazard: This appliance is
provided with a polarized plug (one wide blade) to reduce
the risk of electric shock. The plug fits only one way into a
polarized outlet. Do not defeat the safety purpose of the plug
by modifying the plug in any way or by using an adapter. If the
plug does not fit fully into the outlet, reverse the plug. If it still
does not fit, have an electrician replace the outlet.
5
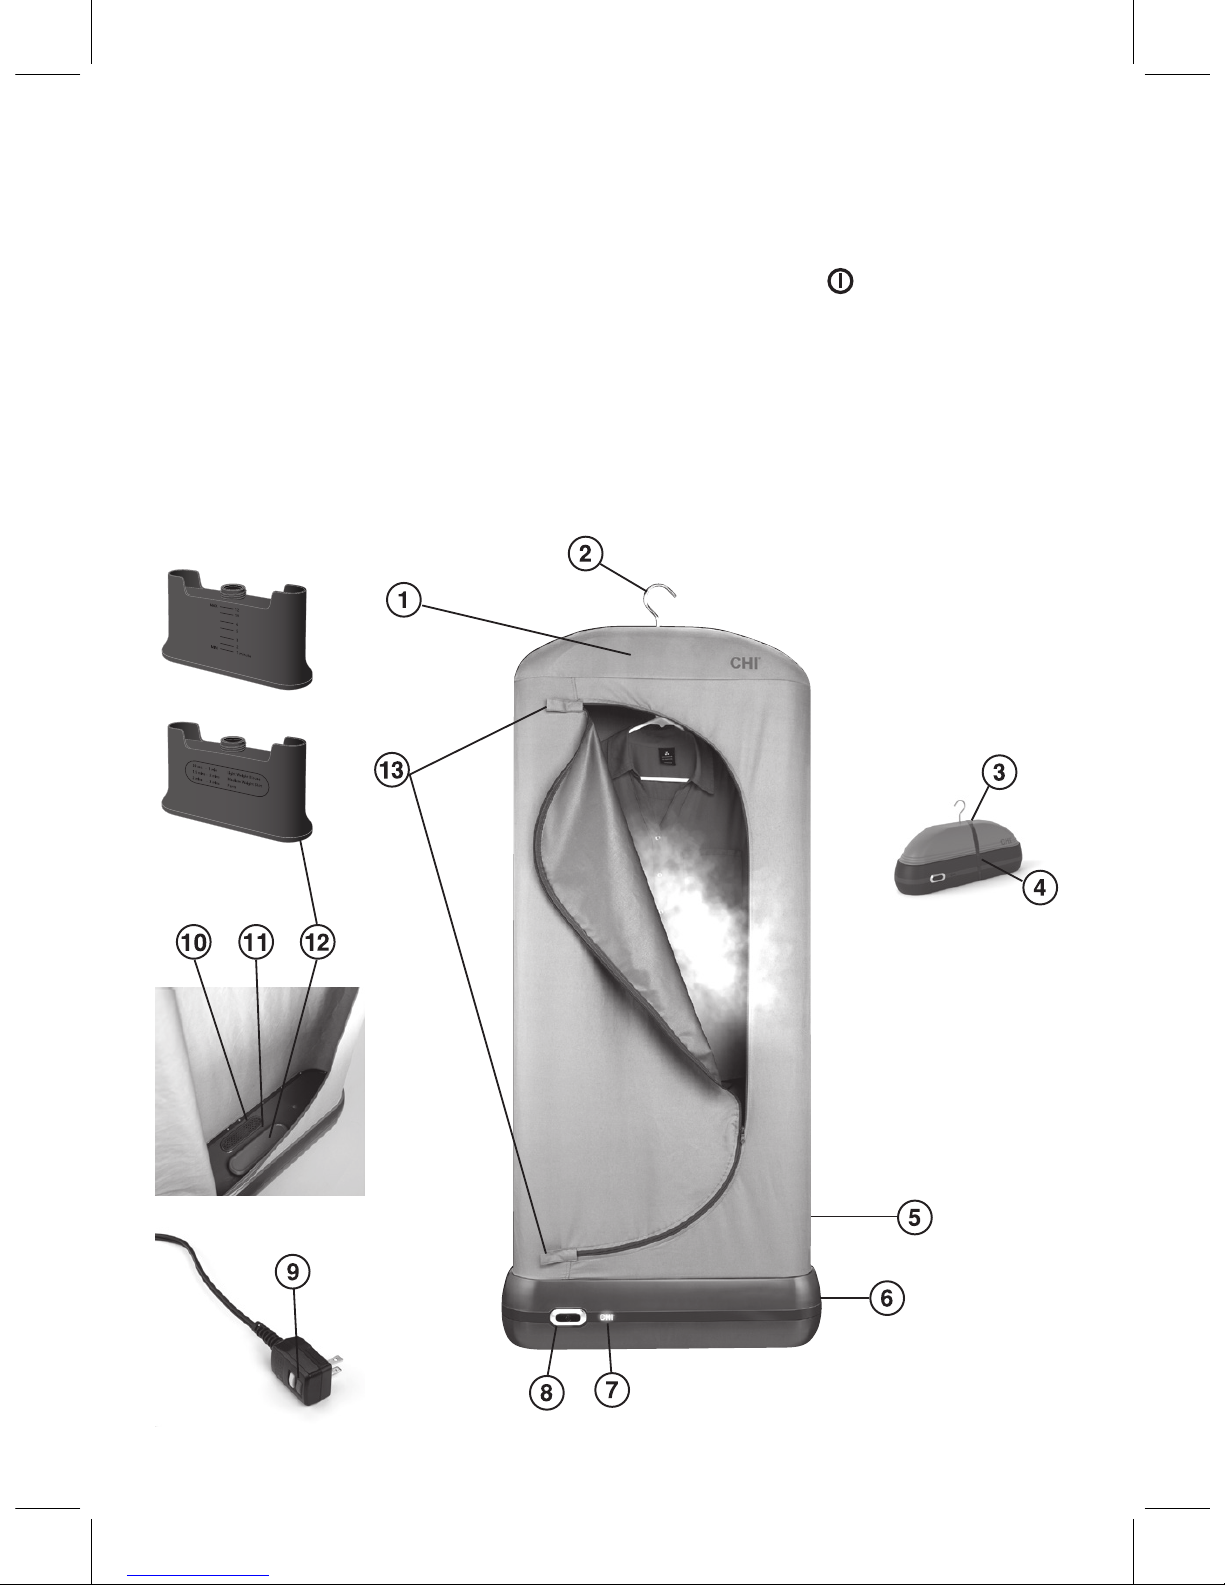
Parts and Features
1.Garment Holder (on
inside)
2.Hanger Hook
3.Storage Strap Loop
4.Storage Strap
5.Waterproof Garment Bag
With Zipper
6.Base
7.Power Indicator
8.ON/OFF ( ) Button
9.6-Foot Plug With Power
Reset
10.Steam Vents
11.Reservoir Holder
12.Water Reservoir
13.Garment Bag Zipper Tabs (2)

6
Get to Know the Easy Steam Garment Steamer
The Easy Steam Garment Steamer is the hands-free way to
refresh and remove wrinkles from your clothes. It provides a
relaxed look to garments. For a pressed finish, you will want to
use a regular steam iron.
There are two ways to use the garment steamer:
1. Steam One Garment: Fill the Water Reservoir to the amount
indicated on the reservoir for the one item you want to steam.
Follow directions in “How to Use” on page 7. When the Power
Indicator flashes, the cycle is complete and your garment is
ready to remove from the steamer.
2. Multiple Steaming Sessions: You also have the convenient
option to fill the Water Reservoir and turn the steamer on and
off as needed for multiple steaming sessions. See Steaming
Chart on page 10.

7
How to Use
Hang the Garment Steamer on an over-the-door hook or a
secured rod near an electrical outlet. Unzip Garment Bag.
Steaming One Garment
1. Remove Water Reservoir from Garment
Steamer. Remove cap and fill with COLD
tap water. Fill to appropriate line on Water
Reservoir for type of garment being steamed.
Do not fill above the MAX fill line or below the
MIN fill line. Replace cap on Water Reservoir.
Do not add water directly to Reservoir Holder.
2. Turn Water Reservoir so the cap side is facing
down, and insert into Reservoir Holder.
3. Place garment on a plastic hanger and hang
on Garment Holder. Clothes should not touch
bottom of garment steamer. Long dresses
and pants should be folded over the bar of the
hanger. Holding the lower Zipper Tab, zip the
Garment Bag closed. Plug into outlet.
wWARNING Burn Hazard.
Steam is hot. Avoid contact with escaping steam.

8
4. Press ON/OFF ( ) Button to begin steaming.
The Power Indicator will illuminate when
steamer is on. Press ON/OFF ( ) Button to
stop steaming at any time.
5. When the Power Indicator flashes, the cycle is
complete and your garment is ready to remove
from the steamer. Press ON/OFF ( ) Button to
turn off Garment Steamer.
6. Unzip Garment Bag by holding the top Zipper
Tab. Check garment for wrinkles. If more
steaming time is needed, zip up Garment Bag.
7. Refill the Water Reservoir with COLD water and
insert into Reservoir Holder. Allow 1 minute for
the heater to reset. Press ON/OFF ( ) Button
to resume steaming. When done, press ON/
OFF ( ) Button to turn off steamer. Remove
garment. Unplug.

9
Multiple Steaming Sessions
1. Remove Water Reservoir from Garment
Steamer. Remove cap and fill with COLD tap
water. Fill to MAX fill line. Do not fill above the
MAX fill line or below the MIN fill line. Replace
cap on Water Reservoir. Do not add water
directly to Reservoir Holder.
2. Turn Water Reservoir so the cap side is facing
down, and insert into Reservoir Holder.
3. Place first garment on a plastic hanger and hang
on Garment Holder. Clothes should not touch
bottom of Garment Steamer. Long dresses
and pants should be folded over the bar of the
hanger. Holding the lower Zipper Tab, zip the
Garment Bag closed. Plug into outlet.
4. Press ON/OFF ( ) Button to begin steaming. The
Power Indicator will illuminate when steamer
is on. Follow Steaming Chart on page 10 for
recommended steaming times. Press
ON/OFF ( ) Button to stop steaming.
5. Unzip Garment Bag by holding the top Zipper
Tab. Check garment for wrinkles. If more
steaming time is needed, zip up Garment Bag.
Press ON/OFF ( ) Button to continue steaming.
When finished, press ON/OFF ( ) Button to stop
steaming. Remove garment and wipe Garment
Bag with towel.
6. Place another garment in Garment Bag. Zip
closed. Press ON/OFF ( ) Button to begin
steaming.
How to Use

10
7. If Power Indicator begins to flash while steaming, the
Garment Steamer has run out of water in the reservoir and
has stopped heating. Press the ON/OFF ( ) Button to turn off
power. Refill the Water Reservoir with COLD water and insert
into Reservoir Holder. Allow 1 minute for the heater to reset.
Press ON/OFF ( ) Button to resume steaming.
8. Press ON/OFF ( ) Button to turn OFF Garment Steamer
before removing garment.
9. Wipe interior of Garment Steamer with a towel after each
garment is steamed.
10. When finished, press ON/OFF ( ) Button to turn off. Unplug.
Steaming Chart
NOTE: If starting cold, the Garment Steamer takes about
30 seconds to begin to steam. Steaming times do not include
warm-up time.
Type of Garment Steaming Time
Lightweight blouse 30 seconds to 1 minute
Medium-weight shirt 1 1/2 to 2 minutes
Heavyweight shirt 2 to 2 1/2 minutes
Suit jacket 2 to 3 minutes
Pants 2 to 3 minutes
Sweater 2 to 3 minutes
2 garments at once – place
fronts to the outside or
switch halfway through
2 to 4 minutes
Tablecloths – fold over
hanger; shake out after
steaming
3 to 5 minutes

11
Care and Cleaning
1. Unplug.
2. Remove Water Reservoir and empty.
3. To remove any remaining water inside steamer, insert
empty Water Reservoir back into Reservoir Holder.
Press ON/OFF ( ) Button and steam with Garment Bag
unzipped until Power Indicator flashes.
4. Let Garment Steamer cool for at least 1 minute.
5. With a clean towel, wipe entire inside of
Garment Steamer. Leave Garment Steamer
hanging with zipper open until interior is
completely dry.
6. While holding lower Zipper Tab, zip until
almost closed to leave room for air to
escape.
7. Unhook Garment Bag from door or rod and
place on a flat surface.
8. Hold Hanger Hook and gradually fold Garment Bag while
moving the bag down onto base. Tuck cord
into base as you collapse the Garment Bag.
To Store Easy Steam
wWARNING Electrical Shock Hazard.
Disconnect power before cleaning. Do not immerse cord, plug,
or base in water or other liquid.
1.
Press ON/OFF ( ) Button to turn off. Unplug. Allow to cool.
2. Wipe out entire inside of Garment Steamer after every
use with a clean dry towel.
3. Always leave Garment Steamer partially unzipped to keep
inside of steamer dry.

12
Troubleshooting
• Power Indicator light does not illuminate when ON/OFF ( )
Button is pressed.
The Circuit Interrupt switch in power cord plug may be open.
Press red RESET button on power cord plug.
• Power Indicator light is flashing.
The appliance has run out of water in the reservoir and stopped
heating.
1. Press ON/OFF ( ) Button to turn off power.
2. Refill Water Reservoir with COLD tap water and replace into
Reservoir Holder.
3. Allow 1 minute for heater to cool.
4. Press ON/OFF ( ) Button to resume steaming.
• Power Indicator light is flashing and Water Reservoir is full.
Water Reservoir is not correctly inserted into Reservoir Holder
to allow water to flow into steamer, or steam generator has not
cooled completely to resume steaming.
1. Press ON/OFF ( ) Button to turn off power.
2. Reposition Water Reservoir to seat securely in place. Press
ON/OFF ( ) Button to turn on power.
3. If still flashing, press ON/OFF ( ) Button to turn off power.
4. Allow 1 minute for the heater to cool.
5. Press ON/OFF ( ) Button to resume steaming.
NOTE: Leaving power on while Power Indicator is flashing will
extend reset time. Be sure to turn off power to reset quickly.
9. Slide loop of strap onto hook. Wrap Storage
Strap under and up around base. Pull snug
and attach end to strap near loop.
10. Store upright in a convenient location.
Do not store on its side.

13
• Some water has dripped from bottom of Garment Steamer
onto floor below.
The Reservoir Holder of the Garment Steamer has a small
overflow hole in the bottom to allow excess water to drain.
Do not add water directly to Reservoir Holder. Use care when
inserting Water Reservoir to prevent excess water from dripping
into holder area.
• Clothes are still wrinkled after steaming the recommended
amount of time.
Steaming provides a relaxed look. Some fabrics release wrinkles
easier than others.
1. Return garment to steamer and continue to steam longer.
2. Steaming multiple garments at a time requires longer
steaming. For best results, steam garments one at a time.
3. The relaxed look may not be what you want. For a pressed
look, use a regular steam iron.
• Clothes feel wet after steaming.
The Garment Steamer produces both heat and moisture to relax
wrinkles. The garment has been steamed for too long a period of
time.
1. Allow garment to hang to dry before wearing.
2. Reduce steaming time at next steaming occasion.
3. Partially unzip Garment Bag during steaming to allow some
steam to escape.
• Clothes are wet at bottom of hem.
Garments are too long for the Garment Steamer. Clothes should
not touch bottom of Garment Steamer. Fold long dresses or
pants over bar of plastic hanger.
• Clothes have condensation on fabric or have water spots.
Steaming for long periods of time will cause condensation to
collect on Garment Bag sides and top.
1. Wipe inside of Garment Bag with a clean towel after every
garment that is steamed.
2. Garments are steamed quickly, often in as short as
30 seconds to 1 minute. Reduce time, check wrinkles, and add
short amounts of time if necessary.

14
Notes

15
Limited Warranty
This warranty applies to products purchased and used in the U.S. This is the only
express warranty for this product and is in lieu of any other warranty.
This product is warranted to be free of defects in material and workmanship for
a period of two (2) years from the date of original purchase. During this period,
your exclusive remedy is repair or replacement of this product or any component
found to be defective, at our option; however, you are responsible for all costs
associated with returning the product to us and our returning a product or
component under this warranty to you. If the product or component is no longer
available, we will replace with a similar one of equal or greater value.
This warranty does not cover glass, filters, wear from normal use, use not in
conformity with the printed directions, or damage to the product resulting from
accident, alteration, abuse, or misuse. This warranty extends only to the original
consumer purchaser or gift recipient. Keep the original sales receipt, as proof of
purchase is required to make a warranty claim. This warranty is void if the product
is used for other than single-family household use or subjected to any voltage and
waveform other than as specified on the rating label (e.g., 120 V ~ 60 Hz).
We exclude all claims for special, incidental, and consequential damages caused
by breach of express or implied warranty. All liability is limited to the amount
of the purchase price. Every implied warranty, including any warranty of
merchantability or fitness for a particular purpose, is disclaimed except to the
extent prohibited by law, in which case such warranty is limited to the duration
of this written warranty. This warranty gives you specific legal rights. You may
have other legal rights that vary depending on where you live. Some states do
not allow limitations on implied warranties or special, incidental, or consequential
damages, so the foregoing limitations may not apply to you.
To make a warranty claim, do not return this appliance to the store. Please call CHI
Garment Care 1.844.882.9038 in the U.S. or visit www.chisteam.com in the U.S.
For faster service, locate the model, type, and series numbers on your appliance.

16
Distributed by CHI®Garment Care
4421 Waterfront Drive, Glen Allen, VA 23060
840280700 06/17
Table of contents
Other CHI Kitchen Appliance manuals


