Chickenmaster RIB PRO 123 User manual
PRINTED IN U.S.A.
IMPORTANT: READ SAFETY RULES AND INSTRUCTIONS CAREFULLY
CARBON MONOXIDE WARNING:
This grill burns charcoal. Charcoal produces carbon monoxide (CO) when it is burned. The Consumer
Product Safety Commission reports about 20 people die and 400 are injured each year as a result of carbon monoxide poisoning from charcoal grills.
CO is a colorless, odorless gas that can accumulate to toxic levels in closed environments. Charcoal grills should never be used in an enclosed area,
even if ventilation is provided.
CHICKENMASTER GRILLS 1025 HIAWATHA BLVD. E., SYRACUSE, NY 13211
OPERATOR’S MANUAL
Model 123
RIB PRO
WWW.CHICKENMASTERGRILLS.COM U.S. PATENTS PENDING
™

2
SECTION 1: FINDING YOUR MODEL NUMBER
SECTION 2: CALLING CUSTOMER SUPPORT
•Every Chickenmaster Rotary Grill has a model plate. You can locate it by standing next to the unit and looking down at the
frame below the rotary motor. See Figure 1.
This Operator’s Manual is an important part of your new Chickenmaster Rotary Grill. It will help you assemble, prepare, and
maintain your grill. Please read and understand what it says.
Before you start to prepare your Chickenmaster Rotary Grill for its rst use, locate the model plate and copy the information
from it in this Operator’s Manual. The information on the model plate is very important if you need help from your dealer or
Chickenmaster Customer Support Department.
Figure 1
This is where your model number will be.
This is where your serial number will be.
Copy your model number here:
Copy your serial number here:
123ABC 1234567890
LOCATE YOUR MODEL NUMBER AND SERIAL NUMBER — Record this information in the space provided.
To find your unit’s specific model number and serial number, see SECTION 1: FINDING YOUR MODEL NUMBER.
Customer Support can be reached by dialing: 1 - (800) 896-7886
Please have your model number and serial number ready when you call.
•
•
•
•If you are having difficulty assembling this product or if you have any questions regarding the operation, maintenance, or
warranty information of this unit, please call the Customer Support Department. For additional grill information, visit the
Chickenmaster website at www.chickenmastergrills.com.
•Additional grill options and accessories are sold separately. Please call the Customer Support Department or visit the
Chickenmaster Grills website for information regarding additional grill accessories.
™

SECTION 3: IMPORTANT SAFETY INFORMATION
WARNING: THIS SYMBOL POINTS OUT IMPORTANT SAFETY INSTRUCTIONS WHICH, IF NOT
FOLLOWED, COULD ENDANGER THE PERSONAL SAFETY AND/OR PROPERTY OF YOURSELF
AND OTHERS. READ AND FOLLOW ALL INSTRUCTIONS IN THIS MANUAL BEFORE ATTEMPTING
TO USE YOUR CHICKENMASTER GRILL. FAILURE TO COMPLY WITH THESE INSTRUCTIONS MAY
RESULT IN PERSONAL INJURY OR FIRE. WHEN YOU SEE THIS SYMBOL - HEED ITS WARNING.
DANGER: Your Chickenmaster Rotary Grill was built to be used according to the rules for safe
use in this manual. Carelessness or error on the part of the operator can result in serious injury or
re. If you violate any of these rules, you may cause serious injury to yourself or others.
1. TRAINING
•
No one should use this grill while intoxicated or while
taking medication that impairs the senses or reactions.
•Keep all children and pets away from grill while in use
and until after use when grill is cooled.
2. PREPARATION
•
•
Use on a level, noncombustible surface only. Keep
away from house, garage, balconies, or overhangs.
Keep grill away from all combustible materials including
gasoline and other ammable liquids and vapors.
•Keep a re extinguisher accessible.
•Never allow children under 14 years old to use a grill.
Children 14 and older should only use the grill under
close parental supervision. Only persons well acquainted
with these rules should be allowed to use your grill.
•This grill is for outdoor use only. See cover for carbon
monoxide warning.
•
•Read & follow all warnings on charcoal package.
•Do not wear loose clothing or jewelry.
3. OPERATION
•Never use any ammable liquid other than charcoal
lighter uid to start the grill.
•Apply charcoal uid sparingly and never apply
i
t after
charcoal has been lit. The re may return to the uid
container and explode.
•Never leave grill unattended when hot or in use.
•Do not put bare hands on grill grate or versa-basket
while in use.
•If versa-basket becomes unclamped, stop grill
a
nd
clamp basket using covered hands. If contents become
loose, do not grab them with your bare hands.
•Exercise caution when attaching or removing versa-
basket, spikes, spit rod, or grill grate while grill is in
use. Grill contents will be hot.
4. MAINTENANCE
•Always soak coals with water after use; they retain
heat for long periods of time.
•Completely extinguish re before leaving.
•Use gloves when handling or moving. Contents and
coal ashes can remain warm for a long time after
extinguishing.
•Dispose of cold ashes and grease properly.
•Always attach holder pin to spit rod when placed on the
spit rod holders to hold rod in place.
•
WARNING - YOUR RESPONSIBILITY: Restrict the use of this grill to persons who read,
understand, and follow the warnings and instructions in this manual and on the grill.
•This grill burns charcoal and wood only. Do not burn
any other materials in this grill.
Place coal grate in low position when rotary cooking
and in high position when grate grilling.
3
!
!
!
Read this Operator’s Manual in its entirety before
attempting to assemble or use this grill. Be completely
familiar with the proper use of this grill before using it.
Keep this manual in a safe place for future and regular
reference and for ordering replacement parts.
•Clean stainless steel parts of grill with a stainless steel
wire brush ONLY. Use of a carbon steel wire brush will
contaminate stainless steel and cause it to rust.

SECTION 4: GRILL CONTENTS
Lay out the grill hardware according to the illustrations for identication purposes. Part numbers are shown in parentheses.
Separate diagrams include additional contents and those within grill.
A
B
C
D
E
F
G
H
I
J
K
L
M
N
O
P
Q
(4)
(4)
(1)
(1)
(2)
(1)
(1)
(1)
(1)
(4)
(1)
(2)
(2)
(1)
(1)
(2)
(2)
Legs
Leg Knob
Grill Lid
Rotary Motor
Spit Rod Holder
Holder Pin
Coal Chute
Versa-Basket
Spit Rod
Spit Rod Clip
Coal Grate
Turkey Spikes
Chicken Spikes
Grill Grate
Thermometer
Vent Handles
Adjustable Damper
C
O
P
N
E
H
I
A
D
Q
G
K
F
L
J
M
B
4
SECTION 5: ASSEMBLY INSTRUCTIONS
NOTE: References to the left or right of the grill are determined from the front of the unit in cooking position. Refer to SECTION
4: GRILL CONTENTS for content labels, numbers, and illustrations.
IMPORTANT: Remove grill lid and all contents inside grill prior to assembly.
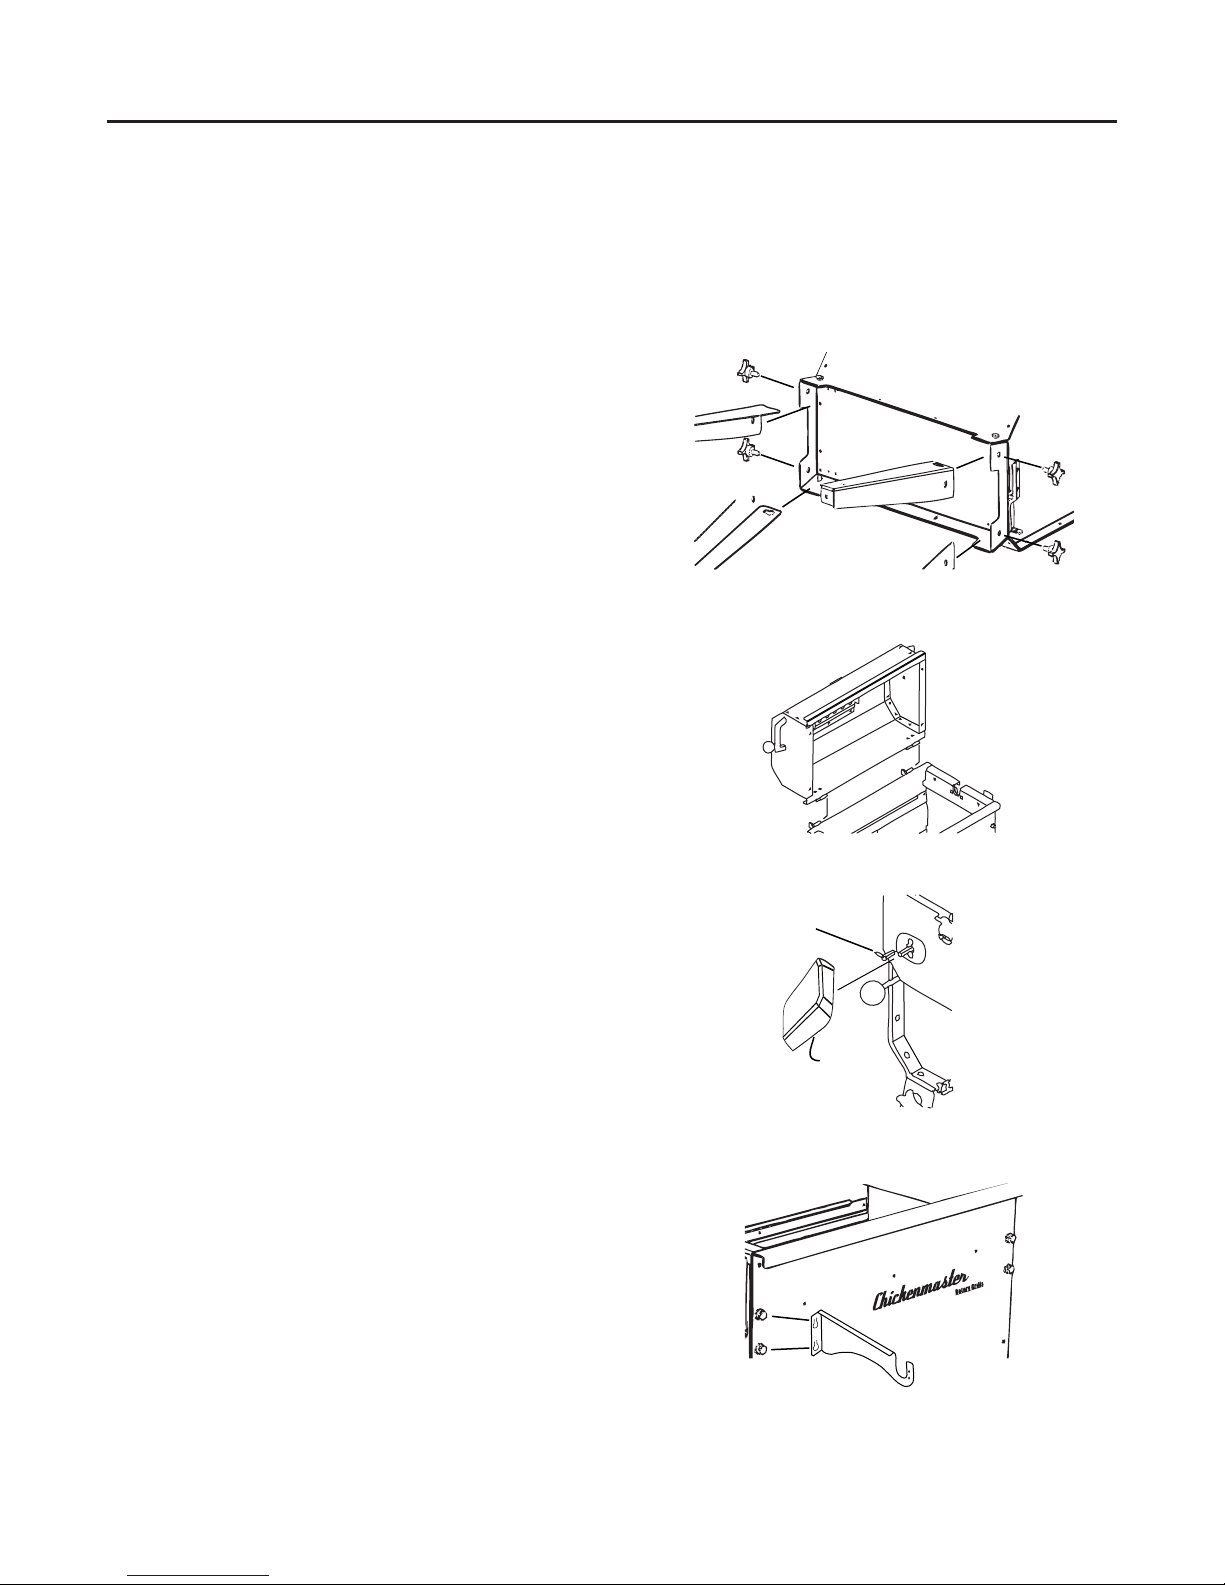
ATTACHING THE LEGS
Set grill frame on its back side. Insert legs (A) into place
by sliding leg holes into studs on grill frame. Pull legs into
stud holes until they are secure. See Figure 2.
1.
Screw leg knobs (B) into the legs through the grill. Fasten
until tight. See Figure 2. Make sure all legs are tightened
before setting grill upright.
2.
Figure 2
ATTACHING THE GRILL LID Figure 3
Set grill upright. Slide grill lid (C) bars into place on grill. See
Figure 3. Open and close lid to ensure it is on correctly.
1.
Turn rotary motor (D) 90˚ and insert onto motor socket.
See Figure 4. Turn motor downward on socket to lock in
place. Make sure motor is secure to motor plate.
1.
Figure 4
Pull out motor rod to hold motor in place. See Figure 4.2.
ATTACHING THE SPIT ROD HOLDERS
Mount spit rod holders (E) into place on holder stud. Pull
spit rod holders into stud holes until secure. See Figure 5.
1.
Figure 5
NOTE: The spit rod holder attached to holder pin (F) should
be placed on the left side of the grill.
5
ATTACHING THE ROTARY MOTOR
▲
▲
Motor Rod
▲
▲
▲
▲
▲
▲
▲
▲
▲
▲
▲
▲
▲

ATTACHING THE COAL CHUTE
Insert coal chute (G) into place on back of grill. See
Figure 6.
1.
ATTACHING THE VERSA-BASKET
Slide versa-basket (H) into spit rod (I) until basket is rmly
in place. See Figure 7a. Make sure basket clip holes are
completely through spit rod barrier.
1.
(Basket Grilling)
Insert spit rod clip (J) through each basket clip hole. See
Figure 7b.
2.
Place coal grate (K) in bottom of grill. 3.
Set spit rod into grill in rod grooves. Rod gear must be
engaged with chain drive to work properly. See Figure 7c.
4.
6
▲
Figure 7a
Figure 7b
Figure 7c
▲
Figure 6
▲
▲
Spit Rod Barrier
▲
▲
▲
Rod Gear
▲
Chain Drive
Figure 8a
ATTACHING THE SKEWER SPIKES
Slide spike with clip holes into spit rod (I) until spike is
rmly in place. See Figure 8b. Make sure spike clip holes
are completely through spit rod barrier.
2.
(Rotisserie Grilling)
Insert spit rod clip (J) through each spike clip hole. See
Figure 8c.
3.
Place coal grate (K) in bottom of grill. 4.
Set spit rod into grill in rod grooves. Rod gear must be
engaged with chain drive to work properly. See Figure 8e.
6.
Figure 9a
ATTACHING THE GRILL GRATE
Set coal grate (K) in high position on ledges in grill. See
Figure 9a.
1.
(Char-Grilling)
Place grill grate (N) into grill. See Figure 9b.2.
7
Slide second spike into spit rod. See Figure 8d.5.
Screw chicken or turkey spikes (L or M) into spike plate.
See Figure 8a.
1.
▲
▲
Spit Rod Barrier
Figure 8b
Figure 8c
Figure 8d
Figure 8e
▲
Figure 9b
▲
▲
▲
▲
▲
Rod Gear
▲
Chain Drive
▲

SECTION 6: OPERATION INSTRUCTIONS
8
!
IMPORTANT: Make sure grill is properly setup prior to operation. See SECTION 5: ASSEMBLY INSTRUCTIONS for correct
assembly and setup techniques.
BASKET GRILLING DIRECTIONS
WARNING: Observe all warning labels on grill and in this Operator’s Manual prior to use. Refer to
SECTION 3: IMPORTANT SAFETY INFORMATION for warnings and safety information.
1.
Set spit rod with versa-basket attached onto rod holders.
Lock holder pin to basket to hold in place.
2.
Place contents into basket. Clamp basket securely.3.
Remove holder pin from basket. Place spit rod into grill
on rod grooves. Make sure rod gear is engaged with
chain drive.
4.
Plug rotary motor into power outlet. Pull out motor rod.
Turn motor on.
5.
Close grill lid. Cook to desired temperature. Use vents
and adjustable dampers to alter temperature. Add
charcoal if needed through coal chute.
6.
ROTISSERIE GRILLING DIRECTIONS
CHAR-GRILLING DIRECTIONS
!
WARNING: Grill must not be operated near
housing or other structure. Use an extension cord
for motor plug if necessary.
•To increase temperature: close grill lid vent and open
adjustable dampers.
•To decrease temperature: open grill lid vent and close
adjustable dampers.
Load 7-9 lbs. of charcoal onto coal grate in bottom of grill.
Carefully light charcoal.
1.
Set spit rod with rst spike attached onto rod holders. Lock
holder pin to spike to hold in place.
2.
Slide contents onto spit rod and stick through spike.3.
Slide second spike onto spit rod and stick into contents.
Make sure spike and contents are secure.
4.
7.
Set coal grate in high position in grill. 1.
Load 4-6 lbs. of charcoal onto coal grate. Carefully light
charcoal.
2.
Place grill grate into grill.3.
Plug rotary motor into power outlet. Pull out motor rod.
Turn motor on.
6.
Place contents onto grill grate.4.
5.
!
WARNING: Do NOT touch or remove grill contents
with bare hands while in use. Contents will be hot.
Close grill lid. Cook to desired temperature. Use vents
and adjustable dampers to alter temperature. Add
charcoal if needed through coal chute.
Keep grill lid open. Cook to desired temperature. Use
vents and adjustable dampers to alter temperature. Tend
to grill at all times while grilling.
MAINTENANCE
Carefully remove grill contents with covered hands.
1.
2.
7.
Load 7-9 lbs. of charcoal onto coal grate in bottom of grill.
Carefully light charcoal.
8. Turn motor off when nished. Grab spit rod by the cool-
touch handles to remove from grill. Do NOT touch other
areas of spit rod or spikes.
Turn motor off when nished. Grab spit rod by the cool-
touch handles to remove from grill. Do NOT touch other
areas of spit rod or basket.
Completely extinguish re when nished grilling.
3. Remove coal from coal grate. Soak coals in water after
use; they retain heat for long periods of time.
5. Place grill contents back into grill. Keep grill lid open to
cool grill.
Properly dispose of coal and ashes once cooled.4.
NOTE: Clean stainless steel parts of grill with a stainless
steel wire brush ONLY. Using a steel wire brush will contaminate
stainless steel and cause it to rust.
NOTE: If the motor rod is not used, motor could become
unattached from an uneven weight distribution in the basket.
Always use motor rod when operating motor.
NOTE: Let charcoal turn white prior to placing spit in grill.
Remove holder pin from spike. Place spit rod into grill on
rod grooves. Make sure rod gear is engaged with chain
drive.
5.
NOTE: Let charcoal turn white prior to placing spit in grill.

9
SECTION 7: TROUBLESHOOTING GUIDE
NOTE: Refer to previous sections of this Operator’s Manual for proper assembly and operation instructions.
NOTE: For repairs beyond the minor adjustments above, contact the Customer Support Department
Trouble Possible Cause(s) Corrective Action
Charcoal fails to light Lack of charcoal lighter uid.
Adjustable dampers are closed.
Apply charcoal lighter uid sparingly to help ignite ame.
Open both adjustable dampers to add air into unit.
Spit rod moves around on spit
rod holders
Holder pin not attached to spit rod. Insert holder pin through spit rod and contents to secure in
place.
Spit rod contents (basket or
spikes) aren’t secure on rod
Spit rod clip not attached to spit rod
contents
Insert spit rod clip through holes on spit rod to secure in
place.
Basket contents are loose Basket cage not properly clamped. Adjust basket cage to tightest possible setting. Make sure
basket clamps are secure within grooves.
Spit rod fails to rotate when
rotary motor is on
Grill temperature continuously
increases or decreases
Adjustable dampers or vents are
open or closed.
Amount of grill charcoal uctuates.
Adjust dampers and vents to control grill temperature.
Check amount of charcoal; add additional charcoal if
needed for consistent temperature.
Spit rod out of alignment in grill.
Rotary motor not properly inserted
into socket, plugged in, or turned on.
Properly place spit rod on grill so rod gear is engaged with
chain drive.
Insert rotary motor into socket. Plug into outlet and turn
switch on.

MANUFACTURER’S LIMITED WARRANTY
CHICKENMASTER GRILLS MANUFACTURED BY
SPECIALTY WELDING & FABRICATING OF NEW YORK, INC.
1025 HIAWATHA BLVD. EAST
SYRACUSE, NY 13211
1 - (315)-426-1807
1 - (800) 896-7886
WWW.SPECWELD.COM
ALL PARTS AND PRODUCTS OF CHICKENMASTER GRILLS ARE MADE IN THE U.S.A.
The limited warranty set forth below is given by Specialty
Welding and Fabricating of New York, Inc. (“SWF”) with
respect to new merchandise purchased and used in the
United States, its possessions and territories.
SWF warrants this product against defects in material and
worksmanship for a period of two (2) years commencing on
the date of the original purchase and will, at its option, repair
or replace, free of charge, any part found to be defective
in material or workmanship. This limited warranty shall only
apply if this product has been operated and maintained in
accordance with the Operator’s Manual furnished with the
product, and has not been subject to misuse, abuse,
commercial use, neglect, accident, improper maintenance,
alteration, vandalism, theft, re, water, or damage because
of other peril or natural disaster. Damage resulting from
the installation or use of any accessory or attachment not
approved by SWF for use with the product(s) covered by this
manual will void your warranty as to any resulting damages.
The rotary motor and components thereof are subject to
separate terms as follows: All rotary motor component failures
will be covered on the product for a period of one (1) year.
After one year, but within the two-year period, rotary motor
part failures will be covered ONLY IF caused by defects in
material and workmanship of OTHER component parts.
HOW TO OBTAIN SERVICE: Warranty service is available
with PROOF OF PURCHASE through the customer support
department of SWF. You may contact the customer support
department of SWF by calling 1-800-896-7886 or 1-315-426-
1807, or writing to 1025 Hiawatha Blvd. East, Syracuse, NY
13211. No product returned directly to factory will be accepted
unless prior written permission has been extended by the
customer support department of SWF.
The two-year limited warranty does not cover the following:
•Routine maintenance items such as lubricants, cleaning
products, or lters.
•Normal deterioration of the exterior nish due to use
or exposure.
•
This limited warranty is exclusive and in lieu of all other
warranties, whether express or implied, by operation of
law or otherwise. SWF disclaims any implied warranties
of merchantability and tness for a particular purpose. No
oral or written information or advice given by any dealer or
retailer shall create a warranty or make any modication,
extension or addition to the express warranty set forth
above.
In no event shall recovery of any kind be greater than the
amount of the purchase price of the product sold. Alteration
of the safety features of the product shall void this warranty.
You assume the risk and liability for loss, damage, or injury
to you and your property and/or to others and their property
arising out of the use or misuse or inability to use this product.
This limited warranty shall not extend to anyone other than
the original purchaser or person for whom it was purchased
as a gift.
How state law relates to this warranty: This limited warranty
gives you specic legal rights, and you may also have other
rights which vary from state to state.
•The rotary motor or component parts thereof. These
items carry a separate one (1) year manufacturer’s
warranty. Please refer to the applicable manufacturer’s
warranty on these items.
Any products sold outside the United States, its
positions and territories, except those sold through
SWF’s authorized dealers or distributors.
In no event will SWF be liable for any indirect, special,
incidental or consequential damages of any kind including,
without limitation, expenses incurred for substitute or
replacement grill services, for transportation or for related
expenses, or for rental expenses to temporarily replace
a warranted product. The terms set forth in this limited
warranty shall replace and supersede any conicting
terms stated elsewhere.
™
This manual suits for next models
1
Table of contents
Other Chickenmaster Grill manuals


