ChiliTec 22607 User manual

Vervielfältigung nur mit Genehmigung durch ChiliTec GmbH, Lehre
Sicherheits-Hinweise und wichtige Informationen!
Um die Sicherheit zu jeder Zeit zu gewährleisten, und das volle Leistungsspektrum des Gerätes
zu nutzen, lesen Sie sich bitte die Sicherheitshinweise sorgfältig und in Ruhe durch !
Bedienungsanleitung
- Produ tdatenblatt Seite 1 /2 -
EAR (WEEE): DE25841852
LUCID VerpackG: DE5562476395648
GRS (UBA-Register) Nr.: 21003466
Stand: 01/2020 - Ver. 1.01
4-fach Stec dosenbloc Edelstahl
Art.-Nr: 22607
Technische Details:
• 4 Schutzkontakt-Steckdosen im Inneren bereits vorverkabelt
• BxHxT 280x78x78mm
• Betrieb nur an 230V/50Hz, max. 16A, 3600W
• Edelstahl-Gehäuse, Steckdosen mit silbernem Kunststoffring abgesetzt
flexible Befestigungsmöglichkeiten!
Produ tbeschreibung:
Hochwertiger 4er Steckdosenblock aus Edelstahl inklusive Gehäuse mit 45° Anwinkelung -
Ideal für ontage z.B. auf der Arbeitsplatte in der Küche,. in Werkstätten etc.
Das Produkt darf technisch sowie mechanisch nicht verändert werden, andernfalls
erlischt mit sofortiger Wirkung die Betriebserlaubnis und die Konformität!! Das Typenschild /
Aufdruck darf auf keinen Fall entfernt werden! Prüfen Sie das Produkt vor jedem Einsatz auf
Beschädigungen. Sollten Beschädigungen am Produkt zu sehen sein, muss dieses vom
Fachbetrieb überprüft, repariert oder ausgetauscht werden und den gültigen Richtlinien
nach, entsorgt werden (Siehe Fusszeile Seite 1). Keinesfalls darf ein beschädigtes oder defek-
tes Produkt weiter in Betrieb genommen werden! Bitte unbedingt das gesamte Verpackungs-
material und Zubehör, vor allem Kleinteile z.B. Schrauben sowie Folien vor Kindern und
Tieren sichern. Erstickungsgefahr! Der Hersteller übernimmt bei Nichtbeachtung der Anlei-
tung oder unsachgemäßer Benutzung, Zweckentfremdung oder vorgenommenen Änderun-
gen am Produkt, keinerlei Haftung für Sach- oder Personenschäden. Das Produkt darf im
Betrieb niemals abgedeckt werden!Dieses Produkt darf niemals im Zugriffsbereich von Kin-
dern oder Tieren betrieben, aufbewahrt, abgelegt oder gelagert werden. Bewahren Sie diese
Anleitung gut auf. Bei Weitergabe dieses Produktes muss die Anleitung sowie die Verpa-
ckung mitgegeben werden. Danke! Druckfehler oder Änderungen an Verpackung, an dem
Produkt, oder in der Anleitung behalten wir uns vor.
Elektronische Produkte, die mit der durchgestrichenen Abfalltonne gekennzeichnet sind gehören nicht in den Hausmüll !!
Diese Produkte können Sie kostenlos an Sammelstellen der Komunen abgeben, erkundigen Sie sich hier bei Ihrer
Gemeindeverwaltung, dem zuständigen Rathaus oder einem lokalem bzw. städtischem Abfallentsorgungsbetrieb. Vielen Dank.
Altbatterien dürfen nicht in den Hausmüll. Verbraucher sind gesetzlich verpflichtet, Batterien zu einer geeigneten Sammelstelle
bei Handel oder Kommune zu bringen.Altbatterien enthalten möglicherweise Schadstoffe oder Schwermetalle, die Umwelt und
Gesundheit schaden können.Die Zeichen unter der Kennzeichnung ( ülltonne) stehen für:
Pb: Batterie enthält Blei, Cd: Batterie enthält Cadmium Hg: Batterie enthält Quecksilber. Die Umwelt und ChiliTec sagen Dankeschön.

Vervielfältigung nur mit Genehmigung durch ChiliTec GmbH, Lehre
Bedienungsanleitung
- Produ tdatenblatt Seite 2 /2 -
EAR (WEEE): DE25841852
LUCID VerpackG: DE5562476395648
GRS (UBA-Register) Nr.: 21003466
Stand: 01/2020 - Ver. 1.01
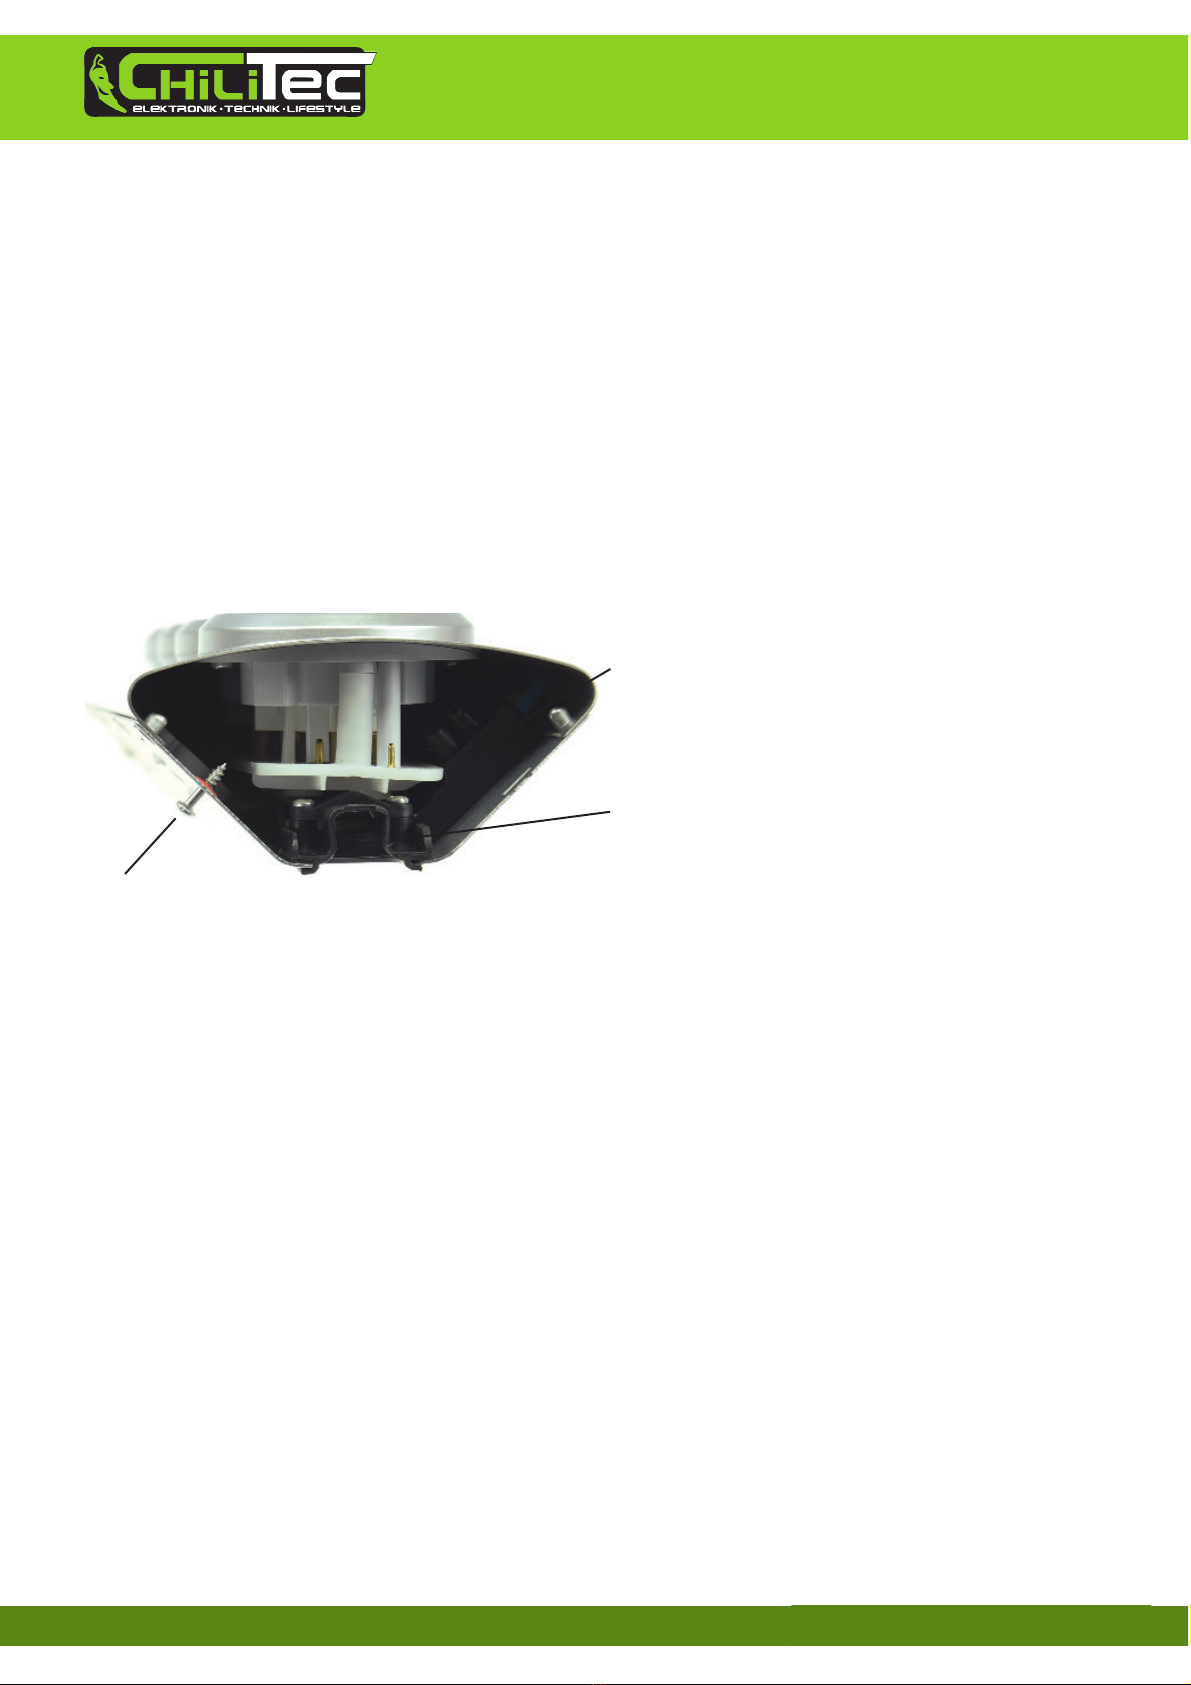
lösen Sie die Arretierungsschraube
der seitlichen Kunststoffabdeckung
Die Lüsterklemmen zum Anschluss der Zuleitung
(muss immer 1,5mm² sein) befindet sich sichtbar
im Inneren des Gehäuses.
Zum Heraussziehen des gesamten Schlussblocks,
ziehen Sie an der Kabeleinführung / Zugentlas-
tung...Falls sie einen leicht höheren Kraftauf-
wand benötigen ist ggfs. eine Zange als
Hilfsmittel ratsam und empfehlenwert.
Vor Installationsbeginn - Strom am Hauptschalter aus - Spannungsfreiheit nochmal prüfen!
Installation der Netzleitung
Die Leiste ist im Inneren komplett „vorverdrahtet“. Entnehmen Sie nun die in der Leiste befindliche
Anschlussklemme (siehe oben). Die Einzeladern der angekommen Leitungen sollten ca. 2cm lang und
ca. 7mm abisoliert sein. Führen Sie nun die ankommende, stromführende Leitung zunächst durch die
Schelle für die Zugentlastung. Führen Sie nacheinander die drei angskommenen Leitungen in die
Klemme. Achten Sie darauf, dass jede Ader in der richtigen Klemme zum „passenden Gegenüber“
montiert wird. Also PE-Schutzleiter grün/gelb auf den gegenüberliegenden PE-Schutzleiter grün/gelb.
Genauso ist mit den beiden anderen Einzeladern zu verfahren. Die Festigkeit aller Einzelandern ist
vorm Zusammenbau zu prüfen. Schieben Sie anschließend die Klemme zurück in die Leiste und befes-
tigen Sie das Seitenteil wieder mit der zuvor entfernten Schraube. Schalten Sie nun die Stromversor-
gung für den Stromkreis Ihrer Installation wieder ein und prüfen Sie mit einem speziellen
Leitungstester den korrekten Anschluss der einzelnen Adern je Steckdose. Ist alles korrekt, können Sie
die Klebestreifen zur Fixierung der Leiste aufbringen und die Leiste in Wunschposition befestigen.
Hierzu bitte die Leiste mit den Klebestreifen 20 Sekunden fest anpressen.
Die Steckdosenleiste darf ausschließlich in einem Schutzkontakt-Stromkreis mit Fehlerstrom-
schutzschaltung betrieben werden.
Sicherheitshinweise
• Das Produkt darf niemals mit Wasser, auch nicht in andere Flüssigkeiten, in Berührung kommen.
• Das Produkt darf nicht Hitze (> °40) oder hoher Luftfeuchtigkeit (> 80%) ausgesetzt werden.
• Achten Sie darauf dass das Kabel nicht geknickt, gequetscht, eingeklemmt oder überfahren wird.
• Achten Sie bei der Kabelverlegung darauf, dass das Kabel nicht zur Stolperfalle wird.
• Vorm Anschluss prüfen, dass die Betriebsspannung (Produkt) mit der Netzspannung übereinstimmt.
• Berühren Sie niemals das Produkt, Netzleitung oder den Stecker mitr feuchten/nassen Händen.
• Ein Umbauen, Verändern oder Erweitern des Produktes ist nicht gestattet.
Die Installation bzw. der Eingriff ins Stromnetz kann zu sehr schwerer Verletzung bis hin zu einem
tödlichen Stromschlag führen. • Anschluss oder Installation darf nur von Fachpersonal / Elektrofach-
kraft im spannungs bzw. stromfreien Zustand durchgeführt werden! Die Spannungsfreiheit muss
zwingend überprüft werden! Beachten Sie unbedingt die UVV (Unfallverhütungsvorschriften) und
VDE Bestimmungen! Betrieb nur erlaubt an 230V~/ 50Hz.Die Installation darf nur mit dafür zugelasse-
nen und geprüften Werkzeugen erfolgen. Schalten Sie bei allen Arbeiten den Stromkreis, in dem die
Installation ausgeführt wird, an der Hauptsicherung komplett ab! Anderenfalls besteht LEBENSGE-
FAHR!!. Zum Anschluss aller 230V~ / 50Hz Komponenten darf der indestquerschnitt (1,5mm²) der-
Anschlussleitung niemals unterschritten werden. Benutzen Sie unbedingt eine für diese Verwendung
ausdrücklich zugelassene Leitung. Es gibt im Inneren dieses Produktes keine zu wartenden Teile. Der
korrekte Anschluss ist zu prüfen, erst bei einwandfreier Installation darf die Spannung wieder zuge-
schaltet werden. Der Stromkreis darf erst in Betrieb genommen werden, wenn alle Komponenten
fachgerecht und fest in der Wand / Halterung / Decke installiert und auf volle Funktion geprüft wur-
den.Die zulässige Anschlusslast darf niemals überschritten werden.
Vor Installationsbeginn - Strom am Hauptschalter aus - Spannungsfreiheit nochmal prüfen!

operation manual EAR (WEEE): DE25841852
LUCID Packaging Act: DE5562476395648
GRS (UBA register) No .: 21003466
-Product data sheet page 1/2 - Status: 01/2020 - Ver. 1.01
Art.-No: 22607
4-way socket block stainless steel
Product description:
High-quality 4-way socket block made of stainless steel including housing with 45 ° angled - ideal
for mounting, for example, on the worktop in the kitchen. in workshops etc.
Technical details:
•4 safety sockets already pre-wired inside
• WxHxD 280x78x78mm
•Operation only at 230V / 50Hz, max.16A, 3600W
•Stainless steel housing, sockets with a silver plastic ring
flexible mounting options!
Safety instructions and important information!
In order to guarantee safety at all times and to use the full range of functions of the device, please
read the safety instructions carefully and carefully!
The product must not be modified technically or mechanically, otherwise
The operating license and the conformity expire with immediate effect !! The nameplate /
imprint must not be removed under any circumstances! Check the product for damage before
each use. If the product is damaged, it must be checked, repaired or replaced by a specialist
company and disposed of in accordance with the applicable guidelines (see footer on page 1).
Under no circumstances may a damaged or defective product continue to be used! Please be
sure to secure all packaging material and accessories, especially small parts such as screws and
foils, from children and animals. Danger of suffocation! The manufacturer assumes no liability
for damage to property or personal injury in the event of non-compliance with the instructions
or improper use, misuse or changes made to the product. The product must never be covered
during operation! This product must never be operated, kept, put down or stored in the access
area of children or animals. Keep these instructions in a safe place. If this product is passed on,
the instructions and the packaging must be included. Thanks! We reserve the right to make
misprints or changes to packaging, the product or the instructions.
Electronic products that are marked with the crossed-out garbage can do not belong in the household waste! You can hand these
products over to the municipal collection points free of charge. Inquire at your local authority, the responsible town hall or a local or
municipal waste disposal company. Many Thanks. Used batteries should not be put in the household garbage. Consumers are legally
obliged to bring batteries to a suitable collection point at the trade or municipality. Old batteries may contain pollutants or heavy
metals that can damage the environment and health. The symbols under the label (garbage can) stand for:
Pb: battery contains lead, Cd: battery contains cadmium Hg: battery contains mercury. The environment and ChiliTec say thank you.
Reproduction only with permission from ChiliTec GmbH, teaching
The translations in EN/FR/ES/IT were created automatically,
we assume no liability for this or guarantee of correctness.

operation manual EAR (WEEE): DE25841852
LUCID Packaging Act: DE5562476395648
GRS (UBA register) No .: 21003466
-Product data sheet page 2/2 - Status: 01/2020 - Ver. 1.01
Before starting the installation - power off at the main switch - check again that there is no voltage!
The installation or the intervention in the power grid can lead to very serious injuries up to a fatal electric
shock. • Connection or installation may only be carried out by qualified personnel / qualified electricians in
a voltage or current-free state! The absence of voltage must be checked! It is essential to observe the UVV
(accident prevention regulations) and VDE regulations! Operation only permitted on 230V ~ / 50Hz.
Installation may only be carried out with approved and tested tools. For all work, switch off the circuit in
which the installation is being carried out completely at the main fuse! Otherwise there is a DANGER TO
LIFE !!. To connect all 230V ~ / 50Hz components, the minimum cross-section (1.5mm²) of the connection
line must never be undershot. Be sure to use a cable that has been expressly approved for this use. There
are no serviceable parts inside this product. The correct connection must be checked; the voltage may
only be switched on again when the installation is correct. The circuit may only be put into operation
when all components have been properly and firmly installed in the wall / bracket / ceiling and checked
for full functionality. The permissible connection load must never be exceeded.
Before starting the installation - power off at the main switch - check again that there is no voltage!
The luster terminals for connecting the supply line
(must always be 1.5mm²) are visible inside the
housing.
To pull out the entire end block, pull on the cable
entry / strain relief ... If you need a slightly higher
effort, pliers may be advisable and recommended
as an aid.
loosen the locking screw of the
plastic side cover
Installation of the power line
The bar is completely "pre-wired" inside. Now remove the connection terminal located in the bar (see
above). The individual wires of the lines that have arrived should be approx. 2 cm long and approx. 7 mm
stripped. Now guide the incoming, live cable through the clamp for the strain relief. Insert the three
cables into the terminal one after the other. Make sure that each wire is installed in the correct terminal
for the "matching counterpart". So PE protective conductor green / yellow on the opposite PE protective
conductor green / yellow. Proceed in the same way with the other two individual wires. The strength of all
individual wires must be checked prior to assembly. Then slide the clamp back into the bar and fasten the
side part again with the screw you removed earlier. Now switch on the power supply for the circuit of
your installation again and use a special cable tester to check the correct connection of the individual
wires per socket. If everything is correct, you can apply the adhesive strips to fix the bar and attach the
bar in the desired position. To do this, please press the bar with the adhesive strips firmly for 20 seconds.
The socket strip may only be operated in an earthed circuit with a residual current circuit
breaker.
safety instructions
•The product must never come into contact with water, not even in other liquids.
•The product must not be exposed to heat (> 40 °) or high humidity (> 80%).
•Make sure that the cable is not kinked, squeezed, pinched or run over.
•When laying the cable, make sure that the cable does not become a tripping hazard.
•Before connecting, check that the operating voltage (product) matches the mains voltage.
•Never touch the product, power cord or plug with damp hands.
•Modifying, changing or expanding the product is not permitted.
Reproduction only with permission from ChiliTec GmbH, teaching

mode d'emploi OREILLE (DEEE): DE25841852
LUCID Packaging Act : DE5562476395648
GRS (registre UBA) N° : 21003466
-Fiche produit page 1/2 - Statut : 01/2020 - Ver. 1.01
Art.-No: 22607
Bloc de prises à 4 voies en acier inoxydable
Description du produit:
Bloc de prises à 4 voies de haute qualité en acier inoxydable avec boîtier coudé à 45 ° - idéal pour le
montage, par exemple, sur le plan de travail dans la cuisine. dans les ateliers etc...
Détails techniques:
•4 prises de sécurité déjà pré-câblées à l'intérieur
• LxHxP 280x78x78mm
•Fonctionnement uniquement à 230V / 50Hz, max.16A, 3600W
• Boîtier en acier inoxydable, douilles avec un anneau en plastique argenté
options de montage flexibles!
Consignes de sécurité et informations importantes !
Afin de garantir la sécurité à tout moment et d'utiliser tout le spectre de performances de
l'appareil, veuillez lire attentivement et attentivement les consignes de sécurité!
Le produit ne doit pas être modifié techniquement ou mécaniquement, sinon
Le permis d'exploitation et la conformité expirent avec effet immédiat !! La plaque signalétique /
l'empreinte ne doit en aucun cas être retirée ! Vérifiez que le produit n'est pas endommagé
avant chaque utilisation. Si le produit est endommagé, il doit être contrôlé, réparé ou remplacé
par une entreprise spécialisée et éliminé conformément aux directives applicables (voir pied de
page à la page 1). Un produit endommagé ou défectueux ne doit en aucun cas continuer à être
utilisé ! Assurez-vous de protéger tous les matériaux d'emballage et accessoires, en particulier
les petites pièces telles que les vis et les feuilles, des enfants et des animaux. Risque
d'étouffement ! Le fabricant n'assume aucune responsabilité pour les dommages matériels ou
corporels en cas de non-respect des instructions ou d'utilisation inappropriée, de mauvaise
utilisation ou de modifications apportées au produit. Le produit ne doit jamais être recouvert
pendant le fonctionnement !Ce produit ne doit jamais être utilisé, conservé, déposé ou stocké
dans la zone d'accès des enfants ou des animaux. Conservez ces instructions dans un endroit
sûr. Si ce produit est transmis, les instructions et l'emballage doivent être inclus. Merci! Nous
nous réservons le droit de faire des fautes d'impression ou de modifier l'emballage, le produit
ou les instructions.
Les produits électroniques marqués de la poubelle barrée peuvent ne pas faire partie des déchets ménagers ! Vous pouvez déposer ces
produits gratuitement dans les points de collecte municipaux, renseignez-vous auprès de votre commune, de la mairie compétente ou
d'une entreprise d'élimination des déchets locale ou municipale. Merci beaucoup. Les piles usagées ne doivent pas être jetées aux
ordures ménagères. Les consommateurs sont légalement tenus d'apporter les piles à un point de collecte approprié dans le commerce
ou la municipalité. Les piles usagées peuvent contenir des polluants ou des métaux lourds qui peuvent nuire à l'environnement et à la
santé. Les symboles sous l'étiquette (poubelle) signifient:
Pb : la batterie contient du plomb, Cd : la batterie contient du cadmium Hg : la batterie contient du mercure. L'environnement et ChiliTec vous disent merci.
Reproduction uniquement avec l'autorisation de ChiliTec GmbH, enseignement

mode d'emploi OREILLE (DEEE): DE25841852
LUCID Packaging Act : DE5562476395648
GRS (registre UBA) N° : 21003466
-Fiche produit page 2/2 - Statut : 01/2020 - Ver. 1.01
Avant de commencer l'installation - couper l'alimentation à l'interrupteur principal - vérifier à nouveau qu'il n'y a pas de tension !
L'installation ou l'intervention sur le réseau électrique peut entraîner des blessures très graves pouvant
aller jusqu'à un choc électrique mortel. • Le raccordement ou l'installation ne peut être effectué que par
du personnel qualifié / des électriciens qualifiés à l'état hors tension ou sans courant ! L'absence de
tension doit être vérifiée ! Respecter impérativement les prescriptions UVV (réglementation de prévention
des accidents) et VDE ! Fonctionnement autorisé uniquement sur 230 V ~ / 50 Hz. L'installation ne peut
être effectuée qu'avec des outils approuvés et testés. Pour tous les travaux, coupez complètement le
circuit dans lequel l'installation est effectuée au niveau du fusible principal! Sinon il y a un DANGER DE
VIE !!. Pour connecter tous les composants 230V ~ / 50Hz, la section minimale (1,5 mm²) de la ligne de
connexion ne doit jamais être dépassée. Assurez-vous d'utiliser un câble qui a été expressément
approuvé pour cet usage. Il n'y a aucune pièce réparable à l'intérieur de ce produit. La connexion correcte
doit être vérifiée, la tension ne peut être rétablie que lorsque l'installation est correcte. Le circuit ne peut
être mis en service que lorsque tous les composants ont été correctement et fermement installés dans le
mur/support/plafond et vérifiés pour leur pleine fonctionnalité.La charge de connexion admissible ne doit
jamais être dépassée.
Avant de commencer l'installation - couper l'alimentation à l'interrupteur principal - vérifier à nouveau qu'il n'y a pas de tension !
Les bornes brillantes pour le raccordement de la ligne
d'alimentation (doit toujours être de 1,5 mm²) sont
visibles à l'intérieur du boîtier.
Pour retirer l'ensemble du bloc d'extrémité, tirez
sur l'entrée de câble / décharge de traction... Si
vous avez besoin d'un effort un peu plus élevé,
une paire de pinces peut être conseillée et
recommandée comme aide.
desserrer la vis de blocage du
couvercle latéral en plastique
Installation de la ligne électrique
La barre est entièrement "pré-câblée" à l'intérieur. Retirez maintenant la borne de connexion située dans
la barre (voir ci-dessus). Les fils individuels des lignes arrivées doivent mesurer environ 2 cm de long et
environ 7 mm dénudés. A présent, faites passer le câble sous tension entrant à travers la pince pour la
décharge de traction. Insérez les trois câbles dans la borne l'un après l'autre. Assurez-vous que chaque fil
est installé dans la borne correcte pour la « contrepartie correspondante ». Donc conducteur de
protection PE vert/jaune sur le conducteur de protection PE opposé vert/jaune. Procédez de la même
manière avec les deux autres fils individuels. La résistance de tous les fils individuels doit être vérifiée
avant l'assemblage. Ensuite, faites glisser la pince dans la barre et fixez à nouveau la partie latérale avec
la vis que vous avez retirée plus tôt. Rallumez maintenant l'alimentation électrique du circuit de votre
installation et utilisez un testeur de câble spécial pour vérifier la connexion correcte des différents fils par
prise. Si tout est correct, vous pouvez appliquer les bandes adhésives pour fixer la barre et fixer la barre
dans la position souhaitée. Pour ce faire, veuillez appuyer fermement sur la barre avec les bandes
adhésives pendant 20 secondes.
Le bloc multiprise ne doit être utilisé que dans un circuit mis à la terre avec un disjoncteur
différentiel.
consignes de sécurité
•Le produit ne doit jamais entrer en contact avec de l'eau, pas même avec d'autres liquides.
•Le produit ne doit pas être exposé à la chaleur (> 40 °) ou à une humidité élevée (> 80 %).
•Assurez-vous que le câble n'est pas plié, comprimé, pincé ou écrasé.
•Lors de la pose du câble, assurez-vous que le câble ne devient pas un risque de trébuchement.
•Avant le raccordement, vérifiez que la tension de fonctionnement (produit) correspond à la tension du secteur.
•Ne touchez jamais le produit, le cordon d'alimentation ou la prise avec les mains humides.
•Il est interdit de modifier, changer ou étendre le produit.
Reproduction uniquement avec l'autorisation de ChiliTec GmbH, enseignement

operación manual OÍDO (RAEE): DE25841852
LUCID Packaging Act: DE5562476395648
GRS (registro UBA) No.: 21003466
-Hoja de datos del producto página 1/2 - Estado: 01/2020 - Ver. 1.01
Art.-No: 22607
Bloque de enchufe de 4 vías acero inoxidable
Descripción del Producto:
Bloque de enchufe de 4 vías de alta calidad fabricado en acero inoxidable, incluida la carcasa con un
ángulo de 45 °, ideal para montar, por ejemplo, en la encimera de la cocina. en talleres, etc.
Detalles técnicos:
•4 tomas de seguridad ya precableadas en el interior
• AnxAlxP 280x78x78mm
•Funcionamiento solo a 230 V / 50 Hz, máximo 16 A, 3600 W
•Carcasa de acero inoxidable, tomas con anillo de plástico plateado
opciones de montaje flexibles!
¡Instrucciones de seguridad e información importante!
Para garantizar la seguridad en todo momento y utilizar todo el espectro de rendimiento del
dispositivo, lea atentamente las instrucciones de seguridad.
El producto no debe modificarse técnica o mecánicamente, de lo contrario
¡El permiso de funcionamiento y la conformidad caducan con efecto inmediato! ¡La placa de
identificación / impresión no debe eliminarse bajo ninguna circunstancia! Compruebe si el
producto está dañado antes de cada uso. Si el producto está dañado, debe ser revisado,
reparado o reemplazado por una empresa especializada y desechado de acuerdo con las pautas
aplicables (ver pie de página en la página 1). ¡En ningún caso se podrá seguir utilizando un
producto dañado o defectuoso! Asegúrese de proteger todo el material de embalaje y los
accesorios, especialmente las piezas pequeñas como tornillos y láminas, de los niños y los
animales. ¡Peligro de asfixia! El fabricante no asume ninguna responsabilidad por daños a la
propiedad o lesiones personales en caso de incumplimiento de las instrucciones o uso
inadecuado, mal uso o cambios realizados en el producto. ¡El producto nunca debe cubrirse
durante el funcionamiento! Este producto nunca debe operarse, guardarse, colocarse o
almacenarse en el área de acceso de niños o animales. Guarde estas instrucciones en un lugar
seguro. Si este producto se transmite, se deben incluir las instrucciones y el embalaje. ¡Gracias!
Nos reservamos el derecho a realizar erratas o cambios en el embalaje, el producto o las
instrucciones.
Los productos electrónicos marcados con el cubo de basura tachado no deben tirarse a la basura doméstica. Puede entregar estos
productos de forma gratuita en los puntos de recogida municipales, consulte con su autoridad local, el ayuntamiento responsable o
una empresa de eliminación de residuos local o municipal. Muchas gracias. Las baterías usadas no deben tirarse a la basura doméstica.
Los consumidores están obligados legalmente a llevar las baterías a un punto de recogida adecuado en el comercio o el municipio. Las
baterías viejas pueden contener contaminantes o metales pesados que pueden dañar el medio ambiente y la salud. Los símbolos
debajo de la etiqueta (cubo de basura) significan:
Pb: la batería contiene plomo, Cd: la batería contiene cadmio Hg: la batería contiene mercurio. El medio ambiente y ChiliTec dan las gracias.
Reproducción solo con permiso de ChiliTec GmbH, enseñanza
operación manual OÍDO (RAEE): DE25841852
LUCID Packaging Act: DE5562476395648
GRS (registro UBA) No.: 21003466
-Hoja de datos del producto página 2/2 - Estado: 01/2020 - Ver. 1.01
Antes de iniciar la instalación, apague el interruptor principal, ¡vuelva a comprobar que no haya tensión!
La instalación o la intervención en la red eléctrica pueden provocar lesiones muy graves hasta una
descarga eléctrica mortal. • ¡La conexión o instalación solo puede ser realizada por personal calificado /
electricistas calificados en un estado libre de voltaje o corriente! ¡Debe comprobarse la ausencia de
tensión! ¡Es fundamental respetar las normas UVV (normas de prevención de accidentes) y VDE! El
funcionamiento solo se permite en 230 V ~ / 50 Hz. La instalación solo puede realizarse con herramientas
aprobadas y probadas. Para todos los trabajos, desconecte completamente el circuito en el que se está
realizando la instalación en el fusible principal. De lo contrario existe PELIGRO DE VIDA !!. Para conectar
todos los componentes de 230V ~ / 50Hz, la sección mínima (1,5 mm²) de la línea de conexión nunca debe
excederse. Asegúrese de utilizar un cable que haya sido aprobado expresamente para este uso. No hay
piezas reparables dentro de este producto. Debe comprobarse la conexión correcta, la tensión sólo se
puede volver a conectar cuando la instalación sea correcta. El circuito solo se puede poner en
funcionamiento cuando todos los componentes se hayan instalado de forma correcta y firme en la
pared / soporte / techo y se haya comprobado su plena funcionalidad.Nunca se debe exceder la carga de
conexión permitida.
Antes de iniciar la instalación, apague el interruptor principal, ¡vuelva a comprobar que no haya tensión!
Los terminales de brillo para conectar la línea de
alimentación (siempre deben ser de 1,5 mm²) son
visibles dentro de la carcasa.
Para sacar todo el bloque del extremo, tire de la
entrada de cable / alivio de tensión ... Si necesita
un esfuerzo un poco mayor, puede ser
aconsejable y recomendado un par de alicates
como ayuda.
aflojar el tornillo de bloqueo de la
cubierta lateral de plástico
Instalación de la línea eléctrica
La barra está completamente "precableada" por dentro. Ahora retire el terminal de conexión ubicado en la
barra (ver arriba). Los cables individuales de las líneas que han llegado deben tener aproximadamente 2 cm de
largo y aproximadamente 7 mm pelados. Ahora guíe el cable vivo entrante a través de la abrazadera para el
alivio de tensión. Inserte los tres cables en el terminal uno tras otro. Asegúrese de que cada cable esté
instalado en el terminal correcto para la "contraparte correspondiente". Por tanto, el conductor de protección
PE verde / amarillo en el conductor de protección PE opuesto verde / amarillo. Proceda de la misma manera
con los otros dos cables individuales. La resistencia de todos los cables individuales debe comprobarse antes
del montaje. Luego, deslice la abrazadera nuevamente en la barra y ajuste la parte lateral nuevamente con el
tornillo que quitó anteriormente. Ahora encienda de nuevo la fuente de alimentación del circuito de su
instalación y utilice un comprobador de cables especial para comprobar la correcta conexión de los cables
individuales por toma. Si todo es correcto, puedes aplicar las tiras adhesivas para fijar la barra y colocar la
barra en la posición deseada. Para hacer esto, presione la barra con las tiras adhesivas firmemente durante 20
segundos.
La regleta de enchufes solo se puede utilizar en un circuito de puesta a tierra con un
disyuntor de corriente residual.
las instrucciones de seguridad
•El producto nunca debe entrar en contacto con el agua, ni siquiera con otros líquidos.
•El producto no debe exponerse al calor (> 40 °) ni a una humedad elevada (> 80%).
•Asegúrese de que el cable no esté doblado, apretado, pellizcado o atropellado.
• Al tender el cable, asegúrese de que el cable no se convierta en un peligro de tropiezo.
•Antes de realizar la conexión, compruebe que la tensión de funcionamiento (producto) coincida con la tensión de red.
•Nunca toque el producto, el cable de alimentación o el enchufe con las manos húmedas.
•No se permite modificar, cambiar o ampliar el producto.
Reproducción solo con permiso de ChiliTec GmbH, enseñanza

manuale operativo ORECCHIO (RAEE): DE25841852
LUCID Packaging Act: DE5562476395648
GRS (registro UBA) n.: 21003466
- Scheda prodotto pagina 1/2 - Stato: 01/2020 - Ver. 1.01
N. art.: 22607
Presa a 4 vie in acciaio inossidabile
Descrizione del prodotto:
Blocco presa a 4 vie di alta qualità in acciaio inossidabile con alloggiamento con angolazione di 45 ° -
ideale per il montaggio, ad esempio, sul piano di lavoro in cucina. nelle officine ecc.
Dettagli tecnici:
•4 prese di sicurezza già precablate all'interno
• LxAxP 280x78x78 mm
•Funzionamento solo a 230V / 50Hz, max.16A, 3600W
• Alloggiamento in acciaio inossidabile, prese con anello in plastica argento
opzioni di montaggio flessibili!
Istruzioni di sicurezza e informazioni importanti!
Per garantire sempre la sicurezza e per utilizzare l'intero spettro di prestazioni del dispositivo,
leggere attentamente e attentamente le istruzioni di sicurezza!
Il prodotto non deve essere modificato tecnicamente o meccanicamente, altrimenti
Il permesso di esercizio e la conformità scadono con effetto immediato!! La targhetta / impronta
non deve essere rimossa in nessun caso! Controllare il prodotto per eventuali danni prima di
ogni utilizzo. Se il prodotto è danneggiato, deve essere controllato, riparato o sostituito da
un'azienda specializzata e smaltito secondo le linee guida applicabili (vedi piè di pagina a pagina
1). In nessun caso si può continuare a utilizzare un prodotto danneggiato o difettoso! Assicurati
di proteggere tutto il materiale di imballaggio e gli accessori, in particolare le parti piccole come
viti e pellicole, da bambini e animali. Pericolo di soffocamento! Il produttore non si assume
alcuna responsabilità per danni a cose o lesioni personali in caso di mancato rispetto delle
istruzioni o uso improprio, uso improprio o modifiche apportate al prodotto. Il prodotto non
deve mai essere coperto durante il funzionamento!Questo prodotto non deve mai essere
utilizzato, tenuto, posato o riposto nell'area di accesso di bambini o animali. Conserva queste
istruzioni in un luogo sicuro. Se questo prodotto viene passato, le istruzioni e la confezione
devono essere incluse. Grazie! Ci riserviamo il diritto di apportare errori di stampa o modifiche
alla confezione, al prodotto o alle istruzioni.
I prodotti elettronici contrassegnati con la spazzatura barrata non possono essere inclusi nei rifiuti domestici! Questi prodotti possono
essere consegnati gratuitamente presso i punti di raccolta comunali, informandosi presso le autorità locali, il municipio competente o
un'azienda locale o municipale di smaltimento dei rifiuti. Grazie molto. Le batterie usate non devono essere gettate nei rifiuti domestici.
I consumatori sono obbligati per legge a portare le batterie in un punto di raccolta idoneo presso il commercio o il comune.Le batterie
vecchie possono contenere sostanze inquinanti o metalli pesanti che possono danneggiare l'ambiente e la salute.I simboli sotto
l'etichetta (bidone della spazzatura) stanno per:
Pb: la batteria contiene piombo, Cd: la batteria contiene cadmio Hg: la batteria contiene mercurio. L'ambiente e ChiliTec ringraziano.
Riproduzione solo con il permesso di ChiliTec GmbH, insegnamento

manuale operativo ORECCHIO (RAEE): DE25841852
LUCID Packaging Act: DE5562476395648
GRS (registro UBA) n.: 21003466
- Scheda prodotto pagina 2/2 - Stato: 01/2020 - Ver. 1.01
Prima di iniziare l'installazione - togliere tensione dall'interruttore generale - ricontrollare che non ci sia tensione!
L'installazione o l'intervento nella rete elettrica può portare a lesioni molto gravi fino a una scossa
elettrica mortale. • Il collegamento o l'installazione possono essere eseguiti solo da personale qualificato/
elettricisti qualificati in assenza di tensione o corrente! L'assenza di tensione deve essere verificata! È
essenziale osservare le norme UVV (norme antinfortunistiche) e VDE! Funzionamento consentito solo a
230 V ~ / 50 Hz. L'installazione può essere eseguita solo con strumenti approvati e testati. Per tutti i lavori,
spegnere completamente il circuito in cui viene eseguita l'installazione dal fusibile principale! Altrimenti
c'è un PERICOLO PER LA VITA!!. Per collegare tutti i componenti 230V ~ / 50Hz, la sezione minima (1,5mm²)
della linea di collegamento non deve mai essere inferiore. Assicurarsi di utilizzare un cavo espressamente
approvato per questo uso. Non ci sono parti riparabili all'interno di questo prodotto. È necessario
verificare il corretto collegamento; la tensione può essere reinserita solo quando l'installazione è corretta.
Il circuito può essere messo in funzione solo quando tutti i componenti sono stati installati correttamente
e saldamente nella parete / staffa / soffitto e verificati per la piena funzionalità.Il carico di collegamento
consentito non deve mai essere superato.
Prima di iniziare l'installazione - togliere tensione dall'interruttore generale - ricontrollare che non ci sia tensione!
All'interno della custodia sono visibili i terminali lustri per il
collegamento della linea di alimentazione (devono essere
sempre di 1,5 mm²).
Per estrarre l'intero blocco terminale, tirare
l'ingresso del cavo / serracavo ... Se è necessario
uno sforzo leggermente maggiore, un paio di
pinze può essere consigliabile e consigliato come
aiuto.
allentare la vite di bloccaggio del
coperchio laterale in plastica
Installazione della linea elettrica
La barra è completamente "precablata" all'interno. Rimuovere ora il terminale di connessione situato
nella barra (vedi sopra). I singoli fili delle linee arrivate devono essere lunghi circa 2 cm e spelati circa 7
mm. Ora guida il cavo in tensione in ingresso attraverso il morsetto per il serracavo. Inserire uno dopo
l'altro i tre cavi nel terminale. Assicurarsi che ogni filo sia installato nel terminale corretto per la
"controparte corrispondente". Quindi conduttore di protezione PE verde/giallo sul conduttore di
protezione PE opposto verde/giallo. Procedere allo stesso modo con gli altri due fili singoli. La resistenza
di tutti i singoli fili deve essere verificata prima del montaggio. Quindi reinserisci il morsetto nella barra e
fissa nuovamente la parte laterale con la vite rimossa in precedenza. A questo punto riaccendi
l'alimentazione del circuito della tua installazione e verifica con un apposito tester per cavi il corretto
collegamento dei singoli fili per presa. Se tutto è corretto, puoi applicare le strisce adesive per fissare la
barra e fissare la barra nella posizione desiderata. Per fare ciò, premere saldamente la barra con le strisce
adesive per 20 secondi.
La presa multipla può essere utilizzata solo in un circuito messo a terra con un
interruttore differenziale.
istruzioni di sicurezza
•Il prodotto non deve mai venire a contatto con l'acqua, nemmeno in altri liquidi.
•Il prodotto non deve essere esposto a calore (> 40°) o elevata umidità (> 80%).
•Assicurarsi che il cavo non sia attorcigliato, schiacciato, schiacciato o travolto.
•Quando si posa il cavo, assicurarsi che il cavo non diventi un pericolo di inciampo.
• Prima del collegamento, verificare che la tensione di esercizio (prodotto) corrisponda alla tensione di rete.
•Non toccare mai il prodotto, il cavo di alimentazione o la spina con le mani umide.
•Non è consentito modificare, cambiare o ampliare il prodotto.
Riproduzione solo con il permesso di ChiliTec GmbH, insegnamento
This manual suits for next models
1
Table of contents
Languages:
Other ChiliTec Accessories manuals


Popular Accessories manuals by other brands

Fiamma
Fiamma F35 Pro Series Installation and usage instructions

Hupfer
Hupfer SGR operating instructions

Stanley
Stanley FATMAX PPS200S instruction manual

ST
ST VL53L1X API user manual

RP Advanced Mobile Systems
RP Advanced Mobile Systems 2400-8040-12V-C owner's manual

CAS
CAS CI-100A Operation & service manual


