BEA
SA
|
LIEGE
Science
Park
|
ALLÉE
DES
NOISETIERS
5
-
4031
ANGLEUR
[BELGIUM]
|
T
+32
4
361
65
65
|
F
+32
4
361
28
58
|
[email protected] |
WWW
.BEA.BE
1
1
2
3
4
5
1
2
1
2
1
1
2
3
1
©BEA | Original instructions | 42.8575 / V1 - 08.15
BEA hereby declares that the FALCON-L is in conformity with the basic requirements and the other
relevant provisions of the directives 1999/5/EC and 2004/108/EC.
TROUBLESHOOTING
The sensor power is off. Check the wiring and the power supply.
The complete declaration of conformity is available on our website: www.bea.be
The door opens
and closes
constantly.
The LED
flashes quickly
after unlocking.
The sensor does
not respond to the
remote control.
Improper output
configuration on the sensor.
The sensor is disturbed
by the door motion or
vibrations caused by the
door motion.
The sensor needs an access
code to unlock.
The remote control
batteries are weak or
improperly installed.
Check the output configuration setting on each
sensor connected to the door operator.
Check the batteries and change them
if necessary.
Make sure the detection mode is unidirectional.
Increase the immunity filter value.
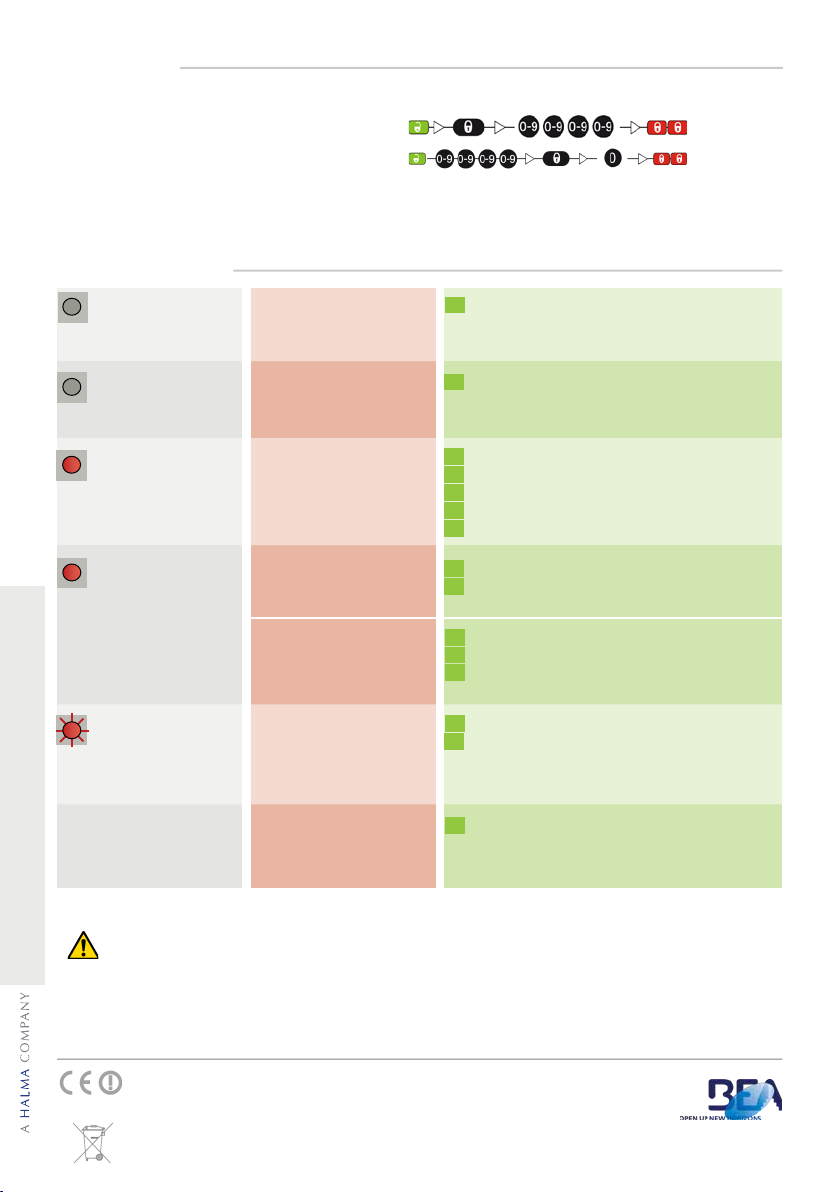
ACCESS CODE
SAVING AN ACCESS CODE:
DELETING AN ACCESS CODE:
The access code (1 to 4 digits) is recommended to set sensors installed close to each other.
Once you have saved an access code, you always need to enter this code to unlock the sensor.
If you do not know the access code, cut and restore the power supply. During 1 minute, you can access the sensor
without introducing any access code.
The door remains
closed.
The LED is OFF.
The door does not
react as expected.
Make sure the sensor is fixed properly.
Make sure the detection mode is unidirectional.
Increase the tilt angle.
Increase the immunity filter value.
Reduce the field size.
Enter the right access code.
If you do not know the access code, cut the power
supply and restore it to access the sensor and
change the access code or delete it.
Change the antenna angle.
Decrease the field size.
Increase the immunity filter value.
The door opens for
no apparent reason.
The sensor detects raindrops
or vibrations.
In highly reflective
environments, the sensor
detects objects outside of its
detection field.
Only for EC countries: According the European Guideline 2012/19/EU for Waste Electrical and Electronic Equipment (WEEE)
SAFETY INSTRUCTIONS
The manufacturer of the door system is responsible for carrying out a risk assessment and installing the sensor and the door system in compliance with
applicable national and international regulations and standards on door safety.
Only trained and qualified personnel may install and setup the sensor.
The warranty is void if unauthorized repairs are made or attempted by unauthorized personnel.