Chilli Penguin short User manual

Contents
CPS 9768 06/2015
1
Welcome
p4
2
Dimensions & Technical
Specifications
p5
4
Instructions for Use
p20
a.
Diagram of outside including
a.
Short Penguin
top plate
b.
Woody
b.
Diagram inside including door
c.
Hungry Penguin
c.
Warnings & Pre-lighting
d.
Fat Penguin
checks
e.
High and Mighty
d.
YOUR FIRST FIRE - a
f.
Penguin 8
simple guide
g.
Penguin 8 with oven
e.
Principles of combustion
f.
The environment
g.
Instructions for use with wood
h.
Instructions for use with
smokeless fuels
i.
Cooking on a penguin
3
Installation Instructions
p12
5
Maintenance
p29
a.
Warning
a.
Routine checks and
b.
Smoke Control Areas and
cleaning
Exemption of Appliances
b.
Painting the stove and
c.
Fitting a Smoke Control Kit
flue pipe
d.
Ventilation
c.
Keeping the glass clear
e.
Floors
d.
Replacing Ceramic door
f.
Hearth
glass
g.
Plinth clamp
e.
Replacing a door seal
h.
Rear flue box
f.
Fire brick replacement
i.
Rear flue adaptor
g.
Removing the throat plate
j.
Base heat shield
h.
Removing the grate
k.
Distance to non combustible
i.
Trouble Shooting
walls
l.
Distances to combustible
6
Guarantee
p35
walls
m.
Distance to flue
Please be aware that our stoves are finished
with a high temperature stove paint so should
only be cleaned with a soft brush or dry lint
free cloth. Do not wipe with a damp cloth. If
you are plastering or painting please protect
the stove. The paint is in its most vulnerable
condition before curing in the first few fires.
n.
Chimney

A very warm welcome and croeso to your new chilli penguin stove
The charter of the penguin
We guarantee that your stove is good quality and well made
We guarantee that your stove will give you years of warm and efficient heating
We know this because we design and make them ourselves here in Wales
We are convinced that stoves make the autumn fabulous and the winter sublime
We hope that your stove will make the bad days bearable and the good days great
We think that human beings with stoves are happier than those without
We believe that your life has just got better
We put a lot of time and energy into developing and improving our stoves to enable
them to run as efficiently as possible and be simple to use. Please spend a few
minutes familiarising yourself with the stove so you can get the best possible
performance out of it. We love to hear how the penguins get on in their new homes, if
you have any comments or questions, please get in touch. www.chillipenguin.co.uk
The Chilli Penguin Team
Let your inner penguin smile
Your stove should arrive with
A pair of heat resistant gloves
A tool for operating the stove and removing the ash pan
Instruction manual
Ash pan drawer
Smoke control kit –must be fitted in smoke control areas
An aerosol of spray paint - coloured stoves only
Trivet - oven models only

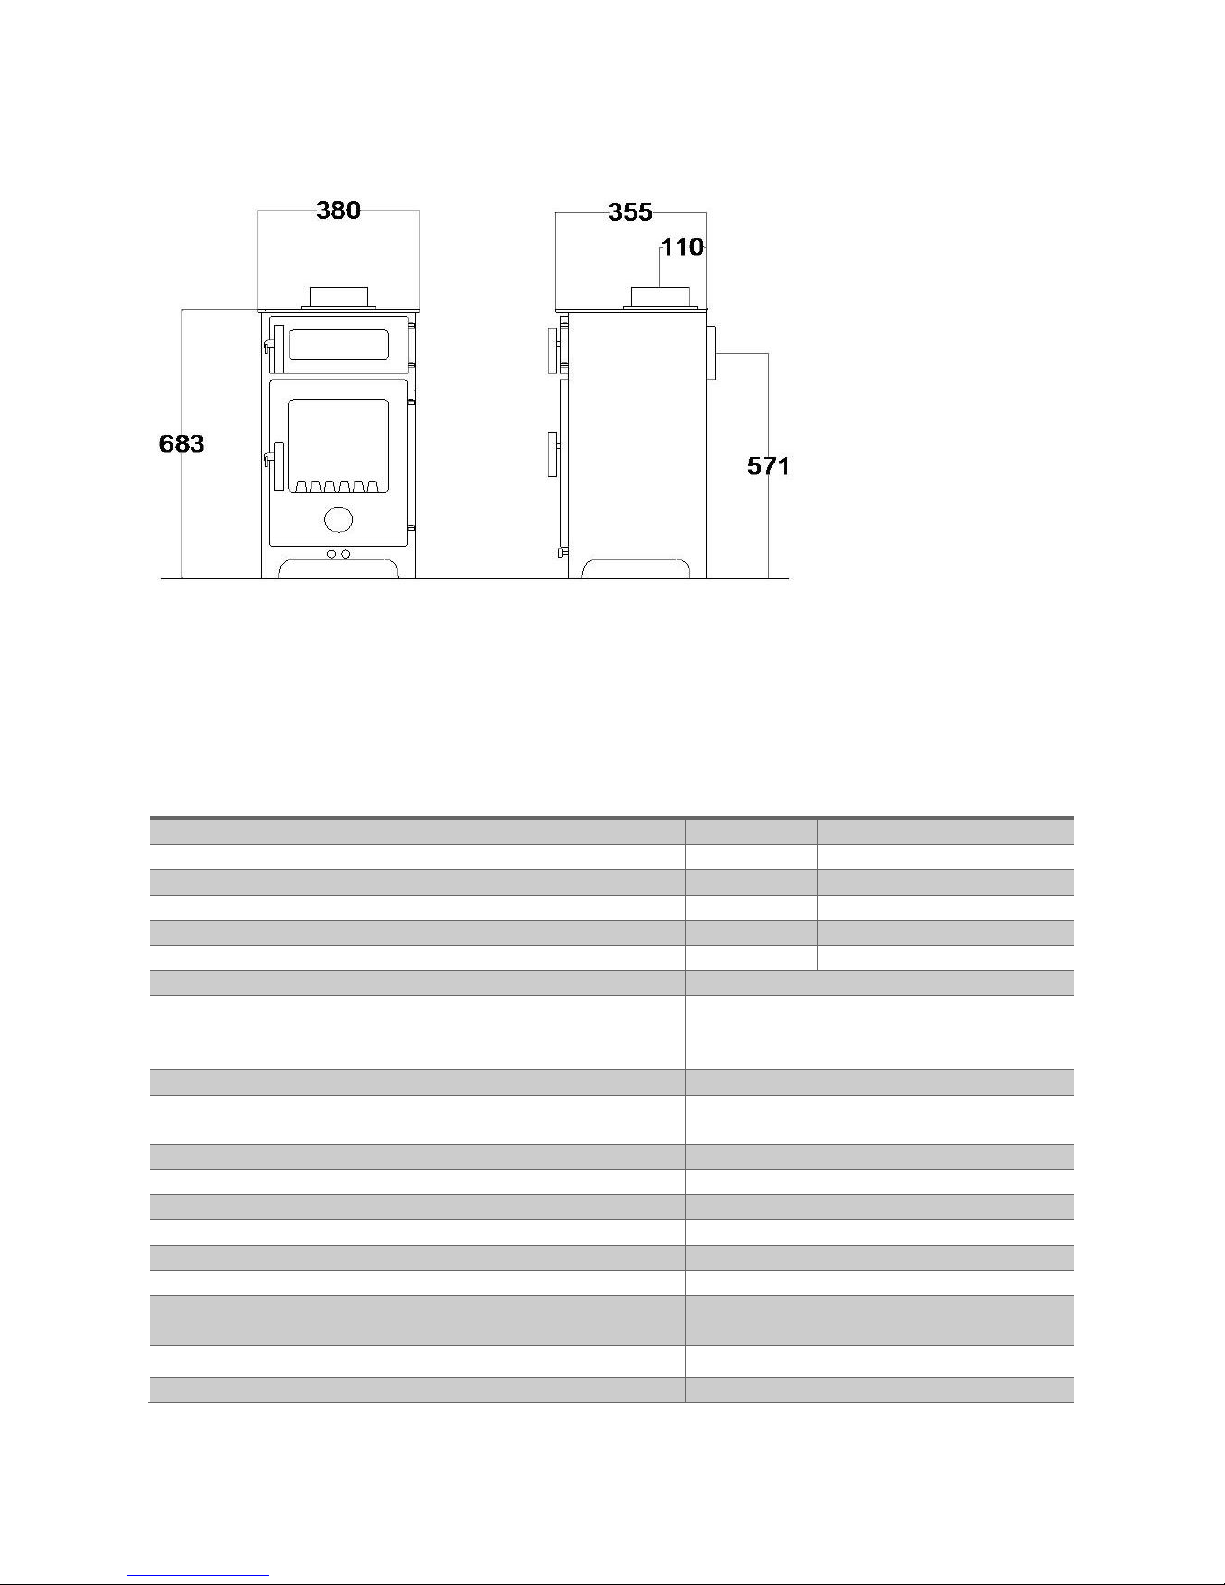
2 a.Technical Specifications - Short Penguin
Tested to EN 13240 and BS3841-2:1994 as intermittent burning
appliance
Item
Wood
Smokeless fuels
Fuel type
Yes
Yes
Nominal Output
5.0kW
4.8kW
Total Energy Efficiency %
81.9
72.7
Flue gas g/s
3.3
3.1
Co content @13% 02
0.21%
0.14%
Mean Flue gas temp. Deg.C
269
311
Exemption Testing complete
Yes
Max. Log length x average diameter*
*With split logs treat this as the greatest depth
/width measurement
270mm x 100mm
Flue collar diameter
127mm
Flue size required
150mm
(125mm if fitted with a smoke control kit)
Top Exit
Standard
Rear Exit
Optional flue box/adaptor required
Hearth type without base heat shield/plinth
constructional
Hearth type with base heat shield/plinth
12mm
Chimney draught required
12Pa
Optional boiler (non pressurised systems)
Not tested for use in smoke control areas
1.4kW
Construction
Welded steel
Nett weight
80kg
2 a. Stove Dimensions - Short Penguin sensational

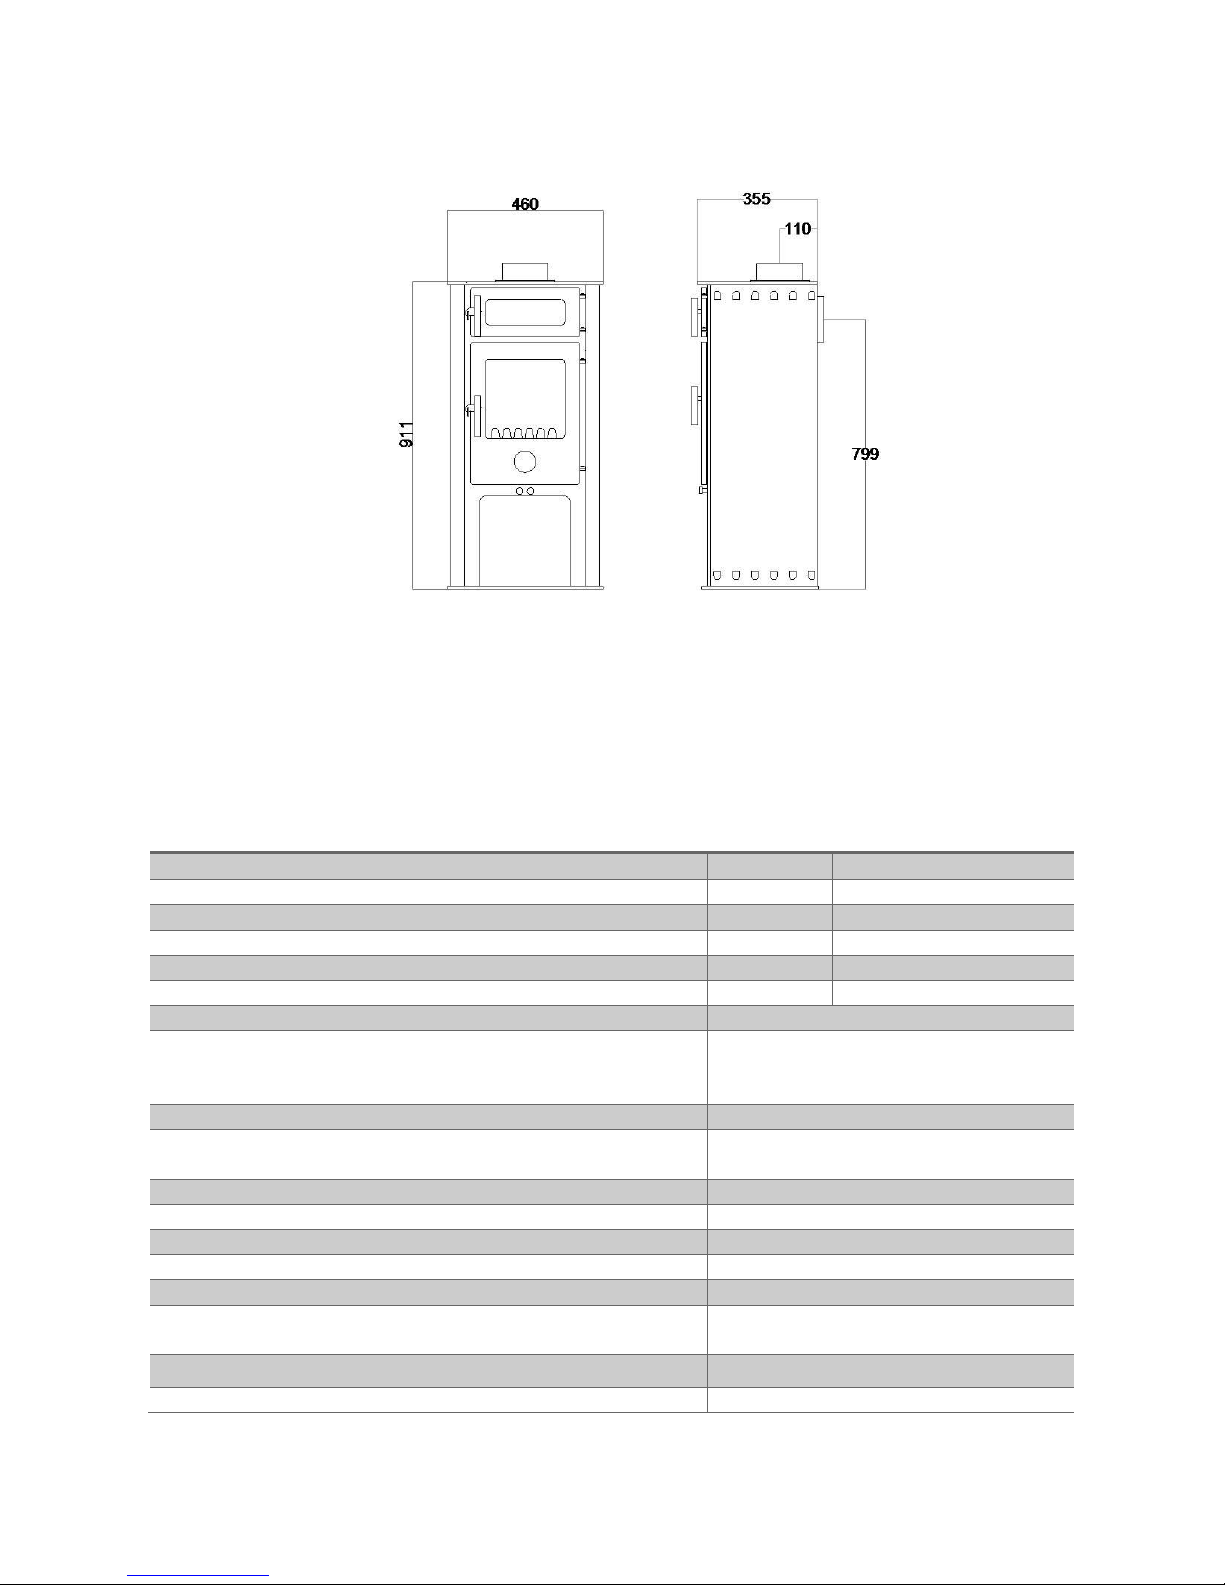
2.bTechnical Specifications - Woody
Tested to EN 13240 and BS3841-2:1994 as intermittent burning
appliance
Item
Wood
Smokeless fuels
Fuel type
Yes
Yes
Nominal Output
5.0kW
5.0kW
Total Energy Efficiency %
82
87
Flue gas g/s
4.0
3.2
Co content @13% 02
0.19%
0.21%
Mean Flue gas temp. Deg.C
200
223
Exemption Testing complete
Yes
Max. Log length x average diameter*
*With split logs treat this as the greatest depth
/width measurement
430mm x 100mm
Flue collar diameter
127mm
Flue size required
150mm
(125mm if fitted with smoke control kit)
Top Exit
Standard
Rear Exit
Optional flue box/adaptor required
Hearth type without base heat shield/plinth
constructional
Hearth type with base heat shield/plinth
12mm
Chimney draught required
12Pa
Optional boiler (non pressurised systems)
Not tested for use in smoke control areas
2.3kW
Construction
Welded steel
Nett weight
90kg
2.b Stove Dimensions - Woody efficient and fabulous
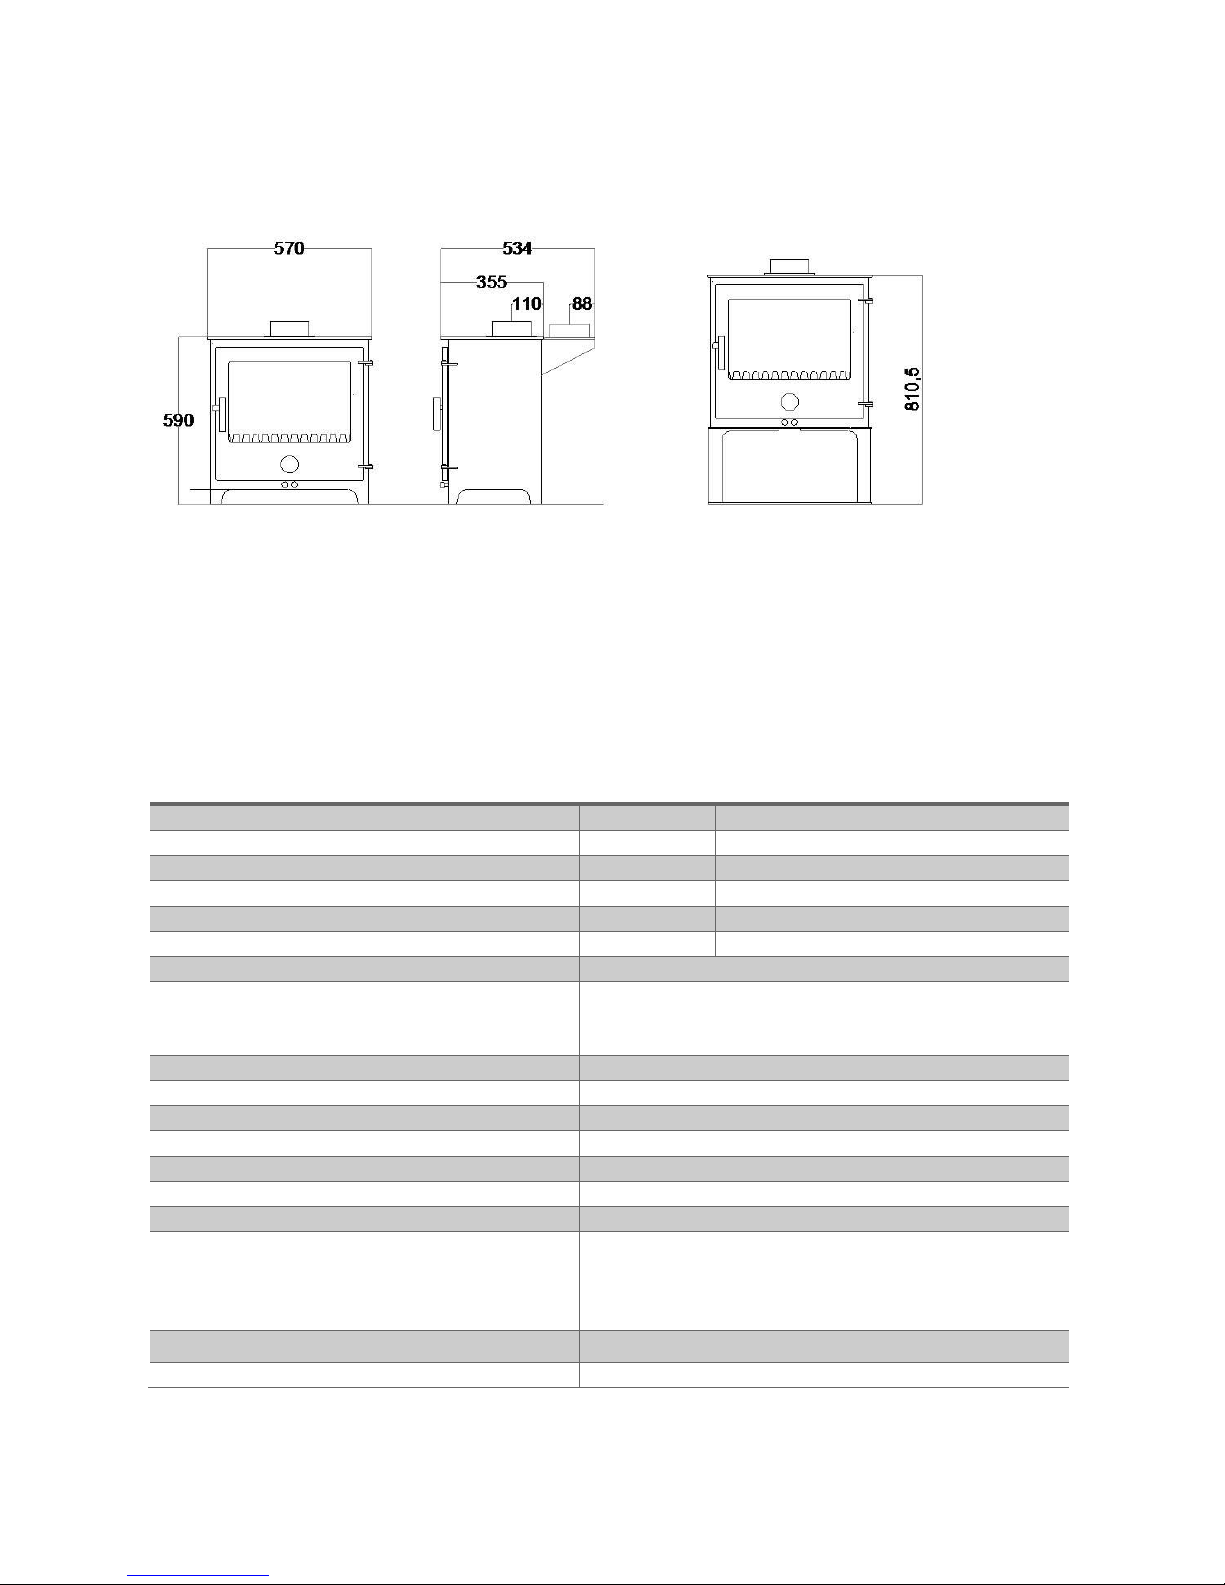
2.cTechnical Specifications - Hungry Penguin
Tested to EN 13240 and BS3841-2:1994 as intermittent burning
appliance
Item
Wood
Smokeless fuels
Fuel type
Yes
Yes
Nominal Output
5.0kW
5.0kW
Total Energy Efficiency %
82
87
Flue gas g/s
4.0
3.2
Co content @13% 02
0.19%
0.21%
Mean Flue gas temp. Deg.C
200
223
Exemption Testing complete
Yes
Max. Log length x average diameter*
*With split logs treat this as the greatest depth
/width measurement
270mm x 100mm
Flue collar diameter
127mm
Flue size required
150mm (125mm if fitted with smoke
control kit)
Top Exit
Standard
Rear Exit
Fit flue collar to rear
Internal cooker dimensions
h100 mm x w250mm x d220mm
Hearth type without base heat shield/plinth
constructional
Hearth type with base heat shield/plinth
12mm
Chimney draught required
12Pa
Optional boiler (non pressurised systems)
Not tested for use in smoke control areas
1.4kW
Construction
Welded steel
Nett weight
90kg
2.c Stove Dimensions - Hungry Penguin does it all

2.d Stove dimensions - Fat Penguin big, fat & beautiful
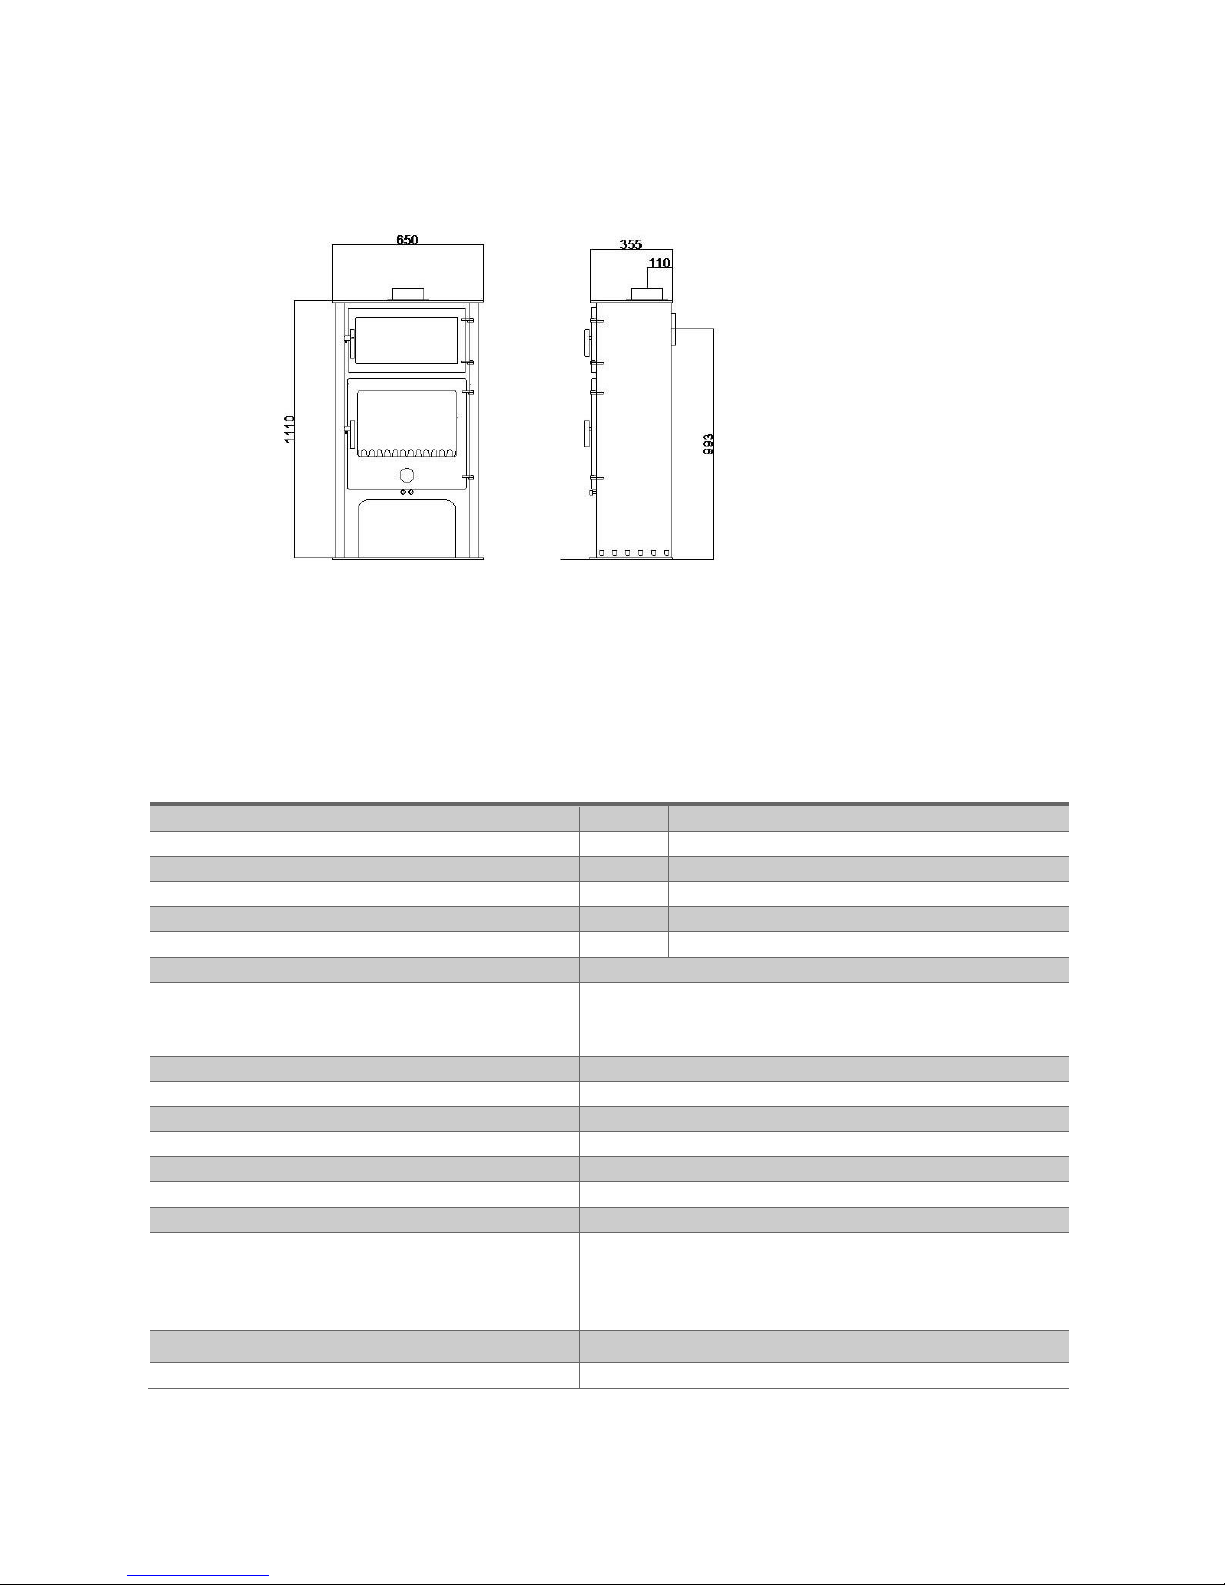
2.d Technical Specifications - Fat Penguin
Tested to EN 13240 and BS3841-2:1994 as intermittent burning
appliance
Item
Wood
Smokeless fuels
Fuel type
Yes
Yes
Nominal Output
5.0kW
5.0kW
Total Energy Efficiency %
82
87
Flue gas g/s
4.0
3.2
Co content @13% 02
0.19%
0.21%
Mean Flue gas temp. Deg.C
200
223
Exemption Testing complete
Yes
Max. Log length x average diameter*
*With split logs treat this as the greatest depth
/width measurement
270mm x 100mm
Flue collar diameter
127mm
Flue size required
150mm (125mm if fitted with smoke
control kit)
Top Exit
Standard
Rear Exit
Fit flue collar to rear
Internal cooker dimensions
h100 mm x w250mm x d220mm
Hearth type without base heat shield/plinth
constructional
Hearth type with base heat shield/plinth
12mm
Chimney draught required
12Pa
Optional boiler (non pressurised systems)
Not tested for use in smoke control areas
1.4kW
Construction
Welded steel
Nett weight
100kg
2.e Stove dimensions - High and Mighty smug as a sausage
2.e Technical Specifications - High and Mighty
Tested to EN 13240 and BS3841-2:1994 as intermittent burning
appliance
Item
Wood
Smokeless fuels
Fuel type
Yes
Yes
Nominal Output
5.0kW
5.0kW
Total Energy Efficiency %
82
87
Flue gas g/s
4.0
3.2
Co content @13% 02
0.19%
0.21%
Mean Flue gas temp. Deg.C
200
223
Exemption Testing complete
Yes
Max. Log length x average diameter*
*With split logs treat this as the greatest depth
/width measurement
270mm x 100mm
Flue collar diameter
127mm
Flue size required
150mm (125mm if smoke control kit
fitted)
Top Exit
Standard
Rear Exit
Fit flue collar to rear of stove
Internal cooker dimensions
h100 mm x w250mm x d220mm
Hearth type with integral plinth
12mm
Chimney draught required
12Pa
Optional boiler (non pressurised systems)
Not tested for use in smoke control areas
1.4kW
Construction
Welded steel
Nett weight
110kg
2.f Technical Specifications –Penguin 8
Tested to EN 13240 and BS3841-2:1994 as intermittent burning
appliance
Item
Wood
Smokeless fuels
Fuel type
Yes
Yes
Nominal Output
8.0kW
8.0kW
Total Energy Efficiency %
81
71
Flue gas g/s
5.1
9.8
Co content @13% 02
0.19%
0.21%
Mean Flue gas temp. Deg.C
200
223
Exemption Testing complete
Yes
Max. Log length x average diameter*
*With split logs treat this as the
greatest depth /width measurement
430mm x 100mm
Flue collar diameter
127mm
Flue size required
150mm (125mm if fitted with smoke control kit)
Top Exit
Standard
Rear Exit
Optional flue box/flue adaptor required
Hearth type without plinth
constructional
Hearth type with plinth
12mm
Chimney draught required
12Pa
Optional boiler (non pressurised
systems)
Not tested for use in smoke control
areas
3kW
Construction
Welded steel
Nett weight
95kg
2.f Stove Dimensions - Penguin 8 simply awesome
2.gStove Dimensions - Penguin 8 with Oven smoking hot
( plinth and side panels included )
2.g Technical Specifications
Tested to EN 13240 and BS3841-2:1994 as intermittent burning
appliance
Item
Wood
Smokeless fuels
Fuel type
Yes
Yes
Nominal Output
8.0kW
8.0kW
Total Energy Efficiency %
81
71
Flue gas g/s
5.1
9.8
Co content @13% 02
0.19%
0.21%
Mean Flue gas temp. Deg.C
200
223
Exemption Testing complete
Max. Log length x average diameter*
*With split logs treat this as the
greatest depth /width measurement
430mm x 100mm
Flue collar diameter
127mm
Flue size required
150mm (125mm if fitted with smoke control kit)
Top Exit
Standard
Rear Exit
Flue collar fitted to rear
Hearth type with integral plinth
12mm
Internal oven dimension (sloping roof)
h180 mm x w440 mm x d220 mm
Chimney draught required
12Pa
Optional boiler (non pressurised
systems)
Not tested for use in smoke control
areas
3kW
Construction
Welded steel
Nett weight
150kg

3. Installation Instructions
3.a Warning
All local and national regulations must be observed when installing the appliance. If
installed incorrectly serious accidents can be caused.
Building Regulation Document J must be referred to when installing this appliance.
It is the installer’s responsibility to ensure the manufacturer’s instructions are complied
with.
A HETAS qualified installation engineer should carry out the installation and issue a
compliance certificate or alternatively your local Building control department needs to
inspect the installation and register the work carried out.
3.b Smoke Control Areas and Exemption of Appliances
If you live in a smoke control area (introduced by The Clean Air Act,1993, see below) you are
permitted to burn approved smokeless fuel only, this does not include wood. However
if you use an Exempt stove then you can burn both seasoned wood and approved
smokeless fuels. NEVER BURN HOUSE COAL in a closed appliance like a stove.
The following stoves have been recommended as suitable for use in smoke control
areas when fitted with a smoke control kit when burning wood logs: the Short
Penguin, the Woody, the Hungry Penguin, the Fat Penguin, the High and Mighty and
Penguin 8. The appliances are not exempted when burning wood briquettes or paper
bricks or unauthorised fuels.
When a smoke control kit has been fitted this should be recorded in this manual.
The clip in boiler option on all our stoves is not approved for use in smoke
control areas.
The general principle to be observed in an Exempt chilli penguin stove is that the air
controls cannot be completely closed, allowing a permanent air supply to the fire
chamber.This means that fuel burns more efficiently, thereby emitting less harmful
emissions into the atmosphere.
“The Clean Air Act 1993 and Smoke Control Areas”
Under the Clean Air Act local authorities may declare the whole or part of the district of
the authority to be a smoke control area. It is an offence to emit smoke from a chimney
of a building, from a furnace or from any fixed boiler if located in a designated smoke
control area. It is also an offence to acquire an "unauthorised fuel" for use within a
smoke control area unless it is used in an "exempt" appliance ("exempted" from the
controls which generally apply in the smoke control area).
The Secretary of State for Environment, Food and Rural Affairs has powers under the
Act to authorise smokeless fuels or exempt appliances for use in smoke control areas
in England. In Scotland and Wales this power rests with Ministers in the devolved
administrations for those countries. Separate legislation, the Clean Air (Northern
Ireland) Order 1981, applies in Northern Ireland. Therefore it is a requirement that fuels
burnt or obtained for use in smoke control areas have been "authorised" in Regulations
and that appliances used to burn solid fuel in those areas (other than "authorised"
fuels) have been exempted by an Order made and signed by the Secretary of State or
Minister in the devolved administrations.
Further information on the requirements of the Clean Air Act can be found here:
http://www.gov.uk/smoke-control-area-rules
Your local authority is responsible for implementing the Clean Air Act 1993 including
designation and supervision of smoke control areas and you can contact them for
details of Clean Air Act requirements.
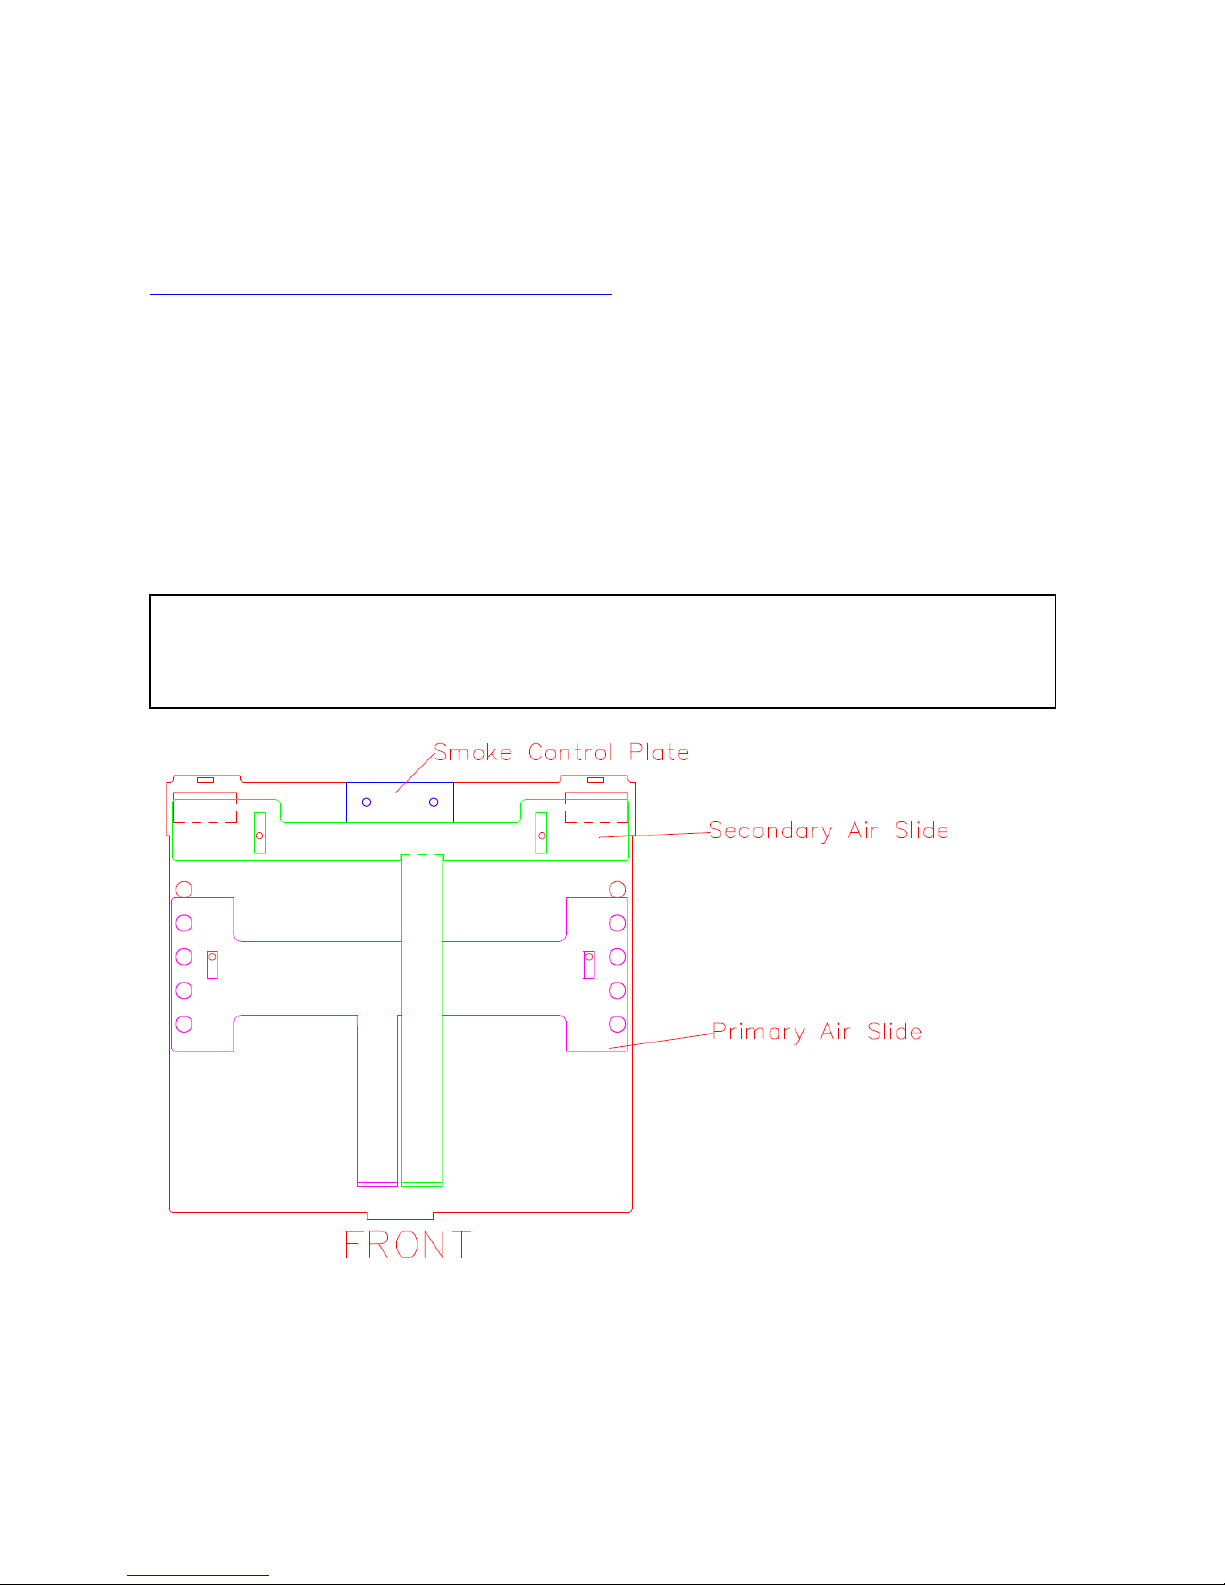
3.c Fitting the Smoke Control Kit
If you are installing a stove in a Smoke Control Area you must fit the Smoke Control kit
supplied. Record whether a smoke control kit has been fitted on the guarantee page of
this manual. The Smoke Control kit consists of a metal plate with 2 holes in, 2 screws
and 2 bolts.
Diagram of the underneath of the stove
3.d Ventilation: In order for the stove to operate correctly there needs to be sufficient
combustion air. For stoves of 5kw and over a permanantly open air vent is required.
For stoves of 5kW and under it may sometimes be required. In new build houses air
To fit: It is fitted to the underside of the stove prior to installation. See diagram
below for the position. When correctly fitted the secondary air knob will not push
in as far as the primary air knob.

vents are required for all sizes of stoves, this can apply to new extensions as well. This
will depend on the air leakage (air permeability) of your property.Your HETAS installer
should be able to guide you on your particular property. In addition a stove should not
be fitted in a room with an appliance such as extractor fan, ceiling fan or tumble drier, it
will affect the draw of the stove and could lead to fumes entering the room.
All air vents should be positioned so that thay are not liable to blockage.
3.e Floors: Make sure the floor can take the weight of the stove, the flue, the hearth
and any decorative surround.
3.f Hearth: A hearth is made up of 2 layers: a constructional hearth (base concrete
layer) and a superimposed hearth (top decorative layer). In some circumstances a
superimposed hearth is acceptable on its own. All of our stoves require a
constructional hearth unless the stoves are either on a plinth or have a base heat
shield fitted. (The Penguin 8 has not currently been tested for use with a base heat
shield but it can go on a plinth)
HEARTH REQUIREMENTS
All models
without base heat shield or plinth
Constructional
total depth (incl. superimposed) 125mm
All models on plinth
Superimposed 12mm (minimum)
All models (except Penguin 8) on
base heat shield
Superimposed 12mm (minimum)
In front of the stove
225mm (minimum)
Both sides of the stove
150mm (minimum)
NB. Do not place any soft furnishings within 1150mm of the stove.
3.g Plinth clamp
If you order a plinth it will come with a plinth clamp. This consists of two flat bars. The
Woody plinth clamp also has 4 bolts. It is designed to clamp the stove and the plinth
together securely.
photo of plinth clamp, taken inside the plinth, looking up
(the bar is painted red for illustration purposes only)
To fit: Place the bars inside the
plinth, one on the left side and one
on the right, running front to back.
Use the levelling bolts attached to
the legs of the stove to clamp the
bar to the underside of the plinth on
each side.
For Woody plinth, replace the
levelling bolts with the longer ones,
supplied.
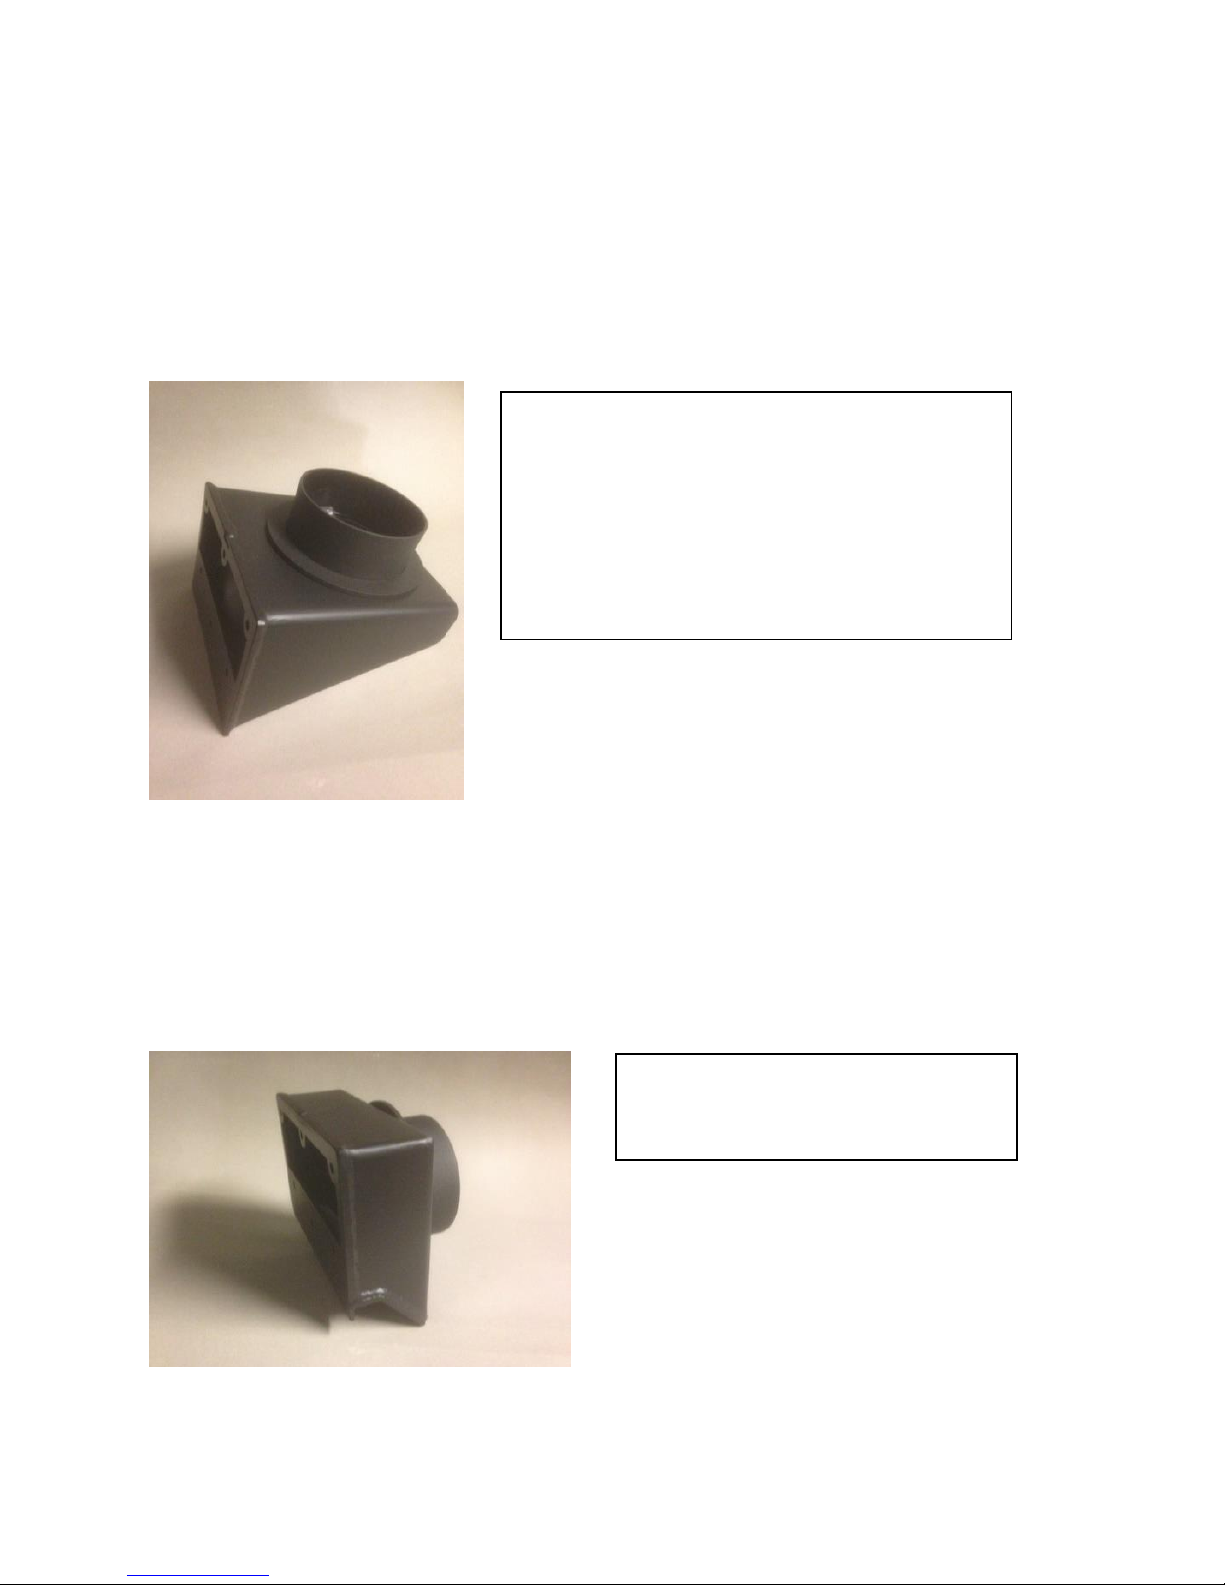
3.h Rear flue box
The usual route for a flue is out of the collar on top of the stove. However the way
some chimneys and fireplaces are set up, fluing out of the rear can be a better option.
Our stoves fall into two groups as far as rear fluing, as follows.
The oven models; the Hungry, the Fat and the High & Mighty have a removable plate,
so a rear flue box is not required, (a rear swept bend or T-junction with cap would be
required).
All other models; the Short, Woody and Penguin 8 would need the rear flue box.
The rear flue box allows you to flue out of the rear of the stove, the flue pipe then goes
vertically up the chimney.
photo of rear flue box
3 i. Rear flue adaptor
There are some circumstances where you may want to flue horizontally from the rear
of the stove. There is a very limited distance that you can rear flue horizontally, for
safety reasons, regulated by building regulations, your installer will be able to advise.
photo of rear flue adaptor
To fit: remove the rear heat shield and
blanking plate (10mm &13mm spanners
required), bolt the rear flue box to the area
where the blanking plate was removed from,
with the blanking plate bolts. Replace the
rear heat shield, having removed the cut out
with tin snips. Place the circular blanking
plate onto the top flue hole.
To fit: same instructions as for
rear flue box
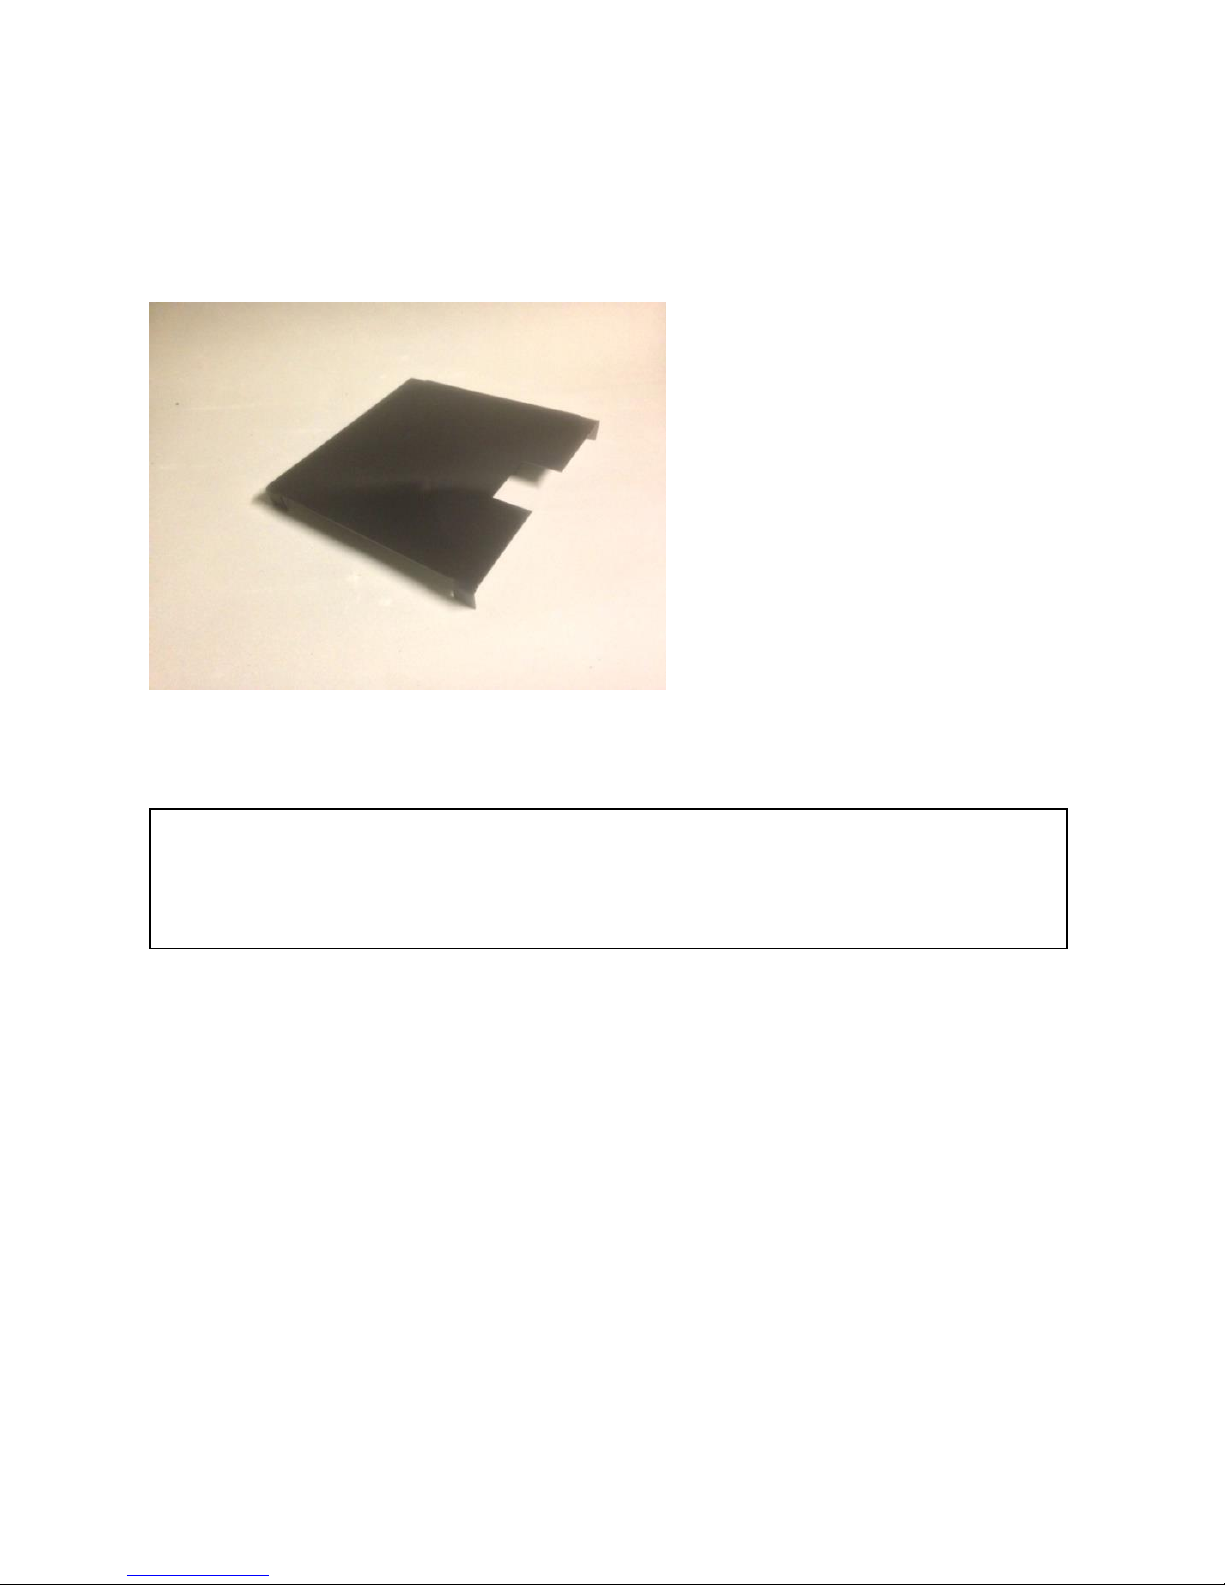
3.j Base Heat Shield
The temperature at the base of a stove will affect the type of hearth required, see
“hearth requirements”. If a constructional hearth is required but is not possible, then a
base heat shield can be fitted underneath the stove. This reduces the hearth
temperatures and allow the stoves to be installed onto a superimposed (12mm) hearth.
Record on the guarantee page whether a base heat shield has been fitted.
photo of base heat shield
To fit: Slide in at the base of the stove prior to installation. It needs to slide in from
the rear. The edge with the cut-out should slide in first, resting at the front of the
stove. The folded legs of the heat shield will sit on the tabs for the leveling screws,
(these are small square tabs with a hole in the centre).

The Woody is illustrated, but non combustible distances are the same for all models
3 k.MINIMUM DISTANCES TO NON COMBUSTIBLE WALLS (ie. stone/brick)
model
rear
sides
above
All models
50mm
100mm
150mm
Rear wall thickness needs to be at least 200mm thick.
These are minimum distances.
NB. Flue pipe safe distances can be greater than the appliance, depending on type
3.k Non Combustible Walls
Diagrams illustrating the minimum distances to combustible walls.

Diagram illustrating the minimum distances to combustible surfaces
3.lMINIMUM DISTANCES TO COMBUSTIBLE WALLS
model
rear
both sides
above
Short
400mm
500mm
450mm
Woody
350mm
400mm
550mm
Hungry
250mm
500mm
450mm
Fat
250mm
400mm
450mm
High & Mighty
250mm
250mm
450mm
Penguin 8
350mm
350mm
550mm
3.m The flue pipe (single wall)
Single walled flue pipe must be at least 3 times its diameter away from any
combustibles eg. a timber beam. This may be reduced if adequate protection is
provided to prevent heat transfer. Refer to Building Regulations Document J for heat
shielding guidance. N.B be aware that it is possible, particularly in older properties for
timber beams to enter the inside of the chimney cavity.
3.l Clearance to combustible walls
Short /Hungry 500mm
Fat /Woody 400mm
Pen 8 350mm
H&M 250mm
Short 400mm
Woody/Penguin 8 350mm
Fat/Hungry/H&M 250mm
Side
Rear
3.n Chimney and Access for sweeping
Existing chimney
Must comply with all current building regulations
height
4.5 metres
Non Exempt
(no smoke control
kit fitted)
Lined with 150mm diameter class 1 liner with 125mm stove pipe +
adaptor
Exempt models
Lined with 150mm diameter class 1 liner where possible, where not,
125mm flue is permitted
A flue way must not be shared with other appliances
A flue way must be gas tight and free of tar deposits
Provision must be made for sweeping access and for the removal of soot and debris. Chilli
penguin stoves can be swept through the stove on a lined chimney if the correct super flexible
rods are used. The debris will fall into the fire box from where it can be removed. However if
the chimney is unlined the cooker models cannot be swept through the stoves (due to size of
brushes) so additional provision will need to be made.
New chimney: A new chimney of factory made insulated flue system must comply
with Building Regulations. Consult a chimney specialist for advice on suitable flue
systems for solid fuel.
4.aInstructions for use
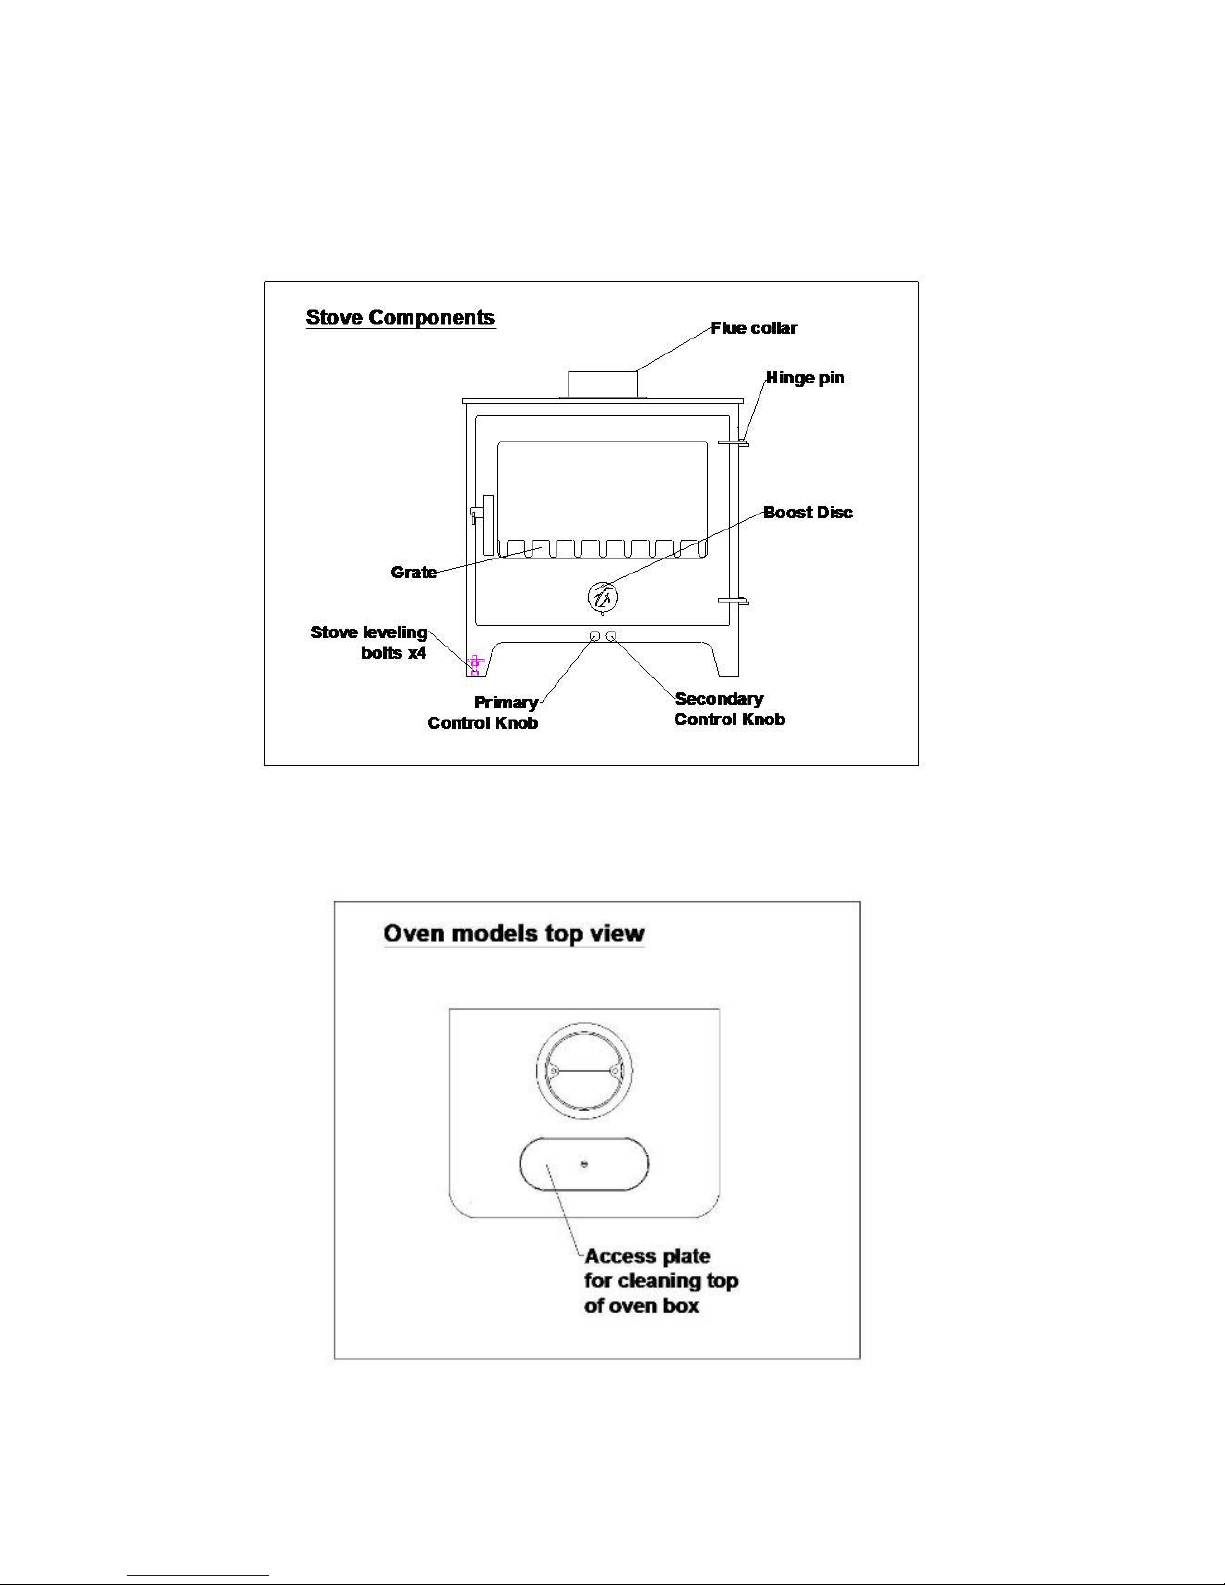
Diagram of the outside of the stove
When you look at your penguin, smile, because it’s looking back at you
Grate:the cast iron grill that sits on the base of the fire chamber, the castellated edge can be seen
through the glass fire door

Stove levelling bolts: bolts on each leg used to level the stove during installation
Primary air control knob: stainless steel knob on the LH side of the stove as you face it. It
controls the flow of air underneath the fire
Secondary air control knob: stainless steel knob on the RH side of the stove as you face it (fully
out it will protrude 10mm further than the other knob). It controls the flow of air over the top of the
fire and the door glass
Boost disc: brushed stainless steel disc with penguin logo on it. In the balanced open position
this will allow the maximum air flow in to the fire. It should swing easily into the closed position
once the fire is established.
Hinge pin: pins to hold the door to the stove body
Flue collar: the 5”/125mm collar on the top of the stove, (the stove is designed to burn on a 6”
flue, a 5-6” adaptor is required unless the smoke control kit is fitted)
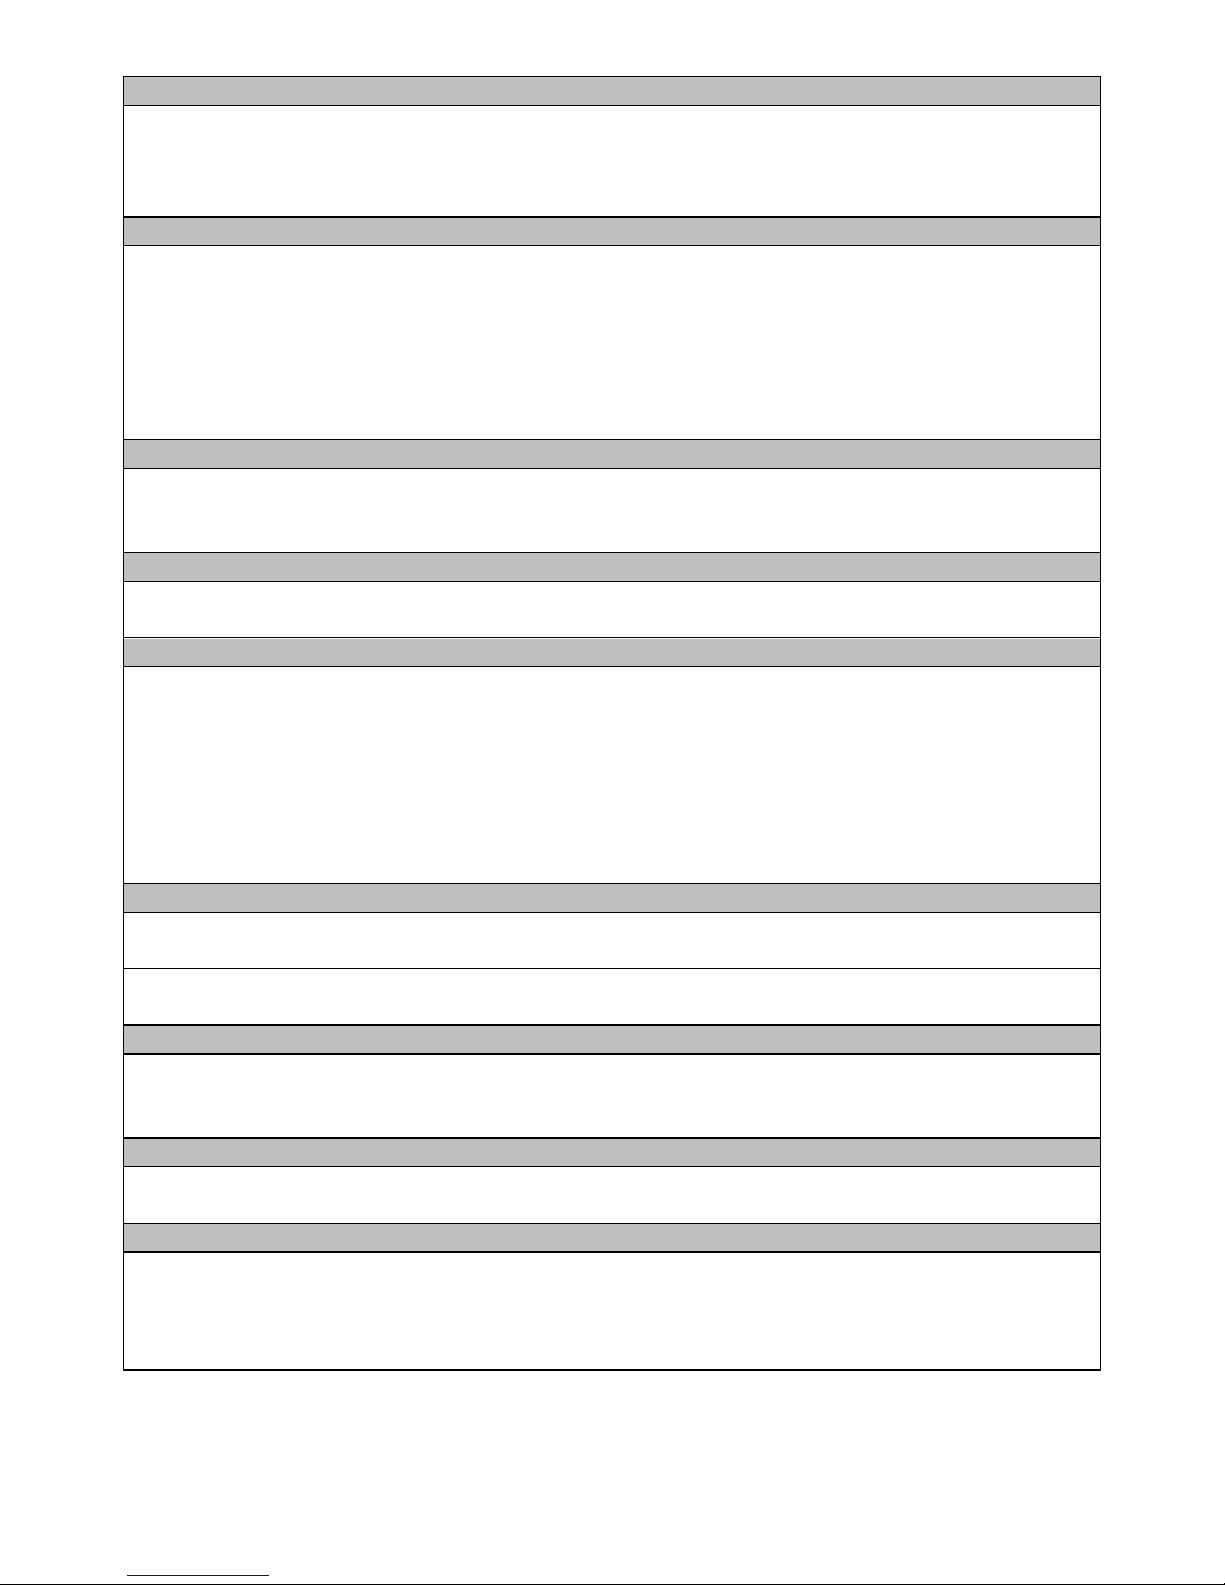
Access plate (cooker models only): this removable access plate is designed to enable the
removal of soot from the top of the oven box. Soot can be brushed back into the fire box and
swept out.
4.b Diagram of the inside of the stove looking into a penguin’s soul
throat plate: this forms the “roof” of the fire box. It has 2 components, a steel plate and a
vermiculite brick, the brick should be underneath the steel plate. It is designed to be easily
removable for the removal of soot
tertiary air channel: this is the perforated metal channel running across the back of the stove, it
is one of the passage ways for air into the fire box. The back of the throat plate rests on this
side brick: one of the two vermiculite side fire bricks
rear fire brick: vermiculite brick at the rear, some models have 1 brick/some 2
ash pan: rectangular metal drawer used for the collection of ash
glass retaining screws and tabs: screw and plates to hold the door glass in situ
rope seal: seal used to form a gas tight seal around all door edge
4 c. Warnings and Pre-lighting checks
Chilli penguin stoves will not be responsible for any damage caused to the stove due to
either the incorrect installation of the stove or the incorrect use of the stove, including the
use of the wrong fuels. We strongly recommend the use of a qualified and experienced
installer. Please read through these warnings and information carefully prior to use.
Protecting the stove surface
Your stove has been painted using a high temperature paint, this will give a long lasting
and durable finish after the paint has cured. The process of curing occurs during the
first few times you light the stove,(see section 5). Care must be taken when handling
the stove prior to the first firings. It is at its most vulnerable at this stage. With the lighter
colours, particularly the almond, we recommend you wear clean gloves from unpacking
onwards. It is dry surface clean only, do not use damp cloths. If you are plastering
/decorating in the same room keep the stove covered.
Painting flue or stove
IF you wish to touch up your stove or paint your flue pipe to match the stove, please read
the 5.b before you begin. All coloured stoves will come with an aerosol of the matching
colour.
Fumes
While the stove paint is curing, it will give off fumes. Please ensure you ventilate the
room, opening doors and windows as necessary.
Smoke emissions
Properly installed and operated the stove will not emit smoke into your home with the
exception of the occcasional smoke from de-ashing and re-fuelling. Occasionally adverse
weather conditions can cause a down-draught, this should be very occasional. Persistent
smoke emission is dangerous and must not be tolerated. If smoke emission does persist:
Open all doors and windows
Let the fire go out
Check flue or chimney for blockage.
Do not re-light fire until cause of problem has been rectified. Seek professional help.
Hot surfaces
The surfaces of the appliance are designed to get hot during operation. It is
recommended to use a fireguard in the presence of children or vulnerable adults.
CO Alarm:It is a legal requirement to install a Carbon Monoxide and smoke alarm when
you install a solid fuel appliance such as a stove.
Wrong fuel
Only burn seasoned wood or smokeless fuels suitable for closed appliances. DO NOT
burn house coal or treat your stove as an incinerator for gereral rubbish. DO NOT use
any liquid fuels.
Chimney fire
In the event of a chimney fire close all stove doors and air vents. Evacuate the house and
phone the fire brigade.
Pre-Lighting checks
The door closes correctly and the rope seals and glass are intact.
The throat plate is installed correctly (see section 5)
All labels and packaging have been removed (including from the flue system)
Any access points in the flue are closed off.
You’ve bought an amazing stove. Let it be amazing
This manual suits for next models
5
Table of contents
Other Chilli Penguin Stove manuals


Popular Stove manuals by other brands


Dometic
Dometic ORIGO E100 operating manual

Sergio Leoni
Sergio Leoni MARLENE P/I installation guide

Monogram
Monogram 30 inch owner's manual

Harman
Harman Allure50 installation manual

Hunter Stoves
Hunter Stoves Herald 6 CE VII Installation and operating instructions

Palazzetti
Palazzetti INSERT A78 instruction manual

RIKA
RIKA TOPOII operating manual

Campingaz
Campingaz CAMP'BISTRO DLX Instructions for use

Jøtul
Jøtul GF 100 DV II Nordic QT Installation and operation instructions

Vogelzang International
Vogelzang International VG130 Owner’s Instruction and Operation Manual

Regency
Regency F39-NG Owners & installation manual

FDI
FDI Rocket instruction manual