manuals.online logo
Brands
  1. Home
  2. •
  3. Brands
  4. •
  5. chinavasion
  6. •
  7. DVR
  8. •
  9. chinavasion CVKT-E184 User manual

chinavasion CVKT-E184 User manual

RISK OF ELECTRIC SHOCK
DO NOT OPEN
CAUTION:TO REDUCT THE RICK OFELECTRTC SHOCK DO NOT
REMOVE COVER. NO USER SERVICABLE PARTS INSIDE.
REFER SERVICING TO QUALIFIED SERVICE PERSONNEL.
The lightning flash with arrowhead symbol,within an equilateral
triangle ,is intended to alert the user to the presence of uninsulated
"dangerous voltage"within the products'enclosure that may be of
sufficient magnitude to constitute a risk of electric shock
The exclamation point within an equilateral triangle is intended to
alert the user to the presence of important operating and
maintenance (servicing) instructions in the literature accompanying
the appliance.
WARNING:TO PREVENT FIRE SHOCK HAZARD,DO NOT
EXPOSE THIS UNIT TO RAIN OR MOISTURE.
CANTION:TO PREVENT ELECTEIC SHOCK,MATCH WIDE BLADE
OF THE PLUG TOTHE WIDE SLOT AND FULLY INSERT.
,
t
CONTENT
1.2.2 BASIC WORKING PARAMETER '-""'---"--'--"-"" 0s
2 DEVTGE OPERATION -----""'----- 04
2.1 REMOTE KEY INSTRUCTION '-'-'--'--04
3 IEOPERATION ------- '---"""'- 25
4 DVRINSTALLATION --......-- ...., 39
I
1 INTRODUCTION
1.1 PREODUCT INTRODUCE
The serial of DVR include 4 channels,8 channels and 16 channels ,that is CIF resolution digital video recording DVR, which
have local recording, playback, support triple code remote network surveillance,data backup, parameter setting,motion detection,
l/O alarm setting, PTZ and USB mouse, USB2.0 backup, lE browser and back up etc.
1.2 PRODUCT FEATURE
n o H.264compression
n o Two USB interface, USB2.0 for data backup, USB2.0 for mouse operation.
n . Support 1 pcs 3.5" SATA HDD at most.
n o Special file system for security.
tr o 16 bit color translucent user-friendly GUl, with notes for selected menu items
n o Optimized one four channel simultaneously playback
n o Double level user management
n . Support the live view, parameter setting and copy playback video via network.
1.2.1 SPECIFICATION
Module DA37O4FC DA37O8FC DA3716FC
Picture compression H.264
Video in 1.0Vp-p/75O,BNCx4 1.0Vp-p/75O,BNCx8 1 .0Vp-p/75O,BNCx 1 6
Video out 1 .0Vp-p/75O,BNCx 1 ;VGAx 1 1 .0Vp-p/75A,BNCx 1 ;SPOTXl ;VGAx 1
["]ser Manual- K
Resolution Live: D1
Record : The 1st channel is D1 of real-time , the others channels are CIF of real-time
rame ratePAL: 100 Fps(ClF) PAL :200 Fps(ClF) PAL: 400 Fps(ClF)
NTSC :120 Fps(ClF) NTSC :240 Fps(ClF) NTSC :480 Fps(ClF)
Audio input RCAx4 RCAxS RCAX16
Audio output RCAx't
Audio codec ADPCM
Alarm input 4 alarm input 8 alarm input 16 alarm input
Alarm output 1 alarm output 2 alarm output 2 alarm output
Video mode Manual recording , Scheduled recording , Movement alarm video and External alarm recording
Network interface RJ45,100M/1000M
PTZ Support
communication
interface
RS485x1, USB2.0x2 RS485x1, RS232x1, USB2.0x3
Data storageSupport 1 SATA HDD ( 300GB-2TB )Support 2 SATA HDD(300c8-2TB)
Mouse USB Mouse
Remote control Support
voltage input 12Vt3A 12Vt5A
Appearance DVR-07 DVR -07 DVR -15
Us*r lvlanual, re 02
Item Parameter Description
Voltage input 12V DC 12V
Video impedance input 75r) 75O Each channel.
Video output 1Vp-p 1Vp-p CVBS signal
r/o 0-2v Low voltage alarm
5V-30v High voltage alarm
RS232 Serial port, for extend use(lGchannels)
RS485 Connect lo PTZ, (Pelco-D,Pelco-P)
SATAHDD One SATA HDD with mainstream capability(16 CH
support two SATA HDDs)
1.2.2 BASIC WORKING PARAMETER
1.3 ENVIRONMENT ADAPTABILITY
For safety while using the DVR and to prolong device life, please pay attention to the following details :
1)When installing device, please comply with all the electric product safety criteria.
2)Power and ground:
Do not touch the power and DVR with a wet hand
Do not drop liquid on DVR
Do not put any object on DVR
Please use soft dry cloth to clean DVR; do not use chemical impregnant.
The Device will have voltage before startup if the power line is connected to power Source.
&Js*$" $4xr:qxx3 'ffi
Please unplug power line from power source if the Device is not intended to be used for a prolonged time.
2 DEVICE OPERATION
ln device operation, the enter key on remote control has the same function as left click of the mouse.
2.1 REMOTE KEY INSTRUCTION
2.1.1 REMOTE CONTROL
The remote control is the secondary input device
For navigating the system's interface.
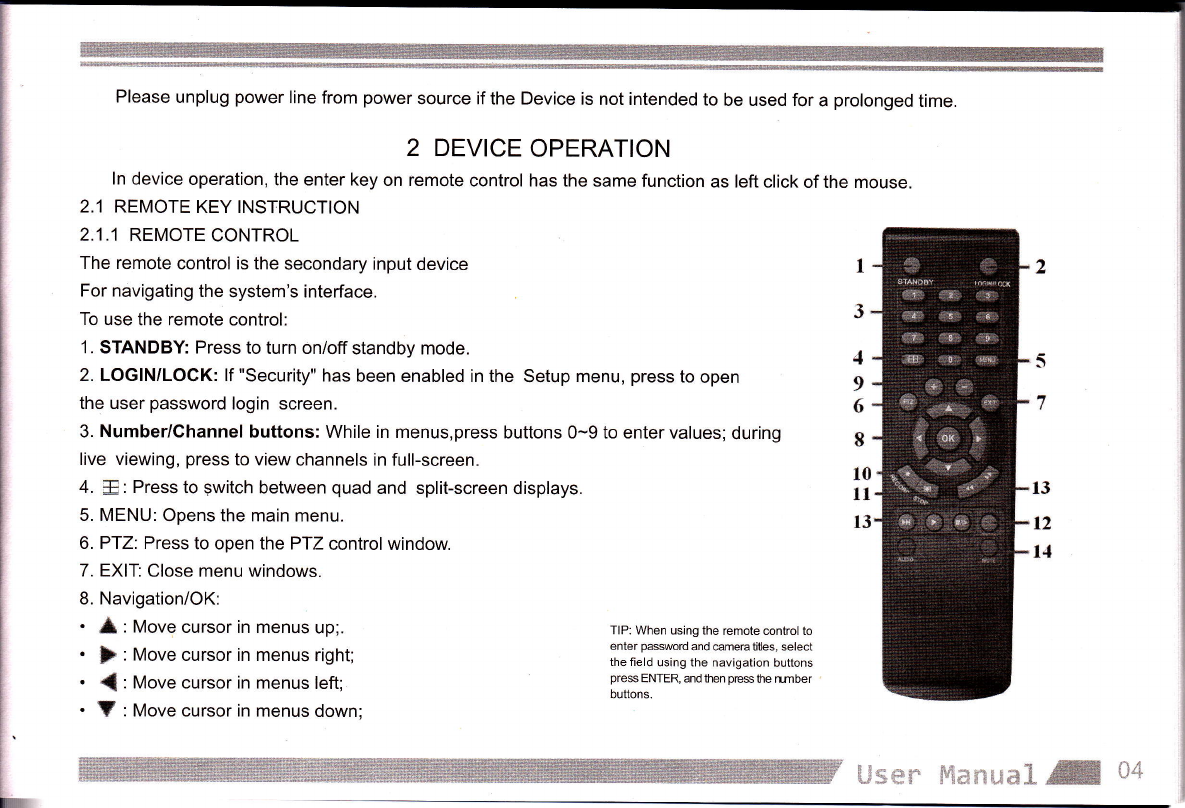
To use the remote control:
1. STANDBY: Press to turn on/off standby mode.
2. LOGIN/LOCK: lf "Security" has been enabled in the Setup menu, press to open
the user password login screen.
3. Number/Channel buttons: While in menus,press buttons 0-9 to enter values; during
live viewing, press to view channels in full-screen.
4. E: Press to switch between quad and split-screen displays.
5. MENU: Opens the main menu.
6. PfZ: Press to open the PTZ control window.
7. EXIT Close menu windows.
8. NavigationiOK:
. * : Move cursor in menus up;.
. }" : Move cursor in menus right;
. { : Move cursor in menus left;
. ? : Move cursor in menus down;
I
I
6
I
l0
1t
l3 1J
t2
I.l
TIP: When using the remote control to
enter pasword and emera tites, select
the field using the navigation buttons
pre$ ENTER, and then pmhe mber
buttons.
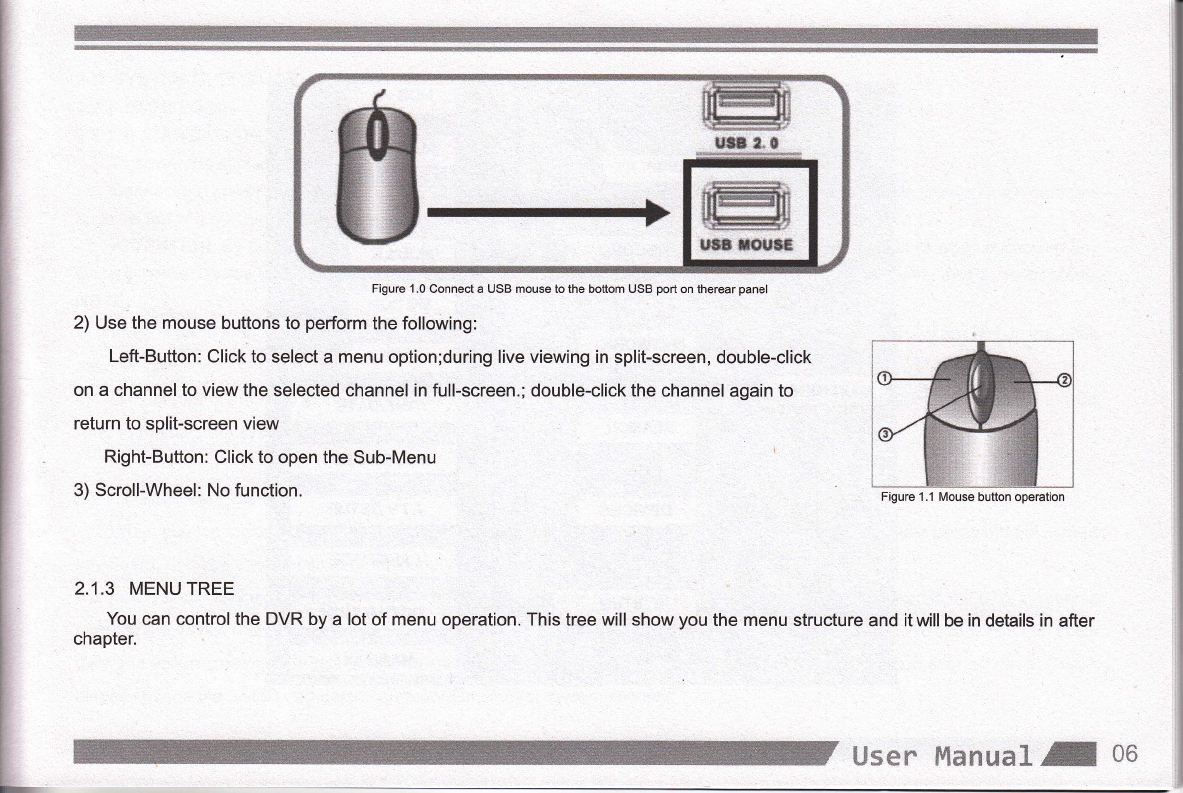
{Jx*n ffixmxx3 -W *{'
. OK: ln menus, press to confirm selections;
9. +/ - : ln menus, press to adjust values.
10. RECORD: Press to start manual recording.
11. STOP: Press to stop manual recording.
12. EXTRA: For the future use.
13. Playback controls:
. {( : lncrease reverse playback speed 2X, 4X, 8X;
.)
.)}
.)x
Press to start playback;
Press to increase fonvard playback speed 2X,4X, 8X;
Press to slow playback speed by 112' 114,118:
. $: press to freeze playback to one frame, then press again to advance frame-by-frame
14.AUDIO/MUTE: Turn on/off audio
2.1.2 MOUSE OPERATION
The mouse is the primary input device for navigating system menus'
NOTE: Unless otherwise noted, all system functions described in this manual are achieved through mouse input.
To use a mouse with the sYstem:
.l )connect a USB mouse to the USB MOUSE port on rear panel of the system.
NOTE: Only the top USB port on the rear panel is designed for data backup to a USB flash drive. Do not connect a USB flash
drive to the bottom USB port on the rear panel.
0s LJs*r {v}mr:ax*} ffi
&0
I jr::==:i:L
--
rr& slrt&
i
L.
-
Figure 1.0 Connect a USB mouse to the bottom USB port on therear panel
2) Use the mouse buttons to perform the following:
Left-Button: Click to select a menu option;during live viewing in split-screen, double-click
on a channel to view the selected channel in full-screen.; double-click the channel again to
return to split-screen view
Right-Button: Click to open the Sub-Menu
3) Scroll-Wheel: No function.
2.1.3 MENU TREE
You can control the DVR by a lot of menu operation. This tree will show you the menu structure and it will be in details in after
chapter.
Figure 1.1 Mouse button operation
&js*n ManuaL "& 05
[.$s*r ffimlrxum] ffi
2.2 SYSTEM OPERSTION
2.2.1 USER LOGIN
2.2.1.1 STARTING THE SYSTEM
To power the system ON/OFF:
Connect the power cable to the DC 12V port on the rear panel. At startup,the system performs a basic system check and runs
an initial loading sequence. After a few moments, the system loads a live display view.
ATTENTION: By default, passwords are disabled on the system. You do not need to enter a password when accessing any
system menus. However, for security purposes, it is highly recommended to enable passwords on the system using the Password Menu.
NOTE:
1) lf there is no HDD in device, or the device didn't read the HDD, or the HDD didn't be formatted it will display an lttl in the video
preview interface.
2)You must format the HDD in the DVR before first using. The steps as follows: MainMenu > Devie>HDD management > format.
After formatting, the system will restart.
2.2.1.1 SYSTEM LOGIN
When you login, you will find the window as follow if the password is enabled, lnput device lD and user password via numeric
key-board, and you can access to main menu via press [Applyl
Remark: default device lD is: 000000, and the password is :user password is 000000 and Admin password is 519070, in order to
manage the device more convenience, please setup the user password and change the device lD in the base setup.You can setup
user and admin password, Administrator has all authorities, operator has limited authorities who they can only watch, playback,
please change the unit lD and default password in time for system security.
[jser Mamua] ,& 08
2.2.2.1DISPLAY
Move the cursor to ( DISPLAYI ( lcon with the orange box means that
selected ) , press IEnterI to enter into the setting interface.
CHO1-CH04: you can select the CH0'l -CH04,CH05-CH08,CH09-CH12
(16CH DVR),CH13-CH16(16CH DVR) here.
CHN NAME: press IEnterl to enter into the setting intefface.
POSITION: press IEnterl to switch name location, there are 5 options.
COLOR: press IEnterl to enter into setting interface, as following:
Press IEnterl or [+l I-l key or directly drag the cursor to set colors,
including chroma,brightness, contrast and saturation, press IRppt_yl to
save the parameters.
LIVE: Open: Means the channel is allowed to view the live mode, Close means not.
LIVE TIME(display time while in live view)): Open: Means yes, Close means not.
RECORD T|ME(display time while recording): Open: Means yes, Close means not.
2.2.2.2 RECORD SETUP
Move the cursor to ( RECORDI (lcon with the orange box means that selected),press ( Enterl to enter into the setting interface'
press (confirml and enter into the setup interface, and you can use direction keys and cursor to change the options'
CHO1-CHO4: you can select the CHO1-CHO4'GHO5-CH08'CHO9-CH12
(1 6CH DVR),CH1 3-CH16(1 6CH DVR) here'
RECORD: Open: Means the channel enable for recording'
BITMTE: There are three options,conesponding different data Stream standard
AUDIO: Open: Means enable the audio recording for all channels' Close:
Means disable audio recording
REC.MODE:
Always: Means the device will start recording when it startup'
Schedule: Recording as the schedule, you can setup the schedule aS you want as follow.
CHANNEL:Youcanselectallchannelsorjustonechanneltosetupschedule.
WEEKLY: You can setup each as you want' There are ALARM' NORMAL'
NO REC three modes, if you select this, there will have a '/ in the frame' that
means when you select the period of the day it will record as this mode' and
you can just setup one day, then copy the setting to all other days' Different
color means different record mode: Red means alarm record' green means
normal record, grounding means no record'
PACK TIME: There are 15min, 30min,45min' 60min four options' that means
it will pack as the mode you selected
Scroll to APPLY and press ENTER to save the new settings'
&is*x* {Xmrxxm3 W
i
I
I
i
I
I
I
I
i
I
I
i
t
t
I
i
I
I
I
i
I
!
i
t
I
I
t
I
I
I
t
I
i
t
L
I
i
L
I
2.2.2.3 NETWORK SETUP
Move the cursor to ( NETWORKI (lcon with the orange box means that selected), and press Ienterl to enter into setting
interface .
TYPE: There are PPPOE, DHCP & Static three options.
. STATIC
Select [Static] in the type, and press [Enter] to enter into the interface
as followings
PORT : For video transmission via lE.
WEB PORT: setup the port of lE browser via HTTP.
lP ADDRESS: setup the lP address, and press [Enter] or number keys to
change the value.
NETMASK: press [Enter] or number keys to change the value.
GATEWAY: press [Enter] or number keys to change the value.
. DHCP
Select the DHCP, and enter into the interface as followings.
PORT: the communicate port between PC and DVR, recommend use default port.
WEB PORT: setup the port of lE browser via HTTP.
Remark: when you setup the net mode as DHCP, the router will arrange a
dynamic lP for DVR.
Ljs*n lXxnr*x},,& 12
. PPPOE
Select the PPPOE, and enter the interface as followings
MEDIA PORT the communicate port between PC and DVR, recommend use
default port
WEB PORT: setup the port of lE browser via HTTP.
PPPOE username and password: fill the usern ame and password of the internet
service offer, and apply it and reboot the system. After rebooting, the device will
save it and set the PPPOE as default network type. lf succeed, the lP address
will be automatically config as dynamic lP of WAN.
DDNS: There are [Open/Close], and if there is a DDNS service, please setup
it as Open.
SERVICE: There are 3 services to select, 3322, dyndns, and perfecteyes.
HOST NAME: lnput the name of the host server.
USERNAME: lnput in the name of the user.
PASSWORD: lnput the password for DDNS.
ffi
! iexx &'{:x:r,:1
2.2.2.4 SEARCH
Move the cursor to ( SEARCH I (lcon with the orange box means that selected),press ( Enterl to enter into the setting interface.
DATE: You can adjust the checking date and time, press If nterl input the number directly to adjust the year,month,date.
After finishing the time sefting, move the cursor to "SEARCH" and press"APPlY',can see the recording status of this date. As follow:
lnstruction:
1. MONTH: lt will show all the recording status in this month. Green means normal recording, Red means alarm recording,
Grounding means no recording. Click any date in this frame can search the recording status of that day, the searching result will
be showed in the below date frame.
2. DAY lt will show all the recording status in this day, you can playback the record file in this period via click the conesponding period.
PLAY: You can press IEnterl input number directly to setup playback time. After setting, move the cursor to "PLAYBACK", and
then press"APLLY"to enter into video playback of that time. Also you can select any period of time in the video status frame after
searching,press"APLLY"to enter into the video playback of this period.
DETAIL FILES: Enter into the video file list interface of the selected date.
Uxen !vlm*,laxa} ,W 14
to enter into playback interface. lf the all channels have recording files, it will be playback all windows at the same time.
3. lf setup as "Open" in the IRECORD TIMEI in IDISPLAYI , it will show the date/time when playback record file; lf setup as
"Close"it will not display time.
4.Whenplayback,canpress [l*ll toplayslowly; press [ts] and I f( I tospeed, reverseplay; alsocanpress (.Ill to
pause and frame by frame play; Press lExitl to exit from playback and return to the former menu;
5. When finished playback files, it will return to the file list interface.
2.2.2.6 BACKUP
You can use USB for backup, should insert USB device into the USB2.0 port before backup files. And it is support USB OTG.
You can select the recording file by direction keys, and press lEnterl means selected OK ( There is a "r/" at the end of the selected
recording files ) and press IEnterl again the ".i" will disappear that means cancel the select, we can start export the recording
files after selecting, and press IBACKUPI to start to backup, as follow:
lnstruction:
1 . When the space in backup device less than recording file, the system will
prompt "Space no enough".
2 . You can move USB device directly when backup finished.
Usex" Manual {W 16
il:r1i.:T:il:?[o ,=o*"H,, and press"AppLy"to enter into the ros nre *st or DVR' as rorrow window'
INFO: means the alarm tYPe'
TRIGGER: means the alarm triggered time'
VIDEO: means whether the log has corresponding video file'
2.2.3 DEVICES SETUP
Move the cursor to IDEVICES) ( lcon with the orange box means
that selected ) ,press lEnterl to enter into setting interface'
Simrx*m3.
.t?
It
Advanced Features include HDD' ALARM' PTZ' MOBILE and MOTION DETECT
2.2.3.1HDD MANAGE
Move the cursor to IHDDI ( lcon with the orange box means that selected ) ,press IEnterl to enter into the setting interface,
and you can use direction keys and cursor to change the options.
HDD STATUS: There status is ok means the HDD is ok. lf HDD can not run normally ( including unformat and no HDD ) , there
is a IHI display on video live view, 8CH DVR can support l HDD at most.so you can select the HDD you want to format here.
OVERWRITE:ENABLE: mearls when HDD space less than 4G, it will delete HDD earliest recording file, and it will stop deleting
when the space is 10G; DISABLE: means when HDD space less than 500M it will stop recording, and an prompt will display in
live view "please shutdown and replace HDD"
HDD FORMAT: Move cursor there to select device and press IAPLLYI to start formatting.
U DISK FORMAT: format the external thumble drive.
8'3s*r ffiamux3 ,W 1&

Other chinavasion DVR manuals

chinavasion SPORTSDVR CVWL-DV89 User manual

chinavasion

chinavasion SPORTSDVR CVWL-DV89 User manual

chinavasion CVADY-I544 User manual

chinavasion

chinavasion CVADY-I544 User manual

chinavasion Mini DV CVMV-DV53 User manual

chinavasion

chinavasion Mini DV CVMV-DV53 User manual

chinavasion CVABO-C242 User manual

chinavasion

chinavasion CVABO-C242 User manual

chinavasion CVYH-I395 User manual

chinavasion

chinavasion CVYH-I395 User manual

Popular DVR manuals by other brands

FLIR M3200 Series Quick connection guide

FLIR

FLIR M3200 Series Quick connection guide

EverFocus EMV401 Quick installation guide

EverFocus

EverFocus EMV401 Quick installation guide

TD Prime 4 Instructional manual

TD

TD Prime 4 Instructional manual

Interlogix truVision DVR 31 user manual

Interlogix

Interlogix truVision DVR 31 user manual

TVonics DTR-HV250 quick start guide

TVonics

TVonics DTR-HV250 quick start guide

Qvis APOLLO PRO DC LX user manual

Qvis

Qvis APOLLO PRO DC LX user manual

American Dynamics Intellex Intellex DVMS Installation and configuration guide

American Dynamics

American Dynamics Intellex Intellex DVMS Installation and configuration guide

Swann DVR4-SecuraNet Specification sheet

Swann

Swann DVR4-SecuraNet Specification sheet

Honeywell HRDPX user guide

Honeywell

Honeywell HRDPX user guide

Samsung SDE-500X user manual

Samsung

Samsung SDE-500X user manual

Bosch DVR 670 Series Specifications

Bosch

Bosch DVR 670 Series Specifications

Idis DR-6216P-S quick guide

Idis

Idis DR-6216P-S quick guide

TOM Ultra XQ-U400H Operation manual

TOM

TOM Ultra XQ-U400H Operation manual

Bolide SVR9004HD operating instructions

Bolide

Bolide SVR9004HD operating instructions

Panasonic DMR-E85HS operating instructions

Panasonic

Panasonic DMR-E85HS operating instructions

Stinger JPEG 2000 user manual

Stinger

Stinger JPEG 2000 user manual

Appro DVR-3704T Installation & operation manual

Appro

Appro DVR-3704T Installation & operation manual

G-Lenz Security GDS-1104 user manual

G-Lenz Security

G-Lenz Security GDS-1104 user manual

manuals.online logo
manuals.online logoBrands
  • About & Mission
  • Contact us
  • Privacy Policy
  • Terms and Conditions

Copyright 2025 Manuals.Online. All Rights Reserved.