CHINON 35FA super User manual

Chinon
35FA Super / 35FA II
Auto Focus camera
Instruction and Illustrated manua
This camera manual library is for reference and historical purposes, all rights reserved.
This page may not be sold or distributed without the expressed permission of the producer
I have no connection with Chinon Co., Japan
On-line camera manual library
If you find this manual useful, how about a donation of $3 to: M. Butkus, 29 Lake Ave.,
High Bridge, NJ 08829-1701 and send me your e-mail address so I can thank you. Most
other places would charge you $7.50 for a electronic copy or $18.00 for a hard to read Xerox
copy.
This will allow me to continue to buy new manuals and pay their shipping costs. It'll make
you feel better, won't it?
If you use Pay Pal, use the link below. Use the above address for a check, M.O. or cash.
Back to my main camera manual page
INTRODUCTION
Welcome to the world of Chinon photography!
Your CHINON 35FA Super & 35FA 11 are one of the most advanced compact 35mm cameras
available today. Employing the latest state-of-the art electronics, the CHINON 35FA Super &
35FA 11 incorporate many outstanding features such as: infrared automatic focusing, automatic
loading, automatic film advance, automatic rewind and built-in flash. Other convenient features
include: automatic rewind stop upon completion of rewinding, continuous exposure, 10 sec. self
timer, and ASA 1000 film setting. In order to take full advantage of the many features of your
CHINON 35FA Super & 35FA 11, please read this instruction manual carefully to totally
familiarize yourself with the camera before actually starting to take pictures. We wish you years
of satisfying and carefree photography.www.4.butkus.org
www.orphancameras.com

NOMENCLATURE
1. Hand strap
2. Shutter release button
3. Self-Timer indicator
4. Self-Timer start switch
5. Viewfinder
6. Lens cover
7. Flash
8. Auto-Focus window
9. Lens
www.orphancameras.com

10. Exposure metering window
11. ISO/ASA setting lever (35FA Super),
ISO/ASA setting ring (35FA II)
12. ISO/ASA scale
13. Back cover
14. Cartridge window
15. Film pressure plate
16. Flash switch
17. Flash ready indicator
18. Frame counter
19. Viewfinder eyepiece
20. Film advance indicator
21. Under exposure warning/Battery check LED
22 Film chamber
www.orphancameras.com

23 Back cover release button
24. Battery compartment cover
25. Rewind spindle
26. Tripod socket
27. Manual rewind switch
28. Film guide
29. Sprocket
30. Take-up spool
SPECIFICATIONS
TYPE: 35 mm EE compact Infrared Auto-Focus camera with auto film load, auto wind, auto
rewind and built-in flash system.
PICTURE FORMAT: 24 x 36 mm.
www.orphancameras.com

LENS: 35FA Super: 35mm F2.8, 4 elements in 3 groups. 35FA 11: 35mm F3.5, 3 elements in 3
groups.
VIEWFINDER: Bright frame with AF frame, parallax marks, focus indicator (35FA Super
only), under exposure warning/battery check indicator, and film advance indicator.
SHUTTER: Programmed electronic shutter (35FA Super/ EV 8-17: ASA100, 35FA 1i; EV 8.6 -
17: ASA100)
with automatic lock system at low voltage.www.4.butkus.org
EXPOSURE METER: SPD Automatic exposure system
ISO/ASA RANGE: 35FA Super: 50 to 400 in 1/3 EV increment plus 1000. 35FA 11:100, 200,
400 and 1000.
FOCUSING: Infrared automatic focusing system with possible prefocus and AF resuming;
cancelable.
FOCUSING RANGE: 35FA Super: 1 M (3.3 ft) to infinity 35FA 11: 1.2 M (3.9 ft) to infinity.
MINIMUM AF DISTANCE WARNING: Built-in with flashing minimum AF distance mark
(35FA Super only).
FILM LOADING: 35FA Super: automatically loads film and advance to the start position when
the shutter release button is depressed after the camera back is closed. 35FA 11: Auto loading
system by built-in motor.
FILM WIND: Automatic power winder for single frame advance and continuous exposure.
FILM REWIND: Automatic power rewinding when at end of roll of film.
INSTALLING THE BATTERIES
1. Slide the battery compartment cover in the direction of the arrow mark with your finger
to open the battery compartment cover (Fig. 1).
2. Place two 1.5V "AA" size alkaline batteries (LR-6) into the battery compartment
correctly so as to correspond with the positive (+) and negative (-) marks shown inside
(Fig. 2).
www.orphancameras.com

NOTE: If you do not use your camera for a long period of time, remove the batteries, and store in
a dry location. This will prevent the possibility of battery leakage and damage to your camera. Do
not use Ni-Cad batteries. Be sure to replace both batteries at the same time when the batteries are
too weak to operate the camera.
HOW TO OPEN THE LENS COVER
1. Hold the flash unit and slide it all the way to open the lens cover (Fig. 3).
2. Slide it back in the opposite direction to close the lens cover (Fig. 4).
NOTE: All electrical circuitry is off when the lens cover is in the closed position. Even in the
closed position, the power will not be off unless the winding or rewinding function is completed.
The shutter will not be released unless the lens cover is fully opened.
BATTERY TESTING
1. Cover the exposure metering window with your hand and press the shutter release
button halfway. (Fig. 5).
2. Make sure the under-exposure warning LED (red) blinks (Fig. 6). If the red LED fails to
illuminate, the batteries are too weak and need to be replaced.
NOTE: As temperature decreases, especially below SAC, battery performance declines. Keep
batteries warmed under these conditions.
www.orphancameras.com

ISO/ASA SETTING
Make sure the correct ISO/ASA film speed is set on the camera to correspond with the ISO/ASA
film speed indicated on the film box. Turn the ISO/ASA setting lever (setting ring) to select the
desired ISO/ASA speed (Fig. 7, 8 and 9).
AUTOMATIC FILM LOADING
Always load and unload your camera in subdued light, and never in direct sunlight.
1. Depress the knob located on the back cover downward to open the back cover (Fig. 10).
www.orphancameras.com
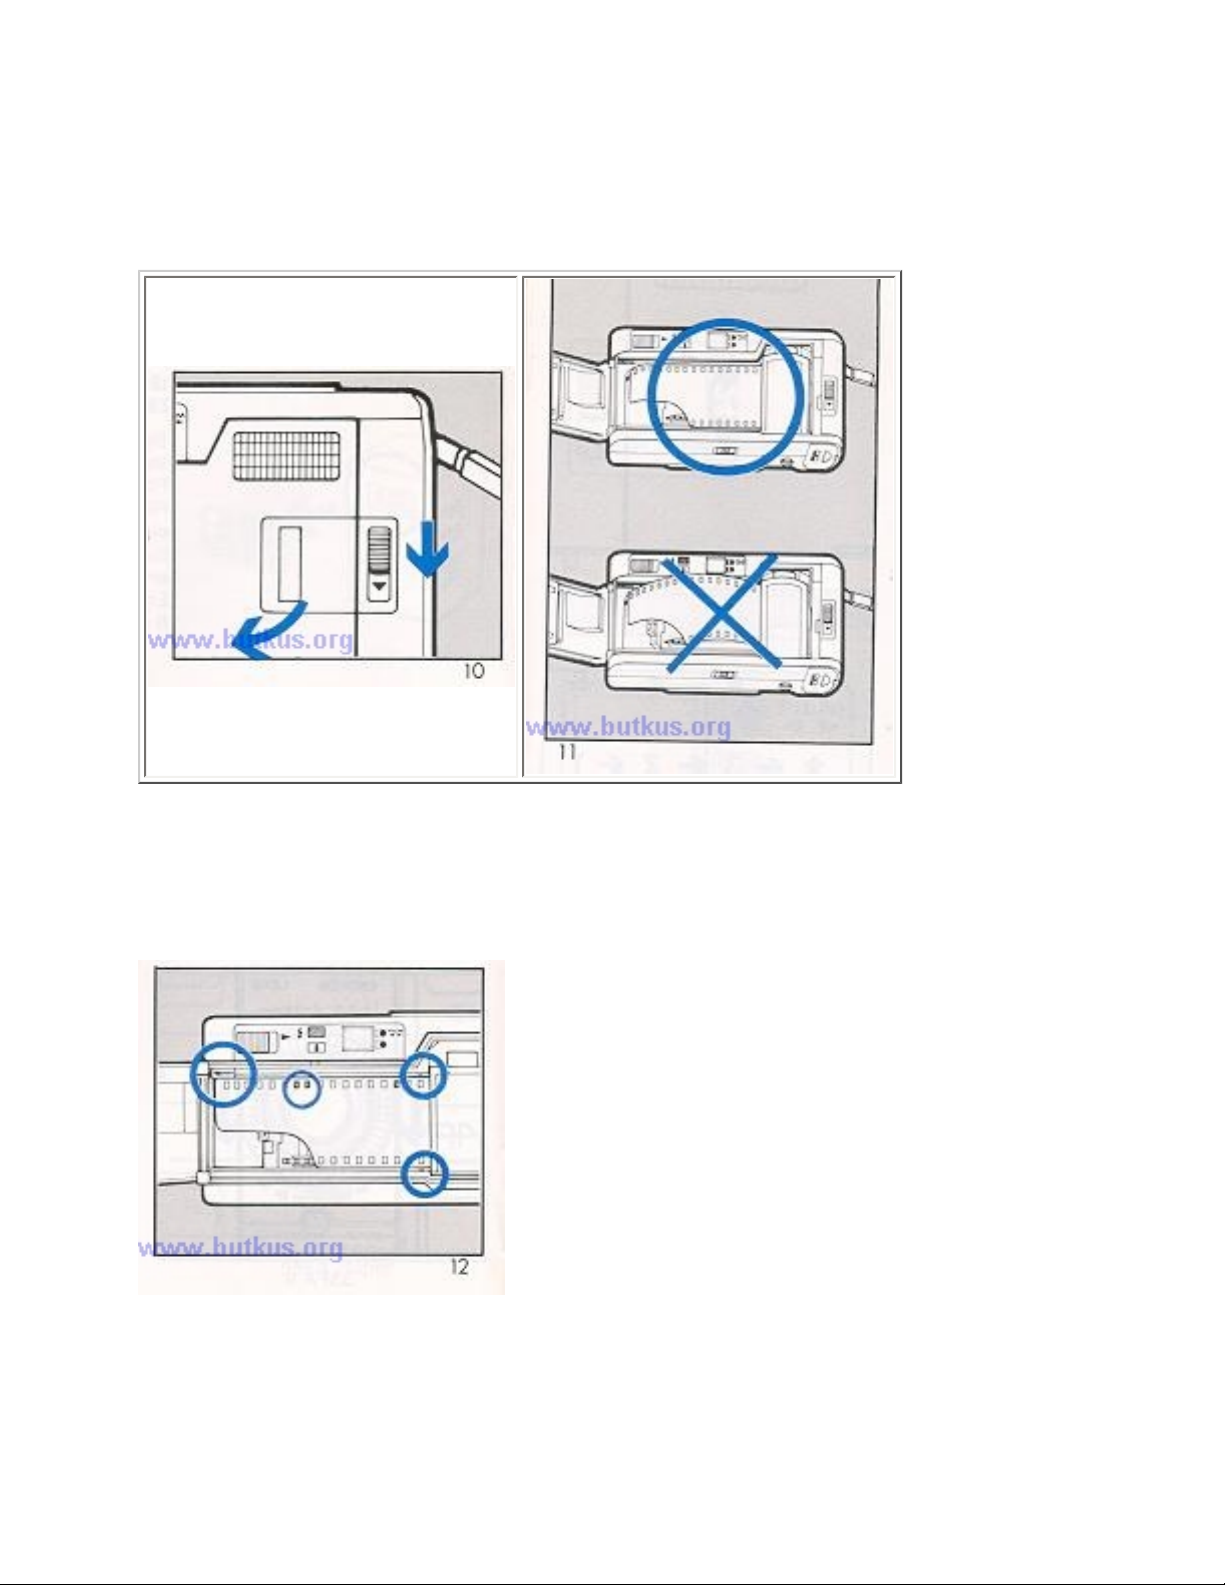
2. Place the film cartridge into the chamber with the protruding end toward the top of the
camera and push it in gently so that it sits firmly in the chamber (Fig. 11 ).
3. Place the trimmed end of the film on the take-up spool along with the arrow mark.
When loading film, make sure that film lies flat between the film guides. And engage the
perforation of the film with the teeth of the sprocket (Fig. 12). Then close the back cover.
4. 35FA Super and 35FA 11 have a convenient cartridge window to confirm what type of
film you are using (Fig. 13).
www.orphancameras.com
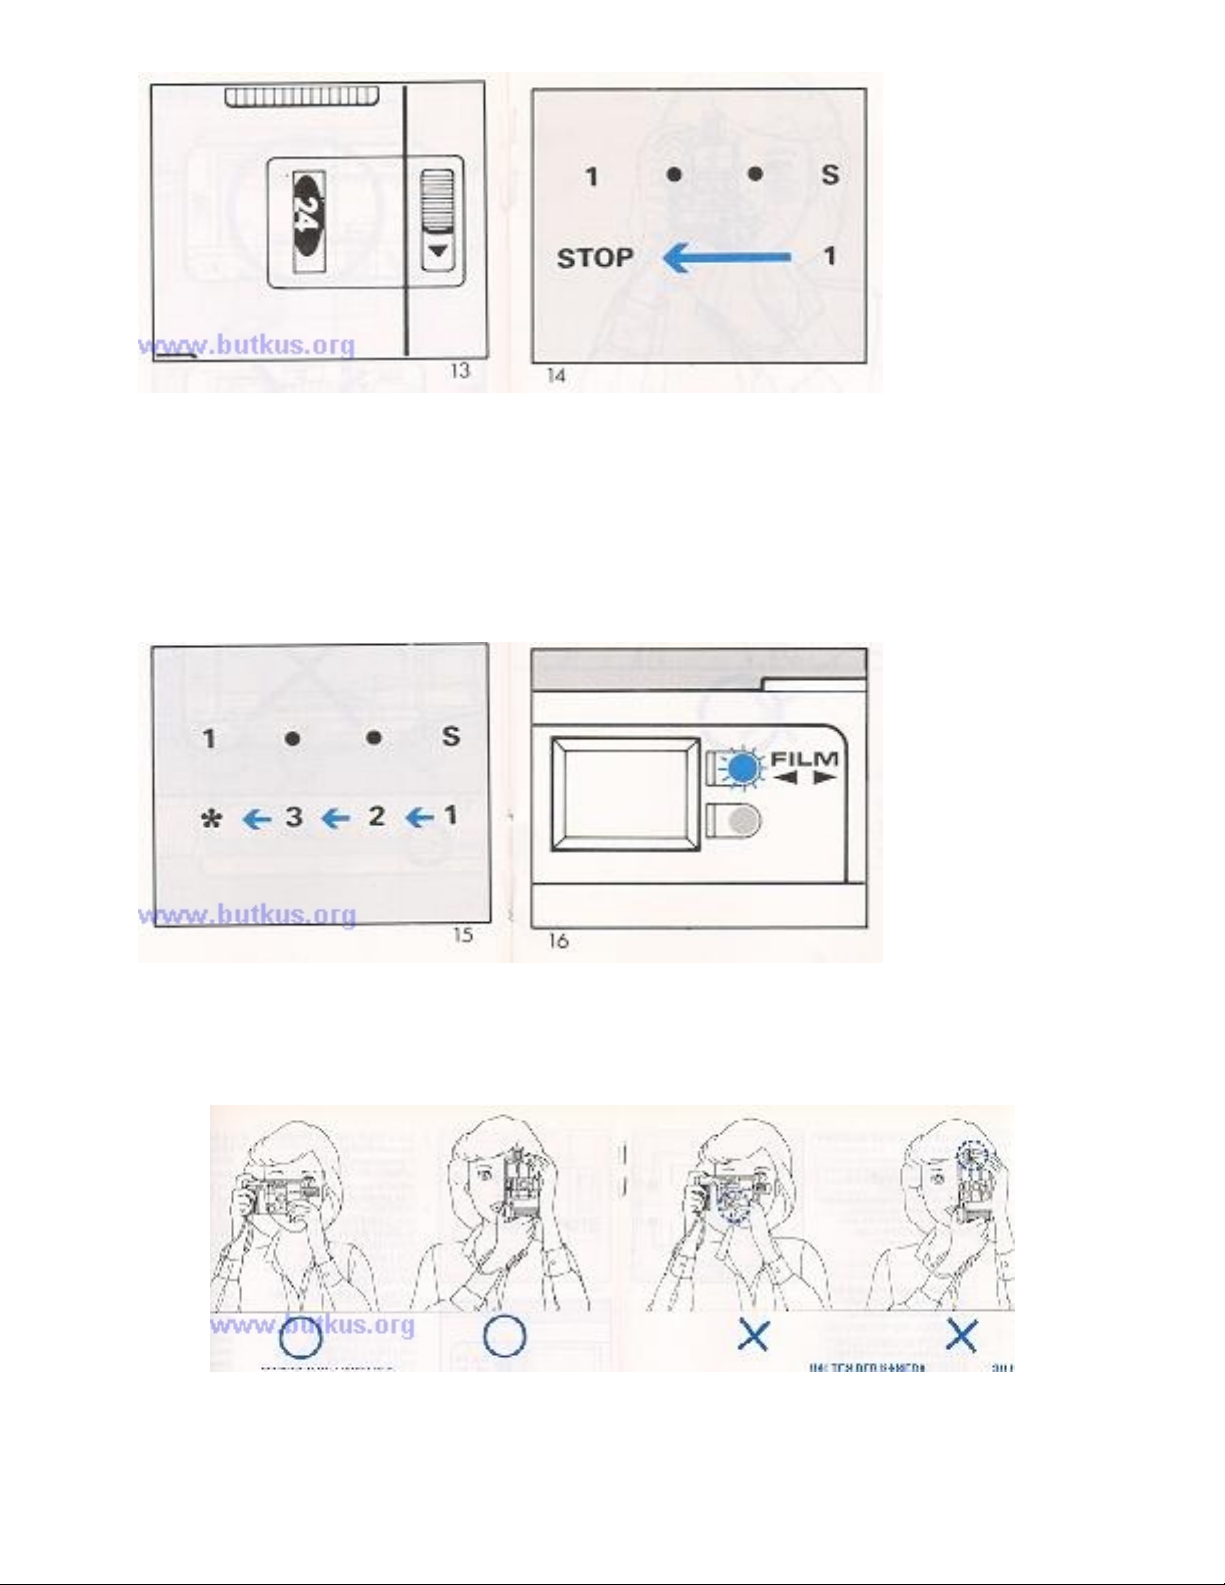
5. 35FA Super: Open the lens cover, then depress and release the shutter button. The film
will automatically advance to figure "1 " position (Fig. 14). Now the film is correctly
loaded, ready for the first picture. 35FA II: Open the lens cover, then depress and release
the shutter button two or three times until the figure "1" appears in the frame counter for
the first picture (Fig. 15).www.4.butkus.org
NOTE: The Film Advance Indicator blinks when the film is advancing properly (Fig. 16). If it
does not blink, reload the film.
Proper ways and improper ways to hold you camera.
www.orphancameras.com
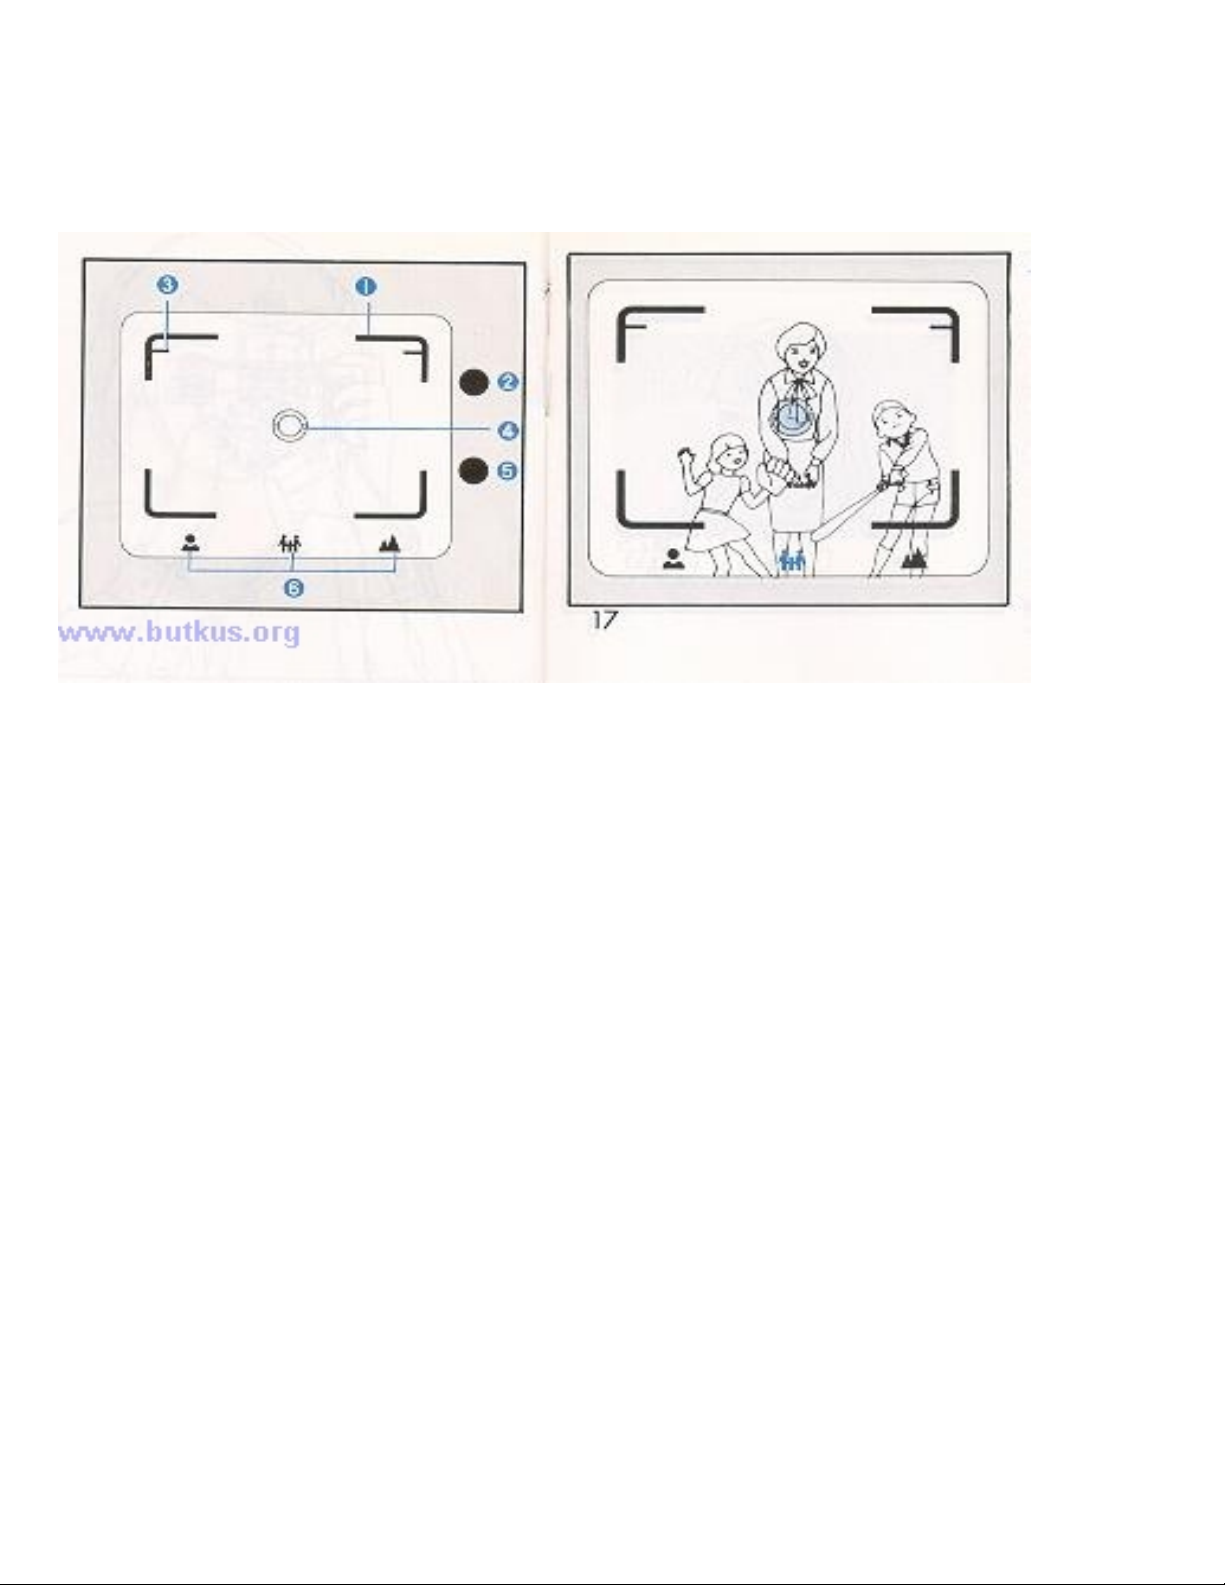
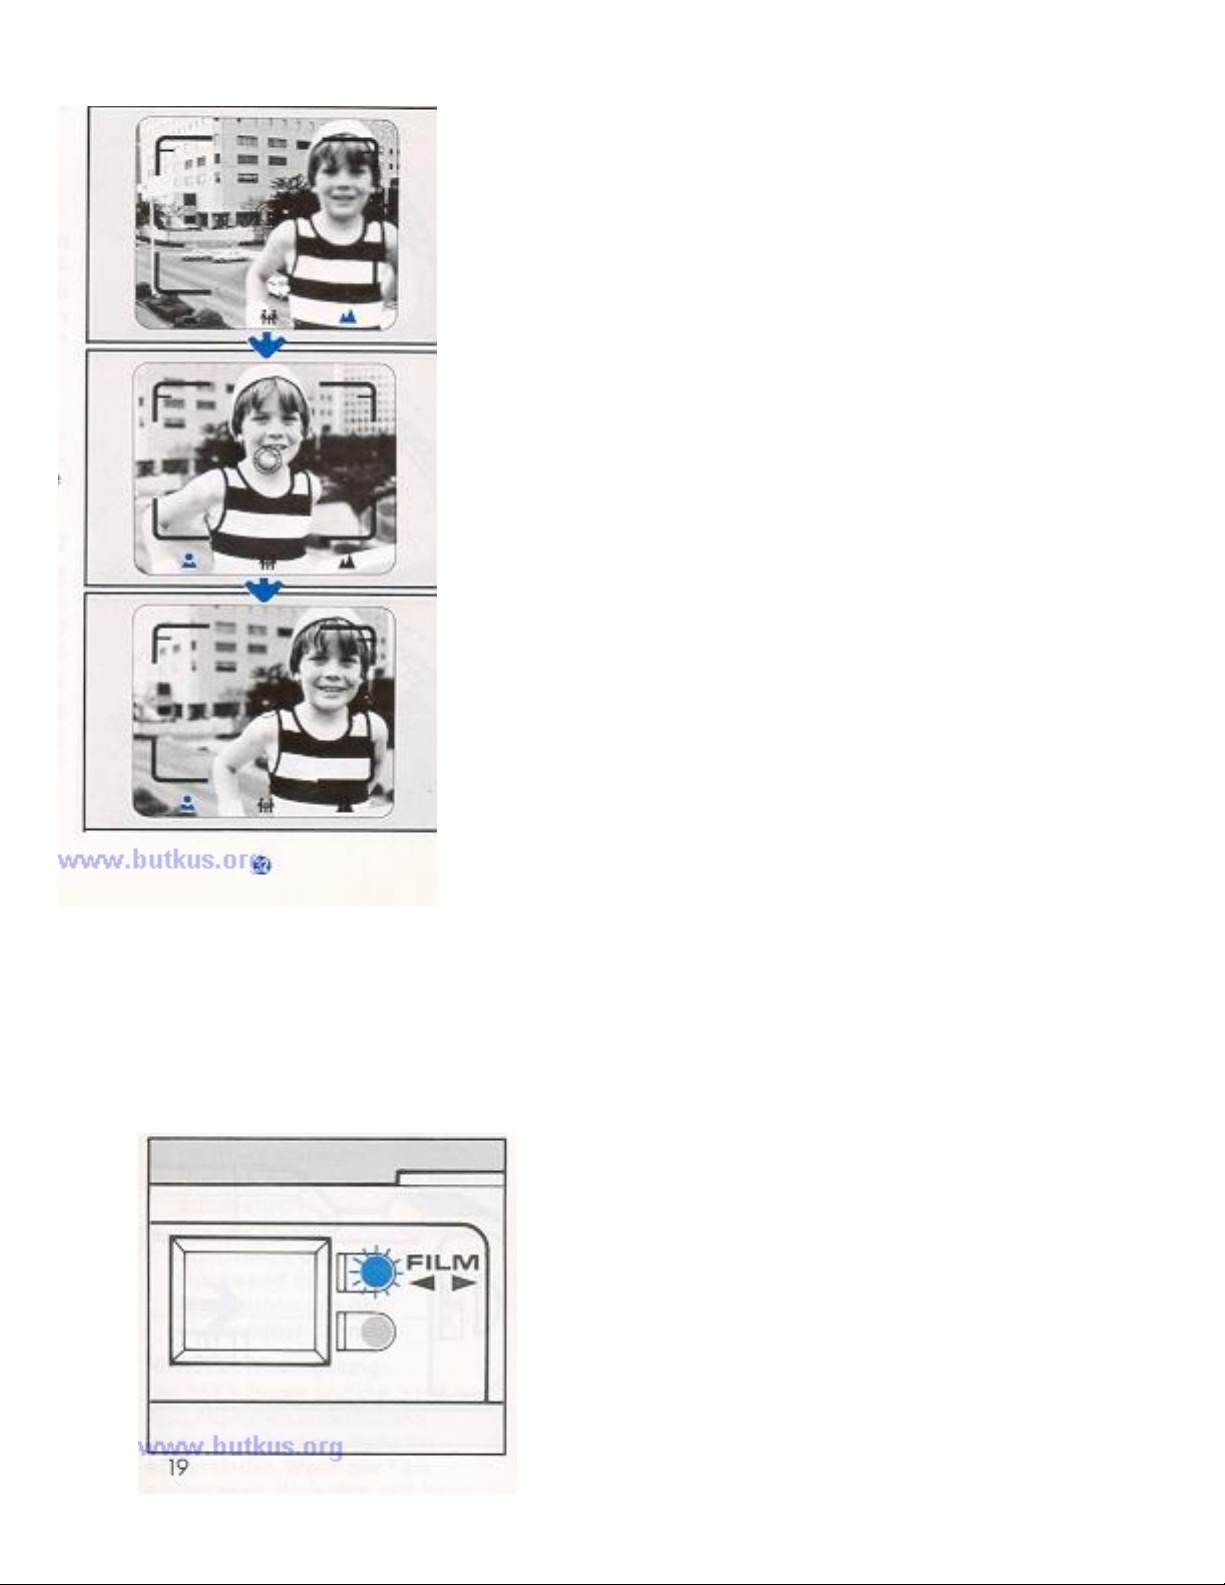
AUTO-FOCUS SHOOTING
1. Bright Line Frame
2. Film Advance Indicator
3. Parallax Marks
4. Auto-Focus Frame
5. Under Exposure Warning/ Battery Check LED
6. Symbol Marks (35FA Super only)
1. Look through the viewfinder and compose the picture so that the main subject is placed
in the
auto focus frame (4) (Fig. 17).
2. Gently press the shutter release button halfway. With the 35FA Super, the approximate
distance from the camera to the subject is indicated on the symbol mark scale (6) in the
viewfinder.
www.orphancameras.com

3. When taking a picture closer than 1.5 meters (5 feet) or when the · mark lights up (35FA
Super), the image area is indicated by parallax marks 3 in the top left and top right corners
of the viewfinder. Compose the photograph within the imaginary zone extending from the
corner of the parallax marks (Fig. 18).
NOTE: If the (person) mark blinks, the subject is too close to be focused.
4. Press the shutter release button all the way and, lift your finger off the release button.
When the under exposure warning LED (5) lights up, use flash.
NOTE: The following subjects will not be properly auto-focused:www.4.butkus.org
· Shiny subjects such as water surfaces or the exterior of a car body.
· Subjects through a glass window
· Semi-reflective subjects.
www.orphancameras.com
CONTINUOUS SHOOTING
With your Chinon 35FA Super & 35FA 11, you can continuously shoot pictures as long as the
shutter is fully depressed.
NOTE: Continuous shooting may not be possible if the batteries are too weak.
FOCUS LOCK SYSTEM
This feature may be used to eliminate tricky focusing situations such as the main subject located
"off center" in the viewfinder. In such a situation, first focus on the main subject (by placing the
subject in the AF frame) and depress the shutter release button halfway. Hold the shutter release
button in the halfway position and recompose the subjects in the viewfinder, then depress the
shutter release button fully. This focus lock system is cancelable by removing your finger from
the release button.
www.orphancameras.com
FILM REWINDING
1. When the roll of film is completed, the cameras automatically rewind the film. During
rewinding, the film advance indicator blinks indicating proper rewinding (Fig. 19)
www.orphancameras.com
2. When the rewinding is completed, motor will stop automatically.
3. Push the back cover release button down, open the back cover, and remove the film
cartridge from the film chamberwww.4.butkus.org
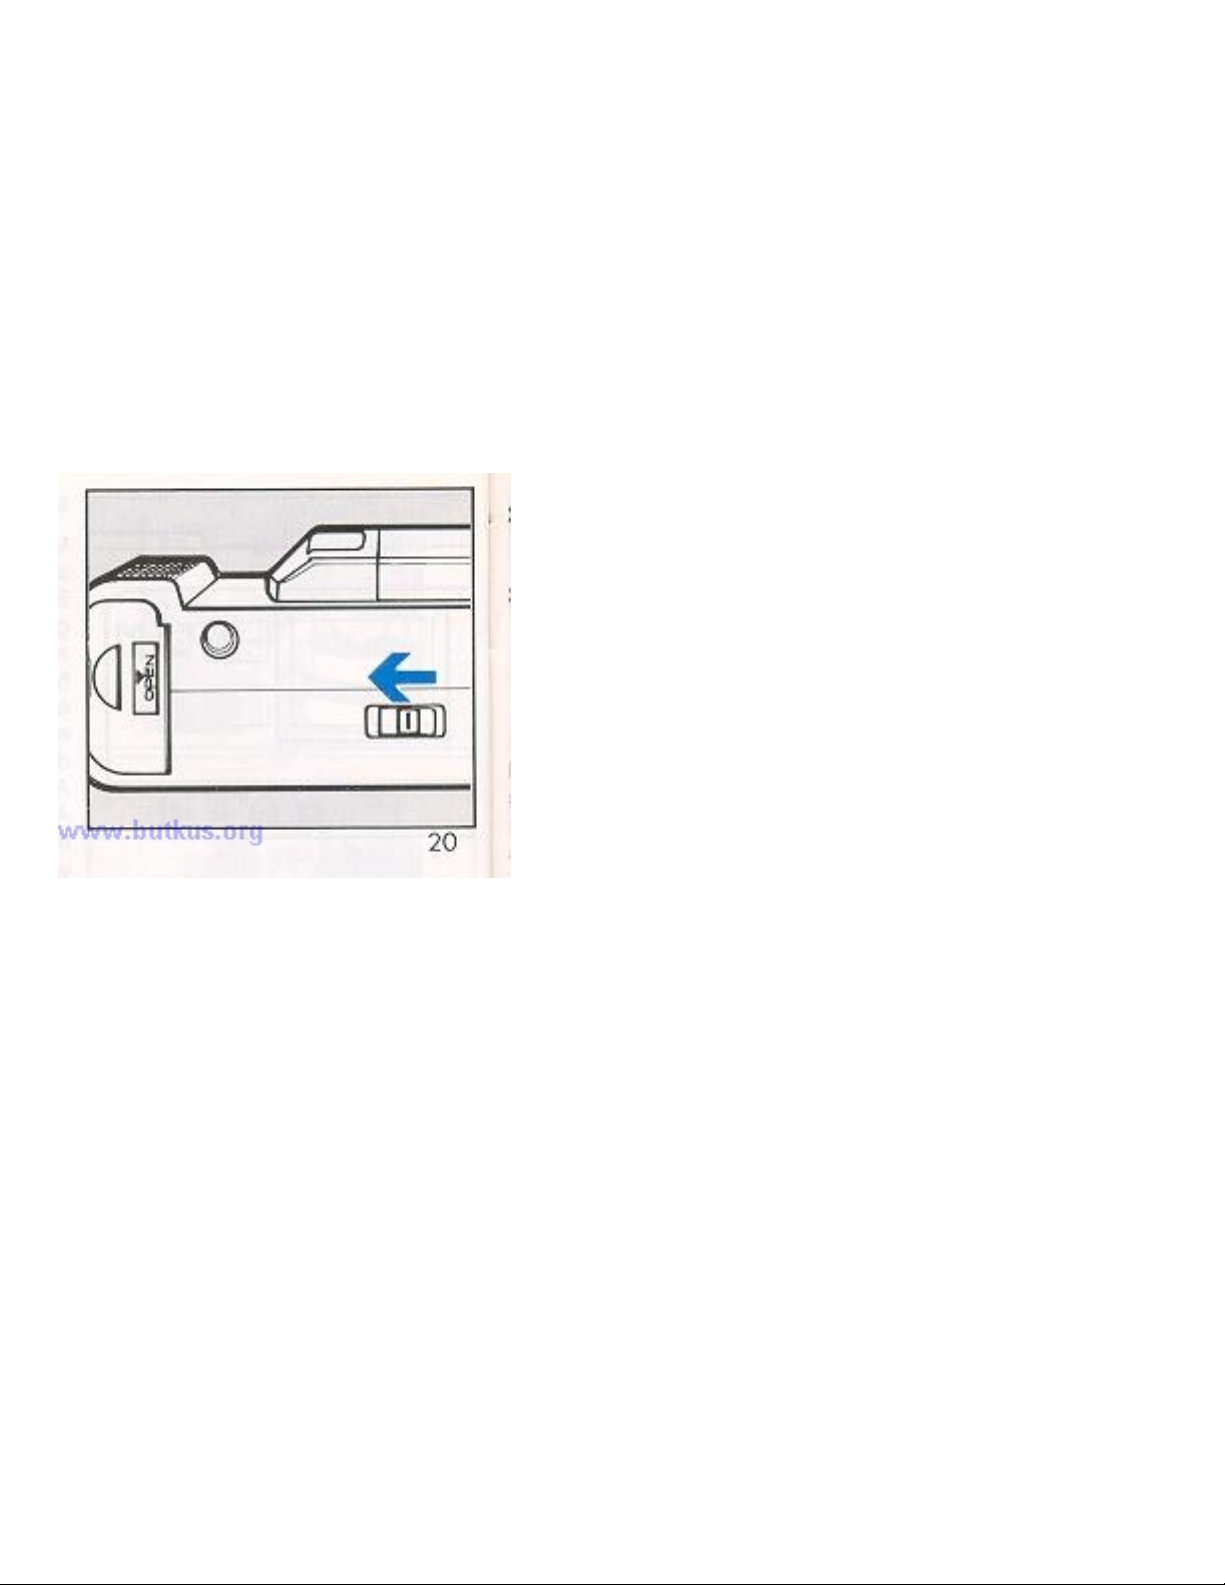
Manual Rewind: 35FA Super and 35FA 11 are equipped with a convenient manual rewind
switch. When you desire to rewind the film before it has been fully exposed, slide the manual
rewind switch in the direction of the arrow (Fig. 20). When the batteries are weak, film may not
be automatically rewound. In that case, replace the batteries with new ones, then use the manual
rewind switch.
NOTE: The camera will not operate if the manual rewind switch is activated when there is no
film in the camera. To operate the camera, open the back cover to deactivate the rewind switch.
FLASH PHOTOGRAPHY
Switch to flash photography when the under exposure warning LED blinks during pressing the
shutter release button halfway (Fig. 21).
www.orphancameras.com
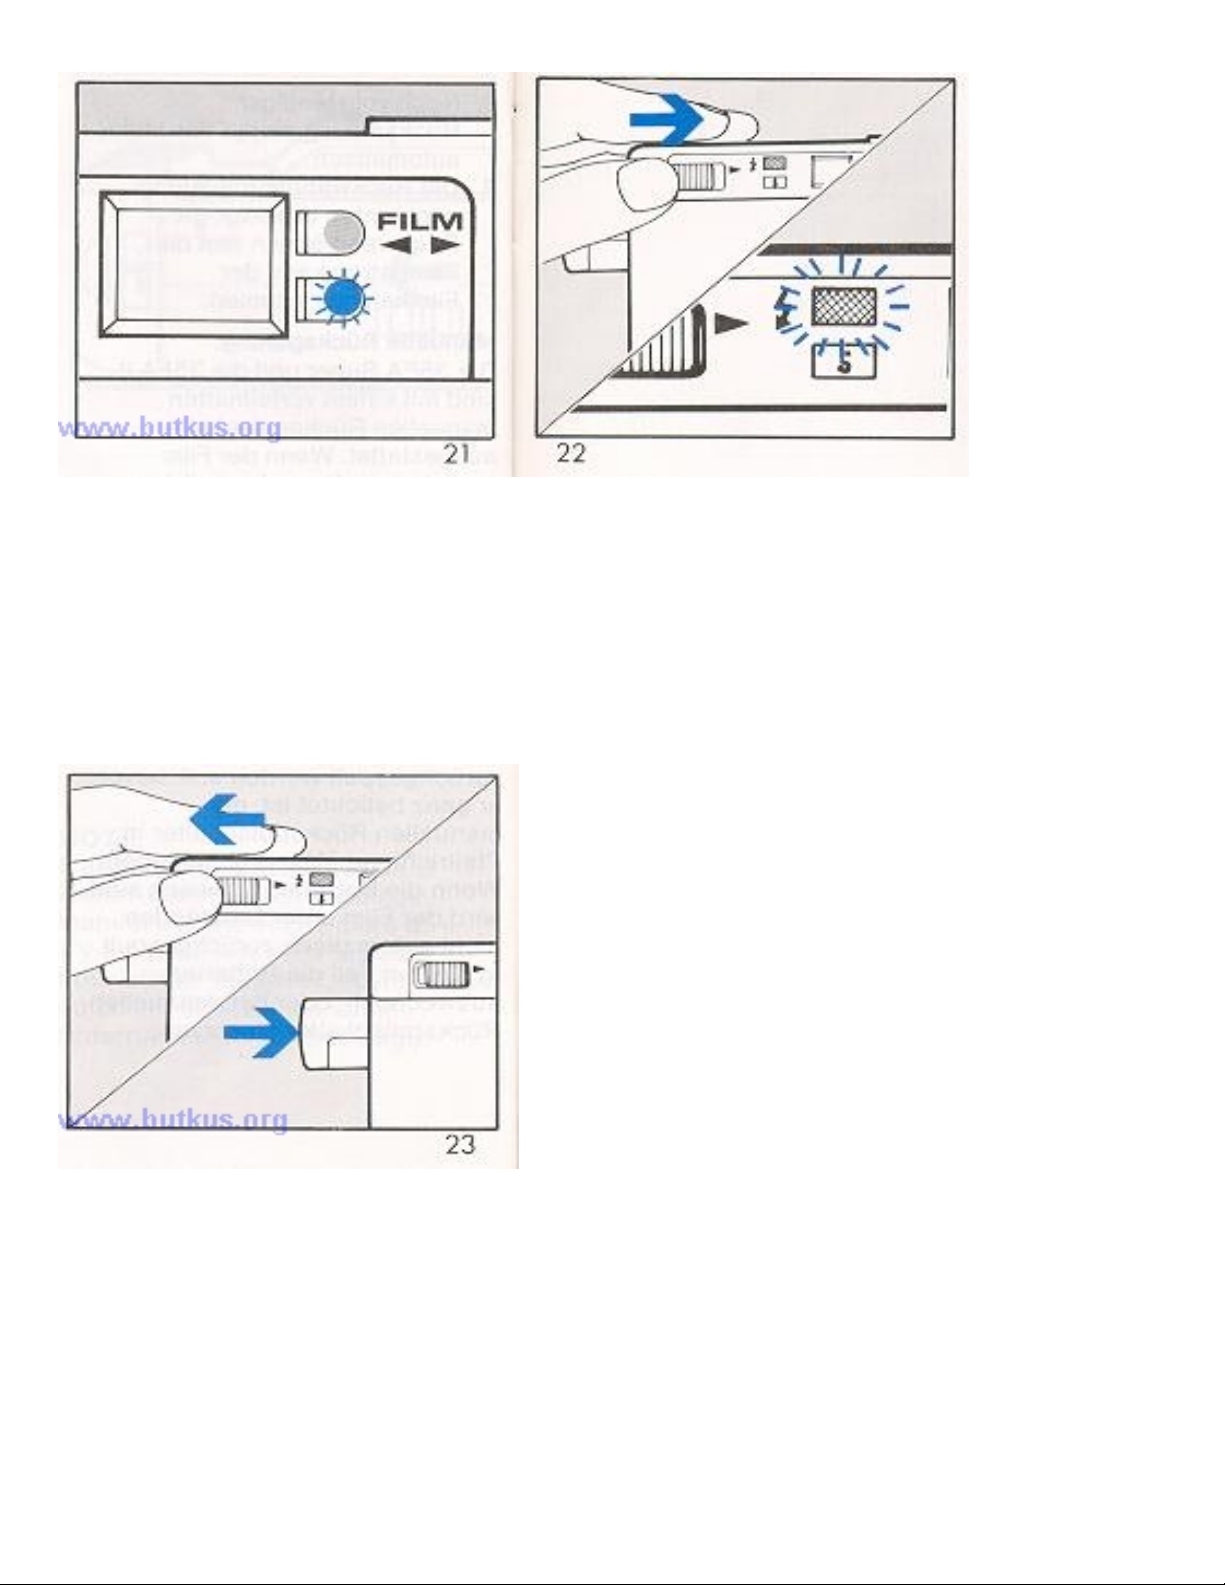
1. Slide the Flash Switch in the direction of the arrow.
2. Make sure that the Flash Ready Indicator is illuminated, then shoot (Fig. 22). - When
the flash photography is completed, slide the Flash Switch in the direction of the arrow
(Fig. 23). The Flash Switch can automatically return to the OFF position by closing the
lens cover.
NOTE: Even if the flash ready indicator illuminates, actual shutter release will only occur with a
fresh set of batteries. To check the strength of the batteries, slightly press the shutter release
button while covering the exposure meter window. The batteries are OK if the under exposure
warning LED blinks during this testing procedure. If the under exposure warning LED does not
blink, this is an indication that your batteries are weak and should be replaced immediately.
www.orphancameras.com

ASA 35FA Super 35FA II
50 1- 3m (3.3- 10ft.) -
100 1 - 4.2m (3.3 - 14ft) 1.2 - 3.4m (3.9 - 11ft)
200 1 - 6m (3.3 - 20ft) 1.2 - 4.8m (3.9 - 16ft)
400 1.5 - 6.4m (5 - 21ft) 1.5 - 6m (5 - 20ft)
1000 2 - 11m (6.6 - 36ft) 2 - 9m (6.6 - 30ft)
NOTES:
1. The Flash Switch can not be operated when the lens cover is closed.www.4.butkus.org
2. If you release the shutter before the Flash Ready Indicator glows, exposure will not be
correct.
3. Do not continuously press the shutter release button halfway while waiting for the flash
ready indicator to illuminate, since the flash will not charge.
DAYLIGHT FLASH PHOTOGRAPHY
If the main subject has less light falling on it than the surrounding area and background,
underexposure of the main subject will result. In such situations, use the flash for the photograph
even in daylight.
www.orphancameras.com
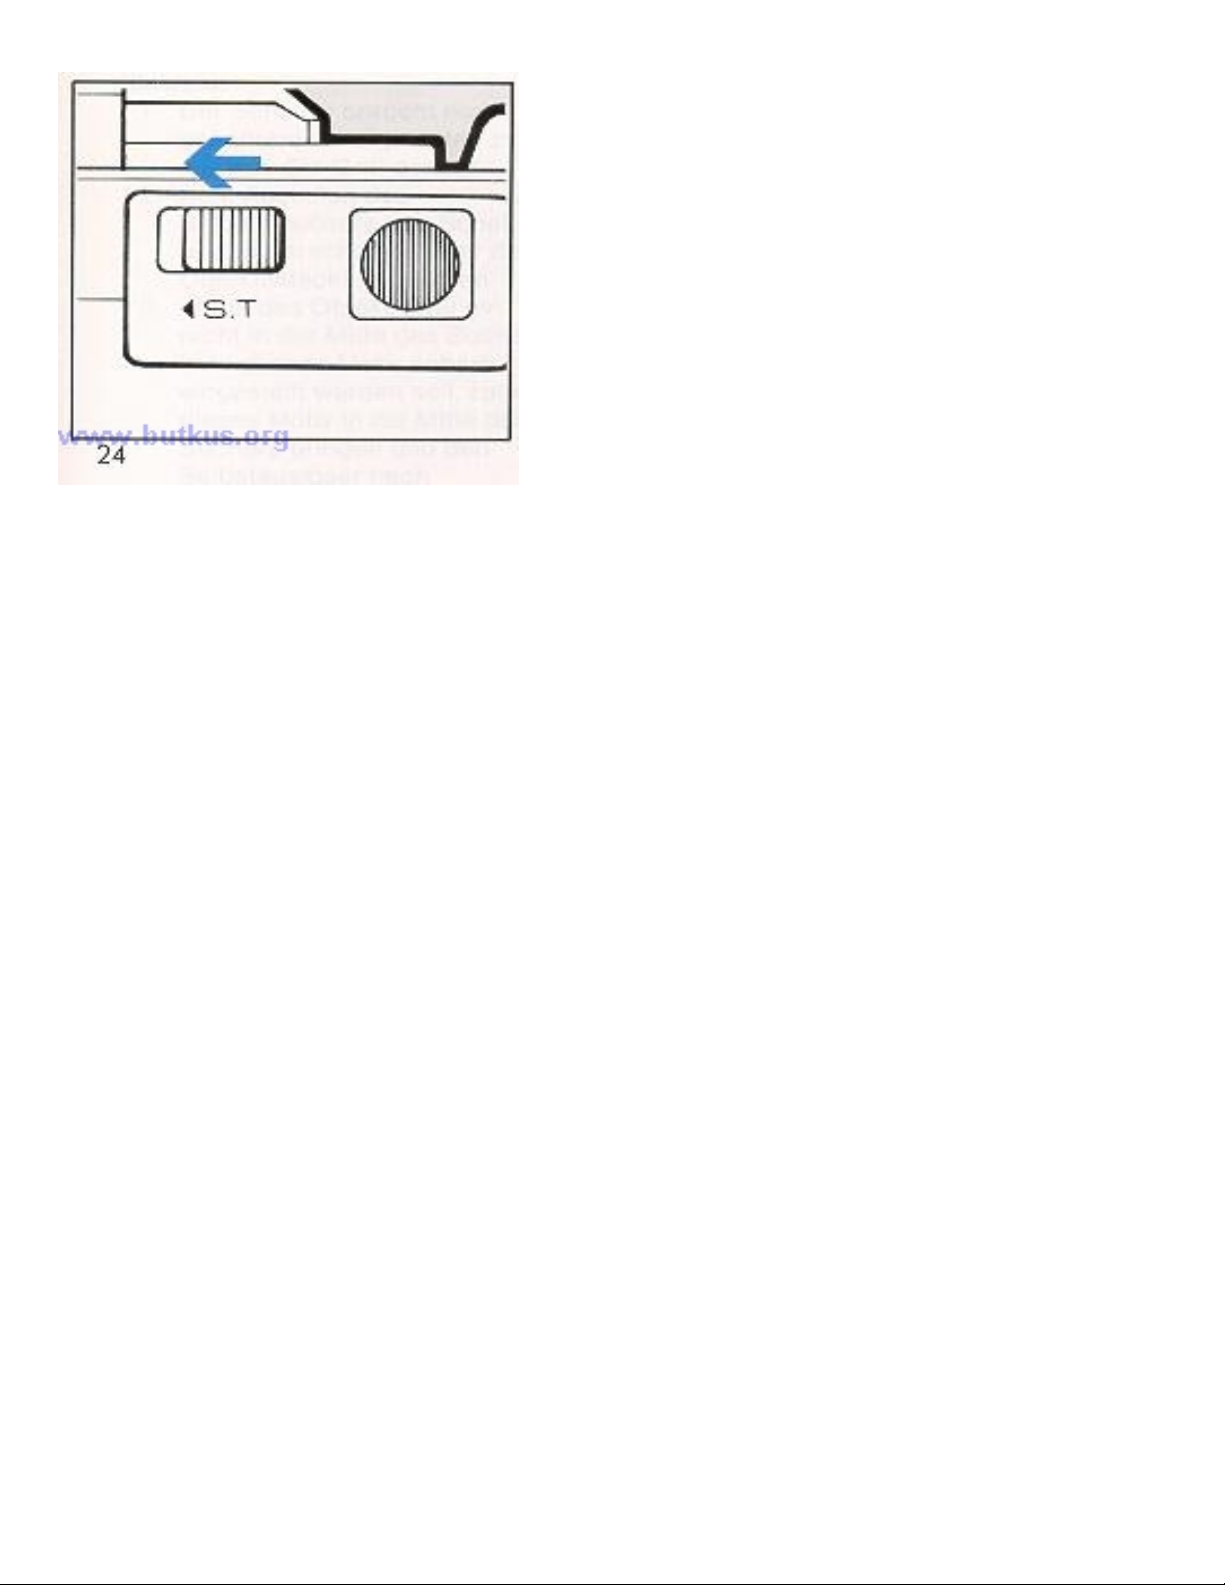
SELF-TIMER
1. Place the camera on a tripod or other firm support.
2. After you check the exposure and adjust the focus simply slide the Self-Timer Switch in
the direction
of the arrow and withdraw your finger (Fig. 24). The picture will be taken in
approximately 10 seconds.
You will notice the red LED Self
www.orphancameras.com
Timer indicator blinking. Two seconds before the shutter is released the flashing frequency will
increase, giving you or your subject a visual signal that the shutter is about to be released.
NOTE:
1. You need not to slide and hold the switch. Just one-touch will do.
2. If you want to cancel the Self Timer, slide the switch again or close the lens cover.
3. If you desire to focus the subject located "off center" in' the viewfinder, first position the
subject in the center of the viewfinder and start the Self-Timer, then recompose your
picture.
4. When using with the flash, make sure that the Flash Ready Indicator lights up before
taking picture.
CARE OF THE CAMERA
Your Chinon 35FA Super & 35FA 11 are precision instruments. When used with care it will
provide years of trouble-free service. Protect your camera from dirt, rain, dampness and excessive
heat. Avoid touching the lens. To clean the lens, wipe it gently with a soft lintless cloth or tissue.
Do not use eyeglass tissues as they might damage the lens coating. Do not open and touch the
inside of camera as the high voltage in the flash circuit is dangerous.
www.orphancameras.com
Other manuals for 35FA super
2
This manual suits for next models
1
Table of contents
Other CHINON Digital Camera manuals


