Vimar ELVOX TVCC User manual

Viale Vicenza, 14
36063 Marostica VI - Italy
www.vimar.com
449401353A0 00 1812
46KIT.436WF
Kit TVCC costituito da:
-
1 NVR Wi-Fi a 4 canali, compressione H.264 e H.265, registrazione 4 Ch@Full-HD,
configurazione Plug&Play, controllo e visione remota da app dedicata con QRcode,
funzioni rilevazione di movimento, e invio notifiche. HDD professionale da 1 TB
incluso,
- 2 telecamere Bullet Wi-Fi Day & Night a colori, risoluzione 2 Mpx (1920x1080),
filtro IR meccanico, con obiettivo fisso da 3,6 mm (46237.KIT),
- 1 cartello “Area Videosorvegliata” (RT03).
Contenuto della confezione
Una volta ricevuto il dispositivo, controllare gli accessori indicati di seguito.
Le illustrazioni sotto riportate hanno solo funzione di riferimento. Far riferimento
all'apparecchiatura in dotazione.
N. Oggetto Quantità
1 NVR Wi-Fi 1
2 Telecamera IP Wi-Fi 2
3 Alimentatore 12 V/2 A 3
4 Mouse USB 1
5 Cavo di prolunga antenna 1
6 Cavo di rete (per abbinamento telecamera) 1
7 Istruzioni per l’uso 1
8 Chiavi esagonali 1
9 Viti (per telecamera IP) 3
10 Dima di foratura (per telecamera IP) 2
11 Cartello “Area Videosorvegliata” 1
Connessioni / Connections
ENIT
TVCC kit, comprises of:
- 1 4-channel Wi-Fi NVR, H.264 and H.265 video compression, 4 Ch@Full-HD
recording, Plug&Play configuration, remote control visualization from dedicated
app with QRcode, motion detection and notice sending functions, professional
HDD of 1 TB included,
- 2 Bullet Wi-Fi Day & Night colour cameras, 2 Mpx (1920x1080) resolution, me-
chanical IR filter with 3,6 mm fixed lens (46237.KIT),
- 1 warning sign “Area Videosorvegliata” (RT03).
Package content
After you receive your device, please check the following accessories.
The pictures here are for reference only.
No. Item Quantity
1 Wi-Fi NVR 1
2 Wi-Fi IP camera 2
3 12 V/2 A power supply 3
4 USB mouse 1
5 Antenna extension cord 1
6 Network cable (for IPC code match) 1
7 Quick setup guide 1
8 Hex wrenches 1
9 Screw bag (for IP Camera) 3
10 Drill template (for IP camera) 2
11 Warning sign “Area Videosorvegliata” 1
100%9:41AM
VGA
HDMI
AUDIO OUT
Internet
HDMI VGA
Router
Porta LAN per
connessione a internet
LAN port to connect
the internet
Controllo remoto
Remote control
Controllo remoto
Remote control
Controllo remoto
Remote control
1 Wi-Fi camera
- The series camera is in the integrated brackets
structure. Please use 3 pcs PA4 screws to x the
basement of the camera at the installation location.
- To loosen the camera body’s screws to adjust the
three-axis. Adjust the connection between brackets
and basement by axis to implement 0º~360º in the
horizontal direction; Adjust the spherical joint of
brackets can achieve 0º~90º in the vertical direc-
tion and 0º~360º in the rotational direction. Please
tighten the screws after adjusting the camera
image to the right scene. All the installation has
nished.
Attention: wall installation should be with a
certain thickness and stand triple weight of the
camera at least.
0°~360°
0°~90°
0°~360°
18,1 mm
36,1 mm
Ø82,0
Ø4,6
Ø25,1
Ø72,2
62,5 mm
120°
120°
Viti regolabili
Adjustable
screws
Sotto
Ceiling
Viti di ssaggio
Install screws
0°~360°
0°~90°
0°~360°
18,1 mm
36,1 mm
Ø82,0
Ø4,6
Ø25,1
Ø72,2
62,5 mm
120°
120°
Installazione Installation
1 Telecamera Wi-Fi
- La telecamera è dotata di staa integrata, utilizzare
le 3 viti in dotazione per ssarla nel luogo di instal-
lazione.
- E' possibile regolare la telecamera su 3 assi:
0°~360° per l'asse orizzontale, 0°~90° per l'asse
verticale e 0°~360° per la rotazione. Stringere le viti
dopo aver posizionato la telecamera nella direzione
desiderata. L'installazione è terminata.
Attenzione: la parete dove viene installata la
telecamera deve sopportare almeno il triplo del
suo peso.
Viale Vicenza, 14
36063 Marostica VI - Italy
www.vimar.com
449401353A0 00 1812
46KIT.436WF
ENIT
2 Run System
Take the adapter out of the acces-
sories box and power on the NVR,
waiting about 45 seconds, the video
will come.
a) If you have new camera want to
be added into NVR, in addition
to the 2 in the kit you can add by
matching code.
- Power on the NVR and WI-FI
camera, then take the network
cable out of the accessories box,
and connect camera and NVR via
this cable.
Attention: The light of NVR on
the wan port interface should be on,
if the light is o, then can’t match
code, please check if the cable or
device can work well or not.
2 Avvio del sistema
Estrarre gli accessori dalla scatola
e accendere l'NVR; dopo circa 45
secondi apparirà l'immagine.
a) Se si desidera aggiungere una
nuova telecamera, oltre alle 2
fornite con il kit, è possibile farlo
abbinando il codice.
- Accendere l'NVR e la telecamera
Wi-Fi, estrarre il cavo di rete dalla
scatola degli accessori e utiliz-
zarlo per collegare la telecamera
all'NVR.
Attenzione: il LED di segnala-
zione della rete LAN dell'NVR deve
essere acceso, se la luce è spenta
non sarà possibile procedere con
l'abbinamento della nuova teleca-
mera. In questo caso veracre che il
cavo o il dispositivo funzionino.
VGA
HDMI
AUDIO OUT
2
3
1
12 Vdc
12 Vdc
Cavo di rete
Network cable
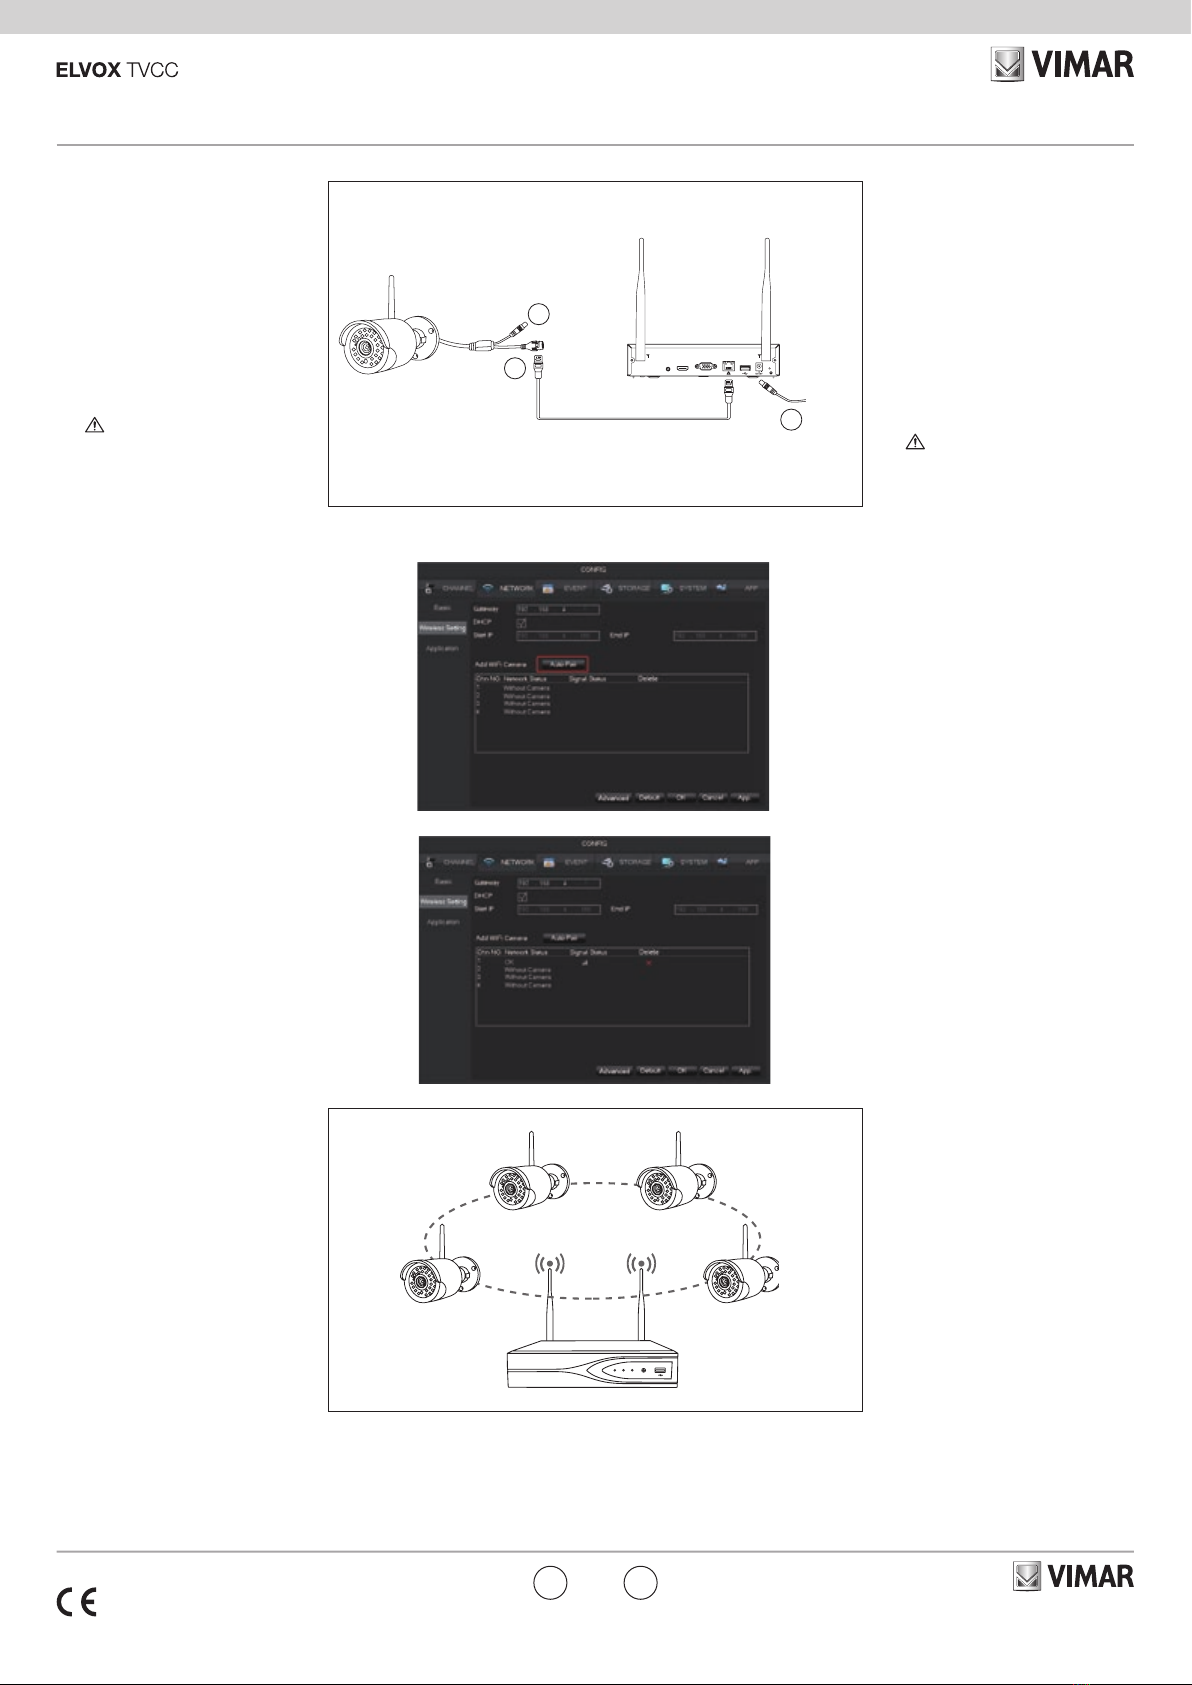
- Go to menu [MAIN MENU] > [Wi-
reless Setting], click match button
"Auto-Pair" to match code.
At the rst access you will be asked
to enter:
User Name: Admin
Password: 123456
- Andare al menu [Menu Principale]
>[Congura Wi-Fi], fare clic sul
pulsante "Auto-Pair" (Abbina-
mento) per abbinare il codice.
Confermare i messaggi di richie-
sta.
Al primo accesso verrà richiesto di
inserire:
Nome utente: Admin
Password: 123456
- If match code successfully, the
network status will show “OK” and
video coming out. Then you can
disconnect the network cable.
- Se il codice di abbinamento è
corretto, lo stato diventerà OK e
comparirà l'immagine. Ora è pos-
sibile scollegare il cavo di rete.
b) Optimize the WI-FI performance.
- The signal coverage of antenna is
similar to a round circule. Antenna
located in center of the round
circule, signal of surrounding is
much stronger, but much weaker
if antenna endopints backo
direction. According to the signal
divergency characteristics of an-
tenna, and in order to guarantee
the video quality, IPC antenna
should try to keep in parallel with
NVR antenna.
b) Ottimizzazione delle prestazioni
Wi-Fi.
- L'area di copertura del segnale
radio è simile a un cerchio. In
base alle caratteristiche di irradia-
zione dell'antenna e al ne di ga-
rantire la qualiltà video, l'antenna
della telecamera dovrebbe essere
tenuta in parallelo con l'antenna
dell'NVR.
PWRHDD NET

Viale Vicenza, 14
36063 Marostica VI - Italy
www.vimar.com
449401353A0 00 1812
46KIT.436WF
ENIT
- If the distance between IPC and
NVR is too far, the signal is not
strong enough, you can take o
the original antenna and substi-
tute antenna extension cord (1
supplied), then put it where WIFI
signal is strong.
- Se la distanza tra IPC e NVR è
troppo grande e il segnale non
è abbastanza forte, è possibi-
le togliere l'antenna originale
della telecamera e sostituirla con
quella esterna (1 in dotazione) e
posizionarla dove il segnale Wi-Fi
è migliore.
PWRHDD NET
Remote Control and Cloud
Service
1 Install APP
Scan the corresponding QR code to
download the app.
We support Android 4.4 and higher
versions, IOS 9.1.3 and higher
versions.
Remote Control and Cloud
1 Installazione APP
Scansionare il QR code corrispondente
per scaricare l'App.
E' supportato Android 4.4 e versioni
successive e iOS 9.1.3 e versioni
successive.
2 Register Wi-Fi TVCC Account
Run the APP, click “Register Now”,
and add device after login in.
Login in is necessary to receive Push
notication.
2 Registrazione a Wi-Fi TVCC
Avviare l'App e poi cliccare su
"Registrazione/Accesso", dopo aver
eettuato il Login, aggiungere il
dispositivo.
E' necessario essere registrati per
usufruire del servizio Notiche.
3 Add device
a) Click Device Manager button
, then click to add
device.
3 Aggiunta dispositivo
a) Cliccare su "Gestione dispo-
sitivo" , quindi cliccare
su per aggiungere il
dispositivo.

Viale Vicenza, 14
36063 Marostica VI - Italy
www.vimar.com
449401353A0 00 1812
46KIT.436WF
b) Add device: click scan button ,
scan the NVR’s P2P code, or you can
enter the P2P ID and password. After
add device successfully, you can go the
[live view] page to live view anywhere.
At the rst access you will be asked to
enter:
User Name: Admin
Password: 123456
b) Aggiunta dispositivo: cliccare su scan
, scansionare il codice P2P del-
l'NVR o inserire ID e password. Dopo
aver aggiunto il dispositivo è possibile
andare alla pagina (Vista dal vivo) per
vedere l'immagine.
Al primo accesso verrà richiesto di
inserire:
Nome utente: Admin
Password: 123456
Statement
This manual describes basic operations.
More details please refer to the main
manual found in the web site:
https://faidate.vimar.com/it/it).
Dichiarazione
Questo manuale descrive le operazioni
base. Per maggiori informazioni fare rife-
rimento al manuale completo disponibili
nella scheda prodotto consultabile nel
sito: https://faidate.vimar.com/it/it).

Viale Vicenza, 14
36063 Marostica VI - Italy
www.vimar.com
449401353A0 00 1812
46KIT.436WF
Avvertenze
- Prima di utilizzare il prodotto si raccomanda vivamente di leggere il manuale e di
conservarlo in un luogo sicuro per consultazione futura.
- Utilizzare l'alimentazione specicata per il collegamento.
- Evitare di azionare il prodotto in modo improprio, sottoporlo a urti o vibrazioni, forti
pressioni che possono danneggiarlo.
- Non utilizzare detergenti corrosivi per pulire il corpo principale della telecamera. Se
necessario, utilizzare un panno morbido e asciutto per pulirla; in caso di sporco resi-
stente utilizzare un detergente neutro. È possibile utilizzare detergenti per mobili di
qualità.
- Non puntare la telecamera direttamente verso oggetti estremamente luminosi, ad
esempio il sole, in quanto si potrebbe danneggiare il sensore d'immagine.
- Seguire le istruzioni per installare la telecamera. Non rovesciare la telecamera, altri-
menti riceverà un'immagine rovesciata.
- Non azionarla se temperatura, umidità e alimentazione non corrispondono ai limiti o
valori specicati.
-
Tenere lontano da fonti di calore quali radiatori, bocchette dell'aria calda, stufe e simili.
- Il presente documento contiene le istruzioni per l'uso del prodotto. Non è la garanzia
di qualità. Ci riserviamo il diritto di correggere errori di stampa, incongruenze con la
versione più recente, aggiornamenti del software e miglioramenti, interpretazione e
modiche al prodotto. Tali cambiamenti saranno pubblicati nella versione più recente
senza previa notica.
- Quando il prodotto è in uso, sono applicabili i contenuti di Microsoft, Apple e Google.
Le immagini e le schermate di questo manuale hanno lo scopo di spiegare l'utilizzo
del prodotto. La proprietà dei marchi commerciali, dei logo e altre proprietà intellet-
tuali relative a Microsoft, Apple e Google appartengono alle suddette aziende.
Cautions
- Before operation, we strongly advise users to read this manual and keep it pro-
perly for using later.
- Please use the specied power supply to connect.
- Avoid from in correct operation, shock vibration, heavy pressing which can cause
damage to product.
- Do not use corrosive detergent to clean main body of the camera. If necessary,
please use soft dry cloth to wipe dirt; for hard contamination, use neutral deter-
gent. Any cleanser for high grade furniture is applicable.
- Avoid aiming the camera directly towards extremely bright objects, such as, sun,
as this may damage the image sensor.
- Please follow the instructions to install the camera. Do not reverse the camera,
or the reversing image will be received.
- Do not operate it incase temperature, humidity and power supply are beyond the
limited stipulations.
- Keep away from heat sources such as radiators, heat registers, stove., etc.
- This is product instructions not quality warranty. We may reserve the rights of
amending the typographical errors, inconsistencies with the latest version, sof-
tware upgrades and product improvements, interpretation and modication. The-
se changes will be published in the latest version without special notication.
- When this product is in use, the relevant contents of Microsoft, Apple and Google
will be involved in. The pictures and screenshots in this manual are only used
to explain the usage of our product. The ownerships of trademarks, logos and
other intellectual properties related to Microsoft, Apple and Google belong to the
above-mentioned companies.
Caratteristiche tecniche
Range di frequenza: 2412-2472 MHz
Potenza RF trasmessa: < 100 mW (20 dBm)
Regole di installazione
L’installazione deve essere eettuata con l’osservanza delle disposizioni regolanti
l’installazione del materiale elettrico in vigore nel Paese dove i prodotti sono in-
stallati.
Conformità Normativa
Direttiva RED
Norme EN 301 489-17, EN 300 328, EN 62311, EN 60950-1
Vimar SpA dichiara che l’apparecchiatura radio è conforme alla direttiva 2014/53/UE.
Il testo completo della dichiarazione di conformità UE è disponibile nella scheda di
prodotto al seguente indirizzo Internet: faidate.vimar.com
RAEE - Informazioni agli utilizzatori
Il simbolo del cassonetto barrato riportato sull’apparecchiatura o sulla sua confezione
indica che il prodottto alla fine della propria vita utile deve essere raccolto separata-
mente dagli altri rifiuti. L'utente dovrà , pertanto, conferire l'apparecchiatura giunta a
fine vita gli idonei centri comunali di raccolta differenziata dei rifiuti elettrotecnici ed
elettronici. In alternativa alla gestione autonoma è possibile consegnare l'apparecchiatura che
si desidera smaltire al rivenditore, al momento dell'acquisto di una nuova apparecchiatura di
tipo equivalente. Pressso i rivenditori di prodotti elettronici con superficie di vendita di almeno
400 m
2
è inoltre possobile consegnare gratuitamente, senza obbligo di acquisto, i prodotti elet-
tronico da smaltire con dimensioni inferiori a 25 cm. L'adeguata raccolta differenziata per l'avvio
successivo dell'apparecchiatura dismesssa al riciclaggio, al trattamento e allo smaltimento
ambientalmente compartibile contribuisce ad evitare possibili effetti negativi sull'ambiente e
sulla salute e favorisce il reimpiego e/o riciclo dei materiali di cui è composta l'apparecchiatura.
Technical characteristics
Frequency range: 2412-2472 MHz
Transmission RF power: < 100 mW (20 dBm)
Installation rules
Installation should be carried out in compliance with the current regulations regar-
ding the installation of electrical equipment in the country where the products are
installed.
Conformity to Standards
RED Directive
EN 301 489-17, EN 300 328, EN 62311, EN 60950-1 Standards
Vimar SpA declares that this radio device complies the 2014/53/UE Directive.
The full text of the UE conformity declaration is available on the product sheet at the
following internet address: faidate.vimar.com
WEEE - User information
The crossed bin symbol on the appliance or on its packaging indicates that the
product at the end of its life must be collected separately from other waste. The
user must therefore hand the equipment at the end of its life cycle over to the
appropriate municipal centres for the differentiated collection of electrical and elec-
tronic waste. As an alternative to independent management, you can deliver the equipment
you want to dispose of to the dealer when purchasing a new appliance of an equivalent
type. You can also deliver electronic products to be disposed of that are smaller than 25 cm
for free, with no obligation to purchase, to electronics retailers with a sales area of at least
400 m
2
. Proper sorted waste collection for subsequent recycling, processing and environ-
mentally conscious disposal of the old equipment helps to prevent any possible negative
impact on the environment and human health while promoting the practice of reusing and/
or recycling materials used in manufacture.
Other manuals for ELVOX TVCC
7
This manual suits for next models
1
Other Vimar Digital Camera manuals

Vimar
Vimar ELVOX 46CAM.136B.8 User manual

Vimar
Vimar ELVOX 46239.040A User manual

Vimar
Vimar ELVOX 46234.010E.67 User manual

Vimar
Vimar Elvox 2559 User manual

Vimar
Vimar ELVAX 0559 User manual

Vimar
Vimar 46KIT.036C User manual

Vimar
Vimar ELVOX 46322.003 User manual

Vimar
Vimar ELVOX 46237.040A User manual

Vimar
Vimar ELVOX TVCC 46534.037BP User manual

Vimar
Vimar 46523.036B User manual


