ChiQ CQHDU30T1T1W User manual
Instructions Manual
Manual de Instrucciones
COOKER HOOD
CAMPANA EXTRACTORA
MODELS / MODELOS:
CQHDU30T1T1W
CQHDU30T1T1S
Read this manual before using your device and
save for future reference.
Lea este manual antes de usar su dispositivo y
guárdelo para futuras consultas.

ENGLISH
SAFETY PRECAUTIONS
Read all instructions before using this appliance.
Save these instructions for future reference.
For residential use only.
Do not attempt to install or operate your appliance until you have read the safety
precautions in this manual.
The manufacturer waives all liability for failure to observe the instructions for the
appropriate installation, maintenance and use of the extractor hood. The manufactu-
rer waives all liability for damages due to negligence and the unit warranty will be
automatically canceled due to incorrect maintenance.
Avoid accidents. After unpacking the range hood, keep packaging materials out of
reach, especially from children.
Do not allow children to handle the range hood, even when it is disconnected.
There shall be adequate ventilation of the room when the range hood is used at the
same time as appliances burning gas or other fuels.
Do not check the status of the filters while the cooker hood is operating.
Do not touch the light bulb within half an hour after appliance use.
Do not flame under the range hood.
Avoid opening gasometer when there is no pan on the stove, as it is damaging for the
filters and a fire hazard.
Constantly check food frying to avoid that the overheated oil may become a fire
hazard.
If the supply cord is damaged, it must be replaced by the manufacture, its service
agent or similarly qualified persons in order to avoid a hazard.
The socket outlet for the range hood must be located so it is easily accessible for the
user after installation. Ensure the mains supply voltage corresponds with that of the
appliance.
There is a fire risk if cleaning is not carried out in accordance with the instructions.
When the hood is in repair, maintenance, replacement of parts, please pull out the
plug, ensure the safety of the people.
To protect the main body from corrosive of the long time accumulation of dirt, the
cooker hood should be cleaned with hot water with non-corrosive detergent every two
months.
The air must not be discharged into a flue that is used for exhausting fumes from
appliances burning gas or other fuels.
Regulations concerning the discharge of air have to be fulfilled.
This appliance is not intended for use by persons (including children) with physical,
sensory, mental limitations, lack of experience or knowledge, unless they have
supervision or instructions regarding use of the appliance by a person responsible for
its safety.
11

ELECTRICAL REQUERIMENTS
Observe all governing codes and ordinances.
It is the customer’s responsibility: To contact a qualified electrical installer. To assure
that the electrical installation is adequate and in conformance with local codes and
ordinances.
This unit must be grounded.
Do not ground to a gas pipe.
Check with a qualified electrician if you are not sure range hood is properly grounded.
Save Installation Instructions for electrical inspector’s use.
BEFORE INSTALLING YOUR RANGE HOOD
Please read the instructions carefully.
Unpack the hood and check that all functions are working. Ensure that the voltage (V)
and the frequency (Hz) indicated on the serial plate match the voltage and frequency
at the installation site.
Check that the area behind the installation surface to be drilled is clear of any electri-
cal cables or pipes, etc.
Please take care to protect the surfaces during installation.
Protect the cooktop surface below with cardboard, to prevent damage occurring
whilst the range hood is being installed above.
The manufacturer shall not be liable for failure to observe all safety regulations in
force for the correct and normal operation of electrical parts.
DESCRIPTION
1. Air duct assembly
2. Main body
3. Filter assembly
2

SELECT A VENTING MODE:
The air must not be discharged
into a flue that is used for
exhausting fumes from
appliances burning gas or other
fuels.
Regulations concerning the
discharge of air have to be
fulfilled.
VERTICAL DISCHARGE
Vertical is the most used.
If you select this venting direction. You only need
to open the ducting knockout A. Remove the
ducting knockout by inserting a Flat head
screwdriver under one end and prying it up. Then
snip or break the attachment points by tin snips.
You must make sure that the ducting knockout B is
not removed.
HORIZONTAL DISCHARGE
Assuming that the range hood is located against
an outside wall. Horizontal discharge is preferred
provided that there are no obstructions such as ,
wall joists, or where openings are difficult to make.
If you select this venting direction, you only need
to open the ducting knockout B.
3

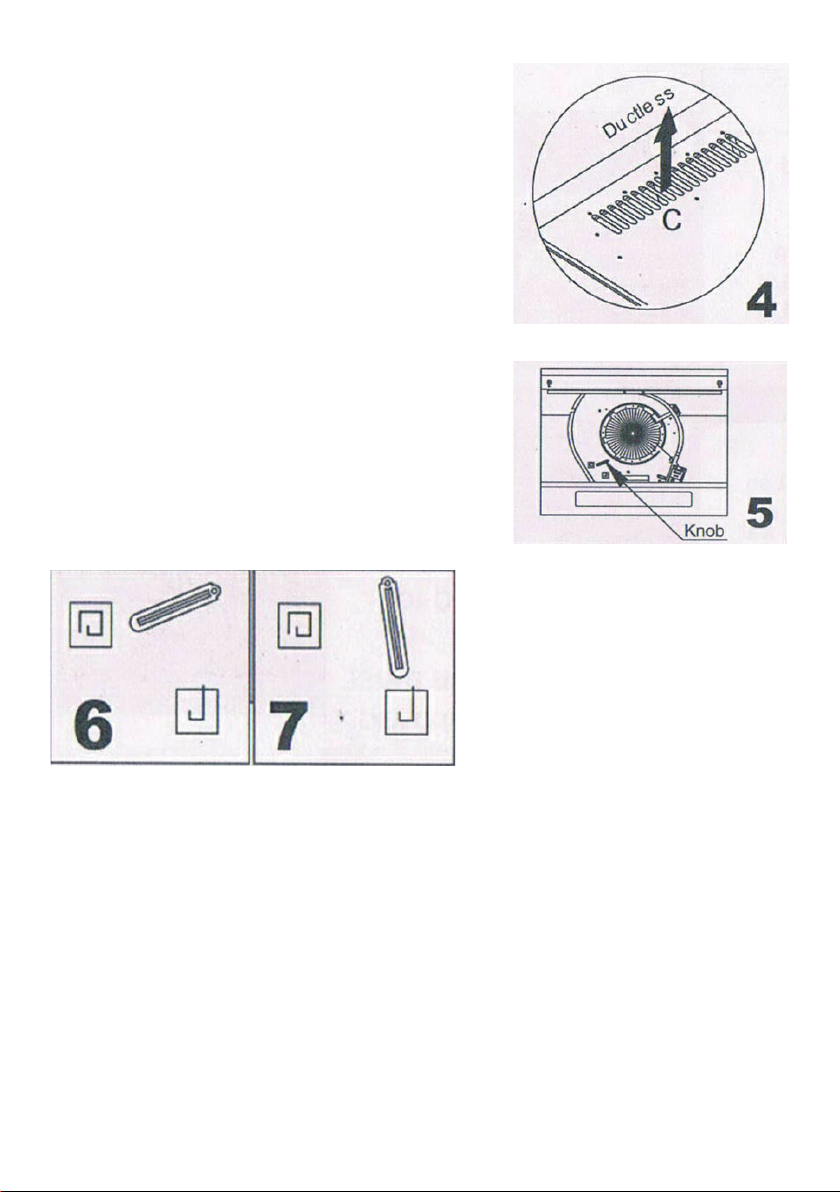
DUCTLESS (Recirculating)
In a ductless installation the air is re-circulated
back into the kitchen, if you do not anticipate
heavy cooking this method will be preferred. It will
not be necessary to remove any duct knockouts,
you only need chose knockout C. you should use
filters to help remove cooking odors. These filters
must be washed and replaced at regular intervals.
After selecting venting direction and completing
installation, you can turn the knob to achieve
ductless or duct Open the filter. Then you can see
the knob.
Extraction-air mode: Turn the venting knob to the
position of the picture 7 means venting outside.
Circulating-air mode: Turn the venting knob to the
position of the picture 6means recirculation.
• Sufficient air is needed for proper combustion and exhaustion of gases through the flue
(chimney) of fuel burning equipment to prevent back drafting. Ductless fans must always
be vented to the outdoors.
• When assessing the air pressure, the entire ventilation system in the house/apartment
must be taken into account, e.g. hob and/or gas cooker, this rule does not apply.
• If you choose extraction-air mode, choose VERTICAL or HORIZONTAL discharge for
venting air, and install check valve on the vent hole you choose.
4
INSTALLATION
In a ductless installation the air is re-circulated Ensure the power has been turned
off before beginning this installation. Plug must be assembled in places easy to
drag and insert.
To install this hood you will require two assistants. You will need following tools and
material to complete this installation.
You will need following tools and material to
complete this installation.
Tools you will need:
• Drill appropriate to your wall
• Phillips Screwdriver
• Tape Measure
• Hand Saw or Jig Saw
Installation work and electrical wiring must be
done by qualified person(s) in accordance with
all applicable codes and standards, including fire
rated construction.
Do not discharge the exhaust air into a flue from
other appliances burning gas or other fuels.
Regulations concerning the discharge of air
have to be fulfilled.
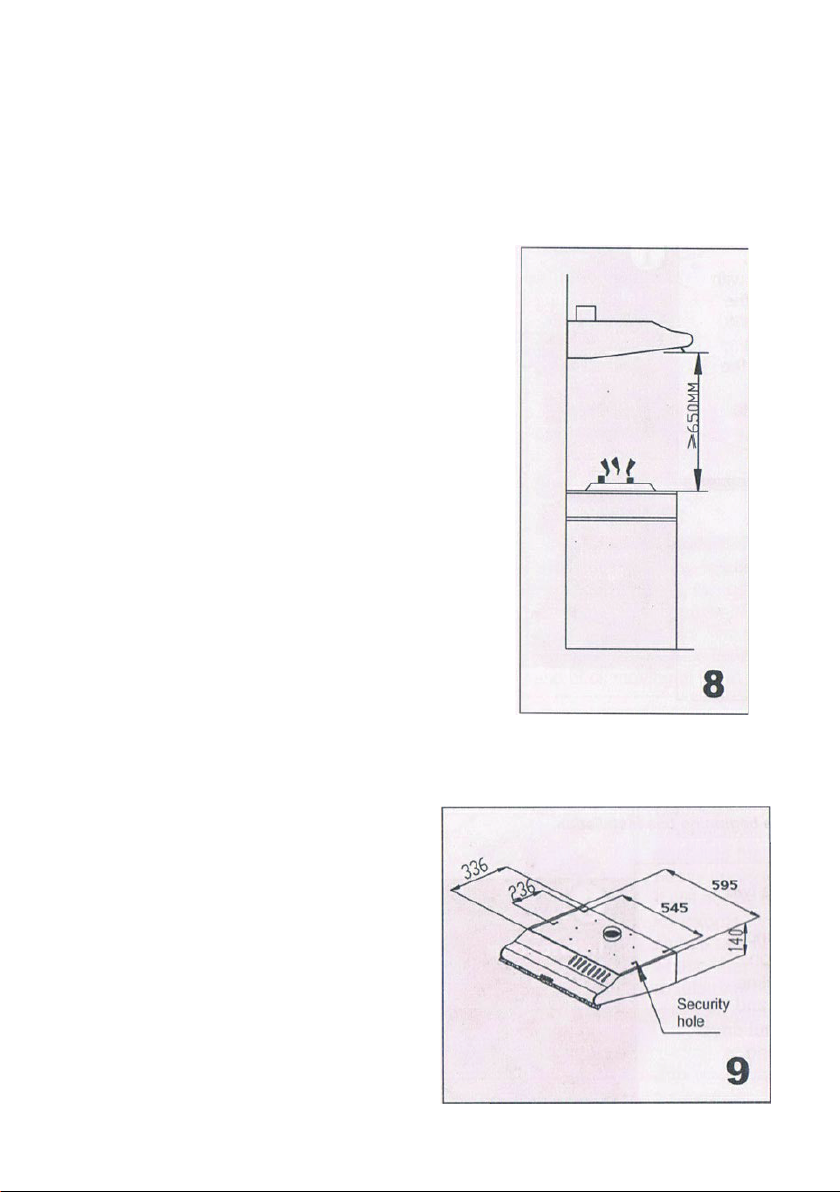
The cooker hood must be placed at a minimum
distance of 65cm above the cooking surface of a
hob and a maximum distance of 75cm.
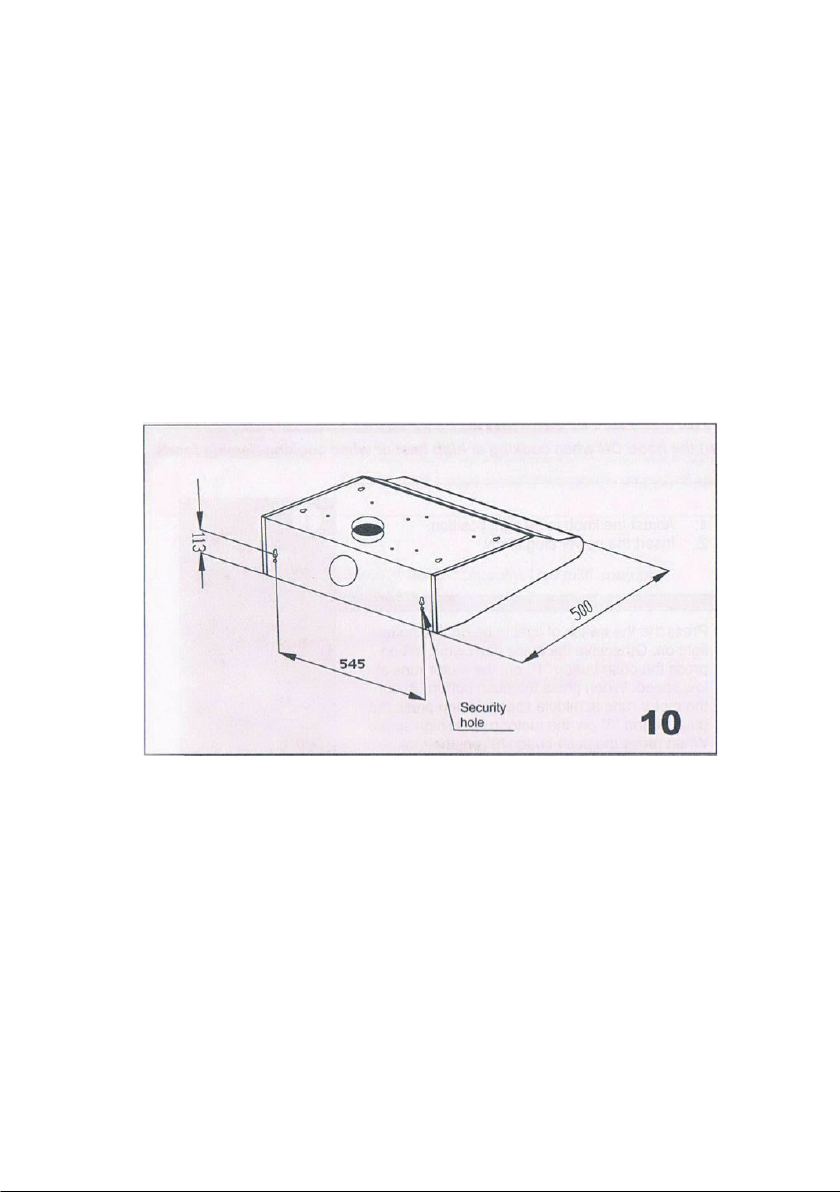
1. According to the figure 9 make sure
the position of hood in the cabinet. The
wood strips should be line up with the 4
keyholes slots on the top of the range
hood.
On the cabinet install 4 screws
(supplied) according to the relative
position of 4 key holes on the bottom of
the hood. The extent of screwing should
be convenience to the next installation.
2. Hand the hood and let it’s 4 key holes
aim at screws, the 4 screws should be in
the narrow parts of key holes. Screws
should be fasten
firmly. Make sure that the installation
between the hood and cabinet is enough
fasten.
5
3. Install screws in the security holes, in case of front and back moving of hood,
so that the using is safer.
Important: When cutting or drilling into wall or ceiling. Do not damage electrical
wiring or other hidden utilities.
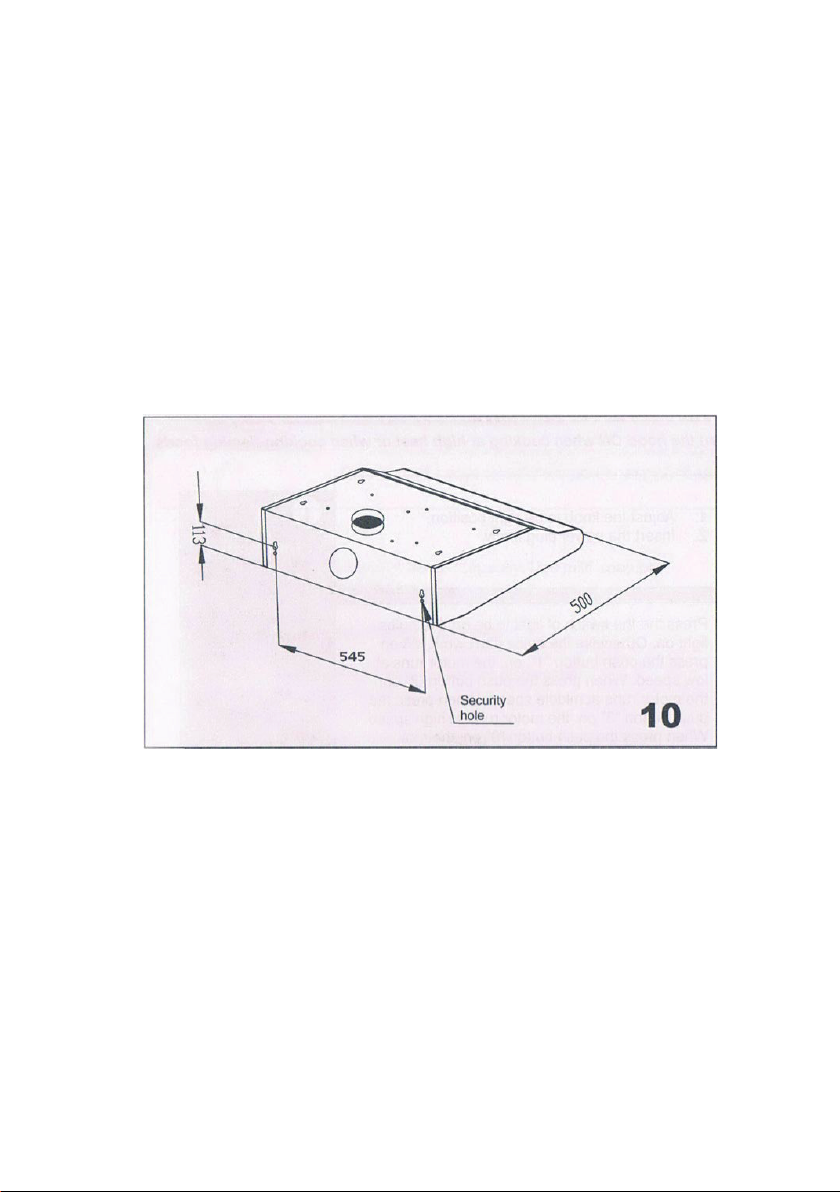
If the installation surface in cabinet don’t adapt to install the cooker hood.
Then as per FIG.10 ,fix the position of cooker hood on the wall . On the wall,
install 2 screws (supplied) according to the relative position of 2 key holes on the
back of hood. The extent of screwing should be convenience to the next
installation.
Also install screws in the security holes, in case of front and back moving of
hood, so that the using is safer.
IMPORTANT: The air must not be discharged into a flue that is used for
exhausting fumes from appliances burning gas or other fuels.
Clean ventilation fan frequently.
Grease should not be allowed to accumulate on fan or filter.
6

OPERATION:
1. Adjust the Knob to be right position.
2. Insert the power plug firmly.
Press the switch of light to be on, the bulbs
light on, Otherwise the bulbs don’t work.
When press the button “LOW” on, the motor
runs at low speed, When press the push
button “MED” on, the motor runs at middle
speed.
When press the push button “MAX” on, the
motor runs at high speed. When press the
push button “0” on, the motor stops running.
Replacing Bulb: Removing the bulb that
need to be replaced, then reinstall the new
bulb. The power of bulb must not be more
than 40W. Contact authorized service center
if necessary.
Please keep this instruction booklet in a safe place for future reference.
Please read this instruction manual careful: it contains important information
concerning the safe operation, installation and maintenance of the appliance.
7
CLEANING AND MAINTENANCE:
Disconnect range hood from power supply before cleaning or servicing.
Cleaning the surface of hood frequently. Use mild soap or detergent to clean the
hood.
Do not use harsh alkalis or abrasives.
Avoid the use of scouring powers or dishwasher compounds.
Grease filter may be washed using mild soap or detergent. (Heavy grease build-up
may not be cleaned easily and the filter may require replacement)
Charcoal filter cannot be cleaned and must be replaced regularly.
Cleaning water must not inter into motor, control switch etc. electrical parts.
It is recommendable to clean the metallic filter every three months by carrying out
the following instruction:
1. Remove the metallic filter from the cooker hood and wash it in a solution of
water and neutral liquid detergent, leaving to soak.
2. Rinse thoroughly with warm water and leave to dry.
3. The metallic filter may alter in color after several washes. This is not an issue.
There is a fire risk if cleaning is not carried out in accordance with the instructions.
The carbon filer cannot be washed or recycled. It should be replaced after
approximately 2-3 months of use.
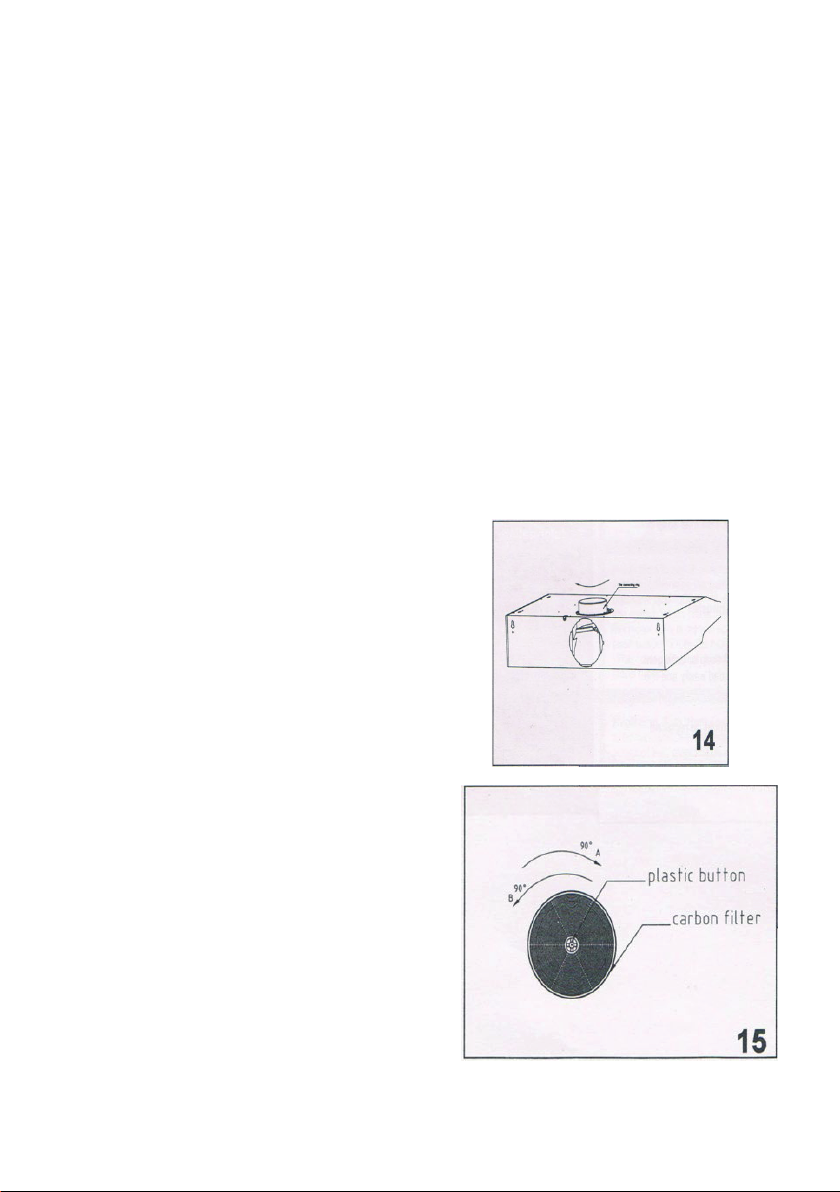
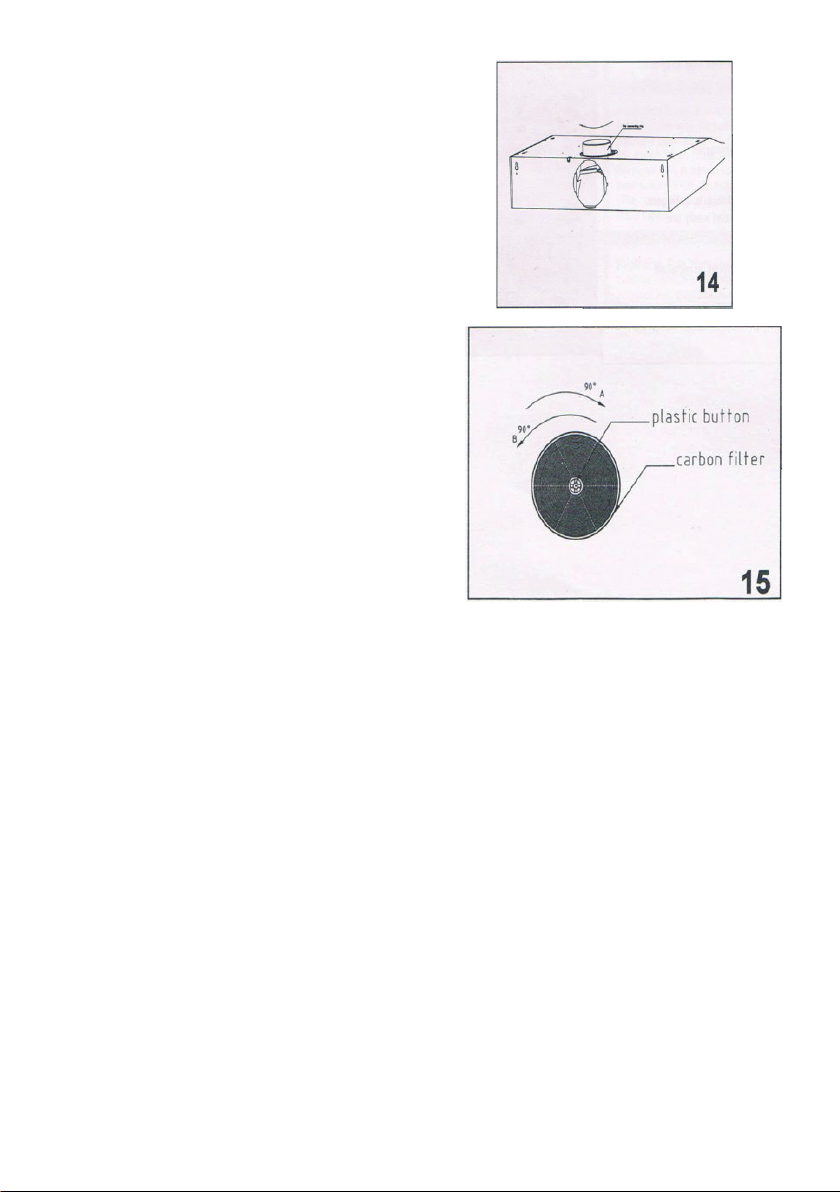
Install the connecting ring
The appliance has two exhaust holes:
One at the front.
One at the back
Chose a exhaust holes, then insert the
connecting ring in the exhaust hole, revolve
it some angles (about 10 ).
Install the carbon filter:
Push the carbon filter and then circumvolve
90 angle clock. (see Fig A)
Take-down the carbon filter.
8

ESPAÑOL
PRECAUCIONES DE SEGURIDAD
Lea todas las instrucciones antes de usar este aparato.
Conserve estas instrucciones para futuras consultas.
Sólo para uso residencial.
No intente instalar o hacer funcionar su aparato sin haber leído las precauciones de seguridad
indicadas en este manual.
El fabricante declina toda responsabilidad en caso de fallo de cumplimiento de las
instrucciones aquí facilitadas para la instalación, el mantenimiento y el uso adecuado del
producto. El fabricante declina además toda responsabilidad por daños ocasionados por
negligencia y la garantía de la unidad queda cancelada automáticamente como consecuencia
de un mantenimiento incorrecto.
Evite accidentes. Después de desembalar la campana extractora, mantenga el material de
embalaje fuera del alcance de los niños.
No permita que la campana extractora sea manipulada por niños aunque la misma se
encuentre desconectada.
Debe haber una adecuada ventilación en la habitación cuando la campana sea utilizada al
mismo tiempo junto a dispositivos quemadores de gas u otros
combustibles.
No revise el estado de los filtros mientras la campana esté funcionando.
No toque el foco dentro de los 30 minutos después de haber utilizado el dispositivo.
No encienda flamas debajo de la campana.
Evite abrir los gasómetros cuando no hay ollas en las hornillas.
Revise constantemente los alimentos que se están friendo para evitar que el aceite se
recaliente y origine incendios.
Si el cable de energía está dañado, éste deberá ser remplazado por el fabricante, su
agente de reparación u otra persona calificada de manera similar para evitar
accidentes.
El tomacorriente para la campana de cocina debe ser colocado de una manera que
sea de fácil acceso para el usuario después de instalarlo. Revise que el voltaje principal sea el
correcto.
Hay riesgos de incendio si es que la limpieza no es realizada de acuerdo con las
instrucciones.
La limpieza y reparación del dispositivo solo debe ser realizado por personal técnico calificado.
Cuando la campana requiera reparación o mantenimiento de sus partes, por favor
desconecte el enchufe.
Para proteger el gabinete de la corrosión debido a la acumulación de la tierra a largo plazo, la
campana deberá ser limpiada con agua caliente y detergente no corrosivo
cada 2 meses.
El aire no debe ser descargado en el escape que está siendo utilizado para el escape de
gases de otros dispositivos quemadores de gas u otros combustibles.
El reglamento con respecto a la descarga de aire debe ser completamente cumplido.
Este artefacto no está diseñado para uso de personas (incluyendo niños) con limitación física,
sensorial, mental, falta de experiencia o conocimiento, a menos que tengan supervisión o
instrucciones con respecto al uso del artefacto por una persona responsable de su seguridad.
9

DESCRIPCIÓN
1. Conducto de Aire
2. Cuerpo principal
3. Filtro
REQUISITOS ELÉCTRICOS
Cumpla todas las normativas y ordenanzas gubernamentales.
Es responsabilidad del cliente: Ponerse en contacto con un instalador eléctrico
calificado.
No ubique la toma a tierra en una tubería de gas. Si no está seguro de que la campa-
na está correctamente conectada a tierra, consulte a un electricista calificado.
Guarde las instrucciones de instalación para su uso.
ANTES DE INSTALAR LA UNIDAD
Por favor lea con cuidado las instrucciones.
Desembale la unidad y revise que todo funcione correctamente. Asegúrese de que el
voltaje (V) y la frecuencia (Hz) indicada en la placa serial coincida con el voltaje y la
frecuencia en el lugar de instalación.
Revise el área detrás de la superficie de instalación en donde se realizarán los
agujeros, revise que no haya cables eléctricos ni tuberías, etc.
Las superficies de vidrio y acero inoxidable de la unidad se dañan fácilmente durante
la instalación si chocan con las herramientas. Tenga cuidado y proteja las superficies
durante la instalación.
Proteja la superficie de la cocina con un cartón o algo parecido para evitar daños en
ella mientras se instala la campana.
La Empresa no se hará responsable por fallas en el cumplimiento de las normas de
seguridad vigentes para el correcto y normal funcionamiento de las partes eléctricas.
10

ESCOJA UN MODO DE
VENTILACIÓN:
El aire no debe descargarse en
un conducto de humos que se
utiliza para expulsar los humos
de los aparatos que queman gas
u otros combustibles.
Deben cumplirse las normas
relativas a la descarga de aire.
DESCARGA VERTICAL (extracción de aire
vertical)
La descarga vertical es la más utilizada.
Si selecciona esta dirección de ventilación, solo
necesita abrir el orificio del conducto A. Quite el
orificio del conducto insertando un destornillador
de cabeza plana debajo de un extremo y haciendo
palanca. Luego corte o rompa los puntos de
sujeción. Debe asegurarse de que no se retire el
orificio B del conducto.
DESCARGA HORIZONTAL (extracción de aire
horizontal)
Suponiendo que la campana extractora está
ubicada contra una pared exterior. Se prefiere la
descarga horizontal siempre que no haya
obstrucciones tales como vigas de pared o donde
las aberturas sean difíciles de hacer.
Si selecciona esta dirección de ventilación, solo
necesita abrir el orificio del conducto B.
Recirculación de aire
(sin ducto)
Extracción de aire
horizontal
Extracción de aire
vertical
11
SIN DUCTO (recirculación de aire)
En una instalación sin conductos, el aire vuelve a
circular hacia la cocina; si no hay una cocción
intensa, se preferirá este método. No será
necesario quitar los orificios ciegos de los
conductos, solo debe elegir el orificio C. Debe usar
filtros para ayudar a eliminar los olores de la
cocina. Estos filtros deben lavarse y reemplazarse
a intervalos regulares.
Después de seleccionar la dirección de ventilación
y completar la instalación, puede girar la perilla
para lograr abrir el filtro en los modos con
conducto o sin conducto.
Modo de extracción de aire: Girar la perilla hasta
la posición de la figura 7 significa ventilar hacia el
exterior.
Modo de circulación de aire: Girar la perilla hasta
la posición de la figura 6 significa recirculación de
aire.
Se necesita suficiente aire para la correcta combustión y extracción de gases a través del
escape (chimenea) del equipo quemador de combustible para evitar accidentes. Los
ventiladores siempre deben ser ventilados hacia la parte externa.
Las normas gubernamentales deben ser observadas para el transporte de la campana. Si
la campana extractora es utilizada en el modo de circulación de aire con el filtro de
carbón activado, no hay restricciones de funcionamiento.
Si usted escoge el modo extracción de aire, escoja el modo HORIZONTAL o VERTICAL
para la ventilación con aire e instale la válvula de retención en el agujero de ventilación
que escogió.
12

INSTALACIÓN
Asegúrese de desconectar la energía antes de comenzar con la instalación. El
enchufe debe ser colocado en un lugar de fácil acceso de donde pueda ser retirado
y conectado fácilmente.
Para instalar esta campana, usted necesitará de 2 personas para que lo ayuden.
Usted necesitará las siguientes herramientas y materiales para completar esta
instalación.
Herramientas que usted necesitará:
• Taladro adecuado para su pared
• Destornillador estrella
• Cinta métrica
• Sierra manual o sierra caladora
El trabajo de instalación o cableado eléctrico
debe ser realizado por personas calificadas de
acuerdo con los códigos y estándares aplicables
que, incluida la construcción resistente al fuego.
No descargue la extracción del aire en la tubería
de escape de otros dispositivos quemadores de
gas u otros combustibles. Las normas de
descarga de aire deben ser cumplidas.
La campana de cocina debe ser colocada en
una distancia mínima de 65cm sobre la
superficie de cocción y 75cm como máximo.
1. De acuerdo con la figura 9, asegúrese
de la posición de la campana en el
gabinete. Las vigas de madera deben
estar alineadas con las 4 ranuras de
cerradura en la parte superior de la
campana extractora.
En el gabinete, instale 4 tornillos
(incluidos) de acuerdo con la posición
relativa de los 4 orificios en la parte
inferior de la campana.
2. Coloque la campana y deje que los 4
orificios apunten a los tornillos, los 4
tornillos deben estar en las partes
estrechas de los orificios. Los tornillos
deben estar apretados firmemente.
Asegúrese de que la instalación entre la
campana y el armario sea suficiente.
Agujero de seguridad
13
3. Instale tornillos en los orificios de seguridad, en caso de movimiento frontal y
posterior de la campana, para que el uso sea más seguro.
Importante: al cortar o taladrar en la pared o el techo no dañe el cableado
eléctrico y otros servicios ocultos.
Si la superficie de instalación en el gabinete no se adapta para instalar la
campana extractora, entonces, según la figura10, fije la posición de la campana
extractora en la pared. En la pared, instale 2 tornillos (incluidos) de acuerdo con
la posición relativa de 2 orificios en la parte posterior de la campana. La
extensión del atornillado debe ser conveniente para la próxima instalación.
También instale tornillos en los orificios de seguridad, en caso de movimiento
frontal y posterior de la campana, para que el uso sea más seguro.
IMPORTANTE:El aire no debe ser descargado en un escape que sea utilizado
para extraer el humo de otros dispositivos quemadores de gas u otros
combustibles.
Limpie el ventilador con frecuencia.
No permita la acumulación de grasa en el ventilador o filtro.
Agujero de seguridad
14

OPERACIÓN:
1. Ajuste la perilla a la posición correcta.
2. Inserte el enchufe de alimentación
firmemente.
Presione el interruptor de la luz para
encender, las bombillas se encienden. De lo
contrario, las bombillas no funcionan.
Cuando se presiona el botón "LOW", el motor
funciona a baja velocidad. Cuando se
presiona el botón "MED", el motor funciona a
velocidad media.
Cuando se presiona el botón "MAX", el motor
funciona a alta velocidad. Al presionar el
pulsador “0”, el motor deja de funcionar.
Reemplazo de la bombilla: Retire la
bombilla que necesita ser reemplazada,
luego instale la bombilla nueva. La potencia
de la bombilla no debe ser superior a 40 W.
Comuníquese con el centro de servicio
autorizado si es necesario.
Conserve el manual de instrucciones en un lugar seguro para futuras consultas.
Lea este manual de instrucciones con cuidado: Este contiene información
importante con respecto al funcionamiento de seguridad, instalación y
reparación del dispositivo.
15

LIMPIEZA Y MANTENIMIENTO
Desconecte la campana del suministro de energía de la campana antes de limpiar
o reparar la unidad.
Limpie la campana con frecuencia. Utilice un detergente o jabón suave para
limpiar la campana.
No utilice limpiadores alcalinos ni abrasivos.
Evite el uso de polvos abrasivos o componentes para lavavajillas.
El filtro de grasa debe ser lavado usando detergente o jabón suave. (Cuando el
filtro acumula mucha grasa, este no podrá limpiarse fácilmente y es posible que
necesite ser remplazado).
El filtro de carbón debe ser limpiado y remplazado de forma regular.
El agua de limpieza no debe ingresar en el motor, interruptor de control, partes
eléctricas, etc.
Se recomienda limpiar el filtro metálico cada 3 meses siguiendo las siguientes
instrucciones:
1. Retire el filtro metálico de la campana y lávelo con una solución de agua con
detergente líquido neutro y déjelo remojarse.
2. Enjuague bien con agua caliente y déjelo secarse.
3. El filtro metálico puede cambiar de color después de varias lavadas.
Existe el riesgo de incendio si es que la limpieza no es efectuada de acuerdo a las
instrucciones
El filtro de carbón no puede ser lavado o reciclado. Este debe ser remplazado de
acuerdo a su uso.
16
Instale el anillo de conexión
El aparato tiene dos orificios de escape:
Uno al frente.
Uno en la parte de atrás
Elija un orificio de escape, luego inserte el
anillo de conexión en el orificio de escape,
gírelo algunos ángulos (aproximadamente
10).
Instale el filtro de carbón:
Empuje el filtro de carbón y luego gire en
un ángulo de 90 en el sentido de las agujas
del reloj. (vea la figura A)
Quite el filtro de carbón.
Botón plastico
Filtro de carbón
17


This manual suits for next models
1
Table of contents
Languages:
Popular Ventilation Hood manuals by other brands

Atag
Atag WS6111MR Instructions for use

Siemens
Siemens LB53NAA30 instruction manual

Whirlpool
Whirlpool GXW7330DXS Installation Instructions and Use & Care Guide

Manrose
Manrose Roof Cowl Kits manual

Electrolux
Electrolux DD9691-M Installation and operating instructions
 operating instructions")
Vent-Axia
Vent-Axia MV250H(RF) operating instructions

Falcon
Falcon FALHDCP90SC instruction manual

Electrolux
Electrolux EFC 980 user manual

Teka
Teka Classic C-601 instruction manual

Miele
Miele DA 7000 D Operating and installation instructions

Spring Air Systems
Spring Air Systems Dynaflow Installation and maintenance manual

Residentia
Residentia Airvolution Esatto EUM52 user manual


