Spring Air Systems Dynaflow Manual

Dynaflow
Hood
Installation and Maintenance
Manual
___________________________
Spring Air Systems Inc., Oakville, Ontario
Phone (905) 338-2999, Fax (905) 338-0179, info@springairsystems.com
2010 Revision 1.0

Dynaflow Installation and Maintenance
Manual
Table of Contents
Introduction 1
Spring Air Systems Hood Model Number Designations 2
Dynaflow MB Hood Principle of Operation 2
Three Fresh Air Boundary Regions 3
Standard Dynaflow MB hood specification 3
Dynaflow MJ Hood Principle of Operation 4
Standard Dynaflow MJ hood specification 5
Dynaflow Installation 5
Arrangement “D” Exhaust Fire Damper Assemblies 7
Link/Cable Assemblies for various exhaust duct collar sizes. 7
Adjusting the Fire Damper Blade Position 9
Grease Filter for Dynaflow Hoods 10
MJ Blower assembly for all MJ hoods 13
Dynaflow Maintenance Schedule 14
Trouble Shooting and Cleaning 15
Measuring Exhaust Air flow with VE, HE, EC and Sa Filters 16
Measure Exhaust Air Flow with CA Filters 20
Measuring Dynaflow MB Supply 22
A. Measuring the Appliance Region 22
B. Adjusting the MB Blade to change velocity at the appliance region. 23
C. Adjusting the air velocity to the Chef Region. 23
C. Measuring the Supply Discharge velocity from the MB Blade. 23
Measuring Dynaflow MJ Plenum Air 25
A. Measuring the Appliance Region 25
B. Adjusting the MJ Blower to change the appliance region velocity 26
C. Adjusting the air velocity to the Chef Region 26
1
Dynaflow Hood Installation and Maintenance Manual
INTRODUCTION
Thank you for selecting a SPRING AIR SYSTEMS INC. Dynaflow commercial kitchen exhaust hood. The Dynaflow
hood is an innovative idea in commercial kitchen ventilator design that provides for the total kitchen comfort, particulate
capture and energy efficiency.
People comfort. The fresh air introduced through the make up air plenum utilizes the Comfort Tuning Blade to provide
a comforting breeze for the people working under the kitchen hood.
Balanced air flow design: The kitchen hood exhaust air and fresh air introduced into the kitchen space are always
balanced, reducing drafts, hot and cold spots and improving particulate capture.
Low exhaust volumes: The exhaust volume is minimized with dynaflow technology to maximize your energy
savings.
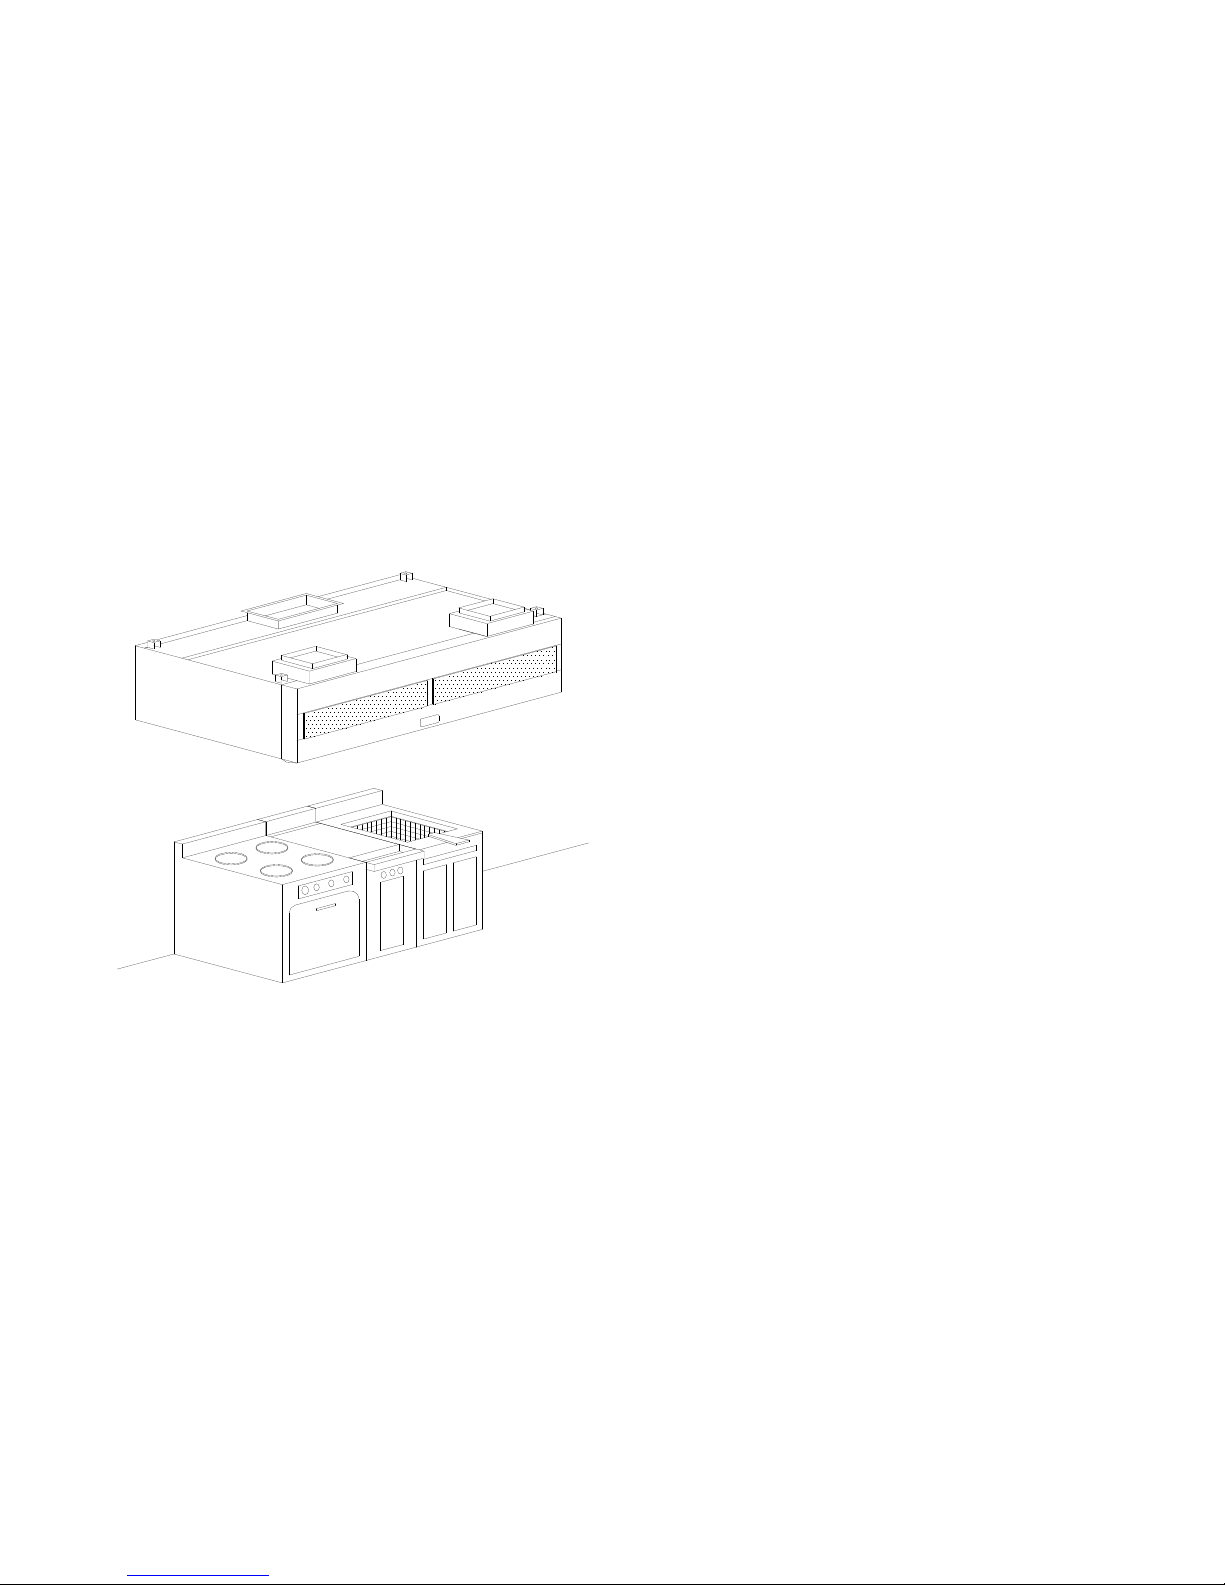
The Spring Air Systems Inc. Dynaflow hood was
selected to best meet the design requirements of
your commercial kitchen application.
The Dynaflow hood is a NFPA-96 Type 1 listed for
use with all temperature ranges on single row; wall
mounted, island double row cooking or island
single row cooking equipment lineups, The hood is
ceiling hung with a maximum mounting height of
87” (2209 mm) from the lower front edge of the
canopy to the floor and (52” (1320mm) from the
surface of the cooking equipment to the lower edge
of the grease extractor). The box canopy can be
tapered to 11” (279 mm) at the front. The hood is
finished with a number 4 finish on exposed sides.
The Dynaflow hood is available with fluorescent,
incandescent, recessed incandescent or LED lights
wired to a J-box.
The Dynaflow hood is equipped with UL/ULC listed
grease filters or cartridges. Five extraction types are
available with Dynaflow.
•VE - standard grease extraction efficiency Stainless steel baffles.
•CA - Medium grease extraction efficiency cartridges with adjustable flow baffles.
•HE - High grease extraction Efficiency Cascade baffles for Enviro applications and reducing grease discharge
from buildings.
•EC - Easy Clean Teflon – standard grease extraction efficiency baffles for hot, heavy grease laden appliances.
•SA - Spark Arrestor – standard grease extraction efficiency, for solid fuel appliances.
MAXIMUM 87"
MOUNTING HEIGH
T
Typical Dynaflow FN-B-MB Hood
Figure 1
2
Model Number Designation
Sample Model Number
F N B MB (VE)
F= Filter Hood
N= Exhaust duct collar with no fire damper, listed under
D= Exhaust duct collar with fusible link fire damper
B = box canopy
DS= double box canopy single row appliance
DB= double box canopy double row appliance
MB= Dynaflow type hood with Tri-Zone control System
MJ= Dynaflow type hood with Perimeter Defense control System
VE= standard grease extraction efficiency Stainless steel baffles.
CA= Medium grease extraction efficiency cartridges with adjustable flow baffles.
HE= High grease extraction Efficiency Cascade baffles for Enviro applications and reducing grease
discharge from buildings.
EC= Easy Clean Teflon – standard grease extraction efficiency baffles for hot, heavy grease laden
appliances.
SA= Spark Arrestor – standard grease extraction efficiency, for solid fuel appliances.
Dynaflow MB hood
APPLIANCE
6.00
12
3
8.00
23.00
MAXIMUM
87"
5.50
WIDTH TO CLEAR 27"
MINIMUM DOOR
3.00 54.00
5.25
2.00
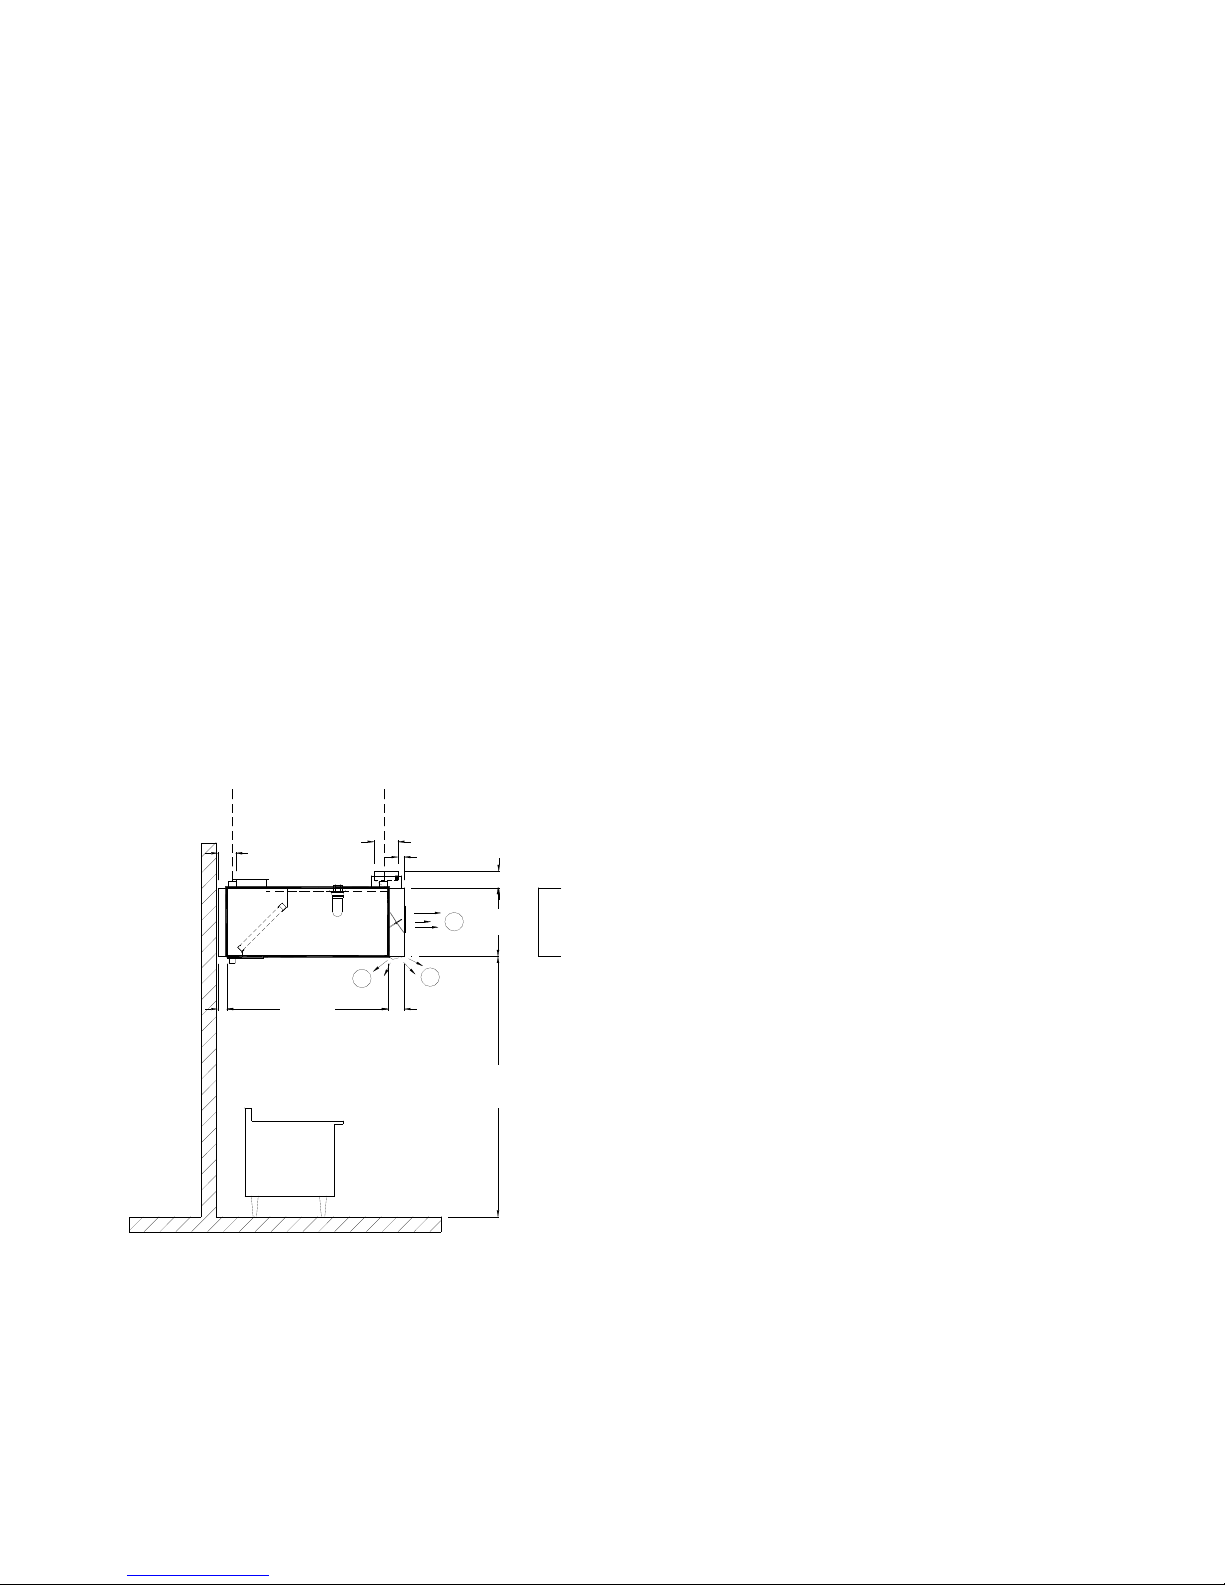
Principle of Operation
The Dynaflow design provides the lowest minimum exhaust. The Dynaflow hood exhaust volume is based on the
appliances below the hood. It’s a simple adjustment to fine-tune your ventilator to provide excellent smoke capture with
maximum grease extraction.
Dynaflow FN-B-MB Hood Section
View with standard VE filters.
Figure 2
3
Heated and/or cooled fresh air ducting is connected to the supply duct collar(s) on the top, front of the hood. The fresh air
enters the fire damper in each supply duct connection and then discharges into the Dynaflow plenum. Within the plenum
the fresh air is routed to three (3) regions within the boundaries of the appliances.
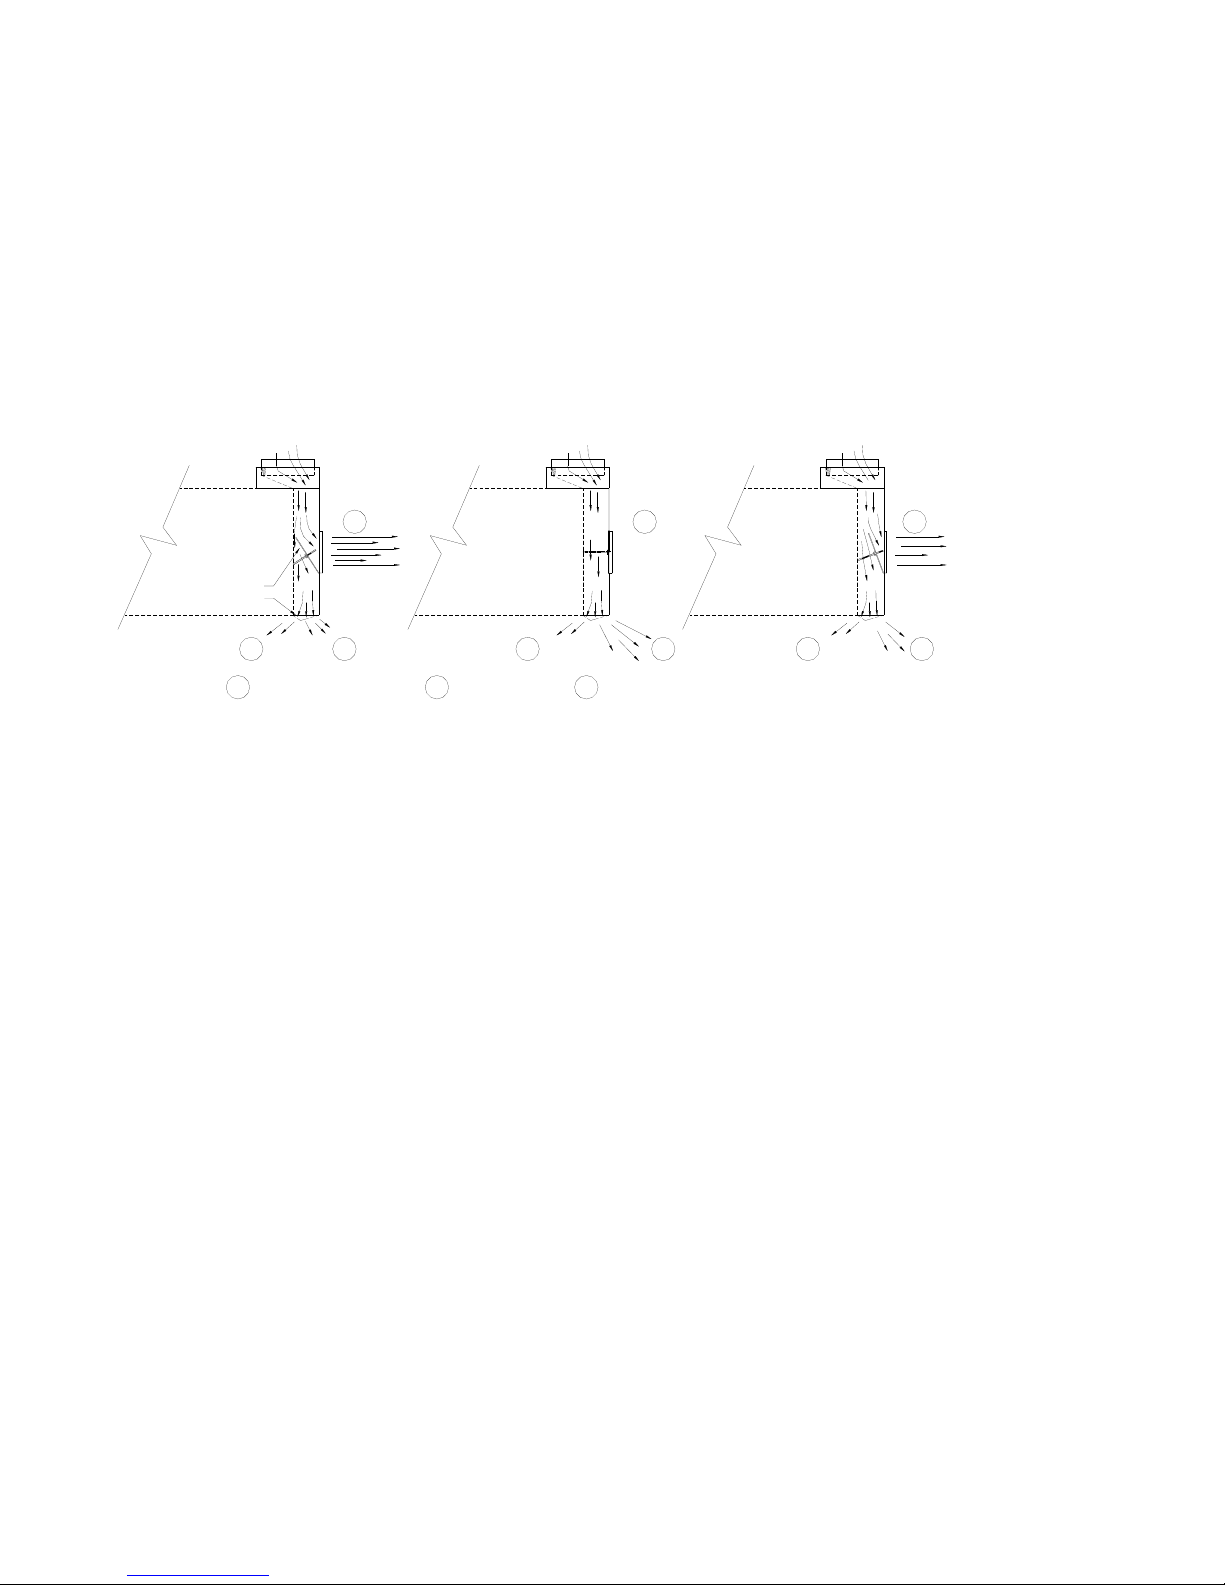
Three Fresh Air Boundary Regions
1. Appliance Region: Fresh air discharges down through a full length S/S perforated panel, creating an air curtain
around the perimeter of the hood within the boundary of the kitchen appliances for excellent smoke capture with
maximum grease extraction and to reduce each appliance net exhaust requirement.
2. Chef Region: Fresh air discharges down through a full length S/S perforated panel towards the chef for a more
comfortable work environment in front of the hood.
3. Kitchen Ambient Region: The horizontal fresh air discharges through a s/s perforated panel out the front of the hood
into the kitchen to provide the exact amount of air to balance the kitchen and ensure optimum capture
BLADE FULL CLOSED
HOOD CANOPY
END VIEW
BLADE FULL OPEN
HOOD CANOPY
END VIEW
BLADE HALF OPEN
HOOD CANOPY
END VIEW
3
12 21
3
21
3
1 Appliance Region Chef Region2 Kitchen Ambient Region3
Internal Blade (IB)
Comfort Tuning Blade(CTB)
The internal blade (IB) is adjusted to direct fresh air between the Kitchen Ambient (3) Region, the Appliance (1) Region,
and Chef (2) Region. The Comfort Tuning Blade (CTB) is adjusted to direct fresh air between the Appliance (1) Region
and the Chef (2) Region. The complete kitchen ventilation system is always balanced. The IB and CTB are adjustable
every 24” (610mm) along the length of the Dynaflow hood to match the appliances underneath. Dynaflow operates with
the lowest minimum exhaust. After your kitchen is complete, appliances can be Relocated, Added, or Removed from
under the hood while maintaining maximum capture and chef comfort within the commercial kitchen.
Standard Dynaflow MB hood Specification
The unit casing shall be a minimum 18 GA. stainless steel, with No. 4 finish on all exposed surfaces. The hood shall include UL/ULC
listed grease filters mounted in an integral stainless steel rack inclined at 45 degrees. The filter rack shall include a full length stainless
steel grease gutter and grease cup.
The optional exhaust fire damper shall be an arrangement "D", butterfly type, constructed of stainless steel with blade and edge seals.
The fire damper shall be activated by a fusible link and dead weight arrangement.
The Dynaflow plenum provides all the fresh air required for the commercial kitchen. The fresh air is routed to three (3) regions within
the boundaries of the appliances. Each region includes an aerodynamically designed s/s perforated discharge panel.
The first (1) region discharges through a full length s/s panel located at the bottom of the Dynaflow plenum. Fresh air is directed through
the Comfort Tuning Blade (CTB) towards the appliances providing maximum exhaust air reduction. The second (2) Region discharges
through a full length s/s angular panel located at the bottom front of the Dynaflow plenum. The fresh air is directed towards the chef to
provide a more comfortable work environment in front of the hood. The third (3) region provides horizontal discharge of fresh air
through a s/s perforated panel out the front of the hood into the kitchen. The third region provides the exact amount of fresh air to
balance the kitchen and ensure optimum capture.
The s/s front discharge shall include multiple s/s perforated panels for the full length of the hood. A manually operated Internal Blade
(IB) damper shall be located behind each front s/s discharge panel. The CTB and IB dampers are field adjustable through the lower s/s
discharge panel. The hood shall have ______ incandescent/fluorescent/recessed/incandescent/LED lights evenly spaced along the length
of the hood. Optional Sideflow right and/or left MJ blower assemblies are available.
Fresh Air Regions
F
i
g
ure 3
4
Dynaflow MJ hood
Principle of Operation
The MJ Perimeter Defense design exhaust volume is based on the appliances under the hood. It’s a simple calculation to
determine your best exhaust volume for any commercial kitchen lineup. The MJ Perimeter Defense hood can be fine-tuned
to provide excellent smoke capture with maximum grease extraction. A MJ tangential blower is mounted on top of the
plenum. Return air from the ceiling is drawn into the blower inlet through removable washable aluminum mesh filters.
The tangential MJ blower discharges air through a fusible link fire damper into the MJ plenum. The air is then discharged
from the bottom through a two way adjustable perforated grill. The air is then proportioned between the appliances and the
chef aria by adjusting the comfort tuning dial. This is not fresh air from outside the building. Fresh supply air must still be
introduced somewhere else in the commercial kitchen.
INTERNAL APPLIANCE DISCHARGE
HOOD CANOPY
END VIEW
MESH FILTERS
RHEOSTAT
SIDEFLOW DISCHARGE
HOOD CANOPY
FRONT RIGHT VIEW
S/S PERFORATED
DISCHARGE
FRONTFLOW
MJ PLENUM
FIRE DAMPER
MJ BLOWER MESH FILTERS
RHEOSTAT
S/S PERFORATED
DISCHARGE
SIDEFLOW
MJ PLENUM
FIRE DAMPER
MJ BLOWER
Introducing supply air back into the kitchen is good engineering practice. An adequate supply of fresh air eliminates cold
drafts, and hot spots, enhances the capture capability of the hood and results in a more comfortable kitchen environment. A
supply air volume of at least 80% of the total exhaust is recommended. The fresh air should be tempered to between 55 and
75F (13 to 24C). Direct the fresh air to separate diffusers surrounding the hood located in the finished ceiling. The diffusers
must be located to eliminate short circuiting the exhaust and drafting. Consult with factory for recommended kitchen
diffuser locations. If the hood is required to supply the fresh air directly refer to the Spring Air MB DYNAFLOW
specification sheet
APPLIANCE
6.63
5.25
2.25
4.63
6.00 10.00
3.00
47.00
5.25
3.00
87.00
23.00
4.63
Dynaflow FN-B-MJ Hood Section View with standard VE filters.
F
i
g
ure 5
MJ Perimeter Defense Operation
F
i
g
ure 4
5
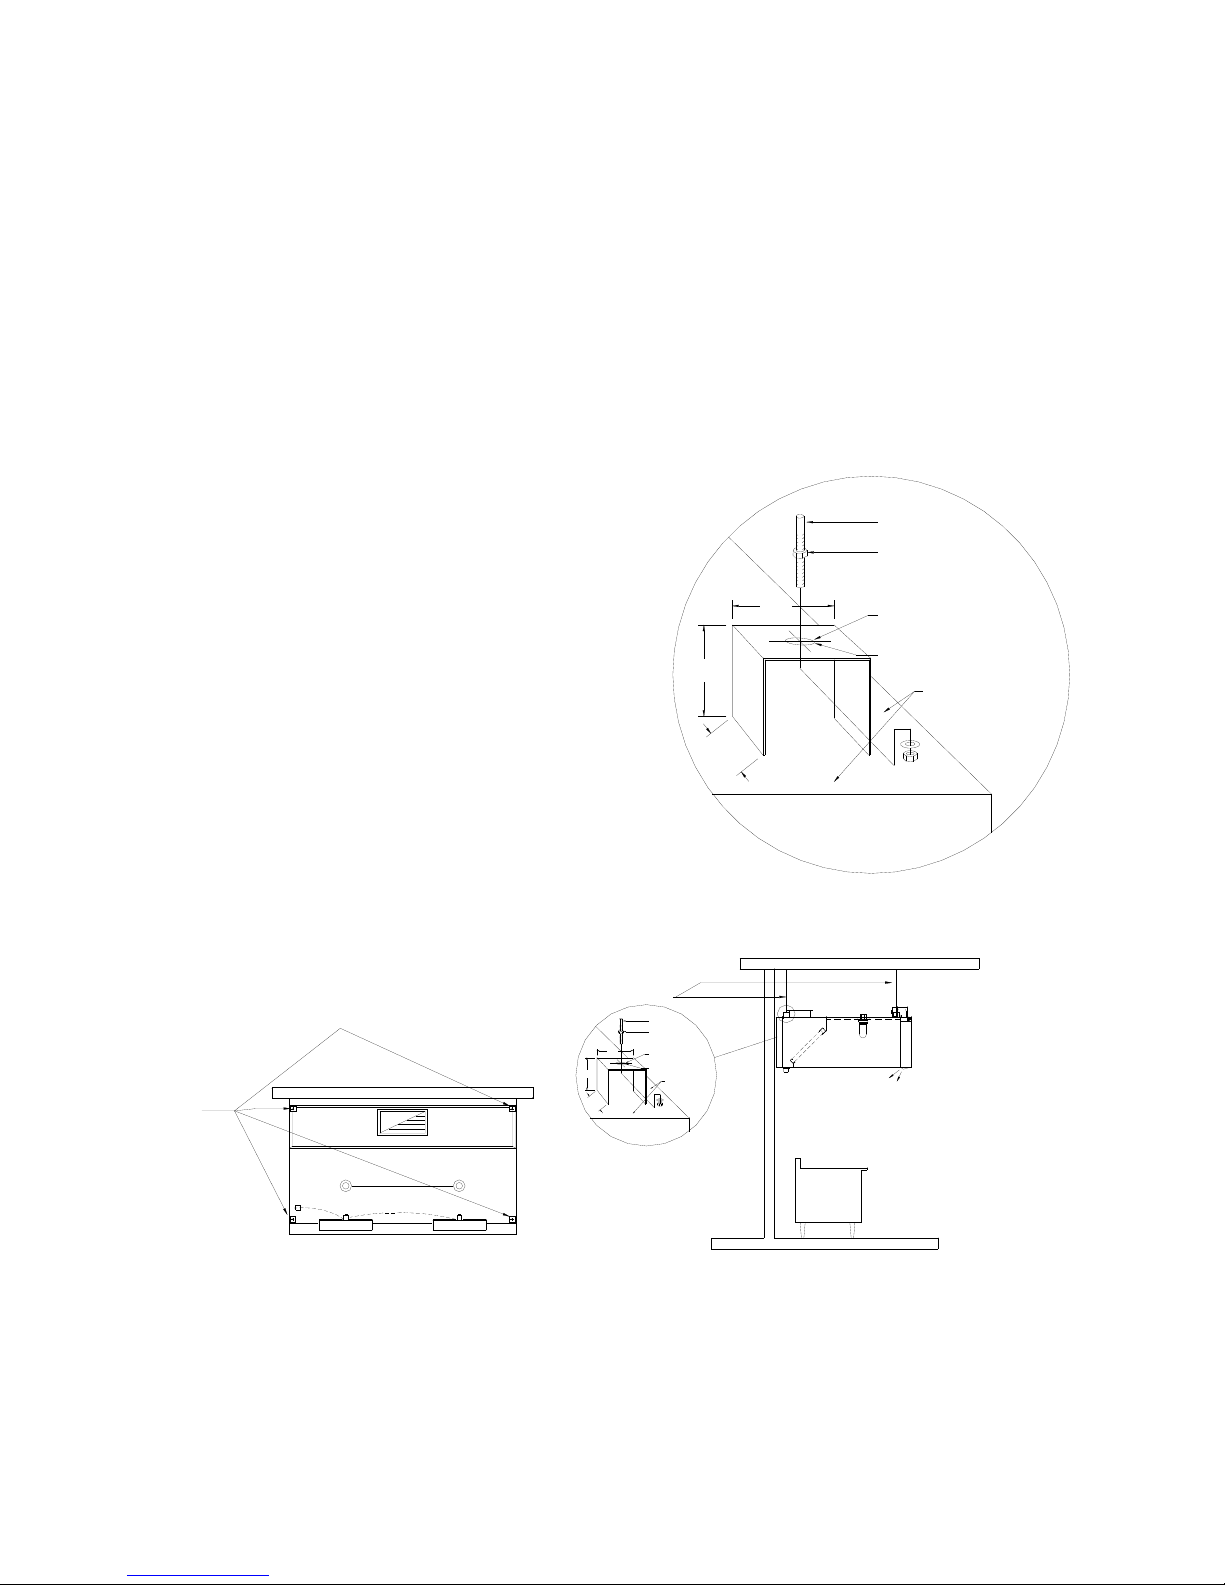
2.5"
(FROM FRONT OF HOOD)
TYPICAL HANGER ROD
BRACKET ISOMETRIC
HOOD
2.25"
TOP OF
2.5
HANGER BRACKET
OFFSET 1/2" FROM
EDGE OF HOOD
Ø 17/32"
PRE DRILLED HOLE,
ACCEPTS UP TO
1/2" Ø ROD
HANGER ROD
HANGER ROD NUT
Standard
Dynaflow MJ hood Specification
The unit casing shall be a minimum 18 GA. stainless steel, with No. 4 finish on all exposed surfaces. The hood shall include UL/ULC
listed grease filters mounted in an integral stainless steel rack inclined at 45 degrees. The filter rack shall include a full length stainless
steel grease gutter and grease cup.
The MJ blowers provides ceiling return air to the MJ plenum which discharges out the bottom of the plenum through a s/s perforated
plate along the length of the MJ plenum. The return air is directed through the MJ plenum towards the appliances. MJ blower(s) mounted
on top of the plenum shall be complete with adjustable Triacs, washable filters and wired to a common J-box on top of the hood. A
fusible link fire damper is located below each MJ blower.
The hood shall have ______ incandescent/fluorescent/recessed/incandescent/LED lights evenly spaced along the length of the hood.
Optional Sideflow right and/or left MJ blower assemblies are available.
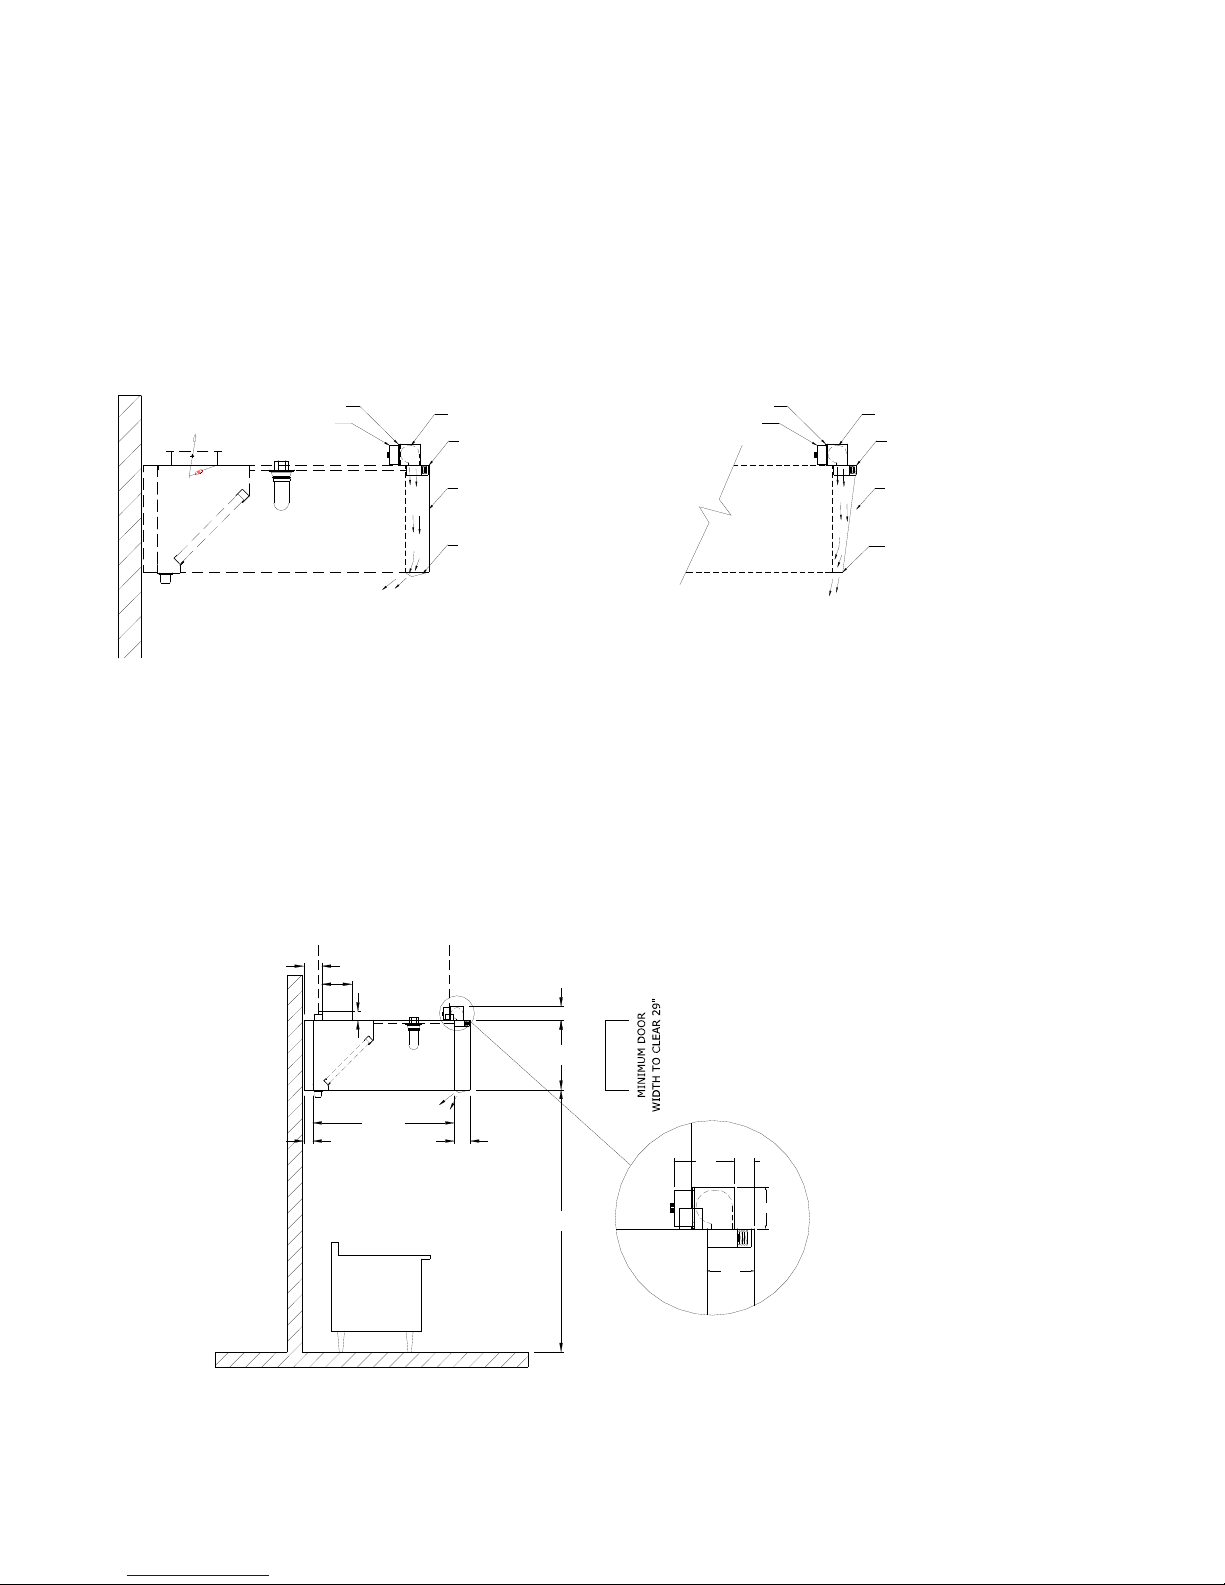
Dynaflow Installation
The Dynaflow hoods are hung from 4 or more hanging brackets
(depending on the model) mounted on top of the hoods as
indicated on the engineering drawings. The engineering
drawings indicate number and location of the hanger bracket.
All hanger brackets shown on the Spring Air Systems
drawings must be used to support the hood. Spring Air
Systems assumes no responsibility for the field installation
of the any hood.
A typical schematic is shown to the right with recommend
method on installing the hanger rods to the hanger brackets.
The size of the hanger rods, washers and nuts must be
determined by a structural engineer based on hood weight and
site conditions. All hood weight is shown on the Spring Air
Systems section view drawing. The hanger rods must be size to
safely hold the weight of the hood from the structure above.
The structure above must be designed to hold the weight of the
hood. Structural engineers will be required to determine what is
acceptable. The hanger bracket diagram indicates how the rod
is attached to the hood. All hanger rods must be installed
perpendicular to the roof of the hood.
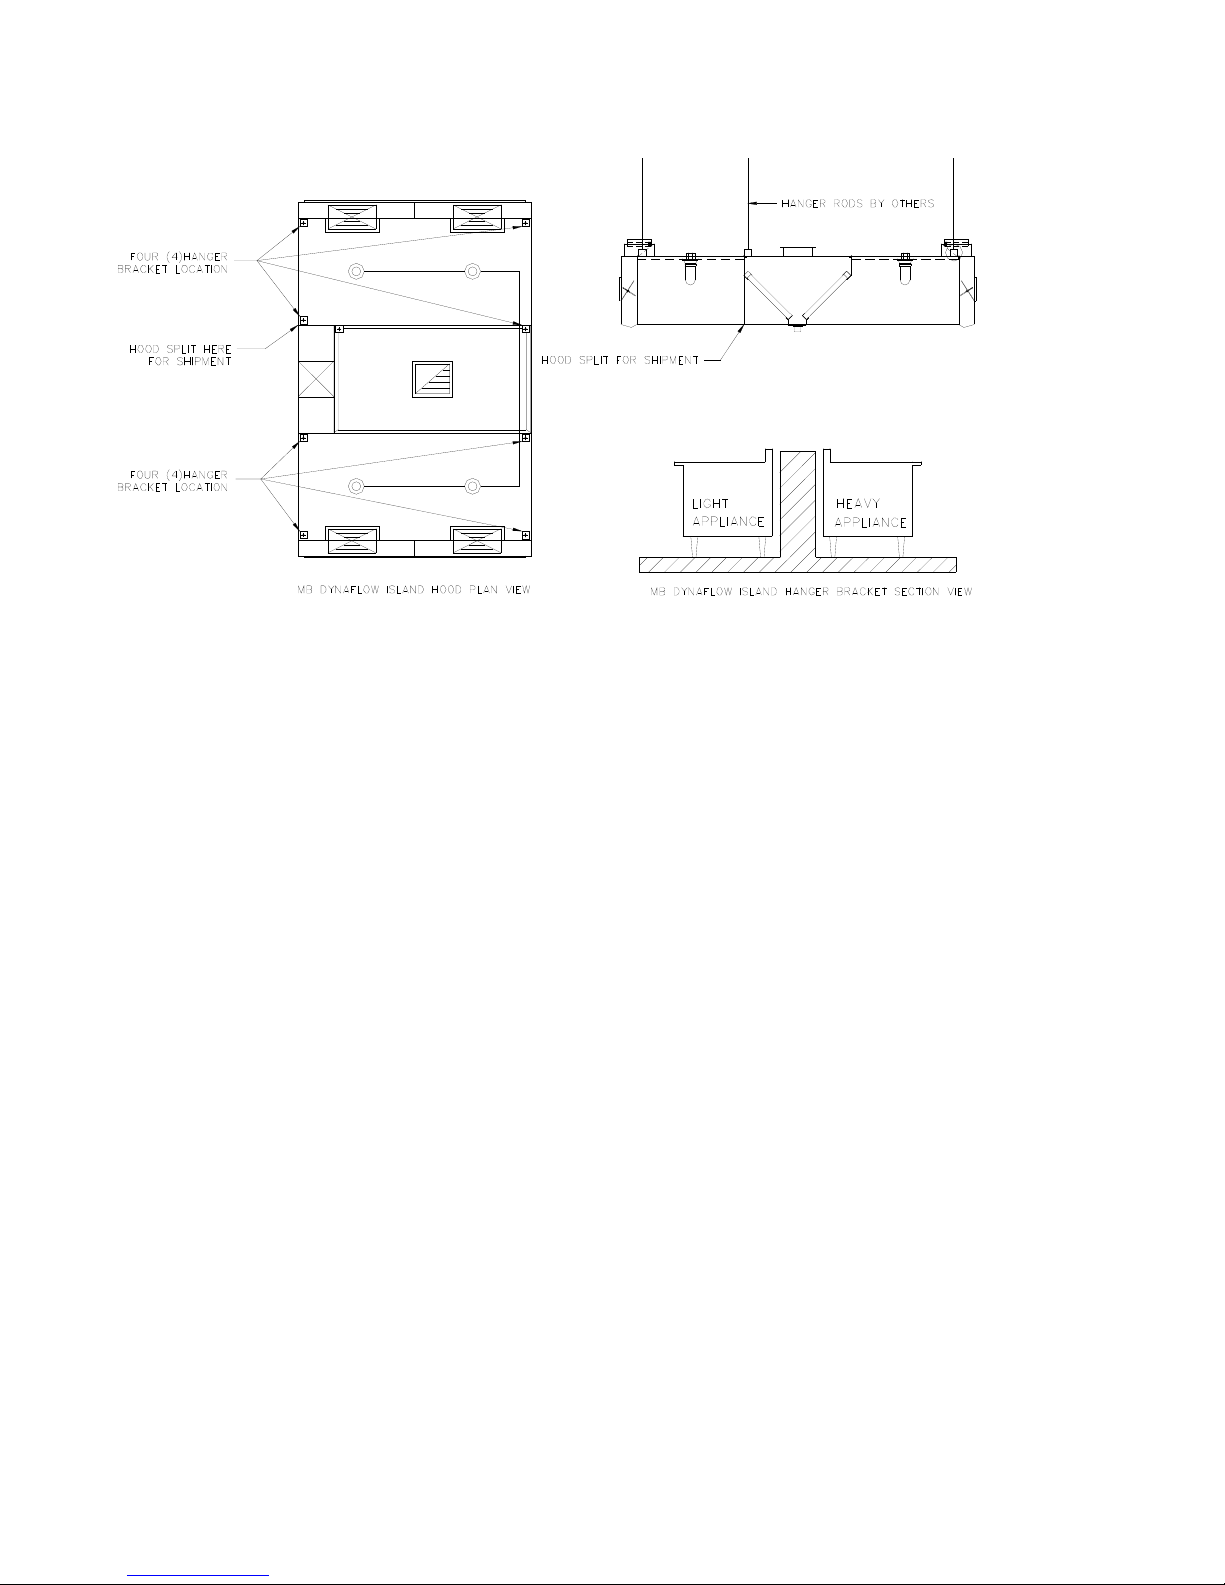
MJ BLOWERMJ BLOWER
FOUR (4)HANGER
BRACKET LOCATION
MJ DYNAFLOW PLAN VIEW
APPLIANCE
2.5"
(FROM FRONT OF HOOD)
TYPICAL HANGER ROD
BRACKET ISOMETRIC
HOOD
2.25"
TOP OF
2.5
HANGER BRACKET
OFFSET 1/2" FROM
EDGE OF HOOD
Ø17/32"
PRE DRILLED HOLE,
ACCEPTS UP TO
1/2" Ø ROD
HANGER ROD
HANGER ROD NUT
HANGER ROD BY INSTALLER
MJ DYNAFLOW HANGER BRACKET SECTION VIEW
Wall mounted Dynaflow model FN-B-MJ Hood in Plan and Section View showing hanger rod locations.
F
i
g
ure
7
Hanger Rod Schematic
F
i
g
ure 6
6
Your Dynaflow hood must be installed in accordance with the building permit issued for the commercial kitchen. The
hood may be mounted against a wall or in an island configuration.
The Dynaflow hood must be installed in accordance with the current edition of the NFPA-96, all local building codes, all
state or provincial building codes, all national building codes, and the authority having jurisdiction.
A commercial kitchen exhaust fan must be installed on the roof or wall mounted and connected to the hood by liquid tight
all welded duct in accordance to the current edition of the NFPA-96. A dedicated fresh air unit may also be installed
depending on the local code requirements for your area. Place the hood on the ground in the position it will hang below
the hanger rods. The hood must rest on wood 2”x 4” or some other soft material to prevent damages to the bottom edges.
When lifting the hood, support from the underside at the four corners. Otherwise the hood ends or sides may buckle. Lift
the hood straight up. Do not remove the lifting device until the hood is secure. After the hood is securely hung the exhaust
and supply ductwork can be connected.
Welding the Exhaust Duct to the Hood Exhaust Duct Collar
A “FD” Dynaflow hood is supplied with an Exhaust duct collar fire damper in the hood exhaust duct collar. The fire
damper must be closed before welding the hood duct collar to the exhaust duct. We recommend the exhaust duct be
continuously welded to the exhaust duct collar of the hood per the current edition of the NFPA-96. The fire damper is
closed by removing the link/cable assembly from the hook on the inside of the hood exhaust duct collar. Check to ensure
the damper moves freely open and closed within the exhaust duct collar after installation of the exhaust duct. Once the
welding is complete the link/cable assembly must be connected to the hook to open the fire damper. See the next section
for details on the cable/link assembly.
Supply ductwork, electrical wiring and plumbing must be installed in accordance with all applicable municipal, state,
provincial and national codes.
Typical Island Dynaflow model FN-DB-MB in Plan and Section View showing hanger rod locations.
F
i
g
ure 8

7
ARRANGEMENT “D” FIRE DAMPER ASSEMBLIES:
Provide on all FD Dynaflow Hoods.
(FN Hoods do not have a fire damper in the exhaust
duct collar)
Description:
The section view of the exhaust fire damper to the right
shows a cross section of the exhaust duct collar, fire
damper blade, fusible link, adjustable cable block, spring,
and stainless steel cable when the damper is in the set
position.
In the event of a fire in the exhaust duct collar, the fusible
link melts, releasing the fire damper, which closes tight
on the damper blade stops and seals. The second drawing
shows the damper as the fusible link has been removed.
The damper will rotate clockwise against the damper bar
weight and close.
The complete assembly is part of the UL/ULC listed
Spring Air Systems “Commercial Kitchen Exhaust Hood
with Fire Damper”.
Link/Cable Assemblies for various Exhaust Duct Collar Sizes.
Dampers up to 18” long:
COLLAR PERIMETER
EXHAUST DUCT
SHAFT
FIRE DAMPER
FIRE DAMPER
BLADE
UP TO 18"
PIN
WIDTH
SECTION VIEW OF ASSEMBLE FUSIBLE LINK
STOPS
DAMPER BLADE
SPRING
CABLE BLOCK
FUSIBLE LINK
PIN
DUCT FLANGE
DAMPER BLADE STOPS
DAMPER BLADE
SECTION VIEW OF DISASSEMBLE FUSIBLE LINK
Exhaust Fire Damper up to 18” long
Figure 10
Link/Cable Assembly
F
i
g
ure 9
8
Dampers up over 18” up to 32” long
COLLAR PERIMETER
FIRE DAMPER
BLADE
SHAFT
FIRE DAMPER
PIN
EXHAUST DUCT
PIN
OVER 18" UP TO 32"
WIDTH
UNDERSIDE OF TOP OF HOOD
SPRING
Dampers up over 32” long
SPRING WELDED TO DUCT COLLAR
PIN WELDED TO FIRE DAMPER BLADE
S/S FUSIBLE LINK CABLE
FUSIBLE LINK
CABLE BLOCK
LEGEND
SPRINGSPRING
UNDERSIDE OF TOP OF HOOD
FIRE DAMPER
SHAFT
EXHAUST DUCT
COLLAR PERIMETER
PIN
FIRE DAMPER
BLADE
PIN PIN
DAMPERS OVER 32"
WIDTH
Exhaust Fire Damper up to 18” to 32” long
Figure 11
Exhaust Fire Damper over 32” long
Figure 12

9
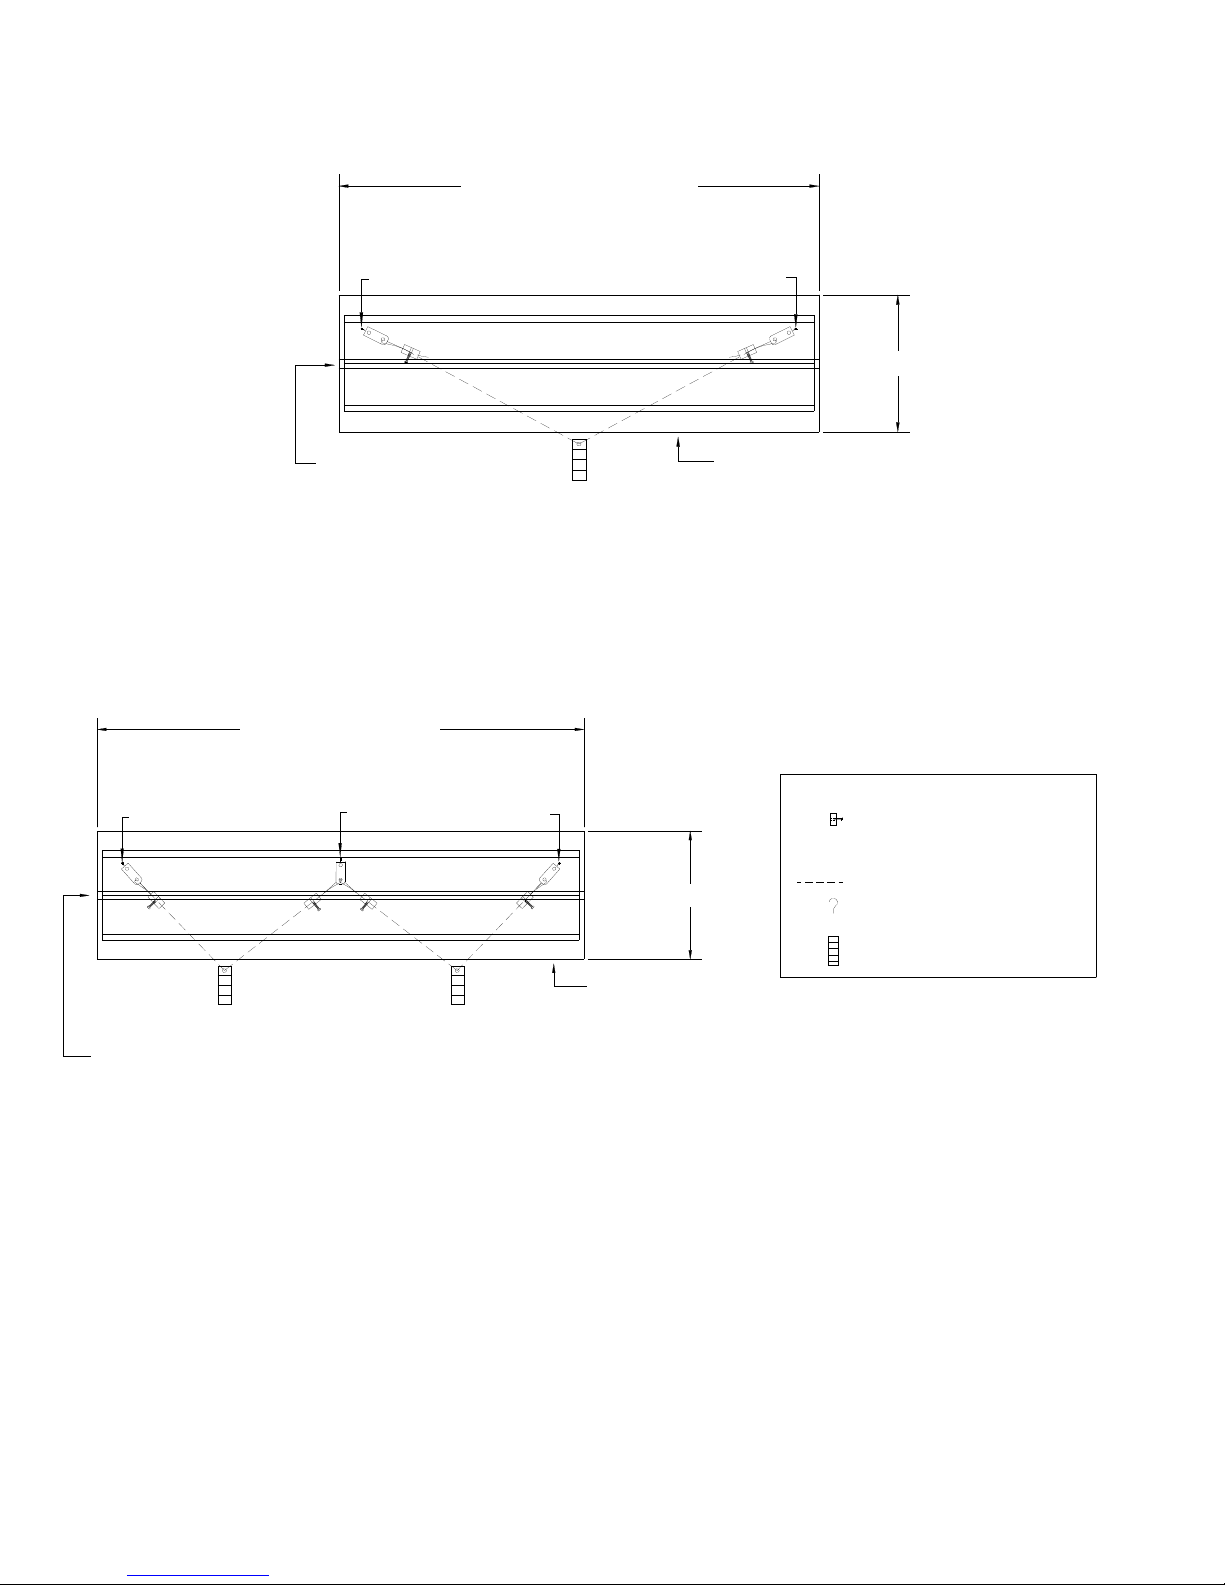
ADJUSTING THE DAMPER BLADE POSITION:
The fire damper fusible links, springs and cable blocks are all accessible through the front on the hood. For filter hoods
remove the baffle filters under the opening of the duct collar(s) of the hood. For dry extractors and cartridge remove the
inserts under the opening of the duct collar(s) of the hood.
A single, double, and triple fusible link assembly is shown above. The blade
position is adjusted by removing the fusible link/cable and block assembly
from the damper pin. The fire damper will close and the complete assembly
will hang loose from the spring. Loosen the set-screw on the adjustable
block and pull the stainless steel cable through the block to open the damper
or release cable from the stainless steel block to close the fire damper.
Once the correct position is reached, re-tighten the set screw on the
adjustable block and re-ached the fusible links on the damper pins.
The single fusible link damper has one block to adjust. The
double fusible link damper has two blocks to just and the
three fusible link dampers have up to four blocks to adjust.
Two fusible link Damper
Figure 13
Single Fusible link Damper
Figure 14

10
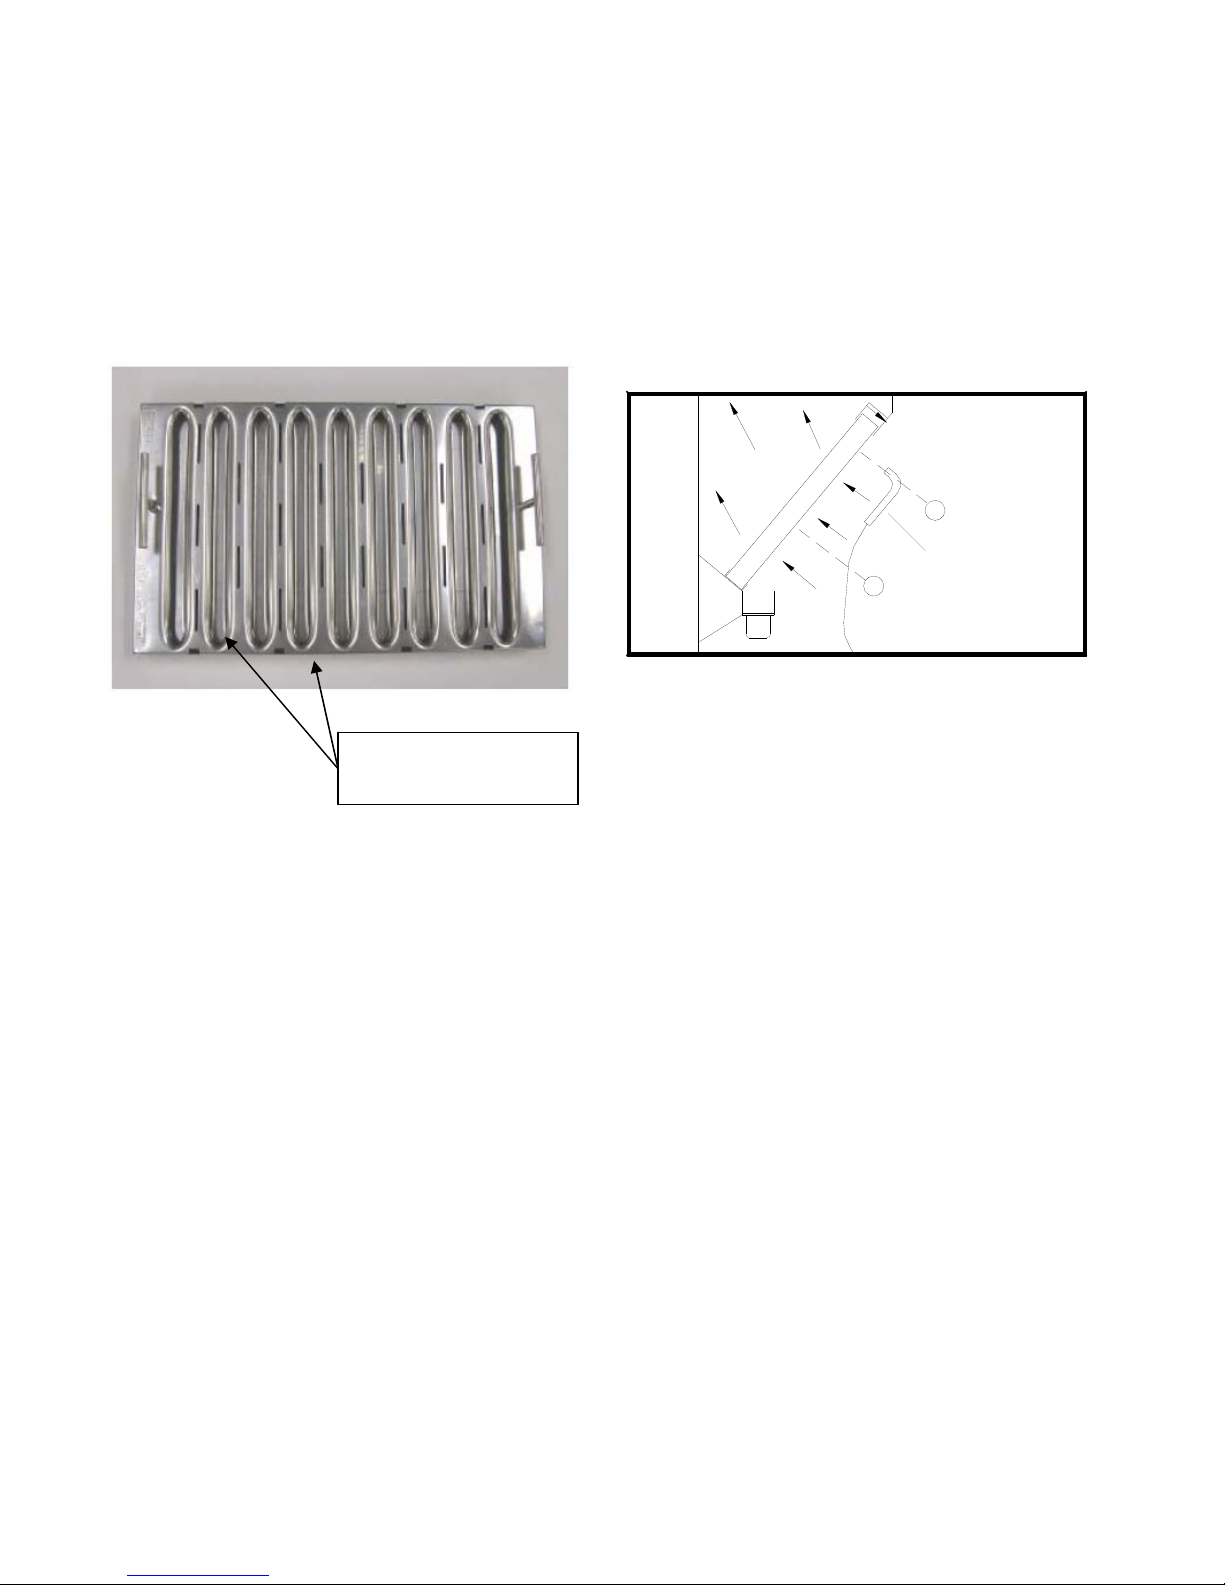
Grease Filters for Dynaflow Hoods
VE- Stainless Steel Baffle Filters
The exhaust air accelerates through two 90
degree turns within the baffle filters. The
liquefied grease then drains down the vertical
length of the baffles to the grease trough and
into a grease cup.
Each grease baffle contains weeping holes to
allow the liquid grease to drain into the grease
trough.
Always ensure that the grease filters are
installed with the weeping holes down
toward the grease trough.
Put the Baffle Filter in a dishwasher or in a pot sink in a detergent and water mixture to soak or spray the inner surfaces
with hot water and detergent to clean.
CA- Stainless Steel Cartridge Filters
The Cartridge Filter provides high efficiency grease extraction at an
economical price. Unlike standard baffle filter grease extraction is carried out
inside the Cartridge Filter not on any visible surface. The Cartridge Filter is
always aesthetic pleasing because the smooth stainless steel surface does not
collect oil or grease. The Cartridge Filter can be removed for easy cleaning.
Each cartridge is also adjustable for various exhaust volume.
Easy Cleaning
Remove the Cartridge Filter Module from the hood rack and take note of the
location of each module if the settings vary across the hood. Remove the
Cartridge Filter Baffle from the Module by taking out two wing nuts; located
in module air inlet.
Put the Cartridge Baffle along with the Module up side down in a dishwasher
or just spray the inner surfaces with hot water and detergent.
Re-install the Cartridge Baffle in the Module with its proper initial air setting
number and tighten the two wing nuts from the air inlet of the Module.
EXHAUST AIR OUT OF BAFFLE FILTER
EXHAUST AIR INTO BAFFLE FILTER
FILTER BAFFLES
FILTER FRAME
Cross Section of Baffle Filter
Figure 15
CA Cartridge
Figure 16

11
HE- High Grease Extraction Efficiency Cascade Filtration
Cascade high efficiency hood filtration captures more grease
than standard filters, reduce grease damage, the hassle and
expense of duct cleaning, cost much less than other high
performance filters, and have lower static pressure.
Cascade is 270% more efficient (at 8 microns capture) then
standard filters and removes 33% more grease than standard
filters. This will result in less grease build up in the ducts and
exhaust fan.
The Cascade is environmentally friendly reducing air pollution
and odors. It reduces duct cleaning cut down on caustic
cleaning chemicals.
Environmentally Friendly
Easy Cleaning
Remove the Cascade Module from the hood rack. Rotate the Locking
Handles opposite the hinge on the Cascade to open the filter. Open
the hinged Cascade and put it in the dishwasher or just spray the inner
surfaces with hot water and detergent.
After cleaning just close the Cascade, lock the handles together and
put them back in the hood filter rack.
EC- Easy Clean Teflon Filters for Heavy Grease
Applications.
Grease laden air is drawn into the filter by the exhaust fan.
As the air starts through the aerodynamic “V” baffle system,
it undergoes a series of compressions, expansions and
pressure changes. the heavy grease is deposited safely and
quickly on the baffles while the grease-free air passes
through the filter and up the exhaust duct. The baffle’s
smooth surface enables the collected grease to run off into
collection troughs without dripping on food utensils or burner
surfaces. the ChG.
Because Flame Gard® removes grease aerosols from the air stream and drain them away instead of retaining them. there is
no build-up of grease in the path of the air Flame Gard® therefore, insures a constancy of air never before achievable with
mesh-type filters.
HE Cascade
Figure 17
Cascade shown in the Open Position
Figure 18
EC – Easy Clean Teflon
Figure 19

12
Flame Gard’s high rate of grease extraction is aided by our TEFLON® coated baffle. In the same manner that grease rolls
off a TEFLON coated pan, it rolls down our baffles, out of the filter and into the hood’s remote collection cup. Because
FlameGard’s filters retain only insignificant amounts of surface grease and do not load, you will have constancy of air flow
throughout your operating day.
The FlameGard’s filters can be easily cleaned in a pot sink or dishwasher with simple detergent and hot water.
SA- Spark Arrestor Filters for Solid Fuel Appliance.
CLASSIFIED BAFFLE GREASE FILTER MEETS
NFPA 96 REQUIREMENT FOR COOKING WITH
SOLID FUEL
SPARK ARRESTOR FRAME
The 3/8” X 1/2” SPARK ARRESTOR FRAME MEETS
NFPA 211REQUIREMENT FOR SOLID FUEL
BURNING APPLIANCES.
The filters are all steel construction, non-loading Teflon
coated. If airborne sparks and embers can be generated
by the solid fuel cooking operation, spark arrestor devices
shall be used prior to the grease removal device to
minimize the entrance of these sparks and embers into the
grease removal device and into the hood and duct system.
NFPA 211 CHAPTER 1.11.2 (B) STATES:
(b) The arrestor screen shall have heat and corrosion
resistance equivalent to 19 gauge (0.011 in.) galvanized steel or 24 gauge (0.024 in.) stainless steel.
(c) Opening shall not permit the passage of spheres having a diameter larger than 1/2 in. (12.7mm) nor block the passage of
spheres having a diameter of less than 3/8 in. (9.5mm).
94% EFFICIENT AT GREASE EXTRACTION!
FlameGard’s high rate of grease extraction is aided by our TEFLON® coated baffle. In the same manner that grease rolls
off a TEFLON coated pan, it rolls down our baffles, out of the filter and into the hood’s remote collection cup. Because
FlameGard’s filters retain only insignificant amounts of surface grease and do not load, you will have constancy of air flow
throughout your operating day. In addition,
The Spark Arrestor FlameGard’s filters must be washed daily to ensure proper operation of your hood filter assembly.
They can be easily cleaned in a pot sink or dishwasher with simple detergent and hot water.
SA- Spark Arrestor Filter
Figure 20

13
MJ- Blower Assembly on Dynaflow MJ
hoods.
Every Dynaflow with MJ Perimeter Defense
control has one or more MJ Blower assemblies
mounted on the top of the MJ plenum. The MJ
blower assembly consists of a double shafted
120V/1/60 AC motor with one tangential blower
attached to each shaft. The motor/blower sub
assembly is inside a protective housing to
discharge the air down into the top of the MJ
plenum. The MJ blower assembly has two (2)
removable washable pre-filters, and a J-box with
rheostat mounted on the switch MTG plate. The
return air from above the hood enters the washable
filters, travels through the tangential blowers and
discharges into the MJ plenum through a fusible
line fire damper. Each MJ Blower assembly is
bolted to four (4) studs on the top of the hood.
The fire damper is accessed by removing the 4
bolts and lifting the MJ blower off the hood to
reveal the fusible link fire damper.
The rheostat is used to adjust the air discharge from the MJ Grille. See the
air measurement section of the manual for more detail.
The filters should be removed and wash every two years in a pot sink or
dishwasher
Exploded View of MJ Blower assembly
Figure 21
Complete MJ Blower assembly
Figure 22

14
DYNAFLOW MAINTENANCE SCHEDULE
DAILY:
1. At the end of the cooking day wipe off the interior and exterior of the Dynaflow hood canopy and the underside of the
grease trough with a damp cloth. Inspect the grease filters and clean if necessary.
2. Clean SA Spark Arrestor filter daily.
3. Inspect and clean HE High Efficiency filters daily as required.
WEEKLY:
1. Remove all the grease filters and wash in a mild detergent and water mixture.
GREASE TROUGH
WIPE UNDERSIDE OF AFTER DAILY COOKING
WIPE INTERIOR OF CANOPY
Cleaning the Hood Exterior
Figure 23
Wipe off the interior of the filter hood plenum behind the grease filters and the interior and exterior of the grease trough.
Remove the grease cup and clean if necessary.
SIX MONTHS
1. Check the exhaust fan belts for alignment, tightness, and wear. Adjust and/or replace.
2. If the hood has an exhaust duct collar fire damper (Models “FD”) inspect the exhaust fusible link fire damper. Clean
and/or replace the fusible link if necessary.
ONE YEAR
1. Check the exhaust fan belts for alignment, tightness, and wear. Adjust and/or replace.
2. If the hood has an exhaust duct collar fire damper (Models “FD”) inspect the exhaust fusible link fire damper. Clean
and/or replace the fusible link if necessary.
3. MB Dynaflow hoods replaced the supply duct collar fusible link.
4. MJ Dynaflow hoods replace the MJ plenum fusible link under the MJ Blower assembly.
5. MJ Dynaflow hoods measure the MJ Grill discharge and adjust MJ Blower assembly rheostat to set correct appliance
velocity at the discharge.

15
CLEANING THE EXTERIOR
Normal soil can be removed with a mild detergent and water mixture applied to a cloth.
To remove baked on grease, apply a cleanser to a damp cloth or sponge and rub on the metal in the direction of the
polishing lines. DO NOT RUB IN A CIRCULAR MOTION.
Burnt deposits which do not respond can usually be removed by rubbing the surface with SCOTCH-BRITE Scouring pads
or Stainless scouring pads. Do not use ordinary steel wool.
Heat tint can be removed by a vigorous scouring in the direction of the polish lines using SCOTCH BRITE or STAINLESS
scouring pads in conjunction with a powdered cleanser.
TROUBLE SHOOTING
Low Exhaust air
1. Improper exhaust fan rotation.
2. Broken or slipping belt.
3. Exhaust ductwork inspection door open.
4. Obstruction in the ductwork.
No Exhaust air
1. Start/Stop station not turned on.
2. Broken belt exhaust fan belt.
3. Exhaust fan overload tripped. Inspect the magnetic starter or VFD overload.
4. Exhaust fan disconnect open on the roof.
5. Exhaust fan breaker open at the breaker panel
6. Exhaust fan motor or fuse or breaker blown.
7. “FD” type Dynaflow hoods Exhaust Fire damper closed. Check fusible link.
Poor Capture
1. Improper exhaust fan rotation.
2. Broken or slipping belt.
3. Exhaust ductwork inspection door open.
4. Obstruction in the ductwork.
5. “FD” type Dynaflow hoods Exhaust Fire damper closed. Check fusible link.
6. MB Dynaflow plenum fresh air supply fusible link fire damper closed.
7. MJ Dynaflow plenum fusible link fire damper closed.
8. MJ Dynaflow Blower not running. Not turned on, fuse blown, breaker open, motor burnt.
9. Dynaflow MB appliance air velocity too high. Adjust the MB Blade position to provide more fresh air out MB front
and less to the appliances.
10. Dynaflow MB appliance air velocity too low. Adjust the MB Blade position to provide less fresh air out MB front and
more to the appliances.
11. Dynaflow MJ appliance air velocity too low. Adjust the MB MJ blower rheostat to provide more air to the appliances
region.
16
Measuring Exhaust Air Flow with VE, HE, EC, and SA Filters
VE= standard grease extraction efficiency Stainless steel baffles.
HE= High grease extraction Efficiency Cascade baffles for Enviro applications and reducing grease
discharge from buildings.
EC= Easy Clean Teflon – standard grease extraction efficiency baffles for hot, heavy grease laden
appliances.
SA= Spark Arrestor – standard grease extraction efficiency, for solid fuel appliances.
Measuring Instruments:
VANAXIAL VELOMETER
Follow the instruments instruction manual to measure the exhaust volume at each filter. The instrument will either measure
the total CFM or average velocity of each filter. Hold the instrument perpendicular to the face of each filter. The
Velometer should be within 1” of the filter face for best results. Once the each filter average exhaust velocity has been
measure use Chart No.1 to convert Average Filter Face Velocity to CFM.
The total exhaust volume is the sum total of each filter CFM.
2"
VELOMETER
BAFFLE FILTER
GREASE CUP
BACK OF
HOOD
INSIDE HOOD
CANOPY
Measuring Exhaust Air
Figure 24
Exhaust Air Flow VS Average Filter Face Velocity
Baffle Filter Average Filter Velocity
Size 100 fpm/0.5m/s 200 fpm/1.0m/s 300 fpm/1.5 m/s
in x in mm x mm CFM l/s CFM l/s CFM l/s
20 x 16 508 x 406 200 94 400 189 600 283
20 x 20 508 x 508 260 123 520 245 780 368
20 x 25 508 x 635 320 151 640 302 960 453
Chart No. 1
17
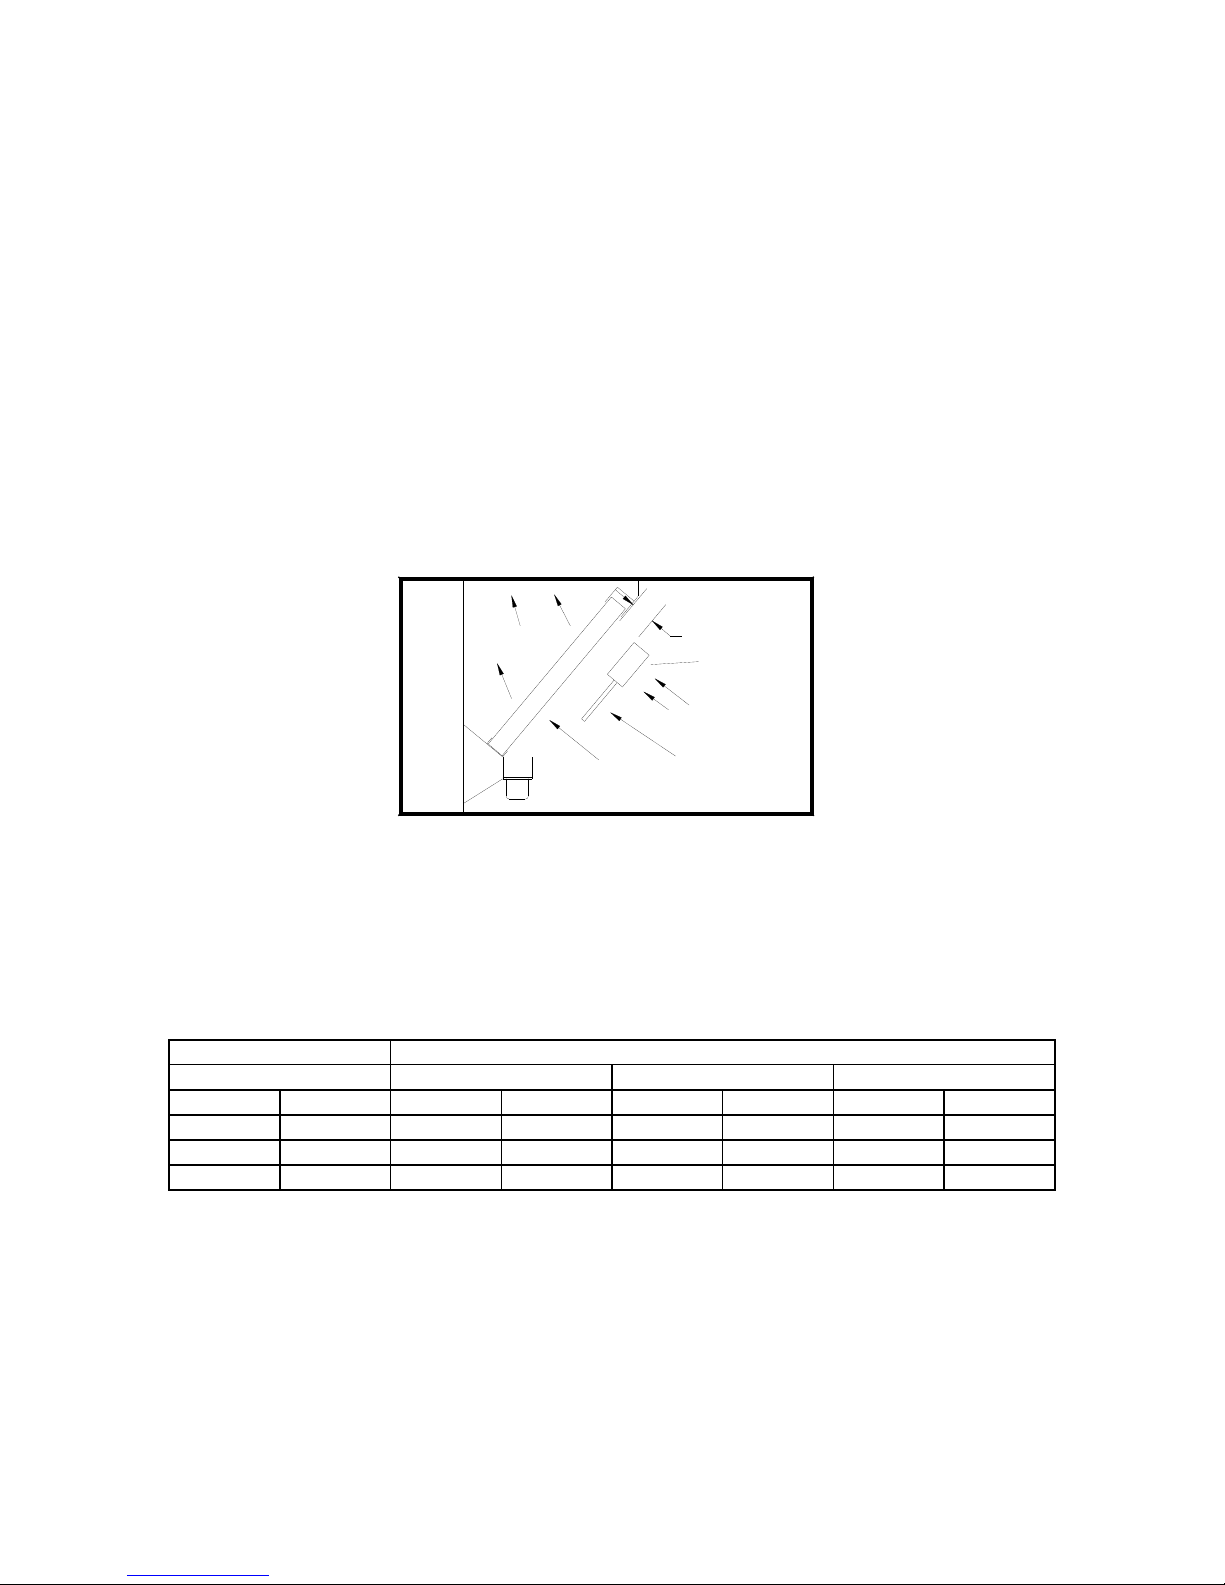
PITOT TUBE OR ANEMOMETER
Spring Air Systems has factory calibrated the average filter slot velocity VS filter CFM. Measure the average bottom slot
velocity of each filter and use Chart No. 2 to convert the slot velocity to total filter CFM.
Each filter has a series of open and closed slots across the face. Hold the instrument perpendicular to the open filter slot at
the bottom of the filter. Place the hot wire anemometer directly in the filter slot. Take one reading at the bottom of each
slot as shown in Figure 25 below. Calculate the average slot velocity for each filter. Refer to Chart No.2 below for the
corresponding filter exhaust volumes. Sum each filter CFM to determine the total hood exhaust volume.
2
1
BACK OF
HOOD INSIDE HOOD
CANOPY
PITOT
TUBE
BAFFLE FILTER
Measuring Exhaust Air
Figure 25
Measure velocity here at
the bottom of the slot.
18
VE/EC/SA STAINLESS STEEL FILTERS
Average Slot Velocity vs CFM per Filter
Filter Slot Filter Size VS CFM per Filter
Velocity 16x16 20x16 20x20 20x25
(fpm) (CFM) (CFM) (CFM) (CFM)
100 37 46 58 72
200 74 92 116 145
300 111 139 173 217
400 148 185 231 289
500 185 231 289 361
600 222 277 347 434
700 259 324 405 506
800 296 370 462 578
900 333 416 520 650
1000 370 462 578 723
1100 407 509 636 795
1200 444 555 694 867
1300 481 601 752 939
1400 518 647 809 1012
1500 555 694 867 1084
1600 592 740 925 1156
1700 629 786 983 1228
1800 666 832 1041 1301
1900 703 879 1098 1373
2000 740 925 1156 1445
2100 777 971 1214 1518
2200 814 1017 1272 1590
2300 851 1064 1330 1662
2400 888 1110 1387 1734
2500 925 1156 1445 1807
2600 962 1202 1503 1879
2700 999 1249 1561 1951
2800 1036 1295 1619 2023
2900 1073 1341 1676 2096
3000 1110 1387 1734 2168
Chart No. 2
This manual suits for next models
3
Table of contents
Other Spring Air Systems Ventilation Hood manuals


Popular Ventilation Hood manuals by other brands

ELICA
ELICA Glide Instruction on mounting and use

KOBE
KOBE RA92 Series Installation instructions and operation manual
 Cooktop Installation Instructions and Use & Care Guide")
Jenn-Air
Jenn-Air 30" (76.2 cm) Cooktop Installation Instructions and Use & Care Guide

Blaupunkt
Blaupunkt 5DD72551 Instruction on mounting and use

Nobilia
Nobilia Airforce F159A SLIM 80 S4 Instruction on mounting and use

Raypak
Raypak 181/182 Installation & operating instructions


