Chironex Motoports SPARTAN 500 User manual

© Copyright Chironex Motorsports Inc. All Rights reserved. - 1 -
SPARTAN 500 OWNERS MANUAL
CHIRONEX MOTORSPORTS INC.

© Copyright Chironex Motorsports Inc. All Rights reserved. - 2 -
TABLE OF CONTENTS
S#
Topic
Pages
I
Introduction
3
II
Technical parameters
6
III
Parts Breakdown
9
IV
Safety Instructions
13
V
Operating the Spartan UTV
15
VI
Breaking-in Period
21
VII
Maintenance and Repair
22
VIII
Troubleshooting
26
IX
Torque specifications
39
X
Fuel/ Oil / Fluid Specifications
41
XI
Circuit Diagrams
42

© Copyright Chironex Motorsports Inc. All Rights reserved. - 3 -
I. Introduction
Chironex welcomes you to its growing family of new Spartan series Utility Vehicle owners. The Spartan has been designed for the Canadian
outdoors with careful attention paid to every detail. Proper set-up, maintenance and safe operating practices will help you get years of satisfactory
use from this vehicle.
Safety First
Chironex is fully aware of the need for safe operating procedures around all of our equipment. We hope you will make a sincere effort to put
safety above all other priorities. The Spartan Utility Vehicle was designed and built for work, recreation, and enjoyment; however, improper and
irresponsible operation could result in serious injury or death. Since this is an off-road vehicle, operators will seldom see the road safety and
warning signs they are accustomed to seeing on highways and public streets. This places additional responsibility on the driver to operate this
vehicle well within the safe operational limits and capabilities of the unit.
This manual has been prepared to instruct you in the safe and responsible operation of your Spartan Utility Vehicle. Read and abide by all safety
alert information about this vehicle. If you do not understand any part of this manual, contact your local dealer for additional information and
clarification. As the operator of this piece of equipment, you are in complete control. Only you can prevent an accident from happening.
Using This Manual
* Prior to any vehicle operation it is absolutely essential that you read and comprehend each section in this manual to develop an understanding of
your vehicle and for your safety. After reviewing this manual, store it in a dry and easily accessible place for future reference.
* The Operator’s Section is designed to help familiarize you with safety, assembly, operation, adjustments, troubleshooting, and maintenance.
Read this manual and follow the recommendations to help ensure safe and efficient operation.
* The information contained within this manual was current at the time of printing. Some parts may change slightly to assure you of the best
performance.
* To order a new Operator’s or Parts Manual contact your authorized dealer.
www.chironex.ca

© Copyright Chironex Motorsports Inc. All Rights reserved. - 4 -
Getting Acquainted with your Utility Vehicle
This off-road utility vehicle is a very unique vehicle designed exclusively for off-road use. It is not designed, properly equipped, or licensed to be
safely operated on public streets and highways. This vehicle is designed to carry two people and a limited amount of gear or cargo comfortably
and safely over rough terrain.
Unlike ATVs that have handlebar steering, the Spartan Utility Vehicles have a steering wheel with easy handling rack-and pinion steering. The
steering’s tight turning radius makes this vehicle more maneuverable than most ATV’s. Its four wheeled independent suspension, large diameter
hi-flotation tires and high center-frame ground clearance adds up to excellent stability and a smooth ride over rough terrain. Outstanding traction
is achieved by using premium off-road ATV type tires in tandem with the engine mounted directly in front of the rear differential.
Also unlike an ATV’s one person “straddle saddle” seat, the Spartan UTV sports dual headrest cushioned seats with seat belts mounted in a
highly styled and protective full length body. Two passengers can ride comfortably in this vehicle protected from splashing water and mud. The
Brush Guard Bar mounted to the vehicle’s frame provides protection against low hanging limbs and briars.
The Brush Guard Bar also provides a mounting system for optional windshields, canopy tops and weather enclosures. It also serves as a mounting
base for many other optional cargo racks, gun and bow racks.
The dump box is for transporting materials and accessories such as camping equipment, tree stands, hunting gear, and fishing gear. A standard
hitch mounting plate enables quick installation of a rear hitch for pulling small trailers full of supplies, tools, gear, and game.
The Spartan UTV has some similarities to an ATV. Like an ATV it has a short wheelbase, narrow stance, and high center clearance all which
provide for narrow and difficult trail access. This combination of short wheelbase and narrow stance also enables this vehicle to be loaded in the
back of most full to mid-sized pickups for transport.
The Spartan UTV’s ground compaction and is very gentle on the ground and surrounding vegetation. The highly energized four wheeled
independent suspension system provides an incredibly soft ride and outstanding stability over difficult terrain.

© Copyright Chironex Motorsports Inc. All Rights reserved. - 5 -
Owner Assistance
The safety information should be viewed by the owner and the Warranty Registration card should be filled out by the dealer at the time of
purchase. The owner, upon purchasing the vehicle, should have participated in a short drivers training course with the dealer. This information is
necessary to provide you with quality customer service.
The parts on your Spartan Utility Vehicle have been specially designed and should only be replaced with genuine Chironex parts.
If customer service or repair parts are required contact a Chironex dealer. They have trained personnel, genuine repair parts and equipment
specially designed to repair Chironex products.
Record your Chironex Spartan Utility Vehicle serial number here for quick reference:
Model Number:___________________________
Serial Number:____________________________
Your Chironex dealer wants you to be satisfied with your new vehicle. If you do not understand any part of this manual or you’re not satisfied
with the service received, please take the following actions.
Discuss the matter with your dealership service manager. Make sure they are aware of any problems so they can assist you.
If you are still unsatisfied, seek out the owner or general manager of the dealership.
For further assistance Initial breaking-in period for the Spartan 500 4x4 is 1000km, during which extra care must be taken (see Section VI). Upon
expiration of this period, continue to carry out the necessary maintenance procedures.

© Copyright Chironex Motorsports Inc. All Rights reserved. - 6 -
II、Technical parameters
(I) Common technical data
1Weight parameters (kg)
Dry Weight: 500
2Dimensions (mm)
Length/ Width: 2690×1270
Wheelbase:1820
Tread: front tire: 1036 rear tire: 1040
Approach angle(°):47
Departure angle(°):82
(II) Operating data
1Top speed(km/h):H gear : 70
2Steering radius(m):4.65
3Braking distance (w/ zero load).
When V0=30km/h:4 m
When V0=40km/h:5.5 m
When V0=50km/h:9 m
4 Gas mileage: 10 km/ L
5 Load capacity: 300Kg
(III) Engine
Type: Single cylinder, 4-stroke, liquid cooled
Valve train: 4 valve, top camshaft, single shaft
Induction: Carburetor
Bore and stroke (mm): 87.5 x 82
Engine displacement: 493 cc
Compression ratio: 10.2:1
Maximum power (kw/r/min): 24/6500
Maximum torque (N·m/r/min): 38.8/5500
Minimum fuel consumption rate (g/Kw·h): 340
Idle speed (r/min): 1300±100
Starting: Electric
Ignition type: touch-less CDI DC
Spark Plug: DPR7EA-9(NGK)
Lubricating oil: SAE 15W—40/SF
Engine # location: Topside surface at rear end of left
crankcase
Ignition angle(°/r/min):
10/1500 – 32/1500
Lubricating type: Pressurized wet sump

© Copyright Chironex Motorsports Inc. All Rights reserved. - 7 -
Engine oil pump type:TOTOR
Oil filter: Full-flow mechanical w/ paper element
Fuel Capacity: 20 L
Carburetion type: Vacuum slide
Air filter: Sponge element
Fuel type: RQ-93 or better
Transmission: Automatic CVT (toothed V-belt)
P/R/N/H/L, Electrically controlled 2WD/4WD
Gear change: Hand lever
Clutch type: wet, centrifugal hoof
Primary gear ratio: 0.703—2.88
Gear ratio:Total gear reduction ratio:
H Gear:3.514 2.47—10.12
L Gear:5.857 4.12—16.87
R Gear:3.828 2.69—11.02
Coolant: antifreeze with rust prevention
Dimension: 610 x 568 x 519
Net weight: 70 kg
Final Drive: shaft
Shaft rotation: clockwise (from the back of engine)
(IV)、Chassis
1. Differential:
Tapered arc gear transmission
Transmission rate:33/9
2. Drive type:Shaft, 2WD/4WD/Differential LOCK
Normal drive: Rear wheel drive.
3. Suspension:
Front suspension: Independent double wishbone
with preload adjustment
Rear suspension:Independent double wishbone
with preload adjustment
4. Front Wheel alignment:
Camber angle:0° ±1°
Main pin inner angle:11°50’ ±3°
Main pin back angle:4°±1°
Front toe-in: -3—3mm
5. Tires:
Front Tire: 25×8.—12
Air pressure:250Kpa
Rear Tire: 25×10 —12
Air pressure:300Kpa

© Copyright Chironex Motorsports Inc. All Rights reserved. - 8 -
6. Steering system:Rack-and-pinion steering
Steering wheel turns, lock to lock: 2.5
Total steering angle: 75°.
Maximum steering angle, right: 37.5°.
Maximum steering angle, left: 37.5°.
7. Brakes:
Front brakes: Dual hydraulic disk
Rear brakes: Dual hydraulic disk
Parking brake: Mechanical disk (rear axle)
8. Electric Dump box:
Dumping angle: 49°
9. Winch:
Rated Single Line Pull: 3000 lbs.
(V)、Electrical components
1. Pipeline voltage: 12V。
2. Alternator power rating: 325W。
3. Battery:12V - 36A·h。
4. Starter motor:12V DC motor
© Copyright Chironex Motorsports Inc. All Rights reserved. - 9 -
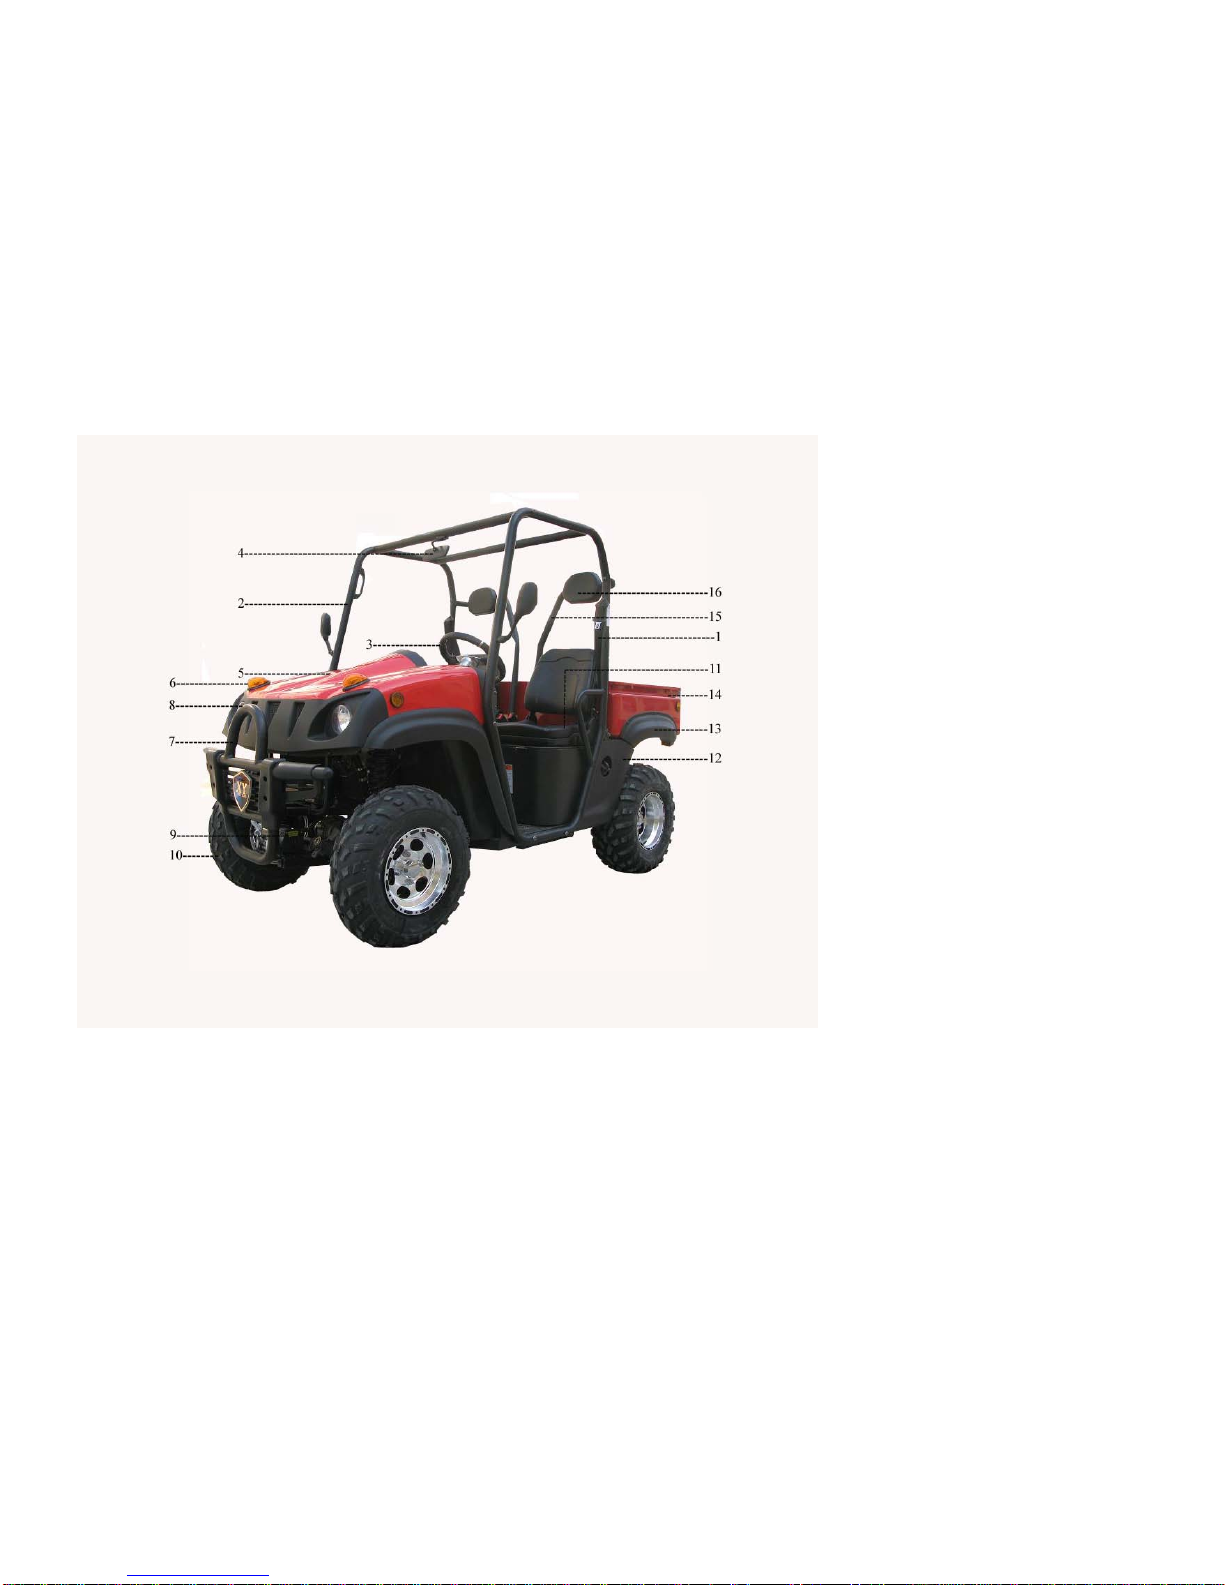
III Parts Breakdown
1. Safety belt
2. Frame
3. Steering wheel
4. Rear view mirror
5. Engine hood
6. Indicator
7. Bumper
8. Headlight
9. Winch
10. Wheel
11. Seat
12. Side cover
13. Rear mudguard
14. Cargo bed
15. Headrest bar
16. Head rest
© Copyright Chironex Motorsports Inc. All Rights reserved. - 10 -
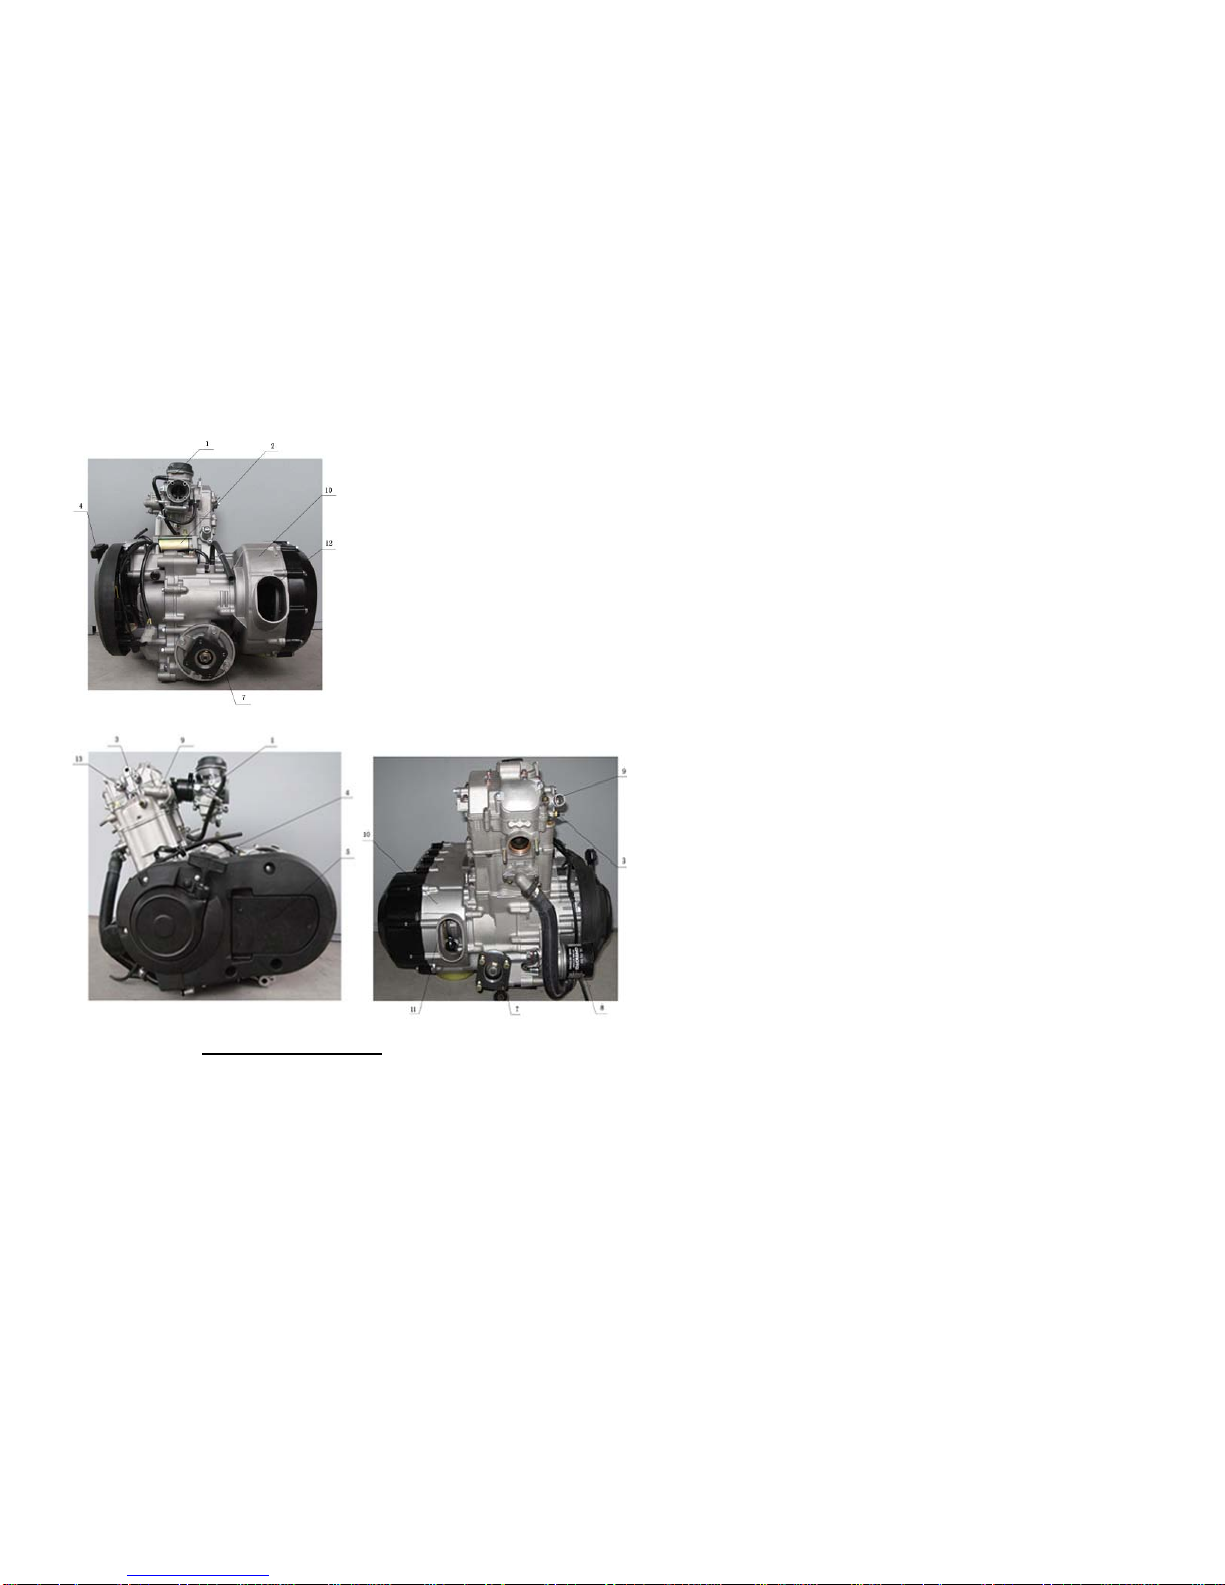
Engine Parts Breakdown
1. Carburetor
2. Starter
3. Water temperature sensor
4. Starting handle
5. Left cover
6. Rear shaft flange
7. Front shaft flange
8. Oil filter
9. Thermostat
10. CVT case
11. CVT inlet
12. CVT inlet
13. Plug
© Copyright Chironex Motorsports Inc. All Rights reserved. - 11 -
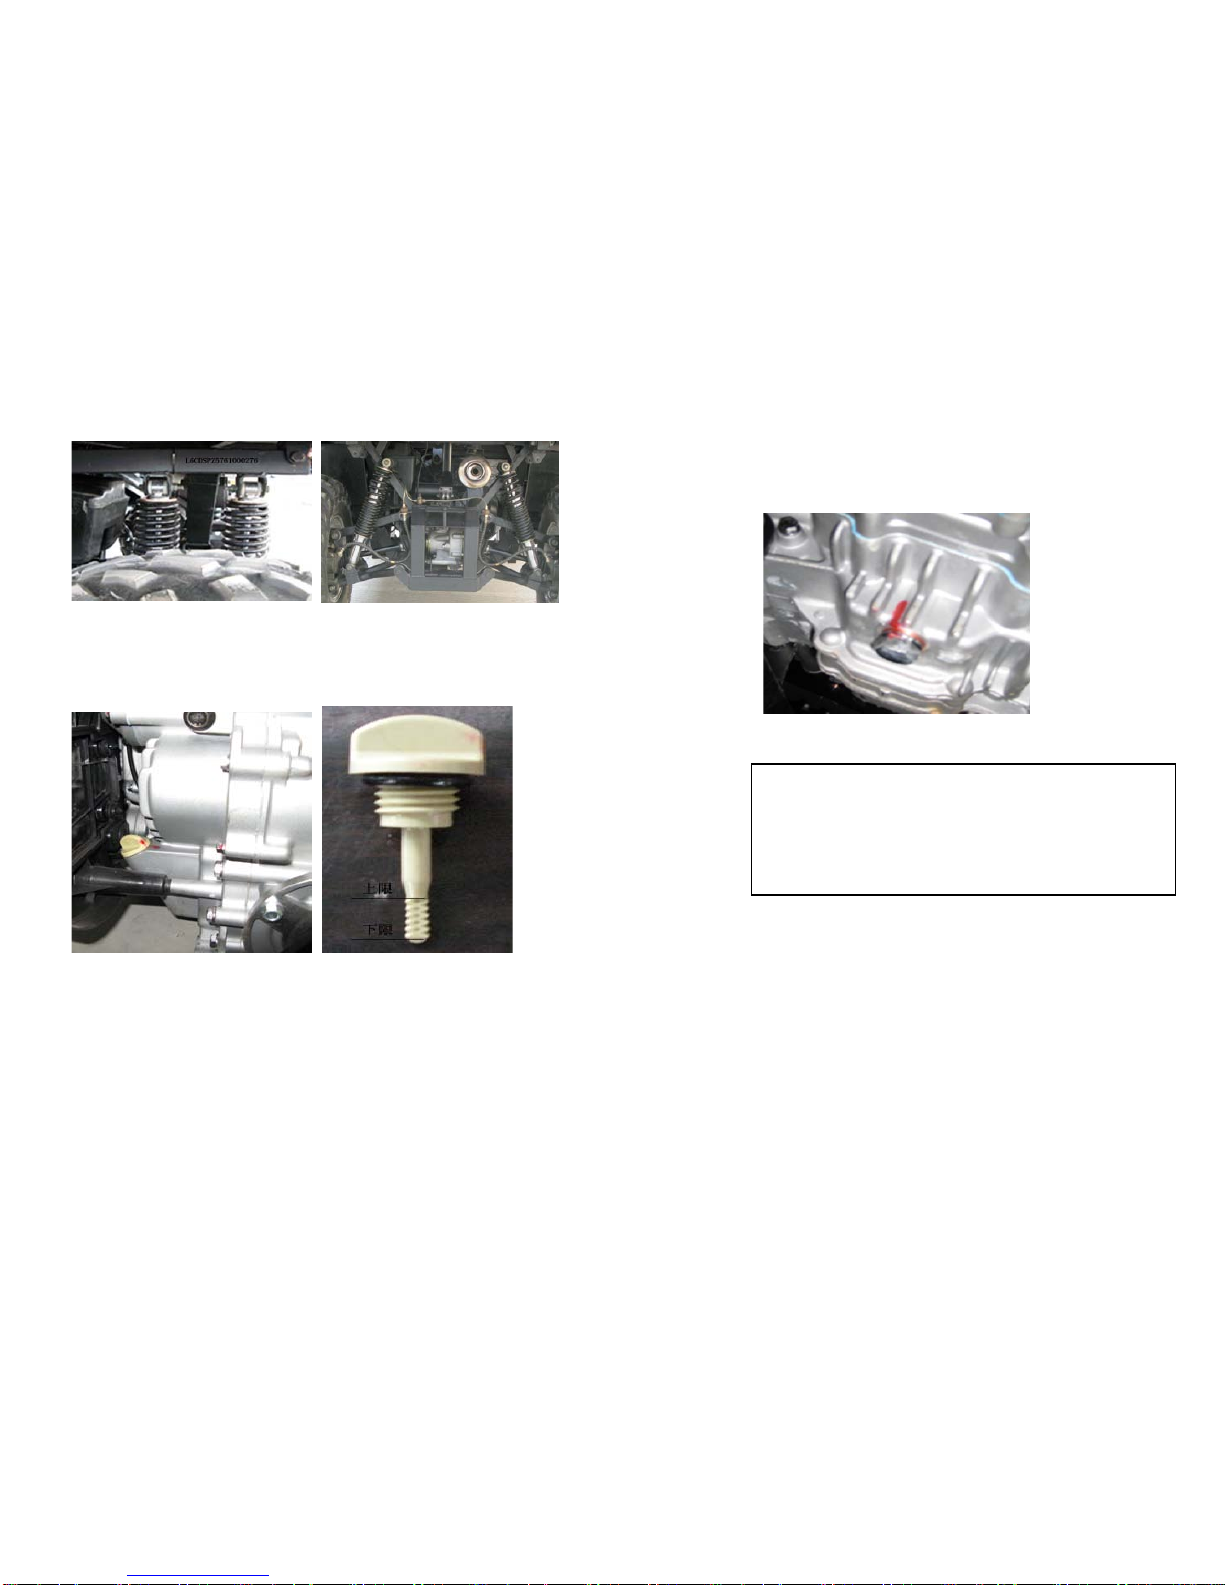
VIN number Rear suspension
(on the frame above right rear wheel)
Oil Intake Oil Dipstick
Oil drain plug(bottom of engine)
Warning:Oil drain plugs of engine and gear box
should be tightened
,otherwise engine would
burned for oil leakage. Should use the correct gear
box oil and quantity. More or less oil can cause the
gear box burned out..
警告:发动机机放机油塞应拧紧,否则会因漏油而烧
毁发动机。
WARNING
:
ENGINE OIL LEVEL SHOULD BE
BETWEEN UPPER AND LOWER MARKINGS. ELSE
YOU RISK ENGINE DAMAGE.
© Copyright Chironex Motorsports Inc. All Rights reserved. - 12 -
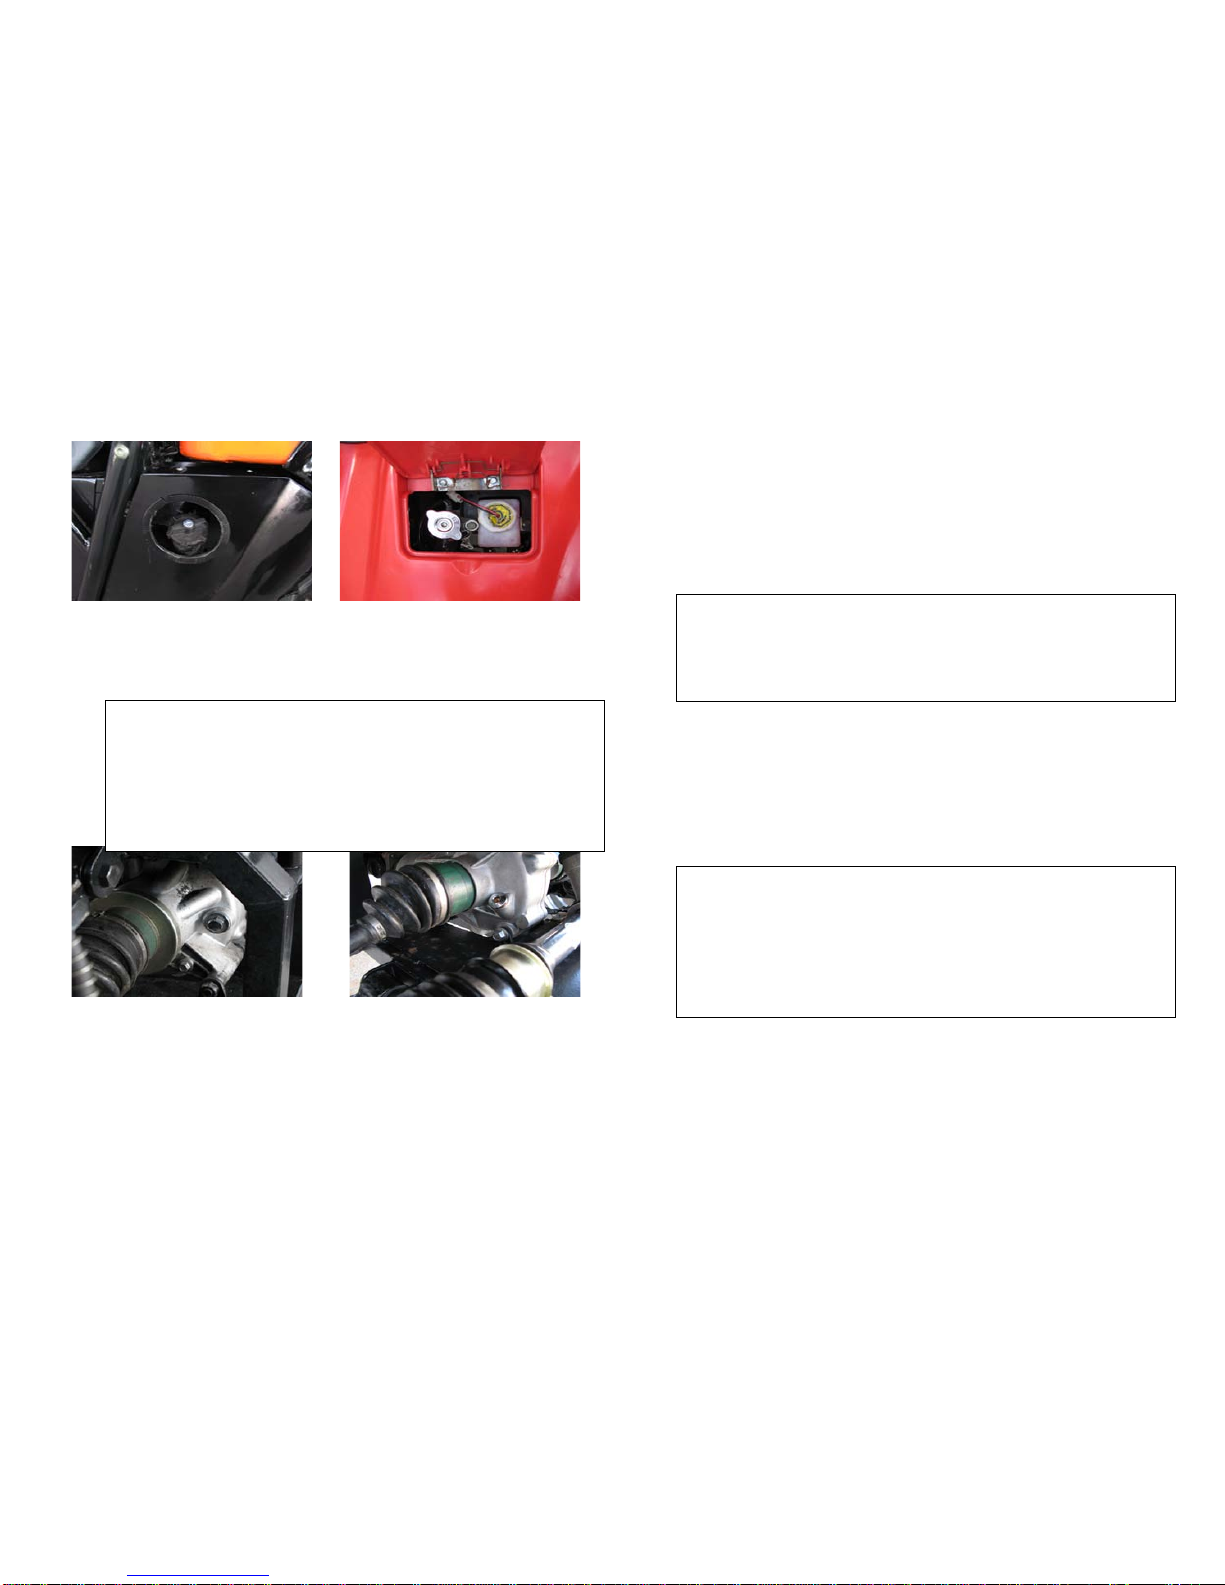
Fuel tank intake(left side)Coolant, Brake fluid intake
Rear differential Front differential
WARNING:Use only TC / DOT approved brake fluid. Do not mix
different types of brake fluids. Always maintain brake fluid level to
ensure proper functioning of the brakes.
WARNING:Do not unscrew radiator cap when engine is hot;
contents are at a high temperature and pressure.
WARNING:Use TC / DOT approved gear oil in the front and rear
differentials. Fill up to just below intake. Filling too much will result
in leakage and too little burn damage to the differential

© Copyright Chironex Motorsports Inc. All Rights reserved. - 13 -
IV、Safety Instructions:
1. Check for leaks of engine oil, coolant, fuel, lubricant.
2. Check the levels of engine oil, brake fluid and coolant. If
necessary, add more.
3. Check the air pressure in tires.
4. Check the functioning of the safety belt.
5. Check steering play.
6. Check engine support frame, bolts, transmission system
and running system.
7. After starting engine, listen for any abnormal noises and
confirm whether all meter readings are normal.
8. Check brake pedal movement and functionality of brakes
(including the hand brake).
9. Check whether the lights (steering light, brake light,
warning light, running lights, headlight – low and high
beams) are working.
10. Check whether the winch and dump box are in good
working order
11. Check fuel level.

© Copyright Chironex Motorsports Inc. All Rights reserved. - 14 -
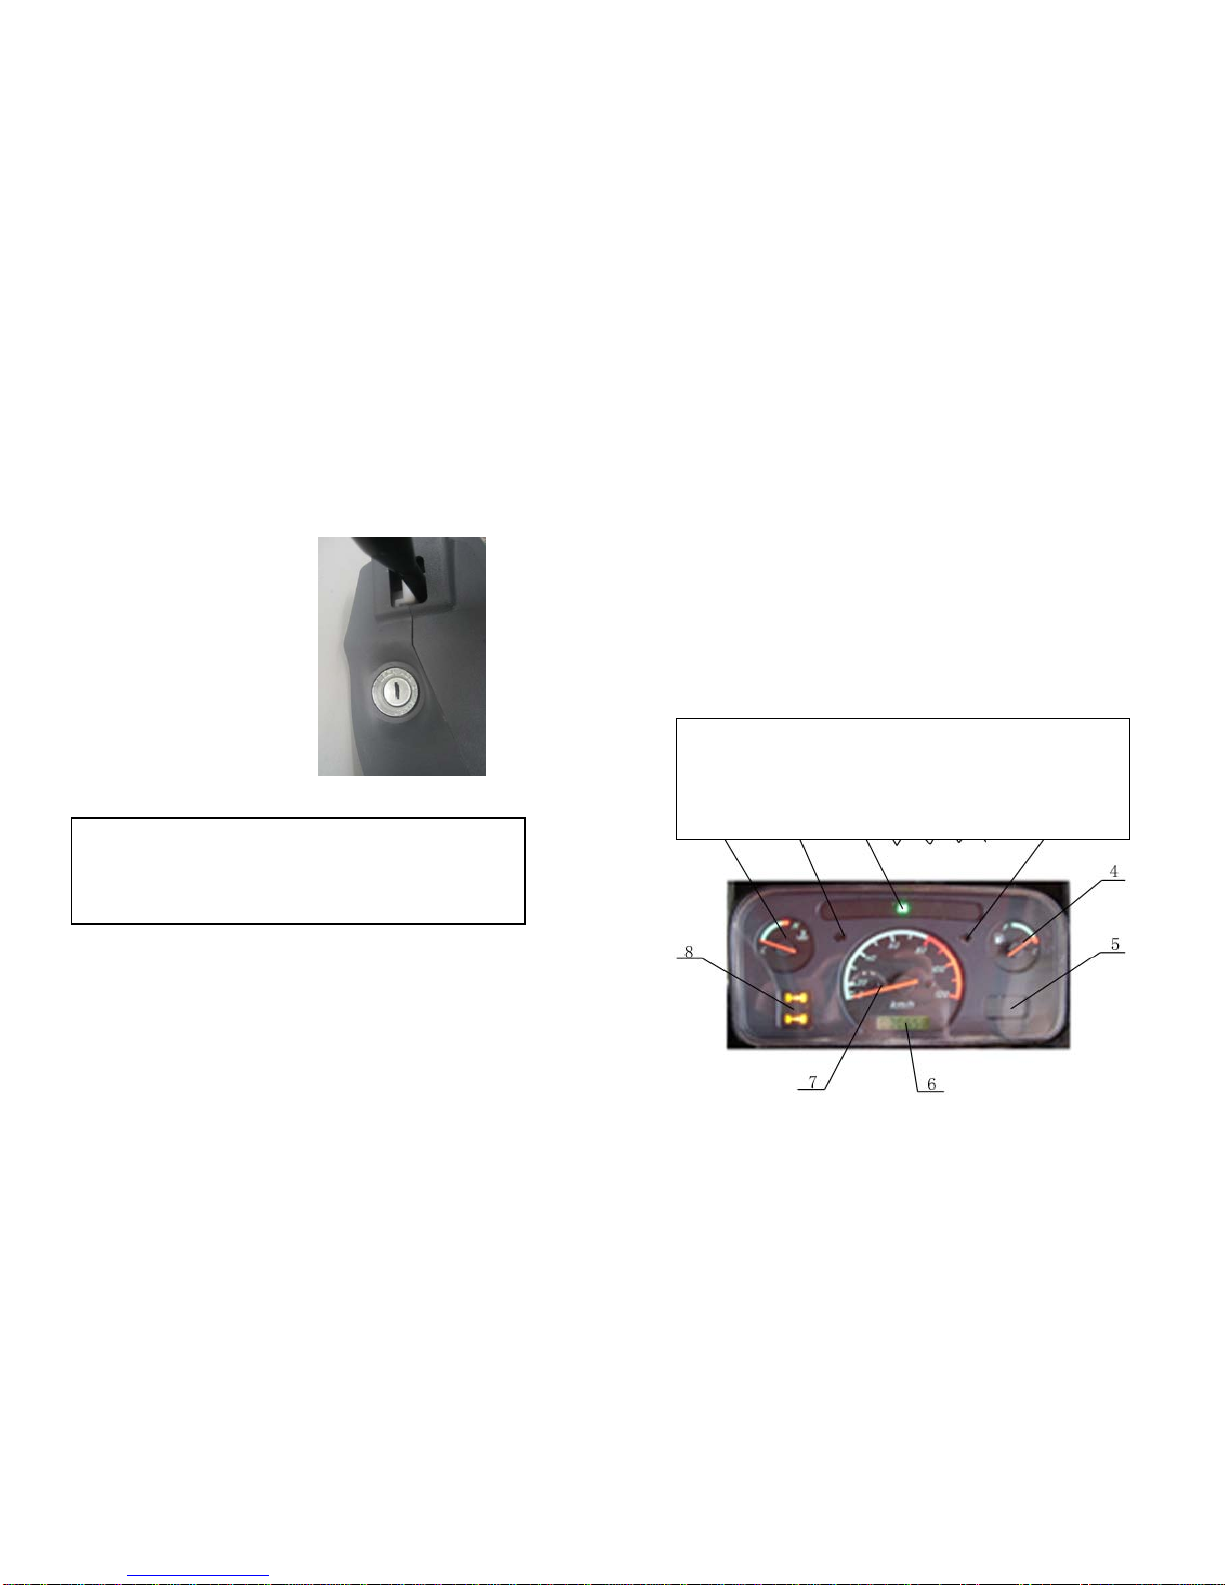
V、Operating the Spartan UTV
(1)Key
The same key is used for ignition and to open fuel tank
cover. You are given two copies of your Spartan UTV
key; remember to put aside one copy.
Warning:
(1) Driver must be of legal age to operate the UTV.
(2) Fasten the safety belt before riding the UTV.
(3) Driver should be adequately insured.
(4) Driver should operate UTV at speeds of 35—45km/h. Speeding will cause an
accident.
(5) Driver should limit speed to 20 km/h when turning.
(6) Do not over load the dump box. If cargo height exceeds height of dump box, it
must be fastened down. This will prevent cargo from falling forward and hurting
the driver.
(7) The antifreeze in radiator is only suitable for use in temperatures above -35 C.
Please use antifreeze with the appropriate temperature rating for temperatures
below -35 C.
(8) Do not use the hand brake at speeds over 50km/h (except in case of
emergency); it may damage the vehicle and cause it to slip or over turn.
(9) Use the two wheel drive for on road driving. Unnecessary use of four wheel
drive may increase wear and tear.
(10) Ensure the vehicle is stopped before switching gears.
© Copyright Chironex Motorsports Inc. All Rights reserved. - 15 -
(2)Ignition switch
Ignition switch has four positions:
“OFF”(close)position:All circuits are turned off
except for the emergency light, electric fan and
cigarette lighter.
“ON”(open)position:All circuits except starter
and ignition are connected, keeps an engine running
“START”(start)position:Connects starter and
ignition circuit to start engine; automatically returns to
“ON” position after engine starts
“LOCK”(lock)position: The steering wheel is
locked at this position and the key can be pulled out.
(3) Instruments
Note: You only can start the engine when gear is in “N”
position. The engine can not be started up when gear is in “H”,
“L” or “R” positions.
WARNING: Ignition key can not be turned to “LOCK”
position and pull out before vehicle is stopped stably. This
could causes the vehicle lost control when the steering wheel is
locked.
© Copyright Chironex Motorsports Inc. All Rights reserved. - 16 -
1、Temperature Gauge 2.3.、L/R Indicators 4、Fuel Gauge
5、High beam 6、Odometer 7、Speedometer 8、2WD/ 4WD
(
1
)
Temperature Gauge: Displays the temperature
of engine coolant.
(
2, 3
)
Indicators: Left or Right indicator blinks
corresponding to turning signal switched on.
Both indicators blink if hazard light is switched
on.
(
4
)
Fuel Gauge: Displays quantity of fuel left in the
fuel tank.
(
5
)
High-beam: Lit when high-beam is switched on.
(
6
)
Odometer: Displays the total distance travelled
(
7
)
Speedometer: Display the current speed
(
8
)
.2WD/4WD and differential lock
Single axle indicator being lit corresponds to
2WD. In 4WD mode both axles indicator are
lit. When an “X” in displayed, it indicates 4WD
with the front differential locked.
(
L/H/N/R
)
Gear Indicator:Displays the currently
operational gear corresponding to Low, High,
Neutral and Rear.
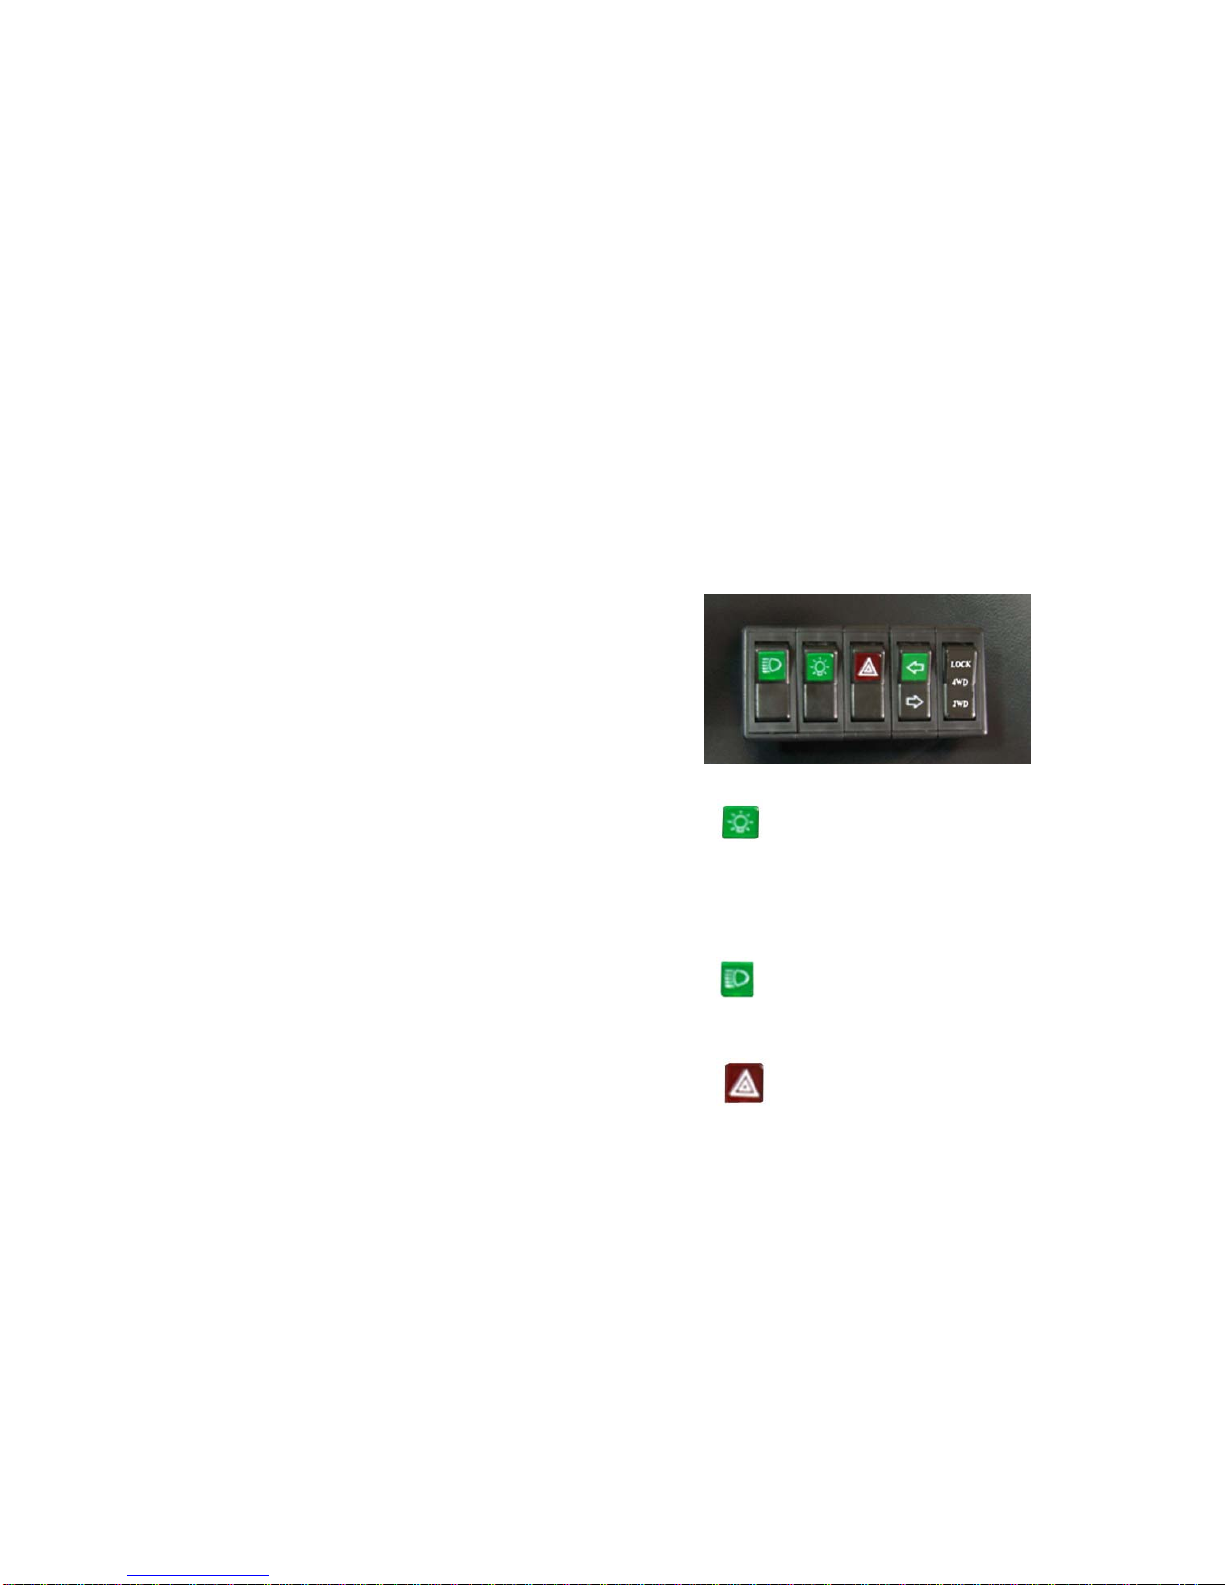
(4) Lights
Press light switch to center position to turn on
the dashboard as well as the running lights of the
UTV. Press switch to “on” position to turn on the
headlight.
With the light switch in the “on” position, press
the headlight switch to turn on high beam.
Hazard light: switches on the front and rear

© Copyright Chironex Motorsports Inc. All Rights reserved. - 17 -
flashers in case of emergency.
Use the turn signal button to switch on left
and right signal lights corresponding to the left and
right arrows marked. To turn off both signal lights keep
button in the center position.
(5) Horn
Press button located at the center of the steering wheel to
blow horn.
(6) Accelerator and brake pedals
The accelerator pedal (left) and brake pedal (right) are
located at the floor board on the driver side of the
UTV. Step on the brake pedal before switching into
L/H/R gear as required, then step on the accelerator
pedal to move.
(7) Hand brake (Parking brake)
Remember to pull up the hand brake when the UTV is
parked to prevent vehicle from rolling.

© Copyright Chironex Motorsports Inc. All Rights reserved. - 18 -
(8) Dump box
To dump contents of the dump box, open the rear gate.
Switch on (“O” position) the red “MAIN” button on the
dash. Now keep the “TRAILER” button pressed in the
“UP”position to lift the dump box, release the button
once box is at desired angle and contents are emptied. To
lower the dump box, keep the “TRAILER” button pressed
in the “DOWN”till the box is completely lowered.
(9) Winch
Keep the winch button pressed in the “OUT”position to
extend the winch cable to the required length. To retract
keep the button pressed in the “IN” position.
(10) 2WD/ 4WD/LOCK
To select normal rear wheel drive switch button to 2WD
position; this mode is for on road driving. Switch to 4WD
position to select all wheel drive; use this mode for off-
roading. If the UTV gets stuck or you are driving in extreme
terrain and/or weather conditions switch to LOCK position;
this locks the front differential.
WARNING:After parking the vehicle, pull up the hand
brake lever. Push down the hand brake lever before stepping
on the accelerator. Do not use the hand brake to stop vehicle
when moving (except in case of emergency). WARNING: Always switch the “MAIN” button to the OFF
position when done using the winch or dump box to conserve
battery power. Once the dump box has been lifted to the
maximum inclination or lowered completely, do not continue
to press the “TRAILER” button.

© Copyright Chironex Motorsports Inc. All Rights reserved. - 19 -
(11)Windshield and wiper (optional)
Turn knob in clockwise direction to the preferred “Low” or
“High” setting. To switch off the wiper, turn knob in anti-
clockwise direction to the “Off” position.
(12)Reverse speed over ride button (installation optional)
Under normal circumstances do not use the reverse over ride.
Use the over ride only when you are stuck or need to reverse in
rough terrain.
WARNING
: Do not change from 2WD to 4WD when the UTV is
in motion. Selected gear is displayed on the dash. At times the
gear is selected only after stepping on the accelerator. In order
to prevent damage to the transmission, step lightly on the
accelerator pedal momentarily, to ensure that the gear is in the
right position.
NOTE:
Using the 4WD mode increases wear and tear on the
UTV. In order to prolong the life of UTV components use 4WD
only when the terrain is muddy, slippery, covered with snow
and/or steep terrain.

© Copyright Chironex Motorsports Inc. All Rights reserved. - 20 -
(13) Choke
When operating the UTV in cold weather, if you
experience difficulty in starting the engine, pull out the choke.
After the UTV starts push down the choke to restore the
carburetor to normal operation.
VI、Breaking-in period
The operating quality and longevity of the UTV depends on
taking proper care during the breaking-in period. During the
initial 1600 km of driving the various components of the UTV
should be allowed to wear into each other. Adhere to the
speed limit, keep total UTV payload to a minimum and carry
out periodic maintenance as per the guidelines in this manual.
1. Maximum permissible speed:
Mileage
Maximum permissible speed
< 800Km 40Km/h
800 - 1600Km 50Km/h
> 1600Km 60Km/h
Avoid full throttle starts, sudden acceleration or
deceleration during the breaking-in period.
2. Warming up engine
During the breaking-in period, it is necessary idle the
engine for 3-5 minutes after starting and warm it up.
This gives time for the engine oil and lubricants to
flow over surfaces in contact.
3. Coolant Temperature Monitoring
Table of contents


