Choc Edge Choc Creator V2.0 Plus User manual

Choc Edge
1

Choc Edge
2
Contents
Part 1 - Product Introduction 3 - 4
1. Part Names
2. Product Parameters
Part 2 - Melting Chocolate 5 - 8
1. Melting Process
2. Precautions
Part 3 - Printer Operation 9 - 22
1. Function Introduction
2. Operation Procedure
3. Precautions
4. Parts List
Part 4 - Software Installation and Use 22 - 40
1. Software Installation
2. Software Use
3. Frequently Asked Questions
4. Appendix A&B
Part 5 - After-Sales Service 41

Choc Edge
3
Cover
Part 1 Product Introduction
1.1. Equipment Introduction
Emergency
Stop Button
Power Switch
Power Cord
Connection
USB Input
Terminal
Power
Computer Cord
Connection
Touch Screen
Stylus Holder
5’LCD Touch Screen
Printing
Platform
Plastic Cup
Holder
Print Head
Choc Edge
4
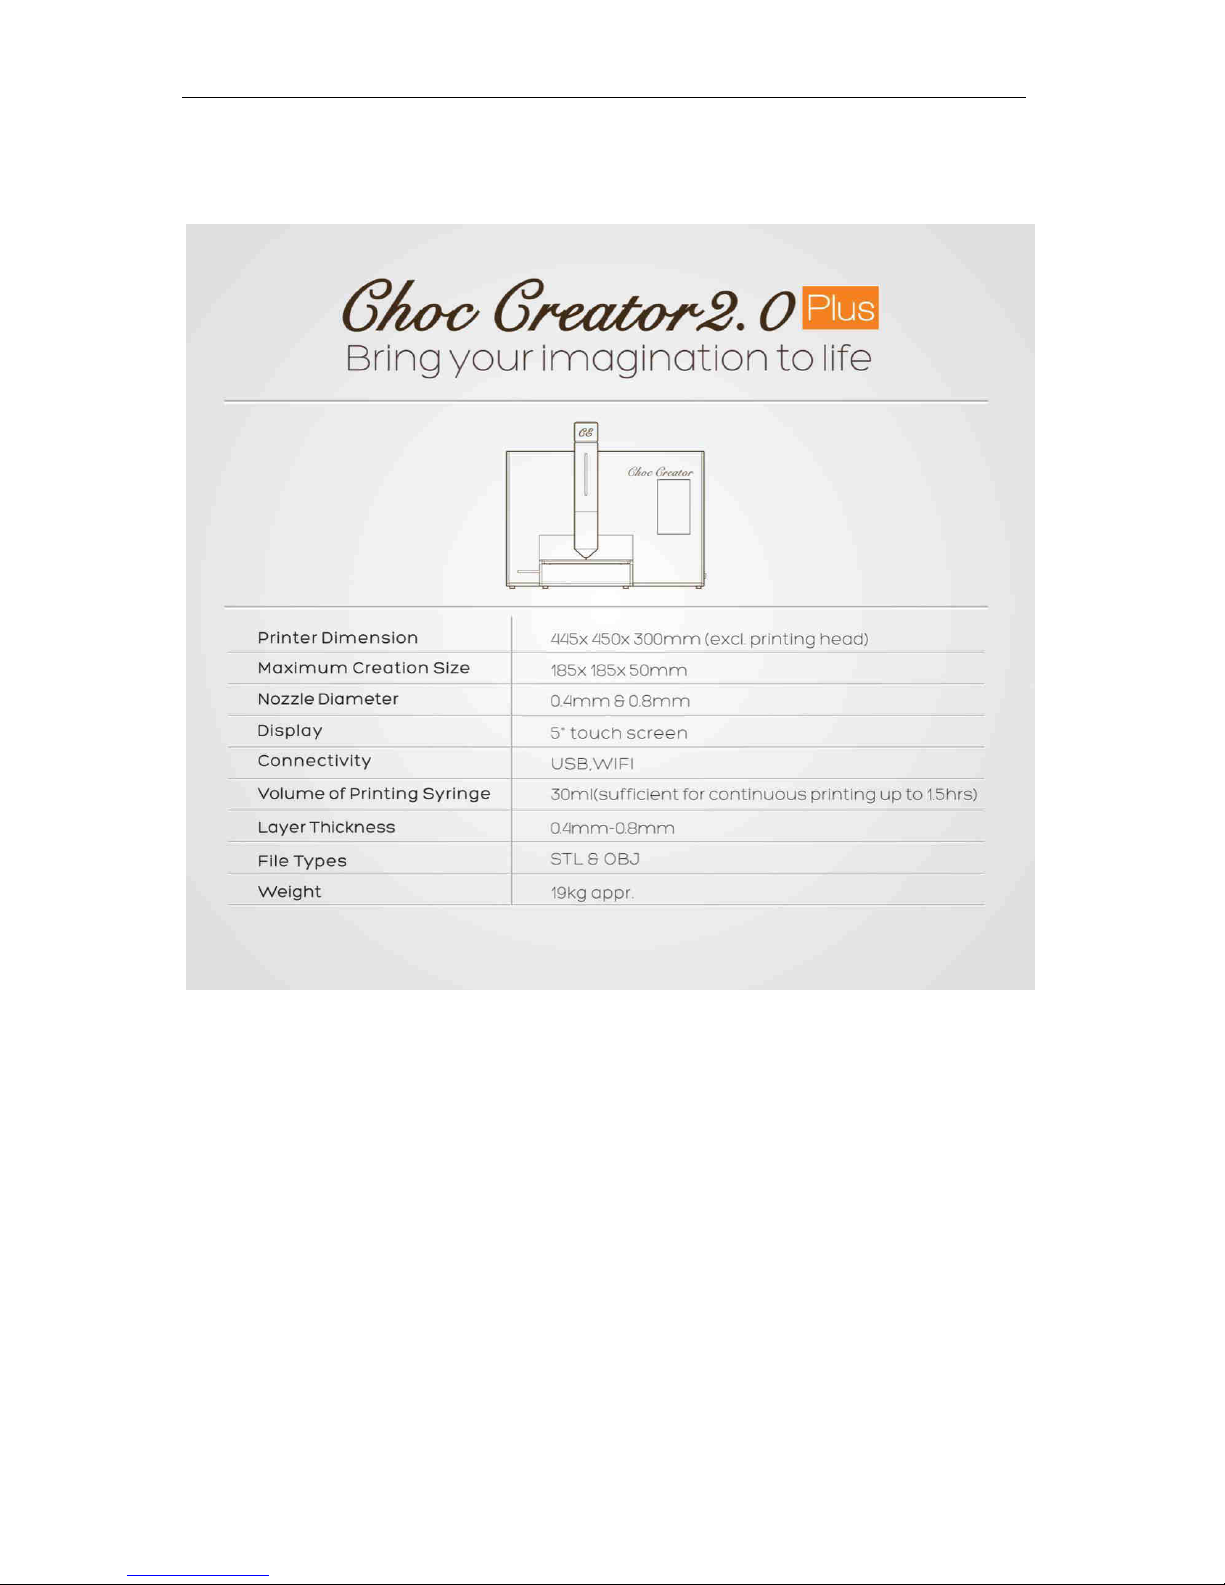
1.2. Product Specifications

Choc Edge
5
Part 2 Melting Chocolate
The process of melting chocolate is critical to the entire process of chocolate printing
as it affects the quality of the printed result.
2.1. Melting Process
Specifications of suggested Melting Pot equipment:
Rated Voltage: Both low and high voltage units available / Weight: 3kg / Chocolate Capacity: 2.5kg
Recommended chocolate: CALLEBAUT 811NV : Recommended for the UK, Europe, USA, etc
CALLEBAUT 2815NV : Recommended for Asia Pacific (See image below)
2.1.1 Prepare the melting pot, chocolate callets, and stirrer.
Note: The amount of chocolate callets required will depend on the situation, but approximately
one fifth of a pot of chocolate callets should be adequate. Be sure to cover the pot with the
lid to maintain the temperature. In an exhibition situation the chocolate beans may need to
be melted quickly due to time restraints. (This can be done by raising the temperature up to
70°C for a short period of time and then lowering the temperature down to 32°C.)
CHOCOLAIERE Melting Pot
811NV (Cocoa Solid % may vary)
2815NV (Cocoa Solid % may vary)

Choc Edge
6
2.1.2 Switch on the Melting Pot appliance and set the temperature between 45-50°C. Pour the
chocolate callets into the pot. (See Figure 2.1.2 below)
2.1.3 Heat the chocolate for a few minutes while stirring intermittently, and lower the
temperature to 32°C when all the chocolate callets have melted. Immediately after lowering
the temperature, add a small amount of fresh chocolate callets and stir the mixture well in
order to ensure the chocolate is evenly heated. The chocolate is ready to use when it is
completely smooth. (See Figure 2.1.3 below)
2.1.4 Attach the green nozzle from the provided tool box onto the end of the syringe, making sure
that the syringe piston is all the way down and there is no air inside the syringe. Start slowly
loading the melted chocolate into the syringe at a slow and steady pace. Try not to let any
air get into the syringe. (See Figure 2.1.4 below)
Note: Try not to let any air get into the syringe when loading as this will affect the printing quality.
During the loading process, a squeaking noiseindicates that air is getting into the syringe, so the
piston should be gently pushed down until a small amount of chocolate is purged to help remove
the air. After successfully removing any air, loading can continue. Hold the syringe facing
downwards after the loading process and gently push the piston until chocolate starts coming out
–This is to make sure there is no air in the tip of the syringe. Wipe off any excess chocolate.
Figure 2.1.2
Figure 2.1.3

Choc Edge
7
2.1.5 Exchange the green nozzle with a metal nozzle and prepare to install the syringe in the
printer. (See Figure 2.1.5 below) (See Figure 2.1.5.2 below for syringe details)
Important: You should regularly examine your nozzles. If you should damage your nozzles (or you are
unsure of their strength, shape and integrity) do not use them –Replace them.
Figure 2.1.5
①Nozzle Plunger 30ML Mark 15ML Mark Piston O-shape Ring Syringe
Additional: The top part of the Syringe (with the finger grip) is referred to as the Flange.
Figure 2.1.4
Figure 2.1.5.2

Choc Edge
8
2.2 Please Note
2.2.1 The amount of chocolate put into the pot during the first step of the melting process
determines how long the process will take. If you want to speed up the melting process use
less chocolate and increase the temperature while stirring frequently. After adding fresh
callets to the melted chocolate, stir continuously. By following the steps above the melting
process will be relatively shortened.
2.2.2 Before loading a syringe, the chocolate needs to have completely melted with no granules
visible when stirring –any remaining granules can cause a blockage during printing.
2.2.3 In order to increase the loading efficiency and achieve the best printing quality, it is not
recommended to continuously reuse the same chocolate.
2.2.4 It is recommended that the syringe be cleaned immediately after use by using the provided
brush in the tool box. This is to prevent the rubber bung getting stuck in the syringe.
2.2.5 In order to ensure the best printing results, it is recommended to use the same or similar
chocolate (see picture above) that Choc Edge uses for printing, noting that printing results
can be affected by the varying melting temperatures of different types and brands of
chocolate.

Choc Edge
9
Part 3 Printer Operation
Note: After connecting to a power source, it is necessary to release the emergency stop
button (the large red button on the right side of the machine) otherwise the machine will
not operate.
3.1 Function Introduction
All functions can be accessed from the HOME screen. (See Figure 3.1 below)
3.2 Operating Procedure
3.2.1 Upon starting up, the machine will initialize and calibrate itself. (See Figure 3.2.1 below)
Safety Note: During the calibration, the Print Head and Printing Platform will move.
Do not touch any parts of the printer during calibration and make sure there are no
foreign objects on or around the printing platform upon starting up.
Note: Make sure there is no syringe inside the print head when starting the machine.
Previously used syringes should be removed before starting the machine.
(See Figure 3.2.1.2 below)
Chocolate
Loading
Choose pre-stored
design files
Set up including:
levelling the platform,
temperature set up, and
restore to factory settings
Adjust
height
Choose files
from a USB
flashdrive
System
update
Figure 3.1
Choc Edge
10
Figure 3.2.1.2
Figure 3.2.1
Calibration will take approximately 20 seconds.
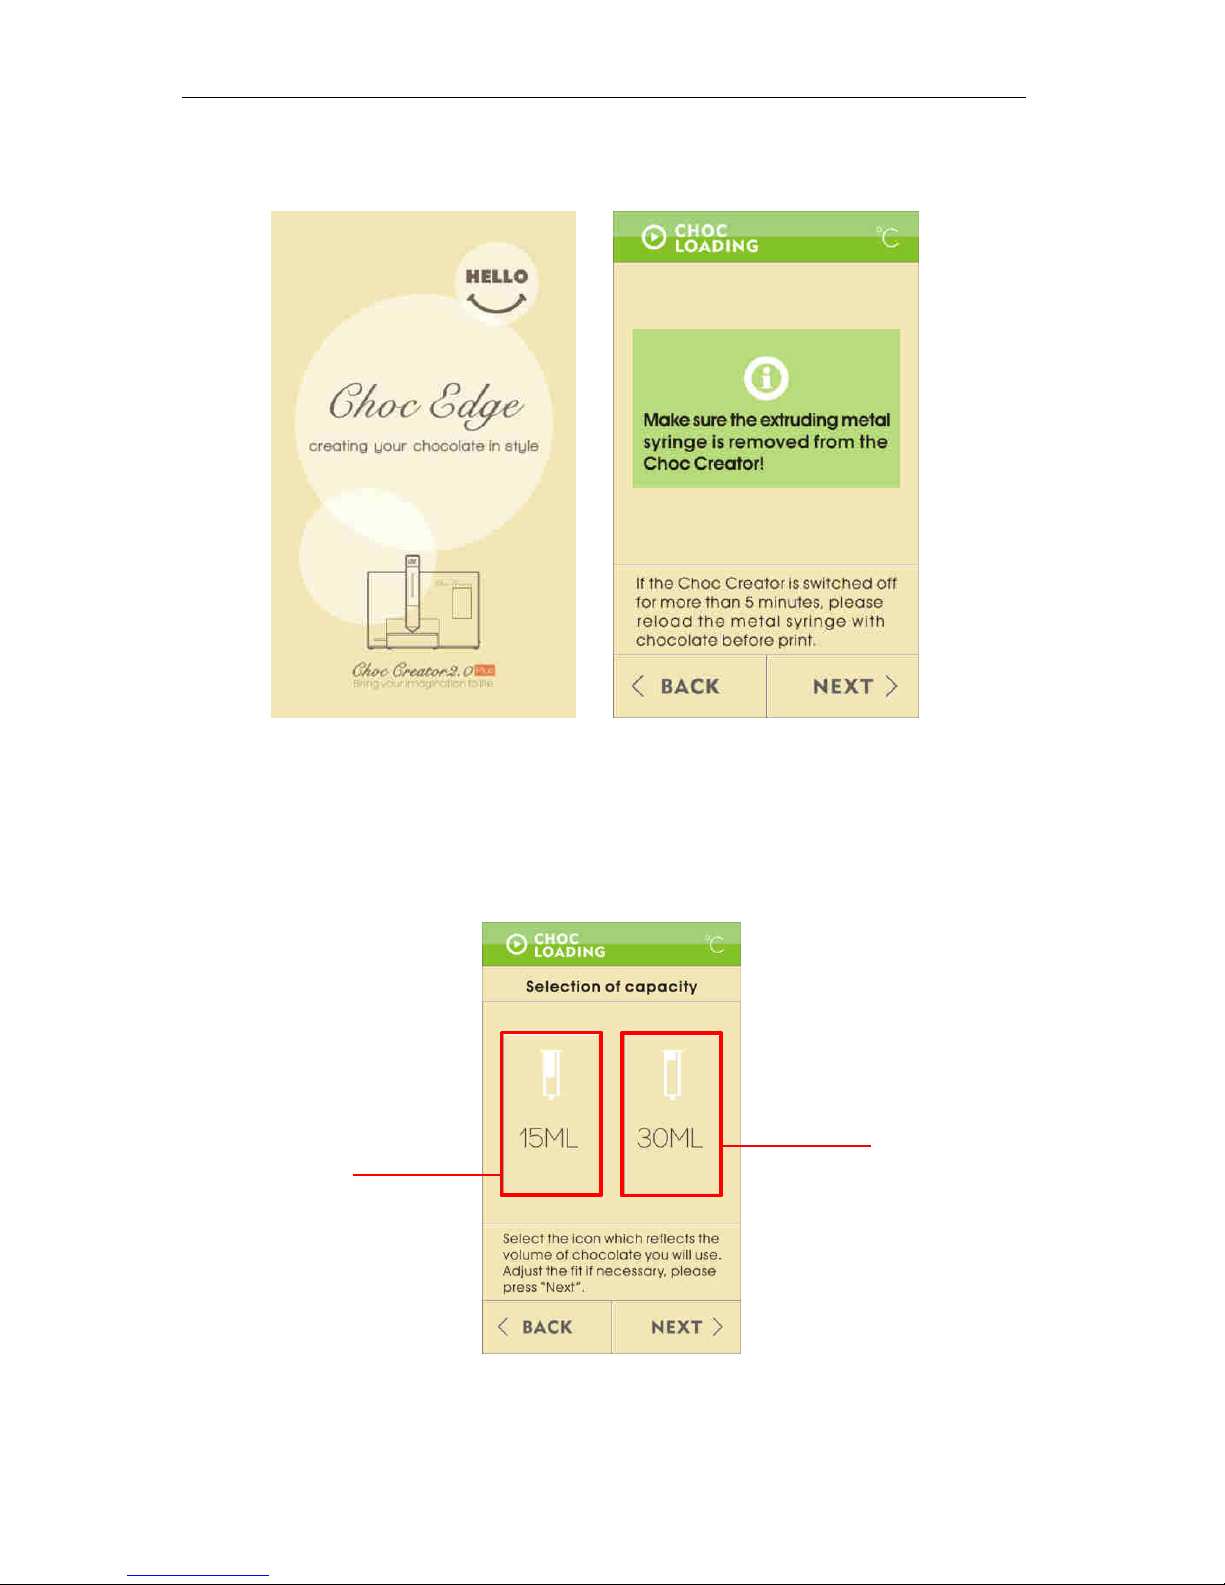
Afte the aliatio has fiished, the fist Choc Loadig screen will be displayed.
3.2.2 Press Nextto move on to the next screen.
3.2.3 Choose 15ML or 30ML depedig o the amount of chocolate in the syringe, with
30ml being maximum capacityad the pites E-axis will move and set itself to the
selected height. (See Figure 3.2.3 below)
Figure 3.2.3
Press 15 ml
for half a syringe
Press 30 ml
for a full syringe
Choc Edge
11
3.2.4 Press Nextto move on to the next screen.
Note: 15ml and 30ml marks can be seen on the syringe, which match with the position on
the piston rod. An adjustment to the exact amount of chocolate in the syringe can be
made on the next screen by pressing the ↑and ↓keys.
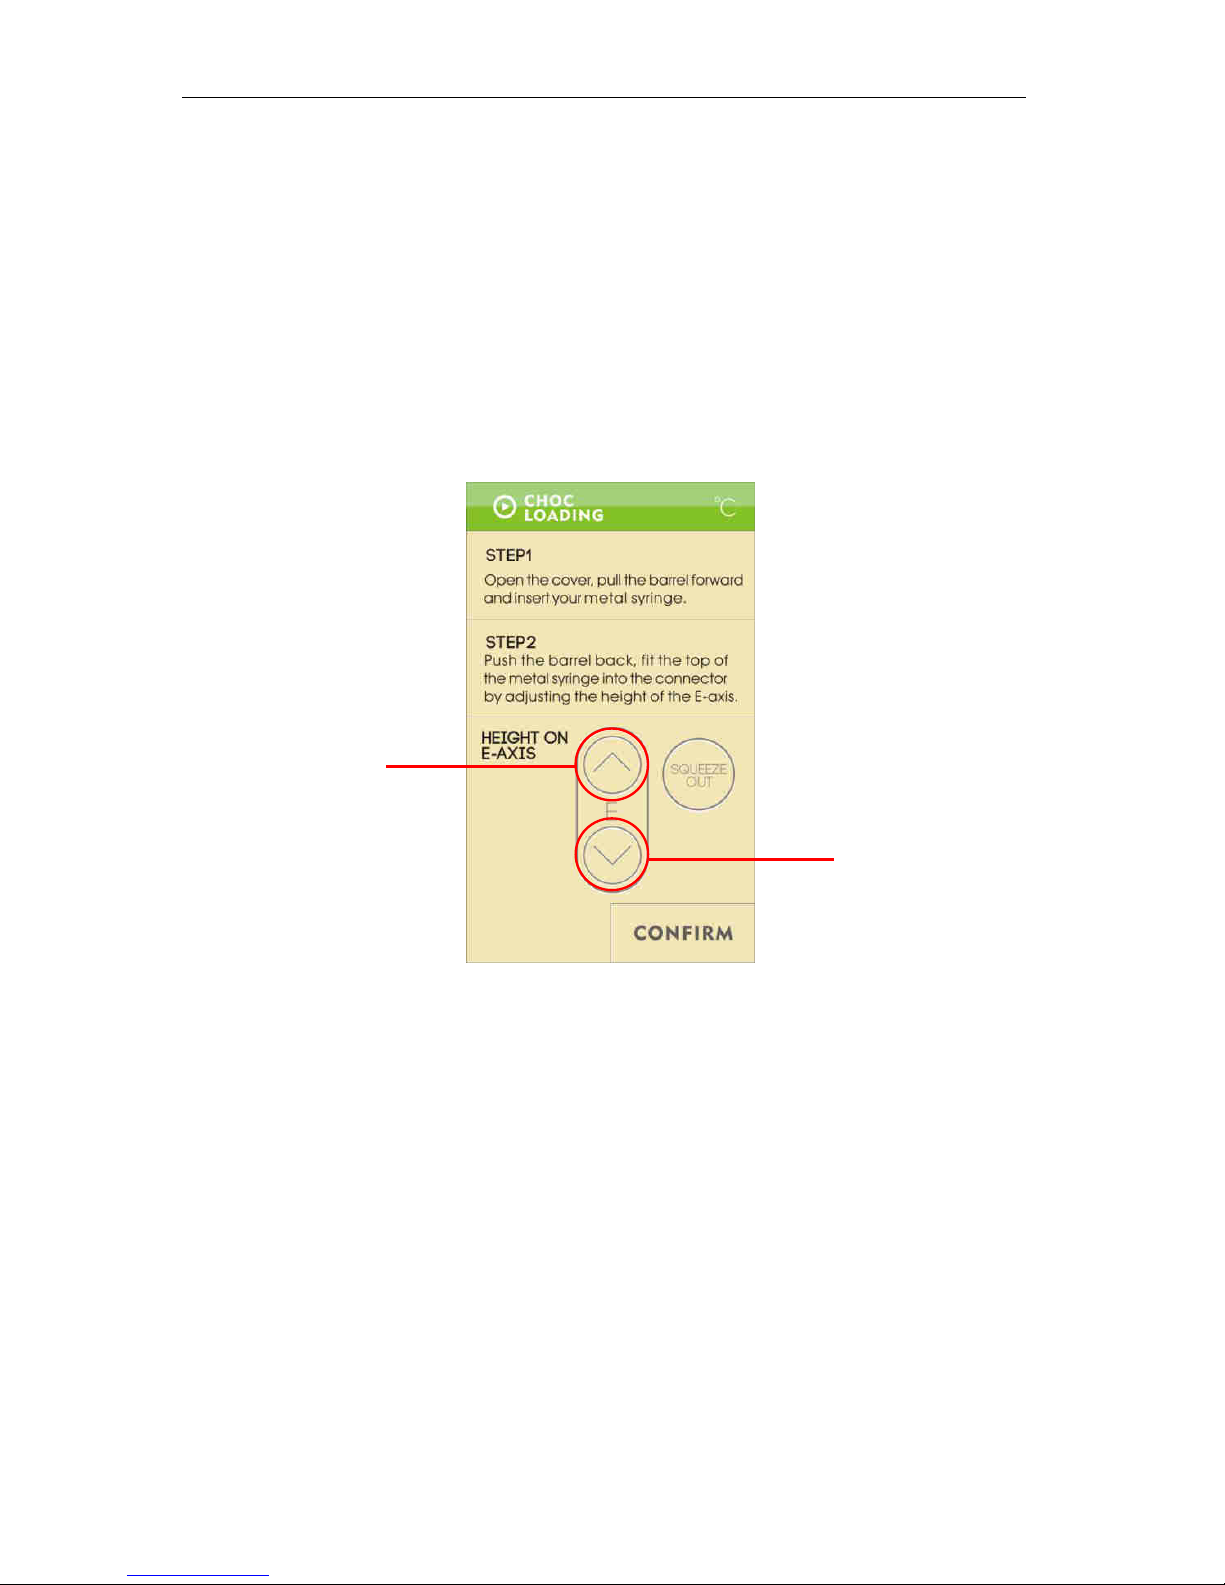
3.2.5 Open the print head cover, pull the barrel forward and insert the syringe into the barrel.
3.2.6 O the Cho Loadig see elo Figure 3.2.6), press the ↓key on the touch screen
et to Height o E-axisand the E-axis will move down.
3.2.7 Afte the E-ais eahes the desied positio, push the ael ak ito plae ad lok the top
of the sige od ito plae, adjustig the fit pessig the ↓ ke if eessa.
Press UP
to move E-axis up
Press DOWN
to move E-axis down
Figure 3.2.6
Choc Edge
12
3.2.8 Pull out the plastic cup holder and place one of the cups from the tool box into the holder.
This will collect any chocolate waste.
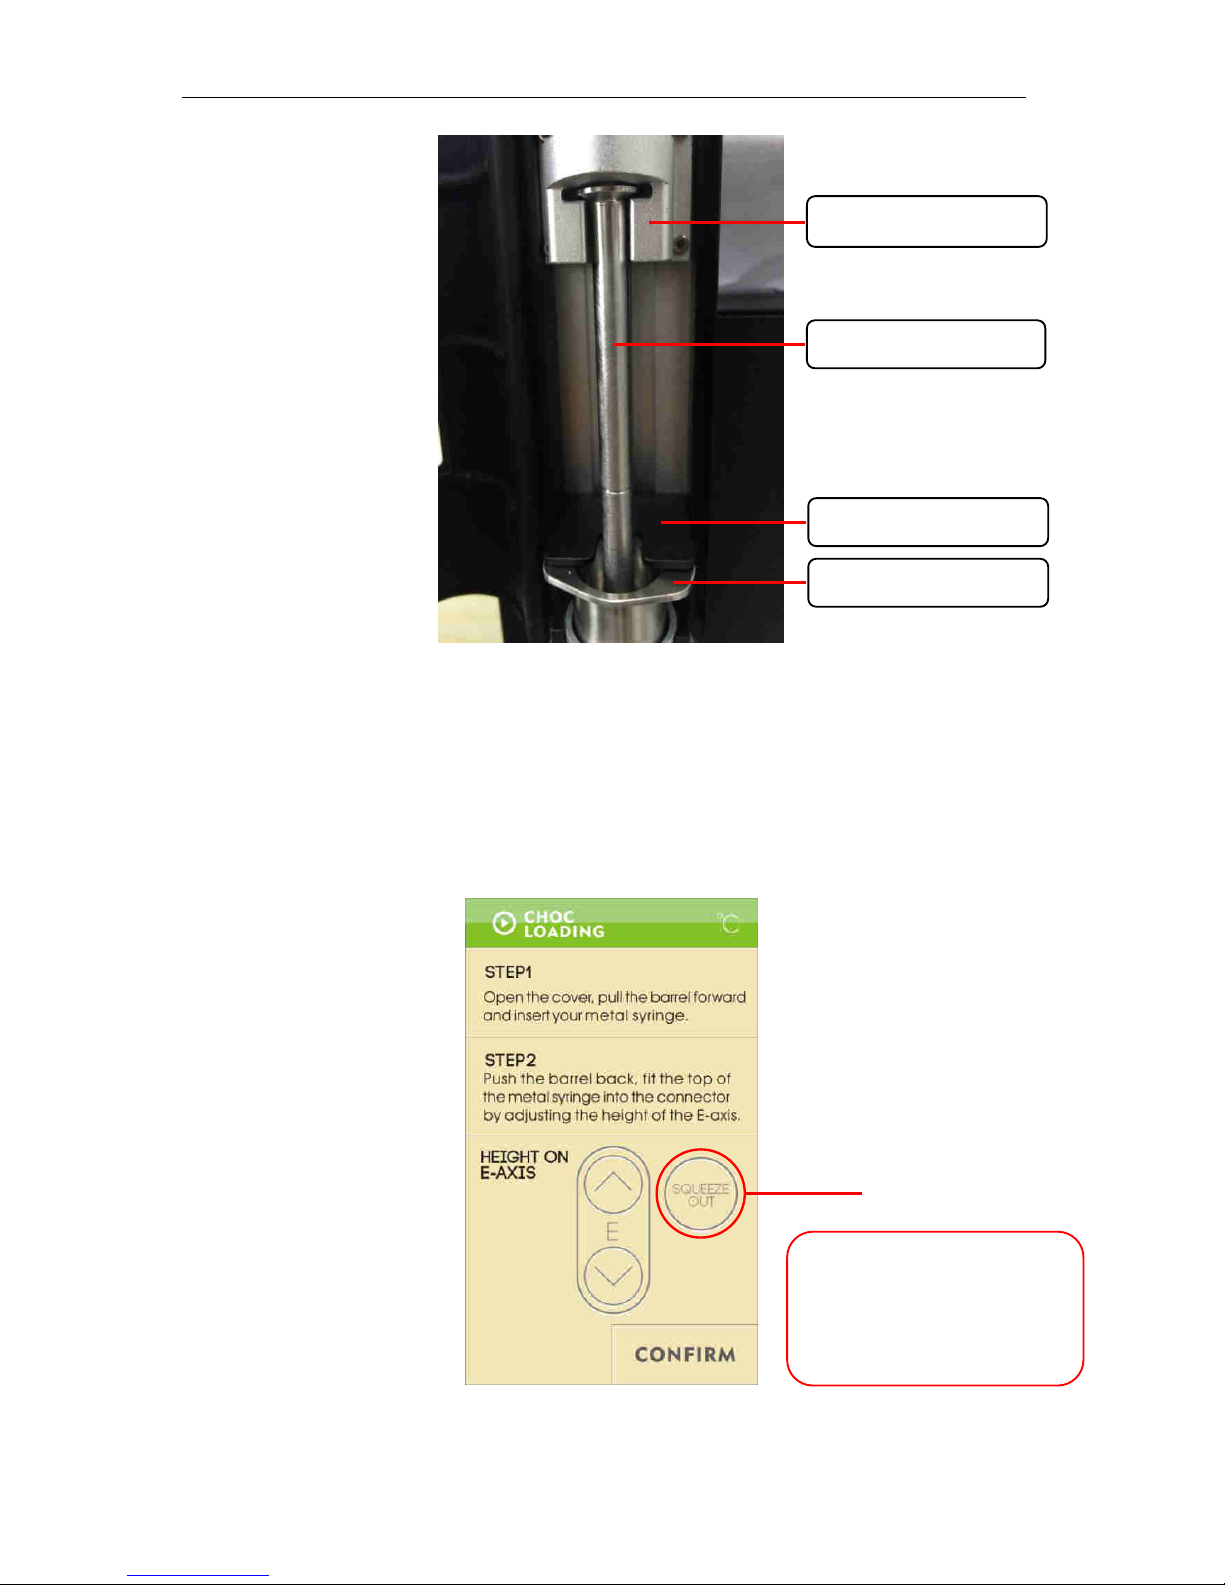
3.2.9 Close the print head cover and press the ↓key several times to check if the chocolate is
being successfully squeezed out or not. After the chocolate stops dripping, press Drop
Retraction Squeeze Out ad then press Confirm. “ee Figure 3.2.9 below)
Figure 3.2.9
E-axis (connector)
Flange Connector
Syringe Rod (Piston)
Figure 3.2.7
Drop Retraction
“ueeze Out
Flange (of syringe)
Dop Retatio pies the ozzle
by pushing the chocolate towards the
ozzle’s tip efoe etatig to the
value of 0.5mm.
Depending on requirements, it can be
pressed once, twice or not at all.

Choc Edge
13
3.2.10 After pessig Confirm, the screen will jump back to the home page from which you can
choose Adjust Height “ee Figure 3.2.10 below):
3.2.11 On the Adjust Height (of Z-Axis screen, you have two options for lowering the Z-axis.
(See Figure 3.2.11 below)
Option 1: Continuously press the ↓key until the Z-axis reaches the value of 40.
From there, you can gently tap the ↓key to fine tune to (e.g.) 42.
This option may be more suitable for first time users.
Option 2: Pess the Ete Value utto oe to ete the ueial pad see.
(See Figure 3.2.11.2 below)
Enter the value of 40 into the numerical window.
Note: For Option 2, a value of no more than 40 can be entered at this time.
This is to prevent novice users from lowering the nozzle too close to the
printing platform. Fine tuning to (e.g.) 42 can still be done after the Z-axis
has moved down into the position of 40.
Adjust the height
of the E-Axis
Figure 3.2.10

Choc Edge
14
3.2.12 On the next screen, press the ↑ or ↓keys until the gap between nozzle and printing
platform is approximately 2mm, which is a suitable starting height when using a 0.8mm
nozzle. If 2mm appears to be too high for your design, try 1.5mm. [ Hint: A food-safe metallic
disc from the tool box can be used as a height guide - The disc is 0.5mm thick, so your nozzle should
be positioned approximately 1.5mm above this disc. If your nozzle touches the disc or is close to it,
your nozzle is too low; Raise the nozzle up by 1mm or more. ]
Once the desired height is set, press Save.
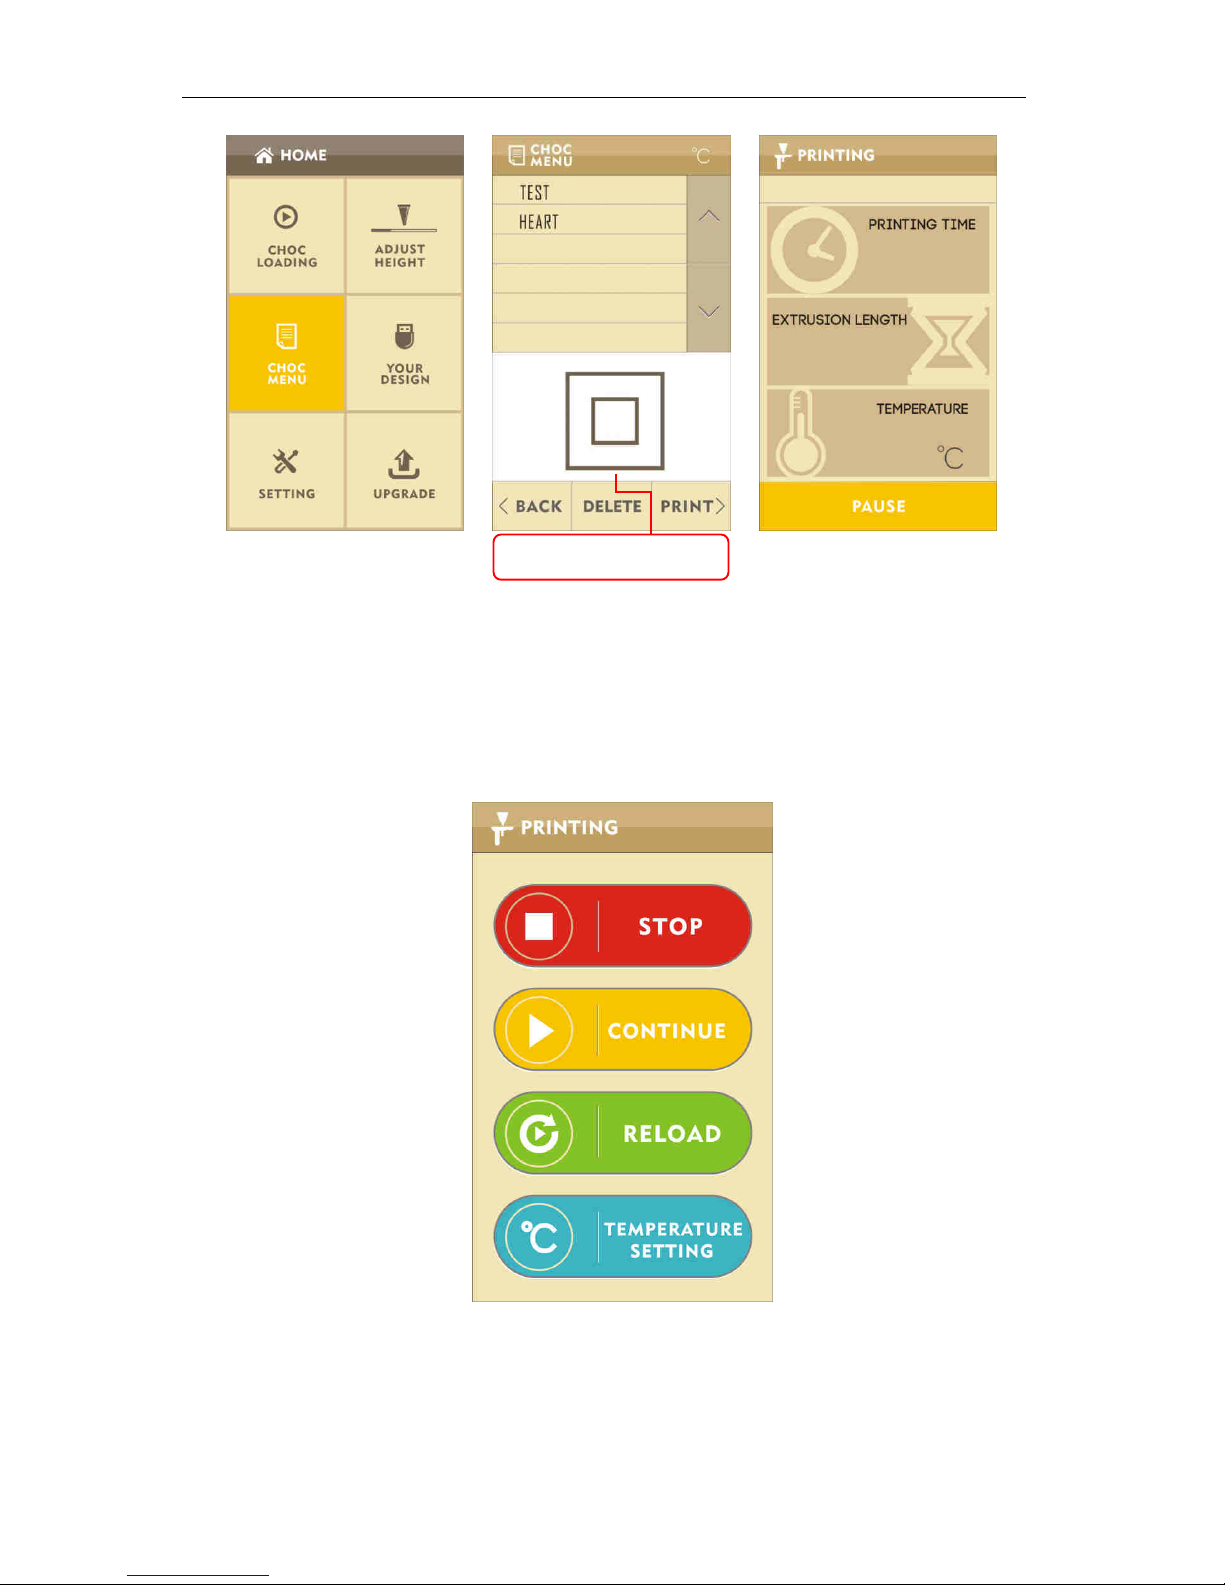
3.2.13 After setting the height, the screen will jump back to the home page automatically.
From here, choose Pre-stored design files, select one of the 12 printing files and press
Print to start the machine printing. (See Figure 3.2.13 below)
4 0
Press ENTER VALUE to manually key in a
specific value using the numerical pad
Figure 3.2.11
Figure 3.2.11.2
Choc Edge
15
Figure 3.2.13
B pessig Pause, Stop, Continue, Reloadand Temperature Settingfunctions can be
selected. (See Figure 3.2.13.2 below).
Figure 3.2.13.2
The Reloadprocess is that which has been introduced above in article 2.1.4.
Pre-stored designs

Choc Edge
16
3.2.14 On the HOME screen, the design files saved onto a USB flash drive can be printed by
seletig YOU‘ DE“IGN. “ee Figure 3.2.14 below)
Figure 3.2.14
3.2.15 If you want to move a file from a USB flash drive to the printers iteal eo,
press Saveand the Confirm. The files will be automatically saved in CHOC MENU as
pre-stored files.(See Figure 3.2.15 below)
Figure 3.2.15

Choc Edge
17
Note: If the files on the USB are imported as pre-stored design files, the files can no longer be
edited.
3.2.16 If the name of an imported file is the same as that of a pre-stored file, you will be asked
whether or not you would like to Replace the file. Choose Confirm to replace the
file or Back to cancel the import and rename the file to import again.
(See Figure 3.2.16 below)
3.2.17 If the printing file exceeds the printing size, you will be prompted that the File exceeds
printing size, in which case you can choose Retry to try again or press Backto
return to the last screen. (See Figure 3.2.17 below)
Figure 3.2.17
Figure 3.2.16
Choc Edge
18
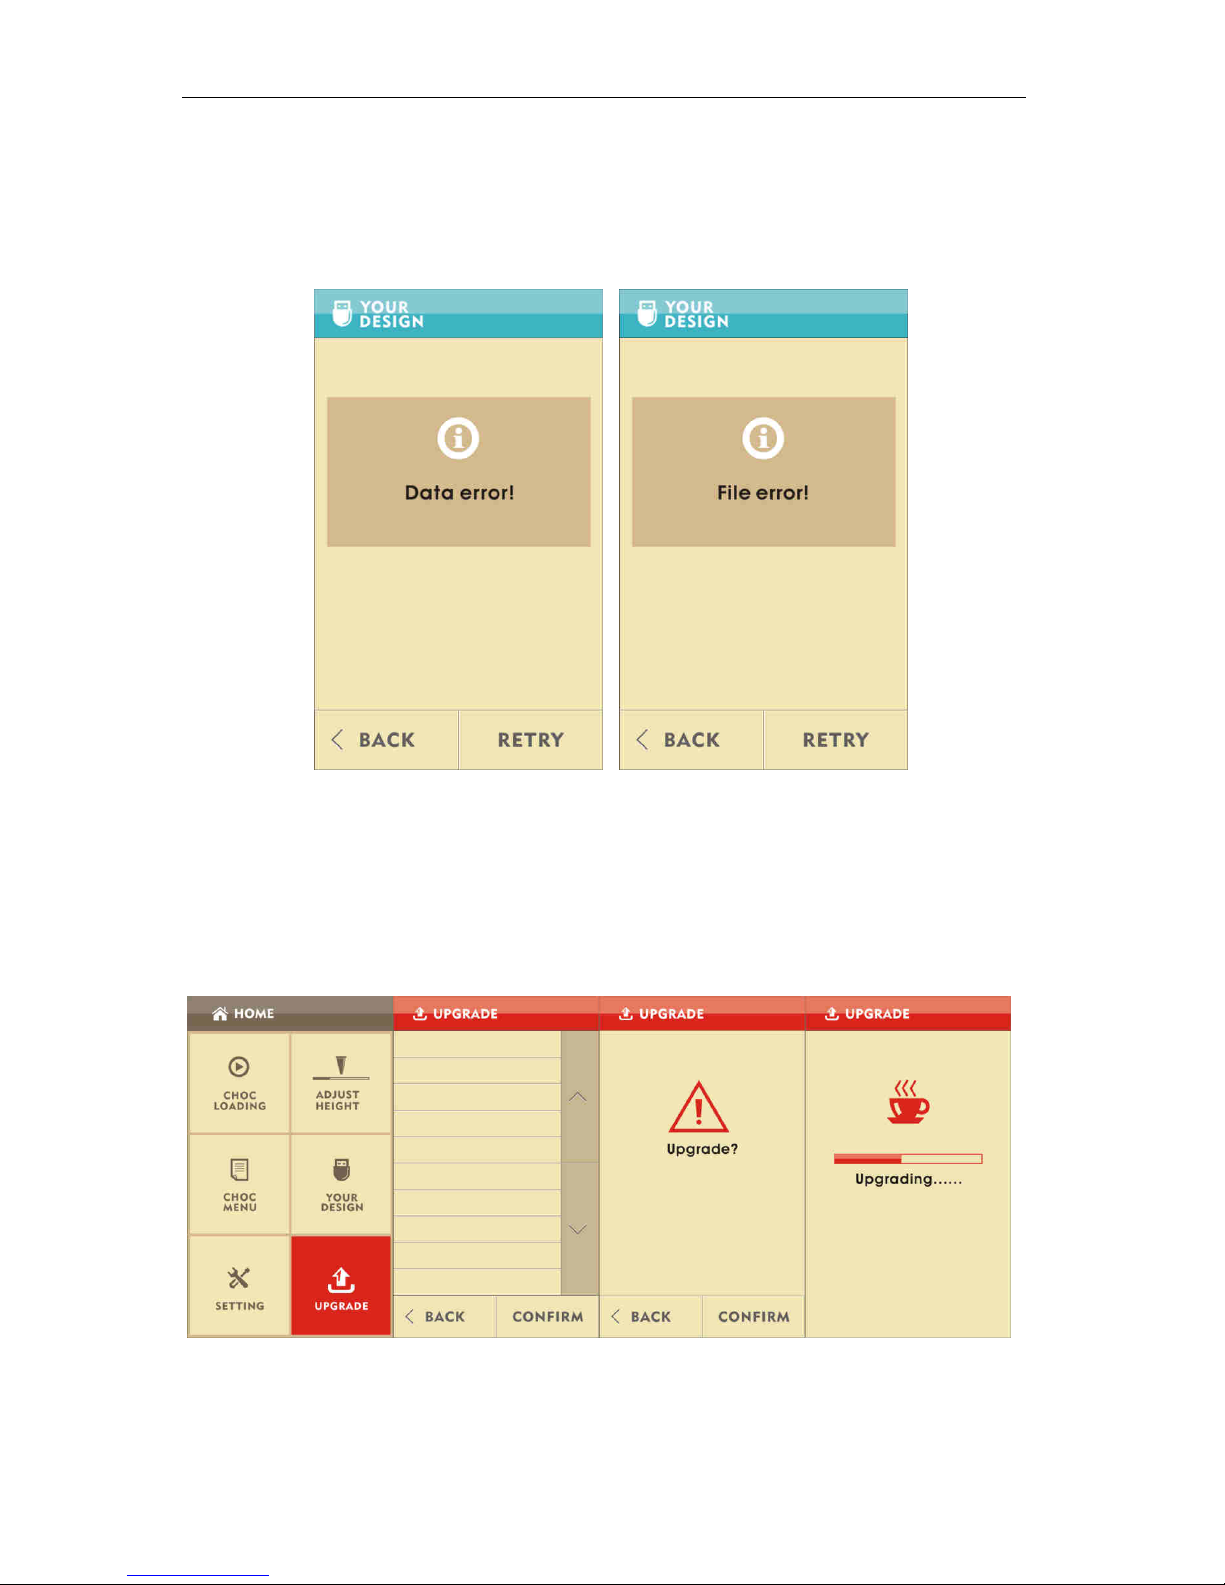
3.2.18 When files cannot be recognized by the machine, a File eo notification will appear on
see. A Data errorprompt means that the file you are using has been corrupted. You can
pess Retryto try again or go back to the last screen. (See Figure 3.2.18 below)
3.2.19 If the system needs to be updated, you can do so by pressing System update, selecting the
update file from a USB flash drive and pessig Confirm. The system will be updated within
a few minutes. (All users will be notified if their system requires an update.)
(See Figure 3.2.19 below)
Figure 3.2.19
Figure 3.2.18

Choc Edge
19
3.3 Note
3.3.1 Before using your Choc Creator for the first time, please check the printing platform is level
to make sure it has not been affected by shipping of the machine. If the platform appears to
need adjustment, refer to the video on the provided USB flash drive.
3.3.2 Clean the syringe after every use in order to avoid the rubber bung sticking inside the
syringe. If it does stick, put the entire syringe into a bowl of hot water (°C) for a few minutes
and pull the rubber bung out with a pair of tweezers. When the rubber bung wears out, it
can be replaced with the spare that is provided in the tool box.
3.3.3 Eletiit euieet: The opeatig oltage of the Cho Ceatos poe adapte is
between 100-240V. An unstable voltage or exceeding the range of the operating voltage can
damage the power adapter. A damaged power adapter will not light up when plugged in.
3.3.4 Before printing, put a piece of paper on the platform and fasten it in place using the four
magnets from the tool box. Displacement of the paper will affect the quality of printing.
Additionally, try to avoid placing the magnets close to the metallic nozzle. Placing the four
magnets on all four corners of the paper is the best option.
3.3.5 When printing for the first time, test the machine by printing a square. A Test Square file is
included as one of the pre-loaded design files. (see Figure 3.3.5 below)
Figure 3.3.5 (Actual photographs)
Choc Edge
20
3.3.6 If the room temperature is cold (lower than 8°C), the machine will need to be run
continuously in order to stop the chocolate from solidifying in the nozzle. Use the dredge
needle in the tool box to unblock the nozzle if the chocolate has solidified inside it.
3.3.7 If ou istakel go to the Loadig page afte opletig a pit ad ould like to pit
aothe, pess Next tie skippig the poess of hoosig 5l o 3l ad pess
Confirm. Please ote that the height of the pit head eeds to e set agai afte doig
this. (Adjusting procedure refers to the 3.2 Operating Procedure).
3.3.8 When printing files other than the pre-stored files, import the 3D model (STL or OBJ format)
and use the Cho Pit softae poided o the U“B flash die to geeate G-code files
on a computer. G-code files can then be printed either by connecting the computer to the
printer, or by placing them onto a USB flash drive. When using a USB flash drive, plug the
U“B flash die ito the pite ad pess U“B files. Choose the file ou at to pit ad
pess Print. If ou at to sae the file to the pites iteal eo, pess Import
ad Confirm, ad the file ill e autoatiall saed i Pe-stoed files.
3.3.9 If the sste eeds to e updated, pess “oftae Update, hoose the update file ad
pess Confirm. Custoes ill e ifoed Cho Edge if thei sste euies
updating).
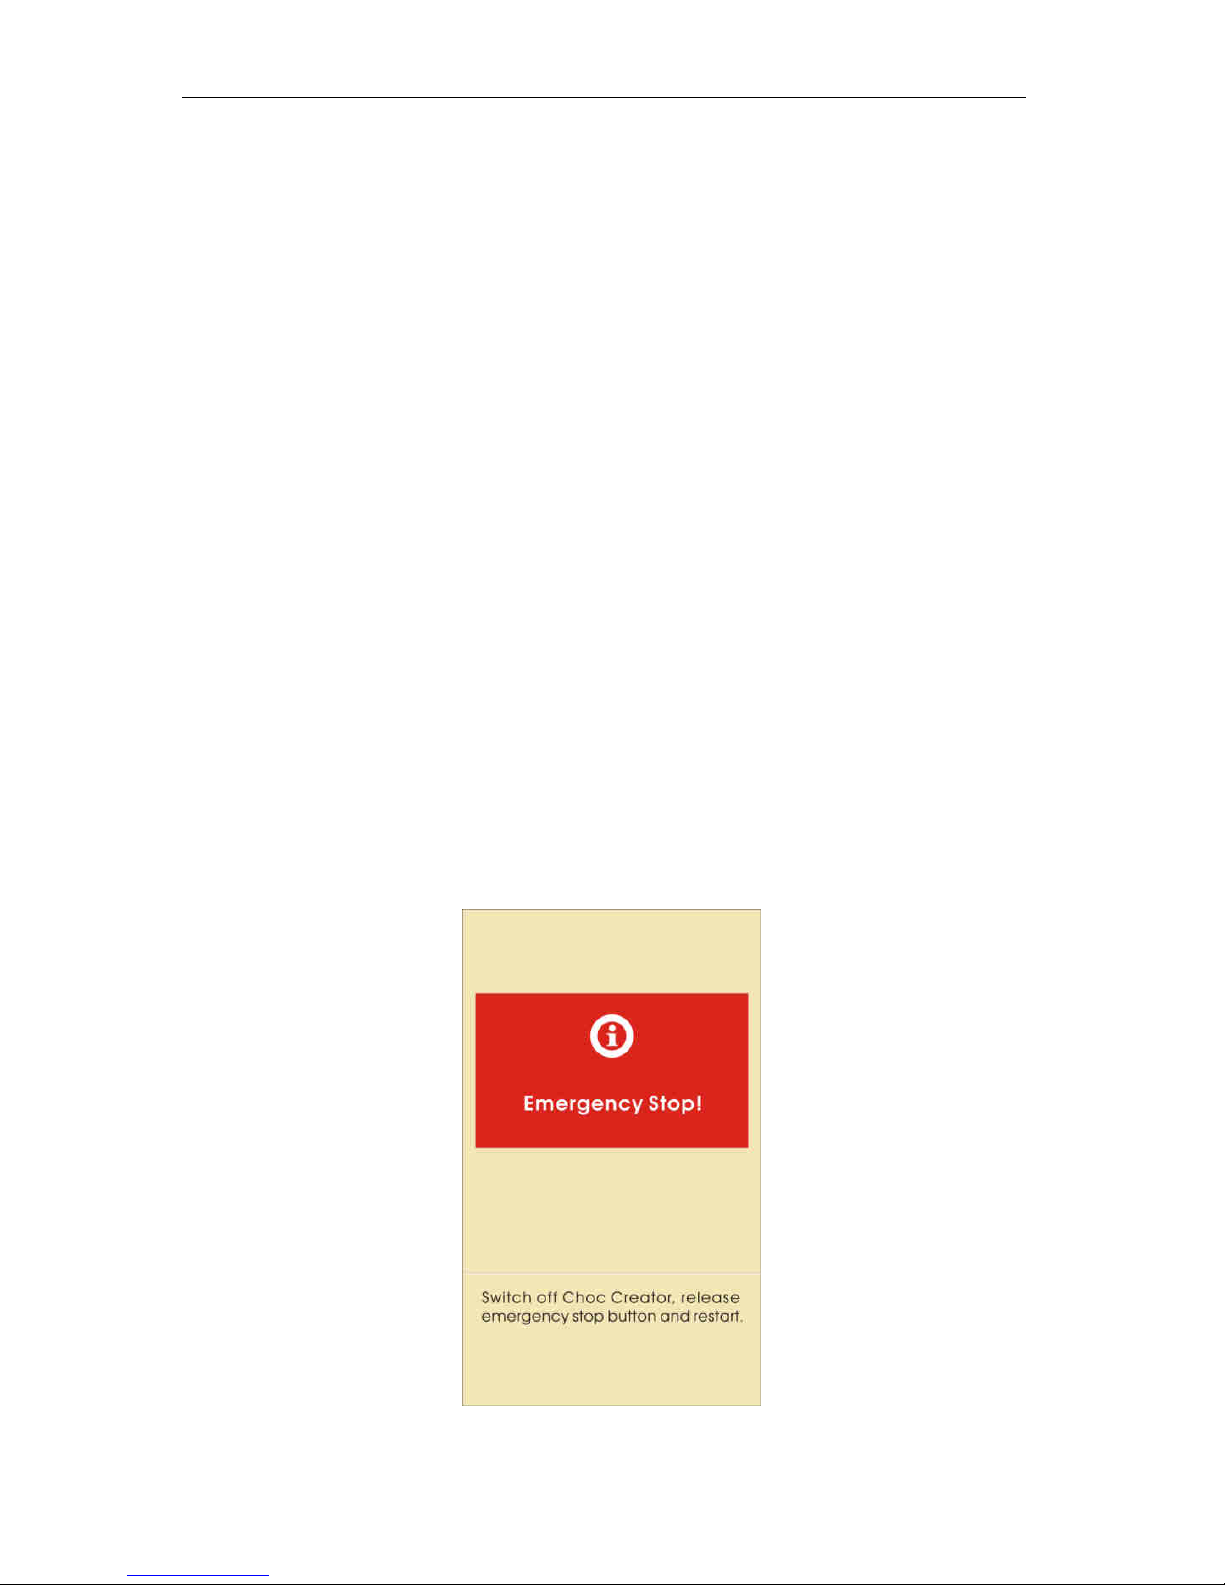
3.3.10 If anything unusual occurs during printing, press the emergency stop button and the
machine will stop instantly. Releasing the button does not make the machine continue
printing from where it stopped. After pressing the emergency stop button, the machine will
need to be powered off and restarted. The printer will not work until the emergency stop
button has been released. (See Figure 3.3.10 below)
Figure 3.3.10
Table of contents


