Choo Choo Vision PAN-CAM User manual

www.choochoovision.com 1 Released 12/15/2021
CAB-CAM 6
PAN-CAM User Manual

www.choochoovision.com 2 Released 12/15/2021
Contents
Introduction .............................................................................................................................................. 2
Pre-Requisites:.......................................................................................................................................... 2
Using your Choo Choo Vision Camera: .................................................................................................... 3
Admin Screen ........................................................................................................................................... 4
User Screen Controls and Operation ....................................................................................................... 6
Connecting your PAN-CAM Accessory ..................................................................................................... 9
Product Support: .................................................................................................................................... 11
Introduction
Congratulations! You have purchased a unique technological advancement for Model Railroading that
immerses you into the world of your layout. The PAN-CAM accessory allows you to rotate the view of
your CCV Camera. It easily attaches to CCV Trackside and CAB-CAMs
Pre-Requisites:
The Choo Choo Vision PAN-CAM accessory can be used with a CAB-CAM or a Trackside Camera that has
the following features:
The camera must have a 3” lens installed.
The camera must have the larger 400mAh battery installed or be powered externally (via our
DCC Convertor or USB 5V Power). The larger power source is required due to the current draw
of the PAN-CAM servo.
www.choochoovision.com 3 Released 12/15/2021
Using your Choo Choo Vision Camera:
Menus:
The Choo Choo Vision cameras is controlled by two menu screens, the Main User Screen, and an Admin
Screen.
The Choo Choo Vision Admin screen allows you to manage camera settings and control what types of
controls are displayed on the User Screen.
The Choo Choo Vision Main User Screen is the primary screen for viewing video and controlling the
camera.
The following sections detail how to access and utilize the Admin Screen and the Main User Screen:
Choo Choo Vision Admin Screen Choo Choo Vision Main User Screen

www.choochoovision.com 4 Released 12/15/2021
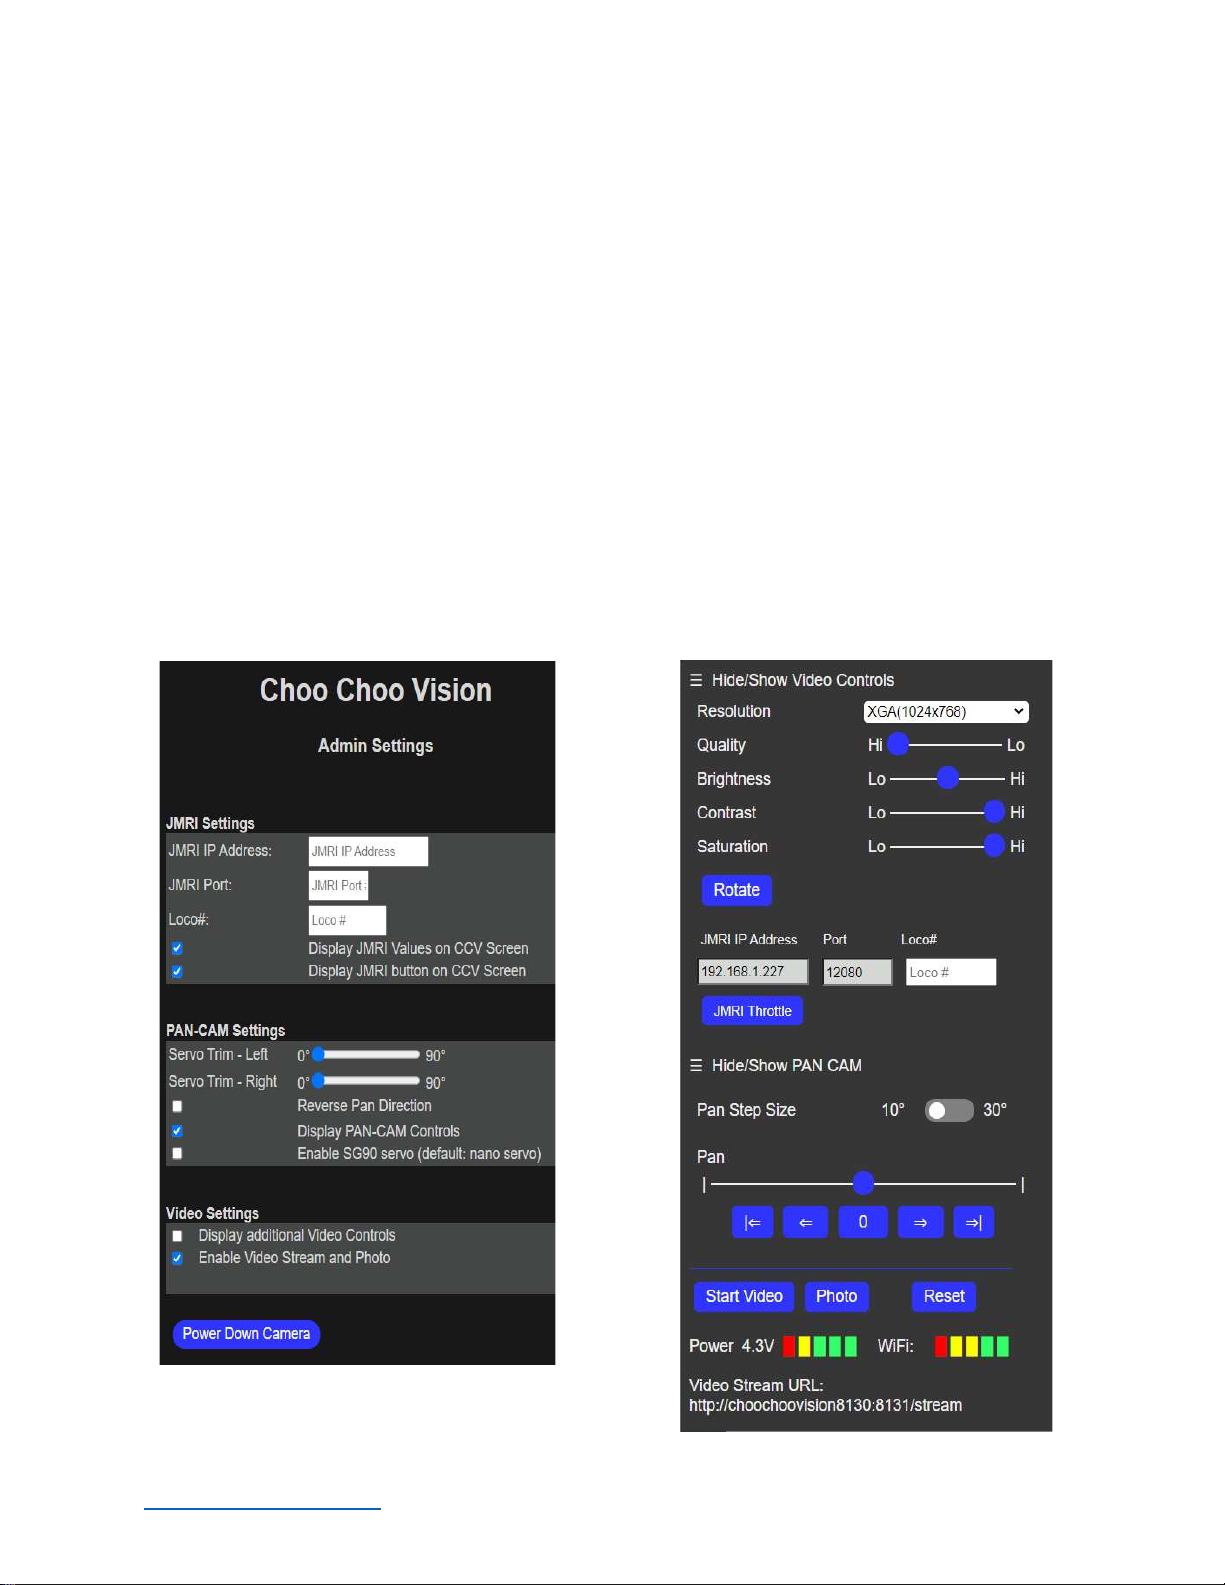
Admin Screen
The Choo Choo Vision Admin screen allows you to manage camera settings and control what types of
controls are displayed on the Main User Screen.
Accessing the Choo Choo Vision Admin Screen
To access the Admin Screen:
Turn the camera ON
Open a web browser on a computer or mobile phone. Note: The computer or mobile phone
must be on the same WiFi network as the camera.
Locate the camera’s ID number (printed on the back of the camera).
Enter the camera’s URL into your web browser The proper format is
http://ChooChooVisionxxxx:xxxx/admin where xxxx is your camera ID. Notice the colon “:”
between the ID numbers.
For example, if your camera ID is 8012, you would enter
http://ChooChooVision8012:8012/admin into the web browser address. Take notice of the
colon “:” between the two camera id values.
Book-mark this screen for future use.
www.choochoovision.com 5 Released 12/15/2021
Admin Screen Settings
JMRI Settings
JMRI IP Address: Enter the IP address of your JMRI Server.
Note: JMRI’s Web Server and WIThrottle services must be ON
within JMRI (see the JMRI manual for more information)
JMRI IP PORT: Port Number for the JMRI WiThrottle. This is
typically 12080 or 12090, but can be set to any value within JMRI.
LOCO #: DCC Address of the locomotive you wish to control
with the JMRI throttle. If you leave this blank, the JMRI system
will launch a list of all the JMRI Locos.
PAN-CAM Settings
Servo Trim – Left: Adjusts the brightness level of the image
Servo Trim – Right: Adjusts the contrast level of the image
Pan Direction: Reverses the direction of the PAN controls
Left/Right to Right/Left
Display PAN-CAM Controls: Show the PAN-CAM controls on
the Choo Choo Vision User Screen
Enable SG90 servo: Adjusts the CCV Software to use an SG90
Servo instead of the default PAN-CAM nano servo.
Video Settings
Display Video Settings: Displays additional video image
controls on the Choo Choo Vision User Screen (AEC Sensor, ASP,
AE Level, etc)
Enable Video Stream and Photo: IMPORTANT: This setting
enables / disables the video and photo capabilities on the main
page. It should normally be “checked” to allow you to view
video on the main page. You may wish to disable the video if
you don’t want remote viewers to see video.
Power Down Camera – Turn the camera power off from the
user screen. Note, in order to turn the camera back on, you must
either press the ON button located on the left side of the camera,
or use the magnet while under USB power. See Powering your
CCV camera for further details.

www.choochoovision.com 6 Released 12/15/2021
User Screen Controls and Operation
The User Screen is the primary screen for controlling the camera.
The Choo Choo Vision user screen allows you to view the video feed, take still images, and manage
camera settings. This page also is remotely viewable via the internet (with firewall port forwarding
enabled on your router).
The Choo Choo Vision User Screen adjusting camera settings, opens a JMRI throttle, runs the PAN-CAM
and start/stop the video feed, and take still images.
Accessing the Choo Choo Vision User Screen
To access the User Screen:
Turn the camera ON
Open a web browser on a computer or mobile phone. Note: The computer or mobile phone
must be on the same WiFi network as the camera.
Locate the camera’s ID number (printed on the back of the camera).
Enter the camera’s URL into your web browser The proper format is
http://ChooChooVisionxxxx:xxxx where xxxx is your camera ID. Notice the colon “:” between
the ID numbers.
For example, if your camera ID is 8012, you would enter http://ChooChooVision8012:8012 into
the web browser address. Take notice of the colon “:” between the two camera id values.
Book-mark this screen for future use.

www.choochoovision.com 7 Released 12/15/2021
Choo Choo Vision User Screen
Camera Main User Screen Controls
The Choo Choo Vision Main User Screen contains controls for adjusting camera settings, open a JMRI
throttle, run the PAN-CAM and start/stop the video feed, and take still images.
Adjusting Camera Image Settings
Resolution: Sets the image size for the camera.
Depending upon your internet speed, VGA mode may
perform the best.
Quality: Adjusts the image quality. Depending on your
internet speed, you may need to adjust the Quality level.
Brightness: Adjusts the brightness level of the image
Contrast: Adjusts the contrast level of the image
Saturation: Adjusts the saturation level of the image
Rotate: Rotates the image 90 degrees.
JMRI IP Address: IP Address of your JMRI Server
PORT: Port for your JMRI Server
Loco#: DCC address for the LOCO you wish to control.
Leave blank to display all JMRI Locos.
JMRI Throttle: Opens the JMRI throttle to control your
locomotive. You must have JMRI’s Webserver and
WiThrottle running on the JMRI server.
Pan Step Size: Sets the number of degrees the PAN
CAM will move when using the <= or => buttons.
Pan Slider: Moving the Pan slider will move the Pan-
Cam left or right.
Pan ( |<= , 0 , =>| ) buttons: Pans the camera to
preset angles of -90 degrees, 0 degrees, or +90 degrees.
Pan ( <= , => ) buttons: Pans the camera in
increments of 10 or 30 degrees.
Start Video: Starts the video stream.
Photo: Takes a single photo from the camera.
Reset Camera: Remotely reboots the camera module.
Power Meter: Displays the power available to the camera. Under external power, the Power
Meter will typically read 4.0 to 4.2 volts. Under battery power, the Power Meter will display
the battery voltage. The camera will automatically shut down when the voltage is less than 3.5
volts.

www.choochoovision.com 8 Released 12/15/2021
WiFi Meter: Displays the strength of the WiFi signal received by the camera. The WiFi Meter
can help you identify areas on your layout with poor WiFi coverage.
Video Stream URL: Displays the raw video feed without the control panel. Enter the IP address
into a web browser to view the camera control screen and display the video. Note: Only one
web browser at a time can be connected to the camera.
www.choochoovision.com 9 Released 12/15/2021
Connecting your PAN-CAM Accessory
The basic steps to connect your PAN-CAM are:
Steps:
Power OFF the camera.
Attach the PAN-CAM unit to the front of the camera body.
o Slide the PAN-CAM accessory it touches the end of the camera.
o Ensure the clips on the PAN-CAM accessory are seated to the camera body.
Plug the PAN-CAM accessory into the camera:
o Locate the wires and connector plug on the PAN-CAM accessory.
o Locate the white GROVE port on the bottom of the camera
o Plug the PAN-CAM connector into the GROVE port.
Insert Lens into PAN-CAM
o Locate the round hole in the PAN-CAM lens mount
o Gently insert the lens thru the hole
Power OFF the
Camera
Attach the
PAN-CAM to
the camera
Plug the
PAN
-
CAM into the
Grove Port
Insert the Lens
into the PAN-
CAM mount
Place PAN
-
CAM against
the end of the camera.
Mounting clips will “click” when
fully seated.

www.choochoovision.com 10 Released 12/15/2021
Insert PAN
-
CAM
plug into the white
connector on the
back of the
camera
Insert lens into
mounting hole

www.choochoovision.com 11 Released 12/15/2021
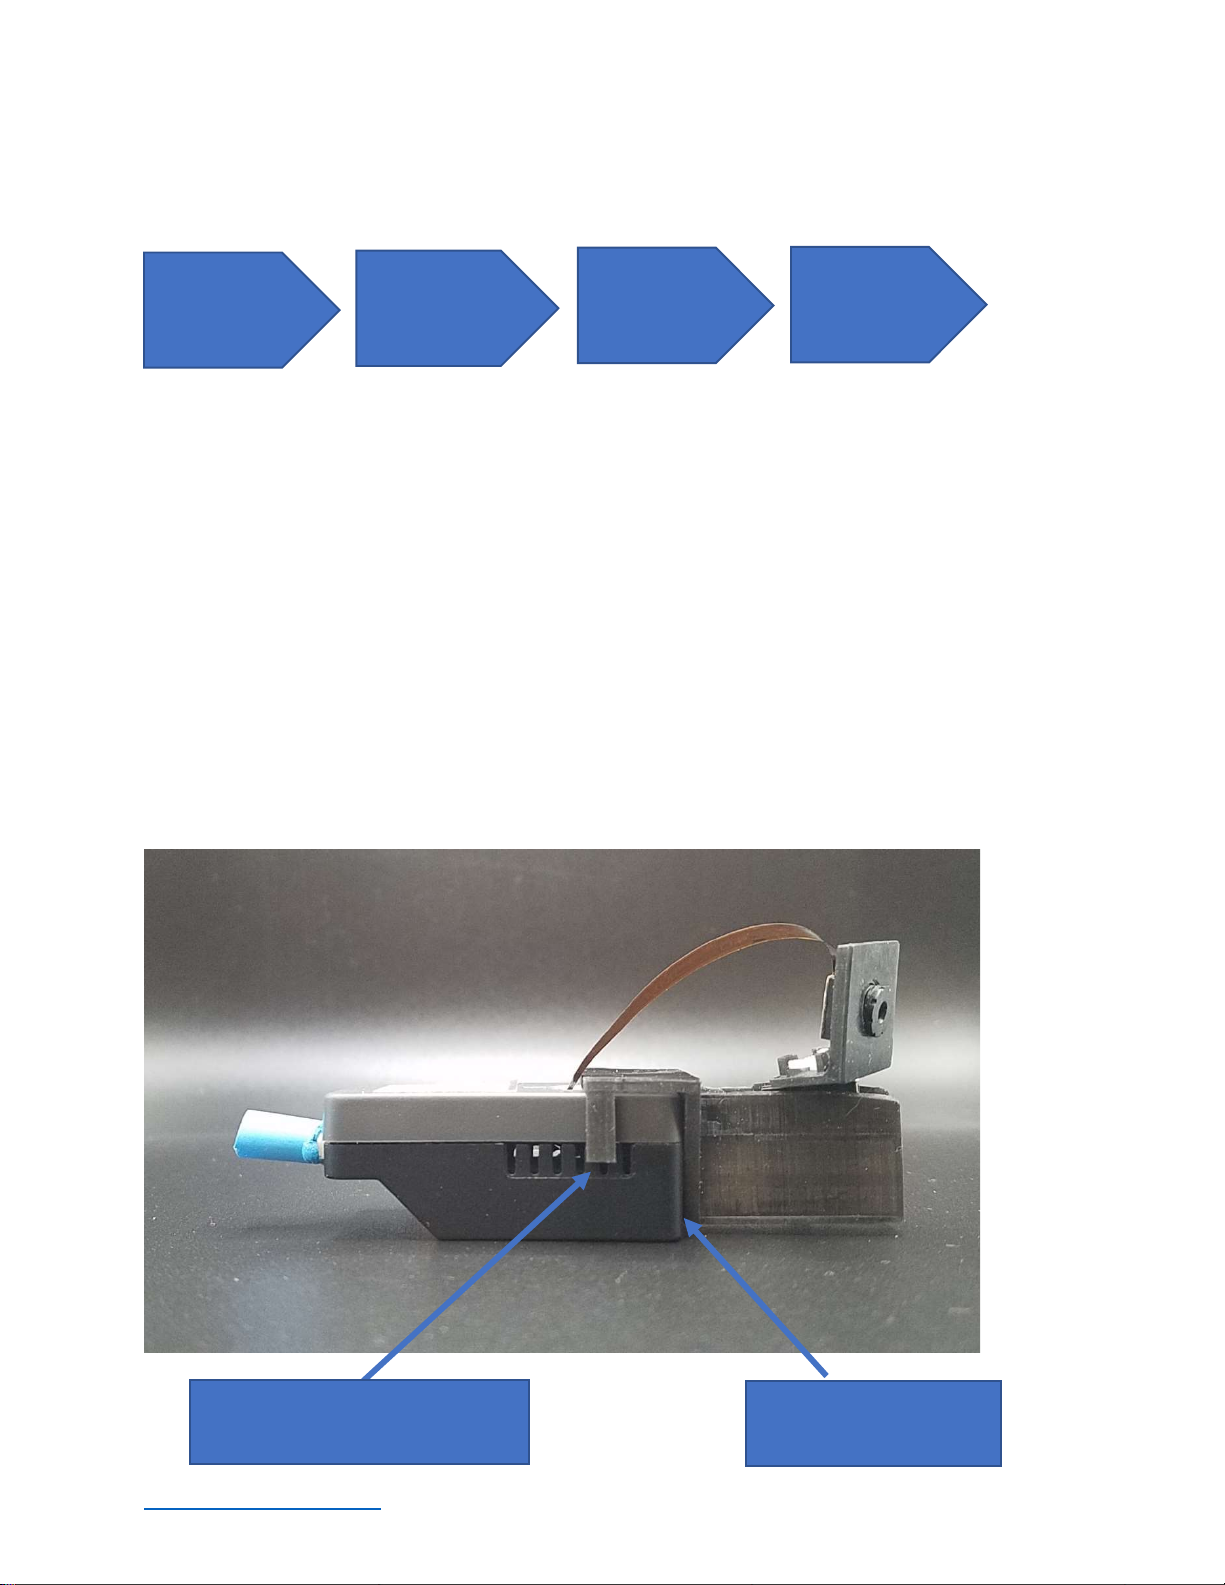
Testing the PAN-CAM installation
Plug the camera into USB power.
The camera status light should blink quickly for 2 seconds and go off.
After a couple of seconds, the camera status light should turn on (dimly).
The PAN-CAM will “center” itself.
Open the Choo Choo Vision user screen and un-hide the PAN-CAM controls on the menu
Move the PAN-CAM fully to the right using the =>| button
Move the PAN-CAM fully to the left using the |<= button
If the PAN-CAM is moving in the wrong direction, press the “Reverse Pan Direction” button
Adjusting the PAN-CAM downward angle
The PAN-CAM lens mount is set at a 10-degree downward angle to provide a more realistic view from
the top of the CAM.
You can adjust the downward angle of the PAN-CAM by positioning the tiny servo inside the PAN-CAM
body. Once you have set the appropriate angle, you can secure the servo to the PAN-CAM body using
blue mounting putty.
If you decide to use the PAN-CAM for trackside viewing or railfanning, you can adjust the position of the
servo to an appropriate angle.
Product Support:
If you have any question regarding the setup, use, or suggestions, please feel free to contact us.
Email: support@ChooChooVision.com
Website: Send a request via our website www.ChooChooVision.com/contact
Table of contents


