Ciclo NAVIC 400 User manual

Manual

2
IMPRINT:
Ciclosport K.W.Hochschorner GmbH
Lohenstr. 11
DE - 82166 Gräfelfing
Ciclosport GmbH reserves the right to change the information and data contained in this manual
without prior notice. Without the explicite written permission of Ciclosport K.W.Hochschorner GmbH,
no part of these documents may be reproduced or transmitted for any purpose whatsoever,
regardless of the manner or means by which this is done.
All trademarks mentioned in this manual are the exclusive property of their respective owners and
may therefore not be used for commercial or other purposes.
Since, despite all efforts, errors can never be completely ruled out, no liability is accepted for the
accuracy of the contents of this manual. We are always grateful for any information on errors.
All illustrations were similar.
© 2019 Ciclosport K.W.Hochschorner GmbH, Gräfelfing.
All rights reserved.

3
CONTENT
1
Safety instructions and maintenance
...........................................................................................
5
2
Device description ..........................................................................................................................
7
2.1
Device
...............................................................................................................................................
8
2.2
Bracket ............................................................................................................................................
9
3
Introduction
.....................................................................................................................................
9
4
Main Screens .................................................................................................................................
10
4.1
Navigation Screen ......................................................................................................................... 10
4.2
Cockpit ............................................................................................................................................
11
4.3
Altitude profile …..
.
..........................................................................................................................
11
5
Main menu ......................................................................................................................................
12
6 Navigation
.......................................................................................................................................
12
6.1
Map ..................................................................................................................................................
12
6.2
Route proposal ................................................................................................................................
12
6.3
Address ...........................................................................................................................................
12
6.4
Home ............................................................................................................................................... 12
6.5 Specific objectives
.........................................................................................................................1
3
6.5.1
Detailed view of a POI ......................................................................................................................
13
6.6
Last destinations
............................................................................................................................
13
6.7
Position in map
..............................................................................................................................
13
6.8 Path points ...........
..........................................................................................................................
14
7
Calculated route ..............................................................................................................................
14
7.1
Alternative routes ........................................................................................................................... 1
5
7.2 Altitude profiles
.............................................................................................................................
15
7.3
Route options and drag route .....................................................................................................
15
7.4 Route information
..........................................................................................................................
15
8
Draw route.......................................................................................................................................
16
9 History
............................................................................................................................................
16
9.1 Recordings tracks
.........................................................................................................................
16
9.1.1
Starting recording
..........................................................................................................................
16
9.1.2
Pausing recording..........................................................................................................................
16
9.1.3
Resume recording..........................................................................................................................
16
9.1.4
Ending recording............................................................................................................................
16
9.1.5 Detailed view of an activity
............................................................................................................
17
9.1.6 Edit activity.................................................................................................................................... 17
9.1.7 Start track as navigation ..............................................................................................................17
9.1.8 Convert track to route ..................................................................................................................17
9.1.9 Starting track guidance directly ..................................................................................................18
9.1.10 Set starting point ..........................................................................................................................18
10 Extras
...............................................................................................................................................
18
11 Waypoint manager ..........................................................................................................................18
11.1 Select waypoint ...............................................................................................................................18
11.2 Create waypoint .............................................................................................................................. 19
11.3 Deleting created waypoints ........................................................................................................... 19
12 Settings ............................................................................................................................................19
12.1 Navigation settings .........................................................................................................................19
12.1.1 Route options .............................................................................................................................. 19
12.1.2 Define country map ........................................................................................................................ 20
12.1.3 Requesting route options .............................................................................................................. 20
12.2. Presentation of the map .................................................................................................................20

4
12.2. Presentation of the map .................................................................................................................20
12.2.1 North/Direction ................................................................................................................................20
12.2.2 Position on Road ............................................................................................................................ 20
12.2.3 Autozoom (only in Bike mode) ......................................................................................................20
12.2.4 Destination on map ........................................................................................................................ 20
12.2.5 Track recording in Map .................................................................................................................. 20
13 Profiles .............................................................................................................................................20
13.1 Change profile .................................................................................................................................20
13.2 Editing profile ..................................................................................................................................20
13.3 Edit user profile ...............................................................................................................................20
14 System/General ...............................................................................................................................21
14.1 Battery ..............................................................................................................................................21
14.2 GPS-Info ...........................................................................................................................................21
14.3 Brightness ....................................................................................................................................... 21
14.4 Navigation sounds ....................................................................................................................... 21
14.5 Compass calibration ..................................................................................................................... 21
14.6 Calibrating the barometer ............................................................................................................. 21
14.7 Setting the position format ............................................................................................................22
14.9 Set Home ......................................................................................................................................... 22
14.10 Default settings ...............................................................................................................................22
14.11 Time ..................................................................................................................................................22
14.12 Language .........................................................................................................................................22
14.13 Screen .............................................................................................................................................. 23
14.14 Info about .........................................................................................................................................23
14.15 Track recording reminder .............................................................................................................. 23
14.16 Unit ................................................................................................................................................... 23
14.17 Processing ...................................................................................................................................... 23
14.18 Day and night mode ....................................................................................................................... 23
15 Tour planner ....................................................................................................................................23
15.1 Creating a new tour ........................................................................................................................ 23
15.2 Planning the circuit ........................................................................................................................ 23
15.3 Selecting a saved tour ....................................................................................................................22
15.4 Detailed view of a tour ....................................................................................................................24
15.5 Edit tour ........................................................................................................................................... 25
16 Extras ............................................................................................................................................... 25
16.1 Active route ..................................................................................................................................... 25
16.2 Remembering position ...................................................................................................................25
16.3 Waypoint manager ..........................................................................................................................25
16.3.1 Select waypoint ...............................................................................................................................25
16.3.2 Creating waypoints .........................................................................................................................25
16.3.3 Deleting created waypoints ........................................................................................................... 26
17 GPX-Manager .................................................................................................................................. 26
18 Tipps and tricks .............................................................................................................................. 26
19 CicloGuide2 .....................................................................................................................................27
20 Troubleshooting ............................................................................................................................. 27
21 Glossary ...........................................................................................................................................28
22 Technical Data .................................................................................................................................29
23 Declaration of guarantee ................................................................................................................30

5
1. SAFETY INSTRUCTIONS AND MAINTENANCE
SECURITY ADVICE
In any case the regulations of the road traffic are valid. Destination entries can only be carried out
when the vehicle is stationary.
The navigation system is only an aid, the data/information may be incorrect in individual cases.
The user has to decide for himself in every situation whether to follow the instructions.
Liability for incorrect information provided by the navigation system is excluded. Due to changing
traffic patterns or deviating data, it may happen that inaccurate
or incorrect instructions are given. It is always necessary to refer to specific signs
and traffic regulations. In particular, the navigation system cannot be used as an orientation aid in
bad visibility conditions.
The device may only be used for its intended purpose. In the case of
of a malfunction (e.g. smoke or odour), the device must be switched off immediately.
For safety reasons, the unit may only be opened by a specialist. In case of repair, within Germany,
please contact Ciclosport K.W.Hochschorner GmbH directly. Outside Germany, please contact your
dealer or the responsible distribution.
The device and the battery must not be opened under any circumstances. Use only original
accessories. This is to ensure that all relevant regulations are observed and damage to health and
property is avoided. Dispose of the unusable devices or the battery according to the applicable legal
regulations.
Improper use excludes any warranty! These safety instructions also apply to the original
accessories.
The battery must not be disassembled, pierced or otherwise damaged. The user must check
whether the device is suitable for the intended use and connection.
The user bears all risks associated with the use of the device and installation.
Ciclosport K.W. Hochschorner GmbH is not liable for injuries, losses, damages or consequential
damages resulting from modifications to the device and accessories, improper installation,
operating errors, dangers in road traffic and accidents.
The device should only be used at temperatures between -10°C - 60°C.
The storage temperature is -20°C - 70°C.
The device must not be exposed to extreme temperatures and should only be operated and stored
in air humidity from 0% to 90%.
The device should also not be exposed to sudden strong temperature fluctuations.
This could cause condensation water in the device, which could damage it.
If condensation water occurs, the unit should not be put back into operation until it is completely dry.
The device is waterproof according to the IPX5 standard. This means that the device is protected
against
splashing water and ingress of water.
Caution: To ensure that the device is protected against water ingress, make sure that the rubber
covers of the USB and charging ports, on the bottom of the device, are completely closed.
The product should not be placed, stored or left in or near heat sources, in places subject to high
temperatures or strong sunlight, in a microwave oven or pressurized container, or exposed to
temperatures above 70ºC (158ºF).
Only original accessories may be used. The use of other parts can lead to malfunction and/or
serious damage.

6
ATTENTION:
•
This navigation device for outdoor use is only an orientation and navigation aid that cannot
replace a reasonable assessment of the situation. In any case, the conditions of the terrain and
the paths used must be observed. Do not follow any routes or route suggestions that involve a
dangerous or illegal riding style or would put you in a dangerous situation.
•
The road traffic regulations must always be observed, for example while cycling, and take priority
over the routes of the navigation device.
•
Never operate the navigation device while riding and never allow yourself to be distracted by the
device while cycling.
•
Please note that Ciclosport K.W. Hochschorner GmbH does not accept any liability for damage
caused by the device/holder becoming detached from the bicycle.
•
The map data used, may contain inaccurate or incomplete data.
Therefore, check the calculated route for reasonableness and select an alternative route if
necessary.
•
The navigation device is NOT suitable for use as a car navigation system!
DISPOSAL
DISPOSAL OF USED ELECTRICAL AND ELECTRONIC EQUIPMENT
EQUIPMENT (APPLICABLE IN THE COUNTRIES OF THE EUROPEAN UNION
AND OTHER EUROPEAN COUNTRIES WITH A SEPARATE COLLECTION SYSTEM
FOR SUCH EQUIPMENT)
The symbol on the product or its packaging indicates that this product should not be treated as
normal household waste but should be handed in at a collection point for the recycling of electrical
and electronic equipment. By helping to dispose of this product correctly, you will help to protect the
environment and the health of everyone around you. The environment and health are endangered
by incorrect disposal. Material recycling helps to reduce the consumption of raw materials. For more
information about recycling this product, contact your local authority, municipal waste disposal
company or the shop where the product was purchased.
•
WEEE-Reg.-No. DE 36497882
AIRPLANES AND HOSPITALS
In most airplanes, in many hospitals and many other places the use of electronic devices is
prohibited. The device must not be used in such an environment. Always switch off your device
where prompted.
CE-CERTIFICATE
The device complies with the regulations of the 2014/53/EU (RED) directive.
You can download the whole certificate from our homepage www.ciclosport.com
download..

7
2. DEVICE DESCRIPTION
2.1 DEVICE
On/Off switch (ON/OFF):
Turns the unit on. If you press the ON/OFF switch during use, you have the following options:
Turn it off:
Turns the unit off completely.
Stand-By:
Switches to stand-by mode.
Screen off:
The screen is switched off, current navigation or activity recordings are retained.
Key lock on/off:
Activates or deactivates the key lock. The key lock prevents unwanted entries via the screen.
To turn the key lock off, press the on/off switch again and press key lock. Pressing the on/off switch
again switches back to the application.
Note:
If the unit stops responding and cannot be operated, reset the unit: Press the power switch for
15 seconds.
Track Record button:
Short press activates the touch screen. Here you can start or stop a recording.
Screen:
Displays the map and menu. To make entries or select functions, tap with your finger on the
corresponding place on the screen.
ON/OFF
Record
Start/Stop
Right
Left
Back
8
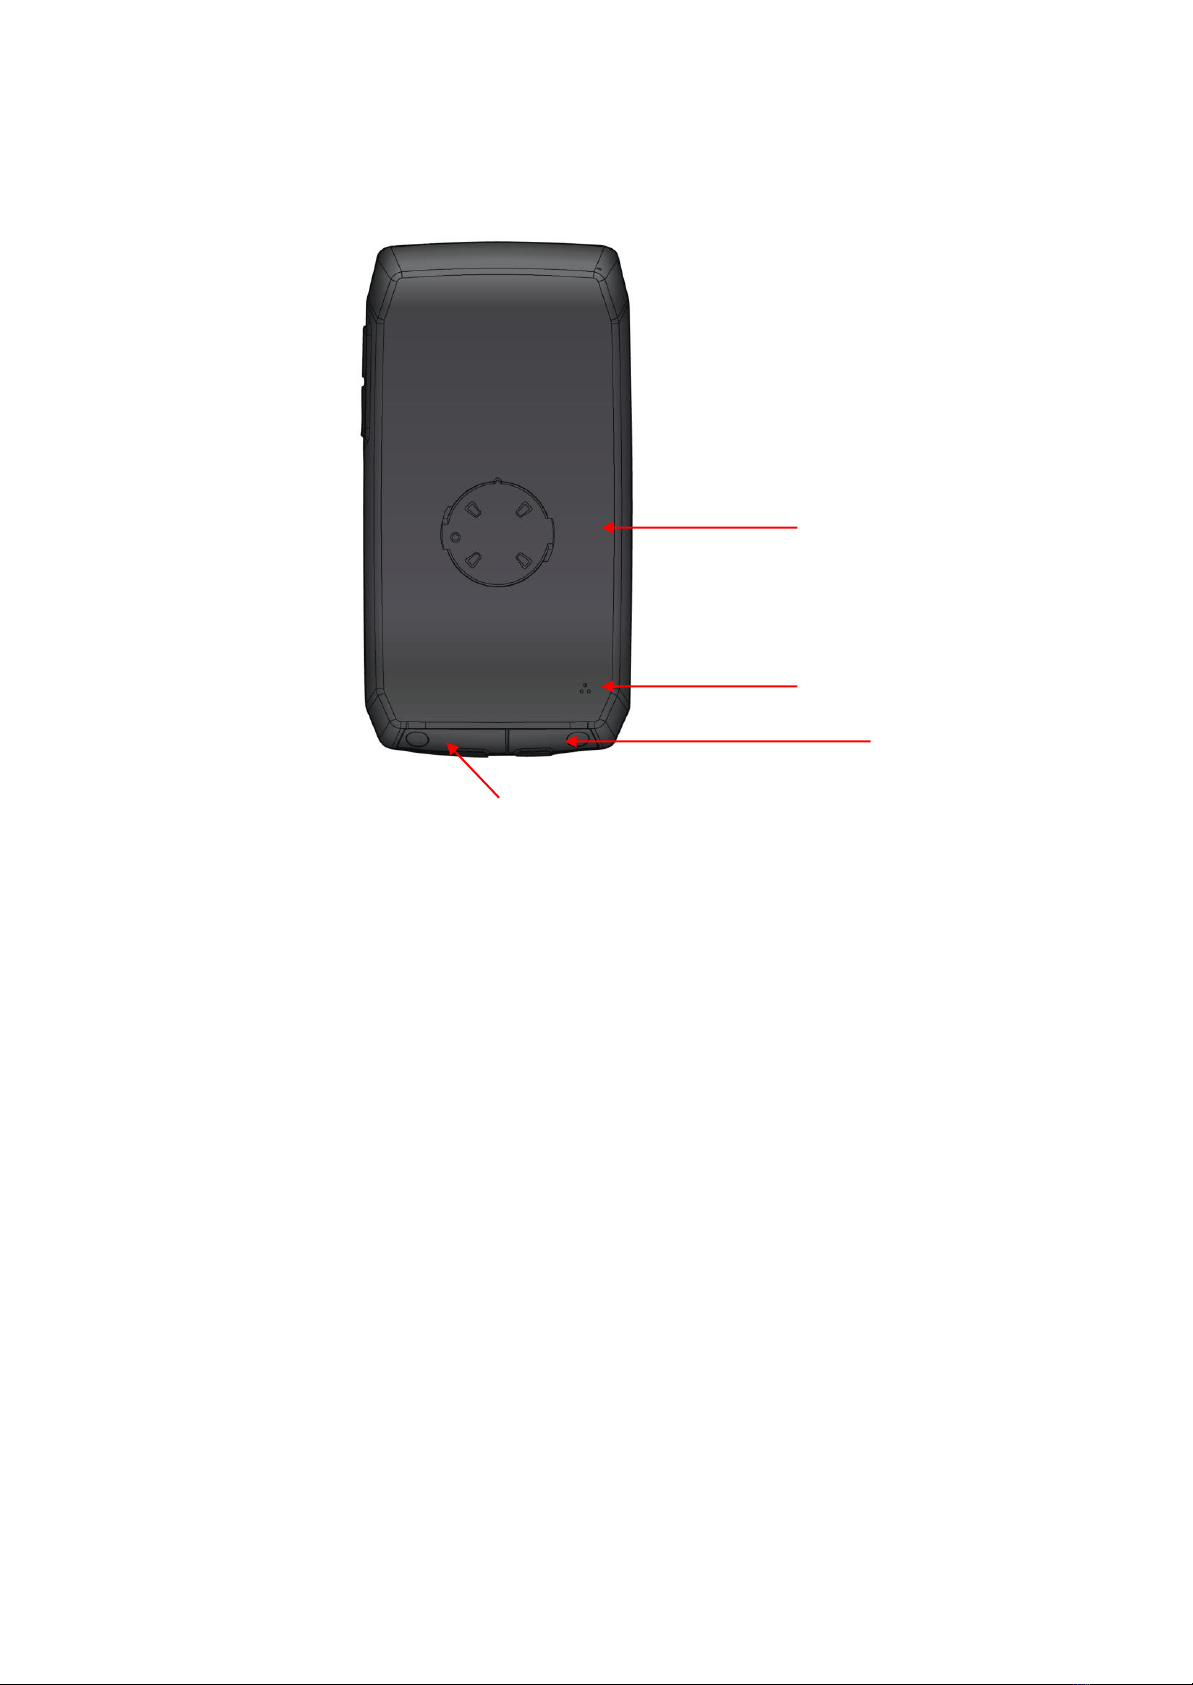
2.1 DEVICE
USB connection:
Connection for charging the battery via the power supply unit or for connecting the device to a PC
via the USB cable.
Slot for Micro SD cards:
Here the NAVIC 400 can be expanded with Micro SD cards of the category SDHC up to a maximum
of 128GB in memory. Both connectors are located under separate covers.
You can simply fold them out. Make sure that you close them again as soon as you have the device
in the field. It's the only way to ensure IPX5-certified waterproofness.werden.
NOTE:
The rubberized cover also protects against water ingress. Make sure that it is always completely
closed when using the Navic400.
Piezo Lsp.
Micro-SB Slot
Micro-SD-Slot
counterpart
bracket

9
2.2 BRACKET
To mount the bracket to the bike you have to
open the screw on the handlebar bracket.
Then put one of the suitable rubber bands in
the ring of the handlebar bracket, open it and put
it at the desired mounting location to install the
Handlebars.
Hand tighten this screw.
Hand tighten this screw.
To fix the device in the holder, insert it to the left into the
handlebar holder and turn it slightly to the right until it
clicks into place. Please always check before cycling
that the NAVIC 400 is correctly fastened.
3. INTRODUCTION
The chapters are based on the menu structure of the application. This way you will quickly know
where to look to get a particular function explained.
If you don't find what you are looking for, you can search for terms in the glossary.
The tips and tricks will help you to use your device quickly and efficiently.
If you're having trouble using your device, or something doesn't seem to work, you might find the
troubleshooting section helpful.
If there is still no solution, please contact our Service & Support (see corresponding chapter).
Scope of supply:
•
Device NAVIC 400
•
Bicycle mount
•
Bicycle mount
•
Micro USB cable
•
Micro USB cable
The following elements are used in this manual for better comprehensibility:
NOTE:
Information worth knowing.
TIP:
Practical application aids.
CAUTION:
Warning label to avoid unwanted effects.
NOTE:
•
Terms are marked «bold» in the text.
•All illustrations are similar.

10
4. MAIN SCREENS
4.1 NAVIGATION SCREEN
GPS signal:
Shows the status of GPS reception.
GPS signal is not sufficient for geta fix
on your position There are fewer as 3 position
satellites received
GPS signal is sufficient to determine
position mood. Three satellites are been
received.
GPS signal has a good quality and allows
a determination of the altitude. There will be at least
4 satellites that are received.
GPS status
The basis of any navigation is sufficient coverage by satellites to continuously determine your
location using a GPS (Global Positioning System) signal. How to check the GPS status of your
device is explained in chapter 14.2.
NOTE:
It may take a few minutes until the GPS position is recognized when the device is switched on for
the first time. If you switch on the device repeatedly, your position will be recognized faster.
Profile:
Shows you which profile you have selected.
Battery:
The battery level and the charging process are indicated by a battery symbol in the navigation
display.
–Remaining battery capacity
–Charging in progress
Recording:
When an activity is recorded, a corresponding icon is displayed.
–Current recording of an activity
Info field:
Displays information on the calculated route. To get more information tap on the field. For example,
you can also view the current altitude, time or gradient.
Map:
Shows the map section with the current position. If you want to move the map, tap the zoom
button .
Now you can move the map and use the plus and minus buttons to zoom in or out. You can then
use the arrow button to return to your current position.
Next maneuver:
In the manoeuvre field, an arrow shows you the next turning direction, previously used roads and
the distance to the next manoeuvre. If you are in a roundabout, the outgoing roads are also
displayed in addition to the turning arrow.
Relevant crossroads and intersections that are before your next turn are also displayed. If there are
several outgoing crossroads before your manoeuvre, numbers on the side symbolize how many
crossroads you still have to pass.
Distance to the next manoeuvre:
Shows you how far away the next manoeuvre is.
Next maneuver:
If you have several manoeuvres to complete in quick succession, the manoeuvre after next in the
form of a directional arrow to the right of the manoeuvre field. This allows an orientation in time.
Current position:
Your current position is marked with a red arrow on the map.
GPS signal quality
Speed
Next
manoevre
Distance
next
manoevre
Cancel
route
Bike profil
Battery status
Remaining km
to destination
Compass
Current position
Map
move to
map view

11
Zoom button:
Tap on the zoom button and then on the plus or minus symbol to adjust the scale of the map.
By tapping on the «Bird button» you can see your route from a bird's eye view.
Click in the map:
If you tap on a location on the map, the location is highlighted, the address or position is displayed.
If you tap on «Actions», you can, for example, navigate to the marked point or save the point as a
waypoint.
Clickable points of interest:
If you tap on the «Zoom-Button» and then tap on a special destination symbol on the map, you
canconveniently find out about the displayed points of interest (POIs), note the position, start a
proximity search or select the special destination for the route calculation.
Select a POI symbol on the map for more information.
If you tap on the name of the POI, the detailed view of this POI is displayed.
A «Actions» button appears under the name.
•Tap this button. The above-mentioned actions are now available to you.
•Tap on «Close» in the information window or on the arrow at the bottom of the screen to
to switch back to the «map view».
NOTE
There are also POIs that are not clickable. These can be trees or barriers, for example.
They serve the purpose of better orientation.
FURTHER INFORMATION:
If you accidentally miss a turn or enter a wrong street, a new route is automatically calculated. This
way you will be guided safely to your desired destination using a new display, your position and the
route to be taken.
You are automatically in «free riding mode» if you are not heading for a destination. Even if you do
not ride to a certain destination and just want to explore the area, you can continuously see your
current position on the navigation screen. You can end navigation by tapping the «Cancel route»
button.
4.2 COCKPIT
If you wipe to the left within the chart view, you will reach the cockpit view,
which shows you many measured values. You can configure the view
yourself by tapping on a field and then selecting from the list which value
should be displayed in this field.
TIP:
You can get the average values, such as average speed, by
recording an activity.
4.3 ALTITUDE PROFILE
To the right of the map view is another screen
with a height profile. This shows you the currently
travelled altitude. As in the map there are also
configurable displays at the top edge to route
information or activities. If you wipe further to the
left, you get back to the trip computer and the
other way around.
With the button you can view the height profile
in detail.

12
5. MAIN MENU
In the «Main Menu» you will find the various functional areas of the NAVIC 400. For a better
overview and orientation, the different areas have different colors deposited. The main areas are
«Navigation», «Cockpit», «Tours», «History», «Extras» and «Settings».
6. NAVIGATION
6.1 MAP
Here you can call up the map of your immediate surroundings. Three
functions are visible in the upper part of the map. If you tap you can
freely select the displays according to the list displayed. If you want to
view the map in more detail by tapping on the «magnifying glass» in
the lower right corner, you can enable further functions.
With the « +» or « -» button you can zoom in or zoom out of the map.
Furthermore, there are the bird's-eye view and the display of the legend.
6.2 ROUTE PROPOSAL
Here you will find two possibilities for navigation. Under «Address»
you can have a tour suggested from your location to any address. Under
«Circuit» the NAVIC 400 calculates a «round trip» from and to your location. To configure the
tour, you can work with kilometers or a time limit. Among other things, the speed level and other
settings, that you want to make, are also queried. Based on this data, the NAVIC 400 will calculate
the most suitable tour.
6.3 ADDRESS
Here you can navigate to a destination by entering an address. You can
enter a complete address with the street and house number.
By tapping the country map, you can select the destination country
(if you have installed other country maps additionally).
1. enter the name of the town first,
2. tap on «Continue» to go to the street and then
3. enter the house number.
You can also tap the «Town or street name» in the text box, to confirm
the entry.
NOTE:
If you do not want to continue your search by selecting a street and/or
house number and only navigate to the center of the town, simply tap on
«Continue» to select the center of the town. If you only want to navigate
to a street without a house number, tap on «Street center».
By tapping on «Map». You can call up the destination on the map.
To enter umlauts or special characters, press and hold the corresponding register letter. After you
have entered a letter, all letters that are no longer possible will be hidden. If you tap on , a list
of all possible place names will be displayed for your entry.
6.4 HOME
The home function brings you back home at any time without any complications. The first time you
start the Navic400, you will be asked to enter your home address. Once you have entered your
address, it will be saved, and you can navigate there at any time by tapping «Home» once. The
route home from your current position will be calculated automatically.
You can change the saved address at any time in the settings menu.
13
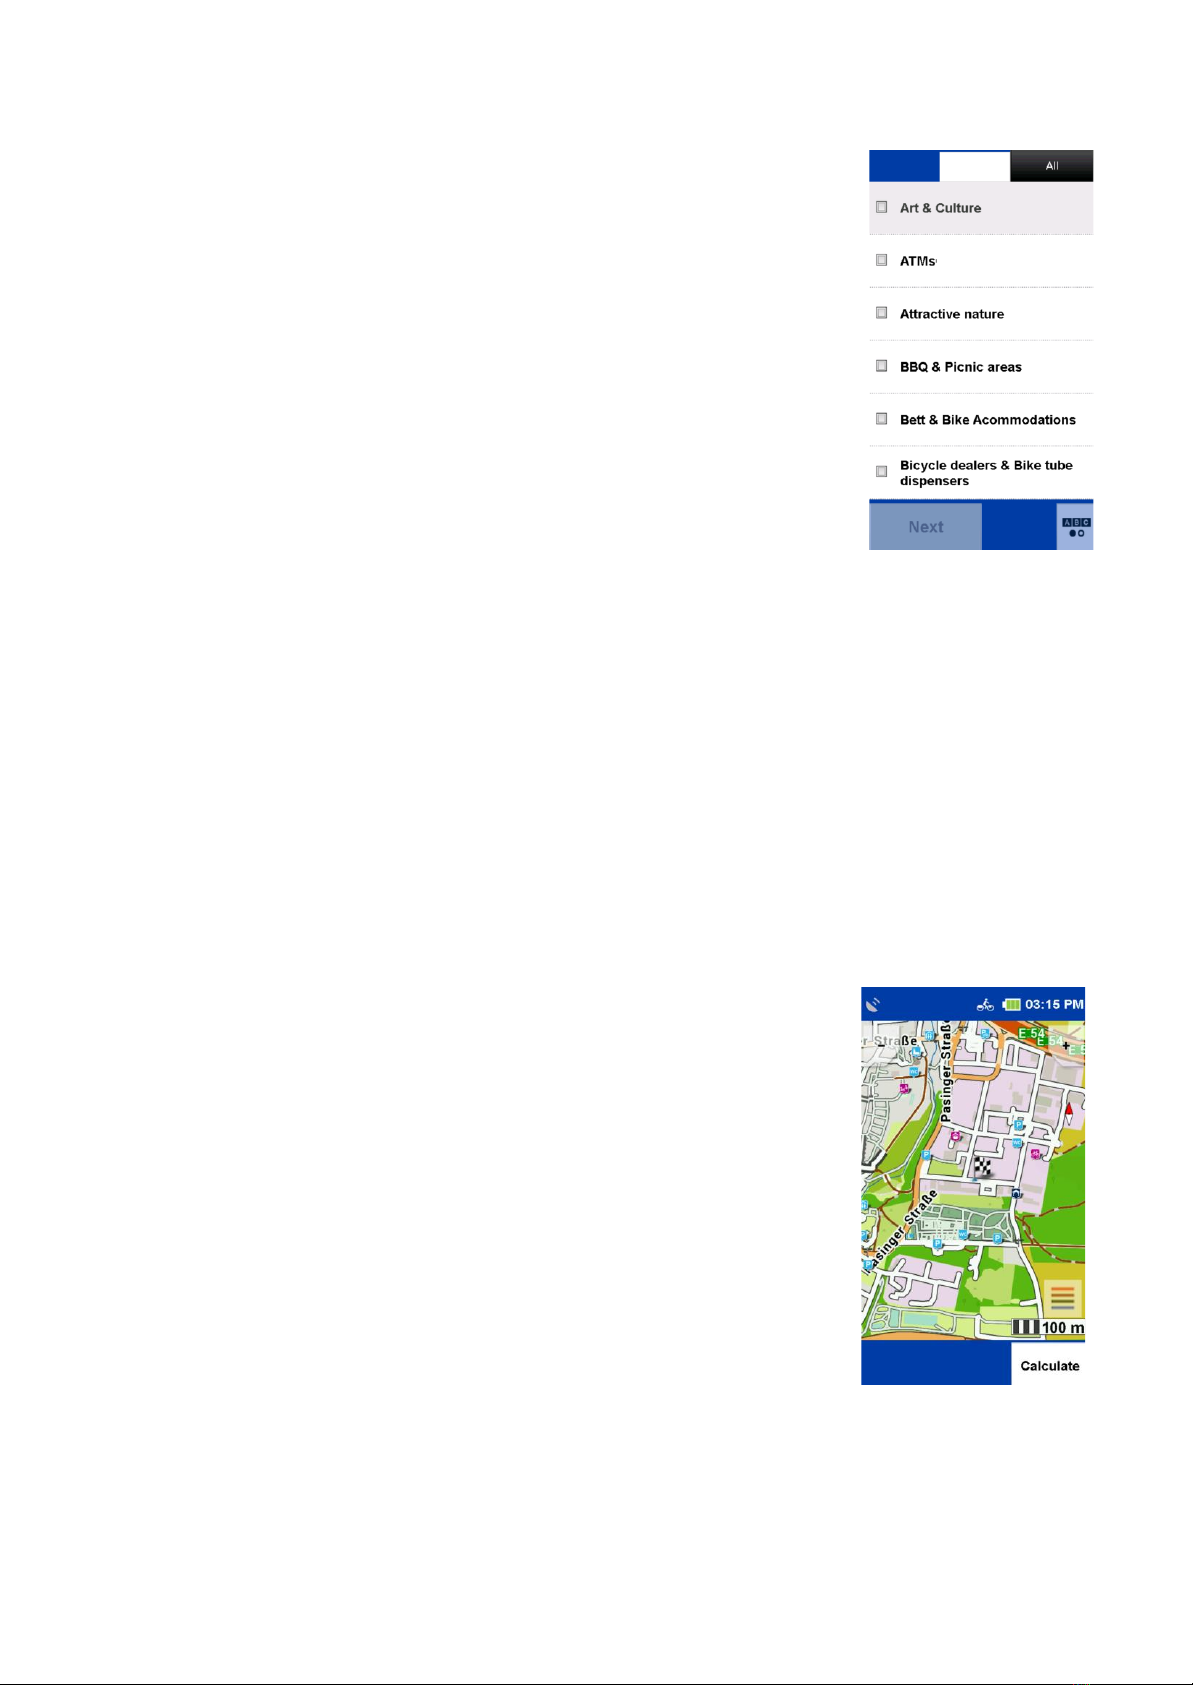
6.5 SPECIFIC OBJECTIVES
Your navigation device knows countless special destinations, such as
«Restaurants», «Viewpoints», «Natural Monuments»,
«Accommodation», «Places of Interest» and much more. If you select
«Points of Interest» in the destination input, a list with all categories
appears.
You can select individual categories by tapping on them or select all
categories at once by tapping on «All» (top right). Tap «Next» or «ABC»
to display a list.
Next, you need to specify a «search center» for your search. The POIs
will then be displayed sorted according to the distance around this point.
The search center can be a waypoint, current location, current destination
along the route, a city, an address, a position on the map or coordinates.
The results are then displayed in a list. You then have the following options:
«Sort» here you can sort points of interest according to various criteria.
«Map» shows the selected POI on the map.
«Calculate» starts the route calculation to the selected point of interest.
Double-click on a list entry opens the detailed view of a POI.
«ABC» lets you search for a POI by entering text.
6.5.1 DETAILED VIEW OF A POI
In the detailed view you will find all available information on a special destination. At the top, you
can switch between the «Info», «Map» (optional) and «Options»views by tapping on the button.
The «Info» tab shows you the address, the distance and a description text are displayed.
The «Map» tab shows you the special destination in the map view.
In the «Options» you also have the following options:
«Search for POI by POI».
Search for another point of interest around the current one (for example, if you want to search for a
restaurant near the hostel).
«Save POI as waypoint».
adds the POI to your waypoints. With the help of the two arrows below you can go to the next or
previous POI to scroll from the list.
«OK» starts the route calculation to this POI.
«Cancel» Switches back to the list of POIs.
6.6 LAST DESTINATIONS
With this function you can easily change your last entered
Select destinations again. The last 40 destinations are automatically saved.
6.7 POSITION IN MAP
Here you can mark a point on the map to navigate there. You can also
move the map with your finger.
If a point is marked that is in a town or street the address is displayed.
Otherwise, the geo-coordinates are displayed.
TIP:
Zoome Use the «minus button» to zoom out to bring the map faster to the
the correct position.
14
6.8 WAY POINTS
A waypoint is a position or address that has been saved. You can create your own waypoints
to navigate to the location later again. Here you can select a destination from the waypoints on
your device.
These can be self-created or imported waypoints. For this purpose, a search center must first be
defined. The waypoints are then displayed sorted according to the distance around this point.
The search center can display the current location, the current destination,
along the route, a city, an address or a place on the map.
As an alternative to a search center, you can also click on
«Show all waypoints», then all waypoints will be displayed in
alphabetical order. The results are displayed in a list
You now have the following options:
«Sort» the waypoints can be sorted alphabetically or by distance
«Map» shows the currently selected waypoint on the map.
«Calculate» starts the route calculation to the selected waypoint.
«Double click» opens the detailed view of the waypoint.
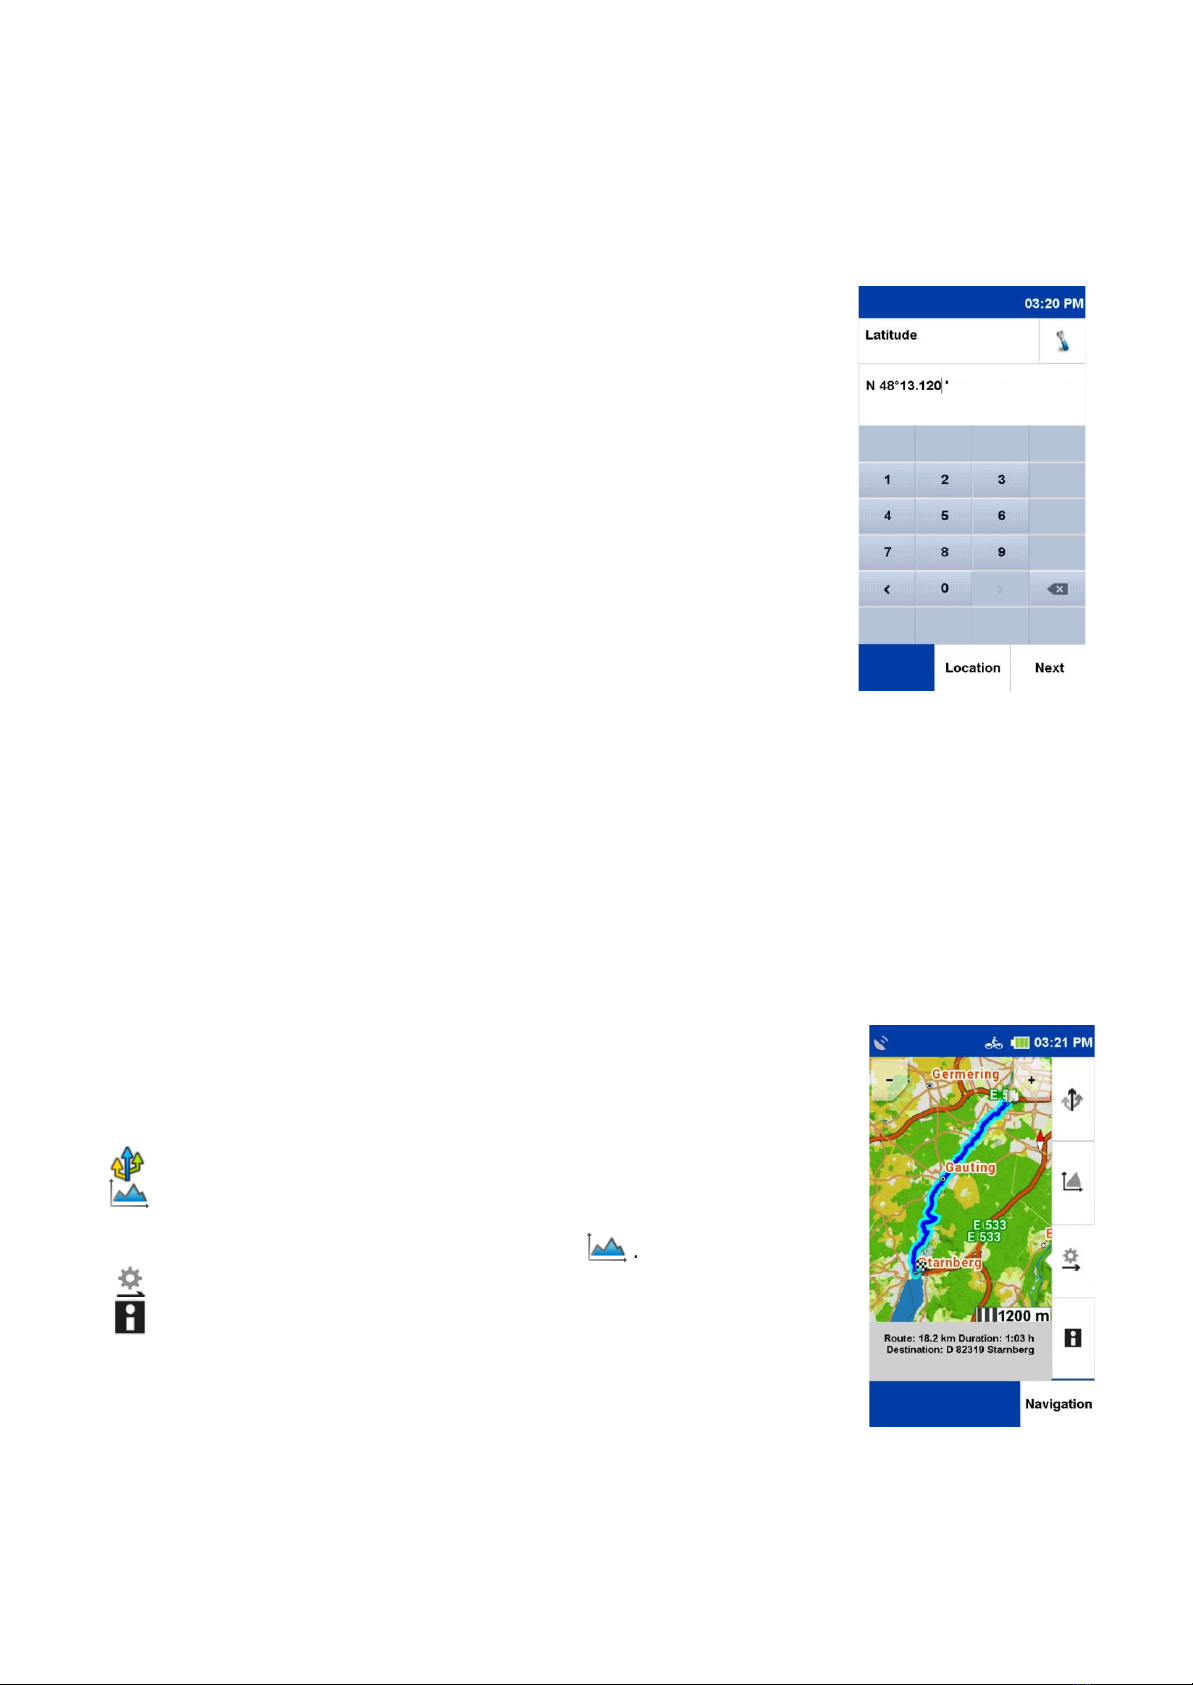
«Coordinates» you can also enter your destination via coordinates.
This function is especially useful for entering the exact place where
no address can be given.
NOTE:
The input format is important as there are different coordinate formats.
The default format is Degrees/decimal minutes (dd°mm,mmmm).
To set a different format, tap on «Format». A list of possible formats will be displayed.
You can change the format at any time in the «Settings». With the «Degrees/Decimal Format»
the latitude is entered first. Tap on «N» for North (North means north of the equator).
Now enter the coordinates. If you tap on «Next», you can enter the longitude. Tap on «E» for east
(east means east of the zero meridian).
If you are on «Location» north of the equator and east of the zero meridian, you will always use
the combination «North/East» when entering coordinates in this format. If you tap on «Next»
after entering the longitude, you will be told (if possible) which address is near the coordinates.
Tap on «Map» to display the location on the map or tap on «Calculate» to start the route guidance
to the location.
7. CALCULATED ROUTE
After you have entered a destination, the route options are requested.
Once a route has been calculated, you will have the option of calling up
various route information or having alternative routes calculated.
Calculates two alternative routes.
Displays the elevation profile of the calculated route.
If you have already calculated alternative routes, you can view and
compare the elevation profiles for all routes here .
. If necessary, you can set the route options again or drag the route.
Displays the route information with directions to the route in a list.
NOTE:
The alternatives are also calculated considering the previously entered
route options. Via «Navigation» you start the destination guidance.

15
7.1 ALTERNATIVE ROUTES
If you have calculated alternative routes after a route calculation, they will
be displayed in different colors on the map.
You can then select an alternative using the fields below, which are also
marked in different colors, and view the information on the selected
alternative.
7.2 ALTITUDE PROFILE
Click to the display to look to the elevation
profile of the currently calculated route.
On the «x-axis» the route is shown in km
(or in miles).
On the «y-axis » the geographical altitude is
shown in m (or in feet).
The scale can be changed with the «plus- and
minus-» keys.
TIP:
Zoom in to see more details in the elevation profile.
If you double-tap on a point in the graphic, it will be zoomed in.
If you click on a point on the graph, it is highlighted and the distance to the
starting point is displayed. By clicking on one of the info fields you can select different values to be
displayed there.
If you have calculated alternative routes after a route calculation, you can compare the elevation
profiles for all alternatives. The altitude profiles are marked in the same colour as the route. Use the
arrows below to switch between the altitude profilesum.
7.3 ROUTE OPTIONS AND DRAG ROUTE
To change the route options set for the calculated route, tap on «Route options».
If you change the route options, the route will be recalculated.
You can find more information about the «Route Options» in chapter 12.1.1
You can find more about the «Draw route» function in chapter 8.
7.4 ROUTE INFORMATION
You can call up the route information by clicking on «Directions».
Here you can call up the route information and view the route description
in the list form.
The following information is displayed in the «Directions»:
•The name of the respective street.
•The distance covered on the respective street.
•Federal roads abbreviation ( e.g. B311).
•The destination is displayed in a bar at the bottom.
Via the button «Directions» you can select the selected entry on the map
and scroll through the route.

16
8. DRAW ROUTE
After calculating a route via the destination input you have the possibility
to change the calculated route manually.
After calculating the route, tap the fold-out button
Tap «Change route» and then click on the
«Draw a route».
If you now click on your route you will get a marker, which you
can drag to any place on the map. The new route will be displayed to
you. You will also be shown the original point and two buttons to continue
with the route you have drawn:
«Delete point»will cancel the previously set marker.
«Set another point» the marker you have just set will be accepted
and the new route is calculated. Set points are marked with a red dot.
NOTE:
If the point is set outside a street, the system searches for the nearest connection point to a street
segment and calculates the route using this point.
NOTE:
A set point can be selected, moved or deleted at any time.
9. HISTORY
Under «History»you will find your recorded activities - also called «Tracks». You can record the
way you drive or run. This recording helps you to be able to retrace your driven or run route later.
After recording, the route can be displayed on the map and the elevation profile can be viewed.
Further information such as the start and finish position, distance and the altitude difference can
also be displayed.
9.1 RECORDING TRACKS
9.1.1 START A RECORDING
To start recording, press the lower right button on the outside of the unit. A «Tracks» button
appears on the touch screen. Select whether you like to start or to stop a recording.
NOTE:
It is recommended that you manually calibrate the barometer before starting recording.
9.1.2 PAUSING RECORDING
The recording can be interrupted at any time, for example if you take a break. To do this, press
the lower right button again and then the pause button.
9.1.3 RESUME RECORDING
To continue, press the lower button on the right and then press the «Pause-Button».
9.1.4 ENDING RECORDING
To end the recording, press and hold the lower side button. You will then be prompted to enter a
name for the activity. In the name line, the date and time of the recording will be displayed first.
The track can be saved under this name. Or you can delete the name line by pressing the
backspace key and enter your own name for the activity. You can also reject the recording. To do
so, tap the appropriate button.
NOTE:
It is recommended to enter a recognizable name to find the recording later easily when several units
are stored on the device. The device has a motion detection sensor technology. The NAVIC 400 will
remind you if you want to record a track when you move.

17
9.1.5 DETAILED VIEW OF AN ACTIVITY
To select an existing activity, tap on the desired unit and then click
«VIEW».
«INFO»
Displays information from the trip computer about this activity.
«MAP»
Displays shows the route on the map. You can zoom the map and
shift.
«POSITION»
By clicking on the position, you can show or hide your position on the
map.
«HEIGHT PROFILE»
Shows the elevation profile to the track.
«START»
Start navigation.
9.1.6 EDIT ACTIVITY
Edit
If you want to edit the activity further, tap on «Edit».
The following options are available:
«Reverse Track»
Changes the direction of the track. You can use this to, for example
also find your way back to the starting point of an activity.
«Change name»
Here you can change the name of the track.
«Delete Track»
Löscht den Track vom Gerät.
9.1.7 START TRACK AS NAVIGATION
If you want to use a track that has already been recorded or saved
you can decide whether you want to start the track directly as track
guidance or change it into a route to receive turning instructions.
9.1.8 CONVERT TRACK TO ROUTE
With the function «Convert track to route» a route is calculated which is as similar as possible to
the original recording of the track (activity).
You will also receive turn-by-turn instructions by a beep. In addition, you will be shown the arrival
time and the real distance.
NOTE:
If road segments are not available in the map material or road segments are avoided by the set
route options, the alternative route will deviate accordingly. The alternative route is compared to the
original track, so you can choose which route option you want to use.
18
9.1.9 STARTING TRACK GUIDANCE DIRECTLY
With «Start track guidance directly» the recording of the activity is started without any changes.
You will receive directions in the map view, but no beeps for turns or distances. Select «Start track
guidance directly» and tap on «OK». Now you can decide whether you want to be guided to the
start of the activity or the nearest point on the track, taking your current position into account.
NOTE:
This procedure is especially recommended if you want to follow a track of 100%.
9.1.10 SET STARTING POINT
If you have selected «Convert Track to Route», the «Route» will first be calculated and displayed
on the map. By clicking on «Route» or «Track» you can switch between the «Track» and the route
in the map view. The «checkered flag» shows the destination of the activity. To start route
guidance using the alternative route, select «Route» and tap to «Navigation».
To start route guidance using the alternative route, select «Route» and tap on «Navigation».
To keep the original route and start track guidance without turning instructions, select «Track» and
tap «Navigation». Now you can decide whether you want to go to the starting point of the track or
the nearest point, taking your current position into account
10. EXTRAS
Under «Transferred Tracks» you will find all tracks that you have transferred to your device.
Here you can also delete imported tracks from your device. You can search for the name of a track
by tapping .
If you select a track and tap View Tour, you will see a detailed view of the track.
Tap on «Start Tour» to start the route guidance.
If you start the track directly from the beginning of the route, you also have the possibility to decide
whether you want to start the track directly or have it converted into a route to receive turn-by-turn
instructions via beeps. You can also choose whether you want to begin at the starting point of the
track or the point of the track nearest to your position.
NOTE:
It is recommended to convert the track into a route if the transferred track contains only a few track
points or if you prefer to be guided on the road network. To edit a transferred track, tap on in the
detailed view .
The following options are available:
Reverse track –changes the direction of the track.
Change name –here you can change the name of the route.
Delete route –deletes the route from the device.
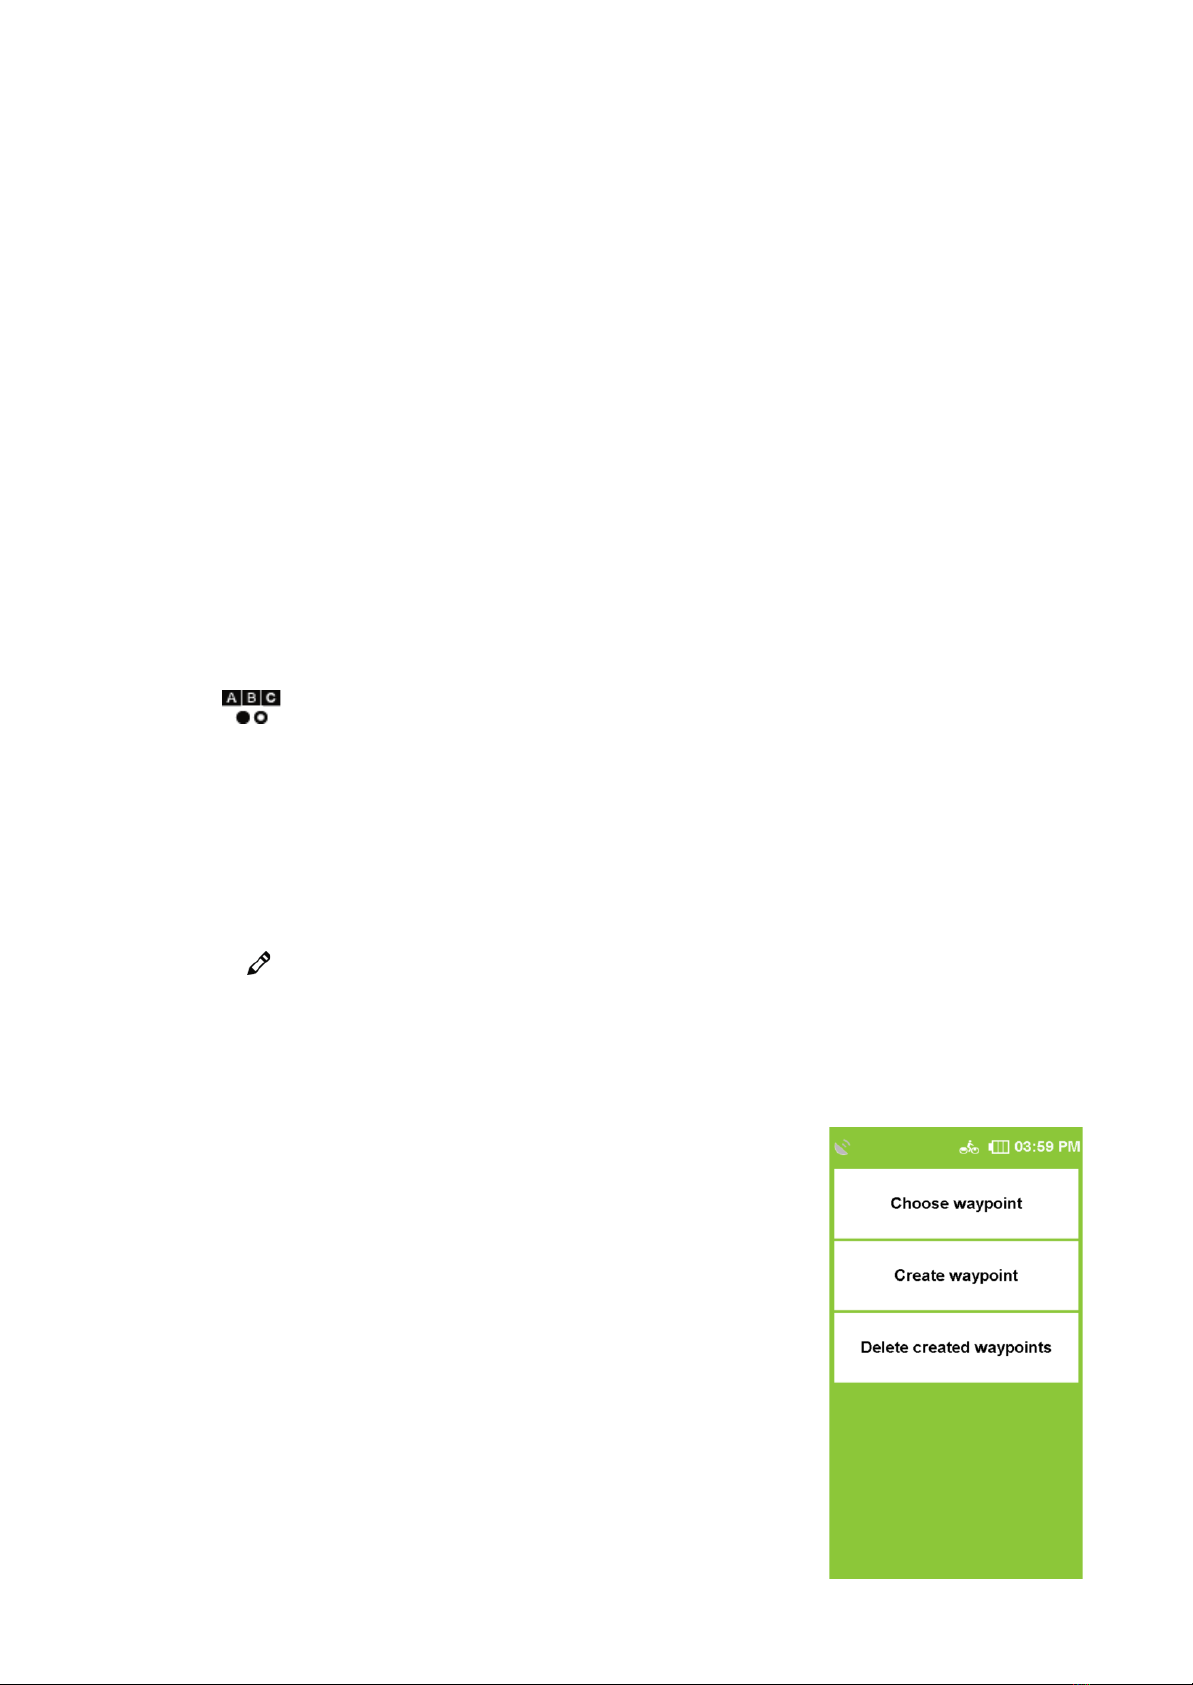
11. WAYPOINT MANAGER
Waypoints can be selected, created and deleted here.
11.1 SELECT WAYPOINT
To create a waypoint, you have several options. You can use the
current position, enter an address, select a position on the map,
select one of the last destinations, enter coordinates or select a POI.
Once the destination is defined, you will be prompted to enter a
name for the new waypoint.
In the name line the address or the geocoordinates of the waypoint
will be displayed automatically. However, it is recommended to assign
a name to each waypoint, especially if several waypoints have already
been created.
You can change the name by pressing the «backspace» key long
and entering another name. Confirm the name. The waypoint is saved.

19
11.2 CREATE WAYPOINT
To create a waypoint, you have several options. You can use the current position, enter an address,
select a position on the map, select one of the last destinations, enter coordinates or select a POI.
Once the destination is defined, you will be prompted to enter a name for the new waypoint. In the
name line the address or the geocoordinates of the waypoint will be displayed automatically.
However, it is recommended to assign a name to each waypoint, especially if several waypoints
have already been created.
You can change the name by pressing the «backspace» key long and entering another name.
Confirm the name. The waypoint is saved.
11.3 DELETING CREATED WAYPOINTS
To delete a waypoint you have created yourself, tap on «delete created waypoints». One or more
waypoints can be marked and deleted from the list.
NOTE:
Imported waypoints can be deleted by deleting the corresponding GPX file in the GPX Manager.
12. SETTINGS
The settings for your device are divided into four categories. «Navigation Settings» concern route
guidance, «Map Settings» cover all map functions, «Profile Settings» concern setup and all
profile settings, and «System/General Settings» concern the device or application.
12.1 NAVIGATION SETTINGS
Here you can make various settings that affect the route guidance. To do this, click on «Settings ->
Navigation settings» in the menu. The following options can be changed.
12.1.1 ROUTE OPTIONS
With the route options you can define your individual route. The route options include two settings:
«Route optimization» and «Traffic routes». By default, these settings are prompted after each
route calculation.
Route Optimization
In the route optimization you have different possibilities to adjust the route:
•flat Flat prefers flat tracks.
•mountainous Prefers mountainous routes.
•Short Calculates the shortest route to the finish, regardless of the gradients.
•Airline Draws a straight line from your current location to the destination
(bearing navigation).
NOTE:
The selected route optimization also affects the length of the route. For example, flat sections of the
route with a too high gradient are avoided, which can lead to a longer route.
Traffic routes –For traffic routes you have the following options:
Hiking routes –Avoids or uses hiking routes (only in bike mode)/uses or
prefers hiking trails (only in pedestrian mode).
Ferries –Uses or excludes routes with ferry connections.
Tunnel –Avoids or uses routes through tunnels.
Fixed rope route –Avoids or uses fixed rope route (only in pedestrian mode).
Paths –Uses or excludes routes via paths and service roads
–(only in bike mode). Uses or avoids routes via paths and service roads
–(only in pedestrian mode). Uses paths or service roads.
Stairs –Avoids or uses stair routing.
–To avoid or allow one of the options, tap the appropriate line
NOTE:
Avoidance does not mean 100% exclusion of traffic routes. It can always happen that occasionally
avoided traffic routes are also used.

20
12.1.2 DEFINE COUNTRY MAP
Proceed as follows: In the country selection list, tap on the desired map of the country.
12.1.3 REQUESTING ROUTE OPTIONS
If this function is activated, the route options are queried before each route calculation. If you do not
change the route options frequently, disable this feature.
NOTE:
This feature is enabled by default.
12.2. PRESENTATION OF THE MAP
Here you can make various settings that affect the map view. To do this, click on
«Settings > Map» in the menu. The following options can be changed.
12.2.1. NORTH/DIRECTION
The map can be oriented either in the direction of movement or always to the north.
NOTE:
If you select Direction of travel, the position arrow always points upwards. This setting facilitates
orientation. If you select «northed», the position arrow is in the middle of the map and rotates
according to the direction of movement.
12.2.2. POSITION ON ROAD
Here you can determine whether your current position should be synchronized with the route
network.
NOTE:
If you want to navigate in open terrain, you should switch off this function.
12.2.3 AUTOZOOM (ONLY IN BIKE MODE)
When auto-zoom is activated, the map scale is adjusted according to the speed (zooming out at
high speed). If you turn off the autozoom, you can adjust the map scale in the map view itself. This
will then be retained.
12.2.4 DESTINATIONS ON MAP
Here you can choose which points of interest should be shown on the map with small symbols.
Select the desired categories. All special destinations of the selected categories are then displayed
on the map
12.2.5 TRACK RECORDING IN MAP
Here you can choose whether the travel distance is displayed on the map or not.
NOT:
This setting only affects the map view during recording. If a track is recorded, the distance travelled
can always be displayed on the map later.
13. PROFILES
Here you will find all settings that affect your activity profiles.
13.1 CHANGE PROFILE
Here you can change the activity profile. There are five profiles available, which you can configure
yourself.
Select your desired profile:
- Road bike, mountain bike, trekking bike, hiking profile, S-pedelec and confirm with «OK».
13.2 EDITING A PROFILE
Here you can edit the currently selected profile and view the overall statistics of this profile.
Other manuals for NAVIC 400
1
Table of contents
Other Ciclo GPS manuals


