CICLOSPORT HAC5 User manual

Instruction manual

2
Table of contents
Page
Content . . . . . . . . . . . . . . . . . . . . . . . . . . . . . . . . . . . . . . . . . . . . . . . . . . . . . . . . . . .3
1. General information . . . . . . . . . . . . . . . . . . . . . . . . . . . . . . . . . . . . . . . . . . . . . . . . . . . . . . . . . . . 3
Attention . . . . . . . . . . . . . . . . . . . . . . . . . . . . . . . . . . . . . . . . . . . . . . . . . . . . . . . . . . . 4
2. Operational Setup . . . . . . . . . . . . . . . . . . . . . . . . . . . . . . . . . . . . . . . . . . . . . . . . . . . . . . . . . . . 4
2.1 Attaching the HAC5 to the wrist band and the handlebar bracket . . . . . . . . . . . . . . . . . . . . 4
2.2 Inserting the batteries . . . . . . . . . . . . . . . . . . . . . . . . . . . . . . . . . . . . . . . . . . . . . . . . . . . . . . 4
2.3 Setup / Initialization . . . . . . . . . . . . . . . . . . . . . . . . . . . . . . . . . . . . . . . . . . . . . . . . . . . . . . . . 4
2.4 Installing . . . . . . . . . . . . . . . . . . . . . . . . . . . . . . . . . . . . . . . . . . . . . . . . . . . . . . . . . . . 4
2.5 Putting on the breast belt . . . . . . . . . . . . . . . . . . . . . . . . . . . . . . . . . . . . . . . . . . . . . . . . . . . 4
3. Using the buttons – special function of the buttons . . . . . . . . . . . . . . . . . . . . . . . . . . . . . . . . . . . . 5
3.1 Using the buttons . . . . . . . . . . . . . . . . . . . . . . . . . . . . . . . . . . . . . . . . . . . . . . . . . . . . . . . . . 5
3.2 Special button functions in normal mode . . . . . . . . . . . . . . . . . . . . . . . . . . . . . . . . . . . . . . . 5
3.3 Special button functions in setting mode . . . . . . . . . . . . . . . . . . . . . . . . . . . . . . . . . . . . . . . 6
4. Usage . . . . . . . . . . . . . . . . . . . . . . . . . . . . . . . . . . . . . . . . . . . . . . . . . . . . . . . . . . . 7
4.1 Profiles . . . . . . . . . . . . . . . . . . . . . . . . . . . . . . . . . . . . . . . . . . . . . . . . . . . . . . . . . . . 7
4.2 Baro Mode/Alti Mode . . . . . . . . . . . . . . . . . . . . . . . . . . . . . . . . . . . . . . . . . . . . . . . . . . . . . . 7
4.3 Transmitter search – digital system . . . . . . . . . . . . . . . . . . . . . . . . . . . . . . . . . . . . . . . . . . . . 7
5. Examples . . . . . . . . . . . . . . . . . . . . . . . . . . . . . . . . . . . . . . . . . . . . . . . . . . . . . . . . . . .9
5.1 First settings (for example time, date) . . . . . . . . . . . . . . . . . . . . . . . . . . . . . . . . . . . . . . . . . . 9
5.2 Initializing the transmitters . . . . . . . . . . . . . . . . . . . . . . . . . . . . . . . . . . . . . . . . . . . . . . . . . . 10
6. Main setting mode . . . . . . . . . . . . . . . . . . . . . . . . . . . . . . . . . . . . . . . . . . . . . . . . . . . . . . . . . . 12
6.1 Short menu (Topical) . . . . . . . . . . . . . . . . . . . . . . . . . . . . . . . . . . . . . . . . . . . . . . . . . . . . . . 12
6.2 Profile Bike and profiles RDS, ALPIN, RUN . . . . . . . . . . . . . . . . . . . . . . . . . . . . . . . . . . . . . 12
6.3 HR-Interval . . . . . . . . . . . . . . . . . . . . . . . . . . . . . . . . . . . . . . . . . . . . . . . . . . . . . . . . . . 15
6.4 CAD-Interval . . . . . . . . . . . . . . . . . . . . . . . . . . . . . . . . . . . . . . . . . . . . . . . . . . . . . . . . . . 17
6.5 Basic settings. . . . . . . . . . . . . . . . . . . . . . . . . . . . . . . . . . . . . . . . . . . . . . . . . . . . . . . . . . .19
6.5.1 Set altitude . . . . . . . . . . . . . . . . . . . . . . . . . . . . . . . . . . . . . . . . . . . . . . . . . . . . . . . . . 19
6.5.2 Set units . . . . . . . . . . . . . . . . . . . . . . . . . . . . . . . . . . . . . . . . . . . . . . . . . . . . . . . . . . 19
6.5.3 Set time . . . . . . . . . . . . . . . . . . . . . . . . . . . . . . . . . . . . . . . . . . . . . . . . . . . . . . . . . . 19
6.5.4 Set personal values. . . . . . . . . . . . . . . . . . . . . . . . . . . . . . . . . . . . . . . . . . . . . . . . . . . 20
6.5.5 Set total values . . . . . . . . . . . . . . . . . . . . . . . . . . . . . . . . . . . . . . . . . . . . . . . . . . . . .21
6.6 PC-Connection . . . . . . . . . . . . . . . . . . . . . . . . . . . . . . . . . . . . . . . . . . . . . . . . . . . . . . . . . . 22
6.7 Powerdown-mode . . . . . . . . . . . . . . . . . . . . . . . . . . . . . . . . . . . . . . . . . . . . . . . . . . . . . . .22
7. Funktions . . . . . . . . . . . . . . . . . . . . . . . . . . . . . . . . . . . . . . . . . . . . . . . . . . . . . . . . . . 23
7.1 Function indications of the upper display . . . . . . . . . . . . . . . . . . . . . . . . . . . . . . . . . . . . . . 23
7.2 Function indications of the medium display . . . . . . . . . . . . . . . . . . . . . . . . . . . . . . . . . . . . . 26
7.3 Functions displayed in the lower display . . . . . . . . . . . . . . . . . . . . . . . . . . . . . . . . . . . . . . . 27
7.4 Basic Functions . . . . . . . . . . . . . . . . . . . . . . . . . . . . . . . . . . . . . . . . . . . . . . . . . . . . . . . . . . 31
8. Special functions . . . . . . . . . . . . . . . . . . . . . . . . . . . . . . . . . . . . . . . . . . . . . . . . . . . . . . . . . . 32
8.1 Memory function . . . . . . . . . . . . . . . . . . . . . . . . . . . . . . . . . . . . . . . . . . . . . . . . . . . . . . . . . 32
8.2 Heart rate time manager . . . . . . . . . . . . . . . . . . . . . . . . . . . . . . . . . . . . . . . . . . . . . . . . . . .32
8.3 Recovery heart rate . . . . . . . . . . . . . . . . . . . . . . . . . . . . . . . . . . . . . . . . . . . . . . . . . . . . . . . 33
8.4 Heart rate limit time memory . . . . . . . . . . . . . . . . . . . . . . . . . . . . . . . . . . . . . . . . . . . . . . . .33
8.5 Set markers . . . . . . . . . . . . . . . . . . . . . . . . . . . . . . . . . . . . . . . . . . . . . . . . . . . . . . . . . .33
8.6
CICLO
IInnZone®--Philosophy and use . . . . . . . . . . . . . . . . . . . . . . . . . . . . . . . . . . . . . . . 33
9. PC-Mode . . . . . . . . . . . . . . . . . . . . . . . . . . . . . . . . . . . . . . . . . . . . . . . . . . . . . . . . . . 34
9.1 Installation of the interface . . . . . . . . . . . . . . . . . . . . . . . . . . . . . . . . . . . . . . . . . . . . . . . . . . 34
9.2 Program installation . . . . . . . . . . . . . . . . . . . . . . . . . . . . . . . . . . . . . . . . . . . . . . . . . . . . . . . 34
9.3 Transfer stored tours . . . . . . . . . . . . . . . . . . . . . . . . . . . . . . . . . . . . . . . . . . . . . . . . . . . . . . 34
9.4 Update the HAC5 firmware . . . . . . . . . . . . . . . . . . . . . . . . . . . . . . . . . . . . . . . . . . . . . . . . . 35
10. Changing the batteries . . . . . . . . . . . . . . . . . . . . . . . . . . . . . . . . . . . . . . . . . . . . . . . . . . . . . . . . . 35
11. Service and maintenance . . . . . . . . . . . . . . . . . . . . . . . . . . . . . . . . . . . . . . . . . . . . . . . . . . . . . . 35
12. Trouble shooting . . . . . . . . . . . . . . . . . . . . . . . . . . . . . . . . . . . . . . . . . . . . . . . . . . . . . . . . . . 36
13. Guarantee . . . . . . . . . . . . . . . . . . . . . . . . . . . . . . . . . . . . . . . . . . . . . . . . . . . . . . . . . .37
14. Technical date . . . . . . . . . . . . . . . . . . . . . . . . . . . . . . . . . . . . . . . . . . . . . . . . . . . . . . . . . . 37
15. Guarantee Certificate . . . . . . . . . . . . . . . . . . . . . . . . . . . . . . . . . . . . . . . . . . . . . . . . . . . . . . . . . . 38
Congratulations!
By purchasing the HAC5you have acquired an electronic multifunctional sports computer with the
highest level of precision and newest digital transmission technology.
The HAC5is waterproof up to 30 metres and convinces through his high durability.
It’s special feature: The transfer from the transmitters to the device takes place digitally, which means
the transfer is extremely safe from disturbances. You can, for example, use the HAC5on two diffe-
rent bikes and have the data shown separately for each bike.
The HAC5can, amongst other things, also show you the cadence and the heart rate without any wi-
res.
The HAC5is also fitted with the new
CICLO
IInnZone®, which, on the basis of the users personal
data and his/her daily fitness, calculates the ideal heart ratezone for optimum training (see also chap-
ter 8.6).
The HAC5can show three functions at once in its display. And if that isn’t enough for you, you
can use the function 'autoscroll' in the lower display. With this the functions in the lower dis-
play are changing automatically every three seconds, so this disposes of the manual swit-
ching between the functions in the lower display.
In order to use all functions of the HAC5in the correct way, please read through this operating ma-
nual carefully.
Content
1. General Information
Attention: whoever carries out sport should have a general medical check up on his/her general state
of health – especially beginners, persons older than 35 years of age and anyone who has suffered from
illnesses or injuries in the past. It is recommended that a doctor be consulted in any case in the presen-
ce of risk factors, such as smoking, high blood pressure, high cholesterol values, diabetes, lack of exer-
cise and excess weight.
Pacemaker wearers should consult their doctor before using any heart rate measuring devi-
ce!
In order for the HAC5 to be able to display heart rate, speed and cadence, the according trans-
mitters have to be initialized once. See the exemplifies initialization in chapter 5.2.
To set up time, date etc. see the exemplifies setup in chapter 5.1.
3
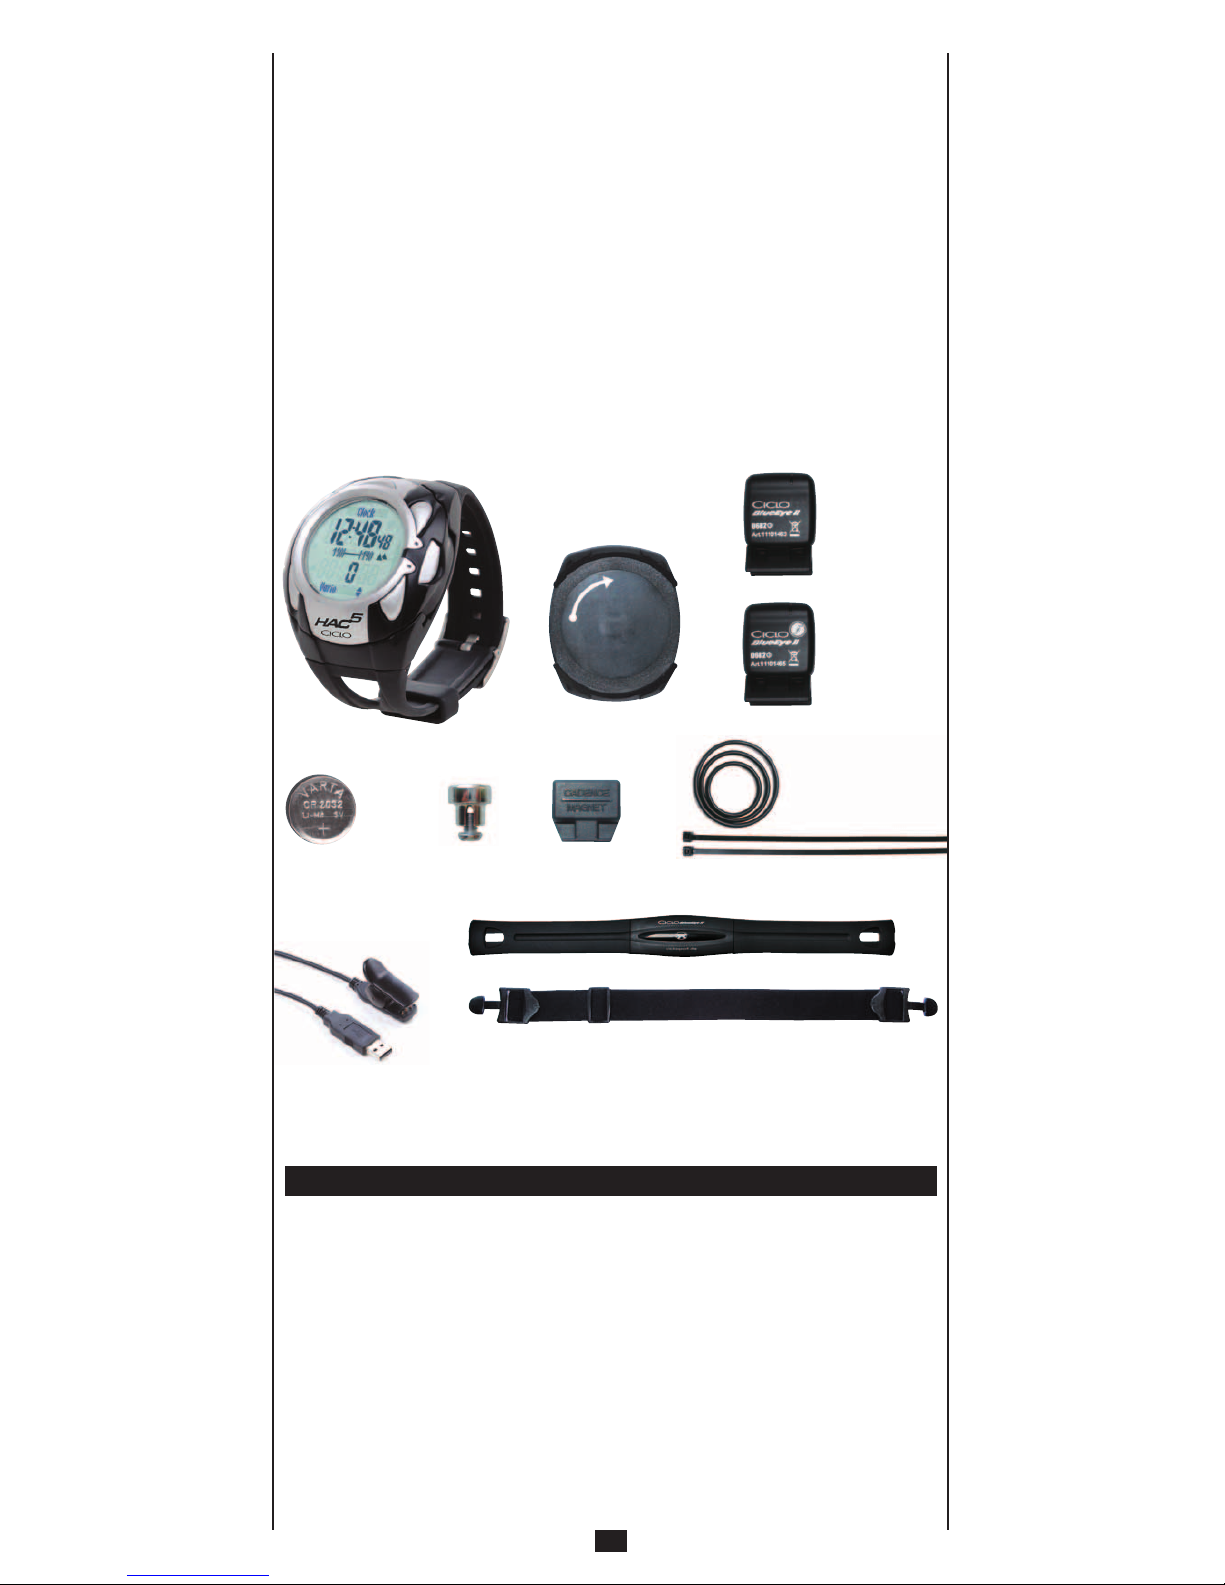
HAC5
watch with wristband
Batteries (4x)
CR2032 (for HAC5,
Speed transmitter,
Cadence transmitter
and Transmitter belt)
Spoke
magnet
Cadence
magnet Cable ties
Handlebar bracket
Speed transmitter
Cadence transmitter
Transmitter belt
Breast belt (adjustable)
PC cable
CD with manual and Softwareprograms
O rings
!
Attention!
To save energy, the HAC5 turns off automatically at night, meaning the display turns off at
12 p.m. and only lights up again after pressing any button.
All functions active at the time of shut-off keep going internally despite the display turned
down.
2. Operational Setup
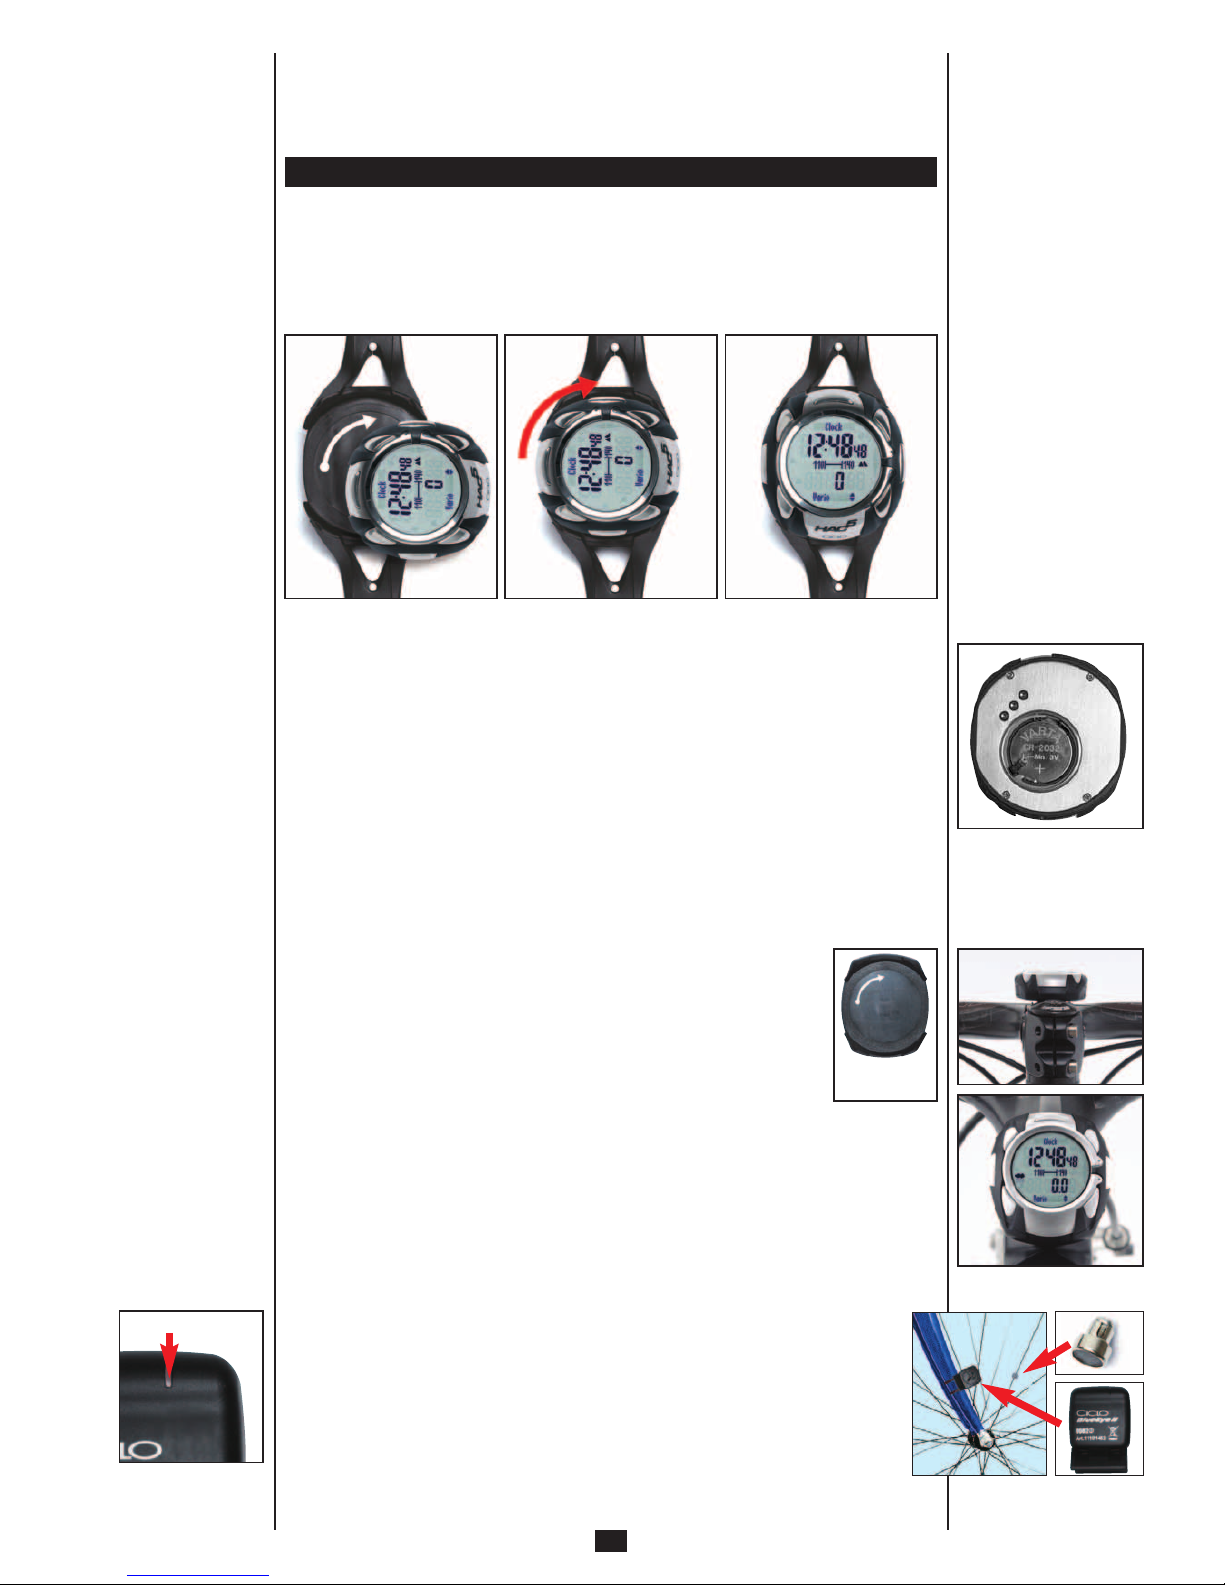
2.1 Attaching the HAC5 to the wrist band and the handlebar bracket
To take the HAC5out of the wrist band or the handlebar holder, turn it 90° to the left, then remove.
To insert into the wrist band or handlebar bracket, insert at a 90° angle to the left, then turn to right
until it engages.
2.2 Inserting the batteries
• Inserting the battery into the HAC5:
Open the battery cap on the back of the HAC5with the aid of a coin (turn counter clockwise). Insert
battery type CR2032 with plus pole facing up, please make sure that the battery is inserted at a
angle from the side (from right to left), so that the contacts lie on the battery. Then close the battery
cap. The display of the HAC5shortly shows all segments, then returns to the normal display.
• Inserting the battery into transmitter belt, speed- and cadence transmitter:
Open the battery cap with the aid of a coin (turn to left). Insert battery type CR2032 with the plus
pole facing up and close the cap again.
2.3 Setup / Initialization
Because of the new digital transmission technique, all transmitters have to be initialized prior to first
use. We therefore recommend that you first conduct all necessary initializations (and, if required, ent-
er all required data) before attaching the parts to the bike. In chapter 5 you will find a step-by-step
setup as well for the initializations as for setup of time and date.
2.4 Installing
• Installing the handlebar bracket:
The handlebar mounting can also be installed on a stem. To do this the top section
of the handlebar mounting must be removed from the bottom section. To make it
easier to remove the top section carefully push the sides of the bottom section
upwards slightly.
Then turn both parts through 90° and assemble them again until the snap-on
mounting engages.
Remove the backing foil from the underside of the handlebar mounting, place the
handlebar mounting in the required position on the handlebar (or on the stem) and
press it down slightly. Secure it with the O ring or with the cable ties
• Installing the speed transmitter:
Attach the speed transmitter at the fork or the rear construction with the aid of the cable ties (the
printed side of the transmitter with the marking must point to the spokes).
Mount the magnet to a spoke directly opposite the marking on the transmitter.
Do not over tighten the fixing screw on the magnet. Adjust transmitter in such a way that the di-
stance between transmitter and magnet does not exceed 3 millimetres.
• Installing the cadence transmitter:
Attach the cadence transmitter to a strut opposite the pedal crank with the aid of the cable ties
(the printed side of the transmitter with the marking must point to the crank).
Mount the magnet on the pedal crank directly opposite the transmitter with the help of the ca-
ble tie, so that the magnet points exactly to the marking on the transmitter. Adjust transmitter
in such a way that the distance between transmitter and magnet does not exceed 3 millimet-
res.
4
Inserting the batteries
Setup / Initialization
Installing
Attaching the HAC5
to the wrist band and
the handlebar bracket
Attention!
Mark
handlebar
bracket

5
2.5 Putting on the breast belt
Hang the transmitter belt in the elastic breast belt and then put the breast belt around your (naked) up-
per torso. The transmitter (plastic part with inscription) should be placed above the middle of your up-
per stomach region, slightly below the breast and the inscription on the transmitter (when seen from
the front) must be legible (pictured).
Pull the belt tight so that it always is in contact with your body when moving and so that it can not slip.
If the breast belt is not long enough, a longer breast belt can be acquired from your local bicycle dealer.
If your skin is too cold or too dry, the electrical contact between the skin and the electrodes can be so
minimal that an accurate measurement is not possible. It often helps to wet the electrodes and the skin
where they are to be attached with your finger (do not wet the transmitter but only the rubber parts on
the left and on the right). If this doesn’t help, one should train until they start sweating. You will get the
best contact by means of a special electrode-gel (available at your local pharmacy).
Electrodes
Transmitter
Putting on the breast belt

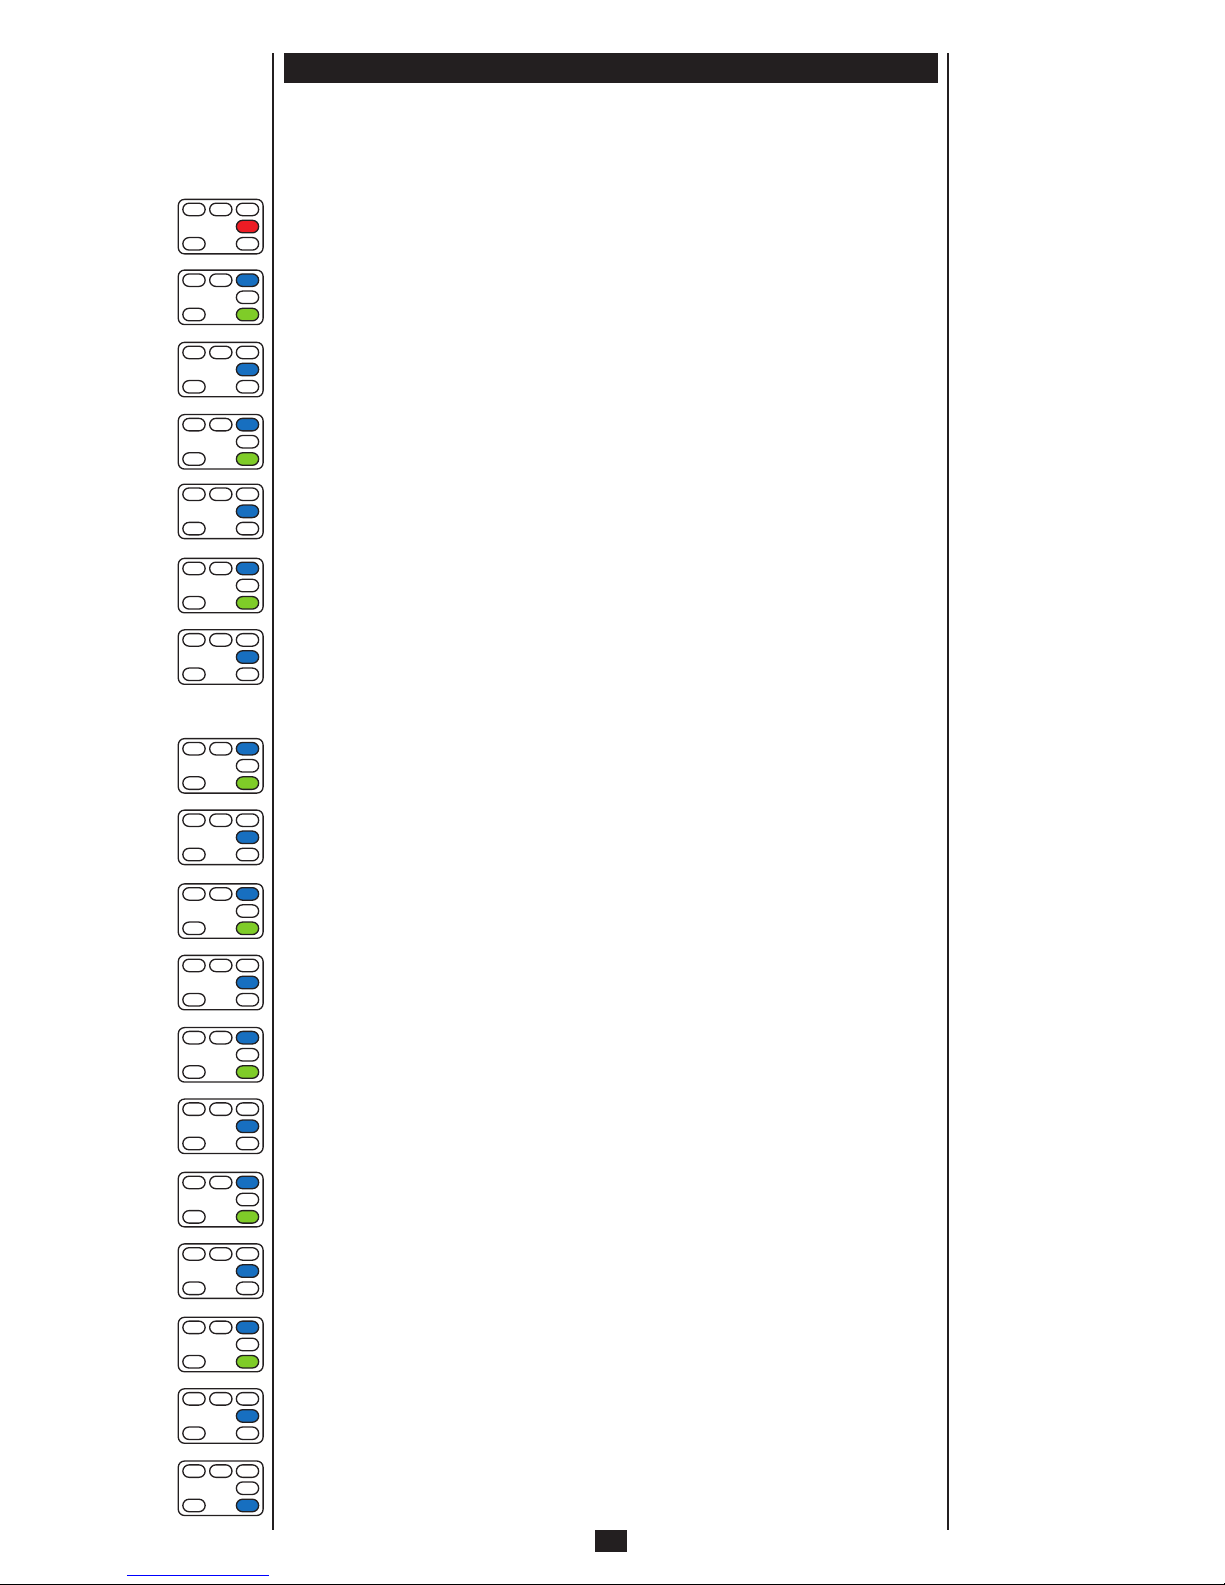
3. Using the buttons – special function of the buttons
3.1 Using the buttons
The display if the HAC5is separated into 3 areas: an upper, a middle and a lower. Each area dis-
plays one function, so that there are three functions displayed simultaneously at all times. This means
that the possible functions can be combined to personal taste.
The buttons are termed as follows in the manual:
Upper Left button: UL-button
Upper Middle button: UM-button
Upper Right button: UR-button
Middle Right button: MR-button
Lower Left button: LL-button
Lower Right button: LR-button
For the functions of the upper area use the UL- and UR-buttons,
for the middle section the MR-button
and for the lower display the LL- and LR-buttons.
The following applies:
The buttons on the right side access the main functions (UR-, MR- and LR-buttons).
The sub-functions of the functions in the upper and lower display are accessed through the depen-
ding button on the left side (UL- and LL-buttons).
The stopwatch and the countdown are started, stopped and paused by shortly pressing the UM-but-
ton and reset by pressing the UM-button for three seconds (this also deletes all split- and lap times).
Pressing long means at least between 3 and 6 seconds (as stated)
Pressing shortly means pressing for approximately 1 second,
either of one or the other button
Every press of the button makes a short sound, this sound can be turned off in the advanced settings.
3.2 Special button functions in normal mode
Start/Stop the recording:
Press UL- and LL-button simultaneously for three seconds
Set a mark/start the recuperating heart rate function:
Press UL- and LL-button simultaneously shortly
Heart rate alarm on/off:
Press UL-button for three seconds
Set back Stopwatch/countdown:
Press UM-button for three seconds
Display the current profile, start transmitter search:
Press LL-button for three seconds
Choose Menu Topical:
Press UR-button for three seconds
6
OR
MR
OMOL
UR
UL
Special button functions
in normal mode
UL
MR
➔
LL
UR
LR
➔
➔
➔
➔
UM
➔
Using the buttons
Choose setting mode:
Press MR-button for three seconds
Turn on light (for five seconds):
Press LR-button for three seconds
Turn on light manager (for 5 hours):
Press LR-button for 6 seconds
Choose profile:
Shortly press UR- and LR-button simultaneously
Display measuring units:
Shortly press LR- and LL-button simultaneously
3.3 Special button functions in setting mode
In the setting mode, the according function/setting is always chosen and/or stored by short pressing
of the MR-button.
With the UR- and LR-buttons you can choose between different settings or change the settings (UR-
button counts upward, LR-button counts downwards, longer pressing moves the numbers
faster).
For the settings themselves, the following applies:
UL- and UR-button simultaneously
sets the displayed value to its maximum.
UR- and LR-button simultaneously
resets the displayed value to its default.
LL- and LR button simultaneously
resets the displayed value to its minimum.
The setting mode can be quit prematurely at any time by pressing the MR-button for three seconds.
Attention: when you quit the setting mode in this way, the last displayed value is not automatically
stored, to store simply press the MR-button shortly.
7
Special button functions
in setting mode
8
4. Usage
4.1 Profiles
The HAC5offers the possibility to set five different profiles, these are termed in the following as
Bike 1, Bike 2, RDS, Alpine and Run.
Every profile allows separate settings each, the different functions can be chosen separately for each
profile (and therefore what is displayed).
So if you feel no need for example to display the altitude measurements while running (and thus all
connected functions like slope, performance etc), you can turn off this function under the profile Run.
If the profile Run is activated afterwards, these displays are not shown when going through the func-
tions.
This means that the number of the possible displayed functions can be determined individually for
each profile and displays not needed can be turned off.
In addition to these profiles there are two sub-profiles, HR-Intv (heart rate-interval) and CAD-Intv.
These can be turned on in addition, meaning that if you choose Bike 1, for example, you can pick the
CAD interval for this setting.
Alpine is the default setting. To switch or pick a profile simply press the two right buttons (UR- and
LR-button) simultaneously.
The profile menu now appears on the display (by pressing the UR- or LR-button all menu points can
be accessed one by one).
Choose the desired profile with the UR-/LR-button and confirm
by shortly pressing the MR-button.
If HR-Intv (heart rate-interval) or CAD-Intv (cadence-interval) is selected, the interval is valid for the
previously chosen profile (example: HAC5is in profile bike 1. If CAD-intv is selected, then the caden-
ce-interval is active for bike 1).
To check which profile is active at the moment and/or begin transmitter search (which searches for all
transmitters active in the mode concerned), press LL for three seconds.
The display shows the active profile for 10 seconds. During this time, the automatic transmitter se-
arch runs in the background.
4.2 Baro Mode/Alti Mode
The HAC5is able to switch automatically between measuring the altitude and the barometer. This can
also be switched manually: to do so shortly press UR- and LR-buttons simultaneously in the profile sel-
ection menu, then choose the desired mode with the UR-/LR-button.
Then confirm by shortly pressing the MR-button.
If the altitude doesn’t change for more than 350 metres per hour in the alti mode – for example during a
pause – then the HAC5automatically switches to the baro mode. The mountain symbol disappears
and the weather symbol appears instead on the display.
The current altitude is saved. Through this altitude automatism, the altitude does not have to be re-adju-
sted if air pressure changes occur (during the night or a break for example). If you move up and down at
short intervals again, the HAC5switches back to the alti mode.
If the baro mode (barometre-mode) is selected, or the alti mode (altitude mode) selected or automatical-
ly activated, then the HAC5switches to that mode in the current setting, this may cause some func-
tions to not be shown although they are allowed in the profile.
(The baro mode, for instance, does not allow a display of altitude and therefore no display of data based
on altitude).
4.3 Transmitter search – digital system
In order for the HAC5to display speed or heart rate or similar, the according transmitter has to be fo-
und first.
The search begins automatically when a recording is started (UL- and LL-buttons pressed simulta-
neously for three seconds), and manually by pressing the LL-button for three seconds (in both cases,
the active profile is shown for 10 seconds).
During this display all transmitters are searched for which are active in this profile. Should no or not all
transmitters be found during this time, then this is displayed when selected, for example: SPD: no TX,
meaning that for the speed ( = spd) display there were no transmitters ( = tx) found.
Bike1
Bike2
RDS
Alpine
Run
HR-Intv
CAD-Intv
Baro Mode
Alti Mode
Exit
Profile
Alpine
No Interval
Profiles
Baro Mode/Alti Mode
Transmitter search –
digital system
Sunny
cloudy
unsettled (shower)
rainy
SPD: no TX

9
In this case, the transmitter search must be started again (by pressing the LL button for three se-
conds).
If the display shows “Speed Bike2”, for example, this means that the speed transmitter for bike 2 is ac-
tivated (for example by turning the wheel) and was found.
Speed Bike2
10
5. Examples
Through the selection process, the settings of the HAC5 are relatively easy to do (as most displays are
self-explaining). Thus we are showing you two short examples:
5.1 First settings (for example time, date)
Press MR-button three seconds to enter the main setting mode.
By pressing shortly the LR-/UR-button a few times in a row choose the mode “basic set” (=basic set-
tings, appears in the dark area on the middle display),
confirm by shortly pressing the MR-button.
Select “set time” with the LR-/UR-button,
confirm with the MR-button.
Select “set clock” with the LR-/UR-button,
confirm with the MR-button.
The current time is now flashing on the upper display, the lower shows the second time zone.
The time can be set with the LR-/UR-button,
confirm with the MR-button.
After this the time (only the hours can be adjusted) of the second time zone flashes on the lower display
and can be set with the LR-/UR-button.
Confirm with MR-button, “set clock” appears again on the display.
Select “set date” with the LR-/UR-button,
confirm with the MR-button.
The year flashes on the upper display and can be adjusted with the LR-/UR-button,
confirm with the MR-button, now the month flashes on the lower display.
Also set with LR-/UR-buttons and confirm with MR-button.
Now the day flashes.
Set to the right number with the LR-/UR-button
and confirm with the MR-button.
Select “back” with the LR-button
Topical
Prof.Bike
RDS,Run,Alp
HR-Interval
CAD-Interval
Basic Set.
PC-Connect
Powerdown
Exit
First settings
(for example time, date)
11
And confirm with the MR-button to get back to the mode “basic settings”.
Now you can make further personal adjustments, like:
“set altitude”: here the current altitude/air pressure can be set.
“set units”: here the measuring units – kilometres or miles for distance, mbar or inhg for air pressure etc.
– can be determined.
“Set perso.”: this is where the personal data like date of birth, weight, sex, heart frequency-limits and
countdowns are entered, the
CICLO
IInnZone®can also be calculated and totals for burning calories
and burning fat determined.
“Set totals.”: here, total sums (like total kilometres, total time of tour etc.) can be preset or erased for
the current profile.
By pressing the MR-button for three seconds, the setting mode can be left at any time.
5.2 Initializing the transmitters
In order for the HAC5to be able to show heart rate, speed and cadence, the concerning transmitters
have to be initialized first.
Please do as follows:
Put on the transmitter belt and do the following:
Press the MR-button for three seconds
Select “Prof.Bike” with the LR-button (the selected line has a dark background)
Confirm with the MR-button
The display shows “select bike“,
confirm with MR-button
The display shows “select bike1“,
confirm with MR-button
Display shows “select bike“ again
Press LR-button shortly for a few times to select “speed“,
confirm with MR-button
Display shows “Speed on/off“, on is marked
Confirm with MR-button
“Iniscan SPD yes/no“ is displayed, “yes“ is marked
Now activate the speed transmitter (pick it up and gently knock the spoke magnet against the marking
of the transmitter a couple of times, this turns on the transmitter and it will give a signal.
Attention: The display of the HAC5remains unchanged during the activation.
Confirm with MR-button (please confirm only after activating the transmitter)
Display will shortly show a percentage and returns back to selection mode after successful initialization
(display shows ‘speed’ marked).
Unit Press.
Unit Dst.
Unit Speed
Unit Temp.
Unit Time
Unit Weight
Back
Exit
S.Birthdate
Set Weight
Select Sex
In-Zone
HR-Target
Set Countdn
Total kcal
Total FatBack
Exit
Tot.Dst.Bike1
Tot.Dst.Bike2
Tot.Tm.Bike1
Tot.Tm.Bike2
Back
Exit
Set perso.
Set totals.
Initializing the
transmitters
12
If the initialization is not successful, the percentage runs up to 100 % and the HAC5shows “Iniscan
Error retry cancel“ afterwards.
Activate transmitter once again after this and start initialization once again by selecting “retry” (LR-but-
ton,
confirm with MR-button).
Mit “cancel” (mit UR-Taste auswählen
Through “cancel“ (select with LR-button and confirm with MR-button), the Initialization function can be
left (HAC5shows the selecting menu again).
Press LR-button once to select “CAD“
Confirm with MR-button
Display shows “CAD on/off“, “on“ is marked.
Confirm with MR-button
Display shows “Iniscan CAD yes/no“, “yes“ is marked.
Now activate the cadence transmitter (pick it up and gently knock the spoke magnet against the mark
of the transmitter a few times, this starts the transmitter and it gives a signal.
Caution: The display of the HAC5remains unchanged during the activation).
Confirm with MR-button (please confirm only after the transmitter is activated).
Display will shortly show a percentage and returns back to selection mode after successful Initialization
(display shows “CAD“ marked). Should the Initialization be unsuccessful see further up.
Press LR-button once to select “HR“
Confirm with MR-button
Display shows “HR on/off“, “on“ is marked.
Confirm with MR-button.
Display shows “Iniscan HR yes/no“, “yes“ is marked.
If you have already put on the breast strap, it should already be activated. If not, activate it “manually“:
take the strap into your hands and rub it right and left on the ribbed parts with your thumbs, the trans-
mitter turns on through the friction and gives a signal.
Caution: the display of the HAC5remains unchanged during activation.
Confirm with MR-button.
Display now shortly shows a percentage and returns to the section menu after successful Initialization
(Display shows “HR“ marked). Should the Initialization be unsuccessful see further up.
Press MR-button for three seconds to leave the settings mode.
Through the settings in the ‚Bike1“ profile, this profile is already automatically ‚selected“, meaning the
display now shows the normal function mode of the ‚Bike1“ profile.
Now you can install the transmitters, the HAC5 is ready for use in terms of Initialization.
You can of course enter all the other data like wheel circumference, weight, measurements etc. first, to
do so follow the structure of the above example and enter the data in the setting mode concerned.
Important: Altogether, two speed transmitters, two cadence transmitters, one RDS II and one heart
rate transmitter can be initialized.
That means if you have already initialized the heart rate transmitter for “Bike1“, you only have to turn on
this function in the other profiles (“on“), you don’t have to initialize again (select “no“ for “Iniscan HR“ and
then confirm with the MR-button).
An already initialized speed- or cadence transmitter for “Bike1“ cannot be initialized for “Bike2“. Only if
another transmitter was initialized for “Bike1“ (or an Initialization was made without transmitter, which
then breaks off with “error“) can the original transmitter be initialized for “Bike2“.
!

13
6. Main setting mode
By pressing the MR-Button for 3 sec. the main setting mode will be selected. By pressing the MR-
Button again for 3 sec. the setting mode can be left from any area (except during the PC transmission,
display “PC-Connect“).
Note: When leaving the main setting mode with MR-Button for 3 sec. the last displayed choice will not
be saved (saving only by pressing the MR-Button shortly).
The specific options can be accessed by shortly pressing the LR-/UR-Button
and be selected by shortly pressing the MR-Button.
The desired setting can be selected by the LR-/UR-Button
and be confirmed with the MR-Button.
6.1 Short menu (Topical)
Whereas most settings have to be set only once, there are some values which have to/should be adju-
sted constantly. These values can be selected and modified and set in the short menu.
Attention: during recording settings can only be changed in the short menu.
By accessing normal setting mode (via MR-Button 3 sec.) and selecting a profile, recording will be tur-
ned off automatically.
The short menu includes the following values/functions
(dependent on whether the functions have been activated in the particular profiles):
Options: LR-/UR-Button
Saving and back: MR-Button
Cancel: Push MR-Button 3 sec.
6.2 Profile Bike and profiles RDS, ALPIN, RUN
Here first select the desired profile and then you can switch on or off the desired functions for the particu-
lar profile and furthermore the particular transmitters can be initialized.
Settings for the profiles
Since the settings for the profiles repeat themselves, all possible settings are listed, it depends on the
particular profile if they appear.
WEIGHT
Here you can enter the material’s weight (e.g. bicycle, backpack etc.).
Parameters: Min: 0 kg
Max: 100 kg
Standard: 10 kg
Select with MR-Button,
the desired weight can then be set with the LR-/UR-Button.
By pressing the MR-Button again the set value will be saved and the setting menu appears again.
CIRCUM
The wheel circumference can be set here.
Parameters: Min: 500 mm
Max: 3000mm
Standard: 2080 mm
Select with MR-Button,
the desired wheel circumference can then be set with the LR-/UR-Button.
By pressing the MR-Button again the set value will be saved and the setting menu appears again.
Topical
Prof.Bike
RDS.Run.Alp
HR-Interval
CAD-Interval
Basic Set.
PC-Connect
Powerdown
Exit
!
Set Altitude
Set Pressure
Set DST
IN-Zone
HR-Target
Set Countdown
Zone2
Exit
Profile Bike and profiles
RDS, ALPIN, RUN
Einstellungen
für die Profile
WEIGHT
Short menu (Topical)
CIRCUM
14
SPD
Here the function “speed measurement“ can be switched on and off.
Select with MR-Button,
Then the speed measurement can be switched on or off with the LR-/UR-Button.
Upon switching on the speed measurement, the display for initializing appears after pressing the MR-
Button (for saving the setting).
When the speed transmitter has not been initialized yet, the initialization can now be started here. It is
important that the speed transmitter will be activated first: this can be done by short (careful) hitting the
marking on the transmitter with the circle magnet or (in case it has already been installed) by turning the
wheel a few times (so the magnet will pass the transmitter activating it).
By shortly pressing the MR-Button you confirm (please only after activating the transmitter).
The display now shows briefly a percentage number and will go back after successful initialization to the
options menu (display shows “Speed“ highlighted).
If the initialization is not successful, the percentage number goes to 100% and the HAC5will display
“Iniscan Error“.
Then activate the transmitter again and restart the initialization with “retry“ (select with LR-Button and
confirm with MR-Button). With “cancel“ (select with LR-Button and confirm with MR-Button) the initia-
lization function can be left (HAC5shows the options menu again).
Cadence
Here the function “pedal frequency measurement“ can be switched on or off.
Select with MR-Button,
then the pedal frequency measurement can be switched on or off with the UR-/LR-Button.
If the pedal frequency measurement is switched on, the display for initialization appears on the display
after pressing the MR-Button (for saving the setting).
When the pedal frequency transmitter has not been initialized yet, the initialization can be started now. It
is important that first the speed transmitter will be activated: this happens by short (careful) hitting the
marking on the transmitter with the circle magnet or (in case it has already been installed) by turning the
crank a few times (so the magnet will pass the transmitter activating it).
By shortly pressing the MR-Button you confirm (please only after activating the transmitter).
The display now shows briefly a percentage number and will go back to the options menu after succes-
sful initialization (display shows “CAD“ highlighted).
If the initialization is not successful, the percentage number goes to 100% and the HAC5will display
“Iniscan Error“.
Then activate the transmitter again and start the initialization again with “retry“ (select with LR-Button
and confirm with MR-Button). With “cancel“ (select with LR-Button and confirm with MR-Button) the
initialization function can be left (HAC5shows again the options menu).
RDS
Here the speed measurement can be switched on or off using the accessory RDS II (Radar Distance
System – optionally available at your dealer).
Select with MR-Button,
the speed measurement can then be switched on or off with the UR-/LR-Button.
If the speed measurement is switched on, the display for initialization appears on the display after pres-
sing the MR-Button (for saving the setting).
Before initializing the RDS II must be switched on to transmit a signal which the HAC5can receive.
By pressing the MR-Button shortly you confirm (please only after activating the transmitter).
The display now shows briefly a percentage number and will go back after successful initialization to the
options menu (display shows “RDS“ highlighted).
If the initialization is not successful, the percentage number goes to 100% and the HAC5will display
“Iniscan Error“.
Then activate the transmitter again and restart the initialization with “retry“ (select with LR-Button and
confirm with MR-Button). With “cancel“ (select with LR-Button and confirm with MR-Button) the initia-
lization function can be left (HAC5 shows again the options menu).
Heart
Here the function “heart rate measurement“ can be switched on or off.
Select with MR-Button,
then the heart rate measurement can be switched on or off with the UR-/LR-Button.
Upon switching on the heart rate measurement, the display for initializing appears after pressing the
MR-Button (for saving the setting).
SPD
12 %
Iniscan SPD
Bike1
retry
Iniscan Error
cancel
12 %
Iniscan CAD
Bike1
retry
Iniscan Error
cancel
Iniscan Error –
Fehler bei der Initialisierung
Iniscan Error –
Fehler bei der Initialisierung
Cadence
RDS
Iniscan Error –
Fehler bei der Initialisierung
12 %
Iniscan RDS
RDS
retry
Iniscan Error
cancel
Heart
15
When the heart rate transmitter has not been initialized yet, the initialization can be started now. It is im-
portant that first the speed transmitter will be activated: this happens by wearing the belt or by short
and simultaneous rubbing (preferably with the thumb) on the electrodes (corrugated rubber parts left
and right from the hard transmitting device on the chest belt).
By shortly pressing the MR-Button you confirm (please only after activating the transmitter).
The display now shows briefly a percentage number and will go back after successful initialization to the
options menu (display shows ”HEART“ highlighted).
If the initialization is not successful, the percentage number goes to 100% and the HAC5will display
“Iniscan Error“.
Then activate the transmitter again and start the initialization again with “retry“ (select with LR-Button
and confirm with MR-Button). With “cancel“ (select with LR-Button and confirm with MR-Button) the
initialization function can be left (HAC5shows again the options menu).
Ski SPD
Here the speed measurement during skiing and snowboarding can be switched on or off.
The speed will be measured accordingly to the current decline (height difference).
Select with MR-Button,
the measurement can then be switched on or off with the UR-/LR-Button. By pressing the MR-Button
again the set value will be saved and the setting menu reappears.
Note: Upon switching on e.g. the ski speed measurement in one profile and RDS at the same time, the
ski speed measurement will be internally switched off (according to the height difference) and the speed
will be measured with RDS II.
Altimeter
Here the function “altimetry“ can be switched on or off.
Select with MR-Button,
the altimetry can then be switched on or off with the UR-/LR-Button. By pressing the MR-Button again
the set value will be saved and the setting menu reappears.
Beeper
The beep sounds and the acoustic heart rate alarm can here be switched on or off.
If the heart rate alarm has been switched on, the alarm symbol “ “ will appear to the left in the display.
Select with MR-Button,
the function can then be switched on or off with the UR-/LR-Button-Button. By pressing the MR-
Button again the set value will be saved and the setting menu reappears.
In the normal operation mode the heart rate alarm can be switched on or off anytime by pressing the
UL-Button for 3 sec.
Ascent
Here the function “ascending/descending display“ can be switched on or off.
Select with MR-Button,
then the function can be switched on or off with the UR-/LR-Button-Button. By pressing the MR-
Button again the set value will be saved and the setting menu appears again.
Vario
Here the function “ascend/descend“ can be switched on or off.
Select with MR-Button,
the function can then be switched on or off with the UR-/LR-Button-Button. By pressing the MR-
Button again the set value will be saved and the setting menu reappears.
STW
Here the function “stop watch“ can be switched on or off.
Select with MR-Button,
the function can then be switched on or off with the UR-/LR-Button-Button. By pressing the MR-
Button again the set value will be saved and the setting menu reappears.
Countdown
Here the function “countdown“ can be switched on or off.
Select with MR-Button,
the function can then be switched on or off with the UR-/LR-Button-Button. By pressing the MR-
Button again the set value will be saved and the setting menu appears again.
Power
Here the function “power“ can be switched on or off.
Select with MR-Button,
the function can then be switched on or off with the UR-/LR-Button-Button. By pressing the MR-
Button again the set value will be saved and the setting menu reappears.
Ski SPD
Altimeter
12 %
Iniscan HR
Bike1
retry
Iniscan Error
cancel
Iniscan Error –
Fehler bei der Initialisierung
➔
➔
Beeper
Ascent
Vario
STW
Countdown
Power
16
CAL
Here the function “calorie use“ can be switched on or off.
Select with MR-Button,
the function can then be switched on or off with the UR-/LR-Button-Button. By pressing the MR-
Button again the set value will be saved and the setting menu reappears.
FAT
Here the function “fat burning“ can be switched on or off.
Select with MR-Button,
the function can then be switched on or off with the UR-/LR-Button-Button. By pressing the MR-
Button again the set value will be saved and the setting menu reappears.
Temp
Here the function “temperature display“ can be switched on or off.
Select with MR-Button,
the function can then be switched on or off with the UR-/LR-Button-Button. By pressing the MR-
Button again the set value will be saved and the setting menu reappears.
Autoscroll
Here the function “autoscroll“ can be switched on or off.
Select with MR-Button,
the function can then be switched on or off with the UR-/LR-Button-Button. By pressing the MR-
Button again the set value will be saved and the setting menu reappears.
Mem.Interval
Here the desired memory interval can be set.
Select with MR-Button,
the desired value can then be set with the UR-/LR-Button. By pressing the MR-Button again the set
value will be saved and the setting menu reappears.
Back
Goes back to the previous level (Main setting menu).
Confirm with MR-Button.
Exit
Goes back to normal operation mode.
Confirm with MR-Button.
6.3 HR-Interval
Here heart rate limits and corresponding countdowns can be set for an interval training and the heart
rate time manager can be switched on (see chapter 8.2).
Sel.Profile
Here you can select for which profile the heart rate interval will be valid (it can be set individually for each
profile).
Confirm with MR-Button,
then select the desired profile with the UR-/LR-Button and save with the MR-Button.
HR-Limit 1
Select with MR-Button,
the function can then be switched on or off with the UR-/LR-Button-Button. By pressing the MR-
Button again the setting will be saved.
If HR-Limit 1 is switched off, the options menu reappears.
If HR-Limit 1 is switched on, “Countdown 1” will appear on the display.
With the UR-/LR-Button the desired countdown time for this heart rate limit can be set,
Confirm the set value with the MR-Button.
Parameters: 00:01:00 h – 19:59:59 h
Default setting: 10 minutes (10:00)
CAL
FAT
Temp
Autoscroll
Mem.Interval
Back
Exit
HR-Interval
Sel.Profile
Sel.Profile
HR-Limit 1
HR-Limit2
HR-Limit3
HR-Manager
HR-Counter
Back
Exit
Select Bike1
Select Bike2
Select RDS
Select Alp.
Select Run
Back
Exit
HR-Limit 1
on
HR-Limit 1
off
+
Countdown 1
00:10:00
–

17
On display appears now in the upper display the heart rate upper limit 1 (blinking)
and can be set with the UR-/LR-Button.
Parameters: 20 – 250 bpm (=beats per minute)
Default setting: 100 bpm
Confirm with MR-Button, in the lower display the heart rate lower limit 1 is now blinking
and can be set as well with the UR-/LR-Button.
Parameters: 20 – 250 bpm (= beats per minute)
Default setting: 80 bpm
Confirm with MR-Button, the options menu will reappear on the display with HR-Limit 1.
HR-Limit 2
Select “HR-Limit 2” with LR-Button.
Select with MR-Button,
the function can then be switched on or off with the UR-/LR-Button-Button. By pressing the MR-
Button again the setting will be saved.
If HR-Limit 2 is switched off, the options menu appears again.
If HR-Limit 2 is switched on, “Countdown 2” will appear on the display.
With the UR-/LR-Button the desired countdown time for this heart rate limit can be set,
Confirm the set value with the MR-Button.
Parameters: 00:01:00 h – 19:59:59 h
Default setting: 20 minutes (20:00)
On display appears now on the upper display the heart rate upper limit 2 (blinking)
and can be set with the UR-/LR-Button.
Parameters: 20 – 250 bpm (= beats per minute)
Default setting: 120 bpm
Confirm with MR-Button, in the lower display the heart rate lower limit 2 is now blinking
and can be set as well with the UR-/LR-Button.
Parameters: 20 – 250 bpm (= beats per minute)
Default setting: 100 bpm
Confirm with MR-Button, the options menu will reappear on the display with HR-Limit 2.
HR-Limit 3
Select “HR-Limit 3” with LR-Button.
Select with MR-Button,
the function can then be switched on or off with the UR-/LR-Button-Button. By pressing the MR-
Button again the setting will be saved.
If HR-Limit 3 is switched off, the options menu appears again.
If HR-Limit 3 is switched on, “Countdown 3” will appear on the display.
With the UR-/LR-Button the desired countdown time for this heart rate limit can be set,
Confirm the set value with the MR-Button.
Parameters: 00:01:00 h – 19:59:59 h
Default setting: 30 minutes (30:00)
On display appears now on the upper display the heart rate upper limit 3 (blinking)
and can be set with the UR-/LR-Button.
Parameters: 20 – 250 bpm (=beats per minute)
Default setting: 140 bpm
Confirm with MR-Button, in the lower display the heart rate lower limit 3 is now blinking
and can be set as well with the UR-/LR-Button.
Parameters: 20 – 250 bpm (= beats per minute)
Default setting: 120 bpm
Confirm with MR-Button, the options menu will reappear on the display with HR-Limit 3.
HR-Manager
Select “HR-Manager” with LR-Button.
Here the heart rate time manager can be switched on (see chapter 8.2).
Once switched on, the particular countdown times will only be count backwards, if the current heart
HR-Limit 2
HR-Limit 3
+
100
HR-High 1
80
–
+
100
HR-Low 1
80
–
on
HR-Limit 2
off
+
Countdown 2
00:10:00
–
+
120
HR-High 2
100
–
+
120
HR-Low 2
100
–
on
HR-Limit 3
off
+
Countdown 3
00:10:00
–
+
140
HR-High 3
120
–
HR-Manager
+
140
HR-Low 3
120
–

18
rate is within the set limits of the particular interval. If the heart rate is above or below, the countdown
will stop and returns once the current heart rate is within the set limits.
INT-Counter
Select “INT-Counter” with LR-Button.
Here a counter can be set, which defines how many times the interval will be repeated. Parameters:
1 – 99 intervals
Back
Goes back to the previous level (main setting mode).
Confirm with MR-Button.
Exit
Goes back into normal operation mode.
Confirm with MR-Button.
6.4 CAD-Interval
Here pedal frequency limits and corresponding countdowns can be set for an interval training and the
pedal frequency time manager can be switched on.
Sel.Profile
Here you can select for which profile (Bike1 or Bike2) the pedal frequency interval will be valid.
Confirm with MR-Button,
then select the desired profile with the UR-/LR-Button and save with the MR-Button.
Select with MR-Button,
then the function can be switched on or off with the UR-/LR-Button-Button. By pressing the MR-
Button again the setting will be saved.
If CAD-Limit 1 is switched off, the options menu appears again.
If CAD-Limit 1 is switched on, “Countdown 1” will appear on the display.
With the UR-/LR-Button the desired countdown time for this pedal frequency limit can be set,
Confirm the set value with the MR-Button.
Parameters: 00:01:00 h – 19:59:59 h
Default setting: 10 minutes (10:00)
On display appears now on the upper display the pedal frequency upper limit 1 (blinking)
and can be set with the UR-/LR-Button.
Parameters: 20 – 250 rpm (= turns per minute)
Default setting: 60 rpm
Confirm with MR-Button, in the lower display the pedal frequency lower limit 1 is now blinking
and can be set as well with the UR-/LR-Button.
Parameters: 20 – 250 rpm
Default setting: 40 rpm
Confirm with MR-Button, the options menu will reappear on the display with CAD-Limit 1.
CAD-Limit 2
Select “CAD-Limit 2” with LR-Button.
Select with MR-Button,
then the function can be switched on or off with the UR-/LR-Button-Button. By pressing the MR-
Button again the setting will be saved.
If CAD-Limit 2 is switched off, the options menu appears again.
If CAD-Limit 2 is switched on, “Countdown 2” will appear on the display.
With the UR-/LR-Button the desired countdown time for this pedal frequency limit can be set,
Confirm the set value with the MR-Button.
Parameters: 00:01:00 h – 19:59:59 h
Default setting: 20 minutes (20:00)
Sel.Profile
CAD-Limit 1
CAD-Limit2
CAD-Limit3
CAD-Manager
CAD-Counter
Back
Exit
Select Bike1
Select Bike2
Back
Exit
on
CAD-Limit 1
off
+
Countdown 1
00:10:00
–
+
60
CAD-High 1
40
–
+
60
CAD-Low 1
40
–
INT-Counter
Back
Exit
CAD-Interval
Sel.Profile
CAD-Limit 2 on
CAD-Limit 2
off
+
Countdown 2
00:20:00
–

19
On display appears now on the upper display the pedal frequency upper limit 2 (blinking)
and can be set with the LR- / UR-Button.
Parameters: 20 – 250 rpm
Default setting: 80 rpm
Confirm with MR-Button, in the lower display the pedal frequency lower limit 2 is now blinking
and can be set as well with the LR- / UR-Button.
Parameters: 20 – 250 rpm
Default setting: 60 rpm
Confirm with MR-Button, the options menu will reappear on the display with CAD-Limit 2.
CAD-Limit 3
Select “CAD-Limit 3” with LR-Button.
Select with MR-Button,
the function can then be switched on or off with the UR-/LR-Button-Button. By pressing the MR-
Button again the setting will be saved.
If CAD-Limit 3 is switched off, the options menu appears again.
If CAD-Limit 3 is switched on, “Countdown 3” will appear on the display.
With the UR-/LR-Button the desired countdown time for this pedal frequency limit can be set,
Confirm the set value with the MR-Button.
Parameters: 00:01:00 h – 19:59:59 h
Default setting: 30 minutes (30:00)
On display appears now on the upper display the pedal frequency upper limit 3 (blinking)
and can be set with the UR-/LR-Button.
Parameters: 20 – 250 rpm
Default setting: 100 rpm
Confirm with MR-Button, in the lower display the pedal frequency lower limit 3 is now blinking
and can be set as well with the UR-/LR-Button.
Parameters: 20 – 250 rpm
Default setting: 80 rpm
Confirm with MR-Button, the options menu will reappear on the display with CAD-Limit 3.
CAD-Manager
Select CAD-Manager' with LR-Button,
confirm with MR-Button.
Here the pedal frequency time manager can be switched on or off.
Once switched on, the particular countdown times will only be counted backwards, if the current pedal
frequency is within the set limits of the particular interval. If the pedal frequency is above or below, the
countdown will stop and returns once the current pedal frequency is within the set limits.
INT-Counter
Select “INT-Counter” with LR-Button,
confirm with MR-Button.
Here a counter can be set, which defines how many times the interval will be repeated. Parameters:
1 – 99 intervals
Back
Goes back to the previous level (main setting mode).
Confirm with MR-Button.
Exit
Goes back into normal operation mode.
Confirm with MR-Button.
CAD-Limit 3
CAD-Manager
INT-Counter
Back
Exit
+
80
CAD-Low 2
60
–
on
CAD-Limit 3
off
+
Countdown 3
00:30:00
–
+
100
CAD-High 3
80
–
+
100
CAD-Low 3
80
–
+
80
CAD-High 2
60
–

20
6.5 Basic settings
Basic settings can be made here which apply to all profiles.
6.5.1 Set altitude
After having selected this function the current altitude is indicated in the upper display and the current
air pressure (reduced to sea level) in the lower display. The upper value (the altitude indication) is flas-
hing.
The current altitude can be set now with the UR-/LR-buttons.
Range: -500m – 9000m
Pressure
If you wish to set the air pressure, too, shortly press the UL- and the LL-button simultaneously. Then
the air pressure is starting to flash in the lower display and can be set with the UR-/LR-button.
The values can be confirmed and stored with the MR-button.
6.5.2 Set units
The units of measurement – kilometres or miles for the measurement of the distance, hpa or Inhg for
the measurement of the air pressure – can be set here.
Set with the MR-button.
Unit pressure
The unit of measurement for the air pressure can be selected here: hpa or inhg.
Unit distance
The unit of measurement for the distance indication can be selected here: kilometres or miles.
Unit speed
The unit of measurement for the speed indication can be selected here (dependent on the previous set-
ting): either km/h (kilometres per hour) or min/km (minutes per kilometre) or mi/h (miles per hour) or
min/mi (minutes per mile).
Unit temperature
The unit of measurement for the temperature indication can be selected here: °C (Celsius) or °F
(Fahrenheit).
Unit time
The format for the time indication can be selected here: 24h (24 hours indication) or 12 h (12 hours
AM/PM-indication).
Unit weight
The unit of measurement for the time can be selected here: kg or lb.
6.5.3 Set time
The current date, time (incl. a 2nd time zone) and alarm time can be set here.
Set alarm
The alarm can be switched on and off here.
Basic settings
Set altitude
Pressure
Set units
Unit pressure
Set Altitude
Set Units
Set Time
Set Perso.
Set Totals
Back
Exit
m +
496
Altitude
1025,5
hPa –
m +
496
Pressure
1025,5
hPa –
Unit Press.
Unit Dst.
Unit Speed
Unit Temp.
Unit Time
Unit Weight
Back
Exit
Set Alarm
Set Clock
Set Date
Back
Exit
on
Set Alarm
off
Unit distance
Unit speed
Unit temperature
Unit time
Unit weight
Set time
Set alarm
Table of contents
Other CICLOSPORT Watch manuals


