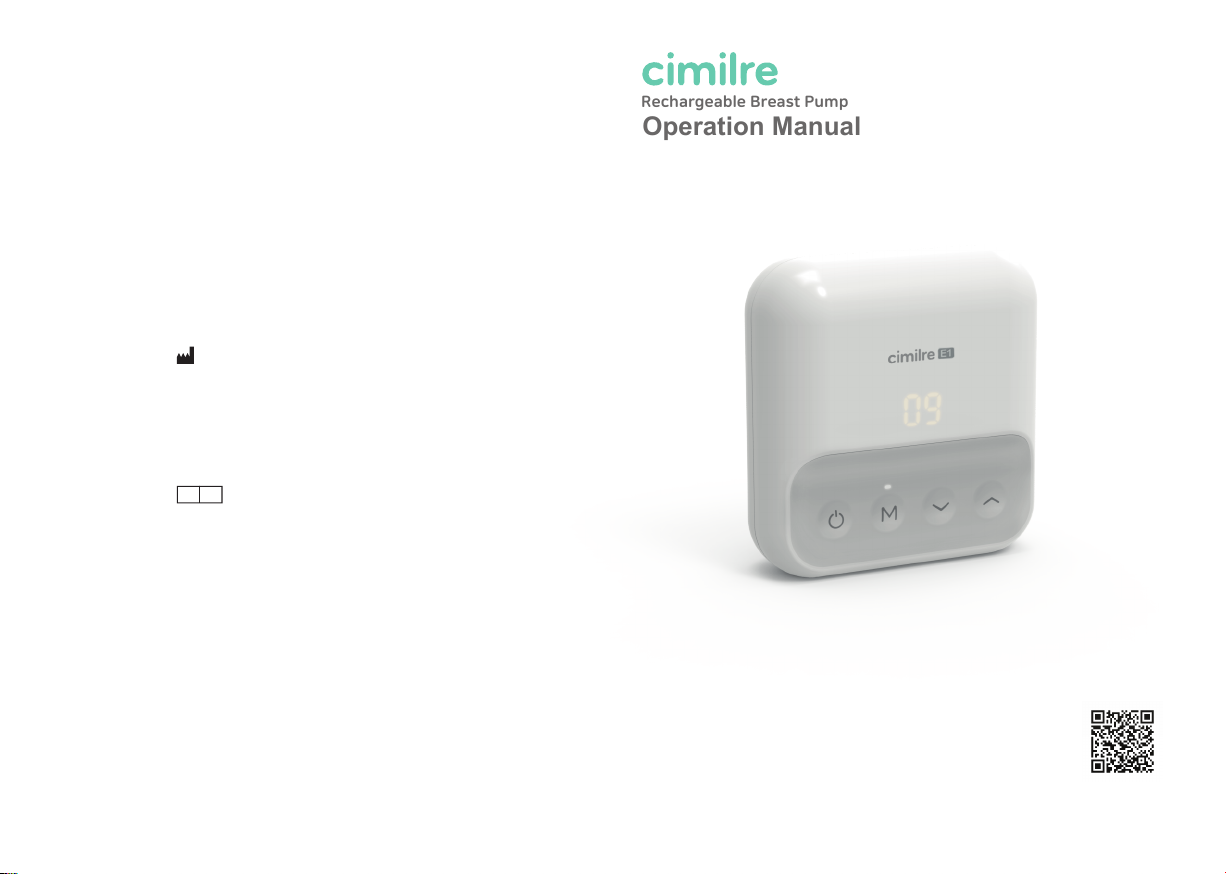
cimilre E1 User manual
REV 0
2023.03.17
UM-128(0)QF-708-22
CIMILRE E1
Operation Manual
97-14, Seongnam-ro, Mokcheon-eup,
Dongnam-gu, Cheonan-si,
Chungcheongnam-do, Korea
Phone : +82-41-553-0941
Cimilre Co., Ltd.
615 Main Street
Toms River, NJ 08753
Phone: (888) 394-2422
Email: [email protected]
Symmetrical Health, LLC
US AGENT
Operation Manual
E1
Use your phone to scan the QR code
for manuals in other languages.
Rechargeable Breast Pump

1. Introduction
1.1 Key Features
1.2 Indications for Use
1.3 Explanation of Symbols
2. Warnings and Cautions
3. Components
4. Cleaning
4.1 Before using your pump
4.2 After using your pump
6.1 Positioning
6.2 Button Controls
6.3 Display Screen
7.1 Understanding Size
7.2 Test your breast shield size
8.1 How long can I store breast milk?
8.2 How do I thaw and use stored milk?
7.3 Determining the right fit
6.5 Pump Operation
6.6 Suction Settings
6.7 Massage and Expression Modes
5. Assembly
6. Pumping
7. Breast Shield Sizing
8. Breast Milk Storage
9. Troubleshooting
10. Disposal
11. Technical Information
12. Electromagnetic Compatibility
13. Description of IP Classification
14. Warranty
Table of Contents
3
.
....................................................................................4
...............................................................................4
......................................................................4
...........................................................5-6
...............................................................6-8
.....................................................................................9
........................................................................................10
............................................................10
...............................................................10
.........................................................................................11
.........................................................................................12
................................................................................12
.........................................................................13
.........................................................................13
6.4 Battery Information
......................................................................14
.........................................................................17
......................................................................18
...................................................................18
..................................................18-19
.............................................................19
......................................................................19
............................................................................21
.........................................................................................22
...................................................................22
................................................23-26
....................................................................................28-29
....................................................27
..............................................19
..........................................20
..............................................17
...................................................................15-17
1. Introduction
PLEASE READ THIS MANUAL IN ITS ENTIRETY, INCLUDING ALL
INSTRUCTIONS AND WARNINGS, BEFORE USE.
Congratulations on your decision to provide your baby with breast milk and thank
you for choosing the Cimilre E1 breast pump to help you reach your breastfeeding
goals. While we hope you enjoy your Cimilre E1, it is recommended to breastfeed
your baby whenever you can. The Cimilre E1 was innovated with moms in mind,
as it combines premium quality, portability, and modern design. The Cimilre E1 is
a safe, efficient, and effective choice for pumping moms.
1.1 Key Features
Double Pumping: Expressing from both breasts at the same time can save time
and supports milk supply.
Massage & Expression Modes: Effortlessly switch from Massage to Expression
Mode by pressing a single button.
1.2 Indications for Use
The Cimilre E1 breast pump is intended to be used by lactating women to express
and collect milk from their breasts.
WARNING
!
NOTICE
CAUTION
!
97-14, Seongnam-ro,
Mokcheon-eup,
Dongnam-gu, Cheonan-si,
Chungcheongnam-do, Korea
Manufactured
Phone : +82-41-553-0941
Potentially dangerous situation that could result in serious injury
A possibly dangerous situation that could result in slight bodily injury
Useful information or information you need to know when using
this product.
Please read this document completely and follow the instructions
exactly. To prevent personal injury and material damage, please observe the
warning and safety information provided in this document. Identification of
danger levels:
Built-in Rechargeable Battery: With a battery life of 2+ hours between charges,
the E1 is portable, allowing for ease of use while pumping on the go.
4
1.3 Explanation of Symbols
Manufacturer
Date of manufacture
Serial number
General prohibition sign
General warning sign
Caution
Notice
Refer to instruction manual
Type BF applied part
CLASS II equipment
DC
Alternating current
Degree of protection against harmful ingress of water or
particulate matter. Please see section 11 for the detail
information.
Temperature limit
US Agent
IP22
Symbol Description
!
!
US AGENT
5

2. Warnings and Cautions
Humidity limitation
Atmospheric pressure limitation
Keep dry
Fragile, handle with care
This product should not be mixed with other
commercial waste for disposal.
Power
• Do not modify this equipment without authorization of the manufacturer.
• Do not disassemble or modify the product. The device has no user-serviceable parts.
• Always unplug immediately after use.
• Do not use while bathing.
• Do not place or store product where it can fall or be pulled into a tub or sink.
• Do not place or drop into water or other liquid.
• Do not reach for a product if it has fallen into water. Immediately unplug from
electrical outlet.
PROHIBITION: To reduce the risk of electrocution.
WARNING: To reduce the risk of electrocution.
!
6
Adjust the level of suction
Changes the operation mode
• Do not leave the product unattended when plugged into an electrical outlet.
• Close supervision is necessary when this product is used near children or persons
with disabilities.
• Place product out of reach of children.
• Use the product only for its intended use as described in this manual. Do not use
attachments not recommended by the manufacturer.
• Never operate this product if it has a damaged cord or plug, it is not working properly,
or if it has been dropped or damaged, or dropped into water.
• Keep cord away from heated surface.
• Never use while sleeping or when drowsy.
• Never drop or insert any object into any opening or tubing.
• Do not use outdoors, or operate where aerosol (spray) products are being used or
where oxygen is being administered.
• Always inspect power adapter and battery pack wires prior to use for damage or
• The CIMILRE E1 should not be positioned so that it is difficult to operate the adapter.
exposed wire. If damage is found, immediately discontinue use of power adapter or
battery pack and call Cimilre customer service.
WARNING: To avoid fire, electrocution, or serious burns.
!
• If you are a mother who is infected with Hepatitis B, Hepatitis C, or Human
Immunodeficiency Virus (HIV), pumping breast milk will not reduce or remove the risk
of transmitting the virus to your baby through your breast milk.
• Before each use visually inspect the individual components for cracks, chips, tears,
discoloration or deterioration. In the event that damage to the device is observed,
please discontinue use until the parts have been replaced.
• This product is intended for use by a single user only and should not be shared
between users.
• Do not drive while pumping.
• Never use while pregnant, as pumping can induce labor.
• Clean and disinfect all parts that come in contact with your breast and breast milk
prior to first use.
• Wash all parts that come in contact with your breast and breast milk after every use.
• Inspect all appropriate pump components before each use.
• Do not continue pumping for more than two consecutive pumping sessions if no
results are achieved.
• Do not thaw frozen breast milk in a microwave or in a pan of boiling water.
• If tube becomes moldy, discontinue use and replace tube.
• If breastmilk backup occurs, you must clean tube and make sure it is dry before your
next pumping session.
WARNING: To avoid health risk and reduce the risk of injury.
7
!
• Cimilre reserves the right to substitute any component or accessory with a replacement
of equivalent performance.
3. Components
2 - Long Tubing
3 - Backflow Protector Top
4 - Backflow Protector Silicone
5 - Backflow Protector Bottom
6 - 21mm & 24mm Breast Shield
7 - Valve
8 - Bottle
9 - Bottle Cap
10 - Nipple
11 - Bottle Cover
12 - Bottle Disk
1 - Rechargeable Breast Pump, Cimilre E1
2x Milk
Collection Kit
Included Components
1
2
3
4
5
6
7
8
13
12
11
10
9
14
15
9
• Do not wrap cord around adapter body.
• Use only the power adapter that comes with the powered breast pump.
• Pump only with the breast pump in an upright position.
• Do not shorten tubing.
• Make sure the voltage of the power adapter is compatible with the power source.
• Plug the power adapter into the breast pump first and then into the wall socket.
• Do not use antibacterial or abrasive cleaners/detergents when cleaning breast pump
or breast pump parts.
• Never put breast pump motor unit in water or a Sterilization, as you can cause
permanent damage to the breast pump.
• Do not attempt to remove the breast shield from your breast while pumping. Turn the
breast pump off and break the seal between your breast and breast shield with your
finger, then remove breast shield from your breast.
• If pumping is uncomfortable or causing pain, turn the unit off, break the seal between
the breast and the breast shield with your finger and remove the breast shield from
your breast.
• Plastic bottles and component parts become brittle when frozen and may break
when dropped.
• Bottles and component parts may become damaged if mishandled, e.g. dropped,
over-tightened or knocked over.
• Take appropriate care in handling bottles and components.
• Do not use the breast milk if bottles or components become damaged.
CAUTION: To avoid minor injury.
!
8
14 - 3-Way Connector
15 - USB-C Cable
13 - Small Tubing
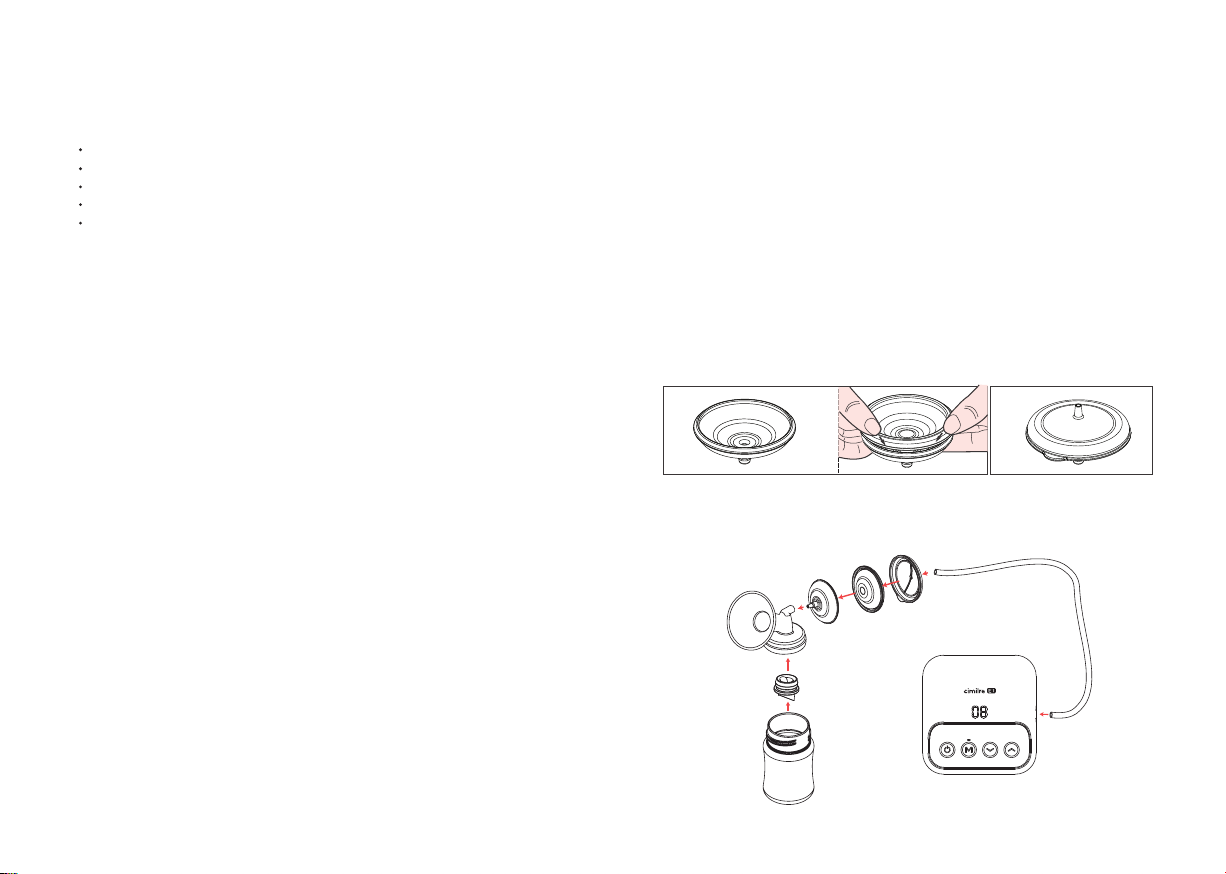
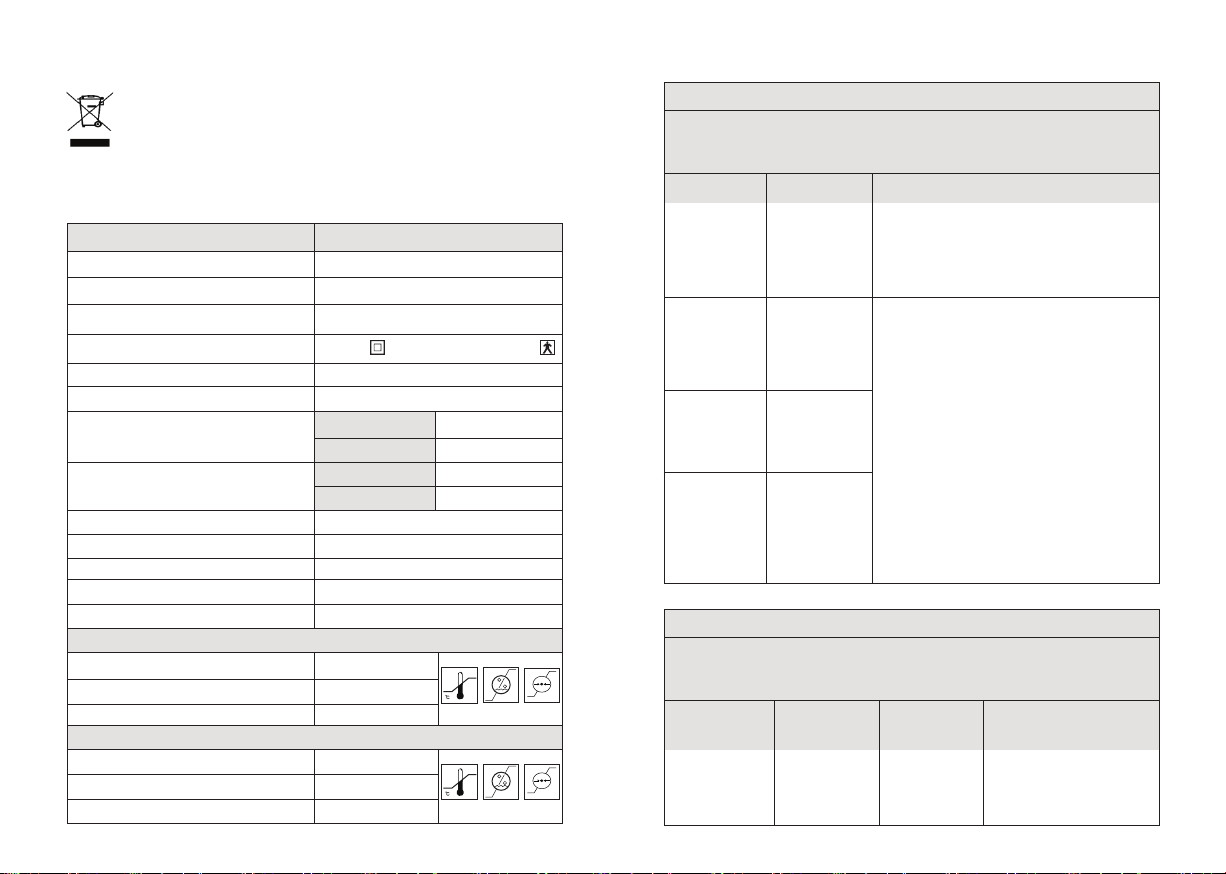
5. Assembly
1. Wash hands before touching breast pump parts.
1. Insert silicone membrane into lower protector.
2. Snap on the protector top to the assembled protector bottom.
2. Place breast pump on a clean, dry, and secure surface.
3. Insert the backflow protector silicone into the backflow protector bottom (the part
that connects to the breast shield). Ensure that it fits securely and that the backflow
protector silicone edge fits around the rim of the backflow protector bottom.
4. Snap on the backflow protector top (the component that connects to the tubing)
to the assembled backflow protector bottom.
5. Push the valve onto the underside of the breast shield.
6. Connect the backflow protector assembly to the top of the breast shield. Use a
twisting motion to attach, and later remove this assembly, to avoid damaging it.
7. Screw the bottle onto the underside of the breast shield.
9. Attach USB-C cable to the Cimilre E1.
10. Plug USB-C cable directly into a USB port, or into a separate power adapter,
which would then be plugged into a standard electrical outlet.
8. Connect the tubing to the backflow protector assembly and connect the other end
of the tubing to the Cimilre E1 for single pumping. For double pumping,
refer to Section 6.5.
11
1 2
4. Cleaning
4.1 Before using your pump
4.2 After using your pump
WARNING: Do not wash or boil tubing. Tubing needs to remain dry to avoid any
potential mold contamination.
Clean and disinfect the parts before using your pump for the first time.
Cleaning and sanitizing instructions:
Backflow protectors
Breast shields
Bottles, bottle discs, and bottle covers
Nipples
Valves
1. Only use drinking-quality water or bottled water for cleaning.
2. Wash hands thoroughly.
3. Wash parts with a clean dish cloth or soft brush in warm soapy water.
4. Rinse parts with clear water.
5. Disinfect the parts by placing in boiling water for 5 minutes.
6. Safely remove all parts from water with tongs.
7. Allow all parts to air dry in a clean area.
Take apart and wash all parts that come in contact with your breasts or breast milk
after use to avoid milk residue and bacteria growth.
1. Thoroughly wash your hands before handling each breast pump part.
2. Disassemble each part that comes into contact with breast milk including the
backflow protectors, breast shields, bottles, bottle disks, bottle covers,
nipples, and valves.
3. Rinse each part in cool water to remove milk residue.
4. Separately wash each part in the sink with a soft brush or clean dishcloth; OR
soak each part in warm soapy water for 5 minutes and thoroughly rinse them.
Alternatively, place the disassembled parts, except for the tubing, on the top rack
of your dishwasher.
5. Dry each part with a clean towel and/or allow them to completely air dry on a
sanitary surface.
6. Wipe the main body with a dry, clean towel after each use.
7. Store completely dry parts in a clean bag or container. Do not store
any damp parts.
10
We recommend to disinfect all parts that come in contact with your breast and
breast milk daily.

6.1 Positioning
6. Pumping
1. Before pumping, get into an upright position to prevent milk from back flowing and
maintain that position throughout your pumping session.
Gently massage your breasts from the breast toward the nipple or apply warm
compresses before using. Express milk from each breast for 10-15 minutes.
It is recommended to pump frequently rather than pumping for a long duration.
(Every 2-3 hours, 8 times a day).
2. Center the breast shield on your breast
so that the nipple is drawn into the flange.
It is important that the breast shield is
positioned properly before pumping
begins to avoid any pain that may be
caused by rubbing or twisting of your
nipple onto the side of the flange.
If double pumping, place the second
breast shield in place.
While some discomfort may be felt when first using a breast pump, using
a breast pump should not cause pain. If you are unsure about breast shield
sizing, please contact a Lactation Consultant or Cimilre representative
who can help you get a proper fit.
( ) ( X ) ( X ) ( X )
Consult with your health care provider regarding recommendations for
breastfeeding, including breastfeeding while pumping.
12
6.2 Button Controls
6.3 Display Screen
13
When pump is powered on for the first time after unboxing,
the suction may be preset to a higher level than desired.
Adjust the level to a preferred setting before first use.
Suction (Vacuum) Level
White light in Massage Mode/
Blue light in Expression Mode
Power Button Massage Mode (Levels 1-5)/
Expression Mode (Levels 1-10)
1. When adjusting suction levels, the screen will blink, indicating what level is
selected.
2. After selecting the preferred level, the screen will blink three more times, then
will change to the timer display, which will remain lit, indicating the number of
minutes in the pumping session.
3. When you proceed back to adjusting levels, the screen will return to a blinking
level indicator.

14 15
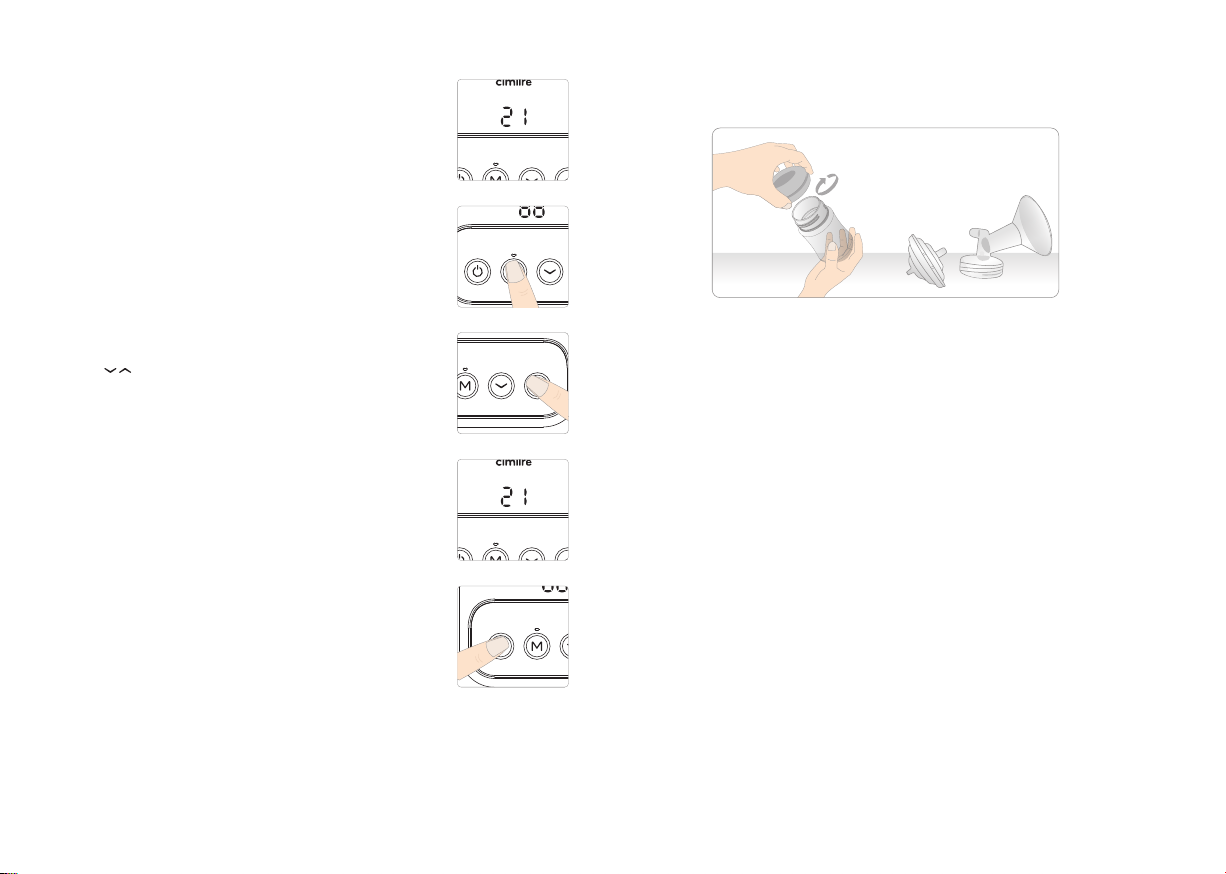
6.5 Pump Operation
1. Wash hands before touching breast pump and parts.
2. For single pumping, attach only one of the longer
pieces of tubing to the pump.
3. For double pumping, attach one end of the small piece of tubing to the pump
and the other to the 3-way connector. Then, attach the two long pieces of
tubing to the 3-way connector.
4. To begin pumping, press and hold the power button
on top of the pump motor. The device will power ON,
indicated by the screen lighting up. Press the Mode
button to begin your pumping session in Massage
Mode, which will help initiate a faster letdown
(light will be white).
5. Adjust suction (vacuum) strength using the down
and up level buttons to preferred comfort level.
When adjusting suction levels, the screen will blink,
indicating what level is selected.
When the pump is powered on for the first time after unboxing, the suction
may be preset to a higher level than desired. Adjust the level to a preferred
setting before first use. After first use, the Cimilre E1 will automatically
remember your last settings for your next pumping session.
Operating time: Approx 2+ hours
When using the USB-C cable, the battery will be charging even while the pump is
in use.
1
2When Charging
- Indicator light at charging port will be red.
3Fully Charged
- Indicator light at charging port will be green.
No. Description
6.4 Battery Information
Different Levels of Charge
Blink
Low Battery Full Charge2/3 Charge
1/3 Charge
-
Connect USB-C cable
soon
16
6. After selecting the preferred level, the screen will blink
three more times, then will change to the timer display,
which will remain lit, indicating the number of minutes
in the pumping session.
10. When you wish to stop expressing, press the Power
button and then remove the milk collection kit from your
breast.
7. Once your milk starts flowing, press the Mode button to
change to Expression Mode (light will be blue).
8. Adjust suction (vacuum) strength using the down and
up level buttons to preferred comfort level.
When adjusting suction levels, the screen will blink,
indicating what level is selected.
11. Close the bottle(s) tightly with bottle disk and cover and store safely.
17
1. The Cimilre E1 will automatically remember your last settings for your
next pumping session. If you want to start pumping on different settings,
adjust the settings before you start expressing.
2. The suction (vacuum) level refers to the suction strength; this is measured
in millimeters of mercury (mmHg). When you are using the Cimilre E1, you
will usually find that expressing is most effective on the highest suction level
that is comfortable for you.
However, it’s important not to set suction level so high that it makes you
uncomfortable or causes pain as this can hinder your milk flow.
Suction pattern with fast cycle speed and low suction to
help encourage a letdown and to start milk flowing
(light will be white).
6.6 Suction Settings
6.7 Massage and Expression Modes
Massage Mode:
Suction pattern with slower cycle speed and higher
suction to express milk gently and efficiently
(light will be blue).
Expression Mode:
9. After selecting the preferred level, the screen will blink
three more times, then will change to the timer display,
which will remain lit, indicating the number of minutes
in the pumping session.

Pumping should not hurt. This guide is a starting point to help determine
your optimal size based on your nipple diameter.
How to find the right size flange for you:
Step 1: Using a ruler or measuring tape,
measure the diameter of your nipple at
base (across middle) in millimeters (mm).
*1cm = 10mm. Do not include areola.
Step 2: Take your measurement and add
4mm to determine your breast shield size.
*Example: If your nipple size measures
24mm in diameter, the recommended
breast shield size is 28mm.
Measure
Nipple
Nipple Base
Areola
7. Breast Shield Sizing
7.1 Understanding Size
18
During pumping, your nipple is able to move freely in the flange tunnel.
You will have space around your nipple and not much of the areola is
drawn into the tunnel with the nipple.
7.2 Test your breast shield size
Good Fit
During pumping, some or your entire nipple rubs against the sides of
the flange tunnel.
Too Small
During pumping, more of your areola is drawn into the breast pump
flange with your nipple. You may experience your areola rubbing up
against the side of the flange tunnel.
Too Large
7.3 Determining the right fit
Does your nipple rub the sides of flange tunnel to the point of causing
discomfort?
Do you see excessive areola being pulled into tunnel?
Do you see any redness?
Is your nipple or areola turning white?
Do you feel unexpressed milk after pumping?
If you answered ‘YES’ to any of these questions, consider trying a new
size by following the measuring instructions above. If you are still unsure
if you selected the correct size, see a lactation consultant or breastfeeding
specialist for assistance in choosing the right size breast shield.
19
8. Breast Milk Storage
8.1 How long can I store breast milk?
Countertop
77°F (25°C) or colder
(room temperature)
Refrigerator
40°F (4°C)
Freezer
0°F (-18°C) or colder
Type of Breast Milk
Up to 4 hours Up to 4 Days Within 6 months is best
Up to 12 months is acceptable
Freshly Expressed
or Pumped
Storage Locations and Temperatures
1-2 hours Up to 1 Day
(24 hours)
Never refreeze human milk
after it has been thawed
Thawed, Previously
Frozen
Use within 2 hours after the baby is
finished feeding
Leftover from a
Feeding (baby did not
finish the bottle)
Source: cdc.gov
Good Fit Too LargeToo Small

8.2 How do I thaw and use stored breast milk?
1. Always thaw the oldest breast milk first. Remember first in, first out.
Over time, the quality of breast milk can decrease.
2. There are several ways to thaw your breast milk:
a. In the refrigerator overnight.
b. Set in a container of warm or lukewarm water.
c. Under lukewarm running water.
3. Never thaw or heat breast milk in a microwave. Microwaving can destroy
nutrients in breast milk and create hot spots, which can burn a baby’s
mouth.
4. Use breast milk within 24 hours of thawing in the refrigerator (this means
from the time it is no longer frozen or completely thawed, not from the
time when you took it out of the freezer).
5. Once breast milk is brought to room temperature or warmed after storing
in the refrigerator or freezer, it should be used within 2 hours.
6. Never refreeze breast milk once it has been thawed.
Source: cdc.gov
21
9. Troubleshooting
USB-C cable
Check if the USB-C
cable is damaged or
working properly.
Listen for abnormal
pump sound/noise.
Check the connection
of the kit.
Examine the breast
shield for potential
cracks or chips.
Check breast shield
sizing (see section 7).
Check if there is
damage to the valve.
Check the
suction level.
Check if they are
properly connected to
breast shield.
Check the tubing to
make sure it is
connected to the air
flow port on the pump.
If cord is damaged, order
replacement at
cimilrebreastpumps.com.
Plug into standard outlet. If it
is still not working, contact
Cimilre at (888) 394-2422.
No power
Tubing Connect the tubing to the air
flow port on the pump.
No suction
Possible Causes Checks SolutionsCondition
Valve
Suction
level
Defective
assembly
kit
Breast
Shield
Valve
Suction
too high
Disassemble and properly
reassemble.
Contact Cimilre at (888) 394-
2422.
Disassemble and
reassemble the kit.
Visit cimilrebreastpumps.com to
purchase and replace breast
shield.
Visit cimilrebreastpumps.com to
purchase and replace valve.
Decrease suction level and
consult with your lactation
consultant or healthcare
provider.
Low suction
Pain
20
Class II, TYPE BF :Breast Shield
10. Disposal
11. Technical Information
Contents Description
Rated voltage and frequency
Power consumption 0.4 A
Battery / Life
Operation mode (Continuous operation) Expression Mode, Massage Mode
Suction levels Expression Mode
Massage Mode 1 - 5 Levels
Cycle speeds Fixed (24-60)
Massage Mode Fixed (50-86)
Single/Double
Timer function
Noise
Backflow protection Yes
Cleaning Method for Accessories Boiling water
Operating conditions
Ambient temperature
Relative humidity
Air pressure 700 to 1,060 hPa
Transport and storage conditions
Ambient temperature
Relative humidity
Air pressure 500 to 1,060 hPa
Protection on electronic shock
Degree of protection against ingress of water IP Classification: IP22
Input: DC 5V, 2A
3.7V 1800mAh Li-Polymer / 2 hours +
1 - 10 Levels
Single/Double
Automatic Off ( 30 min ± 1 min)
Less than 45 dB
Expression Mode
41 to 104°F
20 to 80 %
-4 to 122°F
20 to 95 %
Temperature Humidity Pressure
5
40 80
20 70
106
Temperature Humidity Pressure
-20
50 95
20 50
106
As an electrical and electronic equipment, the device must be
disposed of according to a specialized procedure for collection,
pick-up and recycling or destruction in accordance with Directive
2012/19/EU of the European Council on Waste Electrical and
Electronic Equipment [WEEE]. Please properly dispose the
Class II medical device in accordance with local, state and federal
regulations.
23
12. Electromagnetic Compatibility
The Cimilre E1 is intended for use in the electromagnetic environment specified
below. The customer or the user of the Cimilre E1 should ensure that it is used in
such an environment.
Guidance and Manufacturer’s Declaration – Electromagnetic Immunity
Floors should be wood,
concrete or ceramic tile.
If floors are covered with
synthetic material, the relative
humidity should be at least 30%.
Immunity test
Electrostatic
discharge (ESD)
IEC 61000-4-2
± 6 kV contact
± 8 kV air
± 6 kV contact
± 8 kV air
IEC 60601
test level
Compliance
level
Electromagnetic
environment—guidance
The Cimilre E1 is intended for use in the electromagnetic environment specified in
the table below. The customer or the user of the Cimilre E1 should ensure that it is
used in such an environment.
Guidelines and Manufacturer’s Declaration – Electromagnetic Emissions
The Cimilre E1 uses RF energy only
for its internal function. Therefore, its RF
emissions are very low and are not likely to
cause any interference in nearby electronic
equipment.
The Cimilre E1 is suitable for use in
all establishments, including domestic
establishments and those directly connected
to the public low-voltage network that is
supplied to buildings used for domestic
purposes.
Emission test
RF emission -
CISPR 11
RF emission -
CISPR 11
Group 1
Class B
Class A
Complies
Harmonic
emissions
IEC 61000-3-2
Voltage
fluctuations
/flicker
emissions
IEC 61000-3-3
Electromagnetic environment—guidanceCompliance
22

Mains power quality
should be that of a typical
commercial or hospital
environment.
Electrical fast
transients IEC
61000-4-4
± 2 kV for
power supply
lines
± 1 kV for
input/ output
lines
± 2 kV for
power supply
lines
Mains power quality
should be that of a typical
commercial or hospital
environment.
Surges IEC
61000-4-5
± 1 kV
differential
mode
± 2 kV
common
mode
± 1 kV
differential
mode
± 2 kV
common
mode
Power frequency magnetic
fields should be measured
in the intended installation
location to ensure that it is
sufficiently low.
Power
frequency
(50/60 Hz)
magnetic field
IEC 61000-4-8
± 1 kV
differential
mode
± 2 kV
common
mode
± 1 kV
differential
mode
± 2 kV
common
mode
Mains power quality
should be that of a typical
commercial or hospital
environment. If the user
of the Cimilre E1
requires continued
operation during a power
interruption, it is
recommended that the
Cimilre E1 be powered
from an uninterruptible
power supply.
Voltage dips,
short
interruptions
and voltage
variations
IEC 61000-4-11
< 5% U T
(> 95% dip in U T)
for 0.5 cycle
40% U T
(60% dip in U T)
for 6 cycles
70% U T
(30% dip in U T)
for 30 cycles
< 5% U T
(>95% dip in U T)
for 5 s
< 5% U T
(> 95% dip in U T)
for 0.5 cycle
40% U T
(60% dip in U T)
for 6 cycles
70% U T
(30% dip in U T)
for 30 cycles
< 5% U T
(>95% dip in U T)
for 5 s
NOTE. UT
is the AC mains voltage prior to application of the test level.
Portable and mobile RF
communications equipment
should be used no closer to
any part of the device,
including cables, than the
recommended separation
distance calculated from
the equation applicable to
the frequency of the
transmitter.
Recommended separation
distance
d = 1,.2 √P
d = 1,2 √P 80 MHz
to 800 MHz
d = 2,3 √P 800 MHz
to 2.5 GHz
Where (P) is the maximum
output power rating of the
transmitter in watts (W)
according to the transmitter
manufacturer and d is the
recommended separation
distance in meters (m).
Field strengths from fixed
RF transmitters, as
determined by an
electromagnetic site
survey, should be less
than the compliance level
in each frequency range
b.
Interference may occur in
the vicinity of equipment
marked with the following
symbol:
Conducted RF
IEC 61000-4-6
3 Vrms
150 kHz to
80 MHz
3 Vrms
Radiated RF
IEC 61000-4-3
3 V/m
80 MHz to
2.5 GHz
3 V/m
NOTE 1. At 80 MHz and 800 MHz, the higher frequency range applies.
NOTE 2. These guidelines may not apply in all situations. Electromagnetic pro-
pagation is affected by absorption and reflection from structures, objects and people.
24 25
0.01
0.1
1
10
100
0.12 m
0.38 m
1.2 m
3.8 m
12 m
0.12 m
0.38 m
1.2 m
3.8 m
12 m
0.23 m
0.73 m
2.3 m
7.3 m
23 m
a. Field strengths from fixed transmitters, such as base stations for radio (cellular/cordless)
telephones and land mobile radios, amateur radio, AM and FM radio broadcast and TV
broadcast cannot be predicted theoretically with accuracy. To assess the electromagnetic
environment due to fixed RF transmitters, an electromagnetic site survey should be
considered. If the measured field strength in the location in which the device is used
exceeds the applicable RF compliance level above, the device should be observed to
verify normal operation. If abnormal performance is observed, additional measures may
be necessary, such as reorienting or relocating the device.
b. Over the frequency range 150 kHz to 80 MHz, field strengths should be less than 3
V/m .
The Cimilre E1 is intended for use in an electromagnetic environment in which radiated RF
disturbances are controlled. The customer or the user of Cimilre E1 can help prevent
electromagnetic interference by maintaining a minimum distance between portable and
mobile RF communications equipment (transmitters) and the Cimilre E1 as recommended
below, according to the maximum output power of the communications equipment.
For transmitters rated at a maximum output power not listed above, the recommended
separation distance (d) in meters (m) can be estimated using the equation applicable to
the frequency of the transmitter, where P is the maximum output power rating of the
transmitter in watts (W) according to the transmitter manufacturer.
NOTE 1. At 80MHz and 800MHz, the separation distance for the higher frequency range applies.
NOTE 2. These guidelines may not apply in all situations. Electromagnetic propagation is
affected by absorption and reflection from structures, objects and people.
Recommended separation distances between portable and mobile RF
communications equipment and the Cimilre E1
Separation distance according to frequency of transmitter [m]Rated
maximum
output power of
transmitter [W]
150kHz to 80MHz
d = 1,2 √P
80MHz to 800MHz
d = 1,2 √P
800MHz to
2.5GHz
d = 2,3 √P
13. Description of IP Classification
0: Non-protected
1: Protected against solid foreign objects of 50 mm Ø and greater
2: Protected against solid foreign objects of 12,5 mm Ø and greater
3: Protected against solid foreign objects of 2,5 mm Ø and greater
4: Protected against solid foreign objects of 1,0 mm Ø and greater
5: Dust-protected
6: Dust-tight
0: Non-protected
1: Protection against vertically falling water drops
2: Protection against vertically falling water drops when enclosure
tilted up to 15°
3: Protected against spraying water
4: Protected against splashing water
5: Protected against water jets
6: Protected against powerful water jets
7: Protected against the effects of temporary immersion in water
8: Protected against the effects of continuous immersion in water
IPN1N2
N1
N2
26 27

The manufacturer provides the following limited warranties on the
Cimilre E1:
THE MANUFACTURER PROVIDES A LIMITED 24-MONTH MECHANICAL
WARRANTY FOR MAIN PUMP:
The manufacturer provides a LIMITED MECHANICAL WARRANTY that the
main pump will be free from manufacturing defects in materials and
workmanship under normal personal use for the 24-month period after
purchase by the original owner. Proof of purchase (copy of your original
receipt, purchase order, or invoice), the date that the product was purchased,
and the location of purchase will be required. Replaced or repaired products
are warranted only for the period remaining under the initial warranty.
THE MANUFACTURER ALSO PROVIDES A LIMITED 90-DAY WARRANTY
FOR ALL OTHER PARTS:
The manufacturer provides a LIMITED WARRANTY that all other parts will
be free from manufacturing defects in materials and workmanship under normal
personal use for the 90-day period after purchase by the original owner. Proof
of purchase (copy of your original receipt, purchase order, or invoice), the date
that the product was purchased, and the location of purchase will be required.
Replaced or repaired products are warranted only for the period remaining under
the initial warranty.
At the manufacturer’s discretion, the manufacturer will replace the main pump
and/or any part that proves to be defective in material and/or workmanship under
normal use and service. PLEASE NOTE: WARRANTIES DO NOT COVER
NORMAL “WEAR AND TEAR.” This warranty is extended to the original
consumer owner only and shall not apply to any products or parts of products
which have been (A) Repaired by unqualified persons not using original spare
parts or altered in any manner unless previously authorized in writing by the
manufacturer; or (B) Damaged as a result of misuse, negligence, accident, or
faulty use or maintenance; or (C) Used or stored in a manner contrary to the
manufacturer’s written instructions; or (D) Damaged by the effects of improper
cleaning and/or use of aggressive cleaners. The warranty does not cover
misplacement or theft of the breast pump or supplies.
14. Warranty
LIMITED MANUFACTURER’S WARRANTY
28
THIS IS THE EXCLUSIVE WARRANTY BY THE MANUFACTURER, WHICH
DOES NOT MAKE ANY OTHER WARRANTY OF ANY KIND, INCLUDING
BUT NOT LIMITED TO THE IMPLIED WARRANTY OF MERCHANTABILITY.
This breast pump is intended for single-user use only. Sharing a breast pump
can cause health hazards and voids the manufacturer’s warranty. The user of
this product assumes all responsibilities and risks for use of this product. The
user should consult with a health care professional before using this or any
other equipment.
THIS WARRANTY IS LIMITED IN SOLELY TO THE ABOVE AND THIS
WARRANTY AND ANY WARRANTIES IMPLIED BY STATE LAW WILL
APPLY ONLY FOR THE APPLICABLE WARRANTY PERIOD SPECIFIED
HEREIN. ALSO, THE MANUFACTURER WILL NOT BE LIABLE FOR ANY
LOSS, DAMAGE, EXPENSE OR INCIDENTAL OR CONSEQUENTIAL
DAMAGES OF ANY KIND, WHETHER BASED ON WARRANTY,
CONTRACT OR NEGLIGENCE AND ARISING IN CONNECTION WITH
THE SALE, USE OR REPAIR OF THE PRODUCT. SOME STATES DO
NOT ALLOW THE EXCLUSION OR LIMITATION OF CONSEQUENTIAL
DAMAGE OR LIMITATIONS ON HOW LONG AN IMPLIED WARRANTY
LASTS, SO THE ABOVE LIMITATIONS OR EXCLUSIONS MAY NOT
APPLY. THIS WARRANTY GIVES YOU SPECIFIC LEGAL RIGHTS,
AND YOU MAY ALSO HAVE OTHER RIGHTS WHICH VARY FROM
STATE TO STATE. UNLESS OTHERWISE CONTRARY TO STATE LAW
GOVERNING THE PURCHASE, THE MANUFACTURER’S LIABILITY
WILL NOT EXCEED THE CONTRACT PRICE FOR THE PRODUCT
CLAIMED TO BE DEFECTIVE OR UNSUITABLE.
To make a warranty claim visit cimilrebreastpumps.com/warranty.
Please note that items returned without a Replacement Authorization
Number will be returned to Sender.
29
Other manuals for E1
1
Table of contents
Other cimilre Breast Pump manuals


