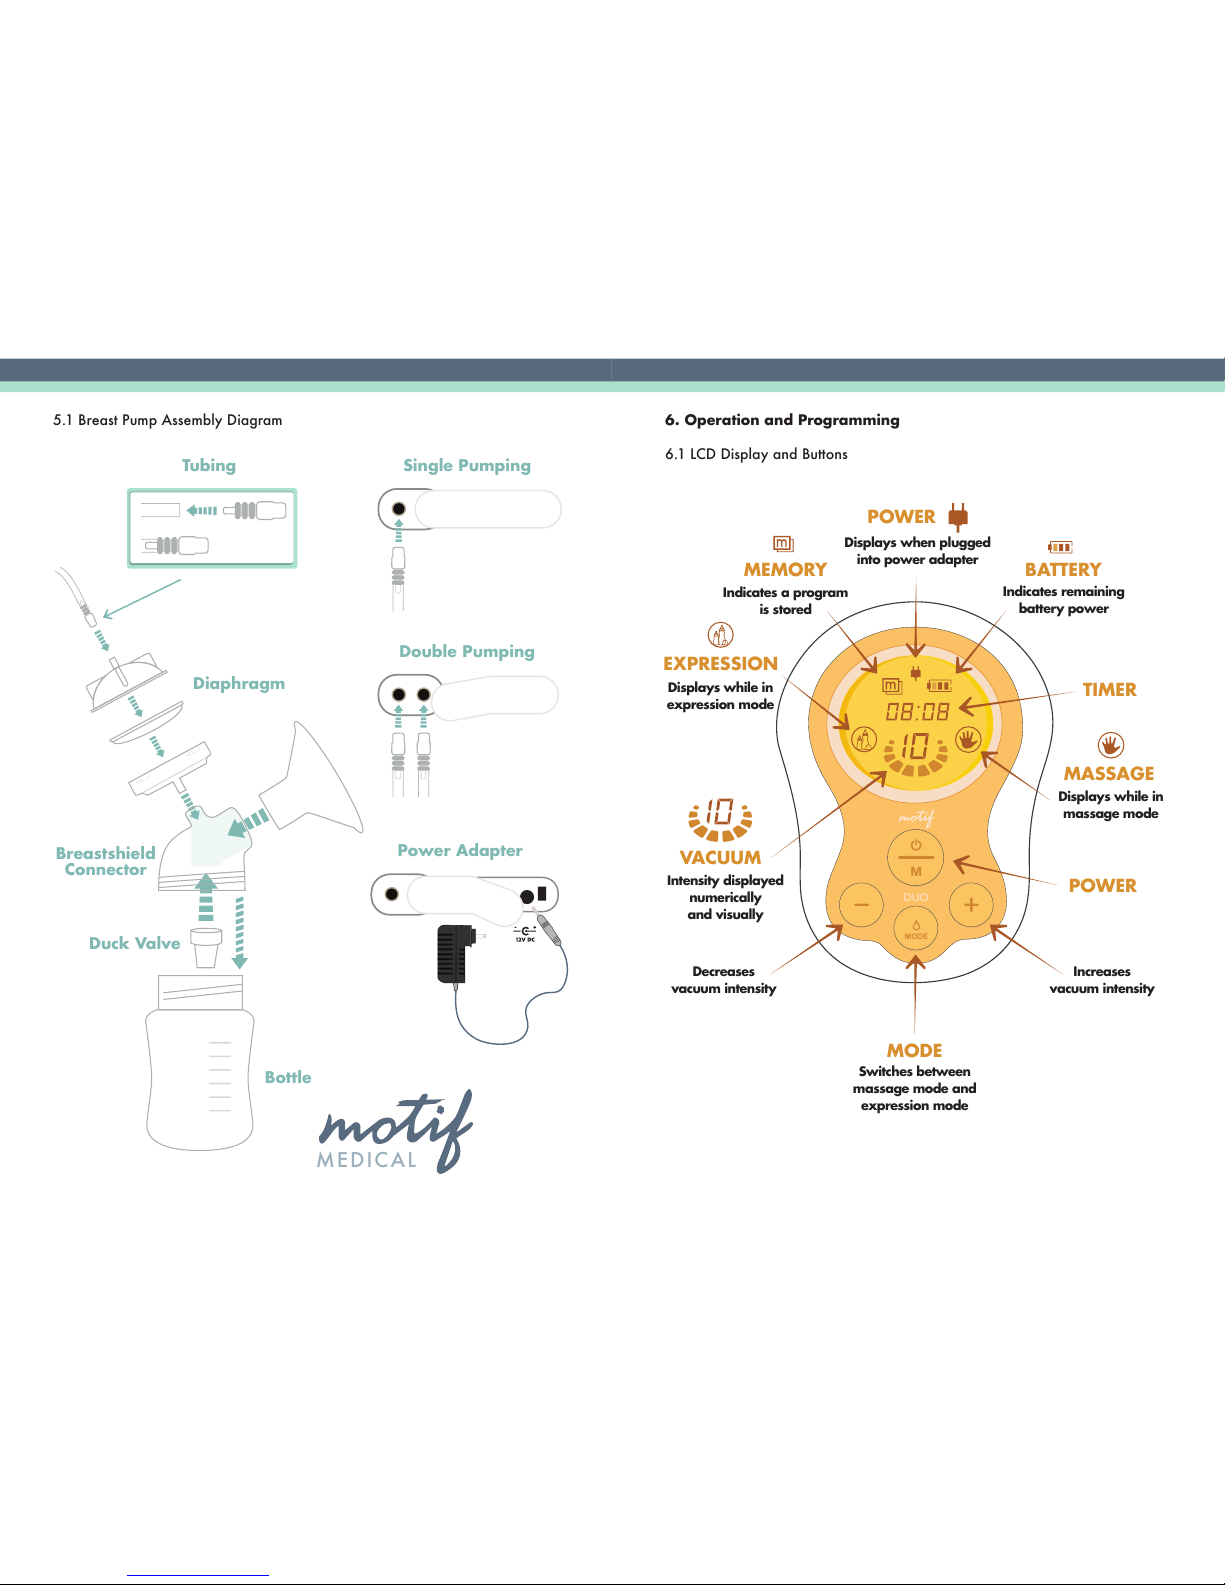
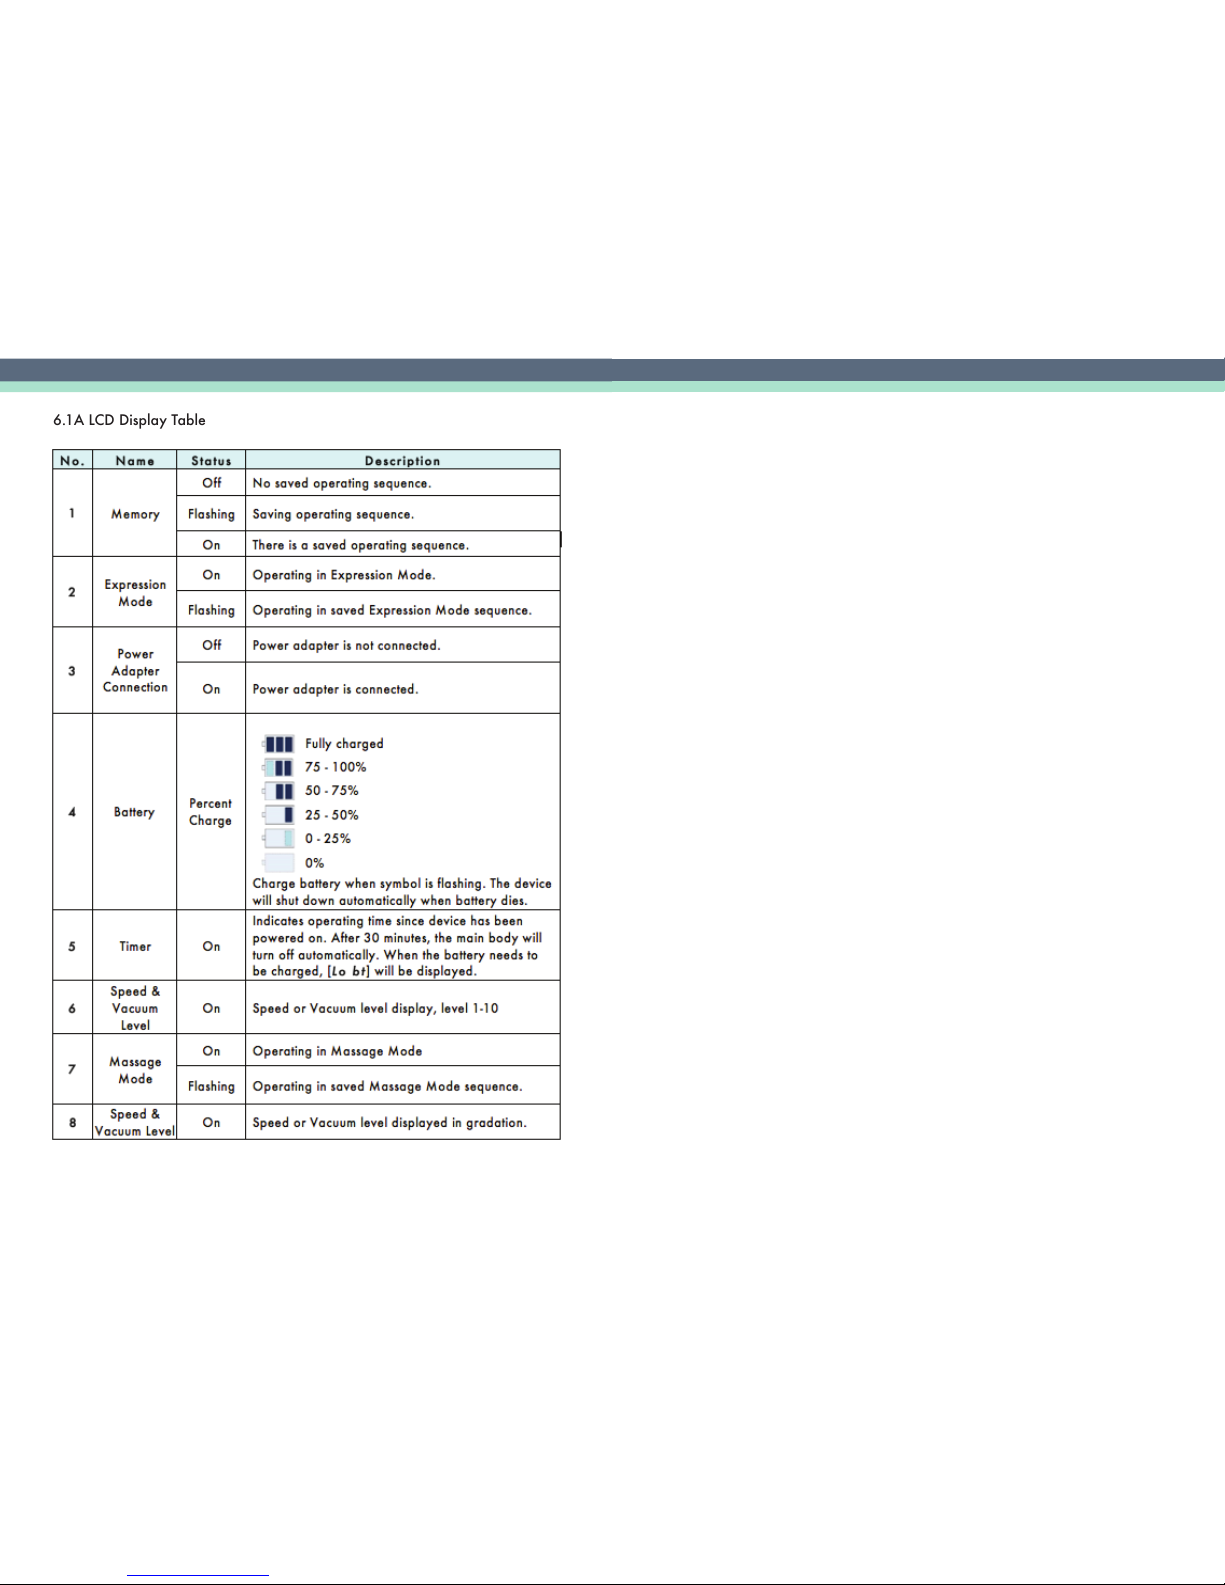
Motif Medical Motif Duo User manual

Thank you for choosing the Motif
Duo Double Electric Breast Pump.
Motif Duo Operation Manual
Motif Medical
8 The Green
Suite #5601
Dover, DE 19901
Phone: (844) 272-8390
Email: info@motifmedical.com
Web: www.motifmedical.com
Duo-ENG-OPM-USA-R02
2018.10

1. Product Description
1.1 Duo
1.2 Product Warranty
2. Important Safeguards
2.1 Intended Use
2.2 Contraindications
2.3 Safety Information
3. Included with the Motif Duo
3.1 User Manual
3.2 Pump Components
4. Sterilization and Cleaning
4.1 Before Initial Use
4.2 After Each Use
4.3 Once Per Day
4.4 Tubing
5. Breast Pump Assembly
5.1 Assembly Diagram
6. Operation and Programming
6.1 LCD Display and Buttons
6.1A LCD Display Table
6.2 Powering Your Breast Pump
6.3 Operating Your Breast Pump
6.4 Programming Your Breast Pump
6.4A Memory Function
6.4B Frequency Function
7. Preparing to Pump
8. Pumping
9. Troubleshooting
9.1 Common Issues
9.2 Breast shield Sizing
10. Storing and Using Breast Milk
10.1 After Each Pumping Session
10.2 Freezing Breast Milk
10.3 Thawing and Warming Milk
10.4 Storing Fresh Breast Milk
10.5 Storing Thawed Breast Milk
Motif Duo Operation Manual
Table of Contents

1.Product Description
The Motif Duo double electric breast pump utilizes a vacuum to
express breast milk. The motor is classified as a medium vacuum
with an intermittent suction device.
1.1 Motif Duo
1. Basic tubing port-tubing port for single pumping
2. Auxiliary Tubing Port: Tubing port for double pumping
3. Port Cover
4. Power Adapter Port
5. Port Cover Stabilizer 2
LCD
Display
Decrease Increase
Mode
Power
M
MODE
DUO
3 4 5
1
1.2 Product Warranty
Product Name Motif Duo
Brand Name Motif Duo
Model Name MD-20.2
Serial Number
Warranty Period 1 Year Manufacturer Warranty
Date of Purchase
2. Important Safeguards
2.1 Intended Use
The Motif Duo Double Electric Breast Pump is intended for use by lactating
women to express and collect breast milk. The Duo can be used as a single
or double pump and is only intended for personal use.
CAUTION — Sharing a breast pump can cause health hazards.
2.2 Contraindications
There are no known contraindications for this breast pump.
2.3 Safety Information
Warning Symbols
The following symbols are important for user safety. Failure to follow these
instructions could lead to personal injury or cause damage to the breast pump.
When used in conjunction with the following words, the symbols indicate:
WARNING A hazard of serious injury or death.
!
CAUTION A hazard of minor injury or damage to the system.
!

4. Sterilization and Cleaning
4.1 Before Initial Use
Prior to using the pump for the first time, sanitize all parts
4.2 After Each Use
1. Wash hands thoroughly before handling breast pump components.
2. Disassemble all parts that come in contact with breast milk including:
Breast shield Breast shield Connector Valve
Bottle Bottle Disc Bottle Nipple
3. Rinse all parts in cool water to remove breast milk residue.
3. Included With Your Motif Duo:
3.1 User Manual
3.2 Pump Components
*Note: While unpacking the box, make sure all of the following components are enclosed.
Name
User Manual
Diaphragm
Top
Breastshield
Bottle / 180ml
Power
Adapter
Diaphragm
Breastshield
Connector
Bottle Cap
1
2
2
2
1
2
2
2
Main Body
Diaphragm
Bottom
Valve
Bottle Cover
Nipple
Tubing
Connector
Tubing
Bottle Disc
1
2
2
2
2
2
2
2
Shape Quantity Name Shape Quantity
4. Wash parts separately in sink with a clean dishcloth or soft brush; or soak
all parts in warm, soapy water for five minutes; or wash separated parts on
the top rack of your dishwasher.
5. Dry with a clean towel and/or allow to air dry on a sanitary surface.
6. Wipe main body of the device with a dry towel after each use.
7. Store dried parts in a clean bag or container. Do not store wet or damp parts.
4.3 Once Daily
1. Sanitize all components that come in contact with the breast or breast milk
once daily.
2. Disassemble breast pump.
3. Place breast pump components in a pot of water. Submerge any pump parts
that come in direct contact with breast milk.
3. Bring water to a boil and allow parts to sanitize for 5 minutes.
4. Once water has cooled, remove parts with caution, as they might be hot.
5. Place sanitized parts on a clean surface and/or towel.
6. Allow parts to completely air dry.
7. Store dry parts in a clean, cool place when not in use. Do not store wet or
damp parts.
4.4 Tubing
1. Tubing should only be cleaned if dirty or if there is any sign of breast milk.
2. Making sure breast pump is off and unplugged, detach tubing from breast
pump unit and breast shield.
3. Rinse tube in cool water to remove breast milk residue.
4. Wash tubing in warm, soapy water and rinse thoroughly in cool water.
5. Hang tubing and allow to air dry completely
*Note: The presence of moisture in tubing can contribute to the growth of mold.
Examine tubing prior to each use. Discard and replace if there is any indication
of mold.
5. Breast Pump Assembly
1. Wash hands before touching breast pump components.
2. Place the diaphragm downward, so the cross-lined surface is facing
the bottom. Cover the top of the diaphragm and turn it to lock.
3.. Place the breast shield in the breast shield connector.
4. Connect the valve by placing it in the bottom of the breast shield connector.
Screw the bottle into the breast shield connector.
5. Connect the bottom of the diaphragm to the top of breast shield connector.
6. Connect the tubing to the port to the main body of the pump.
7. Connect the other end of the tubing to the bottle block as shown
in the diagram.
8. To clean or store after use, disassemble the bottle in the reverse order.

5.1 Breast Pump Assembly Diagram
Diaphragm
Tubing
Breastshield
Connector
Bottle
Duck Valve
Single Pumping
Double Pumping
Power Adapter
MEDICAL
6. Operation and Programming
6.1 LCD Display and Buttons
MEMORY
TIMER
Indicates a program
is stored
EXPRESSION
MODE
POWER
Displays when plugged
into power adapter
Switches between
massage mode and
expression mode
Displays while in
massage mode
Decreases
vacuum intensity
Increases
vacuum intensity
BATTERY
Indicates remaining
battery power
Displays while in
expression mode
VACUUM
Intensity displayed
numerically
and visually
MASSAGE
M
MODE
DUO
POWER

6.1A LCD Display Table
6.2 Powering Your Breast Pump
Prior to initial use, plug the device into the power adapter and allow the
breast pump to charge fully.
The battery charge level displayed on the LCD screen can differ from
the actual battery capacity.
Use your breast pump with a fully charged battery whenever possible.
Charge the battery immediately when [Lo Bt] is displayed on the LCD screen.
If the breast pump remains unused for a long period of time, make sure that
the battery is fully charged before use. Unplug the power adapter from the
breast pumpimmediately after you are finished charging your device.
6.3 Operating Your Breast Pump
The Motif Duo software has three major components: Massage and
Expression Modes, Frequency Function, and Programmable Memory.
Buttons
Each button has three functions. Pressing the button will perform a base
function, a Press with a Short Hold will engage the secondary function,
and a Press with a Long Hold will engage the advanced function.
Memory
Off - No saved operating sequence
Flashing - Saving operating sequence.
On - There an operating sequence saved.
Expression Mode
On - Operating in Expression Mode.
Flashing - A saved Expression Mode Sequence is operating.
Power Adaptor Connection
Off - Power adaptor is not connected.
On - Power adaptor is properly connected.
Battery
Percent Charge - Fully Charged
Charge the battery as soons as the [Lo bt] symbol begins flashing.
If the battery dies, your Motif Duo will automatically shut down.

Timer
On - This timer indicates the amount since your Motif Duo was powered on.
After 30 minutes it will automatically turn off. [Lo bt] will be displayed when
the battery needs to be charged.
Speed & Vacuum Level
On - Levels 1 - 10 are displayed to indicate which level the Speed
& Vacuum are operating on. 1 is the lowest level, and 10 is the highest.
Massage Mode
On - Operating in Massage Mode.
Flashing - A saved Massage Mode Sequence is operating.
Operating Functions
The Motif Duo software includes three major Features:
Two Pumping Modes, Frequency Function, and Programmable Memory.
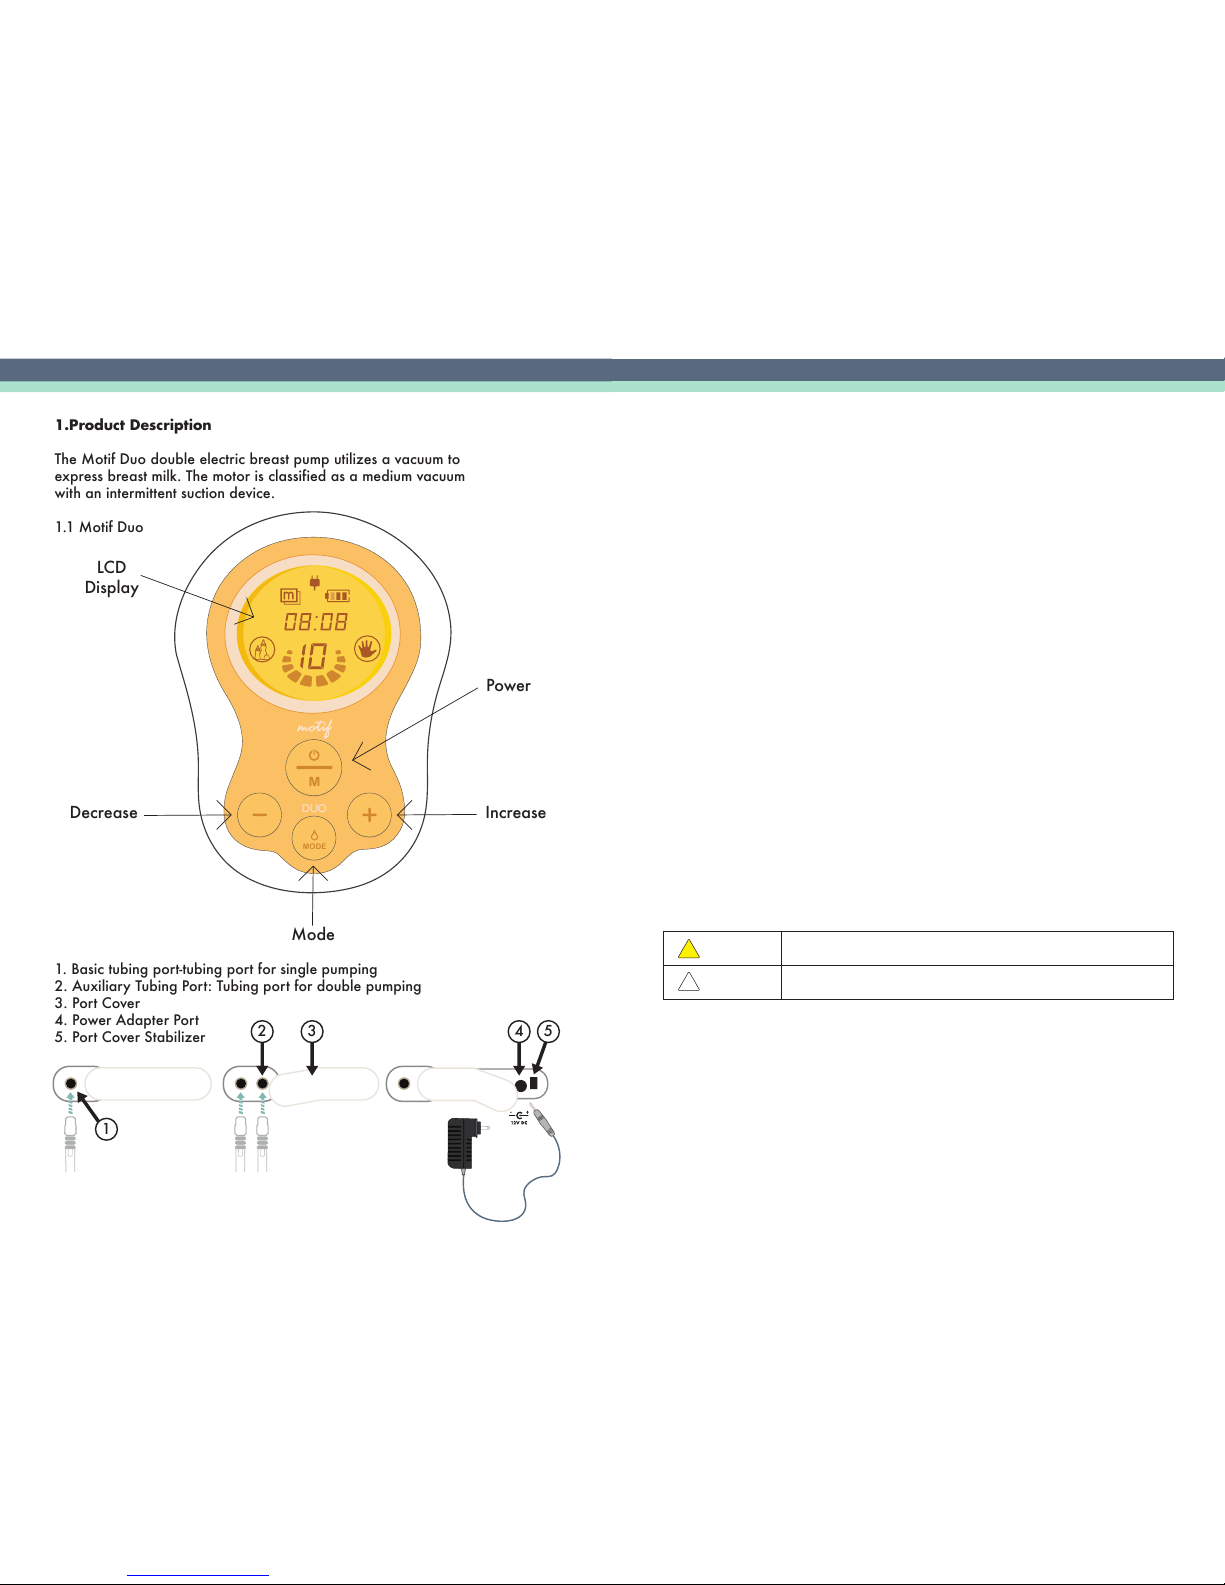
Buttons
Each button has three functions.
Pressing the button once will perform a base function.
Holding the button down for a few seconds will engage the secondary function.
Holding the button down longer will engage the advanced function.
Power Button
Turns pump On and Off.
When the pump is On, this will start the stored memory sequence.
When a memory sequence is activated the memory icon will flash on the LCD
display. Operate the pump according to your personal preferences, then press
and hold the button down to save it as a memory sequence. The memory
sequence will not be erased when your Duo is powered off.
Plus Button
Increases the Speed/Vacuum levels during during the Massage and
Expression modes. Will increase the frequency during Expression Mode.
If operating a saved memory sequence, this will cause it to stop,
otherwise there will be no response.
Minus Button
Decreases the Speed/Vacuum levels during the Massage and Expression
modes.Will decrease the frequency during Expression Mode.
This will start a memory sequence, unless you donʼt have one saved, then
there will be no response.
Mode Button
Switches between the Massage and Expression Modes. This will delete a
saved memory sequence. The Memory icon will turn off once the sequence
has been deleted. After a sequence is deleted, your Duo will return to your
previous pump settings.
If no sequence is saved, there will be no response.
Pump Modes
The Motif Duo has two operating modes, Massage and Expression.
Massage Mode
The Massage Mode mimics an infantʼs natural sucking pattern to relax your
breast muscles and stimulate milk flow. This mode operates on 10 different
suction levels, 10 being the strongest.
Expression Mode
Use the Expression Mode for a stronger pull. This mode includes 10 different
suction levels and 10 is the strongest. Increase the suction power by turning
the level up.
Performance
The performance of the Motif Duo is limited to a vacuum greater than -250 mmHg.
6.4 Programming Pump Memory
You can save your preferred settings for the Massage and Expression Modes,
as well as the length of your most productive pumping times.
1. Determine your favorite operating mode along with the suction level
and operating time.
2. Turn your Duo on by pressing the POWER button.
3. Press and hold the POWER button for 3 seconds, to start the memory
programing sequence.
The Memory Icon will flash when your Duo is ready to record.
4. Operate the pump using the desired sequence and suction levels.
5. After pumping, press and hold the POWER button for 3 seconds to
save the sequence.
The Memory Icon will turn on once the sequence has saved.
6. To start your saved memory sequence, press and hold the DECREASE
button for 3 seconds.
Depending on which mode you saved, the Expression or
Massage Mode Icon will flash as the sequence begins.
7. To stop running your saved operating sequence, press and hold the
INCREASE button for 3 seconds, and your pump will return to its
previous settings.

6.4A: EXAMPLE: Programming Memory
Program the following operation sequences to practice saving them with your Duo.
Operating
Mode
Massage
Mode
Massage
Mode
Expression
Mode
Expression
Mode
Speed/Vacuum
Level Level 4 Level 5 Level 3 Level 4
Operating
Time 1 Minnute 30 Seconds 1 Minute Until Pumping
Session Completed
1. Check the LCD display to see if there is an existing saved operating
sequence, the Memory Icon will be displayed if there is an existing memory
sequence saved.
2. If there is a saved sequence, delete it by pressing and holding MODE
button for 3 seconds. The Memory Icon will disappear once the sequence
has been deleted.
3. Set the Massage Mode on level 4 and Expression Mode on level 3.
4. Change the Operating Mode to Massage Mode on level 4.
5. Begin the memory function by pressing and holding the POWER button for
3 seconds. The Memory Icon will flash to indicate the sequence is saving.
6. Press the MODE button until the Massage Mode icon is illuminated, then
adjust Speed/Vacuum to Level 4 by pressing the INCREASE or DECREASE
buttons. Then allow the pump to operate for 1 minute.
7. Increase the Speed/Vacuum to level 5 by pressing the INCREASE button,
and let the pump run for 30 seconds.
8. Change to Expression Mode by pressing the MODE button and the Expression
Mode Icon will be displayed. Adjust Speed/Vacuum to level 3 by pressing the
INCREASE or DECREASE buttons. Allow the pump to run for 1 minute.
9. Press the INCREASE button briefly to increase Speed/Vacuum to level 4,
and then press and hold the POWER button for 3 seconds in order to save
the operating sequence.
10. The last programmed step will continue to operate until stopped by the
user or until the timer reaches 30 minutes.
11. To run the saved operating sequence, press and hold the DECREASE
button for 3 seconds.
12. To stop running the saved operating sequence, press and hold the
INCREASE button for 3 seconds. The pump will return to your previous settings.
6.4B Frequency Function
This function is available during expression mode, and effects the number of
times your pump pulls per minute.
• There are 3 frequency levels (1-3), that you can select during
Expression Modes by pressing and holding the INCREASE or DECREASE
buttons for 1 second.
• The LCD Display will show [CY: --], to indicate the current frequency level.
• Adjust the frequency level by pressing either the INCREASE or
DECREASE buttons.
• The frequency will be displayed for 4 seconds, then the pump will
automatically return to normal operating mode.
Note: Increasing the frequency may also increase the noise and vibration.
7. Preparing to Pump
1. Thoroughly wash your hands with soap and water before touching any
pump parts.
2. Check each component for wear or damage before use and
replace parts when/if necessary.
3. Make sure that all components that come into contact with breast milk
are properly sanitized.
4. Assemble the breast shield, diaphragm, and bottle according to the
instructions and connect to the pump body via the tubing.
5. Ensure tubing is tightly connected to prevent air leakage.
6. Check battery level before use to ensure the device is fully charged.
7. Massage the breast for about 5 minutes with a warm towel to
promote expression.

8. Pumping
To prevent backflow in the tubing, always use the breast pump while seated.
1. Place the breast shield on your breast so that your nipple is centered within it
(See troubleshooting to learn more about finding the correct breast shield size).
2. Turn the breast pump on to begin pumping.
3. Adjust the Speed/Vacuum settings to a comfortable level.
4. Normal pumping durations range from 15 to 30 minutes, but vary between
individual moms.
5. When your pumping session is over, turn off the power and slide a finger
between the breast shield and your breast to separate them.
9. Troubleshooting
9.1 Common Issues
Disassemble the breast shield, milk collection kids, diaphragm,
and bottle. Check each part for chips or cracks. Clean and dry
each part. Once each component is completely dry ressemble
the parts. Make sure the tubing is free of twists and kinks. While
single pumping, make sure the Auxiliary Port is blocked by
the Port Cover.
Double-Check connections between the:
• Diaphragm Assembly and Breast Shield connector.
• Tubing and Milk Collection Kit.
• Tubing and Main Body.
Make sure the power adapter is properly connected.
If you pump fails to hold a charge, replace the power adapter.
Inspect the Power button and pump exterior for any
foreign objects.
No or Low
Suction
Battery Not
Charging
Does Not
Power On
If you are having trouble with your Breast Pump, or have any questions, please
contact the Motif Medical customer center.
9.2 Breast shield Sizing
Unplug the power adapter from the socket. Turn off the Breast Pump.
Wipe the main body with a clean dry cloth and store it in a warm
dry area for about 12 hours.
Main Body
Becomes Wet
Turn off the breast pump. Disconnect the tubing from the diaphragm.
Remove the milk and tubing from the diaphragm.
Breast Milk
in Tubing

10. Storing and Using Breast Milk
The following information is referenced from the Office of Womenʼs Health.
Store your breast milk in clean glass or hard BPA-free plastic bottles with
tight-fitting lids. You can also use milk storage bags, which are specifically
made for freezing human milk. Do not use disposable bottle liners or other
plastic bags to store breast milk.
10.1 After Each Pumping Session
• Label the date on the milk storage container. Include your childʼs name if
you are giving the milk to a childcare provider.
• If cream rises to the top of the bottles, gently swirl them to mix the cream
with the rest of the milk. Do not shake the milk, as it could cause some of the
milk nutrients to break down.
• Refrigerate or chill breast milk immediately after expression. You can
refrigerate breast milk in a cooler or insulated cooler pack, or freeze the
milk in small (2 to 4 ounce/60 to 110 g) batches.
10.2 Freezing Breast Milk
• If using BPA-free plastic or glass bottles, wait until milk is completely frozen
to tighten bottle caps or lids.
• Try to leave an inch or so from the milk to the top of the container, as it will
expand when freezing.
• Store milk in the back of the freezer, away from the freezer door.
10.3 Thawing and Warming Milk
• Clearly label milk containers with the date the milk was expressed. Use
oldest stored milk first.
• Thaw the bottle or bag of frozen milk by putting it in the refrigerator
overnight, holding it under warm running water, or by placing it in a container
full of warm water for several minutes.
• Never put a bottle or bag of breast milk in the microwave. Microwaving
breast milk creates hotspots that could burn or damage the milk.
• Swirl the milk, and test the temperature by placing a few drops on your
wrist. The milk should be comfortably warm, not hot.
• Use thawed breast milk within 24 hours. Never refreeze thawed breast milk.
10.4 Storing Fresh Breast Milk
10.5 Storing Thawed Breast Milk
Thawed Breast Milk
1 to 2 hours is best, do not store for over 4 hours.
24 hours.
Do NOT refreeze.
Room temperature
(up to 77°F or 25°C)
Ideally, use
within 3-5 hours.
Containers should be
covered and kept as cool
as possible.Discard leftover
milk within 1 to 2 hours after
your baby is finished feeding.
Countertop or Table
39° F
(4° C) or colder
Use within
3-5 days.
Store milk in the back of the
main body of the refrigerator.
Use an insulated bag to store
milk in the back of the
refrigerator while at work.
Refrigerator
Temperature Longevity TipsStorage Method
0° F
(4° C) or colder.
Use within 3 to
6 months is best.
Store the milk in the back
of the freezer where the
temperature will remain
the most consistent.
Freezer
Other manuals for Motif Duo
1
Table of contents
Other Motif Medical Breast Pump manuals