Cine Gears CG-FC821 User manual

Wireless follow focus
controller
USER MANUAL
Brand:CINEGEARS
Model:CG-FC821,CG-FC831
Manufacture:GuangZhou SunFieldAimo Electronic Technology Co., Ltd

Contents
Introduction
Rattlesnake Follow Focus User Manual
Setting Up the Controller
• Controller
• Syncronization
• Automatic Calibration
• Manual Calibration
• LED Marker Light
• Screen Brightness
Using the Controller
• Remote Record Trigger
• Setting Up Vibration and Lock Points
• Setting Presets
• Changing Motor Speed
• Changing Damping Setting
Setting Controller Modes
• M-Normal Mode
• M-Lock Mode
• M-Zoom Mode
• Manual Mode
Disclaimers
About Cinegears
1
2
3
3
4
5
6
7

Introduction
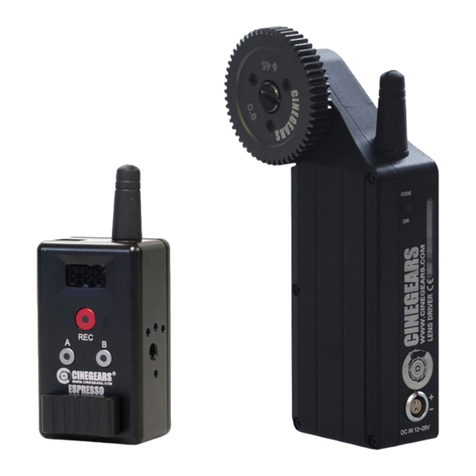
The Wireless follow focus controller is a wireless lens control kit for
driving your lens rings (focus, iris, and zoom.) The W ireless follow
controller has been redesigned to be more ergonomic than ever before.
With up to 20 hours of continuous shooting per battery charge, control your
lens focus, iris, or zoom with precision from up to 200 meters away with our
Wireless follow focus controller. Our controllers work with jib, Steadicam,
MoVI, and Gamble stabilizer shots, allowing you to perform with precision
without sacrificing the mobility of your cameras or the integrity of the shot. The
larger focus wheel feels more fluid, precise, and ergonomic, and the mounting
harness allows you to use it like a finger wheel. Also included are two thick
magnetic marking discs and a redesigned Lemo cable, with a right-angle
connector that helps keep your wiring clean.
2

Setting Up the Controller
Synchronization
Turn on the remote control power switch and plug in the motor. Once both are
on hold (SET) + (POWER) for 3 seconds. The motor light will stop blinking, and
the gear will shudder. This means that the controller and motor have been
successfully synchronized. (Note: This process is usually done before leaving
the factory.)
Automatic Calibration
1) Before installing the drive onto the lens, please make sure the wireless
remote controller and motor are powered on and connected. DO NOT turn the
wireless remote control dial, put the drive gear close to the lens ring and
tighten the screws.The controller can automatically locate the start and end points
of any lens. To calibrate your lens, hold the (SET) + (A) button on the remote
controller for 3 seconds.
Manual Calibration
Rotate the focus ring clockwise to the end; hold (SET) + (REC) + (POWER)
buttons together for 3 seconds. Rotate to the opposite end and press the three
buttons again
LED Marker Light
Press (POWER) quickly to toggle marker light ON or OFF.
Screen Brightness
To change screen brightness, press and hold (SPEED) + (A), (B), (C), or (D),
(SPEED) + (A) being the lowest brightness level, (SPEED) + (D) being the
highest brightness level.
3
Controller
The controls have been designed for ease of use: They allow for preset
memory points, where you can save up to four, as well as two lock points
that will cause the controller to vibrate as you approach them. Choose from 16
different speed levels to control the transition speed of the presets, and 4 different
damping levels from ultraresponsive to ultra smooth. The controller has an accuracy
circuit built into it to ensure the lens stop precisely where you want it to, even after
repeated use.

Using the Controller
4
Remote Record Trigger
Press (REC) on your controller to toggle Recording mode ON or OFF.
Setting Up Vibration and Lock Points
Press and hold (REC) to toggle turn on/off the vibration setting. Press and hold
(REC) + (A) to set controller to “M-Normal.” Turn controller to desired
start point and press and hold (SET) + (C) to set lock point 1.
Turn controller to desired end point and press and hold (SET) + (D)
to set lock point 2.
To clear all lock points, press and hold (REC) + (D).
Setting Presets
Go to the focus point of your choosing, press and hold (A) button until it flashes,
your point is now set. Repeat with (B) (C) and (D) for multiple points. Press the
same preset button to exit the preset mode.
Changing Motor Speed
Press (SPEED) on the controller to adjust the motor speed.
Changing Damping Setting
Press and hold (POWER) + (REC) + (A) to set motor to damping 1 (Responsive +).
Press and hold (POWER) + (REC) + (B) to set motor to damping 2 (Responsive).
Press and hold (POWER) + (REC) + (C) to set motor to damping 3 (Smooth).
Press and hold (POWER) + (REC) + (D) to set motor to damping 4 (Smooth +).

Setting Controller Modes
5
M-Normal Mode
Press and hold (REC) + (A) to switch to M-Normal mode. In
M-Normal mode, user can set vibration points, and move controller beyond set
lock points.
M-Lock Mode
Press and hold (REC) + (B) to switch to M-Lock mode. In M-Lock mode, user
cannot move past set lock points.
M-Zoom Mode
Press and hold (REC) + (C) to switch to M-Zoom mode. In M-Zoom
mode, user cannot move past set lock points. In M-Zoom, controller moves more
slowly between lock points for finer control.
Manual Mode
Specifically used with infinity lenses that have no start or end point. Press
(SET) + (B) for 3 seconds until you see the (A), (B), (C), (D) lights go on. Then use
(C) or (D) button to control the lens. (Hold down the C or D key for more
than 3 seconds to rotate continuously.) Once it rotates to the proper
position, click the (A) button to set a starting point, (B) button to set the end point.
After points are set, the (A), (B), (C), and (D) lights turn off to indicate the initialization
has been completed.

Disclaimers
6
Terms and Conditions
Congratulations on purchasing your new CINEGEARS product. Please read
this manual carefully before using the product. By using this product, you
hereby agree to this disclaimer and signify that you have read it in full. You
agree that you are responsible for your own conduct and any content created
while using CINEGEARS products, and for any consequence thereof. You
agree to use this product only for purposes that are proper and in accordance
with local regulations, terms and any applicable polices and guidelines.
By reading this disclaimer, you also agree:
1. Any part of this disclaimer is subject to change without prior notice. Refer to
WWW.CINEGEARS.COM for the latest version.
2. CINEGEARS reserves the right of final interpretation of this disclaimer.
CINEGEARS and the Follow Focus Kit are registered trademarks of Littlecent
International Trading Corp. as names of product, brand, etc., appearing in this
manual are trademarks or registered trademarks of their respective owner
companies. This product and manual are copyrighted by CINEGEARS with all
rights reserved. No part of this product or manual shall be reproduced in any
form without the prior written consent or authorization of CINEGEARS.

About Cine Gears Inc.
Cine Gears Inc. is an industry leading company that designs and manufactures digital
wireless follow focus systems, lens control systems, camera motion control systems
and accessories for film and broadcast industry. As a big believer in the power of
creativity and ideas, we designed the Pegasus cablecam, the wireless motor drive that
integrated a built in wireless transmitter, and the wireless finger wheel controller. The
Cine Gears Inc. wireless lens control system has the international CE certification on
all its equipment. Cine Gears lens control system can achieve the finest minutia of
focus pulling, with extreme accuracy and control. This very same technology is what
drives the Pegasus for ultra-smooth, highly controlled, programmed movement.
We have been working from Vancouver, B.C. for five years and our equipment has
been used on hundreds of movies. Filmmakers of all experience levels will benefit
greatly from a simple, professional, and well rounded follow focus system. The Single
Axis and Multi Axis models provide greater ease, with lesscrew, and less wires. You
can achieve professional film quality scenes on a shoestring budget. Camera
operators, assistant camera operators, and jib operators can use the wireless follow
focus to attain that perfect shot.

FCC Caution.
This device complies with part 15 of the FCC Rules. Operation is subject to the following two
conditions: (1) This device may not cause harmful interference, and (2) this device must accept
any interference received, including interference that may cause undesired operation.
Any Changes or modifications not expressly approved by the party responsible for compliance could
void the user's authority to operate the equipment.
Note: This equipment has been tested and found to comply with the limits for a Class B digital
device, pursuant to part 15 of the FCC Rules. These limits are designed to provide reasonable
protection against harmful interference in a residential installation. This equipment generates
uses and can radiate radio frequency energy and, if not installed and used in accordance with the
instructions, may cause harmful interference to radio communications. However, there is no guarantee
that interference will not occur in a particular installation. If this equipment does cause harmful
interference to radio or television reception, which can be determined by turning the equipment off
and on, the user is encouraged to try to correct the interference by one or more of the following
measures:
-Reorient or relocate the receiving antenna.
-Increase the separation between the equipment and receiver.
-Connect the equipment into an outlet on a circuit different from that to which the receiver is
connected.
-Consult the dealer or an experienced radio/TV technician for help.
The device has been evaluated to meet general RF exposure requirement. The device can be used in
portable exposure condition without restriction.
This manual suits for next models
1
Table of contents
Other Cine Gears Controllers manuals
Popular Controllers manuals by other brands
Warren Controls
Warren Controls E025 Installation, operation and maintenance instructions
Shelly
Shelly PLUS I4 user manual
Aurora Scientific
Aurora Scientific 315D instruction manual

Scion-Tech
Scion-Tech SC08.CTL100H user manual
AMS
AMS AMS KCU Operation and service manual
OJ Electronics
OJ Electronics OJ-DV Series instructions
Atek
Atek ALC 77-C user manual
Christie
Christie Terra TXO 102 SO Setup and installation guide
Carrier
Carrier TruVu VVTZC-E2 Installation and startup guide
Mitsubishi Electric
Mitsubishi Electric MELSEC iQ-R Series Reference manual
STI
STI Select-Alert STI-SA5000 Series quick start guide
DecaLED
DecaLED Controller 3 Mini manual
