Cirago Platinum CMC2000 User manual
Users Manual

2 / 48

3 / 48
Table of Contents
1. Introduction.......................................................................................................................... 4
1.1 Preface........................................................................................................................ 4
1.2 Packing List................................................................................................................. 5
1.3 Caution........................................................................................................................ 5
1.4 Connection.................................................................................................................. 6
1.5 First Time Usage....................................................................................................... 12
2. About the Player ................................................................................................................ 13
2.1 Remote Control......................................................................................................... 13
2.2 Front Panel ............................................................................................................... 16
2.3 Rear Panel................................................................................................................ 16
3. Getting Started................................................................................................................... 17
3.1 Video In –Live TV, Recording and Timeshift............................................................ 17
3.2 PlayBack –Play and Edit Recorded Titles................................................................ 17
3.3 Browser –Browse and Play files .............................................................................. 18
3.4 Internet Radio –Listen to internet radio stations...................................................... 19
3.5 Playlist –Music Playlist............................................................................................. 19
4. Timer Record Menu........................................................................................................... 20
4.1 Create a New Schedule............................................................................................ 20
4.2 Editing Schedule....................................................................................................... 21
4.3 Deleting Schedules................................................................................................... 21
4.4 Viewing Schedule Status .......................................................................................... 21
4.5 Viewing Recording History........................................................................................ 21
5. Setup Menu ........................................................................................................................ 22
5.1 Changing Video Settings .......................................................................................... 22
5.2 Changing Audio Settings........................................................................................... 24
5.3 Changing Record Settings........................................................................................ 25
5.4 Changing Network Settings ...................................................................................... 26
5.5 Changing System Settings........................................................................................ 32
5.6 Miscellaneous ........................................................................................................... 36
6. File Copy Menu.................................................................................................................. 37
7. NAS Function..................................................................................................................... 39
8. Firmware Upgrades........................................................................................................... 40
9. Specifications .................................................................................................................... 42
10. Frequently Asked Questions.......................................................................................... 44
11. Copyrights and Trademarks ........................................................................................... 47
12. Warranty ........................................................................................................................... 47
13. Contact Information......................................................................................................... 47

4 / 48
1. Introduction
1.1 Preface
Dear Customer,
Thank you for purchasing the CMC2000 CiragoTV Platinum Network Multimedia Center.
This player has the following functionality:
Video Recording
-
Supports one button recording and scheduled recordings in MPG
format. Record programs from cable / satellite box through the AV
input; edit the recorded titles
-
Time shifting function;
Movie Playback
-
supports VOB (DVD), IFO (DVD), MPG (MPEG-2/1), AVI (MPEG-4
ASP: XviD), DAT (VCD), and MPEG-2 TS files; resolution up to 1080i;
Music Playback
-
supports MP3, OGG, and WMA* files;
-
supports one button playlist music playback;
Photo Playback
-
supports JPEG and BMP files;
Card Reader
-
supports memory cards: SD/MMC/MS/MS Pro;
Data Storage
-
works as a portable hard disk using USB 2.0 port;
Network Function
Internet Radio
-
-
-
Ethernet & WLAN streaming playback
- NAS function
Listen to thousands of internet radio stations
HDMI
-
High-Definition Multimedia Interface transmits the highest quality
digital video and audio via a single cable, simplifies cabling and
provides high quality home theater experience.
* Notice: WMA Pro & Advanced Profile and WMA with DRM are not supported.

5 / 48
1.2 Packing List
Part
Quantity
CiragoTV Platinum
1
A/V cable
1
Y/Pb/Pr cable
1
HDMI cable
1
USB cable
1
Remote Control
1
Remote Control Battery
2
AC/DC adaptor
1
User Manual
1
Quick Start Guide
1
Yellow review Card
1
Note:
The actual contents in the package might be different from the packing list in this manual.
1.3 Caution
The CMC2000 was designed with your safety in mind. In order to safely and effectively use this
product, please read the following before usage.
1.3.1 Usage cautions
User should not modify this player. If commercial hard disk is being used, the environmental
temperature should be within +5℃~ +35℃.
1.3.2 Power
The player‟s power voltage: DC 12V.
When using this player, please connect the supplied AC adapter or AC adapter cable to the
player‟s power jack. When placing the adapter cable, make sure it does not get damaged or be
subjected to pressure. To reduce the risk of electric shock, unplug the adapter first before
cleaning it. Never connect the adapter to the player in a humid or dusty area. Do not replace
the adapter or cable‟s wire or connector.
1.3.3 Radio interference/compatibility
If not properly shielded, almost all electronic devices will get radio interference. Under some
conditions, your player might get interference.
The design of this player has followed the FCC/CE standard, and has followed the following
rules:
(1) This player may not cause harmful interference;
(2) This player could accept some interference received including interference that may
cause undesired operation.

6 / 48
1.3.4 Repair
If the player has a problem, contact Cirago Customer Service at 408-331-8822 or email
[email protected]. Repairing the product yourself will lead to voiding the product warranty.
1.3.5 Disposing of the player
When you dispose of the player, be sure to dispose it appropriately. Some countries may
regulate disposal of electrical device, please consult with your local authority.
1.3.6 Others
Do not let the player come into contact with water or other liquid.
Do not disassemble the player, repair the player or change the design of the player, any
damage done will not be included in the repair policy.
During electrostatic discharge and the strong electromagnetic field, the product will
malfunction. Unplug the power cable and the product will return to normal performance
next time it is powered on.
All data stored in the player may be lost due to physical impact, electrical shock, power
lost, HDD format etc. Please backup your data.
1.4 Connection
1.4.1 Connect to Computer
(1) Make sure the player is powered on;
(2) Plug in the mini connector of the USB cable to this player‟s USB DEVICE port;
(3) Plug in the big connector of the USB cable to Computer.
1.4.2 USB Mass Storage Device (USB HDD, USB Flash Drives) Connection
(1) Make sure the player is powered on;
(2) Plug in the USB storage device to one of the USB host ports of this player.

7 / 48
1.4.3 Memory card connection
A Memory card can be used by inserting it in to the memory card slot
(1) Follow the picture to insert the memory card to the card slot properly;
(2) Insert the card by following the arrow pointer in the picture.
8 / 48
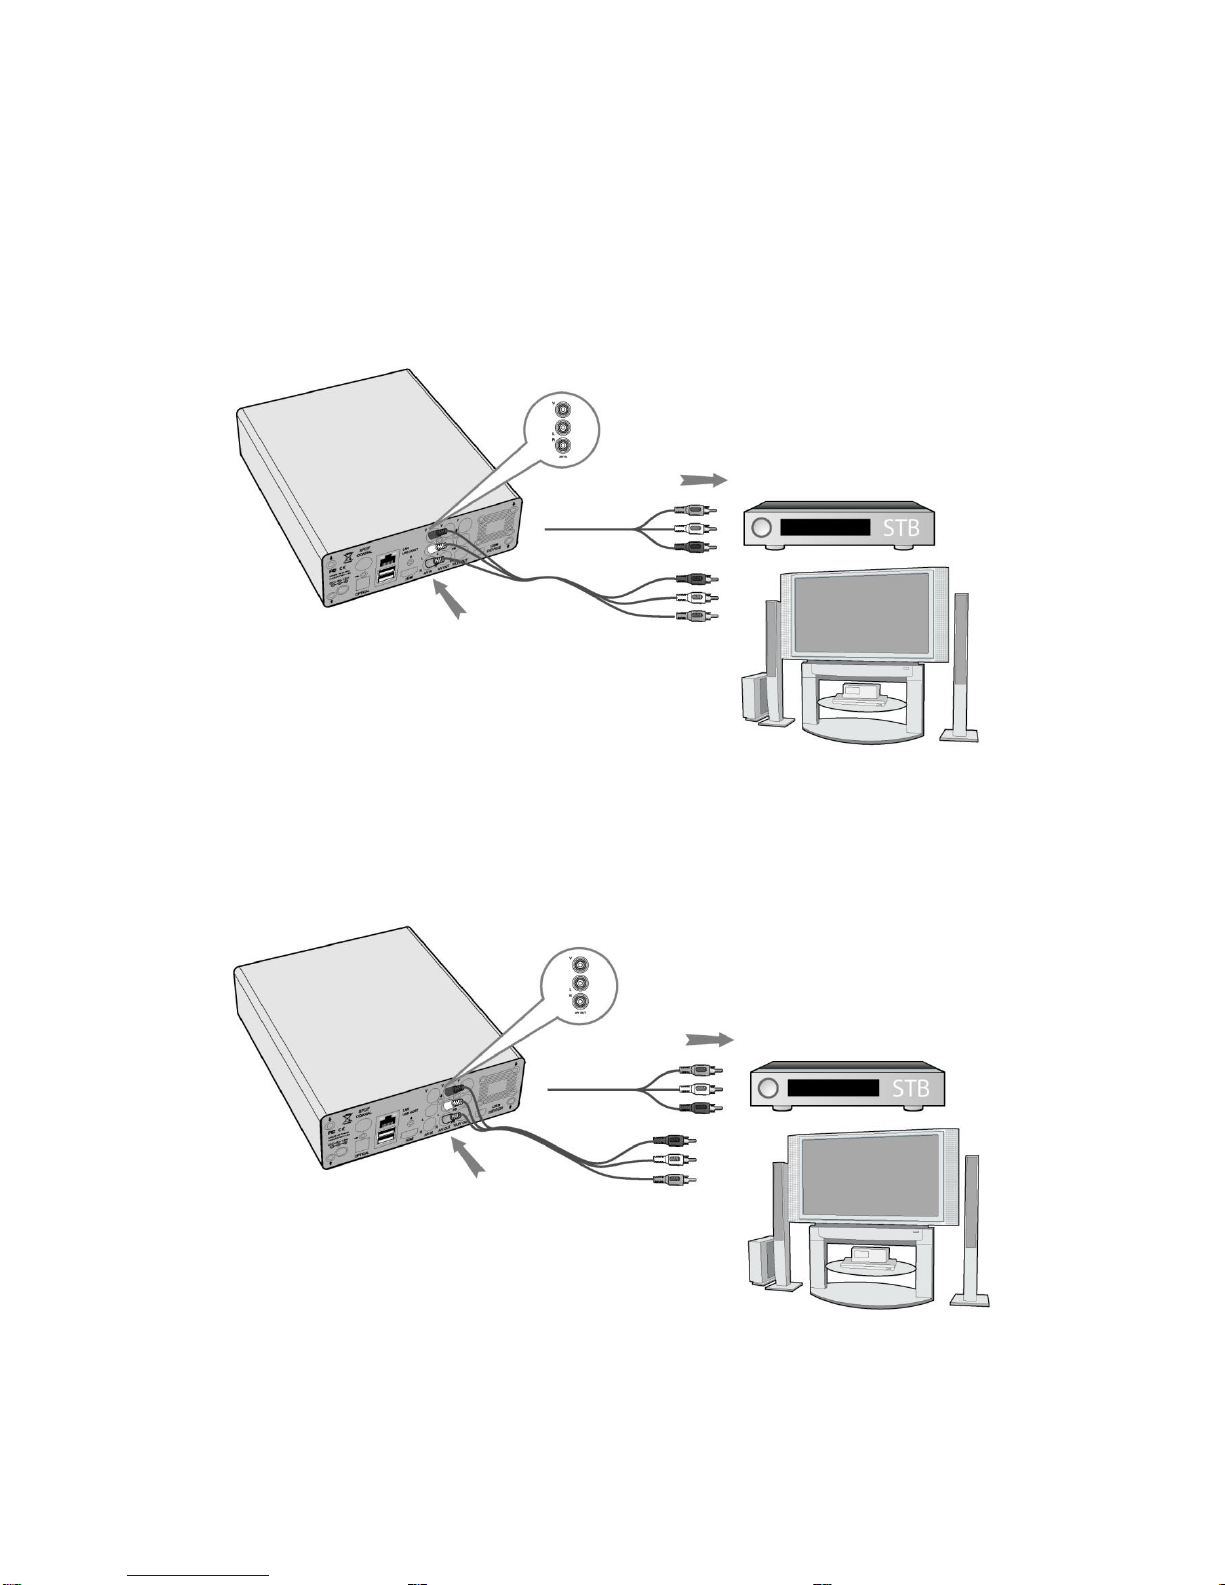
1.4.4 TV connection
1. A/V IN
(1) Follow the picture and plug in the AV Cables (red, white and yellow cable) to the player‟s
A/V IN jack;
(2) Follow the picture and plug in the AV Cables to the A/V OUT jack of the Cable or Set-Top
Box (STB).
In this way, you can record TV programs from the cable box.
2. A/V OUT
(1) Follow the picture and plug in the AV Cables to the player‟s A/V OUT jack;
(2) Follow the picture and plug in the AV Cables to the TV‟s A/V IN jack.
In this way, you can enjoy the content in the player on TV or other display devices.

9 / 48
3. Y/Pb/Pr Component OUT
(1) Follow the picture and plug in the Component Cables (Red, Green and Blue cable) to the
player‟s Y/Pb/Pr jack;
(2) Follow the picture and plug in the Component Cables to the TV‟s Y/Pb/Pr jack.
Audio Connection while using Y/Pb/Pr Video out:
First method: use the audio output from the A/V OUT jack;
Second method: use the audio output from the S/PDIF Coaxial or Optical jack.
In this way, you can also enjoy videos, music, and photos in the player on TV.
4. HDMI OUT
(1) Follow the picture and plug one connector on your HDMI cable to the player‟s HDMI jack;
(2) Follow the picture and plug the other connector on your HDMI cable to the TV‟s HDMI jack.
In this way, you can have the highest quality video and audio via a single cable.

10 / 48
1.4.5 Digital Audio Device connection
(1) Follow the picture and plug in the RCA connector on your coaxial cable to the player‟s
S/PDIF Coaxial jack. Or if you use optical fiber, please plug in the Toslink connector on your
optical fiber to the player‟s S/PDIF Optical jack;(not supplied)
(2) Follow the picture and plug in the other connector on your coaxial cable or optical fiber to
the digital audio device.(not supplied)
1.4.6 Power connection
(1) Follow the picture and connect the AC adaptor to the player‟s DC IN jack;
(2) Follow the picture and plug in the AC adaptor to the power outlet.
11 / 48
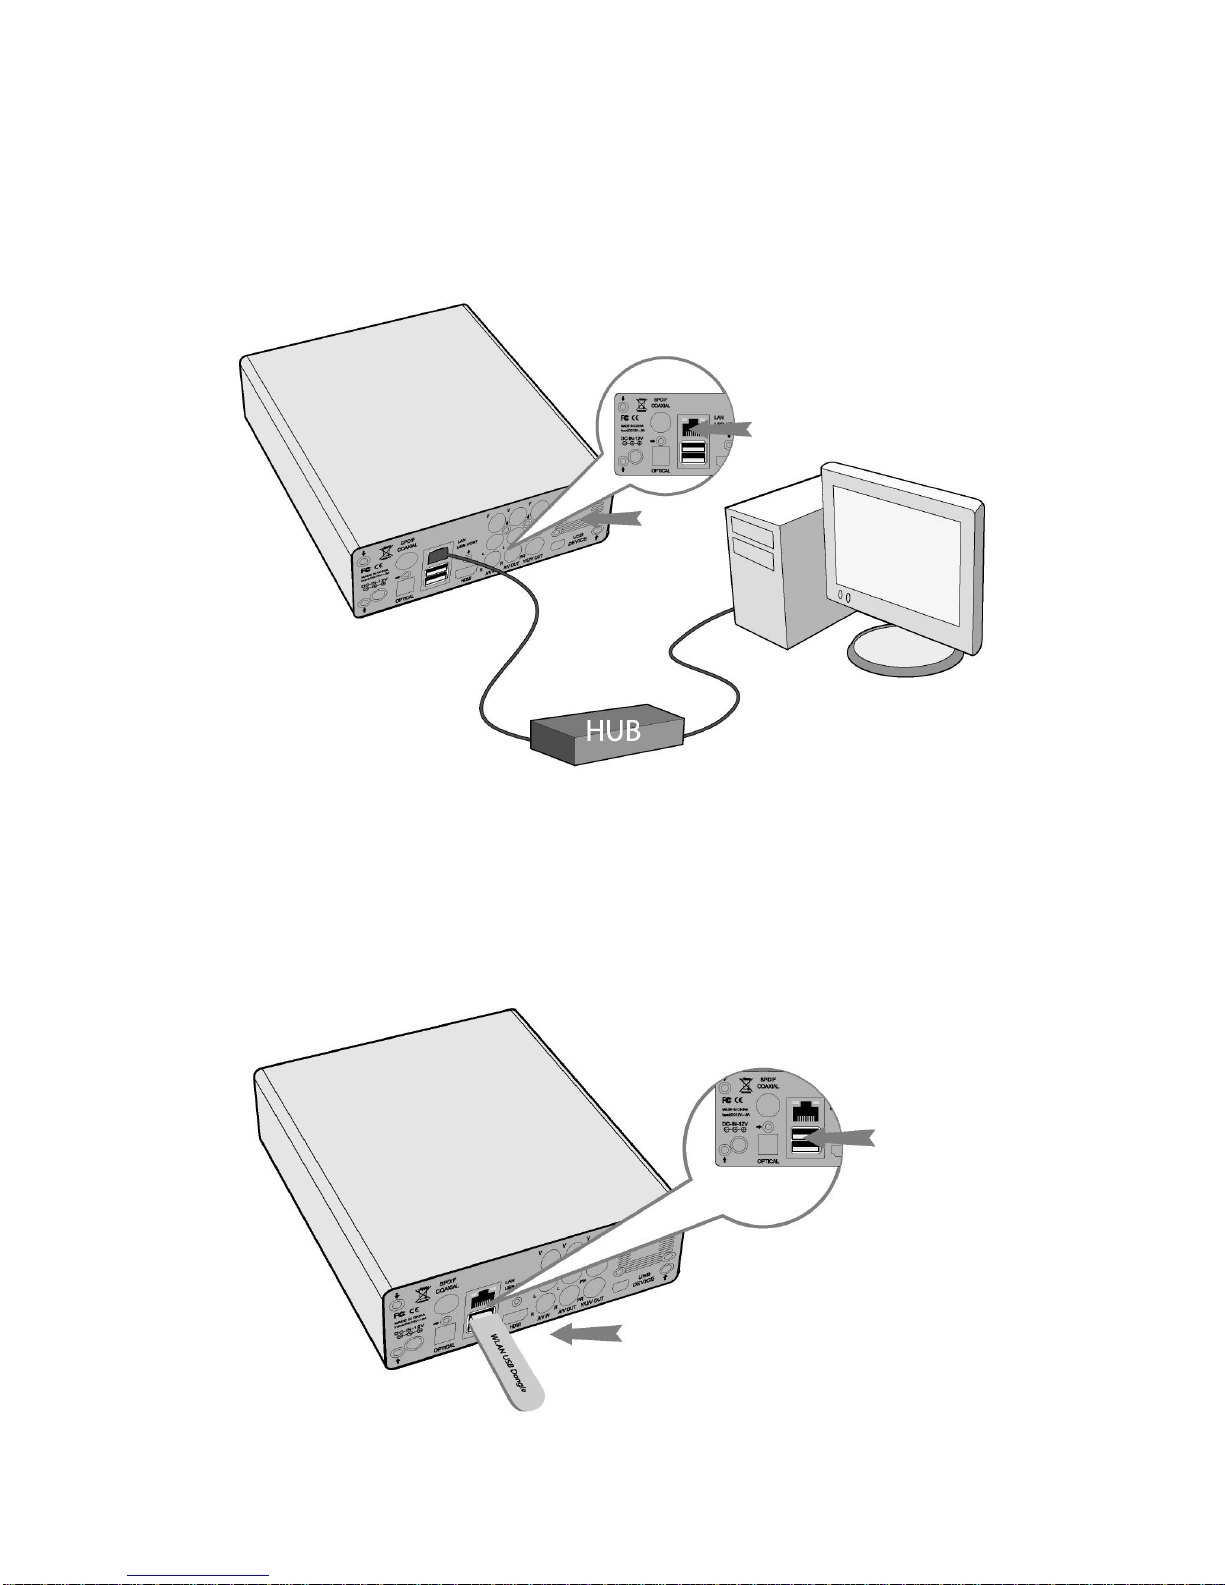
1.4.7 Ethernet connection
To connect to a LAN (Local Area Network) you require a cat5, cat5e or cat6 network cable.
(1) Connect the network cable to the player‟s RJ45 LAN socket;
(2) Connect the other crystal plug on the cable to a RJ45 LAN port on your router, switch, or
hub devices.
1.4.8 WLAN connection
(1) Make sure the player is powered on;
(2) Plug a Wireless LAN USB Adapter into the USB HOST port of the player.(The wireless LAN
feature will only work using an adapter which has the Realtek 8187 chipset. Please visit
www.cirago.com/cmc2000 for more information or to purchase a wireless USB adapter.
12 / 48
1.5 First Time Usage
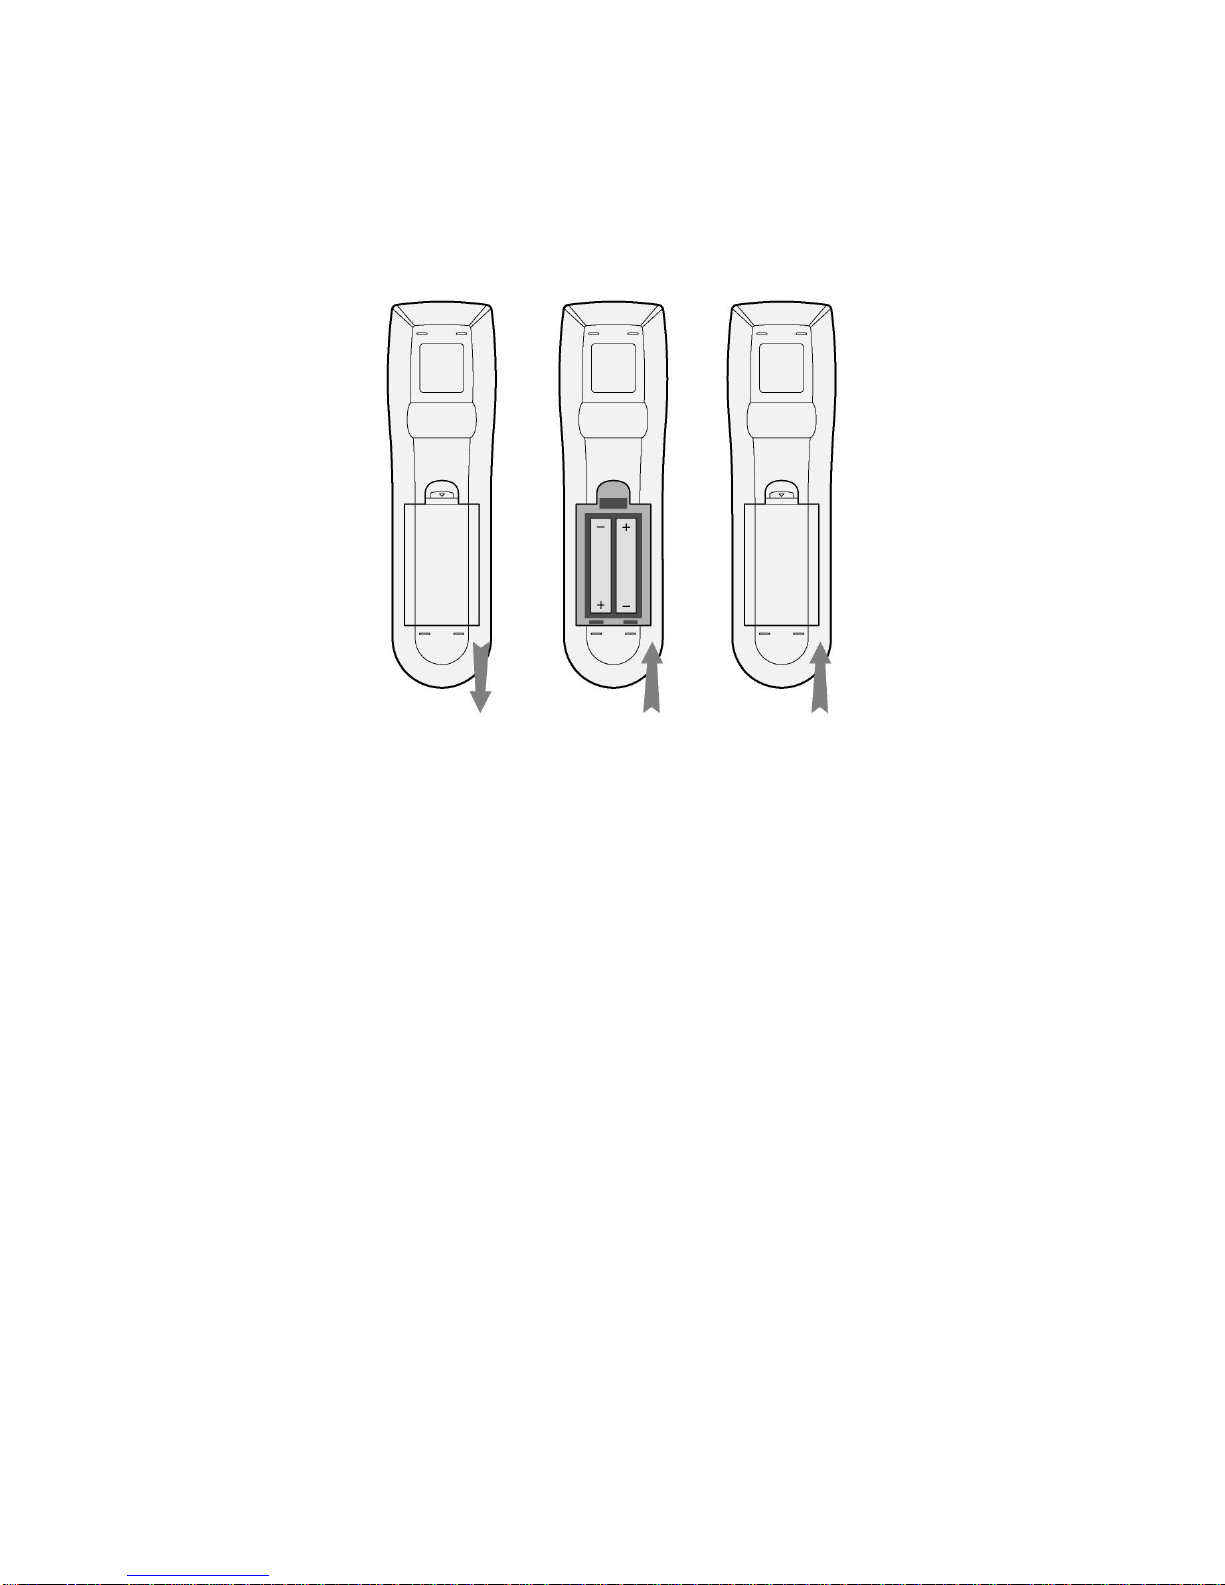
1.5.1 Remote Control
First time usage of Remote control
Install the batteries before using the remote control, installation steps are as the picture shows:
1.5.2 Power on/off, language control
1. Power On / Off
After connecting the power supply cord, press the POWER button on the front panel or remote
control to turn on the player. The blue ON indicator on the front panel will turn on. Press the
POWER button to turn off the player. The player may take some time to shut down as it saves
all settings before shutting down.
2. Language control
Press the setup button on the remote control > System > Menu Language.
For more information, please refer to page32.
13 / 48
2. About the Player
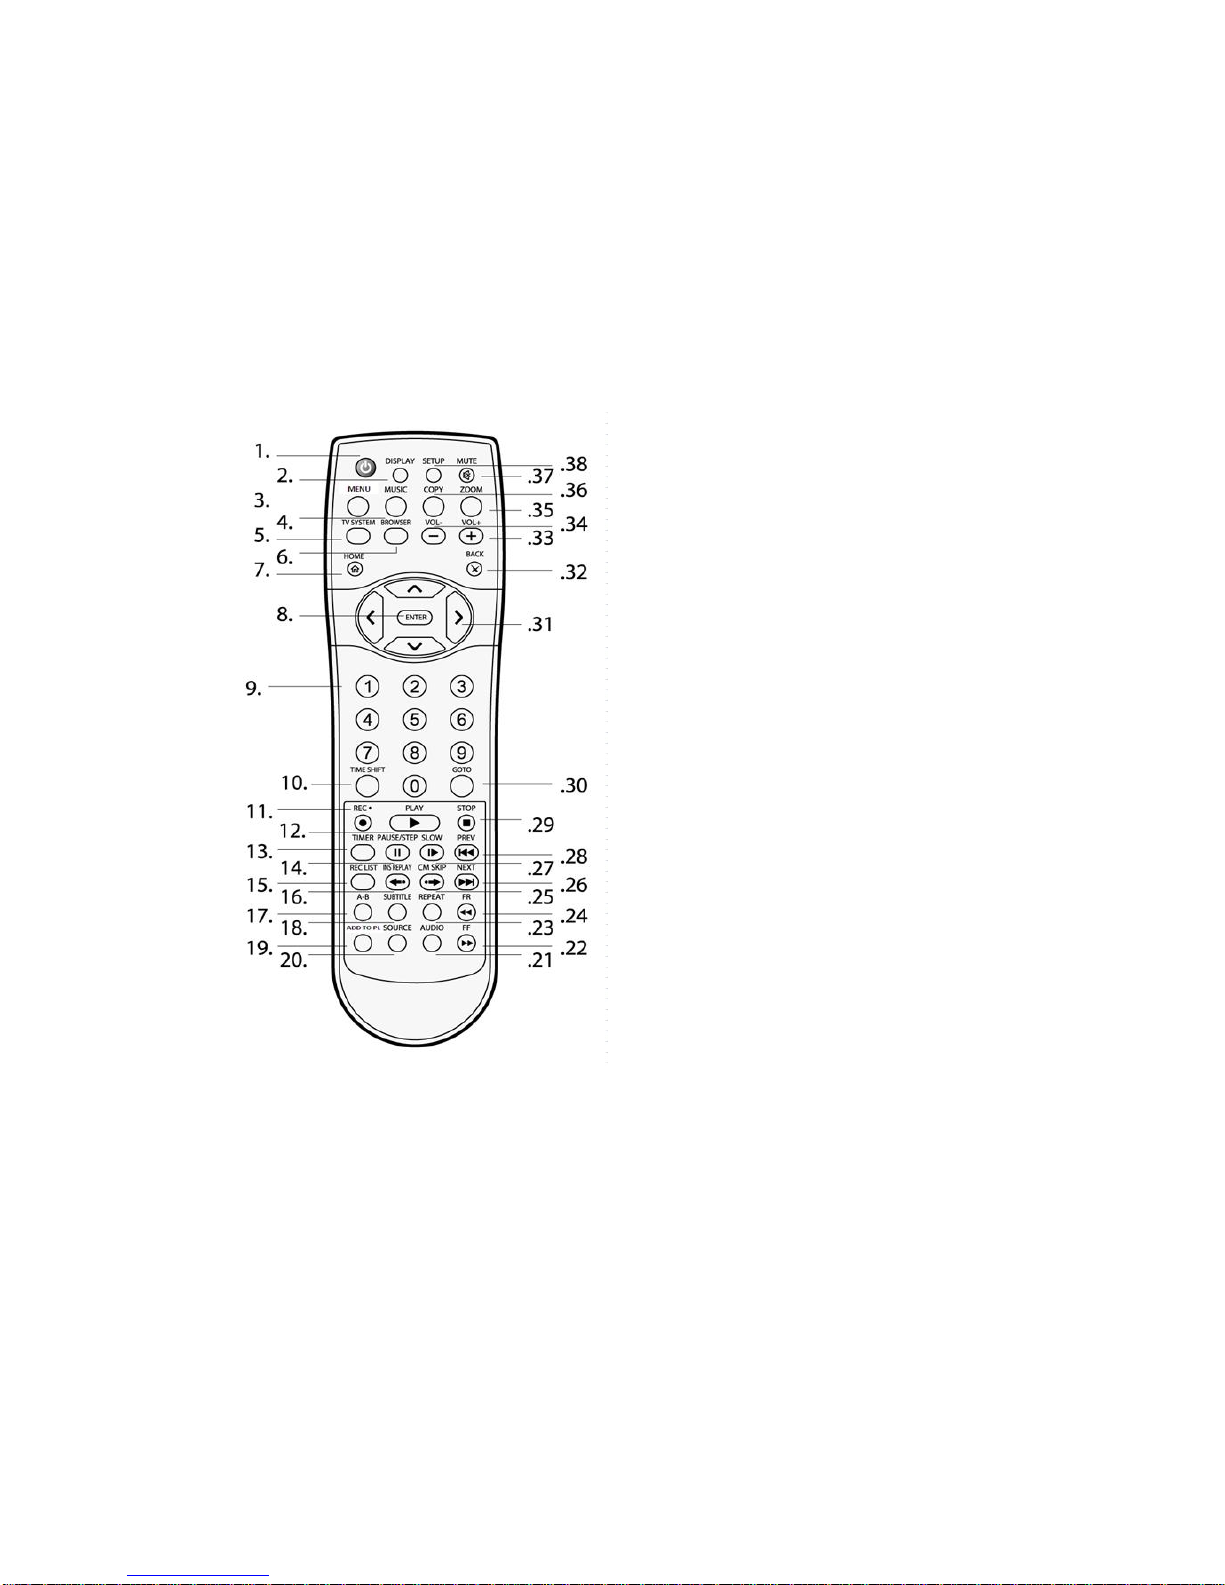
2.1 Remote Control
All procedures in this manual can be carried out using the remote control buttons. Certain
functions can also be carried out using the buttons located on the front panel of the product.
See the following for details on each button and its function:
1. POWER / STANDBY
2. DISPLAY
3. MENU
4. MUSIC
5. TV SYSTEM
6. BROWSER
7. HOME
8. ENTER
9. Numeric buttons
10. TIME SHIFT
11. REC
12. PLAY
13. TIMER
14. PAUSE/STEP
15. REC LIST
16. INS REPLAY
17. A-B
18. SUBTITLE
19. ADD to PL
20. SOURCE
21. AUDIO
22. FF
23. REPEAT
24. FR
25. CM SKIP
26. NEXT
27. SLOW
28. PREV
29. STOP
30. GOTO
31. Navigation buttons
32. BACK
33. VOL+
34. VOL-
35. ZOOM
36. COPY
37. MUTE
38. SETUP

14 / 48
No.
Button
Function
1
POWER
Press to turn on / off the player.
2
DISPLAY
Press to display current status.
Press during playback and an onscreen display appears, showing
track number and time elapsed/remaining.
Press during recording and an onscreen display appears, showing the
recording quality setting and time elapsed.
Press while watching live TV and an onscreen display appears,
showing the current channel number and time.
Press during time shifting to turn the time shifting bar on/off.
3
MENU
Press to activate tools menu.
Press in the Browser Menu to rename and delete files, or add music to
playlists.
4
MUSIC
When the player is idle, press the button to start playback music in the
first nonempty playlist. Press the button again to switch to the next
playlist and playback music.
5
TV SYSTEM
Press to switch between NTSC, PAL, 480P, 576P, 720P, and 1080I.
6
BROWSER
Press to browse music, photo, and movie files on HDD, USB, Card,
and NET.
7
HOME
Press to view the Home menu. See The Home Menu in 3. Getting
Started on page 17 for more details.
8
ENTER
Press to select options in menus.
9
NUMBERS
Press to enter a numeric input when changing settings.
10
TIMESHIFT
Press to activate the time shift function, which allows you to pause live
TV and resume the program from the point you left it. While paused,
the program is recorded to the HDD, as long as space is available.
Press to activate TIME SHIFT function and wait for the
PLAY arrow to appear on the screen.
Press PAUSE to pause the recording.
Press PLAY to resume viewing the program.
Timeshift mode remains active until you press the STOP button.
11
RECORD
Press to begin recording or to resume when recording has been
paused.
Press repeatedly to set one touch recording (OTR) length (30 MIN. / 60
MIN. / 90 MIN. / 120 MIN. / 180 MIN. / 240 MIN. / Off).
12
PLAY
Press to begin playback of a title.
13
TIMER
Press to enter the Timer Menu directly to add, edit and delete
recording schedules. See 4.Timer Record Menu on page 20 for more

15 / 48
details.
14
PAUSE
Press to pause current playback.
Press PLAY to resume playback.
15
REC LIST
Press to show the recording list.
16
INSTANT
REPLAY
Press to go back 10 seconds of the current playback.
17
A-B
Press to set the beginning and end points of a recorded video.
18
SUBTITLE
Press to access the subtitle menu during video playback.
19
ADD TO PL
Press to add a music file to a playlist.
20
SOURCE
Press to select AV input source. See 3.1 Selecting Video In on page
17 for more details.
21
AUDIO
Press to select an audio track.
22
FAST
FORWARD
Press to fast forward the current playback.
Press repeatedly to select speeds.
23
REPEAT
Press to set repeat option: Repeat once, repeat all, repeat off.
24
FAST REWIND
Press to fast rewind the current playback.
Press repeatedly to select speeds.
25
CM SKIP
Press to advance 30 seconds when in playback or record mode.
26
NEXT
Press to go to the next file or the next chapter on a title.
27
SLOW
Press to play back in slow motion.
Press PLAY to resume regular playback.
28
PREVIOUS
Press to go to the previous file or the previous chapter on a title.
29
STOP
Press to stop playback.
30
GO TO
Press to jump to a specific point on a video or recording. Specify the
point using Title, Chapter and Time.
31
NAVIGATION
Press the arrow buttons to select menu options.
32
BACK
Press to go back to the previous screen when navigating menus.
33
VOL +
Press to increase the volume.
34
VOL -
Press to decrease the volume.
35
ZOOM
Press to zoom in/out the image (photo or video).
36
COPY
Press to enter the File Copy Menu.
37
MUTE
Press to mute audio output, and press again to resume.
38
SETUP
Press to access the Setup Menu directly.
16 / 48
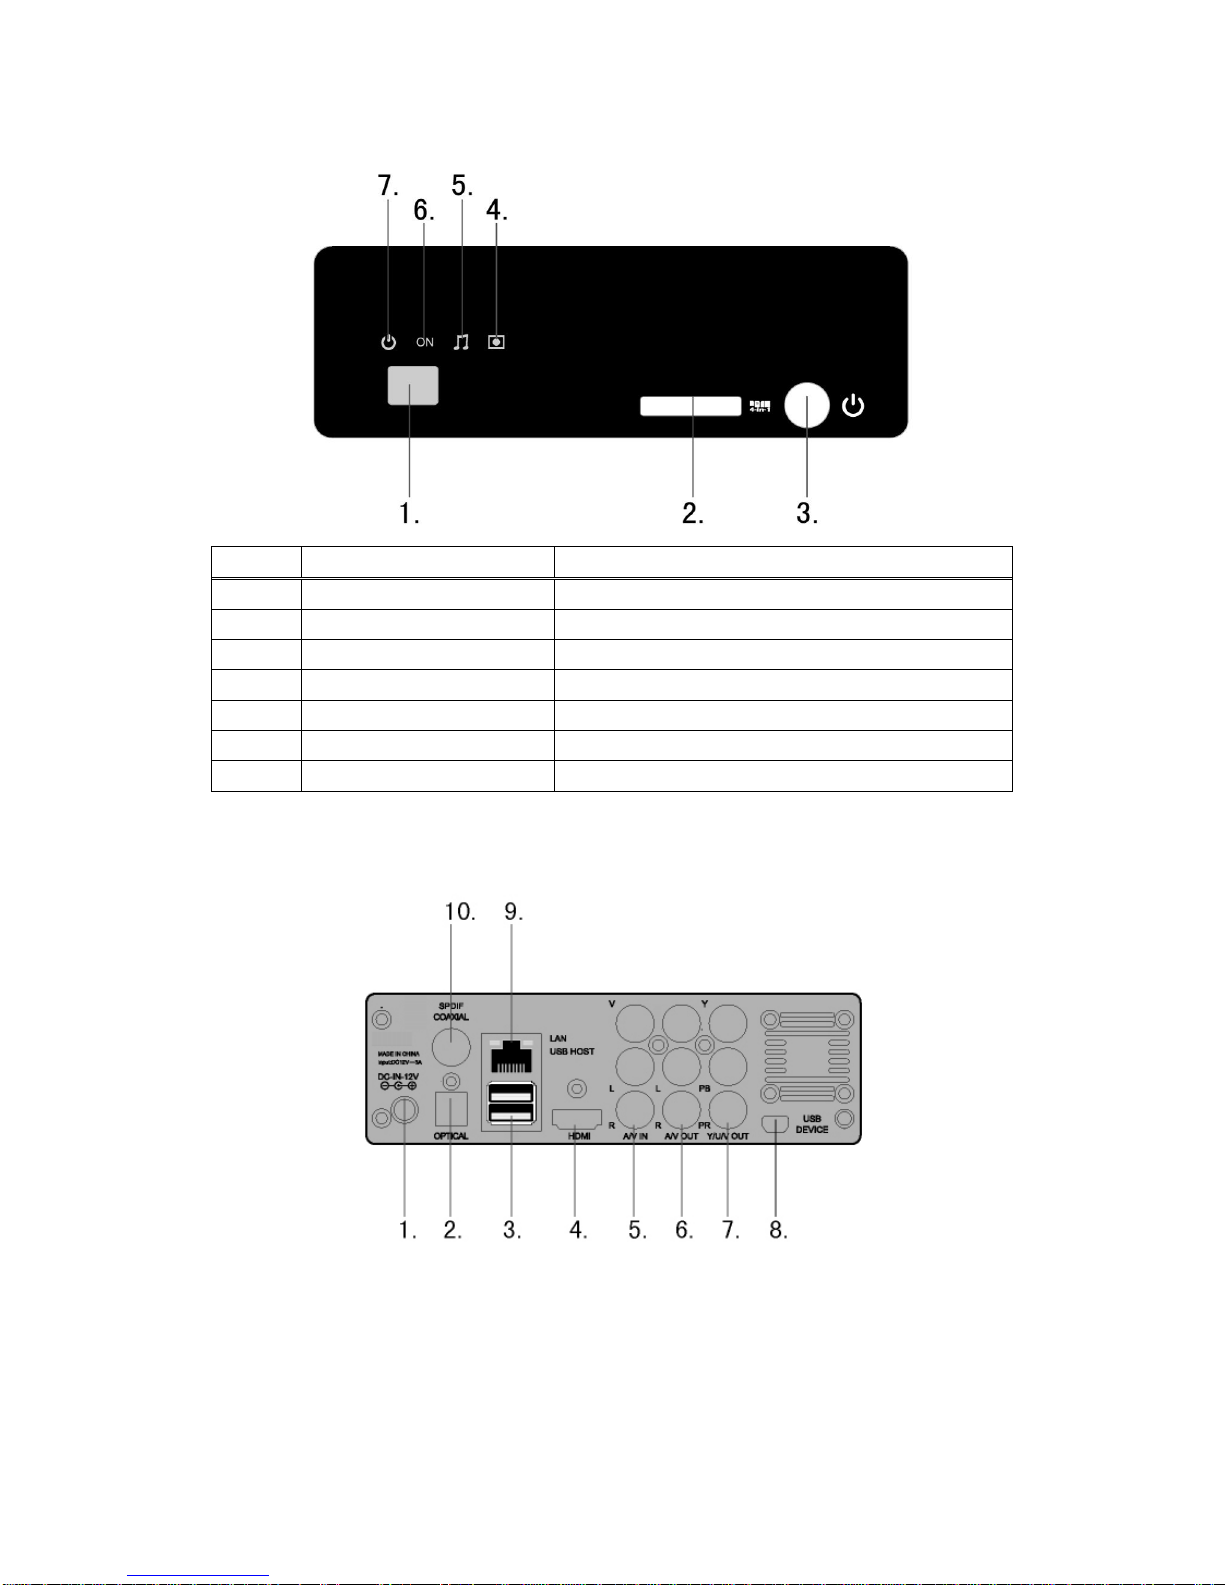
2.2 Front Panel
No.
Name
Function
1
Infrared receiver window
Receives IR signals from the remote control.
2
4-in-1 Card slot
Compatible with SD/MMC/MS/MS Pro cards.
3
POWER / STANDBY button
Press to enter standby mode or wake up.
4
REC indicator
Indicator (red) turns on when recording starts.
5
MUSIC indicator
Indicator (blue) turns on during music playback.
6
ON indicator
Indicator (blue) turns on when the system is on.
7
POWER indicator
Blue light when on / Red when off / standby
2.3 Rear Panel
1. DC IN jack
2. S/PDIF Optical jack
3. USB HOST port x 2
4. HDMI jack
5. A/V IN jack
6. A/V OUT jack
7. Component (Y/Pb/Pr) OUT jack
8. USB DEVICE port (MINI B)
9. RJ45 LAN socket
10. S/PDIF Coaxial jack

17 / 48
3. Getting Started
Power on the system, and after a few seconds, the system will enter the home menu. You can
also access this menu by pressing the HOME button on the remote control.
3.1 Video In –Live TV, Recording and Timeshift
To view Live TV, connect your cable or satellite box to the AV input on the Multimedia Center,
and select Video In to display what is playing. A DVD player or VCR can also be connected to
the Multimedia Center.
Recording and Timeshift features can be used in this mode.
3.2 PlayBack –Play and Edit Recorded Titles
Press REC LIST on the remote control or select Playback button on the home menu page to
access Title List. A clip recorded on HDD or USB device is called a Title.This menu allows you
to play and edit all saved titles. To enter the menu, press REC LIST or select Playback from
the Home menu page.
1. Tab Menu
2. List of recorded titles
3. Hard Drive recording space
available based on
recording quality selected
4. Preview of recorded title
18 / 48
There are options listed in the tabs on the top of the Playback page.
1. Play –this shows you a list of all the recorded titles. It also shows you how many
hours of recording time is available
2. Delete –deleted recorded titles
3. Rename –rename stored titles
4. Sorting –sort titles by title number, recording time, title name or newest titles.
5. Title Edit –this menu provides several editing options for recorded titles.
a. Set Thumbnail –select a frame from the recorded title as a thumbnail
b. AB Erase –delete specific sections of the video. “A” is the starting point and
“B” is the ending point of the section to be deleted.
c. Split Title –split one title into two separate files.
d. Merge Title –merge two titles into one file.
e. Add Chapter Mark –select chapter mark points to a title, and access them
by pressing the PREVIOUS and NEXT buttons on the remote control.
f. Remove Chapter Mark –remove chapter mark points that you previously
added to a title.
g. Copy to FAT32 partition –copy recorded titles over to the FAT32 partition of
the hard drive for easy access to them and network sharing through the
NAS. This also frees up more recording space for future recordings.
6. Tools –this section has the option to Delete all the recorded titles.
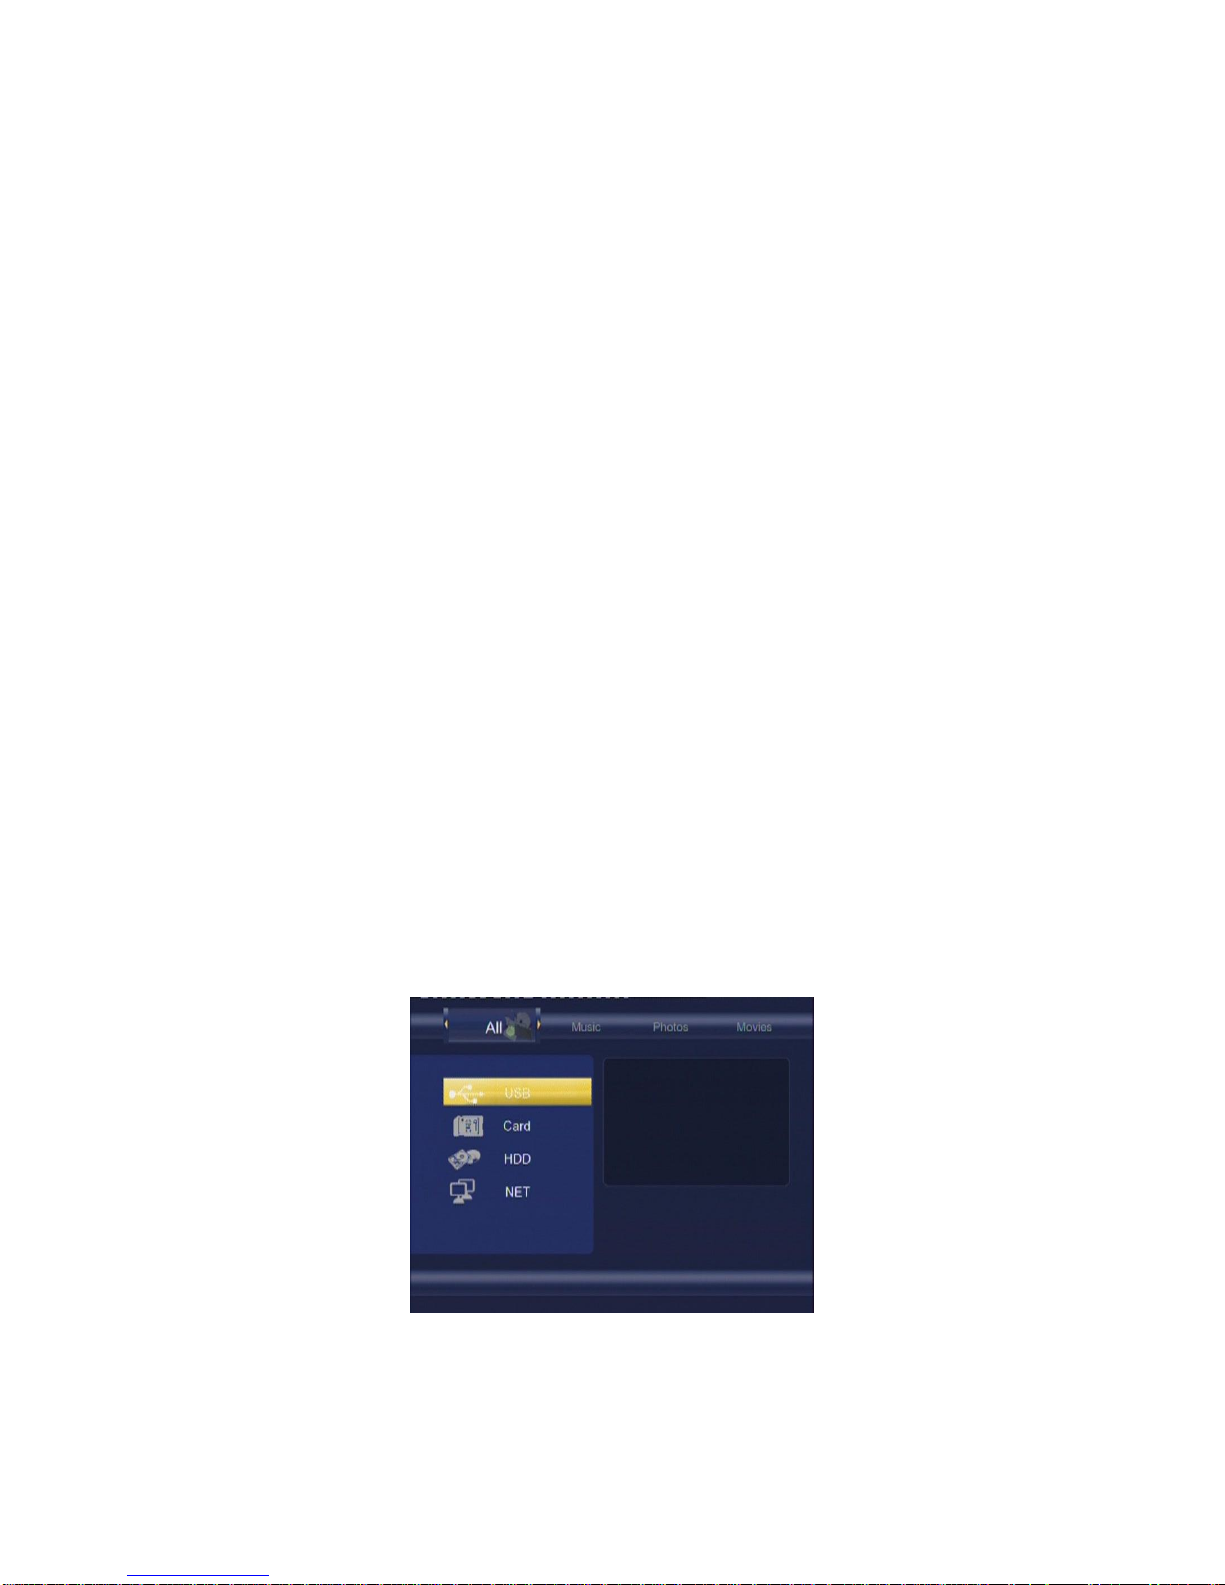
3.3 Browser –Browse and Play files
Press BROWSER on the remote control or select Browser on the home menu page to browse
movie, photo, and music files stored either on a HDD, USB device, Memory Card or Network.
The Browser menu allows you to browse and play music, photo and movie files stored on a
HDD, an external USB device, Memory Card, and Network.
Choose from HDD, USB, Card and your local network, and press the ENTER button.
There is a horizontal tab across the top of the page with All, Music, Photo and Movies options
to select from. These tabs act as filters for viewing only photos or music or movies. The All tab

19 / 48
will display all the media files in the directory or folder you are in.
Photo slideshows with music can be played when the music files are in the same folder as the
photos. The navigation buttons on the remote control can be used to rotate images and the
zoom button can be used to zoom in on photos.
3.4 Internet Radio –Listen to internet radio stations
Select the Internet Radio icon on the home menu page. Sort by Station, Genre or Saved
favorites.
Press the MENU button on the remote control to add an internet radio station to your favorites.
3.5 Playlist –Music Playlist
To enter the music playlist menu, select Playlist button on the home menu page. When the
system is idle, pressing the MUSIC button on the remote control will play the music on a
playlist.
When you are browsing your Music stored on the hard drive, you can add music to the playlist
by selecting a file and pressing the MENU button on the remote control. Select “Add to Play
List”. Alternatively, you can press the ADD TO PL button on the remote control. You can have
up to 5 playlists.

20 / 48
From the Home menu page, select Playlist. Choose the playlist you would like to listen to.
Press the REPEAT button on your remote control to set your repeat options.
4. Timer Record Menu
The Timer Record menu allows you to create, edit and delete recording schedules and view
schedule status and history. Press TIMER on the remote control to enter the menu.
4.1 Create a New Schedule
Select the Edit tab from the menu bar. Select Add a New Schedule and press the ENTER
button. The schedule setting screen appears.
Use the navigation keys on the remote control to scroll through and change the recording
settings.
Start Time
Enter the date and time of the recording.
Length
Enter the duration of the recording
Repeat
Select how often you want the schedule to record. Choose from
Once, Everyday, Mon-Fri, Mon-Sat or for an individual day of the week.
Device
Choose between recording to the hard drive or an external USB device.
Quality
Select the recording quality. Choose from HQ, SLP, EP, LP and SP.
The higher the quality, the more space it will take up on the hard drive. See
HDD/USB Free Space on the left of the screen for details of how long you can
record for using each setting. The Multimedia Center will only show you free
space on the HDD, and not on the USB device, even if you choose the USB
device as your recording device.
Other manuals for Platinum CMC2000
1
Table of contents
Other Cirago Media Player manuals


