Circassia NIOX VERO User manual

000190-09 (EPM-000165) NIOX VERO®User Manual US
April 2017
NIOX VERO® Airway Inflammation Monitor
User Manual
510(k) 133898

Remember
It is important to adhere to the following specified conditions:
• Ambient temperature: 50°F to 95°F
• Humidity: 20% to 80% RH (non-condensing)
• Mobile phones, cordless phones and gas emitting appliances might
interfere with the instrument and should therefore be kept away from
the instrument. Interference could make it impossible to perform a
measurement.
•Exhaled breath contains water vapor which can condense
inside the instrument. When excessively used in a short period,
there is a risk for condensation of water inside NIOX VERO.
Normally a maximum of 10 exhalations/hour can be performed with
NIOX VERO during continuous use. However, it is possible to
perform 20 exhalations in one hour if the instrument is paused for a
minimum of 30 minutes prior to the next session of exhalations.
Exhalations include failed and successful measurements.
• Avoid spilling water or other fluids on the instrument or Sensor.
• Always use a closed case or bag (NIOX VERO®bag recommended)
for transportation and storage of NIOX VERO.
• It is recommended, after inserting a new sensor, to wait for three
hours with the instrument switched on before performing a
measurement.
• Operational life-time NIOX VERO®Instrument: Minimum 5 years at
time of delivery, or 15, 000 measurements.
• Operational life-time NIOX VERO®Sensor: Maximum 12 months
after opening package and installed in NIOX VERO or expiration
date as stated on the Sensor, whichever comes first.
WARNING!
Use of substances containing alcohol close to the
NIOX VERO®instrument may cause erroneous measure-
ment results.
DO NOT clean the instrument or handle with products con-
taining alcohol. This includes sprays or wipes containing
alcohol!
Do not use substances containing alcohol on or close to
the NIOX VERO®instrument. This includes any cleaning
agents used to clean the facility, or other equipment in the
area, as well as alcohol wipes or sprays used on patients.
CAUTION!: Do not use NIOX VERO®in the proximity of areas where
volatile substances such as organic fluids or disinfectants are being
used. Special attention should be paid to aerosols and disinfection
baths, either open vessels or ultrasonic baths.

Table of contents
1
1 Important information ...............................................................3
1.1 Before using NIOX VERO®Airway Inflammation Monitor ........ 3
1.2 About this manual..................................................................... 3
1.3 Compliance .............................................................................. 3
1.4 Responsible manufacturer and contacts.................................. 3
1.5 Warnings .................................................................................. 3
1.6 Indications for use .................................................................... 4
2 Product description ..................................................................5
2.1 NIOX VERO®accessories and parts........................................ 5
2.2 Instrument ................................................................................ 5
3 Installation and set up ..............................................................6
4 User interface ..........................................................................10
4.1 Main and settings view........................................................... 10
4.2 Main View............................................................................... 10
4.3 Settings view .......................................................................... 11
5 Using NIOX VERO® ..................................................................11
5.1 Start the instrument from power save mode .......................... 11
5.2 Register patient ID (optional).................................................. 11
5.3 Measure FeNO....................................................................... 12
5.4 Demonstration mode.............................................................. 14
5.5 Measure ambient NO ............................................................. 15
5.6 Change settings ..................................................................... 15
5.7 Turn off the instrument ........................................................... 17
5.8 External Quality Control (QC) procedure ............................... 18
6 Using NIOX VERO®with NIOX®Panel ...................................23
6.1 Warnings................................................................................ 23
6.2 Installation of NIOX®Panel .................................................... 23
6.3 Connect to a PC via USB....................................................... 24
6.4 Connect to a PC via Bluetooth............................................... 24
6.5 Setup...................................................................................... 24
6.6 Firmware update .................................................................... 26
6.7 Using NIOX®Panel ................................................................ 26
7 Troubleshooting ...................................................................... 28
7.1 Alert codes and actions.......................................................... 28
8 Preventive care ....................................................................... 33
8.1 General care .......................................................................... 33
8.2 Change disposables .............................................................. 34
8.3 Operational life-time............................................................... 36
8.4 Disposal of instrument and accessories ................................ 36
8.5 Return shipments................................................................... 37
9 Safety information .................................................................. 37
9.1 Warnings................................................................................ 37
9.2 Cautions................................................................................. 37
9.3 Substances disturbing FeNO measurement .......................... 38
9.4 Electromagnetic immunity...................................................... 39
9.5 Emission of electromagnetic energy ...................................... 40
9.6 Operating conditions .............................................................. 40
10 Reference information .......................................................... 41
10.1 Buttons and descriptions...................................................... 41
10.2 Symbols and descriptions .................................................... 41
10.3 Symbol explanation.............................................................. 42

Table of contents
2
11 Technical data .......................................................................43
11.1 Dimensions and weight ........................................................ 43
11.2 Electrical data....................................................................... 43
11.3 Noise level............................................................................ 43
11.4 Exhaled NO - performance data........................................... 43
11.5 Linearity................................................................................ 43
11.6 Precision............................................................................... 43
11.7 Accuracy............................................................................... 43
11.8 Method comparison.............................................................. 43
11.9 Inhalation parameters........................................................... 43
11.10 Exhalation parameters ....................................................... 44
11.11 Essential performance........................................................ 44
11.12 Memory capacity ................................................................ 44
11.13 Patient filter ........................................................................ 44
11.14 Bluetooth ............................................................................ 44
11.15 Rechargeable battery capacity........................................... 45
11.16 Instructions for transport and storage................................. 45
12 NIOX VERO®parts and accessories ....................................46
12.1 Parts included in NIOX VERO®package
(Article No. 12-1200) .................................................................... 46
12.2 Accessories.......................................................................... 46
13 Medical Device Reporting (MDR) .........................................47
14 Guidance and manufacturer's declaration - Electromagnetic
immunity and electromagnetic emissions ...............................48

Chapter 1 Important information
000190-09 NIOX VERO®User Manual US 3
1 Important information
1.1 Before using NIOX VERO® Airway Inflammation
Monitor
NIOX VERO®may only be operated as directed in this manual by trained
healthcare professionals. Trained status is achieved only after careful reading
of this manual. Read the entire instructions for use and make certain that you
fully understand the safety information.
1.2 About this manual
NIOX VERO®User Manual - US 000190 (EPM-000165), version 09,
April 2017, for instruments with software version 1D1x-xxxx. X can be any
number between 0 and 9 or a character. For instructions on how to view the
software version number installed in the instrument, see page 17.
Information in this document is subject to change. Amendments will be made
by Circassia AB as they occur.
The User Manual provides instructions on how to operate NIOX VERO®.
It contains numbered step-by-step instructions with screens and illustrations.
Choices within steps are displayed with bullet points.
For clinical and performance characteristics, refer to the NIOX VERO®
Labeling Summary/Package Insert 000249 (EPS-000069).
1.3 Compliance
NIOX VERO® is CE-marked according to In Vitro Diagnostics Device Direc-
tive 98/79/EC. NIOX VERO®is RoHS compliant.
1.4 Responsible manufacturer and contacts
Mailing address:
Circassia AB, P.O. Box 3006
SE-750 03 Uppsala, Sweden
Visiting address:
Hansellisgatan 13
SE-754 50 Uppsala, Sweden
www.circassia.com
www.niox.com
1.5 Warnings
• Do not use substances containing alcohol on or close to the
NIOX VERO®instrument. This includes any cleaning agents used to
clean the facility, or other equipment in the area, as well as alcohol
wipes or sprays used on patients.
• NIOX VERO®should only be operated by healthcare professionals.
• Operate NIOX VERO®as stated in this manual. Circassia accepts no
responsibility for damaged equipment or faulty results, if the equipment is
not handled according to this manual.
Symbol Description
WARNING Indicates a potentially hazardous situation that, if not
avoided, can result in bodily harm or injury.
CAUTION Indicates a potentially hazardous situation that, if not
avoided, can damage a product or system, cause loss
of data or harm to business.
Note Alerts the reader to important information on the proper
use of the product, user expectations, error situations,
and actions related to these.

Chapter 1 Important information
4 000190-09 NIOX VERO®User Manual US
• When selecting an accessory for your NIOX VERO®product keep in
mind that an accessory not recommended by Circassia may result in
loss of performance, damage to your NIOX VERO®product, fire, electric
shock, injury or damage to other property. The product warranty does
not cover product failure or damage resulting from use with non
approved accessories. Circassia takes no responsibility for health and
safety problems or other problems caused by the use of accessories not
approved by Circassia.
• NIOX VERO®should not be used adjacent to or stacked with other
equipment.
• Only use the power supply provided. Pull the plug when disconnecting
NIOX VERO®from the power outlet.
• Use only the breathing handle supplied by Circassia.
• No modification of NIOX VERO®instrument, handle or Sensor is
allowed.
• Do not drop the instrument or subject it to strong impact.
• Do not use a damaged NIOX VERO® instrument or damaged
components.
• Keep the instrument and Sensor out of water. Ensure that no liquid is
spilled or dropped on the instrument or Sensor.
• Do not heat or dispose of the instrument or Sensor in fire. Refer to
“Disposal of instrument and accessories” on page 36.
• NIOX VERO® and the NO scrubber in the breathing handle contains
potassium permanganate. Used or expired instruments and breathing
handles should be disposed of as hazardous waste in accordance with
local waste disposal regulations.
• The breathing handle must not be used after the expiration date.
• Patient filters should be used immediately after opening.
• NIOX VERO®Sensor contains chemicals that could be harmful if
swallowed.
• Do not touch or clean the white Sensor membrane.
• Do not clean the sensor. Cleaning of the Sensor with ethanol or similar
disinfectant might destabilize it for a non-predicable time period.
• After inserting a new Sensor it is recommended to wait for three hours
with the instrument switched on before performing a measurement.
• Do not reuse the patient filters.
• Do not use NIOX VERO®in the proximity of areas where volatile
substances such as organic fluids or disinfectants are being used.
Special attention should be paid to aerosols and disinfection baths,
either open vessels or ultrasonic baths. Do not use the instrument in the
presence of flammable anesthetic, vapors or liquids.
1.6 Indications for use
NIOX VERO®measures Nitric Oxide (NO) in human breath. Nitric Oxide is
frequently increased in some inflammatory processes such as asthma. The
fractional NO concentration in expired breath (FeNO), can be measured by
NIOX VERO according to guidelines for NO measurement established by
the American Thoracic Society.
Measurement of FeNO by NIOX VERO is a quantitative, non-invasive, sim-
ple and safe method to measure the decrease in FeNO concentration in
asthma patients that often occurs after treatment with anti-inflammatory
pharmacological therapy, as an indication of the therapeutic effect in patients
with elevated FeNO levels. NIOX VERO is suitable for children, approxi-
mately 7 - 17 years, and adults 18 years and older.
FeNO measurements provide the physician with means of evaluating an
asthma patient’s response to anti-inflammatory therapy, as an adjunct to the
established clinical and laboratory assessments in asthma. The NIOX VERO
is intended for prescription use and should only be used as directed in the
NIOX VERO User Manual by trained healthcare professionals. NIOX VERO
cannot be used with infants or by children approximately under the age of 7,
as measurement requires patient cooperation. NIOX VERO should not be
used in critical care, emergency care or in anesthesiology.

Chapter 2 Product description
000190-09 NIOX VERO®User Manual US 5
2 Product description
2.1 NIOX VERO® accessories and parts
(A) Breathing handle and handle cap, (B) Sensor (supplied separately),
(C) Instrument (including stand), (D) Rechargeable battery, (E) NIOX®Apps
USB memory stick, (F) USB cable, (G) Power adapter and power cord,
(H) Patient filter (supplied separately)
Note: Only accessories and parts supplied by Circassia may be used.
2.2 Instrument
H) ON/OFF button, (I) Power adapter port, (J) USB port
(K) Battery LED - lit when battery is charging, (L) Standby LED - blinking in
Standby/Sleep mode, (M) Touch panel Display

Chapter 3 Installation and set up
6 000190-09 NIOX VERO®User Manual US
(N) Breathing handle holder, (O) Breathing handle port
3 Installation and set up
Open the package with care. Prior to installation, check that the package
contains all the parts. (See page 5). A screwdriver is required for opening the
compartment lid and installation of Sensor and battery. Remove the plastic
film from the display.
1. Carefully place the instrument with the display facing down on a flat and
clean surface, then unscrew and remove the compartment lid. There is
a taper on the side of the lid for better grip when opening.
2. Open the Sensor can.

Chapter 3 Installation and set up
000190-09 NIOX VERO®User Manual US 7
WARNING! Open the Sensor can with care. The inside of the opening may
have sharp edges.
3. Open the Sensor package.
WARNING! Do not touch or clean the white Sensor membrane.
CAUTION! The Sensor should only be stored in its original unopened
package or installed in a NIOX VERO®instrument.
4. Insert the Sensor and turn the swivel clockwise until locked.
5. Open the battery package.
Note: Only use the correct rechargeable battery supplied by Circassia.
Type No BJ-G510039AA, Article No 12-1150
6. Insert the rechargeable battery and replace the lid. Tighten the screw by
using a screwdriver.
Chapter 3 Installation and set up
8 000190-09 NIOX VERO®User Manual US
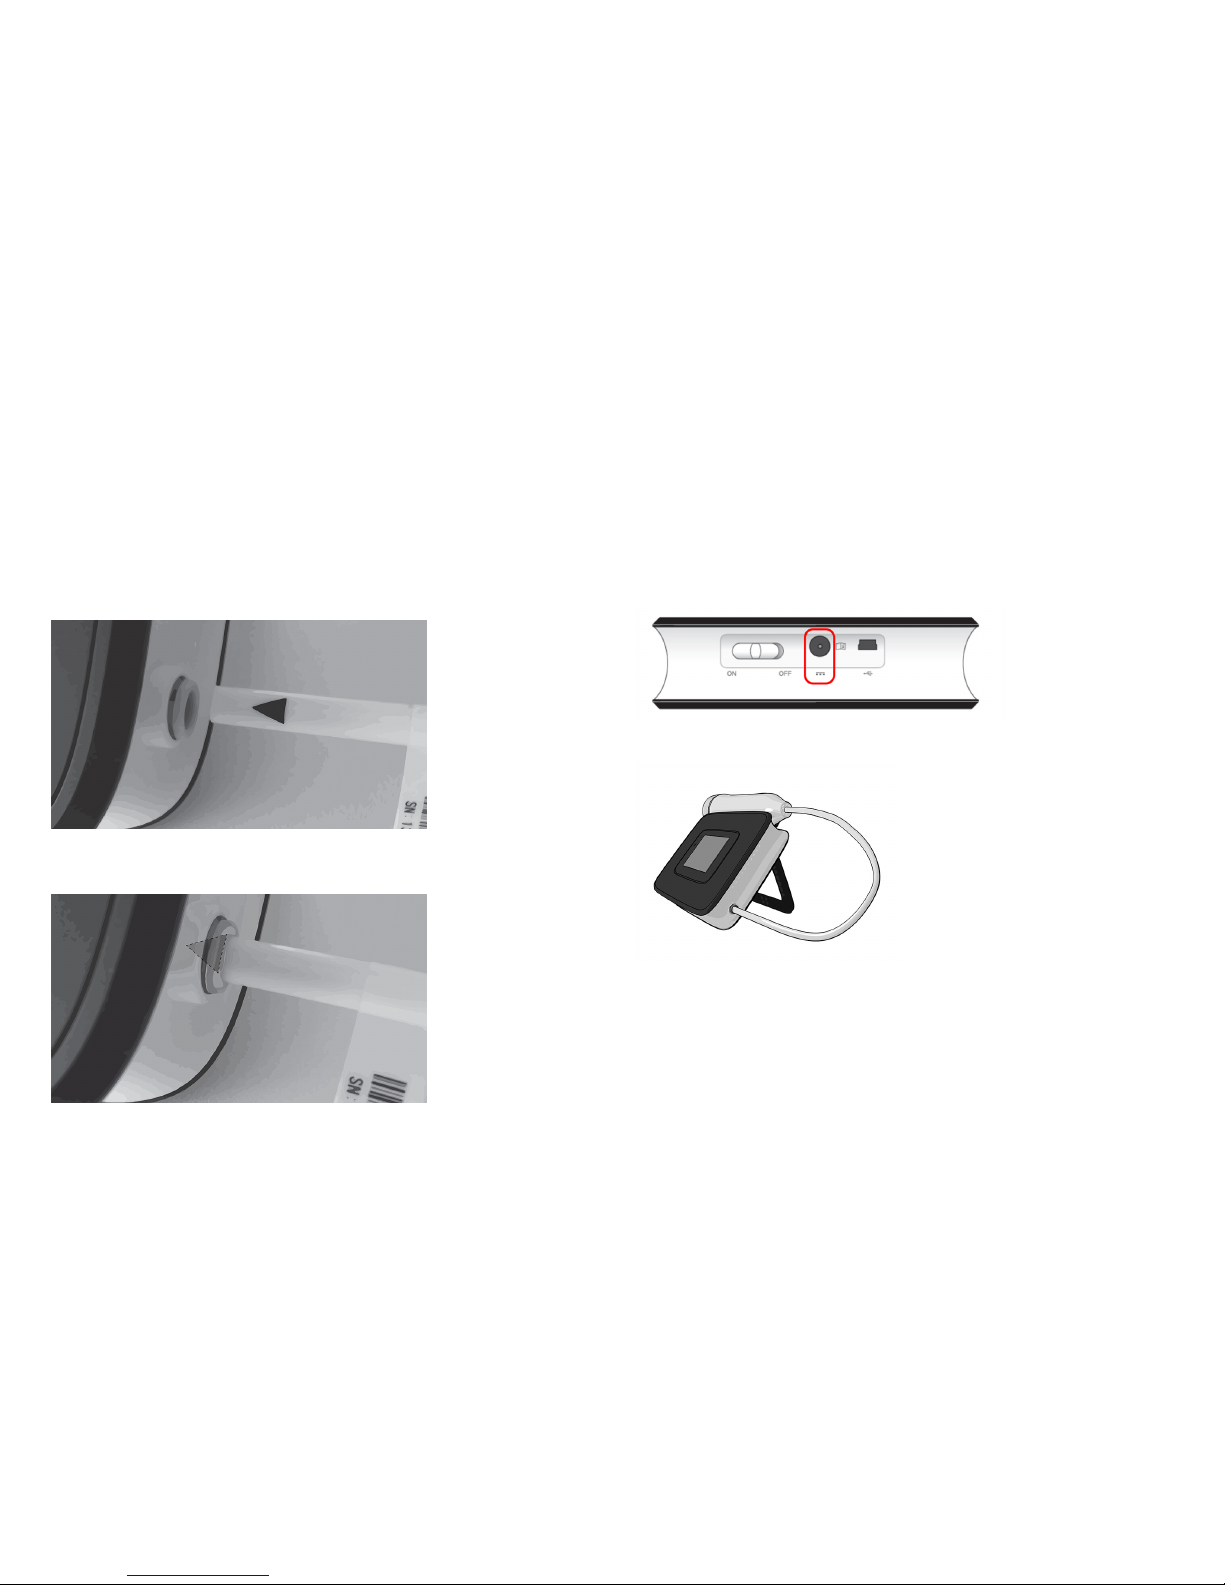
7. Take the breathing handle tube and push the end of the tube into the
breathing handle port slowly until the triangle is no longer visible.
The breathing handle and the patient filter are Applied parts Type B.
Note: Only attach the breathing handle supplied by Circassia.
Article No 12-1010
Note: Use care not to bend the handle tube.
Note: The triangle should not be visible when assembled correctly.
8. Attach the power adapter to the instrument and then to the power outlet.
When installing the unit, either use a socket outlet with a readily
accessible power switch, or connect the AC cord plug to an easily
accessible socket outlet near the equipment. If a fault should occur
during operation of the unit, use the power switch to cut the power
supply, or remove the AC cord plug.
Note: Only use the power adapter supplied by Circassia with the
instrument. Article No 12-1120.
9. Position the instrument with the stand folded out.

Chapter 3 Installation and set up
000190-09 NIOX VERO®User Manual US 9
Start the instrument by sliding the ON/OFF button to ON and allow the instru-
ment to start up and perform the internal check.
CAUTION! After inserting a new Sensor it is recommended to wait for three
hours with the instrument switched on before performing a measurement.
10. When the internal check is completed, the main menu appears.
11. Select the Settings button on the main menu.
12. Select Time and date.
This opens the Time and date setting view.
13. Select between 12h US and 24h ISO time and date
format.
14. Set time by pressing the button for hour. It changes
color to blue. Change the value to the current hour
by pressing the increase or decrease buttons.
Repeat this procedure for minute, year, month and
day.
15. Select OK to accept the changes and return to the main menu.
The Undo button closes the view without saving any changes.
16. Select the Settings button on the main menu.
17. Select the Breathing handle button. This opens the Breathing
handle view.
18. Select the Reset Breathing handle button. The breathing
handle information view opens to confirm the insertion of the
breathing handle.
19. Select the OK button to confirm insertion of a new breathing
handle. This sets the remaining measurements to 1000 and expiry
date one year from the current date.
The Return button returns to Settings view without registering
change.

Chapter 4 User interface
10 000190-09 NIOX VERO®User Manual US
4 User interface
4.1 Main and settings view
This section describes the main view, settings view, menus and symbols.
Buttons and symbols are further described on page 41.
4.2 Main View
(A) Status bar, (B) Instructive demonstration, (C) Patient ID,
(D) Start measurement button
4.2.1 Main menu
(a) QC Users (b) Demo, (c) Patient ID entry, (d) Settings
4.2.2 Status bar
(e) Battery status, (f) USB connection (in this position a Bluetooth
connection may be indicated instead), (g) QC warning, (h) Breathing handle
has expired or is about to expire - blinking symbol, (i) Instrument has expired
or is about to expire - blinking symbol, (j) Sound disabled, (k) Sensor status
and number of remaining measurements, (l) Temperature outside of
specification, (m) Humidity outside of specification, (n) Time

Chapter 5 Using NIOX VERO®
000190-09 NIOX VERO®User Manual US 11
4.3 Settings view
(A) Modes configuration - see page 15, (B) Volume settings - see page 15,
(C) Alert log see page 16, (D) Instrument & Sensor info - see page 17,
(E) QC log - see page 21, (F) Time and date settings - see page 15,
(G) Measurement log - see page 16, (H) Ambient measurement - see
page 15, (I) Breathing handle status and settings - see page 34,
(J) QC tester info - see page 21, (K) Return to main view
5 Using NIOX VERO®
5.1 Start the instrument from power save mode
If NIOX VERO®is in standby or sleep mode simply touch the display to
activate it.
5.2 Register patient ID (optional)
Note: If Patient ID is used, it must be entered before each measurement,
even if it is the same patient. Local Regulations on Patient
information privacy must be considered when using unique patient
identifiers.
1. Select the Register patient ID button from the main menu.
Chapter 5 Using NIOX VERO®
12 000190-09 NIOX VERO®User Manual US
2. Enter up to 12 characters (alpha or numeric).
3. Select the ABC-button to activate a keyboard with the alphabet.
The 123-button changes view back to the numerical keyboard.
4. Select OK button to confirm the registration.
Use the Erase button to erase.
Use the Undo button to undo a registration.
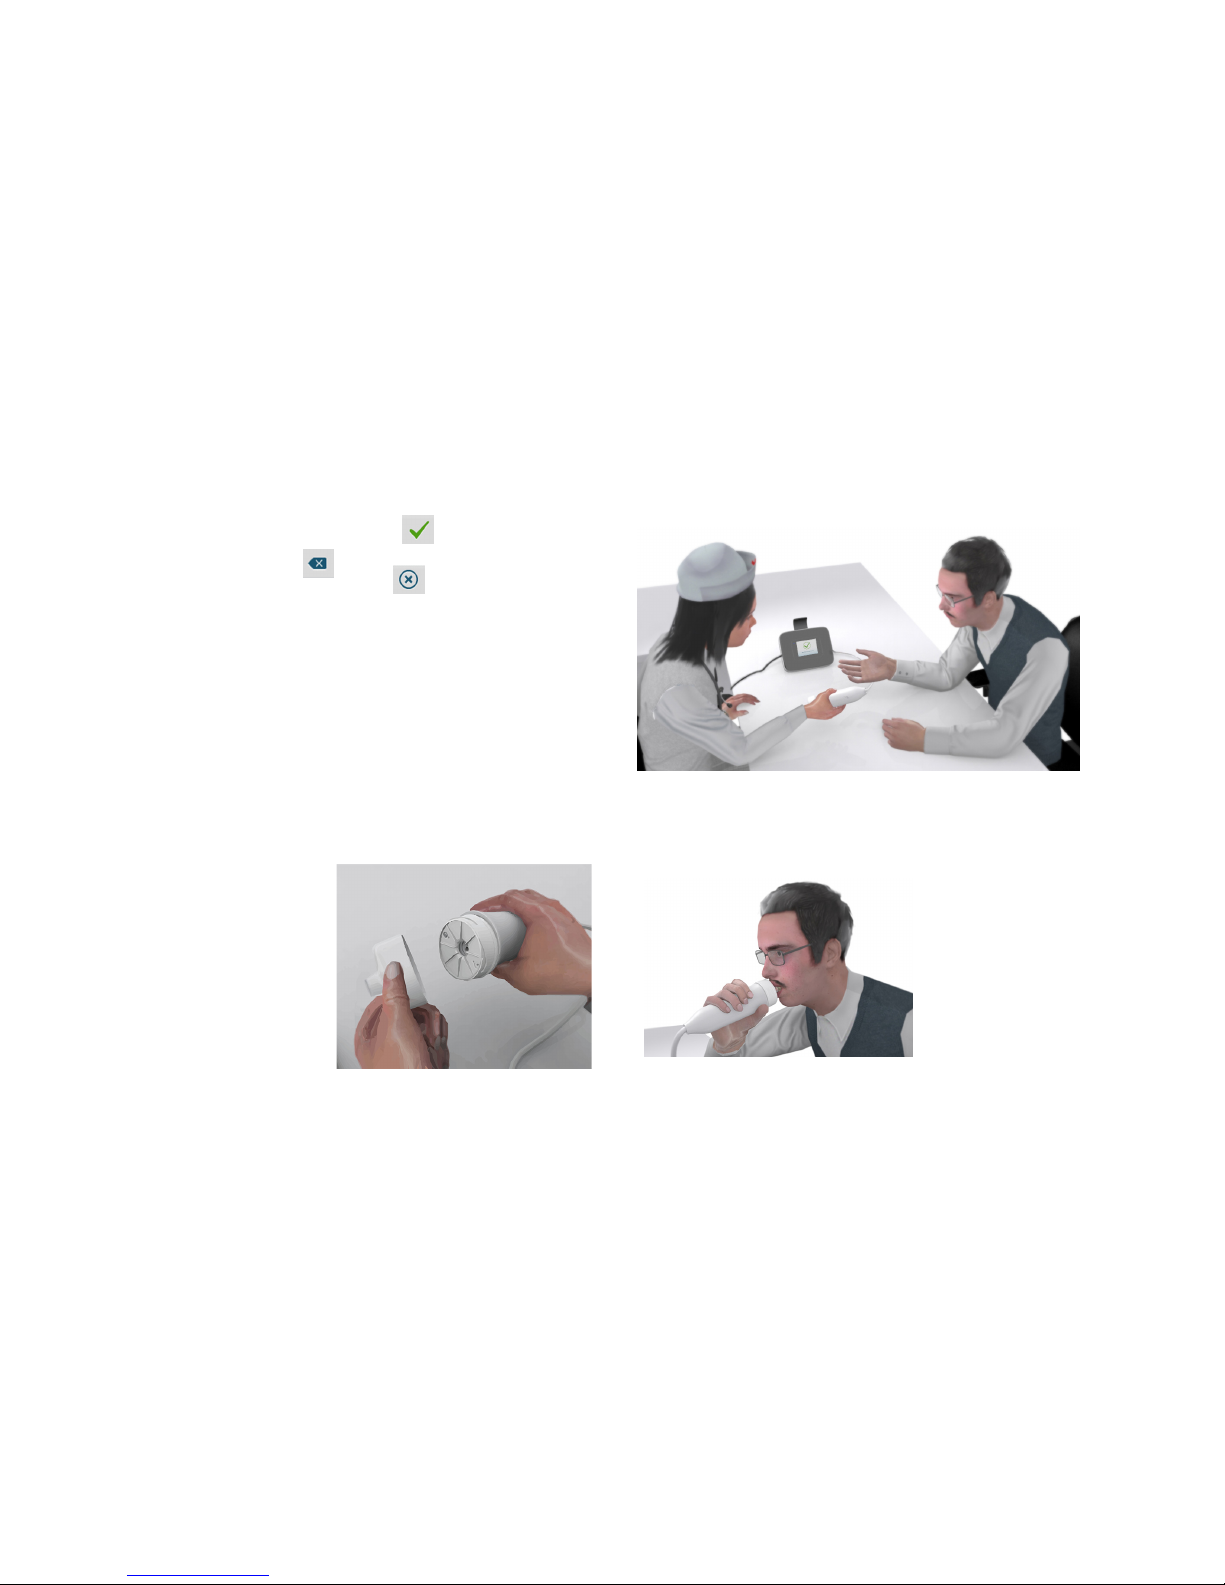
5.3 Measure FeNO
Verify proper preparations before performing a measurement with
NIOX VERO®. A basic preventive inspection is recommended before each
use (see page 34).
WARNING! The patient filter is for single use only.
5.3.1 Preparation for measurement
1. Lift the breathing handle from the holder and remove the handle cap.
2. Obtain a new patient filter. Attach the patient filter to the breathing
handle. Make sure to twist the patient filter in place until it clicks.
Note: Store the patient filters in the
original box prior to use.
Note: Do NOT use sharp objects to
open the packaging for the
patient filter. Do not touch the
filter membrane.
Note: Patient filters should be used
immediately after opening.
Note: There is a risk of leakage if the
filter is not correctly attached to the breathing handle and this may
result in incorrect measurement values.
Note: Do not switch OFF the instrument during measurement procedure.
3. Give the breathing handle to the patient and guide the patient to provide
a breath sample as described in the next section.
5.3.2 Measurement
1. Empty the lungs by breathing out thoroughly.
2. Close the lips around the mouthpiece on the patient filter so that no air
leakage occurs.
3. Inhale deeply through the patient filter to total lung capacity. During
inhalation, the cloud on the display moves upwards.

Chapter 5 Using NIOX VERO®
000190-09 NIOX VERO®User Manual US 13
Note: The procedure is activated by inhaling air from the handle or by
pressing the start measurement button.
4. Exhale slowly through the filter while keeping the cloud within the limits as
indicated on the display (the white lines).
5. The instrument display and audio signals guide the user to the correct
exhalation pressure.
A continuous sound indicates correct pressure with a frequency proportional
to the pressure.
An intermittent high frequency sound - too strong pressure
An intermittent low frequency sound - too weak pressure
Exhalation with:
Pressure correct Pressure too strong Pressure too weak
6. Exhale until the cloud has passed the flag.
7. The instrument will analyze the sample and generate a result in
approximately one minute.
Note: Do not exhale or inhale through the patient filter during the analysis
process.

Chapter 5 Using NIOX VERO®
14 000190-09 NIOX VERO®User Manual US
The result is then displayed: (A) Patient ID - if applicable, (B) FeNO value in
ppb (parts per billion), (C) Measurement mode,
(D) Measurement sequence number, (E) OK - returns to main view.
5.4 Demonstration mode
To help professionals in guiding patients, the instrument contains three ani-
mated demonstrations with visual and audio guides of the different stages of
a measurement procedure.
1. Select the Animation button on the main menu.
2. Select which animation to use Cloud, Balloon or Meter
3. Select the Demo button.
4. Select the forward button to move to the following sequence.
5. The undo button closes the demonstration and returns the animation
select.
6. Select OK button to confirm the changes.
7. The undo button returns to the main menu without saving changes.
a. Inhalation
through the
breathing
handle.
b. Exhalation
through the
breathing
handle with
correct
pressure.
c. Exhalation
through the
breathing
handle with
pressure too
weak.
d. Exhalation
through the
breathing
handle with
pressure too
strong.

Chapter 5 Using NIOX VERO®
000190-09 NIOX VERO®User Manual US 15
5.5 Measure ambient NO
Note: An ambient measurement may be requested by customer support
during troubleshooting.
Note: An ambient measurement is counted as one measurement on
NIOX VERO®Sensor and the instrument.
1. Attach a patient filter to the breathing handle until it clicks into place.
2. Select the Settings button on the main menu.
3. Select Ambient Measurement button.
4. Select the Start measurement button.
5. The progress bar is visible until the measurement is finished and the
result is displayed: Ambient measurement value (in ppb), measurement
mode, and measurement sequence number.
5.6 Change settings
5.6.1 Change time and date
1. Select the Settings button on the main menu.
2. Select the Time and Date button.
For more details refer to page 9.
5.6.2 Change sound volume
1. Select the Settings button on the main menu.
2. Select the Sound button.

Chapter 5 Using NIOX VERO®
16 000190-09 NIOX VERO®User Manual US
3. The settings for sound and volume opens.
4. Select increase/decrease to adjust volume.
5. The volume bar indicates the set volume.
6. Select the OK button to save settings and return to the Settings view.
The Undo button closes the view without saving changes.
7. The status bar indicates mute status when the sound volume is
set to zero.
5.6.3 View measurement logs
All measurement results are stored in the instrument and can be viewed at
any time.
1. Select the Settings button on the main menu.
2. Select the Patient measurements log view button.
3. The selected log will display the following:
(A) Patient ID - if defined, (B) FeNO value, (C) Measurement date and time,
(D) Measurement mode, (E) Return to settings, (F) Backward, (G) Forward,
(H) Measurement sequence number, (I) QC Warning, only shown if the daily
QC measurement is not performed or if the results from the QC are outside
limits
4. Browse through the measurement logs using the backward and
forward buttons.
5. Select the Return button to return to settings.
5.6.4 View alert logs
Alerts are stored in the instrument and can be viewed at any time.
The alert codes are for Circassia Technical Support use.
1. Select the Settings button on the main menu.
2. Select Alert log button.

Chapter 5 Using NIOX VERO®
000190-09 NIOX VERO®User Manual US 17
(A) Alert code (for customer support purpose only), (B) Return - returns to
previous view, (C) Date and time of alert, (D) Scroll list (blue), (E) Backward
(F) Forward
3. Select the Return button to return to settings.
5.6.5 View instrument information
Detailed information about the instrument and Sensor can be viewed.
1. Select the Settings button on the main menu.
2. Select the Instrument button.
3. This opens the Instrument information view displaying the following:
(A) Numbers of remaining measurements on the instrument, (B) Instrument
serial number, (C) Software version number, (D) Instrument expiration date,
(E) Return to settings, (F) Numbers of remaining measurements on the
Sensor, (G) Sensor serial number, (H) Sensor expiration date, (I) Enter
configuration code (only used on request from Circassia)
5.7 Turn off the instrument
1. To turn off the instrument, slide the ON/OFF button to OFF.

Chapter 5 Using NIOX VERO®
18 000190-09 NIOX VERO®User Manual US
Note: Before transportation remove the used patient filter (if still attached)
and attach the handle cap.
Note: Always use a closed bag or case (NIOX VERO®bag recommended)
for transportation and storage of the instrument.
5.8 External Quality Control (QC) procedure
The external Quality Control is one of the procedures that ensures the sys-
tem is operating within the specifications.
Note: The Quality Control function must always be activated as a daily QC
measurement is mandatory when the instrument is clinically used.
A QC icon in the status bar on the screen indicates that a daily external
QC assessment is needed or that there are not any currently qualified
QC individuals who have completed their initial 4 qualification attempts.
The external Quality Control consists of two parts. One positive control from
a qualified staff member with a stable FeNO value providing a normal biolog-
ical FeNO sample and a negative control consisting of a NO free gas sample
automatically generated from ambient air.
NIOX VERO®will allow for one daily QC measurement that will not affect the
number of remaining tests on the NIOX VERO®Sensor. (During the first 20
days of instrument start-up, a maximum of seven QC testers can be qualified
without impact to the number of remaining tests on the Sensor.)
Note: It is also possible to store the QC users in a database, see chapter
“6.7.6 Perform QC measurement” for information.
5.8.1 Selection and qualification of QC testers
A minimum of one individual (two individuals are recommended) needs to
qualify for this procedure. If possible, identify one or two individuals as a
back-up.
Identify the staff members who will perform the Quality Control and meet the
following criteria:
• Over 18 years of age.
• No ongoing cold or known airway disease.
Other manuals for NIOX VERO
2
Table of contents


