CIRCLE FITNESS E7 User manual

E7 Elliptical
Display Type: LED Console
ALWAYS MOVING FORWARD
Owner’s Manual


TABLE OF CONTENTS
Introduction
___________________________________________________________________ 1
1.
Safety Information
____________________________________________________________
2
1.1.
Important Safety Notes......................................................................................................................... 2
1.2.
Serial Number Location and Specifications ......................................................................................... 3
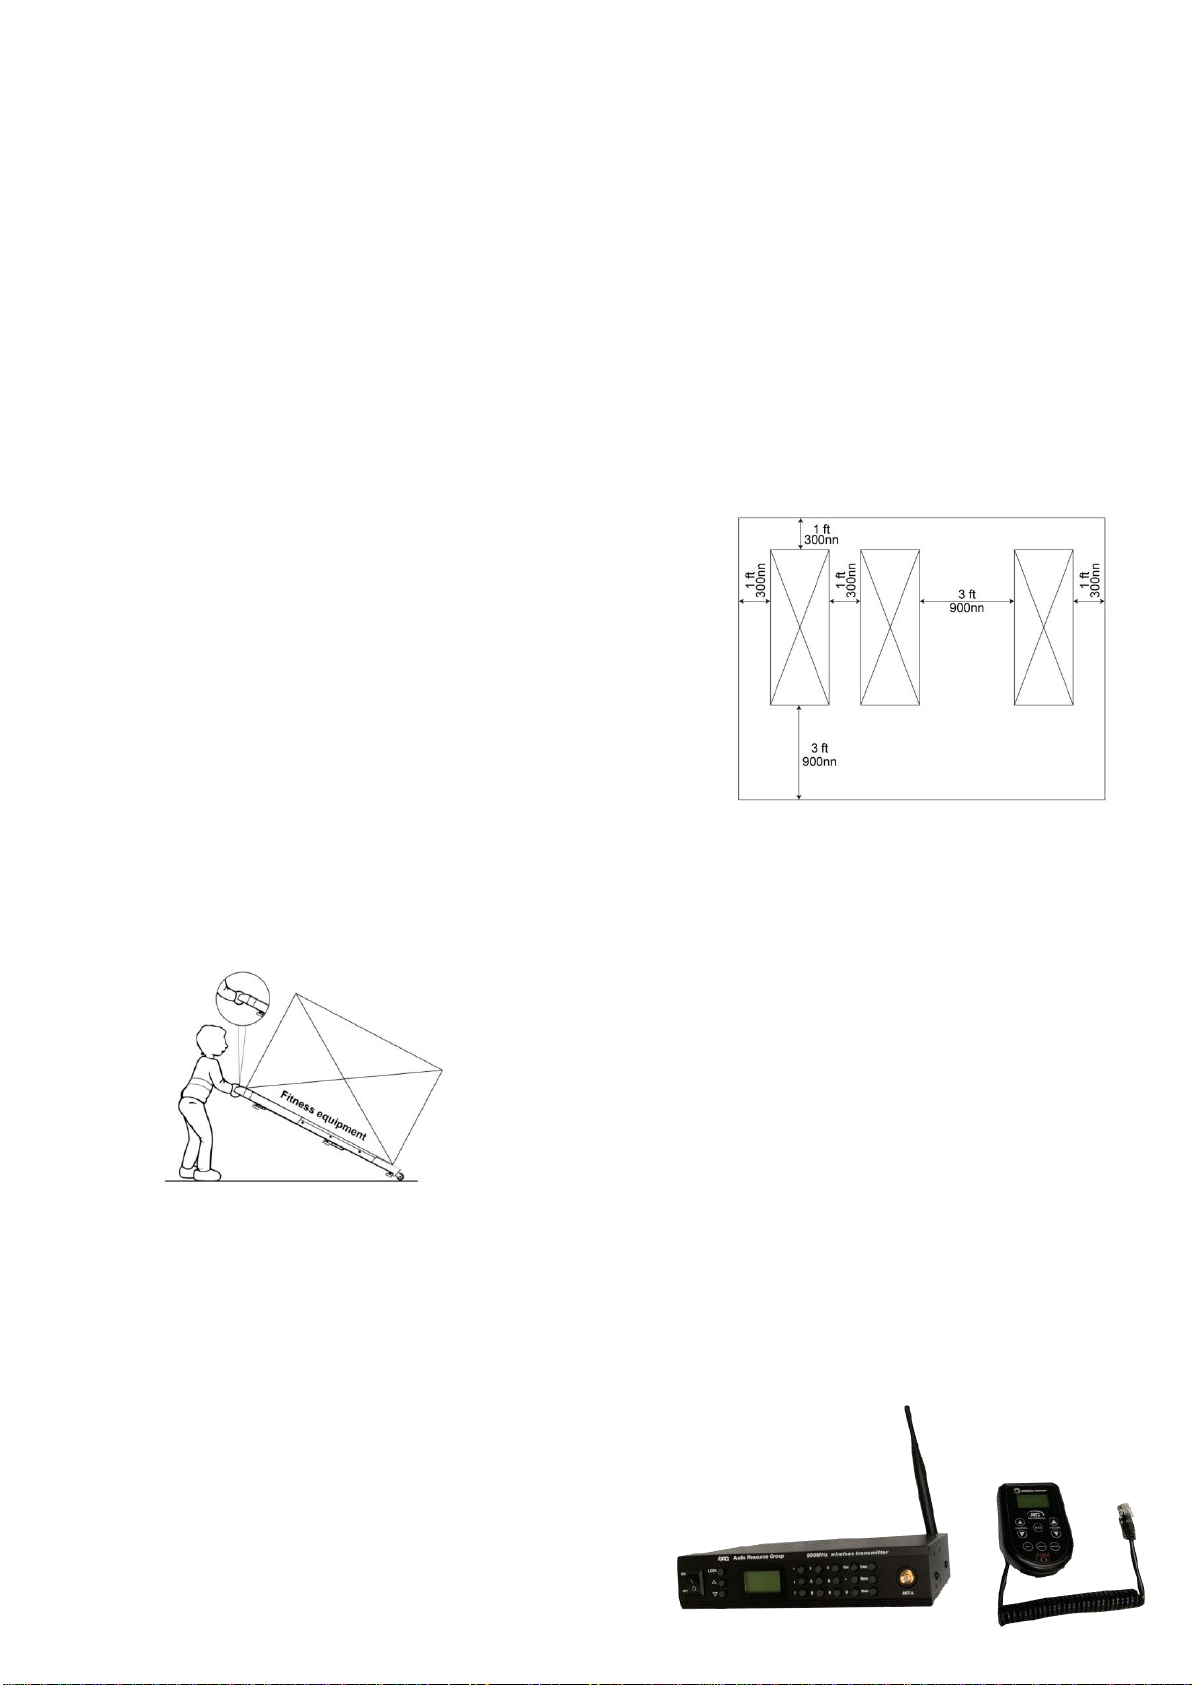
1.3. Equipment Placement and Spacing
........................................................................................................ 3
1.4. Transportation ...................................................................................................................................... 4
1.5. Television Connection Options............................................................................................................. 4
1.6. Grounding Instructions and Power Requirements ............................................................................... 5
2.
Preventative Maintenance
____________________________________________________________
5
2.1.
Preventative Maintenance Schedule.................................................................................................... 5
2.2.
Check for Damaged Parts.............................................................................................................……6
3. Regular Equipment Maintenance __________________________________________________________6
3.1.
Follow the above checking schedule to ensure proper operation ....................................................... 6
3.2. Care and Maintenance Instructions ..................................................................................................... 7
4.
Assembly
____________________________________________________________________
7
4.1. Specifications
...........................................................................................................................................................
7
4.2.
Machine Overview
................................................................................................................................. 8
4.3. Unpacking the E7 Elliptical
......................................................................................................................................
8
4.4 Elliptical Assembly........................................................................................................................................11
5. Engineering Mode Settings
___________________________________________________________________
13
5.1.
Engineering Mode 1
............................................................................................................................. 13
5.2. Engineering Mode 2 ........................................................................................................................13
5.3. Engineering Mode 3....................................................................................................................................13
5.4. Remaining Battery Capacity Checking...............................................................................................14
6.
Operation
______________________________________________________________________
14
6.1. Heart Rate System
............................................................................................................................... 14
6.2. Heart Rate Handlebar (Standard)..............................................................................................................15
6.3. Chest Belt (Optional).............................................................................................................................….15
7.
Console Operation _______________________________________________________________15
7.1. Console of the EP7Elliptical
..............................................................................................................................
15
7.2. Keypad Instruction ............................................................................................................................. 16
7.3. Program Control................................................................................................................................. 16
7.4. P1~ P7 Program Profile ..................................................................................................................... 18
7.5. Watt Table.......................................................................................................................................... 22
8. Error Code and Troubleshooting__________________________________________________________23

INTRODUCTION
Dear Customer,
Thank you for selecting the Circle Fitness E7 Elliptical. The E7 Elliptical provides an
impressive selection of features designed to make your workouts more effective and
enjoyable.
For your benefit, read this manual carefully before you use the elliptical.
If you have questions after reading this manual, please contact us at the telephone and email
addresses shown below. To help us assist you, note the product model number and serial
number before contacting us. The model number and the location of the serial number decal
are shown on the front cover of the elliptical.
No.12, 6th Road, Industrial Park,Taichung, Taiwan
Tel: +886-4-2359-1009
Fax: +886-4-3505-5801
Website: http://www.circlefitness.com/
1

1.0 SAFETY INFORMATION
IMPORTANT: Please read all instructions and warnings before assembly and operation.
To assure the correct use of the product, basic safety measures should always be followed including the warnings
and cautions listed in this Owner’s Manual.
IMPORTANT: It is essential that this equipment is only used indoors in a
climate-controlled room.
W
ARN
ING:
Only one person at a time should use this equipment. If dizziness, nausea, chest pains ,or any
other abnormal symptoms are experienced while using this equipment then please stop the
workout at once.
WARNING: Always use this equipment on a clear and level surface. Do NOT use outdoors or near water.
WARNING: Do NOT drop or insert any object into any openings.
WARNING: Do NOT wear loose clothing or jewelry. This equipment has moving parts. Do NOT put fingers or
other objects into the moving parts.
WARNING: Before using this equipment to exercise, always do stretching exercises first, to properly warm up.
WARNING: It is recommended to replace defective components immediately and keep the equipment out of
use until repairs have been made by an approved technician.
WARNING: Always keep children under age 14 and pets away from the equipment.
WARNING: Please consult your physician before starting a workout or a training program. It is best to have
your doctor review your training and diet programs first so that they can recommend the best
workout routine for you.
WARNING: Make sure all screws and nuts are securely tightened before using this equipment. Periodic
maintenance is required on all exercise equipment to keep it in good condition.
WARNING: Keep your back straight while using this equipment; do not arch your back.
1.1. Important Safety Notes
WARNING: Incorrect/excessive training can cause health injuries. Stop using the equipment when feeling
uncomfortable.
WARNING: The heart rate sensor is not a medical device. Numerous factors, including the
us
er
’
s
movement may
affect
t
he
acc
ura
c
y
of
t
he
heart rate readings
.
The heart rate sensor is intended only as an exercise aid
in determining heart rate trends in general.
WARNING: This equipment should not be used by any person weighing more than 400lbs. (182kgs).
SAFETY SYMBOLS USED IN THIS MANUAL
WARNING
Indicates a potentially hazardous situation which, if not avoided, could result in death
or serious injury.
CAUTION
Indicates a potentially hazardous situation which, if not avoided, may result in minor or
moderate injury to the user or patient or damage to the equipment or other property.
DANGER
Indicates a high probabilty that death, severe bodily injury or major property damage
could result.
2

WARNING: Do not hold the handlebars or the console arms when mounting, dismounting, or using the equipment.
Use the handlebars for stability only.
WARNING: Do not leave equipment unattended when plugged in. Turn all controls to OFF and unplug from outlet
when not in use and before removing or replacing parts.
WARNING: Close supervision is necessary when the equipment is used by, on, or near children, invalids, or
disabled persons.
WARNING: Use the equipment only for its intended use as described in this manual. Do not use attachments not
recommended by the manufacturer.
WARNING: Never use the equipment if it has a damaged cord or plug, if it is not working properly, if it has been
dropped or damaged, or has been dropped into water. Return the equipment to a service center for
examination and repair.
WARNING: Do not carry the equipment by the supply cord or use the cord as a handle.
WARNING: Keep the cord away from heated surfaces.
WARNING: Never use the equipment with the air openings blocked. Keep the air openings free of lint, hair, and the
like.
WARNING: Do not use where aerosol (spray) products are being used or where oxygen is being administered.
WARNING: Only connect the equipment to a properly grounded outlet. See Grounding Instructions.
WARNING: This equipment is intended for commercial use.
WARNING: Store the safety key in a secured location while not in use and keep away from children.
CAUTION: Ensure that the power cable is not pinched and that no-one can trip over it.
CAUTION: Never touch the moving belt with your hands. Also ensure that there are no objects close to the belt or
the rollers which could be pulled into it thus causing injury or damaging the unit itself.
CAUTION: Repairs on the electrical components in the unit should be conducted by qualified technicians only.
DANGER: To reduce the risk of electric shock, always unplug this appliance from the electric outlet at once after
using and before cleaning.
Waste Disposal
Products are recyclable. At the end of its useful life please dispose of this
article correctly and safely (local refuse sites).
1.2 Serial Number Location and Specifications
1.2.1The serial number has 10 characters. The location of the serial
number is shown below.
1.3 Equipment Placement and Spacing
1.3.1 Location
Before assembling the unit, verify the chosen site meets the following criteria:
Area is well lit and well ventilated.
Surface is structurally sound and properly leveled.
Place in a location away from direct sunlight. The intense UV light can cause discoloration on the
plastics.
Locate your elliptical in an area with cool temperatures and low humidity.
3

Do not install, use, or store the elliptical in an area of high humidity, such as in the vicinity of a steam
room, sauna, indoor pool, garage, covered patio, near water or outdoors. Exposure to extensive water
vapor, chlorine and/or bromine could adversely affect the electronics as well as other parts of the unit.
Place the equipment on a level surface. Do NOT place it in any area that will block any vents or air
openings.
1.3.2 Spacing
Free area for access to the unit and emergency dismount. Minimum clearance is 12 inches (0.3 meters)
on the sides of the unit and 36 inches 0.914 meters) behind the unit.
Adjacent units may share the free area.
The below minimum spacing recommendations are based on a combination of the ASTM (U.S.) voluntary
standards and EN (European) regulations as of October 1, 2012, for access, passage around, and
emergency dismount:
ASTM standards are voluntary and may not reflect
current industry standards. The actual area for access,
passage around, and emergency dismount is the
responsibility of the facility. The facility should consider
the total space requirements for training on each unit,
voluntary and industry standards, and any local, state,
and federal regulations. Standards and regulations are
subject to change at any time.
1.4 Transportation
1.4.1 To move the equipment, carefully lift the rear end by pushing down on the 2 front transport wheels (Figure
1.4.1-1). Carefully steer the equipment to another location.
1.5 Television Connection Options
There are multiple options for presenting TV signal with Circle Fitness equipment. Here are some options available
to your facility.
1.5.1 Support Gym‘s Audio System by using CSAFE port (OPTIIONAL)
We can use the Tx and Rx shown in below photo to support Gym’s Audio system. It gets
power from the CSAFE port.
Tx and Rx shown in below photo to support Gym’s Audio system
IMPORTANT: Be careful when moving this equipment, as it is heavy
and awkward. If you do not feel comfortable moving the unit by
yourself, please get help.
NOTE: The transport wheels are designed for indoor use only and
should not be used to move the unit over rough surfaces such as
concrete or asphalt.
Figure 1.4.1-1
4

1.6 Grounding Instructions and Power Requirements
1.6.1 Facility Power Information
2.0 Preventative Maintenance
2.1 Preventative Maintenance Schedule
2.1.1 Daily Maintenance Items
2.1.1.1 Look and listen for loose fasteners, unusual noises, and any other indications that the equipment may need
service.
2.1.1.2 Clean the elliptical trainer before and after each use, including:
2.1.1.3 Use a damp, soft cloth with water or mild liquid detergent to clean all exposed surfaces. DO NOT use
ammonia, chlorine, or any acid based cleaners.
2.1.1.4 Keep the console display free of fingerprints and salt build up caused by sweat.
2.1.1.5 Frequently vacuum the floor beneath the unit to prevent the accumulation of dust and dirt which can affect
the smooth operation of the unit.
2.1.2 MONTHLY MAINTENANCE ITEMS
2.1.2.1 Inspect the console, handrails, link arms, pedal arms, and pedals for damage.
2.1.2.2 Check the link/pedal arms for loose joints. Tighten hardware as needed.
2.1.2.3 Check pedal motion and stability.
2.1.2.4 Adjust leveling feet if the equipment rocks or wobbles.
2.1.2.5 Remove the Rear Shroud and clean the rollers/tracks to prevent flat spots caused by dust/dirt.
2.1.3 QUARTERLY MAINTENANCE ITEMS
2.1.3.1 Remove the Front Shrouds and check belts for damage, alignment, and proper tension.
Product
Line
Voltage
(V)
Line
Frequency
(Hz)
Current
(RMS
Amp)
Circuit
Configuration
Outlet
Max Power
Dissipation
(Watts)
E7/ B8/ R8 (15.6”)
(Touchscreen)
120
50-60Hz
5
Dedicated
NEMA 5-15
600
E7/ B8/ R8 (10”T)
(Touchscreen)
Self-generator
NA
NA
NA
NA
NA
NA
E7/ B8/ R8 (8”)
(Touchscreen)
120
50-60Hz
5
Dedicated
NEMA 5-15
600
E7/ B8/ R8 (LED)
Self-generator
NA
NA
NA
NA
NA
NA
E7/ B8/ R8 (15.6”)
(Touchscreen)
220
50Hz
5
Dedicated
NEMA 6-15
1100
E7/ B8/ R8 (10”T)
(Touchscreen)
Self-generator
NA
NA
NA
NA
NA
NA
E7/ B8/ R8 (8”)
(Touchscreen)
220
50Hz
5
Dedicated
NEMA 6-15
1100
E7/ B8/ R8 (LED)
Self-generator
NA
NA
NA
NA
NA
NA
5

2.2 Check for Damaged Parts
3.0 REGULAR EQUIPMENT MAINTENANCE
3.1 Follow the above checking schedule to ensure proper operation of this equipment.
3.1.1 Do Not use any equipment that is damaged or has worn or broken parts.
3.1.2 Maintain labels and name plates. Do not remove labels for any reason. They have essential information. If
unreadable or missing, contact Circle Fitness Systems for and replacement at
www.service@circlefitness.com
3.1.3 Maintain all equipment. Preventative maintenance is the key to smoothly operating equipment. Equipment
needs to be inspected at regular intervals. Defective components must be kept out of use until they are repaired.
Ensure that any person(s) adjusting or performing maintenance or repair of any kind is qualified to do so.
Item
Parts
Daily
Weekly
Monthly
Season
6 Months
1
Console Screws
Visual Inspection
(Screws loose)
2
Exposed all linkage
tubes
Wipe
Visual Inspection
(Screws loose)
Visual Inspection
3
Pedal
Wipe
Visual Inspection
(Screws loose)
Visual Inspection
(cracks)
4
Power Cord
Visual Inspection
5
Overlay
Wipe
Visual Inspection
(cracks)
6
Fixed Handlebar
Wipe
Visual
Inspection
(Screws loose)
7
Fixed Handlebar(TPR )
Wipe
Visual Inspection
(cracks)
8
Moving handlebar
Wipe
Visual
Inspection
(Screws loose)
9
Moving handlebar (TPR )
Wipe
Visual Inspection
(cracks)
10
Fixed Handlebar TPR
Cap and heart rate plate
Wipe
Visual
Inspection
11
Drive Belt x 2pcs (Main
pulley and small pulley)
Visual
Inspection
(Deviation and
cracks)
12
Water bottle holder
Wipe
13
Ramp (Roller and
dust-proof cover)
Wipe +Visual
Inspection
(obstacles)
Visual Inspection
(Roller worn out)
14
All cosmetic plastics
Wipe
15
Pivot shaft underneath
pedal
Lubricate
location
between shaft &
bearing with
Silicone grease
Lubricate location
between shaft &
bearing with
Silicone grease
6

3.2 Care and Maintenance Instructions
3.2.1 To maximize the life span of the equipment, and minimize down time, all equipment requires regular
cleaning, and maintenance items performed on a scheduled basis. This section has detailed instructions on
how to perform these items, the frequency of which they should be done, and a check list to sign off each
time service is completed for a specific machine. Some basic tools and supplies will be necessary to
perform these tasks which include (but may not be limited to):
Metric Allen wrenches
Phillips’s head screw driver
Adjustable wrench
Torque wrench (capability to read foot pounds and inch pounds)
Lint free cleaning cloths (microfiber)
Teflon based spray lubricant such as "Super Lube" or other approved products.
Mild water soluble detergent such as "Simple Green" or other approved products
Vacuum cleaner with an extendable hose and crevasse tool attachment.
4.0 ASSEMBLY
4.1 Specifications
Technical Specifications
Stride Length
20" (500mm)
Pedal Spacing
2.5" (64 mm)
Step Up Height
12" (320mm)
Resistance Level
25 Levels
Max. User Weight
400lbs. (182kg)
Features
Display Type
LED 7 Segments with Dot-matrix-white light
Display Feedback
NO
Programs
Yes
Hand Pulse
Yes
Heart Rate Receiver
Yes
Quick adjustment
Yes (Level)
Chest Belt
No (Sold separately)
Dimensions
Diameters (L x W x H) (approx.)
2040 (L) x 680 (W) x 1810 (H) mm
Unit Weight (approx.)
120.6 kgs (265.9 lbs)
7

4.2 Machine Overview
4.3 Unpacking the E7 Elliptical
4.3.1 Inside the carton includes the following parts:
4.3.1.1 Inside the accessory pack includes the following parts.
(1) M4 pan head Screw (8 PCS) (2) M3 pan head Screw (2 PCS)
Upper Body Arm
Heart Rate Handlebar
Transportation Wheel
Bottle Holder
Console Set
Upper Body Arm
Pedals
Console
Accessory Pack
Console Mast Cover
Console Mast and Fixed/
Moving Handlebar Assembly
EP7 Main Frame Body
Left/ Right Arms’Cover
8

(3) M5 pan head hex Screw (4 PCS) and (4) Manual (5) Lubrication
M3 Phillips flat head Screw (2 PCS)
(6) Tools
Allen Wrench (3mm) / Allen Wrench (6mm) / Allen Wrench (5mm) / Wrench (13mm)
4.3.2 Prior to opening the shipping box, first you need to cut the fiberglass straps from around the wrapped carton
and remove the upper carton cover.
4.3.3 Remove the accessory pack from the container.
9

4.3.4 Remove the
Console Mast and Fixed/ Moving Handlebar Assembly
form the packaging.
4.3.5 Remove the Rear Styrofoam from the packaging.
CAUTION: DO NOT drop the accessories during this removal process.
4.3.6 Remove the middle and front Styrofoam from the packaging.
Styrofoam
Styrofoam
Styrofoam
10

4.3.7 With the assistance of at least one other person, lift the E7 Elliptical up. Then finish the removal.
4.4 Elliptical Assembly
4.4.1 Take out the Console Mast Cover from the Styrofoam packaging.
4.4.2 Combine the Console Mast Cover with the Console
Mast and Fixed/ Moving Handlebar Assembly, and
install them on the Elliptical’s main frame body.
4.4.3 Take out the console and Left/ Right Arms’ Cover, and use the screws in accessory pack, to install on
the machine.
Remove
M4 pan head Screw (8 PCS) + M3 pan head Screw (2 PCS)
11

4.4.4 Remove the console box from the packaging.
4.4.5 Use the screws in accessory pack, to secure the Console to the
Console Mast and Fixed/ Moving Handlebar Assembly.
4.4.6 E7 Elliptical assembly is now complete.
4.4.7 With the assistance from another person to hold the Console,
connect the connectors from the Console Mast to the Console.
There are (3) cables which need to be connected as shown
below.
1. Console cable
2. Resistance control cable
3. Grounded cable
Step 1:
Step 2:
M5 pan head hex Screw (4PCS) and M3 Phillips flat head Screw (2PCS)
12

5.0 Engineering Mode Setting
5.1 Engineering Mode 1
5.1.1 Test Mode.
5.1.1.1 In IDLE mode, first press “PAUSE/STOP” and then press “Start” for 3 seconds.)
5.1.1.2 All ON and OFF flashing mode: the window is all ON and OFF flashing, press START to enter the next mode.
5.1.2 LED Scanning Mode
5.1.2.1 For production testing of software and hardware, press START to enter the next mode.
5.1.3 LED Indicator Scanning Mode
5.1.3.1 For production testing of software and hardware, press START to enter the next mode.
5.1.4 Keyboard Test
5.1.4.1 The matrix window displays “KEY”, press each key to display the information as follows: (press START to
enter the next mode)
5.1.5 IO Test Mode
5.1.5.1 Detection of heartbeat and RPM, press START to exit.
5.2 Engineering Mode 2
5.2.1 Machine Information
5.2.1.1 In IDLE mode, first press “PAUSE/STOP” and then press “LEVEL ▲” for 3 seconds.
5.2.2 Software Version
5.2.2.1 HEART RATE window displays E21, DOT MATRIX displays [VER X.XX] mobile string, press START to
enter the next setting.
5.2.3 Model
5.2.3.1 HEART RATE window displays E22, DOT MATRIX displays [E7], press START to enter the next setting.
5.2.4 Total Used Time
5.2.4.1 HEART RATE window displays E23, DOT MATRIX displays [TOTAL HOURS] mobile string, TIME window
displays total hours, display range: 00:00 (minutes: seconds) ~ 9999 (hours), added when overflow 3 digits
in INCLINE window, press START to enter the next setting.
5.2.5 Total Used Distance
5.2.5.1 HEART RATE window displays E24, DOT MATRIX display: [TOTAL DISTANCE KM] in metric system /
[TOTAL DISTANCE MI] mobile string in imperial system, total distance displayed in TIME window, 0~9999,
add INCLINE window when overflow 3 digits, press “START”button to exit to IDLE.
5.2.6 Clear TOTAL HOURS and TOTAL DISTANCE
5.2.6.1 PAUSE/STOP + START for 5 seconds.
5.3 Engineering Mode 3
5.3.1 Custom Setting
5.3.1.1 In IDLE mode, first press “PAUSE/STOP” and then press “LEVEL ▼” for 3 seconds.
5.3.2 Unit Setting
5.3.2.1 HEART RATE window displays E31, DOT MATRIX displays [UNIT METRIC] mobile string, you can press
▲ or ▼ to modify it to [UNIT IMPERIAL], press START to enter the next setting.
5.3.3 Language Setting
13

5.3.3.1 HEART RATE window displays E32, DOT MATRIX displays [ENGLISH] mobile string, you can press ▲ or
▼ to modify it to “NEDERLANDS” to “FRANCAIS” to “DEUTSCH” to “ITALIANO” to “ESPANOL” to
“POLAND”to “Portuguese”to “SWEDISH”to “RUCCKIJJ”. Press START to enter the next setting.
5.3.4. Maximum Time Setting
5.3.4.1 HEART RATE window displays E33, DOT MATRIX displays [MAXIMUM WORKOUT TIME] mobile string,
TIME window displays 99:00 flashing, you can press ▲ or ▼ to adjust, the adjustment range is
10:00~99:00, press Start to Go to the next setting. (Limit the maximum use and settable time).
5.3.5. FAN Button Setting
5.3.5.1 HEART RATE window displays E34, DOT MATRIX displays [FAN OFF] mobile character string, you can
press ▲ or ▼ to adjust OFF/ON. Press the START button to exit and return to IDLE.
5.4 Remaining Battery Capacity Checking.
5.4.1 Remaining Battery Capacity on the “Level Window” Test Operation
5.4.2 Use the following instructions to test the full resistance range of the elliptical for proper operation.
5.4.3 Hold the handlebars to steady yourself while stepping into the pedals and then being peddling.
5.4.4 Verify the console display does illuminate.
5.4.5 Run through the full resistance range.
5.4.4.1 Press the (Resistance level +) button until the equipment reaches its highest load.
5.4.4.2 Press the (Resistance level -) button until the equipment reaches its lowest load.
5.4.5 Wait for the pedals come to a complete stop before dismounting the equipment. Hold
the handlebar steady while dismounting.
6.0 Operation
6.1 Heart Rate System
This equipment offers two heart rate feedback options. You may choose to use the Heart Rate Handlebar, or the
Chest Belt (sold separately) for a hands free workout.
WARNING: The heart rate reading is intended only as an exercise aid and not for medical
purposes. Heart rate monitoring systems may be inaccurate. Various factors may affect the
accuracy of heart rate readings. Over exercise may result in serious injury or death. If you feel
faint, please stop all exercise immediately.
Target Heart Rate Chart
Please consult your physician to find your optimal heart rate and Watt setting.
Maximum Heart Zone = 220-Your Age
14

6.2 Heart Rate Handlebar (Standard)
6.2.1 Place the palms of your hands directly on the heart rate handlebars. Both hands must grip the bars for your
heart rate to register.
6.2.2 When gripping the handlebars, do not grip tightly. It is recommended that you hold the handlebars only long
enough to see your heart rate readout on the console.
NOTE: DO NOT do this test during the workout.
6.3 Chest Belt (Optional)
6.3.1 Prior to wearing the chest belt on your chest, center the chest strap just below the breast or pectoral
muscles, directly over your sternum.
NOTE: The Chest Belt must be tight and properly placed to receive an accurate and consistent reading.
7.0 Console Operation
7.1 Console of the EP7 Elliptical
Heart rate handlebar with
hand pulse plates
15

Display Cross Check List
NOTE: The calories burned, and the heart rate are approximate values which are for reference only.
7.2 Keypad Instruction
Keypad Name
Main Function
LEVEL ▲ / ▼
Adjust the resistance, adjust the set value
Calories / Mets
Window transfer Calories←→Mets
TOTAL STRIDES /
STRIDES MIN
Window transfer TOTAL STRIDES←→STRIDES MIN
START
Activate the machine
STOP / PAUSE
To stop and pause the machine, and machine will be back to idle mode after pause
Program control
To select program
LEVEL
To quickly adjust 10 options of resistance
Numerical key
When you set up the number or value, you can use the numerical key 0~ 9 to adjust
directly.
ENTER
Press the key to confirm the setting’s adjustment, or to enter into the next setting.
7.3 Program Control
7.3.1 Target Mode
7.3.1.1 Press the “Target” button to start the Setting Mode.
7.3.1.2 For user weight setting, DOT MATRIX displays the “SET BODYWEIGHT THEN PRESS ENTER”and the
value is displayed in the Calories window and flashes. After the modification has been completed, press
“ENTER”to continue to modify the next item.
7.3.1.3 For Time setting, DOT MATRIX displays the “SET TIME THEN PRESS ENTER”. After the time is modified,
press “ENTER”to continue to modify the next item or press “STOP” to return to the previous setting.
7.3.1.4 For Calorie setting, DOT MATRIX displays “SET CALORIES THEN PRESS ENTER”. After the modification
has been completed, press “ENTER”to confirm and then displays “PRESS START TO BEGIN
Display
Displays content
Time
Time usage or used for countdown
Heart Rate
Heart rate reading
Watts
The wattage machine output during user workout
TOTAL STRIDES
Total strides user pedaled
STRIDES PER MINUTE
Strides user pedaled every min
Level
Level settings L1~L25, the greater the level set, the greater the resistance
Calories
The calories user applied(consumed) to machine during workout
Mets
User’s METS readings
16

WORKOUT”. You can press “STOP” to go back to the previous setting or press “Start” to execute the
program under Start.
7.3.1.5 Press the “Start” key and all the values will begin to accumulate. This is the start of the “Execution Mode.”
7.3.1.6 DOT MATRIX displays the same message as “Quick Start” during program execution.
7.3.1.7 MESSAGE WINDOW displays messages during the execution of the Program, except that Time and
Calories are in Count Down while the others are the same as Quick Start.
7.3.1.8 When one of the “Time” or “Calories” is in “Count Down” and counting is then terminated. The program
will enter the “Stop Mode.”
7.3.2 Program Profiles Mode
7.3.2.1 There are seven PROGRAM PROFILES, namely Rolling, Valley, Fat Burn, Ramp, Strength, Interval,
Random.
7.3.2.2 Press the “Profile” button to start the “Setting Mode.”
7.3.2.3 The user weight setting DOT MATRIX displays “SET BODYWEIGHT THEN PRESS ENTER”. The value is
displayed in the Calories window and flashes. After the modification has completed, press “ENTER” to
continue to modify the next item or press “STOP” to return to the previous setting.
7.3.2.4 The Time setting DOT MATRIX displays the “SET TIME THEN PRESS ENTER”. After the time has been
modified, press “ENTER”to continue to modify the next item or press “STOP” to return to the previous
setting.
7.3.3 Graphic Settings
7.3.3.1 If RANDOM is selected, the DOT MATRIX will display the “CHANGE PROFILE BY PRESS ARROW KEY”
once and then DOT MATRIX will display the profile graph. Press LEVEL ▲ or ▼ to select other graphs.
After the modification has completed, press “ENTER”to confirm and continue to modify the next item or
press “STOP”to return to the previous setting.
7.3.3.2 In the LEVEL setting, DOT MATRIX displays the “SET LEVEL”once then DOT MATRIX displays the profile
graphic. When the LEVEL window displays “L1”, press LEVEL ▲ or ▼ to select L1~ L5. After the
modification has completed, press “START”to confirm or press “STOP”to return to the previous setting.
7.3.3.3 After the setting has completed, the “PRESS START TO BEGIN WORKOUT”will be displayed. You can
press “STOP”to return to the previous setting or press “Start”to begin the program.
7.3.3.4 Press the “Start” key and all the values will begin to accumulate. This is the start of the Execution Mode】.
7.3.4 DOT MATRIX displays a message during the program execution.
7.3.4.1 The execution method is performed in accordance with the built-in PROFILE with line breaks every minute.
7.3.4.2 If executed for more than 27 minutes, the graph and X-axis scale will automatically shift to the left for 5
minutes (same as Quick Start).
7.3.4.3 The executed line is displayed in 1 Second flashing mode, and you can press ▲ or ▼ to make LEVEL
modification. The number of executed lines will not be modified.
7.3.4.4 MESSAGE WINDOW displays a message during Program execution except that Time is in Count Down,
and the others are the same as Quick Start.
7.3.4.5 When Time Counting mode is Count Down and counting has terminated, the program will enter the “Stop
Mode.”
17
Other manuals for E7
6
Table of contents