manuals.online logo
Brands
  1. Home
  2. •
  3. Brands
  4. •
  5. Cisco
  6. •
  7. Server
  8. •
  9. Cisco 1600 User manual

Cisco 1600 User manual

This manual suits for next models

2

Other Cisco Server manuals

Cisco UCS C220 Installation and maintenance instructions

Cisco

Cisco UCS C220 Installation and maintenance instructions

Cisco L2TP User manual

Cisco

Cisco L2TP User manual

Cisco ASR 5000 Series Instruction Manual

Cisco

Cisco ASR 5000 Series Instruction Manual

Cisco UCS X9508 User manual

Cisco

Cisco UCS X9508 User manual

Cisco UCS C24 Installation and maintenance instructions

Cisco

Cisco UCS C24 Installation and maintenance instructions

Cisco ONS 15454 Series User manual

Cisco

Cisco ONS 15454 Series User manual

Cisco APP1000 - One Application Server Appliance Instruction Manual

Cisco

Cisco APP1000 - One Application Server Appliance Instruction Manual

Cisco UCS B200 M5 Manual

Cisco

Cisco UCS B200 M5 Manual

Cisco MCS-7825-H1-IPC1 User manual

Cisco

Cisco MCS-7825-H1-IPC1 User manual

Cisco UCS C220 M5 User manual

Cisco

Cisco UCS C220 M5 User manual

Cisco UCS C220 User manual

Cisco

Cisco UCS C220 User manual

Cisco C880 Series Assembly instructions

Cisco

Cisco C880 Series Assembly instructions

Cisco UCS C220 M4 Assembly Instructions

Cisco

Cisco UCS C220 M4 Assembly Instructions

Cisco UCS C220 M3 Installation and operation manual

Cisco

Cisco UCS C220 M3 Installation and operation manual

Cisco UCS 5100 User manual

Cisco

Cisco UCS 5100 User manual

Cisco TelePresence Server 7010 Specification sheet

Cisco

Cisco TelePresence Server 7010 Specification sheet

Cisco SNS-3515 series Manual

Cisco

Cisco SNS-3515 series Manual

Cisco UCS X210c M6 Manual

Cisco

Cisco UCS X210c M6 Manual

Cisco Nexus 7000 Series User manual

Cisco

Cisco Nexus 7000 Series User manual

Cisco UCS B200 Manual

Cisco

Cisco UCS B200 Manual

Cisco AS5300-96VOIP-A User manual

Cisco

Cisco AS5300-96VOIP-A User manual

Cisco S195 User manual

Cisco

Cisco S195 User manual

Cisco UCS C220 M3 Installation and maintenance instructions

Cisco

Cisco UCS C220 M3 Installation and maintenance instructions

Cisco B200 M3 User manual

Cisco

Cisco B200 M3 User manual

Popular Server manuals by other brands

HP Tc2120 - Server - 256 MB RAM installation guide

HP

HP Tc2120 - Server - 256 MB RAM installation guide

Lenovo ThinkServer RD230 manual

Lenovo

Lenovo ThinkServer RD230 manual

Avocent CPS810 Installer/user guide

Avocent

Avocent CPS810 Installer/user guide

Dell PowerEdge R6615 Installation and service manual

Dell

Dell PowerEdge R6615 Installation and service manual

FreeWave HT2+ installation guide

FreeWave

FreeWave HT2+ installation guide

GIGA-BYTE TECHNOLOGY G492-Z50 user manual

GIGA-BYTE TECHNOLOGY

GIGA-BYTE TECHNOLOGY G492-Z50 user manual

Lanner HTCA-E400 user manual

Lanner

Lanner HTCA-E400 user manual

Bull NovaScale T840 E2 user guide

Bull

Bull NovaScale T840 E2 user guide

Asus RS740-E70RS24-EG Configuration guide

Asus

Asus RS740-E70RS24-EG Configuration guide

Meinberg LANTIME M300/TCR manual 

Meinberg

Meinberg LANTIME M300/TCR manual 

HP ProLiant SL335s G7 Maintenance and service guide

HP

HP ProLiant SL335s G7 Maintenance and service guide

ZyXEL Communications VANTAGE RADIUS 50 user guide

ZyXEL Communications

ZyXEL Communications VANTAGE RADIUS 50 user guide

Lantronix xDirect-IAP quick start guide

Lantronix

Lantronix xDirect-IAP quick start guide

Fujitsu PRIMEQUEST 2400E3 General description

Fujitsu

Fujitsu PRIMEQUEST 2400E3 General description

IBM 9040-MR9 manual

IBM

IBM 9040-MR9 manual

IBM 306m - eServer xSeries - 8849 user guide

IBM

IBM 306m - eServer xSeries - 8849 user guide

green hippo Hippotizer Nevis+ quick start guide

green hippo

green hippo Hippotizer Nevis+ quick start guide

IBM 8203-E4A Brochure & specs

IBM

IBM 8203-E4A Brochure & specs

manuals.online logo
manuals.online logoBrands
  • About & Mission
  • Contact us
  • Privacy Policy
  • Terms and Conditions

Copyright 2025 Manuals.Online. All Rights Reserved.

Cisco Firepower Management Center 1600, 2600,
and 4600 Getting Started Guide
First Published: 2019-06-26
Last Modified: 2022-05-31
Firepower Management Center 1600, 2600, and 4600 Getting Started Guide
The Firepower Management Center 1600, 2600, and 4600 Getting Started Guide explains installation, login,
setup, initial administrative settings, and configuration for your secure network. This document also describes
maintenance activities such as establishing alternative means of management center access, adding managed
devices to the management center, factory reset, saving and loading configurations, erasing the hard drive,
and performing shutdown or restart.
In a typical deployment on a large network, you install multiple managed devices on network segments. Each
device controls, inspects, monitors, and analyzes traffic, and then reports to a management center. The
management center provides a centralized management console with a web interface that you can use to
perform administrative, management, analysis, and reporting tasks in service to securing your local network.
About the Firepower Management Center Models 1600, 2600, and 4600
The following topics provide information about front and rear panel features that you need to follow the
instructions in this document.
Rear Panel Features
The following figure illustrates the rear panel of the Firepower Management Center 1600, 2600, and 4600.
For more information on the rear-panel features, see the Cisco Firepower Management Center 1600, 2600,
and 4600 Hardware Installation Guide.
Figure 1: Rear Panel
USB 3.0 Type A (USB 2)
You can connect a keyboard, and along with a
monitor on the VGA port, you can access the
console.
2USB 3.0 Type A (USB 1)
You can connect a keyboard, and along with a
monitor on the VGA port, you can access the
console.
1
Cisco Firepower Management Center 1600, 2600, and 4600 Getting Started Guide
1
eth1 management interface (labeled 2)
Gigabit Ethernet 100/1000/10000 Mbps interface,
RJ-45, LAN2
4eth0 management interface (labeled 1)
Supports 100/1000/10000 Mbps depending on
link partner capability.
3
CIMC interface (labeled M)
Supported only for Lights-Out Management
access.
6VGA video port (DB-15 connector)5
Unit identification button8Serial console port (RJ-45 connector)
Disabled by default.
7
770-W AC power supply (PSU 2)10770-W AC power supply (PSU 1)9
eth2 management interface
10-Gigabit Ethernet SFP+ support
SFP-10G-SR and SFP-10G-LR are qualified for
use on the management center.
12Threaded holes for dual-hole grounding lug11
Riser handle
Not supported
14eth3 management interface
10-Gigabit Ethernet SFP+ support
SFP-10G-SR and SFP-10G-LR are qualified for
use on the management center.
13
Front Panel LEDs and their States
The following figure illustrates the front panel of the Firepower Management Center 1600, 2600, and 4600,
identifies the LED lights, and provides the information you need to determine appliance status based on the
LEDs. The Firepower Management Center 2600 has four SAS drives, and the Firepower Management Center
4600 has six SAS drives, each with the same drive fault and drive activity LEDs as shown in the diagram.
For information on all the front-panel features, see the Cisco Firepower Management Center 1600, 2600, and
4600 Hardware Installation Guide.
Cisco Firepower Management Center 1600, 2600, and 4600 Getting Started Guide
2
Firepower Management Center 1600, 2600, and 4600 Getting Started Guide
Front Panel LEDs and their States
Figure 2: Front Panel LEDs and their States
Drive activity LED:
• Off—There is no drive in the drive tray (no
access, no fault).
• Green—The drive is ready.
• Green, flashing—The drive is reading or
writing data.
2Drive fault LED:
• Off—The drive is operating properly.
• Amber—Drive fault detected.
• Amber, flashing—The drive is rebuilding.
• Amber, flashing with 1-second
interval—Drive locate function activated in
the software.
1
Unit identification LED:
• Off—The unit identification function is not
in use.
• Blue, flashing—The unit identification
function is activated.
4Power LED:
• Off—There is no AC power to the chassis.
• Amber—The chassis is in standby mode.
• Green—The chassis is in main power mode.
Power is supplied to all components.
3
Cisco Firepower Management Center 1600, 2600, and 4600 Getting Started Guide
3
Firepower Management Center 1600, 2600, and 4600 Getting Started Guide
Front Panel LEDs and their States
Power supply status LED:
• Green—All power supplies are operating
normally.
• Amber—One or more power supplies are in
a degraded operational state.
• Amber, flashing—One or more power
supplies are in a critical fault state.
6System status LED:
• Green—The chassis is running in normal
operating condition.
• Green, flashing—The chassis is performing
system initialization and memory check.
• Amber—The chassis is in a degraded
operational state (minor fault).
• Power supply redundancy is lost.
• CPUs are mismatched.
• At least one CPU is faulty.
• At least one DIMM is faulty.
• At least one drive in a RAID
configuration failed.
• Amber, two flashes—There is a major fault
with the system board.
•Amber, three flashes—There is a major fault
with the DIMMs.
• Amber, four flashes—There is a major fault
with the CPUs.
5
Network link activity LED:
• Off—The Ethernet port link is idle.
• Green—One or more Ethernet ports are
link-active, but there is no activity.
•Green, flashing—One or more Ethernet ports
are link-active with activity.
8Fan status LED:
• Green—All fans are operating properly.
• Amber, flashing—One or more fans
breached the unrecoverable threshold.
7
Temperature status LED:
• Green—The chassis is operating at normal
temperature.
• Amber—One or more temperature sensors
breached the critical threshold.
• Amber, flashing—One or more temperature
sensors breached the unrecoverable
threshold.
9
Cisco Firepower Management Center 1600, 2600, and 4600 Getting Started Guide
4
Firepower Management Center 1600, 2600, and 4600 Getting Started Guide
Front Panel LEDs and their States
Related Documentation
For detailed hardware installation instructions, see the Cisco Firepower Management Center 1600, 2600, and
4600 Hardware Installation Guide.
For a complete list of the Cisco Secure Firewall series documentation and where to find it, see the documentation
roadmap.
Access the CLI or the Linux Shell on the Management Center
Accessing the management center CLI or the Linux shell requires a different sequence of steps depending on
what version the management center is running.
We strongly recommend that you do not use the Linux shell unless directed by Cisco TAC or explicit
instructions in the user documentation.
Caution
Before you begin
Establish a direct physical connection with the management center using the serial port, a keyboard and
monitor, or establish an SSH session with the management center interface.
Procedure
Step 1 Log into the management center using the credentials for the CLI admin user.
Step 2 Determine your next action depending on the version in use:
• If your management center is running Version 6.3 or 6.4 and the management center CLI is not enabled,
this gives you direct access to the Linux shell.
• If your management center is running Version 6.3 or 6.4 and the management center CLI is enabled, this
gives you access to the management center CLI. To access the Linux shell, continue with Step 3.
• If your management center is running Version 6.5+, this gives you access to the management center CLI.
To access the Linux shell, continue with Step 3.
Step 3 To access the Linux shell from the management center CLI, enter the expert command.
Shutdown or Restart the Management Center
Use the web interface to initiate an orderly management center shut down or restart.
You can also shut down the management center using the system shutdown command from the management
center CLI.
Cisco Firepower Management Center 1600, 2600, and 4600 Getting Started Guide
5
Firepower Management Center 1600, 2600, and 4600 Getting Started Guide
Related Documentation
For virtual devices, refer to the documentation for your virtual platform. For VMware in particular, custom
power options are part of VMware Tools.
Tip
Do not shut off the management center using the power button; this may cause data loss. Using the web
interface or shutdown commands prepares the system to be safely powered off and restarted without losing
configuration data.
Caution
Procedure
Step 1 Choose System >Configuration> Process
Step 2 Choose one of the following:
•Shutdown Management Center to initiate a graceful shutdown of the management center.
•Reboot Management Center to shutdown and restart the management center gracefully.
•Restart Management Center Console to restart the communications, database, and HTTP server
processes. This is typically used during troubleshooting, and may cause deleted hosts to reappear in the
network map.
Install the Management Center for Versions 6.5 and Later
Follow these instructions to install the management center that will run Versions 6.5 and later.
Review Network Deployment for Versions 6.5 and Later
To deploy the management center you need information about the environment within which it will operate.
The following figure shows an example network configuration for a firewall deployment.
Cisco Firepower Management Center 1600, 2600, and 4600 Getting Started Guide
6
Firepower Management Center 1600, 2600, and 4600 Getting Started Guide
Install the Management Center for Versions 6.5 and Later
Figure 3: Example Network Deployment
By default the management center connects to your local management network through its management
interface (eth0). Through this connection the management center communicates with a management computer;
managed devices; services such as DHCP, DNS, NTP; and the internet.
The management center requires internet access to support Smart Licensing, Secure Firewall threat intelligence
director, and malware defense services. Depending on services provided by your local management network,
the management center may also require internet access to reach an NTP or DNS server. You can configure
your network to provide internet access to the management center directly or through a firewall device.
You can upload updates for system software, as well as the Vulnerability Database (VDB), Geolocation
Database (GEoDB), and intrusion rules directly to the management center from an internet connection or from
a local computer that has previously downloaded these updates from the internet.
Cisco Firepower Management Center 1600, 2600, and 4600 Getting Started Guide
7
Firepower Management Center 1600, 2600, and 4600 Getting Started Guide
Review Network Deployment for Versions 6.5 and Later
To establish the connection between the management center and one of its managed devices, you need the IP
address of at least one of the devices: the management center or the managed device. We recommend using
both IP addresses if available. However, you may only know one IP address. For example, managed devices
may be using private addresses behind NAT, so you only know the management center address. In this case
you can specify the management center address on the managed device plus a one-time, unique password of
your choice called a NAT ID. On the management center, you specify the same NAT ID to identify the
managed device.
The initial setup and configuration process described in this document assumes the management center will
have internet access. If you are deploying a management center in an air-gapped environment, see the Cisco
Secure Firewall Management Center Administration Guide for your version for alternative methods you can
use to support certain features such as configuring a proxy for HTTP communications, or using a Smart
Software Satellite Server for Smart Licensing. In a deployment where the management center has internet
access, you can upload updates for system software, as well as the Vulnerability Database (VDB), Geolocation
Database (GEoDB), and intrusion rules directly to the management center from an internet connection. But
if the management center does not have internet access, the management center can upload these updates from
a local computer that has previously downloaded them from the internet. Additionally, in an air-gapped
deployment you might use the management center to serve time to devices in your deployment.
Initial Network Configuration for Management Centers Using Versions 6.5+:
• Management Interface
By default the management center seeks out a local DHCP server for the IP address, network mask, and
default gateway to use for the management interface (eth0). If the management center cannot reach a
DHCP server, it uses the default IPv4 address 192.168.45.45, netmask 255.255.255.0, and gateway
192.168.45.1. During initial setup you can accept these defaults or specify different values.
If you choose to use IPv6 addressing for the management interface, you must configure this through the
web interface after completing the initial setup.
• DNS Server(s)
Specify the IP addresses for up to two DNS servers. If you are using an evaluation license you may
choose not to use DNS. (During initial configuration you can also provide a hostname and domain to
faciliate communications between the management center and other hosts through DNS; you can configure
additional domains after completing intial setup.)
• NTP Server(s)
Synchronizing the system time on your management center and its managed devices is essential to
successful operation of your System; setting management center time synchronization is required during
initial configuration. You can accept the default (0.sourcefire.pool.ntp.org and 1.sourcefire.pool.ntp.org
as the primary and secondary NTP servers, respectively), or supply FQDNs or IP addresses for one or
two trusted NTP servers reachable from your network. (If you are not using DNS you may not use FQDNs
to specify NTP servers.)
End to End Procedure to Install the Management Center for Versions 6.5 and Later
See the following tasks to deploy and configure a management center that will run Versions 6.5 and later.
Cisco Firepower Management Center 1600, 2600, and 4600 Getting Started Guide
8
Firepower Management Center 1600, 2600, and 4600 Getting Started Guide
End to End Procedure to Install the Management Center for Versions 6.5 and Later
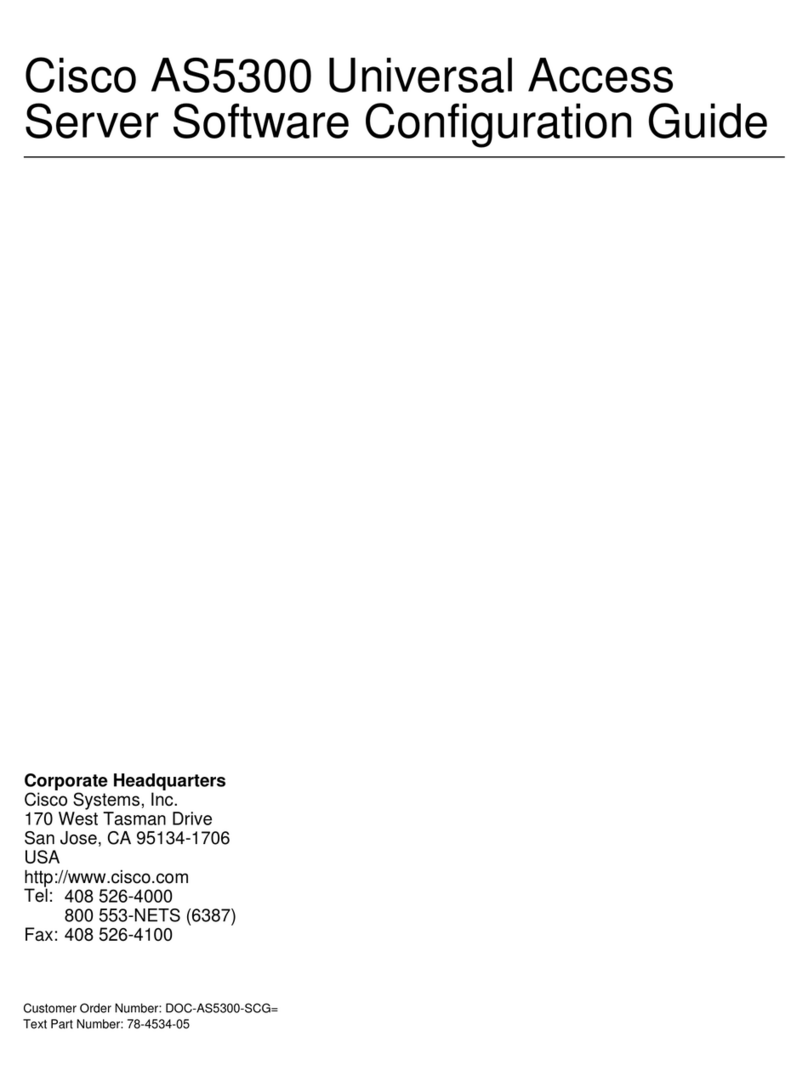
Review Network Deployment for Versions 6.5 and Later, on page 6Pre-Configuration
Connect Cables Turn On Power Verify Status for Versions 6.5 and Later, on
page 9
Pre-Configuration
Use one of the following:
•Perform Initial Setup at the Web Interface for Versions 6.5 and Later, on
page 12
•Management Center Initial Setup Using the CLI for Versions 6.5 and Later,
on page 15
Management Center
Review Automatic Initial Configuration for Versions 6.5 and Later, on page
18
Management Center
Configure Management Center Administrative Settings, on page 29Management Center
Add Managed Devices to the Management Center, on page 38Management Center
Connect Cables Turn On Power Verify Status for Versions 6.5 and Later
This procedure references the rear panel ports of the Firepower Management Center 1600, 2600, and 4600.
AC power supplies have internal grounding so no additional chassis grounding is required when the supported
AC power cords are used. For more information about supported power cords, see the Cisco Firepower
Management Center 1600, 2600, and 4600 Hardware Installation Guide.
We recommend that you establish a connection to support alternate access to the management center for
troubleshooting in case of network outage or other problems that prevent you from accessing the management
center web interface. You can establish one or more of the three connections listed below; console messages
will appear in the output you select in the management center web interface under System >Configuration >
Console Configuration.
•Connect a keyboard and monitor to the management center as described in steps 5 and 6. (The management
center sends console messages to the VGA port by default.)
Cisco Firepower Management Center 1600, 2600, and 4600 Getting Started Guide
9
Firepower Management Center 1600, 2600, and 4600 Getting Started Guide
Connect Cables Turn On Power Verify Status for Versions 6.5 and Later
• Connect a local computer to the management center serial port as described in Step 7. (To use this
connection see Set Up Serial Access, on page 40.)
• Connect the management center CIMC port to a local network reachable from a local computer where
you will run an IPMI utility for Lights-Out Management, as described in Step 8. (To use this connection
see Set Up Lights-Out Management, on page 41.)
After rack-mounting the chassis, follow these steps to connect cables, turn on power, and verify connectivity.
Use the following figure to identify the rear panel ports.
Figure 4: Cable Connections
Before you begin
Read the Regulatory and Compliance Safety Information document before installing the management center
chassis.
Important
• Rack-mount the appliance as described in the Cisco Firepower Management Center 1600, 2600, and
4600 Hardware Installation Guide.
Procedure
Step 1 eth0 management interface (labeled "1" on the rear panel) — Using an Ethernet cable, connect the eth0
interface to the default management network reachable from your management PC. This interface is the default
management interface and is enabled by default. Confirm that the link LED is on for both the network interface
on the local computer and the management center management interface.
You can use this connection to configure network settings and perform initial setup using HTTPS. You can
also use this connection to perform routine management, and to manage devices from the management center
web interface.
Step 2 (Optional) eth1 management interface (labeled "2" on the rear panel)—Connect this management interface
to the same or different network from your other management interfaces depending on your network needs.
For more information about management interfaces, see the Cisco Secure Firewall Management Center
Administration Guide and about network topology, see the Cisco Secure Firewall Management Center Device
Configuration Guide.
Cisco Firepower Management Center 1600, 2600, and 4600 Getting Started Guide
10
Firepower Management Center 1600, 2600, and 4600 Getting Started Guide
Connect Cables Turn On Power Verify Status for Versions 6.5 and Later