DVD PLAYER
MODEL NO.: C805DVD
Instruction Manual
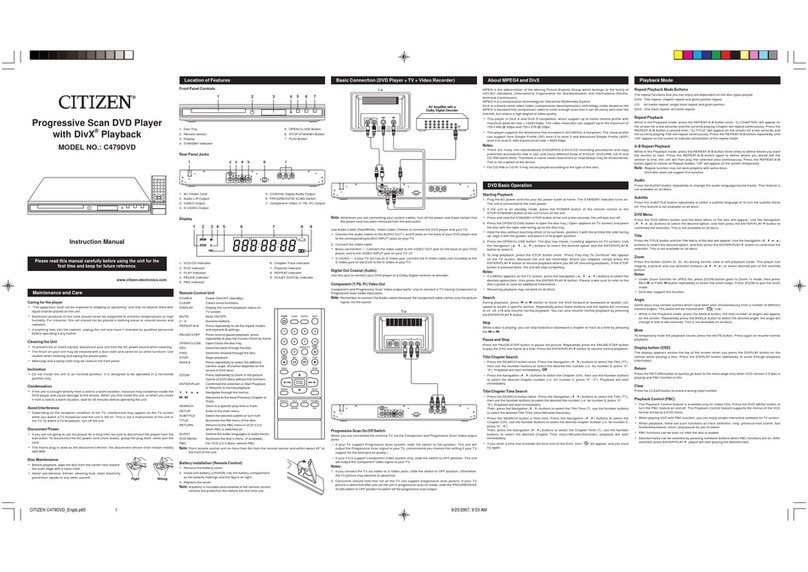
LocationofFeatures
Front Panel Controls
1. Disc Tray
2. REMOTE SENSOR Receives the commands from the remote control.
3. Display
4. OPEN/CLOSE Button Opens and closes disc tray.
5. PLAY Button Begins disc play.
6. STOP Button Stop playback.
7. SKIP / Button Advances to the next/precedent chapter or track.
8. ON/STANDBY Indicator Lights when the system is in standby (off) mode or operating (on) mode.
9. STANDBY Button Turns the DVD player on and off.
Rear Panel Jacks
1. AC Power Cord 5. PROGRESSIVE SCAN ON/OFF Switch
2. HDMI Output 6. COAXIAL Digital Audio Output
3. AUDIO Left/Right Output 7. S-VIDEO Output
4. Component Video Outputs 8. VIDEO Output
Display
1. VCD/CD Indicator
2. DVD Indicator
3. PLAY Indicator
4. Disc Playing Indicator
5. Chapter Track Indicator
6. Repeat Indicator
7. DOLBY DIGITAL Indicator
8. Playtime Indicator
9. PBC Indicator
10. PAUSE Indicator
11. MP3 Indicator
Maintenanceand Care
Caring for the player
•“The apparatus shall not be exposed to dripping or splashing” and that no objects filled with liquid
shall be placed on the unit.
•Electronic products of this kind should never be subjected to extreme temperatures or high humidity.
For instance, this set should not be placed in bathing areas or around stoves and radiators.
•If anything falls into the cabinet, unplug the unit and have it checked by qualified personnel before
operating it any further.
Cleaning the Unit
•To prevent fire or shock hazard, disconnect your unit from theAC power source when cleaning.
•The finish on your unit may be cleaned with a dust cloth and cared for as other furniture. Use caution
when cleaning and wiping the plastic parts.
•Mild soap and a damp cloth may be used on thefront panel.
Inclination
•Do not install the unit in an inclined position. It is designed to be operated in a horizontal position
only.
Condensation
•If the unit is brought directly from a cold to a warm location, moisture may condense inside the DVD
player and cause damage to the lenses. When you first install the unit, or when you move it from a
cold to a warm location, wait for 30 minutes before operating the unit.
Avoid Interference
•Depending on the reception condition of the TV, interference may appear on theTV screen while
you watch a TV broadcast and the unit is left on. This is not a malfunction of the unit or the TV. To
watch a TV broadcast, turn off the unit.
Disconnect Power
•If you are not going to use the player for a long time, be sure to disconnect the player from the
wall outlet. To disconnect the AC power cord (main leads), grasp the plug itself, never pull the cord.
•The mains plug is used as the disconnect device, the disconnect device shall remain readily
operable.
Disc Maintenance
•Before playback, wipe the disc from the center hole toward the
outer edge with a clean cloth.
•Never use benzine, thinner, cleaning fluid, static electricity
prevention liquids or any other solvent.
Right Wrong
Remote Control Unit
1. KEY LOCK Button
2. NUMBER 0 TO +9 Button
3. DVD MENU Button
4. AUDIO MODE Button
5. TITLE MENU Button
6. SUBTITLE MENU Button
7. PBC Button
8. 3D Button
9. DISPLAY Button
10. Navigation (///) Buttons
11. RETURN Button
12. BOOKMARK Button
13. STOP Button
14. SLOW/R Button
15. PAUSE/STEP Button
16. RANDOM Button
17. MUTE Button
18. REPEAT Button
19. REPEAT/A-B Button
20. SEARCH REV / FWD Button
21. SKIP REV / FWD Button
22. SLOW/F Button
23. PROGRAM Button
24. SEARCH Button
25. ENTER Button
26. PLAY Button
27. SETUP Button
28. ANGLE Button
29. AUDIO MENU Button
30. ZOOM Button
31. CLEAR Button
32. DIGEST Button
33. STANDBY ON/OFF Button
34. OPEN/CLOSE Button
Note: Point remote control unit no more than
6m from the remote sensor and within
about 45° of the front of the unit.
Battery installation
1. Remove the battery cover.
2. Insert two battery (AA, R6, UM-3 types)
making sure the polarity (+/–) matches the
marks inside the unit.
3. Replace the cover
•Do not attempt to recharge, short-circuit,
disassemble, heat or throw the batteries into the fire.
•Do not mix different types of batteries or old and new batteries.
BasicConnection(DVDPlayer+TV+VideoRecorder)
Note: Whenever you are connecting your system cables, turn off the power and make certain that the
power cord has been removed from the wall outlet.
Use Audio Cable (Red/White), Video Cable (Yellow) to connect the DVD player and your TV.
1. Connect the audio cables to the AUDIO OUT Land R jacks on the back of your DVD player and to
the corresponding AUDIO INPUT jacks on your TV.
2. Connect the Video cable
•Basic connection — Connect the video cable to the VIDEO OUT jack on the back of your DVD
player, and to the VIDEO INPUT jack on yourTV. Or
•S-VIDEO — If your TV set has an S-Video jack, connect the S-Video cable to the S-Video jack on
the DVD to the S-Video of your TV.
Digital Out Coaxial (Audio)
Use one of these jacks to connect your DVD player to a Dolby Digital receiver or decoder. Some
receivers have either the COAXIAL type of Digital Audio Input jack and some have both. Under
most conditions, coaxial connections work equally well—the only difference is the type of cable you
connect to the jack.
HDMI (High-Definition Multimedia Interface) Socket
The HDMI jack provides optimum picture quality. This jack gives you an uncompressed digital
interface that carries both video and audio data by way of an integrated miniplug cable.
Note: Make sure you set the HDMI setup option in the menu system to the resolution setting that
most closely matches your TV.
Component (Y, PB, PR) Video Out
Use these jacks to connect to a TV with progressive video input jacks and then set the
PROGRESSIVE SCAN switch to ‘ON’. Progressive Scan is a video scanning system that displays all
lines in a frame in one pass, as opposed to the traditional system, interlaced scan. This connection
provides optimum quality. To ensure maximum picture quality use three video-grade cables for
connections. Note that it is essential to match the color-coded connectors with a compatible TV.
525 Line Digital Progressive-Scan Component Video Output
Compared to standard interlaced video, progressive scan effectively doubles the amount of video
information fed to your TV or monitor. The result is a stable, flicker-free image. (Check your
TV/monitor for compatibility with this feature.) For the highest picture quality, try watching a DVD
movie on a Progressive Scan compatible TV.
Notes:
•If you connect a TV that is not compatible with a progressive scan signal and set the
PROGRESSIVE SCAN switch to the ON position, you will not be able to see any picture at all. To
regain the picture, you must shut the unit off and set the PROGRESSIVE SCAN switch to the OFF
position. Then, turn the unit on and the picture will appear.
•Consumers should note that not all high definition television sets are fully compatible with this
product and may cause artifacts to be displayed in the picture. In case of 525 progressive scan
picture problems, it is recommended that the user set the PROGRESSIVE SCAN switch to ’OFF’.
AboutWMA
WMA is the abbreviation of Windows Media Audio and refers to an audio compression technology
developed by Microsoft Corporation.
WMA data can be encoded by using Windows Media Player version 8 or Windows Media Player for
Windows XP. Files are recognized by their file extension “.wma” or “.WMA”.
Windows Media, and the Windows logo are trademarks, or registered trademarks of Microsoft
Corporation in the United States and/or other countries.
•This unit will play CD-ROM, CD-R and CD-RW discs containing files saved in the MP3 or WMA
format with a sampling rate of 32, 44.1 or 48 KHz.
•Fixed bit-rate MP3 files are recommended, or the playing time may not be shown correctly.
•This player is not compatible with no loss encoding or variable bit-rate (VBR) WMA files.
•WMA files encoded with DRM (Digital Rights Management) copy protection will not play.
•When naming MP3 and WMA files, add corresponding file name extension (.mp3 or .wma). Files
are played according to the file extension. To prevent noise and malfunctions, do not use these
extensions for other kinds of files.
•This player can recognize up to 999 files (WMA/MP3) and up to 499 folders. If a disc exceeds
these limits, only files and folders up to these limits will be playable. Files and folders are read/
displayed in alphabetical order.
•Folder and track names (excluding the file extension) are displayed.
•This player cannot 100% playing all kinds of WMA/MP3/JPEG file disc because the unit’s play
ability depends on the quality of the disc, bit-rate, and file structure.
PlaybackMode
Repeat Playback Mode Buttons
The repeat functions that you can enjoy are dependent on the disc types played.
DVD: Chapter repeat, title repeat and given portion repeat.
CD: All tracks repeat, single track repeat and given portion.
REPEATbutton:
•You can repeatedly play a title (DVD) or all tracks (VCD/CD) when “ Title ” or “ All ” appears on
TV screen respectively.
•You can repeatedly play a chapter (DVD) or a single tracks (SVCD / VCD / CD) when “ Chapter ” or
“ Track ” appears on TV screen respectively.
•You can cancel repeat functions when “ Off ” appears on TV screen.
REPEATA-B button:
•You can repeatedly play a given portion by operating as following:
– To press this button once to define the portion head. To press this button again to define the portion
toe. And then the portion will be played repeatedly.
•To press this button again to return to normal playback.
Note: WMA & MP3 discs does not support this function.
Program Playback
This unit has a 20 track programmable memory that allows you to program up to 20 tracks on any
disc for playback in any desired order. You may program 20 different tracks or you may also
program certain tracks to play more than once. Programmed Playback only work for CD’s, it does not
workon MP3 CD’s.
To perform programmed playback, proceed as follows:
1. While in the Stop mode, press the PROGRAM button, the Program menu will appear on the
TV screen.
2. Press the Number buttons to input 2 numbers for each program track: one for title, one for
chapter. After input 2 numbers, the cursor will automatically jump to the next program track for
input another numbers.
3. Repeat step 2 until all desired title & chapters have been programmed (up to 20). You can
repeat a title & chapter more than once if desired.
4. Press the Navigation (,,,) button to select “START” position.
5. Press the PLAY () button to begin programmed playback. Playback will begin on the first
title/chapter that you programmed and the player will continue to play all of the tracks that you
programmed in the order in which you programmed them.
6. To cancel the Program function, press the STOP () button twice, or press the OPEN/CLOSE
button.
For VCD/CD
Select the track to be memory by using the Number buttons. The unit will automatically go to the
next track to allow you to program.
For DVD
Select the TITLE/CHAPTER to be memory by using the number buttons. The unit will automatically
go to the next track to allow you to program. Press the STOP () button to stop programmed play.
Note: WMA & MP3 discs does not support this function.
Random Playback
All the tracks are played in a random order. (Chosen by the DVD player)
1. Insert a disc.
2. In stop mode, press the RANDOM button (Random appears).
3. Press the PLAYbutton to start random playback. Once all the tracks on the current disc have been
randomly played, the player automatically stops playback.
4. Press the RANDOM button again to stop playback (Random disappear).
Interactive Function Buttons (DVD)
1. AUDIO button: You can change the audio language from the one selected at the initial
settings to a different language, if available.
2. SUBTITLE button: You can select a subtitle language, and to turn the subtitle menu on/off.
3. DVD MENU button: Press this button.The Main Menu of the disc will appear. Use the Navigation
(,,,) button to select the desired option, and then press the ENTER
button.
4. TITLE button: Press this button. The Title Menu of the disc will appear. Use the Navigation (,
,,) button to select the desired option, and then press the ENTER button.
Audio Mode (Audio CDs only)
While playing an audio CD (not DVD), you can cycle between the audio modes as follows:
Press the AUDIO MODE button to cycle through the audio modes. The audio modes vary
depending on the disc inserted, but include MONO LEFT, MONO RIGHT, MIX MONO, STEREO,
etc. “DISC NOT SUPPORT” will appear if the disc does not support audio mode changing.
Note: WMA and MP3 discs support this function. continued on next page
Notes:
•If the Search feature is attempted in the Play mode, then you can only go to a specific chapter or
time, you cannot change the title number.
•If you enter a time that exceeds the time limit of the DVD, then “ INPUT INVALID” will appear,
and you must try again.
•Title search may not work properly with some discs.
2345
1689
7
VCD
PBC
123
10
4
11 9
5
87
6
2
4
5
8
9
11
13
15
7
6
10
12
14
16
17 18
19
20
22
21
23
25
24
26
28
27
29
30
1
3
32
31
33
34
BasicOperation
Starting Playback
1. Plug the AC power cord into your AC power outlet at home. The STANDBY indicator turns on.
The unit is connected to the main power.
2. If the unit is on stand by mode. Press the STANDBY ON/OFF button of the remote handset or the
main unit to turn on the player.
•Press and hold the STANDBY button for a few seconds, and the unit will turn on.
3. Press the OPEN/CLOSE button to open the disc tray (‘Open’ appears ondisplay and TVscreen) and
place the disc with the label side facing up on the disc tray.
•Hold the disc without touching either of its surfaces, position it with the printed title side facing
up, align it with the guides, and place it in its proper position.
4. Press the OPEN/CLOSE button. The disc tray closes (‘Load’ appears on display and ‘Loading’
appears on TV screen),and play start automatically.
If a MENU appears on the TV screen:
Press the , , or button, to select the desired item, then press the ENTER button. Playback
of the selected item will start.
Note: For more details, please refer to the jacket or case of the disc.
5. Stopping Play
Press the STOP button once and “Press Play Key To Continue” and “” appear on the screen.
The player memories the point where you stopped. If you press the PLAY button again, play
starts automatically from the point where you stopped. (Resuming Playback) If the STOP button
is pressed twice, the screen only shows “”, then the player stops completely.
Note: Some discs may not start resuming playback.
Key Lock
This feature allows you to lock all the controls on the front panel of the main unit to prevent others,
especially children, from operating the unit without the remote handset. To activate the Key Lock
feature press the KEY LOCK button on the remote control. The "KEY LOCK ON" statement will
appear on the TV screen and all front panel controls, including the Power button will be locked. To
unlock the front panel controls press the KEY LOCK button on the remote control again. The “KEY
LOCK OFF” statement will appear on the TV screen to indicate the unlock action.
Skip and Searching
1. SKIP BACK / NEXT button:
Press these buttons to go to the previous/next chapter (DVD) or track (CD).
2. SLOW/F / SLOW/R button:
Press this button to select slow-motion forward or rewind playback at 1/2, 1/4, 1/8, 1/16 normal
speed without sound.
•Press the PLAY button to resume normal playback.
Note: This player does not support slow-motion rewind (SLOW/R) playback and “ ” will appear on
the TV screen if you press SLOW/R button when playing a VCD disc.
3. PAUSE/STEP button:
Press the PAUSE/STEP button once to pause the picture. Repeatedly press the PAUSE/STEP
button to play the DVD one frame at a time.
•Press the PLAY button to resume normal playback.
4. SEARCH REV and FWD button:
These buttons allow searching ahead/back at 4-level speeds as 2x, 4x, 8x, and 16x.
•Press the PLAY button to return to normal playback.
Title/Chapter Search
Press the SEARCH button once, then press the Navigation button (,) to select Title/Chapter
and press the Number buttons to select title number and chapter number respectively.
Title Time/Chapter Time Search
Press the SEARCH button twice and press Number buttons to select title time (Hour: Minute: Second).
Press the SEARCH button the third time and repeat the above mentioned procedure for chapter
time.
14
23
86
7
5
AV Amplifier with a
Dolby Digital Decoder
COAXIAL
IN
AUDIO IN
RL
HDMI
PLASMA TV
VIDEO
IN
S-VIDEO
IN
YPBPR
CITIZEN C805DVD_Engib.p65 8/11/2006, 3:25 PM1

