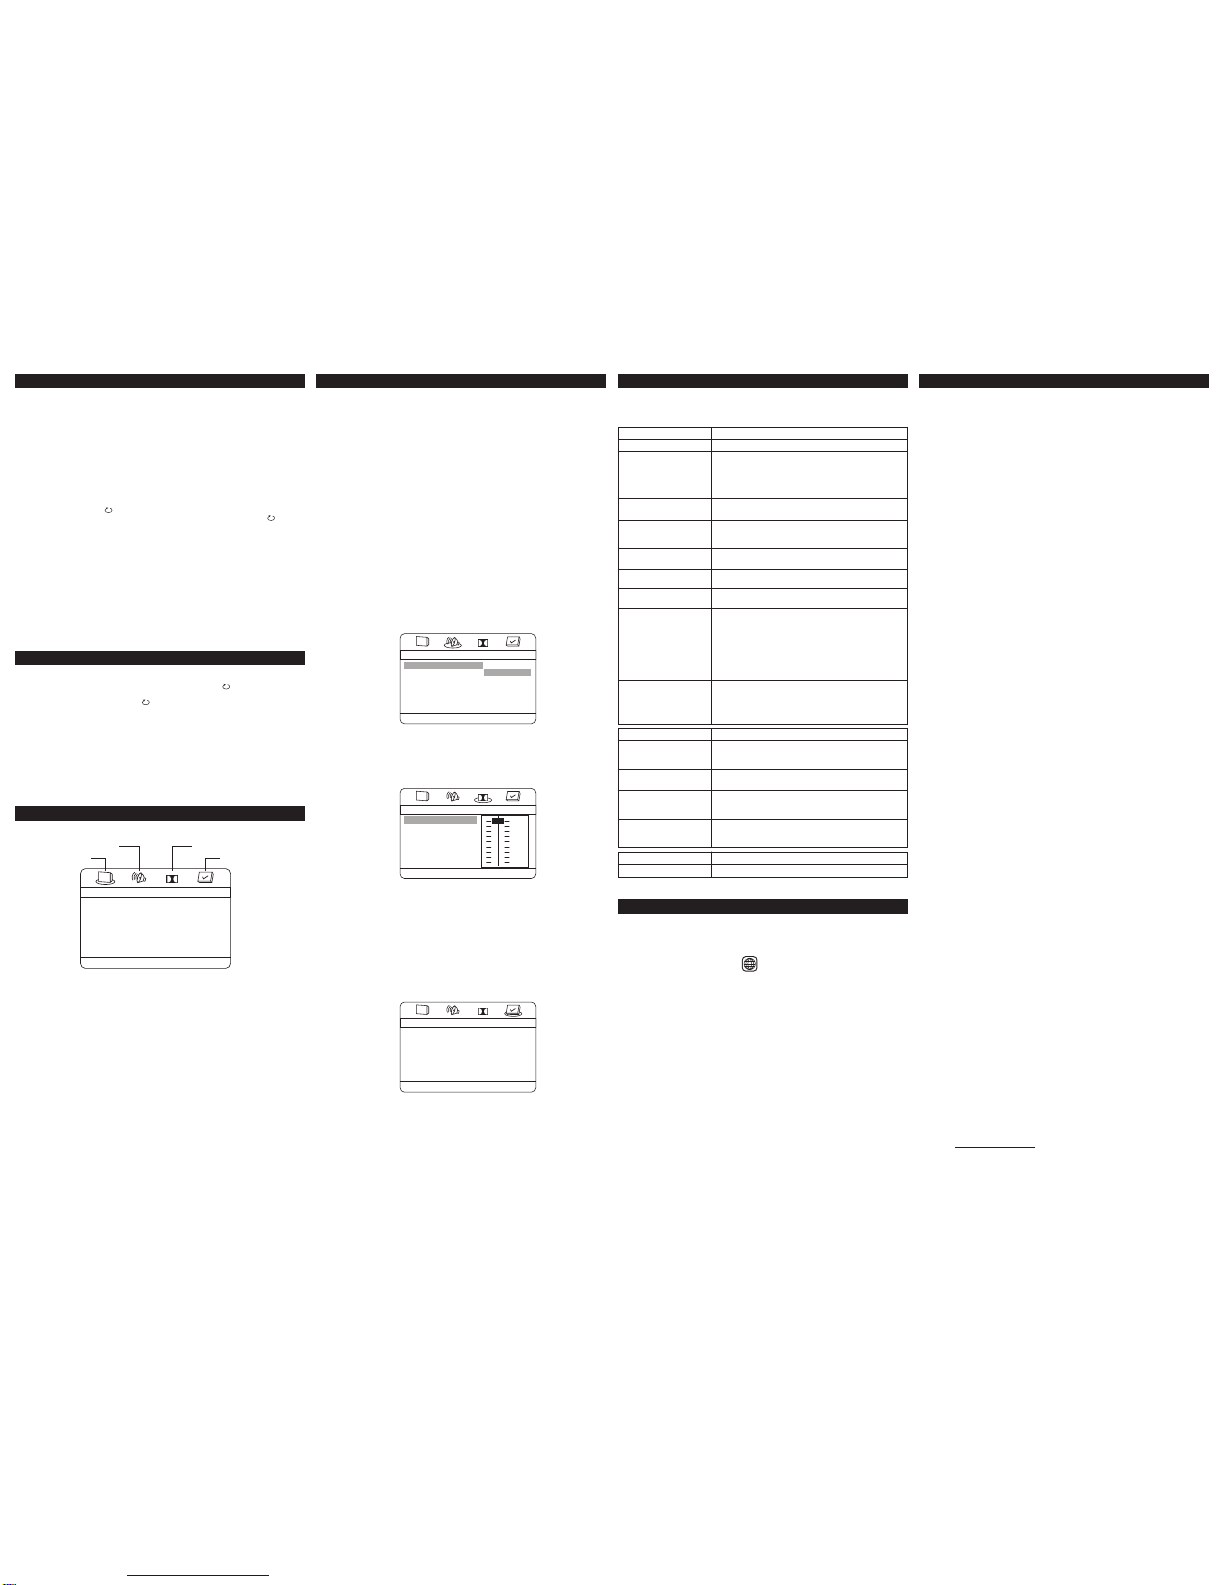
Troubleshooting
Before requesting service for this player, check the chart below for a possible cause of the problem
you are experiencing. Some simple checks or a adjustment on your part may eliminate the problem
andrestoreproperoperation.
Symptom(Common)
Nopower
Playfailstostarteven when
PLAYis pressed.
Playstartsbut then stops
immediately.
Nopicture
Nosoundor
Distortedsound.
Pictureisdistortedduringrapid
advance or rapid reverse.
Norapidadvance(orrapid
reverseplay).
No4:3 (16:9) picture.
Nooperationscanbe
performedwiththeremote
controlunit.
Nokeyoperation(bythe main
unitand/ortheremote control
unit)iseffective.
Symptom(DVD)
Audiosoundtrackand/or
subtitlelanguageis not the
disc,theinitialsettings.
Nosubtitles.
Alternativeaudiosound-track
(orsubtitle)languagefail to
beselected.
Anglecannotbe changed.
Symptom(VideoCD)
Nomenuplay.
Remedy
•InserttheAC power plug securely intothepoweroutlet.
•Condensation has formed: wait about 1 to 2 hours to allow the
playertodryout.
•Thisplayercannotplay a disc other than DVD andCD.
•Thediscmaybedirtyandmayrequire cleaning.
•Ensurethatthe disc is installedwiththelable side up.
•Ensurethattheequipment is connected properly.
•Ensurethattheinputsettingfor the TV is “Video”.
•Ensurethattheequipment is connected properly.
•Ensure that the input setting for the TV and stereo system are
correct.
•Thepicturewillbesomewhatdistortedattimes:thisisnormal.
•Some discs may have sections which prohibit rapid advance
(or rapid reverse.)
•Choose the correct setup “TV Display” item which matches the
TV set used.
•Checkthebatteryareinstalledwith the correct polarities (+ and –).
•Thebatteryareexhausted:replacethemwithnew ones.
•Point the remote control unit at the remote control sensor and
operate.
•Operate the remote control unit at a distance of not more than 6m
fromthe remote control sensor.
•Removetheobstacles between theremotecontrolunit and remote
controlsensor.
•Press the STANDBYbutton of the unit to set the player to Standby
mode and then back to ON. Alternatively, press the STANDBY
buttonto settheplayer toStandbymode,disconnect thepowerplug
and then reconnect it. (The player may not be operating properly
duetolightning,staticelectricity or some other external factor.)
Remedy
•If the audio soundtrack and/or subtitle language does not exist on
the language selected at the initial settings will not be seen/heard.
•Subtitlesappearonly with discs whichcontainthem.
•SubtitlesareclearedfromtheTV monitor.
•An alternative language is not selected with discs which do not
containmore than one language.
•This function is dependent on software availability. Even if a disc
has a number of angles recorded, these angles may be recorded
forspecificscencesonly.
Remedy
•Thisfunctionworksonlyfor Video CDs with playback control.
Menus System
OSDLang
•English: The OSD is in ENGLISH.
•Spanish: TheOSD is in SPANISH.
•German: The OSD is in GERMAN.
•French: The OSD is in FRENCH.
Captions(OPTIONAL)
Select this option when some newer DVD movies include closed captioning for hearing impaired
viewers.
•Select “ON” to switch on the captioning feature that describes other sounds being heard
together with the dialog.
HDMISetup
If you are using the DVD Player’s HDMI output to connect to your TV, set the HDMI Setup
option to the resolution that matches your TV. See the user’s guide that came with your TV for
informationon the highest resolution your TV supports.
HDMIAudio
Select the SPDIF or PCM (Pulse Code Modulation) format to output your Audio signal.
Note: In order to obtain optimum HDMI picture and audio quality, it is necessary to use a HDMI
cable (not included) to connect your TV to this unit.
AUDIO SETUP MENU
Select Audio in the Setup Menu using the 4button, and then select the desired option
using the Navigation (3, 4,5,6) buttons to navigate through the menus/screens and
pressthe ENTER/PLAY4buttonto select and Setup to exit.
Thesetting structure is:
Downmix
LT/RT: The front speakers are in theatrical LT/RTdownmix mode.
Stereo: The front speakers are in Stereo Downmix mode.
DOLBY DIGITALMENU
Thesetting structure is:
Dynamic
This feature monitors the audio track and controls the different sound levels. High volume output
are softened enabling you watch your facourite movie without disturbing others via dynamic
compression. Select a range using the Navigation 5and 6buttons and press ENTER/PLAY4
to confirm.
PREFERENCE SETUP MENU
The menu gives you options to change some aspects of your DVD player to fit your personal
preferences. To access the Preferences Setup Menu, press the SETUP button while the player
is in STOP mode. Select the Preference Setup Menu using the Navigation 4button. Press
ENTER/PLAY4and select the desired options using Navigation 3, 4, 5, 6buttons to navigate
throughthemenu/submenuandpressthe ENTER/PLAY4buttonto confirm selection.
Audio: Selects the dialogue language: English, French, Spanish,German or Japanese.
Subtitle: Selectsthesubtitlelanguage: English French, Spanish,German, Japanese or Off.
Disc Menu: Selectsthedisc’smenulanguage:English,French,Spanish,German or Japanese.
Note: Discs are created differently. The DVD player can’t overrride some languages or
preferences. If a disc’s software was created to play the movie (title) in a perferred
language, the preference you set might be ignored. Also, if the language isn’t available
on the disc you’re playing the disc’s default languages will be chosen. If the disc wasn’t
created with subtitles, you won’t be able to use the Subtitle feature.
CD Basic Operation
PlaybackofaCD
1. Pressthe STANDBYON/OFF button to turn on the unit.The STANDBYindicatorwillgoout.
2. Press the OPEN/CLOSE button to open the disc tray. “Open” will appear on the screen.
Insert a disc with the label side facing up on the disc tray.
3. Press the OPEN/CLOSE button to close the disc tray. “Close” will appear on the screen.
After loading, playback will start automatically.
4. During playback, press the PAUSE/STEP to pause playback, press ENTER/PLAY4button
to resume normal playback.To stop playback, press the STOP button.
Note: There will be no resume function for playing CDs.
RepeatOne/All Play
To repeat play a track, simply select the track as described previously, then press the
REPEAT/A-B button once; “ TRACK” will appear on the screen and the unit will repeat
the selected track continuously. Press the REPEAT/A-B button a second time; “ ALL” will
appear on the screen and the unit will repeat all the tracks on the disc. Press the REPEAT/A-B
again to cancel all repeat modes.
PictureCDOperations
1. Pressthe STANDBYbutton to turn on the unit. The STANDBYindicatorwillgoout.
2. Press the OPEN/CLOSE button to open the disc tray. “Open” will appear on the screen. Insert
a disc with the label side facing up on the disc tray.
3. Press the OPEN/CLOSE button to close the disc tray. “Close” will appear on the TV
screen. After loading, playback will start automatically. Press the Skip 9or :button to
skip through the pictures. If playback does not start automatically, press the Navigation
(5,6) button to select the desired picture and then press the ENTER/PLAY4button to
begin playback.
Playback Mode
RepeatPlayback
While in the Playback mode, press the REPEAT/A-B button once; “ Chapter” will appear on
the screen for a few seconds and the currenty playing Chapter will repeat continuously. Press
the REPEAT/A-B button a second time; “ Title” will appear on the screen for a few seconds
and the currenty playing Title will repeat continuously. Press the REPEAT/A-B button repeatedly
until “Off” appear on the screen to indicate cancellation of the repeat mode.
A-BRepeatPlayback
While in the Playback mode, press the REPEAT/A-B button three times to define where you
want the section to start. Press the REPEAT/A-B button again to define where you would like
the section to end, the unit will then play the selected area continuously. Press the REPEAT/
A-Bbuttonagain to cancel all Repeat modes; “Off” will appear on the screen temporarily.
Note: Repeat function may not work properly with some discs.
Menus System
Press the SETUP button to display the player’s main menu.
The setup menu lets you customize the DVD player by allowing you to select various parameters
foryourdesiredadjustment.Enter the Setup Menu by pressing SETUP button.
Use the Navigation (3,4,5,6) buttons to navigate through the menus/screens and press the
ENTER/PLAY4 button to select the highlighted option. To exit the Setup Menu, press the SETUP
button.
GENERALSETUPPAGE
TVDisplay
You can choose a display that how a disc’s content appears on your TV screen.
1. Normal/PS(4:3 Standard):
Reproduces a 4:3 picture with some distortion,
2. Normal/LB (4:3 Letterbox):
Gives best reproduction of pictures recorded in this format (i,e., with horizontal bands at the
topand bottom of the screen)
3. Wide (16:9 Widescreen):
Reproduces 16:9 format films in full, on a 16:9 screen.
AngleMark
This only works when there is an angle mark on the disc.
•Select “ON” the screen shows the angle mark when playing a DVD.
•Select “OFF” the angle mark is not shown.
152-05550-0545
CITIZEN®WARRANTY
Consumer Electronics Products and Home Appliances
Thank you for choosing CITIZEN®!
SYNNEX Canada Limited gives the following express warranty to the original consumer purchaser or
gift recipient for this CITIZEN product, when shipped in its original container and sold or distributed in
Canada by SYNNEX Canada Limited or by an Authorized CITIZEN Dealer:
SYNNEX Canada Limited warrants that this product is free, under normal use and maintenance, from
any defects in material and workmanship. If any such defects should be found in this product within the
applicable warranty period, SYNNEX Canada Limited shall, at its option, repair or replace the product as
specified herein. Replacement parts furnished in connection with this warranty shall be warranted for a
period equal to the unexpired portion of the original equipment warranty.
This warranty shall not apply to:
a. Any defects caused or repairs required as a result of abusive operation, negligence, accident,
improper installation or inappropriate use as outlined in the owner's manual.
b. Any CITIZEN product tampered with, modified, adjusted or repaired by any party other than
SYNNEX Canada Limited or CITIZEN's Authorized Service Centres.
c. Damage caused or repairs required as a result of the use with items not specified or approved
by SYNNEX Canada Limited, including but not limited to head cleaning tapes and chemical
cleaning agents.
d. Any replacement of accessories, glassware, consumable or peripheral items required through
normal use of the product including but not limited to earphones, remote controls, AC adapters,
batteries, temperature probe, stylus, trays, filters, cables, paper, cabinet, cabinet parts, knobs,
buttons, baskets, stands, shelves, cookware and cooking utensils.
e. Any cosmetic damage to the surface or exterior that has been defaced or caused by normal
wear and tear.
f. Any damage caused by external or environmental conditions, including but not limited to
transmission line/power line voltage or liquid spillage.
g. Any product received without appropriate model, serial number and CSA /cUL /cULus /cETL /
cETLus markings.
h. Any products used for rental or commercial purposes.
i. Any installation, setup and/or programming charges.
Should this CITIZEN product fail to operate during the warranty period, warranty service may be
obtained upon delivery of the CITIZEN product together with proof of purchase and a copy of this
LIMITED WARRANTY statement to anAuthorized CITIZEN Service Centre. In-home warranty service
may be provided at SYNNEX Canada Limited's discretion on any CITIZEN television with the screen
size of 27" or larger.This warranty constitutes the entire express warranty granted by SYNNEX Canada
Limited and no other dealer, service centre or their agent or employee is authorized to extend, enlarge
or transfer this warranty on behalf of SYNNEX Canada Limited. To the extent the law permits, SYNNEX
Canada Limited disclaims any and all liability for direct or indirect damages or losses or for any
incidental, special or consequential damages or loss of profits resulting from a defect in material or
workmanship relating to the product, including damages for the loss of time or use of this CITIZEN
product or the loss of information. The purchaser will be responsible for any removal, reinstallation,
transportation and insurance costs incurred. Correction of defects, in the manner and period of time
described herein, constitute complete fulfillment of all obligations and responsibilities of SYNNEX
Canada Limited to the purchaser with respect to the product and shall constitute full satisfaction of
all claims, whether based on contract, negligence, strict liability or otherwise.
CARRY-IN PARTS & LABOUR WARRANTY PERIODS:
•Audio Products: 1 Year (Remote Control, if applicable – 90 Days)
•DVD Products: 1 Year (Remote Control – 90 Days)
•LCD & Plasma Display TV: 1 Year (Remote Control – 90 Days)
•Television Products: 1 Year (Remote Control – 90 Days)
•VCR Products: 1 Year (Remote Control – 90 Days, Video Heads – 6 Months)
•HomeAppliances: 1 Year
–Microwave Magnetron parts only additional 3 Years
–Refrigerator / Freezer Compressor parts only, additional 4 years
To obtain the name and address of the nearest Authorized CITIZEN Service Centre or for more
information on this warranty:
•visit www.citizen-electronics.com
•mail your inquiry to SYNNEX Canada Limited
Citizen Customer Service
200 Ronson Drive
Toronto, ON M9W 5Z9; or
•call toll free 1-800-663-5954, Monday to Friday 9:00am - 5:00pm Eastern Time.
Citizen is a registered trade-mark of SYNNEX Canada Limited
08.2007
Additional Information
RegionManagementInformation
This DVD/CD player is designed and manufactured to respond to the Region Management Infor-
mation that is recorded on a DVD disc. If the Region number described on the DVD disc does not
correspondto the Regionnumberof thisDVD/CDplayer,this DVD/CDplayercannot play thisdisc.
TheRegionnumberforthisDVDplayeris .
DVD Disc
Therearethemarksonsome DVD disc package.
Notes:
•Onlytheabove types of discscanbeplayed on this unit.
DVD-ROM,CD-ROM,CDV,etc. cannot beplayed.
Some CD-R and CD-RW discs cannot be played depending on the condition of the player and
thedisc.
•This unit is to be used exclusively with the NTSC or PAL colour system. SECAM system discs
cannotbeused with thisunit.
DVD Disc
DVDdiscsare divided into titles,andthetitles are sub-divided intochapter.
MusicCD Disc
MusicCDdiscs are divided into tracks.
Notesonhandlingdiscs
•Do not expose the disc to direct sunlight, high humidity, or high temperatures for extended
periodsoftime.
•Discsshouldbe returned to their casesafteruse.
•Donotapply paperorwriteanything on the discsurface.
•Handlethedisc by itsedge.Do not touch the playingsurface(glossy side).
Fingerprints and dust should be carefully wiped off the playing surface of the disc with a soft cloth.
Wipeina straight motion from thecentretothe outside ofthedisc.
•Never use chemicals such as record cleaning sprays, antistatic sprays or fluids, benzene or
thinnertoclean discs.