Citizen DOUBLE FACE JQ4 Series User manual

CITIZEN QUARTZ
DOUBLE FACE
Model No. JQ4❈❈❈
Cal. No. C820
1. Main Features
This is a combination quartz watch with a full range
of features such as Time, Calendar, Alarm,
Chronograph, and Timer, plus the Taplight function,
which illuminates the face when you tap the watch
face gently. The display can be switched easily, so
that the entire digital display is cleared, leaving only
the time and calendar characters, or the entire
digital display appears, or some other configuration.
An EL light is included, which can be switched on
using the tap switch.
2. Component Parts and their Functions
3. How to Switch the Digital Display
• Use the tap switch or button to switch the time
and calendar modes between three digital
displays. Set the time and calendar displays
according to their respective adjustment methods.
(1) How to switch the display by tap switch
(by tapping the watch gently)
• When the tap switch is on, tap the
face of the watch (the glass or
somewhere else) gently with your
fingernail to light the EL light and
switch display.
✩Do not tap on the glass with any sharp or
metallic object as these could scratch or break
the glass.
✩If the watch is strapped tightly to your wrist, it
may become difficult to switch the tap switch on.
For best results, adjust the strap to deep some
slack.

<How to Switch the Tap Switch
“ON” and “OFF”>
• When the watch is in time
adjustment mode, press button
Ato switch the tap switch ON
and OFF alternately. When the
tap switch is ON, “ON” appears
next to the TAP mark.
(1) Press button
Mto switch to
time mode.
(2) Press button
Bfor 2 seconds or longer to put
the watch in time adjustment mode.
(3) Press button
Awhile both “TAP” and “TME” are
flashing to switch ON and OFF.
(NOTE) Each time you press button
Bagain,
the adjustment position shifts through
summertime, seconds, minutes, hours,12H/24H.
(4) Press button
Mto return to normal Time display.
(2) How to switch the display by pressing
buttons
• Regardless of whether the tap switch is ON or
OFF, the display changes each time you press
button
Bduring normal Time or Calendar display.
(3) Switching the digital display
4. Setting the Analog Time
(1) Pull the crown out so that the second hand
stops at the “0” position.
(2) Turn the crown and set the hands to the correct
time.
(3) After setting the time, press the crown back in to
start the watch.
✩ Stop the second hand at the “0” position and then
press the crown when the digital display reaches
zero seconds. The second hand will start to
move in synchronisation with the digital display.
5. Switching Digital Functions (Modes)
In addition to Time mode, this watch has 4 other
modes; Calendar, Alarm, Chronograph and Timer
Each time you press button
M, the mode changes.
6. Using Digital Functions (Modes)
• Press the button
A(or kept pressing) while the
watch is in normal Time display to switch the EL
light on.
<To Set Time>
(1) Press button
Bfor at least
2 seconds or longer during
Time mode (normal display) to
change to adjustment mode.
The time display and graphic
display will disappear and
“TAP” and “TME” will flash.
(2) Pressing button
Awhile “TAP” and “TME” are
flashing to switch the tap switch ON and OFF.
(3) Press button
Bwhile “TAP” and “TME” are
flashing to change the area of the display that is
flashing. Press button
Buntil the position you
want to adjust is flashing.
(4) Press button
Ato adjust flashing section.
• Press and hold button Afor rapid
advancement. Summertime and 12H/24H
change each time the button is pressed. There
is no rapid advancement for these functions.
(5) Press button
Awhile seconds are flashing,
seconds will return to “00” and restart.
• If seconds show 30 through 50, minutes
display will advance one minute.
(6) Press button
Mto return to normal Time display.
You may also set the analog and digital displays
for different times as a dual time display.
Time Mode
A
• Auto-Return to the normal Time display (Full
Time Display) will be activated when the watch
is left in the adjustment mode for about 2
minutes.
• Make sure that the AM/PM indication is correct
when setting the time in the 12-hour display
system.
• Instant Manual Return to normal Time display
(Full Time Display) can be made by pressing
button
Min Time adjustment mode.

• If you press button B(or kept pressing) while the
watch is normal Calendar mode, the EL light will
flash.
(1) If you press and hold button
B
for 2 seconds or longer while
the watch is in Calendar mode
(normal display), the “Month”
will start flashing, indicating
that the watch is adjustment
mode.
(2) Each time you press button
B, flashing position
changes as shown on the right. Flash the part
you want to adjust.
(3) Press button
Ato adjust flashing position.
(Press and hold button Afor rapid
advancement.)
(4) Press button
Mto return to normal Calendar
display.
Day of the week is automatically set with
adjustment of Year, Month and Date.
• When the tap switch is ON, tap the watch gently
to light the EL light.
<To Set Alarm>
(1) Press and hold button
Bin
Alarm mode (normal display)
for 2 seconds or longer. “Hour”
starts flashing and may be
adjusted.
(2) Each time you press button
B
flashing position changes.
Flash the part you want to adjust.
(3) Press button
Ato set the time you want the
alarm to sound. (Press and hold button Afor
rapid advancement.)
(4) Press button
Mto return to Alarm mode (normal
display).
(Note) If the watch is set to 12-hour display.
(AM-PM) in Time mode, Alarm will also be set to
12-hour display.
<To Switch Alarm ON/OFF>
• Press button
Ain Alarm mode (normal display) to
switch the alarm ON or OFF.
<Duration of Alarm Sounding and How To Stop
the Alarm Sound>
• Alarm will sound for 15 seconds.
• Press any button to stop Alarm buzzer.
<Alarm Sound Monitor>
• Press and hold button
Ain Alarm mode to make
the alarm monitor sound.
< Auto-Return>
• The display will return to normal Alarm display
“ON” in Alarm adjustment mode if no buttons are
pressed for 2 minutes or longer. The display will
return to normal Time mode if no buttons are
pressed for 2 minutes or longer in normal Alarm
display.
<Instant Manual Return>
• Press button
Min Alarm adjustment mode to
return to Alarm mode (normal display).
• Chronograph measures in units of 1/100 of a
second, up to “23 hours, 59 minutes and 59
seconds”. On reaching 24 hours of elapsed time,
it resets to “00 minutes, 00 seconds and 00”
hundredths and stops.
• When the tap switch is ON, tap the watch gently
to light the EL light.
Calendar Mode
B
• Calendar can be set from 1999 through 2099.
• Auto-Return to normal Calendar display will be
activated when the watch is left in Calendar
adjustment mode (flashing display) for about
2 minutes.
• When Calendar is set to a non-existent date
(e.g., February 30), display will automatically
show the first day of next month when returned
to normal mode.
• Month-end adjustments are not necessary
since calendar is programmed to set
automatically.
• Instant Manual Return to normal Calendar
display (Full Calendar Display) can be made by
pressing button
Min Calendar adjustment mode
Alarm Mode
C
Chronograph Mode
D
Minute (“hours” after 60 minutes)
Seconds (“minutes” after 60 minutes)
1/100 (“seconds” after 60 minutes)
Display of Time Measurement
• Chronograph shows “Minutes”, “Seconds” and
“1/100 second” and will change to “Hours”,
“Minutes” and “Seconds” after 60 minutes.

<Elapsed Time Measurement>
(1) Press button
Ato start/stop Chronograph.
1 Each time you press button
Awhile in time
measurement, start/stop is repeated.
2 EL light is turned ON for 3 seconds when
counting is stopped.
(2) Press button
Bwhen counting is stopped to
reset chronograph.
<Split Time Measurement>
(1) Press button
Ato start/stop Chronograph.
(2) Press button Bwhile in time measurement.
Split time will appear for 10 seconds.
1 “SPL” will flash while split time is displayed.
2 EL light is turned on for 3 seconds at the time
of split time operation.
(3) Press button
Bwhen counting is stopped to
reset Chronograph.
• Timer can be set in units of 1 minute up to 60
minutes. When Timer countdown is finished,
buzzer will sound for about 5 seconds and return
to the Timer set time.
• When the tap switch is ON, tap the watch gently
to light the EL light.
<To Set Timer>
(1) If you press button
Awhile the set time is
flashing in timer mode, the set time will be
reduced by one minute for each time you press
and release the button. Continue until you reach
the set time you want.
(Press and hold button
Bto make rapid
adjustment to the set time.)
<To Use Timer>
(1) Press button
A. Timer starts countdown from
set time.
(2) Press button
Ato stop Timer during in the
measurement. Press button
Ato start it again
while in the “Stop” position.
• Press button
B, while Timer is in operation, to
return to the initial set time, and start the
countdown again.
(3) If you press button
Bwhile Timer is stopped,
Timer will return to the initial set time.
• The confirmation tone will sound when you press
the button.
7. All Reset Function
Use All Reset function to reset the watch after
replacing the battery or if the watch is showing
abnormal operation or display. All Reset function
can be performed as follows:
(1) Pull crown out.
(2) Press buttons
A,
Band
Msimultaneously. (All
digital displays will disappear while pressing.)
(3) Release three buttons. (All digits are shown.)
(4) Push crown in. (At this point, buzzer sounds in
confirmation.)
This completes the All-Reset operation. Set
each mode correctly before using the watch.
8. Precautions
CAUTION Water-Resistance Performance
There are several types of water-resistant watches,
as shown in the following table. For correct use
within the design limits of the watch, confirm the
level of water-resistance of your watch, as indicated
on the dial and case, and consult the table.
• Water-resistance for daily use (to 3 atmospheres):
This type of watch is water-resistant to minor
exposure to water. For example, you may wear
the watch while washing your face; however, it is
not designed for use underwater.
• Upgraded water-resistance for daily use (to 5
atmospheres): This type of watch is water-
resistant to moderate exposure to water. You may
wear the watch while swimming; however, it is not
designed for use while skin diving.
• Upgraded water-resistance for daily use (to 10/20
atmospheres): This type of watch may be used for
skin diving; however, it is not designed for scuba
or saturated diving using helium gas.
If switched to another mode while Chronograph
is running and then returned to Chronograph
mode again, the watch will return to countdown
continuing at the time of switching. (If switched
while Split Time is shown, the watch will return
to Chronograph running mode.)
However, if Chronograph counting has exceeded
24 hours, the watch will return to initial
Chronograph reset display.
Timer Mode
E
Remaining Time
(Minutes, Seconds)
Timer Setting Time
If watch is switched to another mode while
Timer is in operation and then returned to
Timer mode again, the watch will return to
countdown continuing at the time of switching.
However, if countdown has completed, the
watch will return to initial Timer setting.

CAUTION
• Be sure to use the watch with the crown pressed
in (normal position). If your watch has a screw-type
crown, be sure to tighten the crown completely.
• Do NOT operate the crown or button with wet
fingers or when the watch is wet. Water may enter
the watch and compromise water-resistance.
• If the watch is used in seawater, rinse in fresh
water afterward and wipe with a dry cloth.
• If moisture has entered the watch, or if the inside
of the crystal is fogged up and does not become
clear within a day, immediately take the watch to
your dealer or Citizen Service Centre for repair.
Leaving the watch in such a state will allow
corrosion to form inside.
• If sea-water enters the watch, place the watch in a
box or plastic bag and immediately take it in for
repair. Otherwise, pressure inside the watch will
increase and parts (crystal, crown, buttons, etc.)
may come off.
CAUTION Keep Your Watch Clean
• Leaving dust and dirt deposited between the case
and crown may result in difficulty in pulling the
crown out. Rotate the crown while in its normal
position from time to time, to loosen dust and dirt
and then brush it off.
• Dust and dirt tend to be deposited in gaps in the
back of the case or band. Deposited dust and dirt
may cause corrosion and soil your clothing. Clean
the watch occasionally.
Cleaning the Watch
• Use a soft cloth to wipe off dirt, perspiration and
water from the case and crystal.
• Use a soft, dry cloth to wipe off perspiration and
dirt from the leather band.
• To clean a metal, plastic, or rubber watchband,
wash away dirt with mild soap and water. Use a
soft brush to remove dust and dirt jammed in the
gaps in the metal band. If your watch isn’t water-
resistant, take it to your dealer.
NOTE: Avoid using solvents (thinner, benzine,
etc.), as they may mar the finish.
WARNING Handling of the Battery
• Keep the battery out of the reach of small
children. If a child swallows the battery, contact a
physician immediately.
CAUTION Replacing the Battery
• For replacement of the battery, take your watch to
your dealer or Citizen Service Centre.
• Replace the battery as soon as possible if the
service life of the battery has expired. Leaving a
depleted battery in the watch may result in
leakage, which can damage the watch severely.
CAUTION Operating Environment
• Use the watch within the operating-temperature
range specified in the instruction manual. Using
the watch where temperatures are outside the
specified range may result in deterioration of
functions or even stoppage of the watch.
• Do NOT use the watch in places where it is
exposed to high temperature, such as in a sauna.
Doing so may result in a skin burn.
• Do NOT leave the watch in a place where it is
exposed to high temperature, such as the glove
compartment or dash-board of a car.
Doing so may result in deterioration of the watch,
such as deformation of plastic parts.
• Do NOT place the watch close to a magnet.
Timekeeping will become inaccurate if you place
the watch close to magnetic health equipment
such as a magnetic necklace or a magnetic latch
of a refrigerator door or handbag clasp or the
earphone of a mobile phone. If this has occurred,
move the watch away from the magnet and reset
the time.
• Do NOT place the watch close to household
appliances that generate static electricity.
Timekeeping may become innacurate if the watch
is exposed to strong static electricity, such as
emitted from a T.V screen.
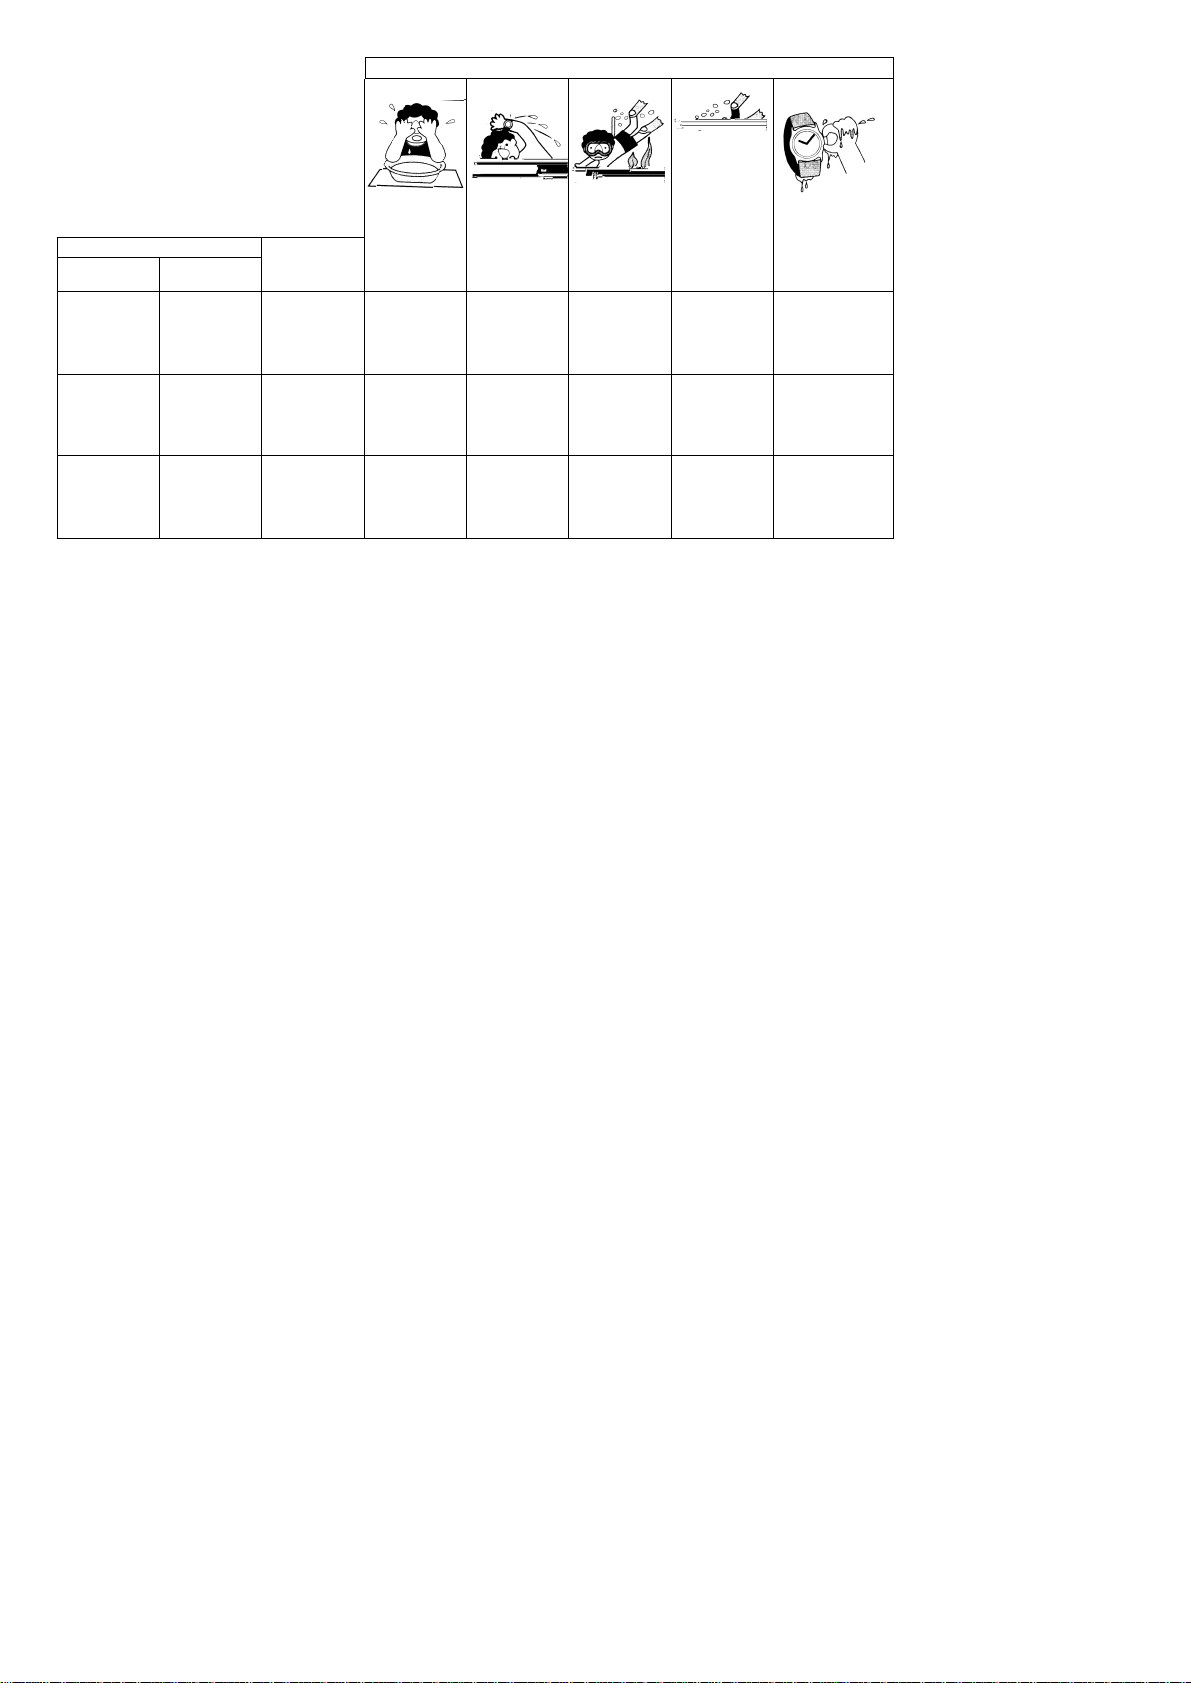
Indication Minor exposure to
water (washing
face, rain, etc.)
Dial Case (Case back) Specifications
OK
OK
OK
NO
OK
OK
NO
NO
OK
NO
NO
NO
NO
NO
NO
Moderate
exposure to water
(washing, kitchen,
work swimming,
etc.)
Marine sports
(skin diving) Scuba diving
(with air tank)
Operation of the
crown with
moisture visible
Examples of use
WATER RESIST
or no indication WATER
RESIST(ANT)
Water-
resistant to 3
atmospheres
WR 50 or
WATER RESIST50
WATER
RESIST(ANT) 5 bar
or WATER
RESIST(ANT)
Water-
resistant to 5
atmospheres
WR 100/200 or
WATER
RESIST100/200
WATER
RESIST(ANT) 10/20
bar or WATER
RESIST(ANT)
Water-
resistant to 10/20
atmospheres
* WATER RESIST(ANT) xx bar may also be indicated as W.R xx bar.

• Do NOT subject the watch to a strong shock such
as dropping it onto a hard floor.
• Avoid using the watch in an environment where it
may be exposed to chemicals or corrosive gases.
If solvents, such as thinner and benzine, or
substances containing such solvents come in
contact with the watch, discolouration, melting,
cracking, etc. may result. If the watch comes in
contact with mercury used in thermometers, the
case, band or other parts may become discoloured.
9. Specifications
1. Caliber No................C820
2. Type.........................Combination (Analog +
Digital) quartz watch
3. Accuracy..................Within ±20 seconds/month
(Within a normal
temperature range of + 5°C
to + 35°C/ + 41° to + 95°F
when worn.)
4. Operating Temperature
Range:.....................0°C~+ 55°C
(+ 32°F~ + 131°F)
5. Displlay Functions....• Time: Hours, Minutes,
Seconds, Normal
Time/switching
summertime, AM/PM
• Calendar, Month, Date,
Day (Year)
• Alarm: Hours, Minutes,
ON/OFF, Alarm Monitor
• Chronograph: 24-hour
Measurement (in 1/100
second units), Split Time
Measurement
• Timer: 60-minute
Countdown (in 1 minute
increaments)
6. Additional Functions...• Tap Switch Function
• EL Light Function
7. Battery......................Battery No.: 280-74,
Battery Code: SR936W
8. Battery Life..............About 2 years. (Based on
assumed use of alarm
buzzer 20 secs/day, timer
buzzer 5 secs/week and EL
Light 18 secs/day.)
• These specifications are subject to change for
product improvement without prior notice.
Table of contents
Other Citizen Watch manuals

Citizen
Citizen 9054 User manual

Citizen
Citizen 8218 User manual

Citizen
Citizen 41 series User manual

Citizen
Citizen 1S02 User manual

Citizen
Citizen 0S11 User manual

Citizen
Citizen E650 User manual

Citizen
Citizen Eco-Drive User manual

Citizen
Citizen 891 Manual

Citizen
Citizen C460 User manual

Citizen
Citizen MIYOTA GP52 User manual

Citizen
Citizen 8205 User manual

Citizen
Citizen 6S50 User manual

Citizen
Citizen AT9030-55L User manual

Citizen
Citizen YF20 User manual

Citizen
Citizen 6P22 User manual

Citizen
Citizen C500 Operating manual

Citizen
Citizen E210 User manual

Citizen
Citizen D130 Manual

Citizen
Citizen J810 User manual

Citizen
Citizen 6P28 User manual