manuals.online logo
Brands
  1. Home
  2. •
  3. Brands
  4. •
  5. Citizen
  6. •
  7. Watch
  8. •
  9. Citizen H80 Series User manual

Citizen H80 Series User manual

24
12
60
30
1050
2040
00
50
10
20
30
80
90
4060
70
LON
PAR
ATH
RUH
DXB
KHI
DEL
DAC
BKK
BJS
TYO
ADL
SYD
NOU
AKL
MDY
HNL
ANC
LAX
DEN
CHI
NYC
SCL
RIO
FEN
PDL
OK
RX
NO
S
M
T
W
T
F
S
ON
SMT
OFF
H80* Abbreviated instruction
• This watch is light-powered. Be sure your watch is fully charged before use.
• For complete instructions for setting, use, charging time and specifications, refer to the full instruction manual:
H80*
instruction manual
Component identification
Checking the power reserve
• You cannot execute this operation while using chronograph function.
1.
Push the crown in to position 0.
2.
Press and release the lower right button Ⓐ.
The chronograph minute hand indicates power reserve amount.
Indication
50
40
10
50
20
40
10
50
20
40
10
50
20
40
50
40
10
50
20
40
10
50
20
40
10
50
20
40
50
40
10
50
20
40
10
50
20
40
10
50
20
40
50
40
10
50
20
40
10
50
20
40
10
50
20
40
Duration About 180 -
130 days
About 130 - 30
days
About 30 - 2
days About 2 days
Power
reserve
Power reserve
is sufficient.
Power reserve
is OK.
Power reserve
is getting low.
Insufficient
charge
Charge immediately.
3. Press and release the lower right button Ⓐto finish checking.
• The hand automatically returns to indicate current time in 10 seconds.
Checking the signal reception result
This watch receives the time signal at 2:00 AM every day and adjust
the time and calendar automatically. If the 2:00 AM reception was
unsuccessful, it tries signal reception again at 3:00 AM.
• You cannot execute this operation while using chronograph function.
1.
Push the crown in to position 0.
2.
Press and release the lower right button Ⓐ.
The chronograph 1/20 second hand indicates the result of the last reception.
Indication Reception result
O (OK) The reception was successful.
N (NO) The reception failed.
• Try signal reception following the steps in “Receiving the signal
manually (on-demand reception)” if the last reception failed.
Continued on the next page
Day of week
indication
Button
Ⓐ
Button
Ⓑ
Reception result
indication
O (OK)
N (NO)
Hour hand
24-hour hand
Power reserve level
Chronograph minute
hand
Second hand/
Chronograph second
hand
Chronograph 1/20
second hand
Reception-in-
progress indication
(R/RX)
Minute hand
Date indication
Summer time
indication
Crown
City name
• Actual appearance may differ from the
illustration above.
• The crown has two positions when pulling it
out.
3. Press and release the lower right button Ⓐto finish checking.
• The hand automatically returns to indicate current time in 10
seconds without executing any operation.
Setting the city
• The city setting controls the target station from which the watch
tries to receive signals. Check the city setting when using this
watch.
1.
Pull the crown out to position 1.
The second hand indicates the current city setting; the chronograph
minute hand the standard/summer time setting; the chronograph
1/20 second hand the summer time auto/manual setting.
2.
Rotate the crown to select a city.
• Choose a city from “Table of the city names” below.
3.
Push the crown in to position 0to finish the procedure.
Table of the city names
Indication City name and second hand's position Time zone Signal station
LON *London 0 sec. 0Germany
PAR *Paris 2 sec. +1
ATH *Athens 4 sec. +2
Germany♦
RUH Riyadh 7 sec. +3
DXB Dubai 9 sec. +4
KHI Karachi 11 sec. +5
China♦
DEL Delhi 14 sec. +5.5
DAC Dhaka 16 sec. +6
BKK Bangkok 18 sec. +7
BJS/HKG
Beijing/Hong Kong 21 sec. +8 China
TYO Tokyo 23 sec. +9 Japan
ADL Adelaide 25 sec. +9.5
Japan♦
SYD Sydney 28 sec. +10
NOU Noumea 30 sec. +11
AKL Auckland 32 sec. +12
MDY Midway 35 sec. -11
USA♦
HNL Honolulu 37 sec. -10
ANC **Anchorage 39 sec. -9
LAX **Los Angeles 42 sec. -8
USA
DEN **Denver 44 sec. -7
CHI **Chicago 46 sec. -6
NYC **New York 49 sec. -5
SCL Santiago 51 sec. -4 USA♦
RIO Rio de Janeiro 53 sec. -3
FEN Fernando de Noronha 56 sec. -2 Germany♦
PDL *Azores 58 sec. -1
• For cities with * or **, indication of summer time and that of
standard time are linked together.
• The time zone in the table is based on UTC (Coordinated
Universal Time).
• When using the watch in an area not listed in the table, choose
and set the city of the same time zone.
• Countries or regions may change time zones for various reasons.
• Cities with ♦mark are out of receivable range and signals cannot be
received.
(The watch tries to receive signals from the target signal station though.)
• It may be difficult to receive signals in certain environment where
it is hard for signals to reach.
Crown's position
012
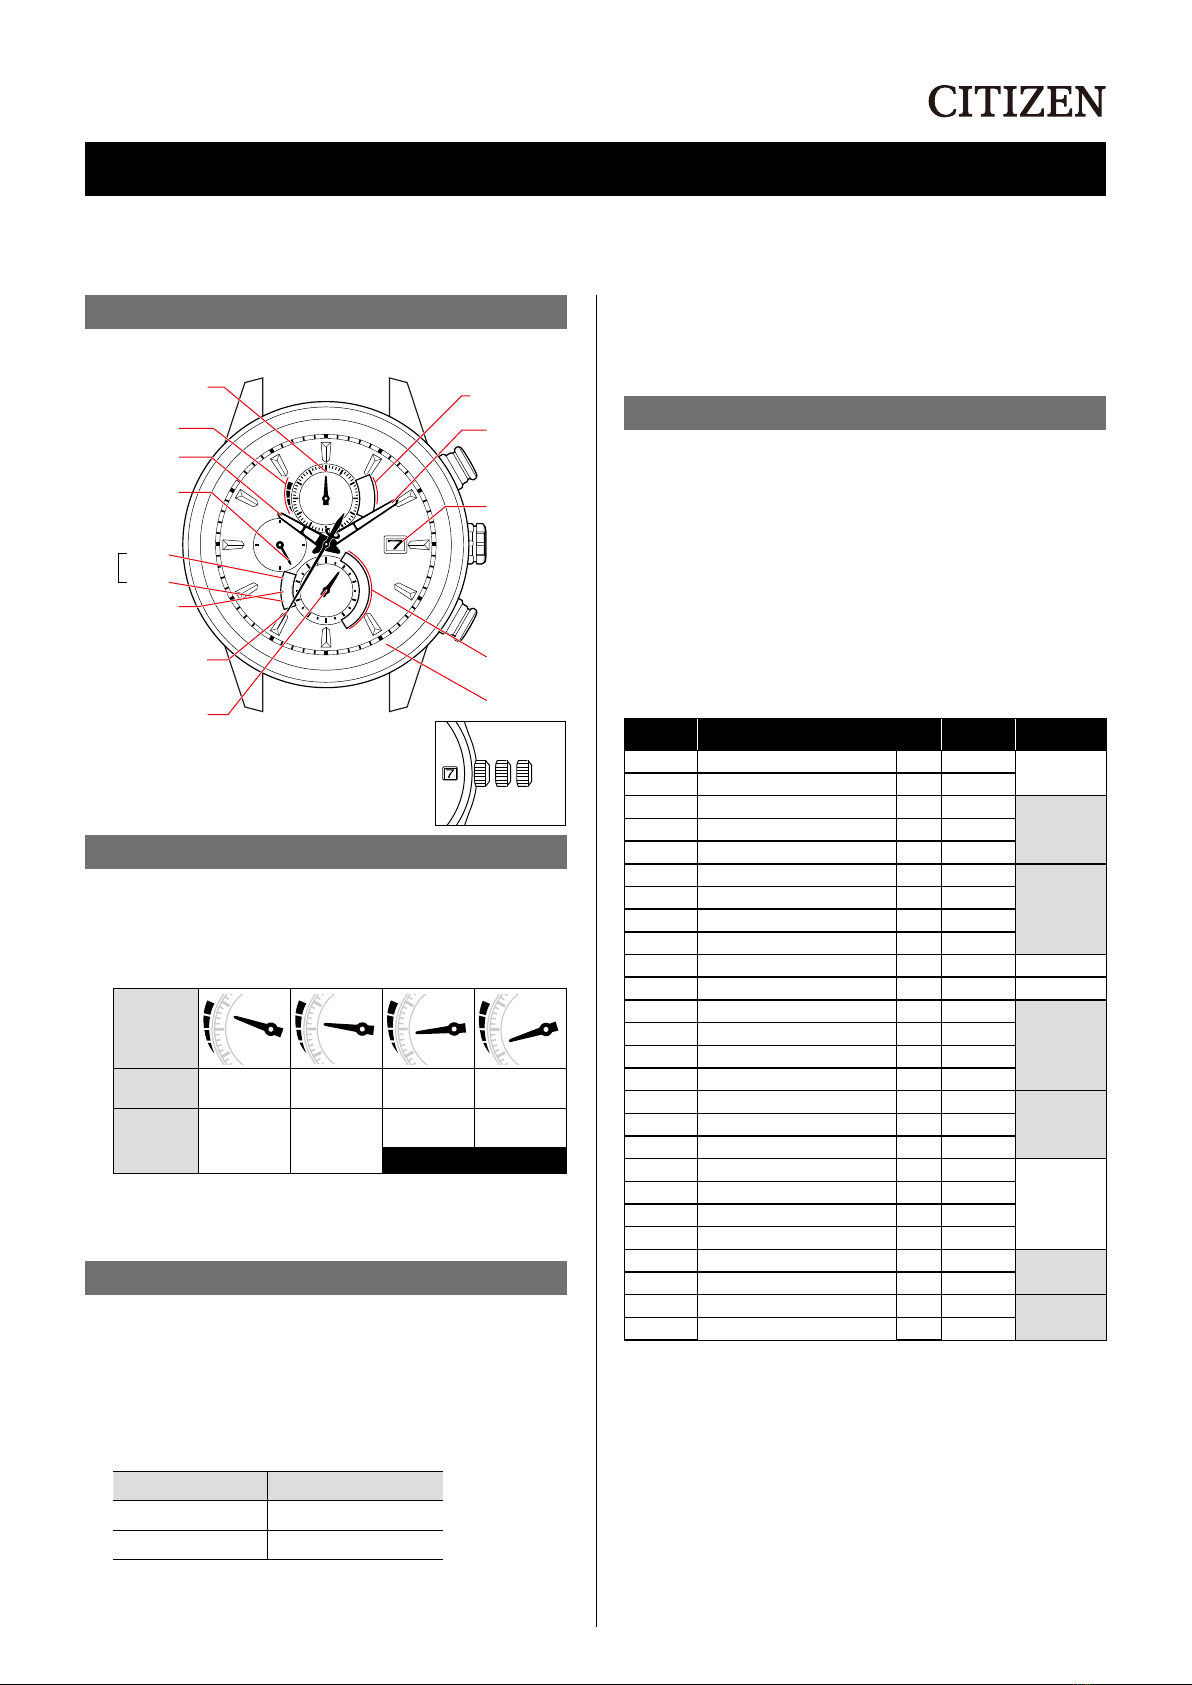
Adjusting the time and calendar manually
• The calendar of this watch does not have to be adjusted manually
until February 28, 2100 including leap years. (perpetual calendar)
1.
Pull the crown out to position 1.
2.
Press and hold upper right button Ⓑfor 2 seconds or
more.
The second hand points the 30-second and the chronograph
minute hand the 60-minute.
3.
Pull the crown out to position 2.
The second hand points 0 second and time and calendar
become adjustable.
4.
Press and release the upper right button Ⓑrepeatedly
to change the hand/indication to be corrected.
• Each time you press button Ⓑ, the target of adjustment
changes as follows and it moves slightly.
Minute/hour/24-hour hands →Date indication →
Day of week (chronograph 1/20 second hand) →Year/
month →(Back to the top)
5.
Rotate the crown to adjust time, date indication, day
of week, year and month.
• When you rotate the crown quickly, the hand/indication will
move continuously. To stop the rapid movement, rotate the
crown.
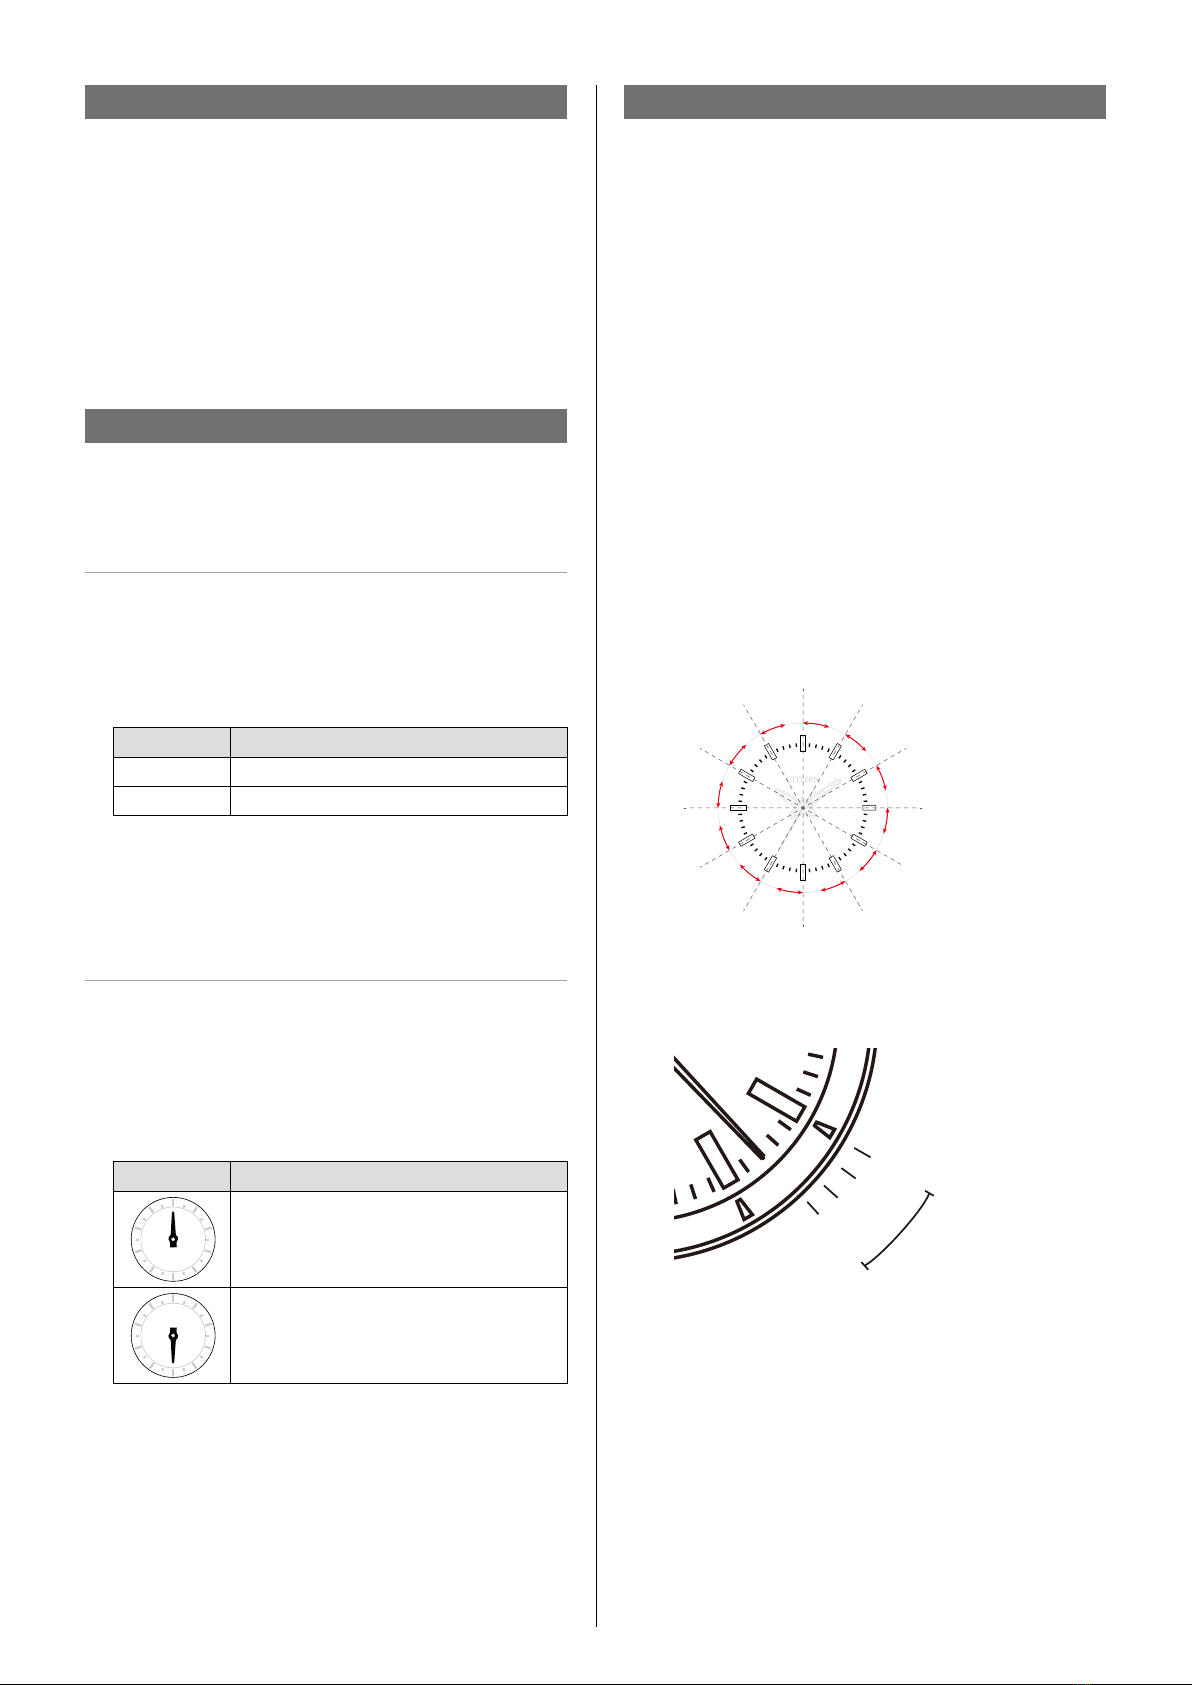
• Year and month are indicated with the second hand.
The month is indicated by the hour area.
The year corresponds to the years since leap year and
is indicated with the position of the second hand.
EX.: to set to April 2015
April → 4 o'clock area
2015 → 3rd year since leap year
6.
Repeat steps 4 and 5.
7.
Push the crown in to position 0in accordance with a
reliable time source.
The second hand starts moving.
H80*
Abbreviated instruction
Receiving the signal manually (on-demand reception)
• You cannot execute this operation while using chronograph
function.
• The target signal station depends on the city set.
1.
Push the crown in to position 0.
2.
Press and hold lower right button Ⓐfor 2 seconds or
more.
The previous signal reception result is indicated.
The chronograph 1/20 second hand points “R (RX)” after that
and on-demand reception starts. (2 - 30 minutes)
• Press and hold button Ⓐfor 2 seconds or more to cancel
reception.
Setting summer time
In regions utilizing summer time, the time signal includes summer
time check signal.
• You cannot execute this operation while using chronograph
function.
Switching summer time and standard time
1.
Pull the crown out to position 1.
The chronograph minute hand indicates the current standard
time/summer time setting.
2.
Press and release the upper right button Ⓑ.
• Each time you press button Ⓑ, the standard time/summer
time setting changes alternately.
Setting Meaning
SMT ON Summer time is indicated.
SMT OFF The standard time is indicated.
• The standard time/summer time setting can be changed
automatically.
3.
Push the crown in to position 0to finish the
procedure.
Switching the summer time auto/manual setting
1.
Pull the crown out to position 1.
The chronograph 1/20 second hand indicates the current
summer time auto/manual setting.
2.
Press and hold the lower right button Ⓐfor 2 seconds
or more.
• Each time you press and hold button Ⓐ, the summer time
auto/manual setting changes as follows:
Indication What to set
S
OK
RX
NO
M
T
W
T
F
S
00
50
10
20
30
80
90
4060
70
S
OK
RX
NO
M
T
W
T
F
S
00
50
10
20
30
80
90
4060
70
Auto:
SMT ON/OFF changes automatically de-
pending on whether received signals contain
the summer time signal or not.
S
OK
RX
NO
M
T
W
T
F
S
00
50
10
20
30
80
90
4060
70
S
OK
RX
NO
M
T
W
T
F
S
00
50
10
20
30
80
90
4060
70
Manual:
The standard time/summer time setting is
changed manually as required.
3.
Push the crown in to position 0to finish the
procedure.
Continued on the next page
12月
1月
2月
3月
4月
5月
6月
7月
8月
9月
10月
11月 Dec.
Jan.
Feb.
Mar.
Apr.
May
Jun.
Jul.
Aug.
Sep.
Oct.
Nov.
Leap year
April
1st year since
leap year
2nd year since
leap year
3rd year since
leap year
Checking the reference position
1.
Push the crown in to position 0.
2.
Press and hold the upper right button Ⓑfor 10
seconds.
The hands and date
indication move to the
current reference positions
stored in memory.
Correct reference
positions:
All hands: 12 o'clock position
Date indication: midway
between “31” and “1”
When the current reference position is different from
the correct one, adjust the position following the steps of
“Correcting the reference position”.
3.
Press and release the upper right button Ⓑto finish
checking.
Correcting the reference position
1.
Push the crown in to position 0.
2.
Press and hold the upper right button Ⓑfor 10
seconds or more.
The hands and date indication move to the current reference
positions stored in memory.
3.
Pull the crown out to position 2.
This will enable you to correct the reference position.
4.
Press and release the upper right button Ⓑ.
• Each time you press button Ⓑ, the target of adjustment
changes as follows and it moves slightly.
Chronograph 1/20 second hand →Chronograph
minute hand/date indication →Minute/hour/24-hour
hands →Second hand →(Back to the top)
5.
Rotate the crown to correct the reference position of
the active hand/indication.
• When you rotate the crown quickly, the hand will move
continuously. To stop the rapid movement, rotate the crown.
6.
Push the crown in to position 0.
7.
Press and release the upper right button Ⓑto finish
the procedure.
Resetting the watch — All Reset
1.
Pull the crown out to position 2.
2.
Press and hold buttons Ⓐand Ⓑat the same time for
4 seconds or more and release them.
All reset is executed.
After All Reset
After All Reset, adjust the reference position. Execute the city
setting and receive signals manually (on-demand reception) to
adjust the time and calendar after that.
Using the chronograph
Measuring up to 60 minutes in 1/20 second increments.
• Chronograph stops when pulling out the crown during
measurement.
• Chronograph cannot be used when the power reserve is “nearly
empty”.
1.
Push the crown in to position 0.
2.
Press and release the upper right button Ⓑ.
The chronograph minute, chronograph second and
chronograph 1/20 second hands point upright.
Start/stop: press button Ⓑ.
• The chronograph 1/20 second hand will stop at the 0-second
position after 30 seconds since measurement started (or
restarted) but measurement continues.
Reset: press button Ⓐwhile the chronograph is stopped.
• Be sure to reset chronograph after finishing measurement.
To resume current time indication
Press button Ⓐafter resetting the chronograph.
• The hands automatically returns to indicate current time in 3
hours without executing any operation.
H80*
Abbreviated instruction
CITIZEN WATCH CO., LTD.

Other Citizen Watch manuals

Citizen FS10 User manual

Citizen

Citizen FS10 User manual

Citizen AT9030-55L User manual

Citizen

Citizen AT9030-55L User manual

Citizen 90S5 User manual

Citizen

Citizen 90S5 User manual

Citizen 6P24 User manual

Citizen

Citizen 6P24 User manual

Citizen 8651 User manual

Citizen

Citizen 8651 User manual

Citizen 9800 User manual

Citizen

Citizen 9800 User manual

Citizen C520 User manual

Citizen

Citizen C520 User manual

Citizen 865 Series User manual

Citizen

Citizen 865 Series User manual

Citizen C470 Manual

Citizen

Citizen C470 Manual

Citizen 8218 User manual

Citizen

Citizen 8218 User manual

Citizen Eco-Drive E784 User manual

Citizen

Citizen Eco-Drive E784 User manual

Citizen 6P25 User manual

Citizen

Citizen 6P25 User manual

Citizen CTZ-B 8195 User manual

Citizen

Citizen CTZ-B 8195 User manual

Citizen ECO-DRIVE J850 User manual

Citizen

Citizen ECO-DRIVE J850 User manual

Citizen Eco-Drive 010 User manual

Citizen

Citizen Eco-Drive 010 User manual

Citizen E365 User manual

Citizen

Citizen E365 User manual

Citizen W760 User manual

Citizen

Citizen W760 User manual

Citizen W770 User manual

Citizen

Citizen W770 User manual

Citizen 9075 User manual

Citizen

Citizen 9075 User manual

Citizen B080 User manual

Citizen

Citizen B080 User manual

Citizen C04 Manual

Citizen

Citizen C04 Manual

Citizen 2502 User manual

Citizen

Citizen 2502 User manual

Citizen 0S11 User manual

Citizen

Citizen 0S11 User manual

Citizen Eco-Drive ES4 Series User manual

Citizen

Citizen Eco-Drive ES4 Series User manual

Popular Watch manuals by other brands

Timex 100 Lap Ironman Triathlon with the FLIX instructions

Timex

Timex 100 Lap Ironman Triathlon with the FLIX instructions

Eterna Legacy user manual

Eterna

Eterna Legacy user manual

Zeon IN1807 CALIBRE 735 Operation manual

Zeon

Zeon IN1807 CALIBRE 735 Operation manual

Aviator MOVEMENT RONDA 515 user manual

Aviator

Aviator MOVEMENT RONDA 515 user manual

RETOX 847506 instruction manual

RETOX

RETOX 847506 instruction manual

THOMSON BB8297 instruction manual

THOMSON

THOMSON BB8297 instruction manual

Amazfit GTS 3e product manual

Amazfit

Amazfit GTS 3e product manual

Braun BN0278 User instructions

Braun

Braun BN0278 User instructions

Bomberg BOLT-68 - Bayonet system User instructions

Bomberg

Bomberg BOLT-68 - Bayonet system User instructions

Vertex M60 AQUALION manual

Vertex

Vertex M60 AQUALION manual

Epson VS75A instruction manual

Epson

Epson VS75A instruction manual

QUO Motiv user manual

QUO

QUO Motiv user manual

Victorinox ALLIANCE CHRONOGRAPH quick guide

Victorinox

Victorinox ALLIANCE CHRONOGRAPH quick guide

Hanhart 14035 quick start guide

Hanhart

Hanhart 14035 quick start guide

Muhle M1-41-08 manual

Muhle

Muhle M1-41-08 manual

eta Valjoux 7750 Technical Communication

eta

eta Valjoux 7750 Technical Communication

Swiss Military Hanowa ACE CHRONO instruction manual

Swiss Military Hanowa

Swiss Military Hanowa ACE CHRONO instruction manual

Bodykey InBodyBAND user guide

Bodykey

Bodykey InBodyBAND user guide

manuals.online logo
manuals.online logoBrands
  • About & Mission
  • Contact us
  • Privacy Policy
  • Terms and Conditions

Copyright 2025 Manuals.Online. All Rights Reserved.