claber Aqua Wireless 8348 User manual

REMOTE CONTROL 1
Guida all’utilizzo
User manual
Guide d’utilisation
DESCRIZIONE. Il Radiocomando RF permette la programmazione ed il controllo delle Unità RF ad esso associate e da queste ultime riceve le informazioni
sullo stato delle batterie e, se presente, del Rain Sensor RF (Sensore di Pioggia cod. 90831).
Può essere associato a: Elettrovalvola programmabile RF (cod. 8323) - Modulo di comando RF (cod. 8321) - Hydro-4 RF (cod. 90839). Può gestire un
massimo di due (cod. 8347) o sei (cod. 8348) Unità RF.
DESCRIPTION. The RF Remote Control is designed to allow programming and control of connected RF Units and receives information from the same on
the status of the batteries and, if installed, of the RF Rain Sensor (cod. 90831).
It may be associated: RF programmable solenoid valve (cod. 8323) - RF control unit (cod. 8321) - Hydro-4 RF (cod. 90839).It can manage up to two (code
8347) or six (code 8348) RF units.
DESCRIPTION. La Radiocommande RF permet la programmation et le contrôle des unités RF avec lesquelles il est associé, qui lui transmettent les
informations sur l'êtat de charge des piles et du pluviomètre Rain Sensor RF (cod. 90831 si installée).
Elle peut être associée: Électrovanne programmable RF (cod. 8323) - Module RF (cod. 8321) - Hydro-4 RF (cod. 90839).Il peut gérer un maximum de deux
(code 8347) ou six (code 8348) Unités RF.
BESCHREIBUNG. Die RF-Fernbedienung ermöglicht die Programmierung und Steuerung der damit verbundenen RF-Geräte und erhält von diesen
Informationen in Bezug auf den Ladestand der Batterien, und, falls vorhanden, den Zustand des RF-Rain Sensors (Regensensor Art. 90831).
Sie kann auch den folgenden Komponenten zugewiesen werden: Programmierbares RF-Magnetventil (Art. 8323) - RF-Steuermodul (Art. 8321) -
RF-Hydro-4 (Art. 90839).
DESCRIPCIÓN. El mando a distancia RF Permite programar y controlar las unidades RF que se le hayan asociado y recibir la información mandada por
estas sobre el estado de las pilas y del sensor de lluvia RF (cód. 90831 si está instalado).
Puede estar asociado: Elettroválvula programable RF (cód. 8323) - Mando a distancia RF (cód. 8321) - Hydro-4 RF (cód. 90839).Puede controlar un máximo
de dos (cód. 8347) o seis (cód. 8348) unidades RF.
Per Remote control 2 o 6 unità (codice): - For RF remote control 2 or 6 units (code): - Pour Radio commande RF 2 ou 6 unités (code): - Für 2 oder 6 Stationen
Fernbedienung (Art.): - Para Mando a distancia RF 2 o 6 unidades (código):
IT
UK
FR
DE
ES
IT
UK
FR
Benuttzzerrhandbucch
Guía de uso
DE
ES
8347 - 8348
RUNNING
TIME
DAY
123456
ONLY
ALKALINE
BATTERY
LINEB
LINEA
LINEB
LINEA
LINEB
LINEA
RUNNING
TIME
DAY
123456
ONLY
ALKALINE
BATTERY
SELECT
cod. 8321 cod. 90839cod. 8323
cod. 90831
cod. 8347 (2 units)
cod. 8348 (6 units)

DESCRIZIONE. Il Radiocomando RF permette di impostare i parametri dell’irrigazione automatica che, trasferiti all’Unità RF, vengono da quest’ultima
eseguiti. L’Unità RF, a seconda del modello, può controllare no a 4 elettrovalvole (LINEE).
Il Radiocomando RF può essere impostato per gestire l’irrigazione automatica di più Unità RF. Le Unità RF operano in modo indipendente tra di loro.
Sul Radiocomando RF è possibile impostare due programmi di irrigazione, A e B, che agiscono in modo indipendente l’uno dall’altro sul numero di
valvole disponibili sull’Unità RF controllata.
Ciascun Programma di irrigazione, A o B, può essere impostato per avviare un CICLO DI IRRIGAZIONE (insieme delle linee) in qualsiasi giorno della
settimana (WEEKLY SCHEDULE), no a 4 volte al giorno (START TIME) e per una durata massima (RUN TIME) di 60 minuti per ciascuna elettrovalvola
(LINEA).
Si inserisce il primo orario di apertura: i successivi si imposteranno automaticamente in base alle singole durate scelte (vedi pag. 12).
Attraverso il Radiocomando RF è inoltre possibile abilitare/disabilitare un’Unità RF a/da un Rain Sensor RF (Sensore di Pioggia).
Dopo aver eettuato o variato una programmazione, trasferire i parametri impostati alle Unità RF. Quando l’Unità RF è stata aggiornata i suoi programmi
saranno eseguiti automaticamente.
DESCRIPTION. The RF Remote Control allows the user to set automatic watering parameters which, when transferred to the RF Unit, will be
implemented by the Unit. One RF Unit can operate up to 4 solenoid valves (LINES).
The RF remote control can be set to manage automatic watering for multiple RF units. The RF Units operate independently of one another. On the RF
remote control is possible to set two indipendent watering programmes, A and B, on the number of valves available on the RF Unit controlled.
Each Programme, A or B, can be set so as to start a WATERING CYCLE (all lines) on any day of the week (WEEKLY SCHEDULE), up to 4 times a day (START
TIME), and for a maximum duration (RUN TIME) of 60 minutes for each solenoid valve (LINE).
Enter the rst opening time and the rest will be set automatically according to the chosen run times (see page 12).
The RF Remote Control can also be used to interlock the operation of an RF Unit to a RF Rain Sensor, or remove the interlock.
Having created or changed a programme, transfer the new parameters to the RF Units installed in the eld. Once the RF Unit has been updated, the new
parameters will be applied automatically.
DESCRIPTION. La Radiocommande RF permet de présélectionner les paramètres d'arrosage automatique à transférer à l'unité RF qui les exécutera
ensuite. L'unité RF, suivant le modèle, peut commander jusqu'à 4 vannes électriques (CIRCUITS).
La radiocommande RF peut être congurée pour gérer l’arrosage automatique de plusieurs Unités RF. Les unités RF opèrent de manière indépendante
entre elles. Sur la télécommande RF est possible de régler deux programmes d'arrosage, A et B, qui sont utilisables indépendamment les uns des autres
par le nombre de vannes disponibles sur l'unité RF contrôlée.
Chaque programme d'arrosage, A ou B, peut être présélectionné pour démarrer un CYCLE D'ARROSAGE (ensemble des lignes) à n'importe quel jour de la
semaine (PROGRAMME HEBDOMADAIRE), jusqu'à 4 fois par jour (HEURE DE DÉMARRAGE) et pour une durée maximale (DURÉE D'ARROSAGE) de 60
minutes pour chaque électrovanne (CIRCUIT).
Saisissez le premier horaire d’ouverture: les suivants se congureront automatiquement en fonction de chaque durée choisie (voir page 12).
La Radiocommande RF permet, en outre, d'activer/de désactiver une unité RF à une/d'un pluviomètre Rain Sensor RF.
Après avoir eectué ou modié une programmation, transférer les paramétres présélectionnés vers les unités RF sur le terrain. Après sa mise à jour, l'unité
RF exécute automatiquement les nouveaux programmes.
BESCHREIBUNG. Die RF-Fernbedienung ermöglicht die Einstellung der Parameter der automatischen Bewässerung, die nach der Übertragung an das
RF-Gerät von diesem ausgeführt werden. Das RF-Gerät ist, je nach Modell, in der Lage, bis zu 4 Magnetventile (KREISE) zu steuern.
Die RF-Fernbedienung kann so eingestellt werden, dass sie die automatische Bewässerung von mehreren RF-Geräten steuern kann. Die RF-Geräte
arbeiten unabhängig voneinander.
An der RF-Fernbedienung können zwei Bewässerungsprogramme, A und B, eingestellt werden, die unabhängig voneinander auf die Anzahl der Ventile
wirken, die an dem gesteuerten RF-Gerät zur Verfügung stehen.
Beide Bewässerungsprogramme, A und B, können so eingestellt werden, dass ein BEWÄSSERUNGSZYKLUS (Gesamtheit aller Kreise) an einem beliebigen
Tag der Woche (WEEKLY SCHEDULE (Wochenplan)), bis zu 4 Mal am Tag (START TIME (Startzeit)) und für eine maximale Dauer (RUN TIME
(Bewässerungsdauer)) von 60 Minuten pro Magnetventil (KREIS) gestartet wird.
Zunächst wird der erste Önungszeitpunkt eingegeben: die Einstellung der darauf folgenden Önungszeitpunkte erfolgt automatisch auf Basis der
jeweils ausgewählten Dauer (siehe S. 12).
Über die RF-Fernbedienung ist es außerdem möglich, ein RF-Gerät für einen RF-Rain Sensor (Regensensor) freizuschalten bzw. es von diesem zu trennen.
Nach Durchführung oder Änderung einer Programmierung übertragen Sie die eingestellten Parameter an die RF-Geräte. Nach Aktualisierung des
RF-Geräts werden dessen Programme automatisch ausgeführt.
DESCRIPCIÓN. El mando a distancia RF permite congurar los parámetros de riego automático y enviarlos a las unidades RF. Según el modelo, la unidad
RF puede controlar hasta 4 electroválvulas (LÍNEAS).
El mando a distancia RF se puede congurar para controlar el riego automático de varias unidades RF. Las unidades RF trabajan de manera independiente
una de otra. En el control remoto de RF es posible establecer dos programas de riego, A y B, que trabajan de forma independiente el uno del otro por el
número de válvulas disponibles en la Unidad RF controlado.
Cada programa de riego, A o B, puede congurarse para iniciar un CICLO DE RIEGO (conjunto de las líneas) en cualquier día de la semana (WEEKLY
SCHEDULE), hasta 4 veces al día (START TIME) y para una duración máxima (RUN TIME) de 60 minutos en cada electroválvula (LÍNEA).
Se introduce la primera hora de apertura: las siguientes se ajustarán automáticamente de acuerdo con las distintas duraciones seleccionadas (véase la
pág. 12).
Mediante el mando a distancia RF también es posible habilitar o inhabilitar la asociación de una unidad RF a un sensor de lluvia RF.
Tras crear o modicar un programa, hay que transmitir los parámetros congurados a las unidades RF presentes en el campo. Una vez actualizada la
unidad RF, los programas se ejecutan automáticamente.
IT
UK
FR
DE
ES
REMOTE CONTROL 2
Per Remote control 2 o 6 unità (codice): - For RF remote control 2 or 6 units (code): - Pour Radio commande RF 2 ou 6 unités (code): - Für 2 oder 6 Stationen
Fernbedienung (Art.): - Para Mando a distancia RF 2 o 6 unidades (código):
8347 - 8348

REMOTE CONTROL 3
Per Remote control 2 o 6 unità (codice): - For RF remote control 2 or 6 units (code): - Pour Radio commande RF 2 ou 6 unités (code): - Für 2 oder 6 Stationen
Fernbedienung (Art.): - Para Mando a distancia RF 2 o 6 unidades (código):
8347 - 8348
DESCRIZIONE. Sul display LCD sono visualizzate le schermate associate ai parametri impostabili dall’utente: ogni schermata è paragonabile ad una
“pagina”di un libro che si sfoglia utilizzando i tasti, come di seguito indicato.
1) Tasto UNIT. Premendolo ripetutamente, si seleziona l‘Unità RF. Premuto per circa 2 secondi durante la programmazione, riporta alla pagina iniziale di
selezione Unità RF.
2) Tasti - e +. Consentono di spostarsi in modo ciclico tra le varie pagine di programmazione dell’Unita RF selezionata e, quando il simbolo OK è acceso, di
modicare le impostazioni della pagina visualizzata.
3) Tasto OK. Permette di modicare con i tasti - e + le impostazioni della pagina visualizzata e di confermare l’impostazione uscendo dalla modalità di
modica. È usato anche per l’apertura e la chiusura della LINEA selezionata in modalità manuale/TEST e per uscire dalla modalità manuale/TEST.
4) Tasto RF. È utilizzato nelle operazioni di comunicazione con l’Unità RF selezionata:
- per trasferire il programma di irrigazione dal Radiocomando RF all’Unità RF selezionata;
- per entrare nella modalità di funzionamento manuale/TEST.
5) Tasto S1. Questo tasto è accessibile solo tramite un oggetto appuntito (ad esempio un fermaglio). È utilizzato nelle procedure di associazione con
un’Unità RF.
6) LED. Ad ognuna delle Unità RF controllate dal Radiocomando RF è associato un Led che lampeggia per l’Unità RF selezionata. Quando si visualizza la
pagina inziale ORA/GIORNO corrente, tutti i Led sono spenti.
DESCRIPTION. The LCD display shows the screens associated with parameters settable by the user: each screen is comparable to a‘page’of a book that
the user can leaf through with the buttons, as indicated below.
1) Unit button. When pressed repeatedly, this button scrolls the pages for the selection of RF Units. Pressing the button and holding it for about 2
seconds in the course of programming, the initial RF Unit selection page reappears.
2) - and + buttons. These allow the user to cycle through the various programming pages of the selected RF Unit and, when the OK symbol appears, to
change the settings on the page currently displayed.
3) OK button. This allows the user to change the settings on the current page, by means of the - and + buttons. Press it to conrm the setting and quit
the change mode. This button is also used to open and close the selected LINE in manual/TEST mode and to quit manual/TEST mode.
4) RF button. Used during operations that involve communication with the selected RF Unit:
- to transfer the watering programme from the RF Remote Control to the selected RF Unit;
- to activate the manual/TEST operating mode.
5) S1 button. This button can be operated only with a pointed object (such as a paper clip). Used for procedures by which the RF Remote Control is
connected with an RF Unit.
6) LEDs. A Led is associated with each of the RF Units operated by the RF Remote Control, which blinks when the relative RF Unit is selected. When the
initial current TIME/DAY page is displayed, all Leds will remain o.
DESCRIPTION. Sur l'acheur LCD apparaissent les écrans des paramètres dénissables par l'utilisateur ; chaque écran peut être comparé à une page
d'un livre que l'on feuillette, en utilisant les touches décrite ci-après.
1) Touche UNIT. Son appui répété fait déler les pages de sélection des unités RF. Son appui pendant environ 2 secondes au cours de la programmation
ramène à la page initiale de sélection des unités RF.
2) Touches - et +. Elles permettent de se déplacer en mode cyclique entre les pages de programmation de l'unité RF sélectionnée et, lorsque le symbole
OK est allumé, de modier les paramétrages de la page achée.
3) Touche OK. Elle permet de modier avec les touches - et + les paramétrages de la page achée et de conrmer le paramétrage en quittant la
séquence de modication. Elle est également utilisée pour l'ouverture et la fermeture du CIRCUIT sélectionné en mode manuel/TEST et pour quitter le
mode manuel/TEST.
4) Touche RF. Elle est utilisée dans les opérations de communication avec l'unité RF sélectionnée :
- pour transférer le programme d'arrosage de la Radiocommande RF à l'unité RF sélectionnée;
- pour accéder au mode de fonctionnement manuel/TEST.
5) Touche S1. Cette touche n'est accessible qu'à l'aide d'un objet pointu (trombone par exemple). Elle est utilisée dans l'opération de combinaison avec
une unité RF.
6) LED. À chacune des unités RF gérées par la Radiocommande RF est associée une LED qui clignote pour l'unité RF sélectionnée. Toutes les LED sont
éteintes lorsque la page initiale HEURE/JOUR courant(e) est achée.
IT
UK
FR
4
5
1
2
6
6
2
3

BESCHREIBUNG. Auf dem LCD-Display werden die Bildschirme angezeigt, die zu den vom Benutzer einstellbaren Parametern gehören: jeder Bildschirm
ist vergleichbar mit den„Seiten“ eines Buchs, das man, wie im Folgenden angegeben, mit den Tasten durchblättert.
1) UNIT-Taste. Durch mehrfaches Betätigen wird das RF-Gerät ausgewählt. Durch das Gedrückthalten für 2 Sekunden während der Programmierung
gelangt man zurück zur Startseite der Auswahl des RF-Geräts.
2) Tasten - und +. Mit ihnen kann man zyklisch die verschiedenen Seiten der Programmierung des gewählten RF-Geräts durchblättern, und, wenn das
OK-Symbol leuchtet,
die Einstellungen der angezeigten Seite verändern.
3) OK-Taste. Sie ermöglicht gemeinsam mit den Tasten - und + die Veränderung der Einstellungen der angezeigten Seite und die Bestätigung der
Einstellungen durch Verlassen des Änderungsmodus. Sie wird auch zur Önung und Schließung des ausgewählten KREISES im manuellen bzw.
TEST-Modus verwendet und, um den manuellen bzw. TEST-Modus zu verlassen.
4) RF-Taste. Sie wird bei den Kommunikationsvorgängen mit dem gewählten RF-Gerät verwendet:
- um das Bewässerungsprogramm von der RF-Fernbedienung an das ausgewählte RF-Gerät zu übertragen
- um in den manuellen Betriebsmodus bzw. in den TEST-Modus zu wechseln.
5) S1-Taste. Diese Taste ist nur mithilfe eines spitzen Gegenstands (z.B. mit einer Büroklammer) bedienbar. Sie wird bei den Zuweisungsvorgängen zu
einem RF-Gerät verwendet.
6) LED. Jedem von der RF-Fernbedienung gesteuerten RF-Gerät ist eine LED zugewiesen, die für das gewählte RF-Gerät blinkt. Beim Anzeigen der
aktuellen UHRZEIT/WOCHENTAG-Startseite sind alle LED ausgeschaltet.
DESCRIPCIÓN. En la pantalla de cristal líquido (LCD) se visualizan las páginas asociadas a los parámetros que el usuario puede congurar: cada página es
como la de un libro que se hojea con las teclas del mando tal como se describe a continuación.
1) Tecla UNIT. Sirve para desplazar las páginas de selección de las unidades RF. Si se pulsa durante 2 segundos durante la programación, visualiza la
página inicial de selección de las unidades RF.
2) Teclas + y -. Sirven para desplazarse de manera cíclica entre las diferentes páginas de programación de la unidad RF seleccionada y, cuando el símbolo
OK está encendido, para modicar la conguración de la página visualizada.
3) Tecla OK. Sirve para acceder a la página en la cual modicar, con las teclas - y + , las conguraciones y para conrmar los cambios saliendo de la
modalidad de modicación. También sirve para abrir y cerrar la LÍNEA seleccionada en modo TEST/riego manual y para salir de dicho modo.
4) Tecla RF. En las operaciones de comunicación con la unidad RF seleccionada, sirve para:
- transmitir el programa de riego del mando a distancia RF a la unidad RF seleccionada;
- acceder al modo test/riego manual.
5) Botón S1. Este botón solo se puede presionar con un objeto puntiagudo, como un clip. Se utiliza en los procedimientos de asociación con unidades RF.
6) LEDS. A cada una de las unidades RF controladas por el mando a distancia RF le corresponde un led que parpadea para indicar la seleccionada.
Cuando se visualiza la página inicial DÍA/HORA actual todos los leds están apagados.
DE
ES
REMOTE CONTROL 3
Per Remote control 2 o 6 unità (codice): - For RF remote control 2 or 6 units (code): - Pour Radio commande RF 2 ou 6 unités (code): - Für 2 oder 6 Stationen
Fernbedienung (Art.): - Para Mando a distancia RF 2 o 6 unidades (código):
8347 - 8348
4
5
1
2
6
6
2
3

REMOTE CONTROL 4
Per Remote control 2 o 6 unità (codice): - For RF remote control 2 or 6 units (code): - Pour Radio commande RF 2 ou 6 unités (code): - Für 2 oder 6 Stationen
Fernbedienung (Art.): - Para Mando a distancia RF 2 o 6 unidades (código):
8347 - 8348
INSERIMENTO BATTERIE. Togliere il coperchio dell’alloggiamento delle batterie. Se presenti, rimuovere le batterie e inserire quelle nuove. Richiudere il
coperchio. Al primo inserimento si visualizza la pagina ORA/GIORNO corrente, alle 12:00 e S (Sunday = Domenica).
FITTING THE BATTERIES. Remove the cover of the battery housing. Remove the at batteries, if in place and t the new batteries. Ret the cover of the
battery housing. The rst time that the batteries are tted, the initial current TIME/DAY page appears in the display, showing the default setting 12:00 and
S, Sunday.
MISE EN PLACE DES PILES. Enlever le couvercle du compartiment à piles. Si installées, enlever les piles usagées. Placer les piles neuves et refermer le
couvercle du compartiment à piles. Après la première mise en place des piles, sur l'acheur apparaît la page initiale HEURE/JOUR courant(e) montrant
par défaut 12:00 et S (Sunday = Dimanche).
EINLEGEN DER BATTERIEN. Nehmen Sie die Abdeckung des Batteriefachs ab. Wenn vorhanden, entfernen Sie die alten Batterien und legen Sie die
neuen ein. Schließen Sie die Abdeckung wieder. Beim ersten Einlegen wird die aktuelle UHRZEIT/WOCHENTAG-Seite mit 12:00 Uhr und S (Sunday =
Sonntag) angezeigt.
COLOCACIÓN DE LAS PILAS. Quite la tapa del compartimiento de las pilas. Si debe cambiar las pilas agotadas, quítelas. Ponga las pilas nuevas y cierre la
tapa del alojamiento de las pilas. Cuando ponga las pilas por primera vez, en la pantalla se visualiza la página inicial HORA/DÍA actual, indicando de forma
predenida 12:00 y S (Sunday = Domingo).
IT
UK
FR
DE
ES
AAA
+
AAA
+
AAA
+
AAA
+
2x AAA
Alkaline
1,5 V
123

REMOTE CONTROL 5
Per Remote control 2 o 6 unità (codice): - For RF remote control 2 or 6 units (code): - Pour Radio commande RF 2 ou 6 unités (code): - Für 2 oder 6 Stationen
Fernbedienung (Art.): - Para Mando a distancia RF 2 o 6 unidades (código):
8347 - 8348
CONTROLLO STATO DELLE BATTERIE.
Radiocomando RF. Per controllare se le batterie del Radiocomando RF sono da sostituire, visualizzare la pagina iniziale ORA/GIORNO corrente e fare
riferimento alla tabella seguente.
Unità RF e Rain Sensor RF. Eettuare una sincronizzazione delle unità RF. La presenza del simbolo LOW BATT nella schermata dell’unità o del Rain Sensor
indica che le batterie sono da sostituire.
CHARGE STATUS OF THE BATTERIES.
RF Remote control. To check whether the batteries of the RF Remote Control need to be replaced, bring up the initial current TIME/DAY page and
consult the following table.
RF Unit and RF Rain Sensor. Make a synchronization of the RF units. The appearance of the LOW BATT symbol onto the screen of the unit or onto the
screen of the Rain Sensor indicates that the batteries should be replaced.
ÉTAT DE CHARGE DES PILES.
Radiocommande RF. Pour contrôler si les piles de la Radiocommande RF doivent être remplacées, acher la page initiale HEURE/JOUR courant(e) et se
référer au tableau suivant.
Unités RF et pluviomètre Rain Sensor RF. Faire une synchronisation des unités RF. La présence du symbole LOW BATT de l'unité RF d'écran o de Rain
Sensor indique qu'il faut remplacer les piles dès que possible.
ÜBERPRÜFUNG LADEZUSTAND DER BATTERIEN.
RF-Fernbedienung. Um zu überprüfen, ob die Batterien der RF-Fernbedienung ausgewechselt werden müssen, lassen Sie sich die aktuelle
UHRZEIT/WOCHENTAG-Startseite anzeigen und lesen Sie die folgende Tabelle.
RF-Gerät und RF-Rain Sensor. Führen Sie die Synchronisierung der RF-Geräte durch. Das Vorhandensein des LOW BATT-Symbols auf dem Bildschirm des
Geräts oder des Rain Sensors zeigt an, dass die Batterien ausgewechselt werden müssen.
ESTADO DE CARGA DE LAS PILAS.
Mando a distancia RF. Para controlar si es necesario sustituir las pilas del mando a distancias RF, vaya a la página inicial HORA/DÍA actual y consulte la
siguiente tabla.
Unidades RF y sensor de lluvia RF. Eectúer la sincronización del mando a distancia RF con la unidad RF. Si se visualiza el símbolo LOW BATT en la
pantalla de la unidad RF o de Rain Sensor signica que las pilas se han de sustituir.
IT
UK
FR
DE
ES
PROG
B
A
S M T W T F S
LOW BATT
LOW BAT T
LOW BATT LOW BATT
S M T W
T F S
LOW BATT
1
4
2 3
+
1 2

NAVIGAZIONE TRA LE PAGINE DI PROGRAMMAZIONE. Per scorrere ciclicamente le pagine di selezione delle Unità RF premere più volte Il tasto UNIT.
Per scorrere ciclicamente le pagine di programmazione dell’Unità RF associata (visualizzata a display), premere i tasti - e +.
La pressione del tasto UNIT per circa 2 secondi durante la programmazione, riporta alla pagina iniziale di selezione delle Unità RF.
Da tutte le pagine di programmazione delle Unità RF se non si preme un tasto entro 3 minuti, si ritorna automaticamente alla pagina iniziale di
ORA/GIORNO corrente.
NAVIGATION OF PROGRAMMING PAGES. To scroll through the selection pages for RF Units press the UNIT button repeatedly.
To scroll through the programming pages for the RF Unit selected and displayed, press the buttons - and +.
Pressing the UNIT button and holding for about 2 seconds in the course of programming, the initial RF Unit selection page reappears.
If no button is pressed for a period of 3 minutes with any RF Unit programming page open, the display reverts automatically to the current TIME/DAY
page.
NAVIGATION ENTRE LES PAGES DE PROGRAMMATION. Pour faire déler cycliquement les pages de sélection des unités RF, appuyer plusieurs fois sur
la touche UNIT.
Pour faire déler cycliquement les pages de programmation de l’Unité RF associée (visualisées sur l’acheur), appuyez sur les touches - et +.
L'appui sur la touche UNIT pendant environ 2 secondes au cours de la programmation ramène à la page initiale de sélection des unités RF.
Si aucun appui sur une touche n'est eectué pendant un laps de temps de 3 minutes, la page initiale HEURE/JOUR courant(e) est automatiquement
réachée.
DURCHBLÄTTERN DER PROGRAMMIERUNGSSEITEN. Um die Seiten für die Auswahl des RF-Geräts zyklisch zu durchblättern, drücken Sie mehrere
Male die UNIT-Taste. Um die Seiten für die Programmierung des zugewiesenen RF-Geräts (auf dem Display angezeigt) zyklisch zu durchblättern, drücken
Sie die Tasten - und +.
Durch Gedrückthalten der UNIT-Taste über circa 2 Sekunden während der Programmierung gelangt man zur Startseite der Auswahl der RF-Geräte.
Wird innerhalb von 3 Minuten auf den Seiten der Programmierung der RF-Geräte keinerlei Taste gedrückt, gelangt man automatisch zur Startseite
aktuelle UHRZEIT/WOCHENTAG.
NAVEGACIÓN POR LAS PÁGINAS DE PROGRAMACIÓN. Para desplazar cíclicamente las páginas de selección de las unidades RF, pulse varias veces la
tecla UNIT.
Para desplazar cíclicamente las páginas de programación de la unidad RF asociada (visualizada en la pantalla), pulse las teclas - y +.
Si se pulsa la tecla UNIT por 2 segundos durante la programación, se visualiza la página inicial de selección de las unidades RF.
Desde todas las páginas de programación de las unidades RF, si no se pulsa ninguna tecla en un plazo de 3 minutos, se vuelve automáticamente a la
página inicial HORA/DÍA actual.
IT
UK
FR
DE
ES
REMOTE CONTROL 6
Per Remote control 2 o 6 unità (codice): - For RF remote control 2 or 6 units (code): - Pour Radio commande RF 2 ou 6 unités (code): - Für 2 oder 6 Stationen
Fernbedienung (Art.): - Para Mando a distancia RF 2 o 6 unidades (código):
8347 - 8348
PROG
B
A
PROG
B
A
S M T W T F S
PROG
A
PROG
B
1
2 sec.
PROG
B
A
LINE
S M T W T F S
PROG
A
1
PROG
B
EXIT
A
B
S
A
B
M
A
B
T
A
B
W
A
B
T
A
B
F
A
B
S
14
15
LINE
RUNNING
TIME
DAY
123456
ONLY
ALKALINE
BATTERY
LINEB
LINEA
LINEB
LINEA
LINEB
LINEA
RUNNING
TIME
DAY
123456
ONLY
ALKALINE
BATTERY
SELECT
1
3
2
12
REMOTE CONTROL 7
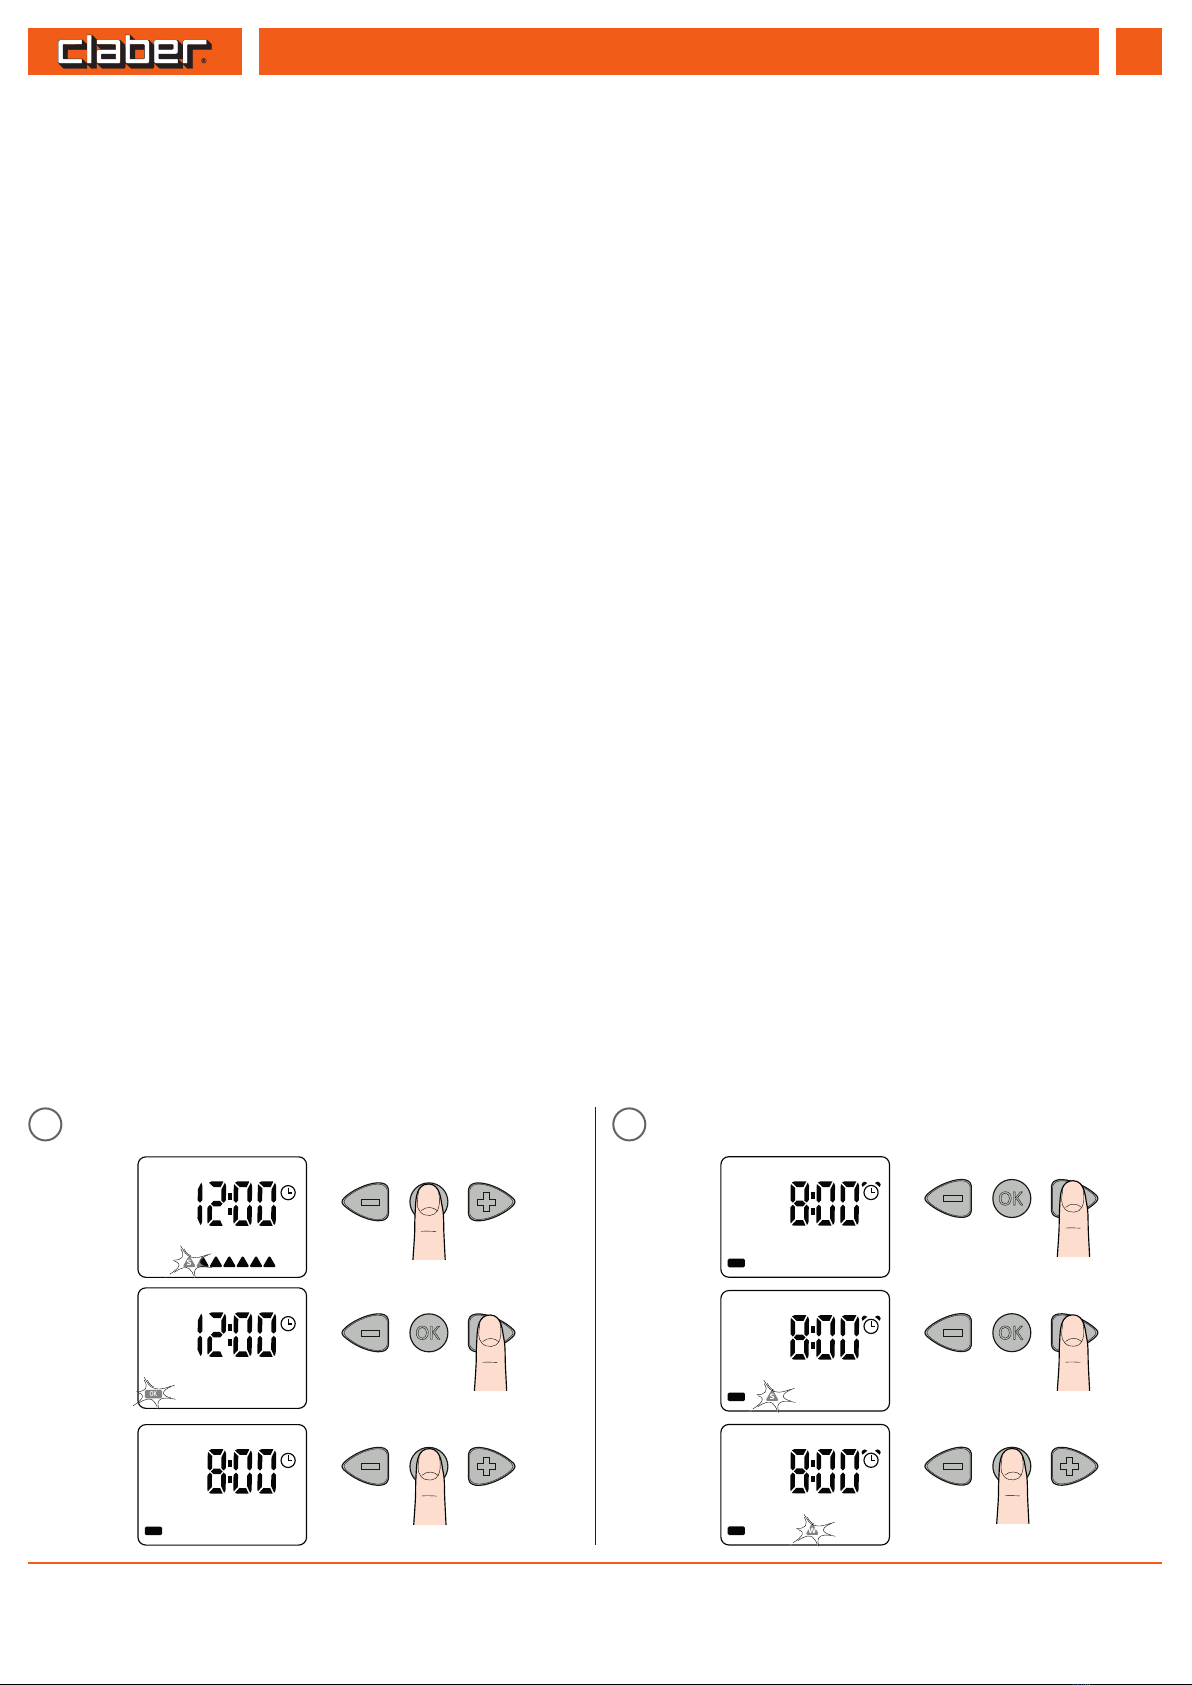
IMPOSTARE ORA E GIORNO. Con la prima accensione o se il Radiocomando RF è rimasto senza batterie a lungo, è necessario impostare/reimpostare
ORA e GIORNO sul Radiocomando RF.
Se non è già selezionata, visualizzare la pagina ORA/GIORNO corrente premendo UNIT più volte. Per modicare l’ora premere OK: il simbolo OK
lampeggia. Impostare l’orario desiderato con i tasti - e + (tenendo premuti i tasti si avanza più velocemente). Confermando l’ora, premendo OK, si passa
all’impostazione del giorno della settimana: posizionarsi sul giorno della settimana con i tasti - e +. Per confermare e uscire premere OK.
N.B. I giorni della settimana partono dalla domenica (Sunday) e sono espressi in inglese (Sdomenica, Mlunedì, Tmartedì, Wmercoledì, Tgiovedì, F
venerdì, Ssabato).
SETTING THE TIME AND DAY. When the RF Remote Control is turned on for the rst time, or after a lengthy period without batteries tted, the user must
set or restore the TIME and DAY.
If not already selected, bring up the current TIME/DAY page by pressing UNIT repeatedly. To change the time, press OK: the OK symbol blinks. Set the time
using the - and + buttons (keeping the buttons pressed, the numbers will scroll faster). Conrm the time by pressing OK, the day of the week can now be
selected: highlight the day of the week with the - and + buttons. To conrm and quit, press OK.
The days are shown as: SSunday, MMonday, TTuesday, WWednesday, TThursday, FFriday, SSaturday.
RÉGLAGE DE L'HEURE ET DU JOUR. Au premier allumage ou si la Radiocommande RF est resté longtemps sans piles, il faut nécessairement
programmer/reprogrammer l'HEURE et le JOUR sur la Radiocommande RF.
Si elle n'est pas déjà sélectionnée, acher la page HEURE/JOUR courant(e) en appuyant plusieurs fois sur UNIT. Pour modier l'heure, appuyer sur OK : le
symbole OK clignote alors. Régler l'heure désirée à l'aide des touches - et + (garder le doigt dessus pour avancer plus rapidement). Appuyer sur OK, pour
conrmer l'heure et passer au réglage du jour de la semaine : se positionner sur le jour de la semaine à l'aide des touches - et +. Pour conrmer et sortir,
appuyer sur OK.
N.B. Les jours de la semaine commencent avec le dimanche (Sunday) et sont exprimés en anglais (Sdimanche, Mlundi, Tmardi, Wmercredi, Tjeudi,
Fvendredi, Ssamedi).
UHRZEIT/WOCHENTAG EINSTELLEN. Beim ersten Einschalten oder wenn die RF-Fernbedienung über lange Zeit ohne Batterien war, ist es notwendig,
UHRZEIT und WOCHENTAG an der RF-Fernbedienung einzustellen bzw. wiederherzustellen.
Falls diese noch nicht ausgewählt wurde, lassen Sie sich die Seite aktuelle UHRZEIT/WOCHENTAG anzeigen, indem Sie mehrere Male die UNIT-Taste
betätigen. Zum Verändern der Stunde drücken Sie auf OK: Das OK-Symbol leuchtet auf. Stellen Sie die gewünschte Uhrzeit mit den Tasten - und + ein
(wenn Sie die Tasten gedrückt halten, kommen Sie schneller voran). Durch Bestätigen der Uhrzeit mit OK gelangen Sie zur Einstellung des Wochentags:
Positionieren Sie sich durch Betätigen der Tasten - und + auf dem entsprechenden Wochentag. Drücken Sie OK, um die Einstellung zu bestätigen, und die
Seite zu verlassen.
Hinweis: Die Wochentage beginnen mit Sonntag (Sunday) und sind in englischer Sprache angegeben (SSonntag, MMontag, TDienstag, WMittwoch, T
Donnerstag, FFreitag, SSamstag).
CONFIGURACIÓN DE LA HORA Y EL DÍA. Cuando el mando a distancia RF se enciende por primera vez o si se ha quedado sin pilas por mucho tiempo,
es necesario congurar/recongurar la HORA y el DÍA.
Acceda a la pagina HORA/DÍA pulsando la tecla UNIT varias veces. Para modicar la hora, pulse OK: el símbolo parpadea. Seleccione la hora deseada con
las teclas - y + (si las mantiene pulsadas, se avanza más rápidamente). Conrme la hora pulsando OK, se pasa a la conguración del día de la semana:
seleccione el día de la semana deseado con las teclas - y +. Para conrmar y salir, pulse OK.
Nota: los días de la semana empiezan por el domingo (Sunday) y están en inglés (Sdomingo, Mlunes, Tmartes, Wmiércoles, Tjueves, Fviernes,
Ssábado).
Per Remote control 2 o 6 unità (codice): - For RF remote control 2 or 6 units (code): - Pour Radio commande RF 2 ou 6 unités (code): - Für 2 oder 6 Stationen
Fernbedienung (Art.): - Para Mando a distancia RF 2 o 6 unidades (código):
IT
UK
FR
DE
ES
8347 - 8348
OK
S
OK
W
OK
OK
S M T W T F S
OK
1
3
2
4
6
5
1 2

USO. Il RUN TIME (durata irrigazione) di ciascun Programma prevede no a 4 schermate, una per LINEA disponibile sull’Unità RF.
Lo START TIME (orario di irrigazione) di ciascun Programma prevede 4 schermate, una per ciascuna delle quattro partenze giornaliere disponibili per
programma.
USE. The RUN TIME for each Programme is displayed on up to 4 screens, one for each available LINE of the RF Unit.
The START TIME for each Programme is displayed on up to 4 screens, one for each of the four available daily starts per programme.
UTILISATION. Le RUN TIME (durée d'arrosage) de chaque programme prévoit jusqu'à 4 écrans, un par CIRCUIT disponible sur l'unité RF.
Le START TIME (heure de démarrage) de chaque programme prévoit 4 écrans, un pour chacun des quatre démarrages journaliers disponibles par
programme.
GEBRAUCH. Die RUN TIME (Bewässerungsdauer) jedes Programms sieht bis zu 4 Bildschirme vor, einen pro an dem RF-Gerät zur Verfügung stehendem
KREIS.
Die START TIME (Startzeit) jedes Programms sieht 4 Bildschirme vor, einen für jeden der vier möglichen Tagesstartzeiten je Programm.
USO. El RUN TIME (duración del riego) de cada programa prevé hasta 4 páginas, una por LÍNEA disponible en la unidad RF.
El START TIME (hora de riego) de cada programa prevé hasta 4 páginas, una por cada inicio diario disponible en el programa.
IT
UK
FR
DE
ES
REMOTE CONTROL 8
Per Remote control 2 o 6 unità (codice): - For RF remote control 2 or 6 units (code): - Pour Radio commande RF 2 ou 6 unités (code): - Für 2 oder 6 Stationen
Fernbedienung (Art.): - Para Mando a distancia RF 2 o 6 unidades (código):
8347 - 8348
RUN TIME PROGRAM A
PROGRAM A
START TIME PROGRAM A
RUN TIME PROGRAM B
PROGRAM B
START TIME PROGRAM B
WEEKLY
SCHEDULE RAIN SENSOR
MANUAL
TEST
PROGLINE
A
S M T W T F S
PROGLINE
A
PROGLINE
A
PROGLINE
A
PROG
A
1 2 3 4
PROG
A
1 2 3 4
PROG
A
1 2 3 4
PROG
A
1 2 3 4
PROGLINE
B
PROGLINE
B
PROGLINE
B
PROGLINE
B
PROG
1 2 3 4
B
PROG
1 2 3 4
B
PROG
1 2 3 4
B
A A A
B B
A
BB
A
B
A
B
A
B
S M T W T F S
14
15
PROG
1 2 3 41 2 3 4
B
REMOTE CONTROL 9
Per Remote control 2 o 6 unità (codice): - For RF remote control 2 or 6 units (code): - Pour Radio commande RF 2 ou 6 unités (code): - Für 2 oder 6 Stationen
Fernbedienung (Art.): - Para Mando a distancia RF 2 o 6 unidades (código):
8347 - 8348
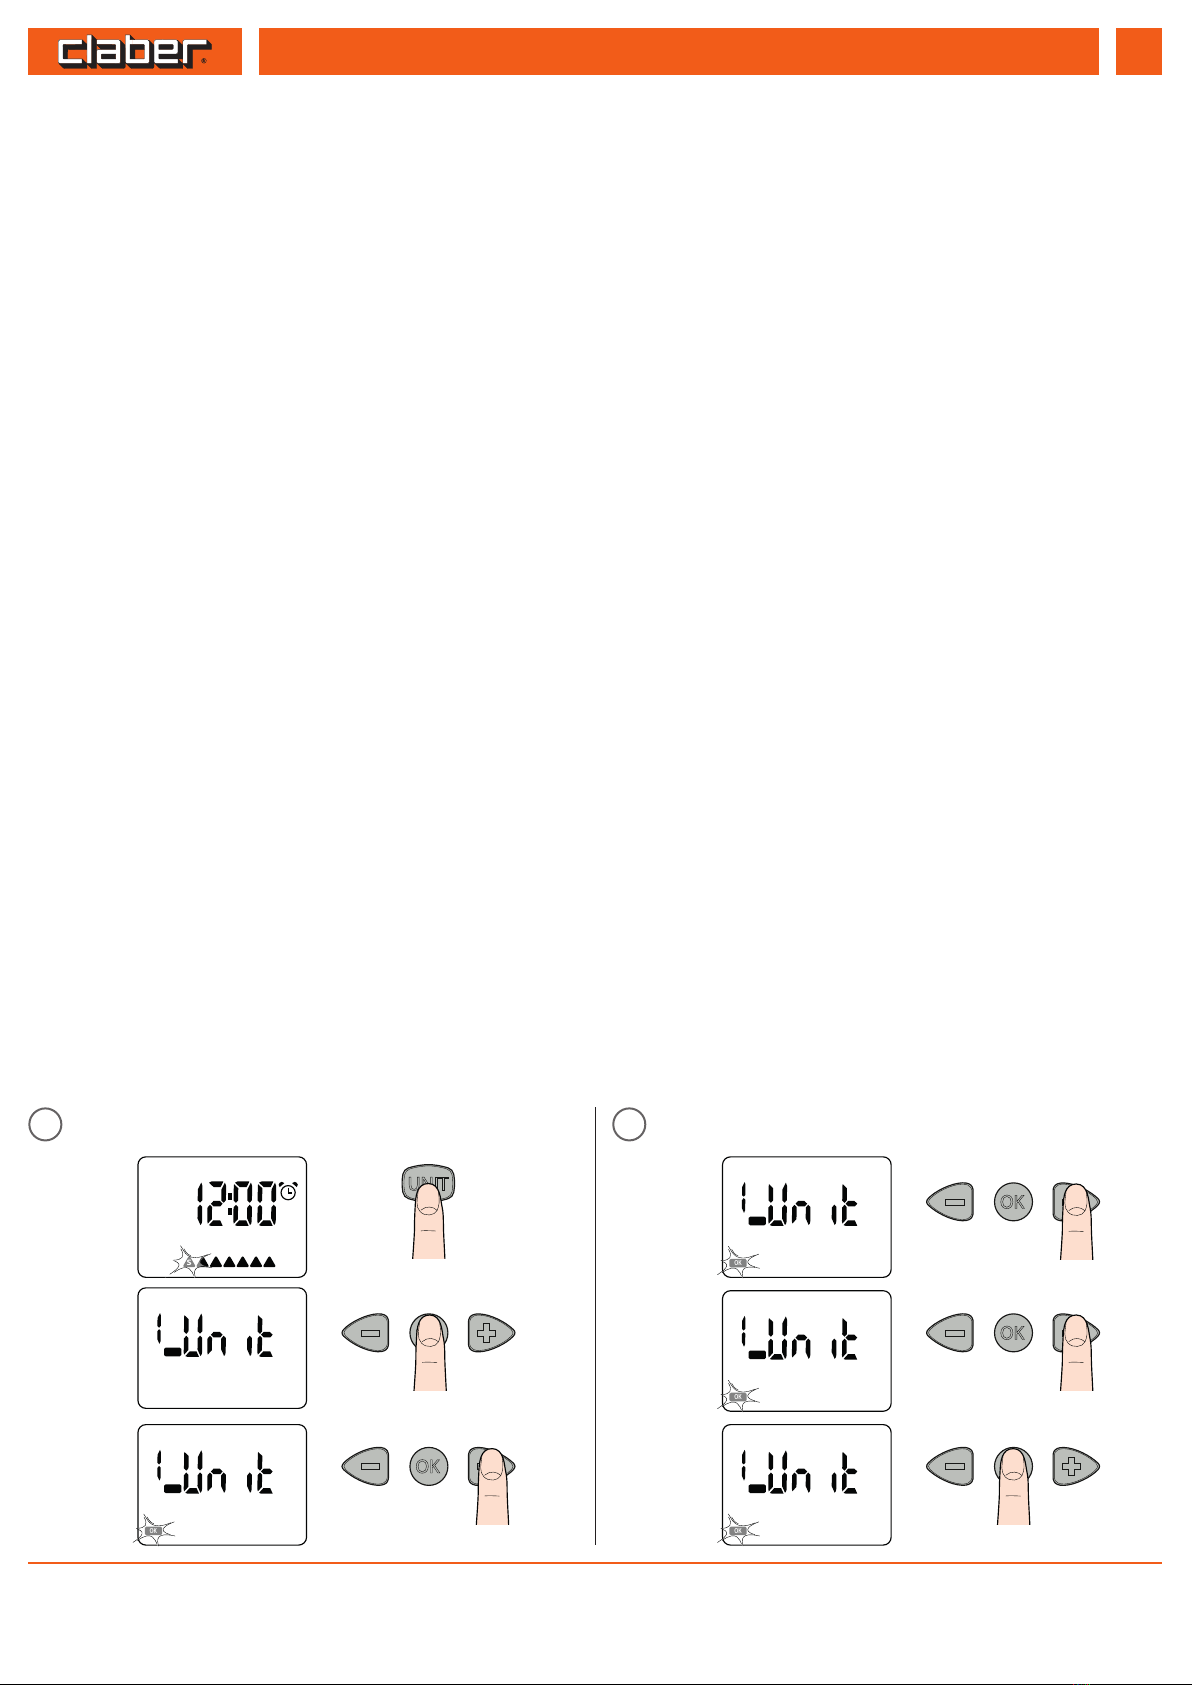
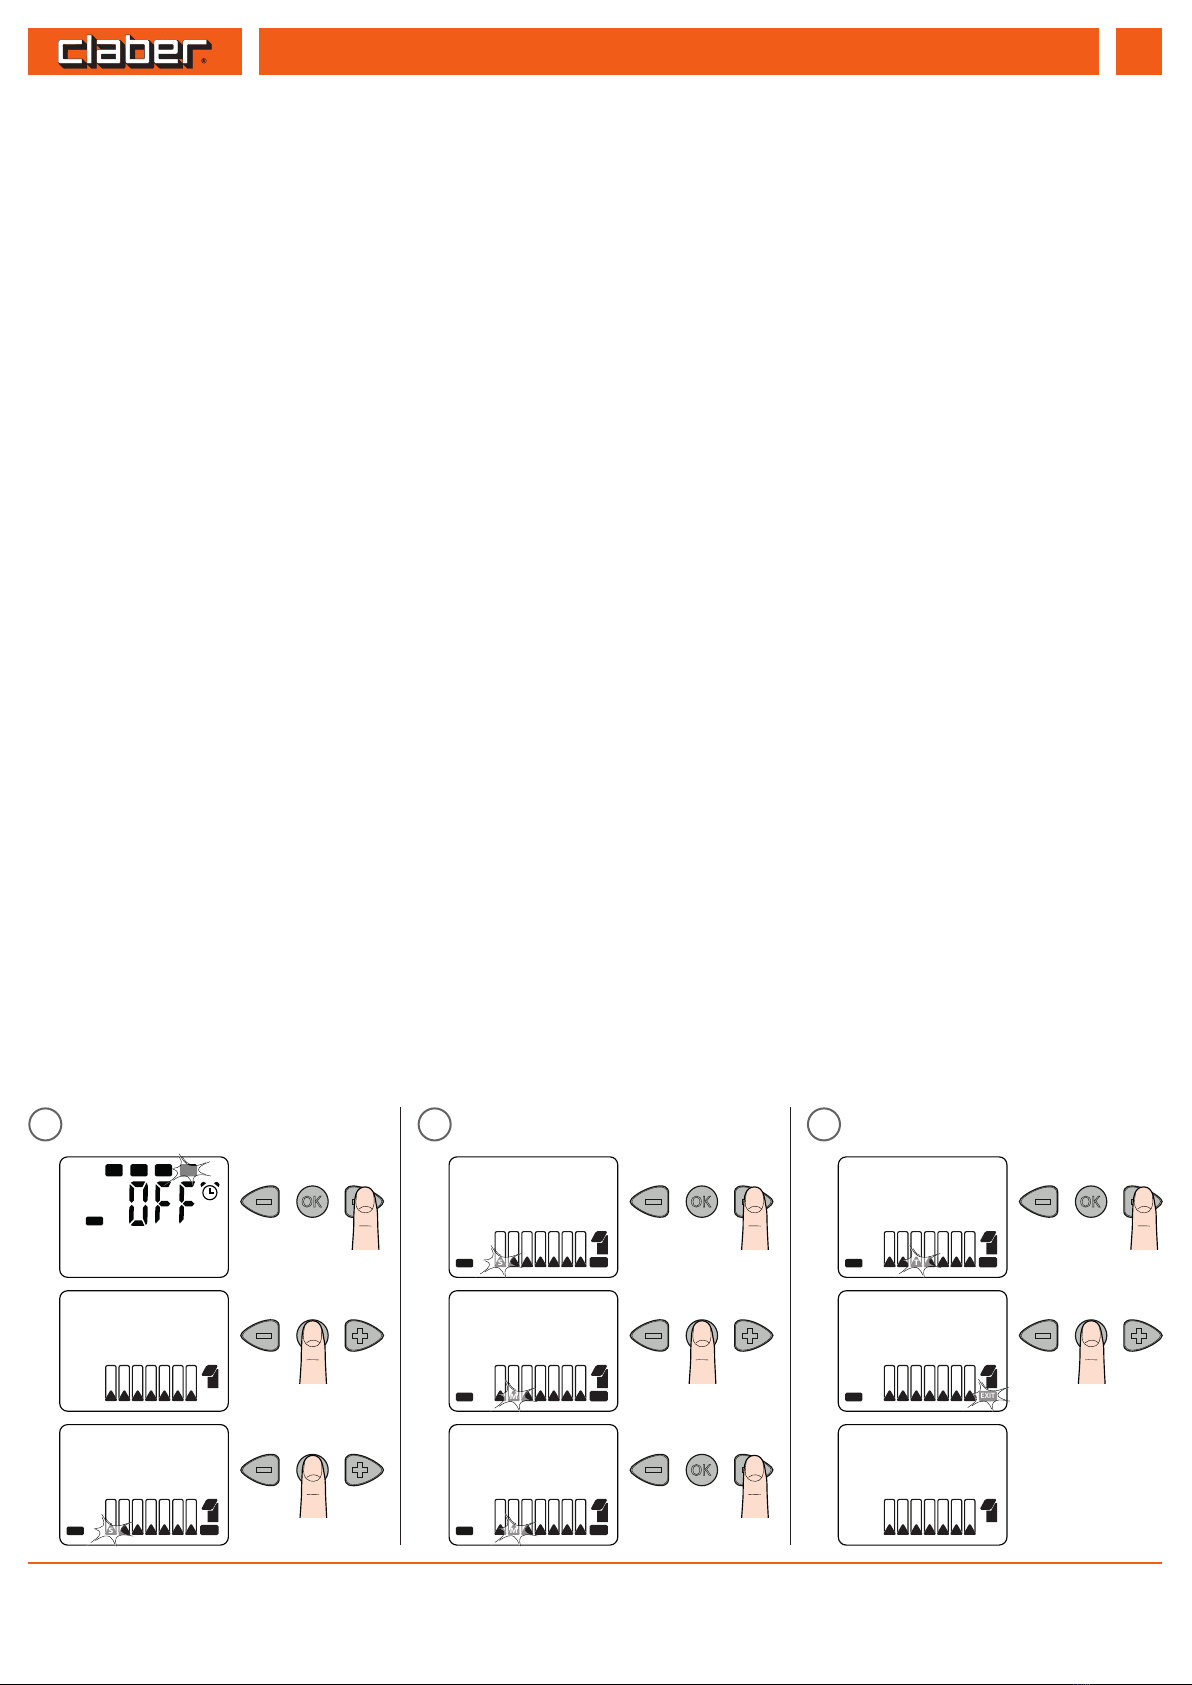
USO - Abilitazione dei programmi A e B e messa in “OFF”delle Unità RF. Attivare/disattivare i programmi A e B delle Unità RF è utile per gestire:
- esigenze idriche diverse a seconda della stagionalità: ad esempio si può impostare il programma A per la stagione estiva - esigenza idrica massima, e il
programma B per la stagione primaverile - esigenza idrica bassa;
- una programmazione semplicata: nel caso un solo programma fosse suciente alle proprie esigenze, si può eliminare la visualizzazione delle pagine
dell’altro programma, semplicando così l’impostazione del programma utilizzato;
- la messa in OFF dell’Unità RF: per bloccare temporaneamente l’irrigazione, senza tuttavia perdere le impostazioni dei programmi.
Sul display viene visualizzata normalmente la schermata ORA/GIORNO corrente; premere più volte il tasto UNIT no a selezionare l’Unità RF da
programmare. Premere il tasto OK e successivamente i tasti - e + per selezionare quale programma abilitare. Confermare premendo OK.
USE - Enabling programmes A and B and switching RF Units to OFF. Activating/deactivating programmes A and B of the RF Units is useful for
managing:
- dierent water demands due to seasonal factors: for example, programme A can be set for the summer months (maximum water demand), and
programme B for the spring (low water demand);
- simplied programming: in the event that a single programme may be sucient for the needs of the user, the pages of the other programme can be
eliminated from the display sequence, making the programme in use easier to consult and set;
- switching the RF Unit to OFF: to suspend watering temporarily, without losing the settings of the programmes.
The display normally shows the current TIME/DAY screen; press the UNIT button repeatedly to select the RF Unit for which programming is required. Press
the OK button then, using the - and + buttons, select the programme to be enabled. Conrm by pressing OK.
UTILISATION - Validation des programmes A et B et mise à « OFF » des unités RF. Activer/désactiver les programmes A et B des unités est utile pour
gérer :
- des apports d'eau diérents suivant la saison : par exemple, il est possible de présélectionner le programme A pour l'été - apports d'eau maximums, et le
programme B pour le printemps - apports d'eau faibles ;
- une programmation simpliée : dans le cas où un seul programme surait à ses propres besoins d'arrosage, il est possible d'éliminer l'achage des
pages de l'autre programme, simpliant ainsi la présélection du programme utilisé ;
- la mise à OFF de l'unité RF : pour suspendre momentanément l'arrosage sans perdre toutefois les présélections des programmes.
Sur l'acheur apparaît normalement l'écran HEURE/JOUR courant(e) ; appuyer plusieurs fois sur la touche UNIT jusqu'à sélectionner l'unité RF à
programmer. Appuyer d'abord sur la touche OK, puis sur les touches - et + pour sélectionner le programme à valider. Appuyer sur OK, pour conrmer.
GEBRAUCH - Aktivierung der Programme A und B und Einstellen der RF-Geräte auf„OFF“. Das Aktivieren/Deaktivieren der Programme A und B der
RF-Geräte ist für folgende Situationen nützlich:
- unterschiedlicher Bewässerungsbedarf je nach Jahreszeit: man kann beispielsweise das Programm A für den Sommer (maximaler Bewässerungsbedarf )
und das Programm B für den Frühling (niedriger Bewässerungsbedarf ) einstellen
- vereinfachte Programmierung: wenn ein einziges Programm für den individuellen Bedarf ausreichend ist, kann die Darstellung der Seiten des anderen
Programms gelöscht werden, was die Einstellung des benutzten Programms erleichtert
- das Einstellen des RF-Geräts auf„OFF“: um die Bewässerung kurzfristig zu stoppen, ohne jedoch die Einstellungen der Programme zu verlieren.
Auf dem Display wird ganz normal der Bildschirm aktuelle UHRZEIT/WOCHENTAG angezeigt; betätigen Sie mehrmals die UNIT-Taste, bis zur Auswahl des
gewünschten zu programmierenden RF-Geräts. Betätigen Sie die OK-Taste und danach die Tasten - und +, um das zu aktivierende Programm
auszuwählen. Bestätigen Sie mit OK.
USO - Habilitación de los programas A y B y apagado (“OFF”) de las unidades RF. Activar/desactivar los programas A y B de las unidades RF es útil
para gestionar:
- necesidades de agua diferentes según la estación: por ejemplo, se puede congurar el programa A para el verano (máxima necesidad de agua) y el
programa B para la primavera (mínima necesidad de agua);
- una programación simplicada: si solo necesita un programa para satisfacer sus exigencias, puede inhabilitar la visualización de las páginas del otro
programa con lo cual es más fácil congurar el programa empleado;
- apagado (OFF) de las unidades RF: para bloquear temporalmente el riego sin perder la conguración de los programas.
En la pantalla se visualiza normalmente la pantalla HORA/DÍA actual; pulse varias veces la tecla UNIT hasta seleccionar la unidad RF que desea programar.
Pulse la tecla OK y, luego, las teclas - y + para seleccionar qué programa habilitar. Conrme pulsando OK.
IT
UK
FR
DE
ES
PROG
B
A
PROG
OK
B
A
S M T W T F S
PROG
OK
A
PROG
OK
B
PROG
OK
B
A
1
3
2
4
6
5
1 2
REMOTE CONTROL 10
Per Remote control 2 o 6 unità (codice): - For RF remote control 2 or 6 units (code): - Pour Radio commande RF 2 ou 6 unités (code): - Für 2 oder 6 Stationen
Fernbedienung (Art.): - Para Mando a distancia RF 2 o 6 unidades (código):
8347 - 8348
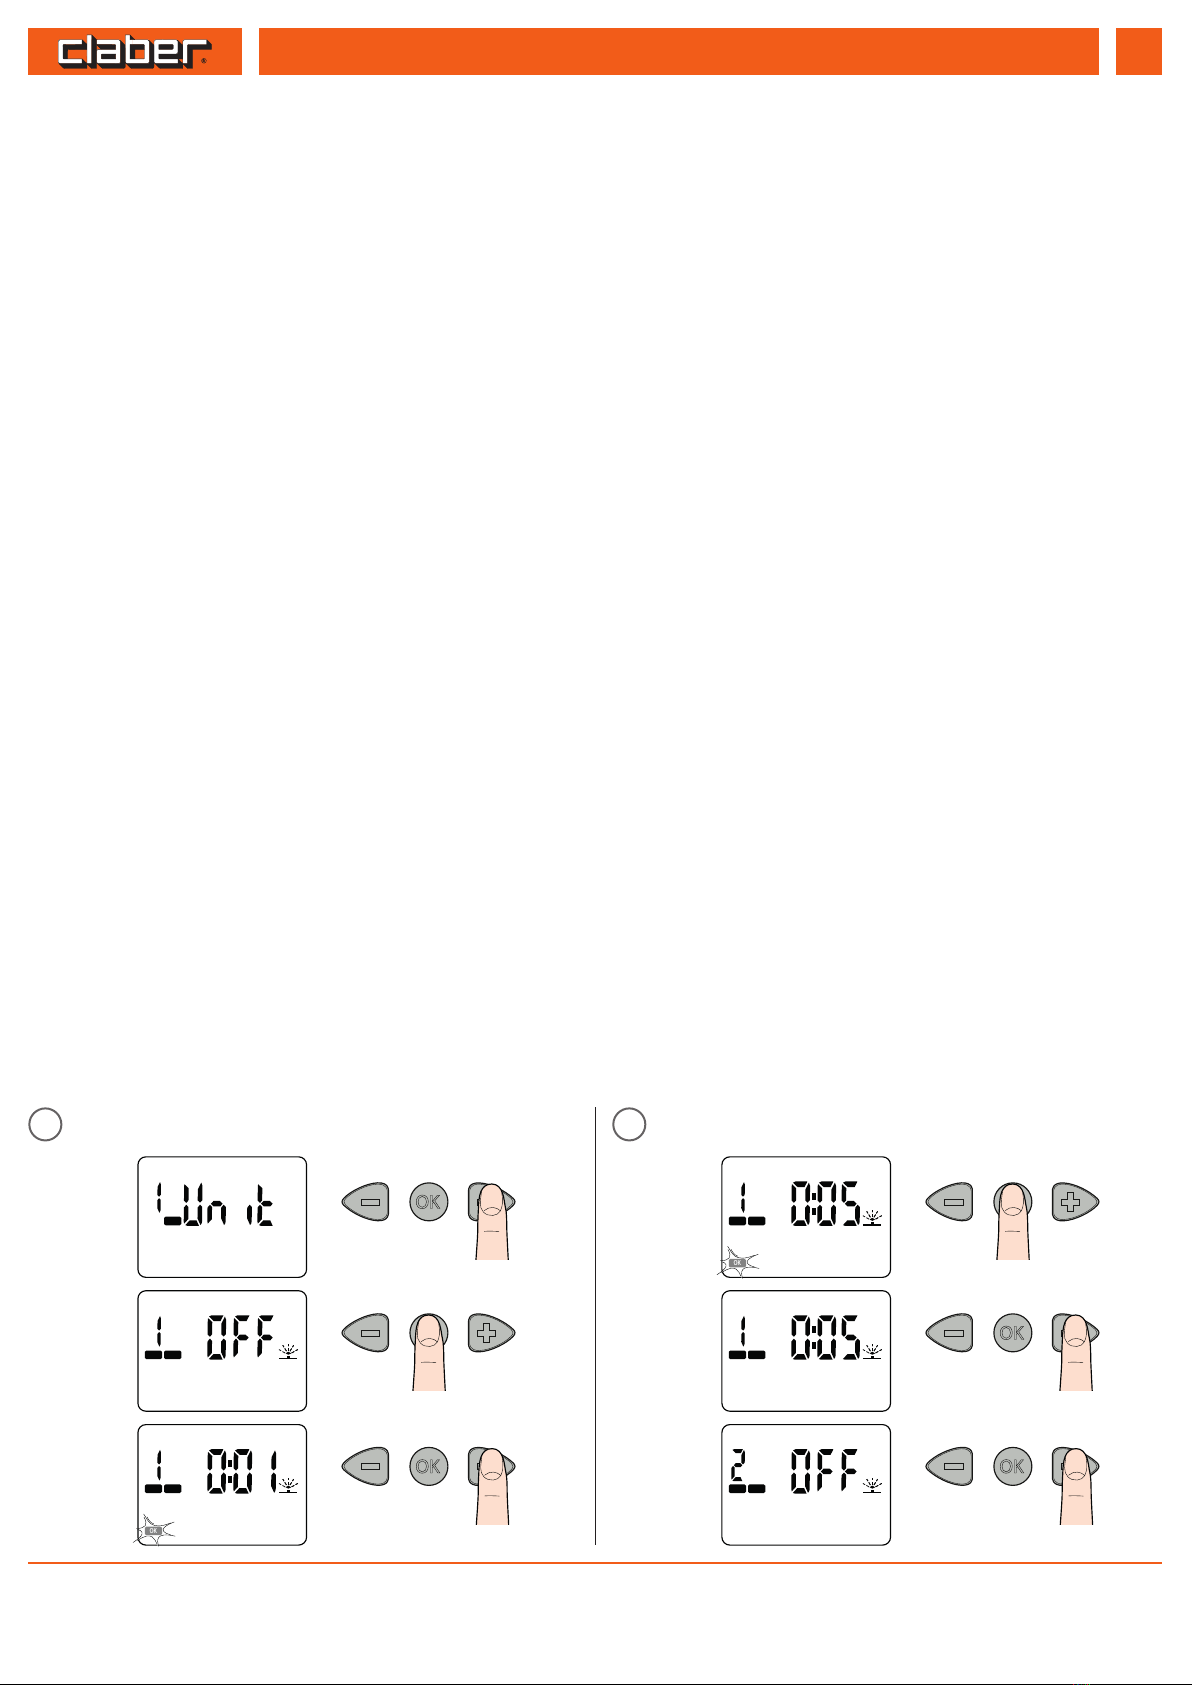
USO - Run Time. La pagina RUN TIME permette di impostare per ciascuna LINEA disponibile sull’Unità RF la durata di irrigazione (da minimo 1 a massimo
60 minuti) sia per il programma A che per il programma B. Premere il tasto + per accedere al RUN TIME e modicare la durata.
Dalla pagina RUN TIME premere il tasto OK per abilitare la modica, il simbolo OK lampeggia ad indicare che i parametri visualizzati possono essere
modicati e richiedono una conferma dell’impostazione. Con i tasti - e + cambiare il valore visualizzato (tenendo continuamente premuti i tasti si avanza
più velocemente). Premere il tasto OK per confermare il valore impostato. Premendo il tasto + si passa all’impostazione del RUN TIME della LINEA
successiva, no ad un massimo di 4 linee a formare un CICLO DI IRRIGAZIONE.
USE - Run Time. The RUN TIME page is used to set the duration of watering (from 1 to 60 minutes) for each LINE available on the RF Unit, both for
programme A and for programme B. Press + to access the RUN TIME and change it.
With the RUN TIME page active, press the OK button to enable changes, the OK symbol blinks to indicate that the parameters displayed can be changed
and that conrmation of the setting is required. Use the - and + buttons to change the value displayed (keeping the buttons pressed, the numbers will
scroll faster). Press the OK button to conrm the selected value. Pressing the + button, the display moves on to the RUN TIME setting for the next LINE; the
sequence is repeated for up to 4 lines, to complete a WATERING CYCLE.
UTILISATION - Run Time. La page RUN TIME permet de présélectionner pour chaque CIRCUIT disponible sur l'unité RF la durée d'arrosage (d'un
minimum de 1 à un maximum de 60 minutes) aussi bien pour le programme A que pour le programme B. Appuyez sur la touche + pour accéder au RUN
TIME et modier la durée.
Dans la page RUN TIME appuyer sur la touche OK pour valider la modication, le symbole OK clignote pour indiquer que les paramètres achés peuvent
être modiés et que ceux-ci doivent être conrmés. À l'aide des touches - et +, changer la valeur achée (garder le doigt dessus pour avancer plus
rapidement). Appuyer sur la touche OK pour conrmer la valeur présélectionnée. Appuyer sur la touche + pour passer au paramétrage de la DURÉE
D'ARROSAGE du CIRCUIT suivant jusqu'à un maximum de 4 circuits formant un CYCLE D'ARROSAGE.
GEBRAUCH - Run Time. Die Seite RUN TIME (Bewässerungsdauer) ermöglicht das Einstellen der Bewässerungsdauer (von minimal 1 bis maximal 60
Minuten) für jeden an dem RF-Gerät zur Verfügung stehenden KREIS, sowohl für das Programm A als auch für das Programm B. Um auf die RUN TIME
(Bewässerungsdauer) zugreifen und diese verändern zu können, betätigen Sie die Taste +.
Betätigen Sie auf der Seite der RUN TIME (Bewässerungsdauer) die OK-Taste, um die Änderung zu aktivieren, das OK-Symbol blinkt, um darauf
aufmerksam zu machen, dass die angezeigten Parameter verändert werden können und die Bestätigung der Einstellung verlangen. Mit den Tasten - und
+ können Sie den angezeigten Wert verändern (wenn Sie die Tasten gedrückt halten, kommen Sie schneller voran). Um den eingestellten Wert zu
bestätigen, betätigen Sie die OK-Taste. Durch Betätigen der Taste + können Sie die RUN TIME (Bewässerungsdauer) des nächsten KREISES, bei bis zu 4
Kreisen einstellen, um einen BEWÄSSERUNGSZYKLUS zu bilden.
USO - Run Time. La página RUN TIME permite congurar, para cada LÍNEA disponible en la unidad RF, la duración de riego (desde un mínimo de 1 hasta
un máximo de 60 minutos) del programa A y del B. Pulse el botón + para acceder al RUN TIME y modicar la duración.
Desde la página RUN TIME pulse la tecla OK para habilitar la modicación, el símbolo OK parpadea para indicar que los parámetros visualizados pueden
modicarse y requieren una conrmación de la conguración. Con las teclas - y + cambie el valor visualizado (manteniéndolas pulsadas, las cifras
cambian rápidamente). Pulse la tecla OK para conrmar el valor congurado. Pulsando la tecla + se pasa a la conguración del RUN TIME de la LÍNEA
sucesiva hasta las 4 líneas que, como máximo, pueden formar un CICLO DE RIEGO.
IT
UK
FR
DE
ES
PROG
B
A
PROGLINE
A
PROGLINE
A
PROGLINE
OK
A
PROGLINE
OK
A
PROGLINE
A
1
3
2
4
6
5
1 2

REMOTE CONTROL 11
Per Remote control 2 o 6 unità (codice): - For RF remote control 2 or 6 units (code): - Pour Radio commande RF 2 ou 6 unités (code): - Für 2 oder 6 Stationen
Fernbedienung (Art.): - Para Mando a distancia RF 2 o 6 unidades (código):
8347 - 8348
USO - Start Time. La pagina START TIME permette di impostare no a 4 orari di partenza al giorno del CICLO DI IRRIGAZIONE per il programma A e 4
orari per il programma B.
Dalla pagina START TIME premere il tasto OK per abilitare la modica dello START TIME, il simbolo OK lampeggia ad indicare che i parametri visualizzati
possono essere modicati e richiedono una conferma dell’impostazione. Con i tasti - e + cambiare il valore visualizzato (tenendo continuamente premuti i
tasti si avanza più velocemente). Premere il tasto OK per confermare il valore impostato. Se necessario, impostare gli orari successivi di START TIME
premendo il tasto + e ripetendo le operazioni già descritte.
Ogni orario impostato farà aprire in maniera consecutiva le valvole per le quali è stato impostato il RUN TIME.
USE - Start Time. The START TIME page allows the user to set up to 4 start times a day for the WATERING CYCLE selected with programme A, and 4 for
that selected with programme B.
With the START TIME page active press the OK button to enable a change to the START TIME 1, the OK symbol blinks to indicate that the parameters
displayed can be changed and that conrmation of the setting is required. Use the - and + buttons to change the value displayed (keeping the buttons
pressed, the numbers will scroll faster). Press the OK button to conrm the selected value. If necessary, set the subsequent START TIMEs by pressing the +
button and repeating the steps described above.
Each time set will make the valves for which a RUN TIME has been set open consecutively.
UTILISATION - Start Time. La page START TIME permet de présélectionner jusqu'à 4 horaires de démarrage par jour du CYCLE D'ARROSAGE pour le
programme A et 4 horaires pour le programme B.
Dans la page START TIME appuyer sur la touche OK pour valider la modication de le START TIME 1, le symbole OK clignote pour indiquer que les
paramètres achés peuvent être modiés et que ceux-ci doivent être conrmés. À l'aide des touches - et +, changer la valeur achée (garder le doigt
dessus pour avancer plus rapidement). Appuyer sur la touche OK pour conrmer la valeur présélectionnée. Si nécessaire, présélectionner les horaires
suivants du paramètre START TIME, en appuyant sur la touche + et en répétant les opérations déjà décrites plus haut.
Chaque horaire conguré fera ouvrir de manière consécutive les vannes pour lesquelles le RUN TIME a été conguré.
GEBRAUCH - Start Time. Die Seite START TIME (Startzeit) ermöglicht das Einstellen von bis zu 4 Startzeiten pro Tag des BEWÄSSERUNGSZYKLUS für das
Programm A und 4 Startzeiten für das Programm B.
Betätigen Sie auf der Seite START TIME (Startzeit) die OK-Taste, um die Änderung der START TIME (Startzeit) zu aktivieren, das OK-Symbol blinkt, um darauf
aufmerksam zu machen, dass die angezeigten Parameter verändert werden können und die Bestätigung der Einstellung verlangen. Mit den Tasten - und
+ können Sie den angezeigten Wert verändern (wenn Sie die Tasten gedrückt halten, kommen Sie schneller voran). Um den eingestellten Wert zu
bestätigen, betätigen Sie die OK-Taste. Falls notwendig, stellen Sie die darauf folgenden START TIMEs (Startzeiten) durch Betätigen der Taste + ein und
wiederholen Sie die bereits beschriebenen Schritte.
Jede eingestellte Uhrzeit önet nacheinander die Ventile, für die die RUN TIME (Bewässerungsdauer) eingestellt wurde.
USO - Start Time. La página START TIME permite congurar hasta 4 horas de inicio al día del CICLO DE RIEGO para el programa A y 4 para el B.
Desde la página START TIME pulse la tecla OK para habilitar la modicación del START TIME 1, el símbolo OK parpadea para indicar que los parámetros
visualizados pueden modicarse y requieren una conrmación de la conguración. Con las teclas - y + cambie el valor visualizado (manteniéndolas
pulsadas, las cifras cambian rápidamente). Pulse la tecla OK para conrmar el valor congurado. Si es necesario, congurar las horas siguientes de START
TIME pulsando la tecla + y repitiendo las operaciones descritas.
Cada hora ajustada hará que se abran de manera consecutiva las válvulas para las que se ha congurado el RUN TIME.
IT
UK
FR
DE
ES
PROGLINE
A
PROG
A
1 2 3 4
PROG
OK
A
1
PROG
A
1 2 3 4
PROG
OK
A
1
PROG
A
1 2 3 4
1
3
2
4
6
5
1 2
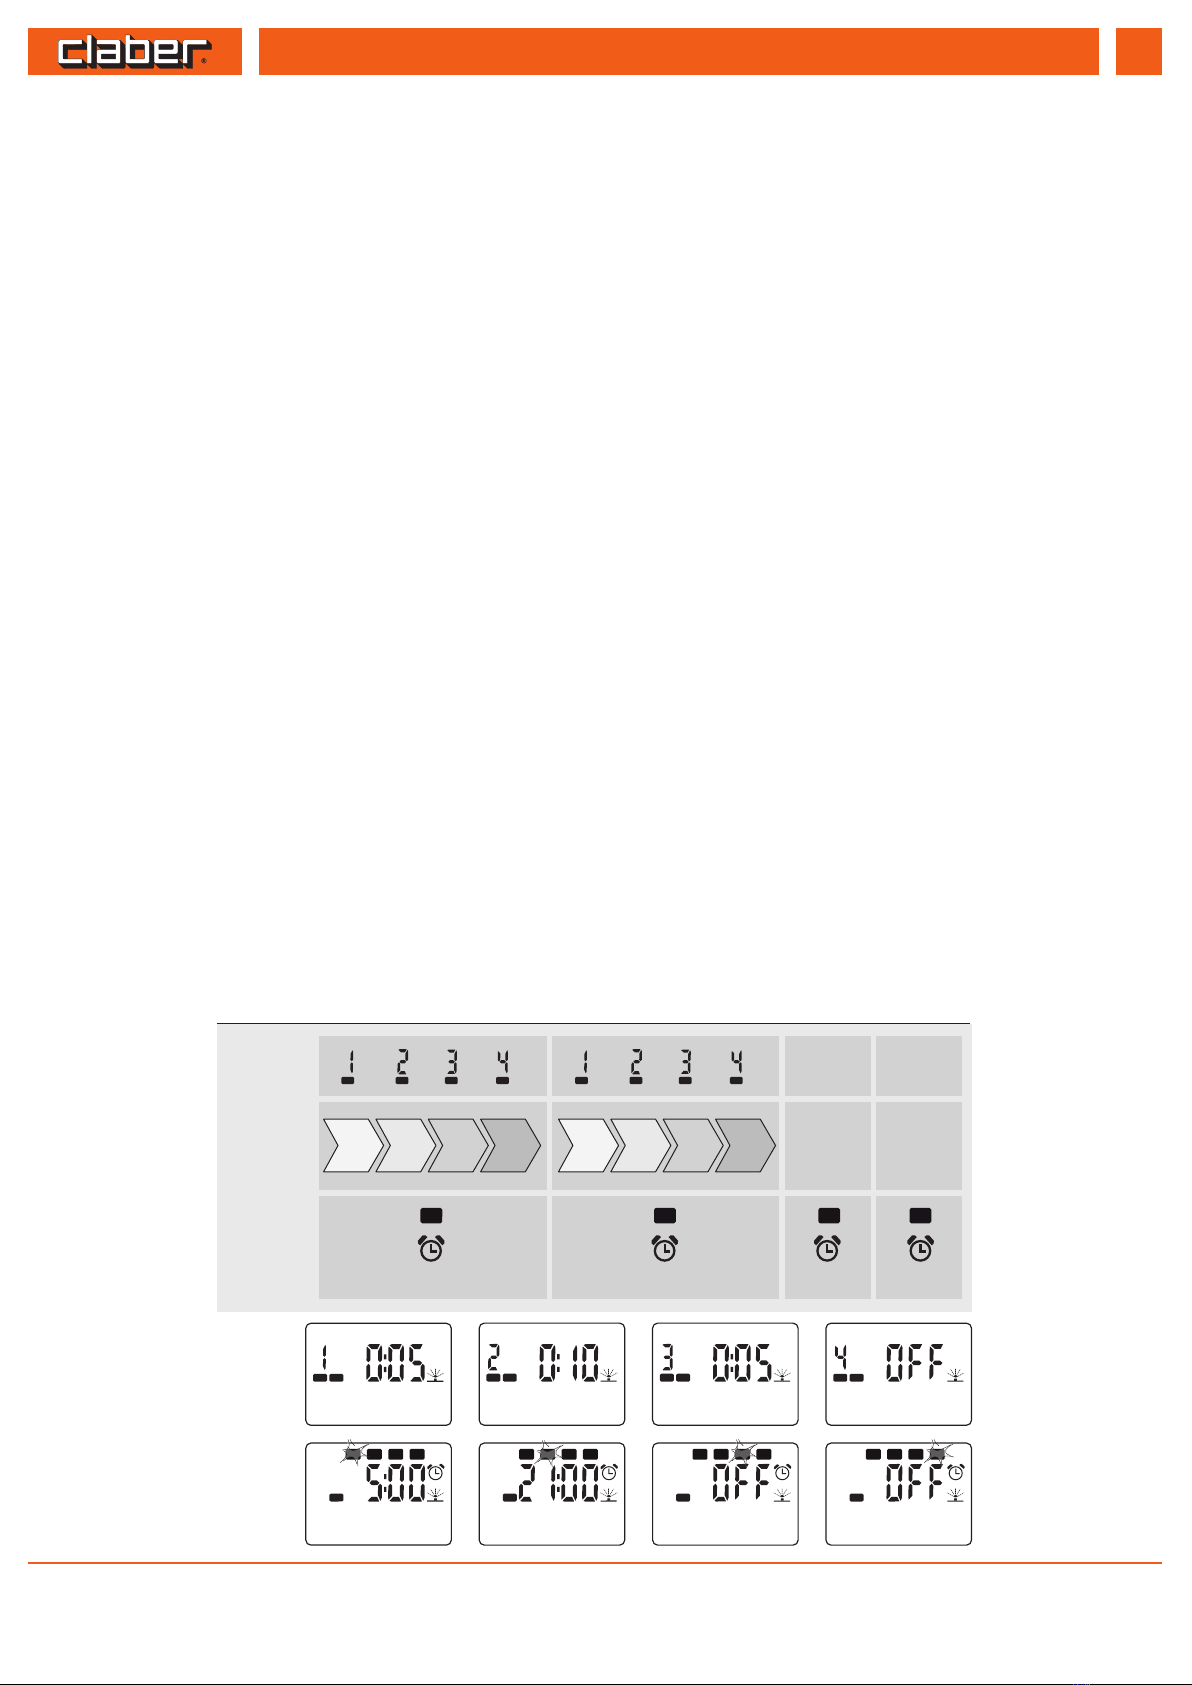
USO - Start Time. Esempio. Nel programma A è stata impostata un durata d’irrigazione (RUN TIME) nelle linee 1, 2, 3 rispettivamente di 5, 10 e 5 minuti.
La linea 4 è stata messa in OFF. Successivamente sono stati impostati solo due orari di partenza (START TIME), alle 5.00 e alle 21.00. Gli altri due sono stati
messi in OFF. Il ciclo di irrigazione (partenza di tutte e 4 le linee) avverrà nel modo seguente: linea 1A dalle 5.00 alle 5.05,
linea 2A dalle 5.05 alle 5.15,
linea 3A dalle 5.15 alle 5.20,
linea 4A nessuna apertura.
Alle ore 21.00 avremo lo stesso ciclo (linea 1A dalle 21.00 alle 21.05, linea 2A dalle 21.05 alle 21.15, linea 3A dalle 21.15 alle 21.20, linea 4A OFF).
Nello stesso modo si potranno impostare i cicli di irrigazione del programma B.
USE - Start Time. Example. For programme A, a watering run time has been set to 5, 10 and 5 minutes for lines 1, 2 and 3, respectively. Line 4 has been
set to OFF. After which, only two start times have been set, at 5 am and 9 pm. The other two have been set to OFF. The irrigation cycle (all 4 lines starting)
will run as follows: line 1A from 5.00 until 5.05,
line 2A from 5.05 until 5.15,
line 3A from 5.15 until 5.20,
line 4A no opening.
At 9 pm, the same cycle will run (line 1A from 9 until 9.05, line 2A from 9.05 to 9.15, line 3A from 9.15 to 9.20, and line 4A OFF).
The irrigation cycle for programme B can be set in the same way.
UTILISATION - Start Time. Exemple. Dans le programme A a été congurée une durée d’arrosage (RUN TIME) sur les lignes 1, 2, 3 respectivement de 5,
10 et 15 minutes. La ligne 4 a été mise sur OFF. Par la suite, seuls deux horaires de départ (START TIME) ont été congurés, à 5:00 et à 21:00. Les deux autres
ont été mis sur OFF. Le cycle d’arrosage (départ des 4 lignes) sera eectuée de la manière suivante: ligne 1A de 5h00 à 5h05,
ligne 2A de 5h05 à 5h15,
ligne 3A de 5h15 à 5h20,
ligne 4A aucune ouverture.
À 21h00 nous aurons le même cycle (ligne 1A de 21:00 à 21h05, ligne 2A de 21h05 à 21h15, ligne 3A de 21h15 à 21h20, ligne 4A OFF).
Il sera possible de congurer les cycles d'arrosage du programme B de la même manière.
GEBRAUCH - Start Time. Beispiel. Im Programm A wurde in den Kreisen 1, 2 und 3 jeweils eine Bewässerungsdauer (RUN TIME) von 5, 10 und 5 Minuten
eingestellt. Kreis 4 wurde auf OFF gestellt. Danach wurden nur zwei weitere START TIMEs (Startzeiten) eingestellt, um 5:00 Uhr und um 21:00 Uhr. Die
anderen beiden wurden auf OFF gestellt. Der Bewässerungszyklus (Start aller 4 Kreise) läuft wie folgt ab: Kreis 1A von 5:00 Uhr bis 5:05 Uhr,
Kreis 2A von 5:05 Uhr bis 5:15 Uhr,
Kreis 3A von 5:15 Uhr bis 5:20 Uhr,
Kreis 4A keine Önung.
Um 21:00 Uhr läuft der gleiche Zyklus ab (Kreis 1A von 21:00 Uhr bis 21:05 Uhr, Kreis 2A von 21:05 Uhr bis 21:15 Uhr, Kreis 3A von 21:15 Uhr bis 21:20 Uhr,
Kreis 4A OFF). Die Bewässerungszyklen des Programms B können auf die gleiche Weise eingestellt werden.
USO - Start Time. Ejemplo. En el programa A se ha ajustado una duración de riego (RUN TIME) en las líneas 1, 2 y 3 de 5, 10 y 5 minutos,
respectivamente. La línea 4 se ha puesto en OFF. A continuación se han ajustado solo dos horas de inicio (START TIME), a las 5.00 y a las 21.00. Las otras
dos se han puesto en OFF. El ciclo de riego (inicio de las 4 líneas) se realizará de la siguiente manera: línea 1A de las 5.00 a las 5.05,
línea 2A de las 5.05 a las 5.15,
línea 3A de las 5.15 a las 5.20,
línea 4A ninguna apertura.
A las 21.00 se efectuará el mismo ciclo (línea 1A de las 21.00 a las 21.05, línea 2A de las 21.05 a las 21.15, línea 3A de las 21.15 a las 21.20, línea 4A OFF).
Los ciclos de riego del programa B se podrán congurar del mismo modo.
IT
UK
FR
DE
ES
REMOTE CONTROL 12
Per Remote control 2 o 6 unità (codice): - For RF remote control 2 or 6 units (code): - Pour Radio commande RF 2 ou 6 unités (code): - Für 2 oder 6 Stationen
Fernbedienung (Art.): - Para Mando a distancia RF 2 o 6 unidades (código):
8347 - 8348
START
TIME
RUN
TIME
START
TIME
RUN
TIME
LINE
h 5:00 h 21:00 OFF OFF
OFF OFF
PROGRAM A
5
min 10
min 5
min OFF OFF
5
min 10
min 5
min
1 2 3 4
LINE LINELINE LINE
AA A A
LINE LINELINE LINE
AA A A
PROGLINE
A
PROGLINE
A
PROGLINE
A
PROGLINE
A
PROG
A
1 2 3 4
PROG
A
1 2 3 4
PROG
A
1 2 3 4
PROG
A
1 2 3 4
USO - Weekly Schedule. Con la programmazione settimanale (WEEKLY SCHEDULE) si scelgono i giorni della settimana in cui attivare i cicli di irrigazione
impostati.
Dalla pagina WEEKLY SCHEDULE, premere il tasto OK, lampeggia il simbolo Sunday = Domenica. Con pressioni successive del tasto OK visualizzare quali
programmi far partire in quel giorno (solo A, solo B, sia A che B, nessuno). Premere - e + per spostarsi sui giorni successivi e procedere allo stesso modo
per programmarli. Per uscire posizionarsi su EXIT premendo più volte il tasto +; quando lampeggia premere OK.
USE - Weekly Schedule. Programming the WEEKLY SCHEDULE, the user can select the days of the week on which to activate the programmed Watering
cycles.
With the WEEKLY SCHEDULE page active, press the button OK, the symbols blinks for Sunday. Press the button OK repeatedly to show which programmes
will be activated on this day (A only, B only, both A and B, neither A nor B). Press - and + to move on to each of the days in turn, programming them in the
same way. To quit, highlight EXIT by pressing the + button repeatedly; when EXIT starts blinking, press OK.
UTILISATION - Weekly Schedule. La programmation hebdomadaire (PROGRAMME HEBDOMADAIRE) permet de choisir les jours de la semaine pour
lesquels activer les cycles d'arrosage présélectionnés.
Dans la page PROGRAMME HEBDOMADAIRE, appuyer sur la touche OK, le symbole Sunday = Dimanche clignote. Acher par appuis répétés sur la
touche OK les programmes à faire démarrer tel jour (A seulement, B seulement, A et B, ni A ni B). Appuyer sur - et + pour se positionner sur les jours
suivants et procéder de même pour les programmer. Pour quitter la séquence, se positionner sur EXIT en appuyant plusieurs fois sur la touche + ; lorsqu'il
clignote, appuyer sur OK.
GEBRAUCH - Weekly Schedule. Mit der wöchentlichen Programmierung (WEEKLY SCHEDULE (Wochenplan)) werden die Wochentage ausgewählt, an
denen die eingestellten Bewässerungszyklen aktiviert werden.
Betätigen sie auf der Seite WEEKLY SCHEDULE (Wochenplan) die OK-Taste, das Symbol Sunday = Sonntag beginnt zu blinken. Mit nachfolgendem
mehrfachen Betätigen der OK-Taste wird angezeigt, welche Programme an diesem Tag gestartet werden sollen (nur A, nur B, sowohl A als auch B, keines
der beiden Programme). Betätigen Sie - und +, um zu den nächsten Tagen zu gelangen und verfahren Sie auf dieselbe Weise, um sie zu programmieren.
Zum Verlassen mehrmals die Taste + betätigen, um auf EXIT zu gehen; beim Blinken drücken Sie auf OK.
USO - Weekly Schedule. Con la programación semanal (WEEKLY SCHEDULE) se eligen los días de la semana en los cuales activar los ciclos de riego
congurados.
Desde la página WEEKLY SCHEDULE, pulse la tecla OK, el símbolo Sunday = Domingo parpadea. Pulsando varias veces la tecla OK visualice qué programas
desea que se activen para ese día (solo A, solo B, A y B, ni A ni B). Pulse OK para desplazarse por los días siguientes y prográmelos de la misma manera.
Para salir seleccione EXIT pulsando varias veces la tecla +; cuando parpadea, pulse OK.
IT
UK
FR
DE
ES
REMOTE CONTROL 13
Per Remote control 2 o 6 unità (codice): - For RF remote control 2 or 6 units (code): - Pour Radio commande RF 2 ou 6 unités (code): - Für 2 oder 6 Stationen
Fernbedienung (Art.): - Para Mando a distancia RF 2 o 6 unidades (código):
8347 - 8348
PROG
B
1 2 3 4
S M T W T F S
B
A
B
A
B
A
B
A
B
A
B
A
B
A
14
15
S M T W T F S
OK
EXIT
B
A
B
A
B
A
B
A
B
A
B
A
B
A
14
15
S M T W T F S
OK
EXIT
A
B
A
B
A
B
A
B
A
B
A
B
A
14
15
S M T W T F S
OK
EXIT
A
B B
A
B
A
B
A
B
A
B
A
14
15
S M T W T F S
OK
EXIT
A
B
A
B
A
B
A
B
A
B
A
B
A
14
15
S M T W T F S
OK
EXIT
A
B B
A
B
A
B
A
B
A
B
A
14
15
S M T W T F S
A
B B
A
B
A
B
A
B
A
B
A
14
15
S M T W T F S
OK
EXIT
A
B B
A
B
A
B
A
B
A
B
A
14
15
1
3
2
4
6
5
7
9
8
123

REMOTE CONTROL 14
Per Remote control 2 o 6 unità (codice): - For RF remote control 2 or 6 units (code): - Pour Radio commande RF 2 ou 6 unités (code): - Für 2 oder 6 Stationen
Fernbedienung (Art.): - Para Mando a distancia RF 2 o 6 unidades (código):
8347 - 8348
ESEMPIO.
EXAMPLE.
EXEMPLE.
BEISPIEL.
EJEMPLO.
IT
UK
FR
DE
ES
S M T W T F S
A A A
B
14
15
START
TIME
RUN
TIME
START
TIME
RUN
TIME
LINE
h 5:00
h 5:00
h 21:00
h 5:00
h 21:00
h 6:00
h 21:00
OFF
OFF
OFF
OFF
PROGRAM A
WEEKLY SCHEDULE
h 5:00
h 21:00
5
min
10
min
5
min
OFF
OFF
5
min
10
min
5
min
1
2
3
4
LINE
LINE
LINE
LINE
A
A
A
A
LINE
LINE
LINE
LINE
A
A
A
A
S
A
M
T
A
W
T
A
F
B
S
PROGLINE
A
PROGLINE
A
PROGLINE
A
PROGLINE
A
PROG
A
1 2 3 4
PROG
A
1 2 3 4
PROG
A
1 2 3 4
PROG
A
1 2 3 4
START
TIME
RUN
TIME
START
TIME
RUN
TIME
LINE
h 6:00
OFF
OFF
OFF
OFF
OFF
PROGRAM B
20
min
OFF
OFF
OFF
1
3
4
LINE
LINE
LINE
LINE
B
B
B
B
PROGLINE
B
PROGLINE
B
PROGLINE
B
PROGLINE
A
PROG
B
1 2 3 4
PROG
B
1 2 3 4
PROG
B
1 2 3 4
PROG
B
1 2 3 4
OFF
2

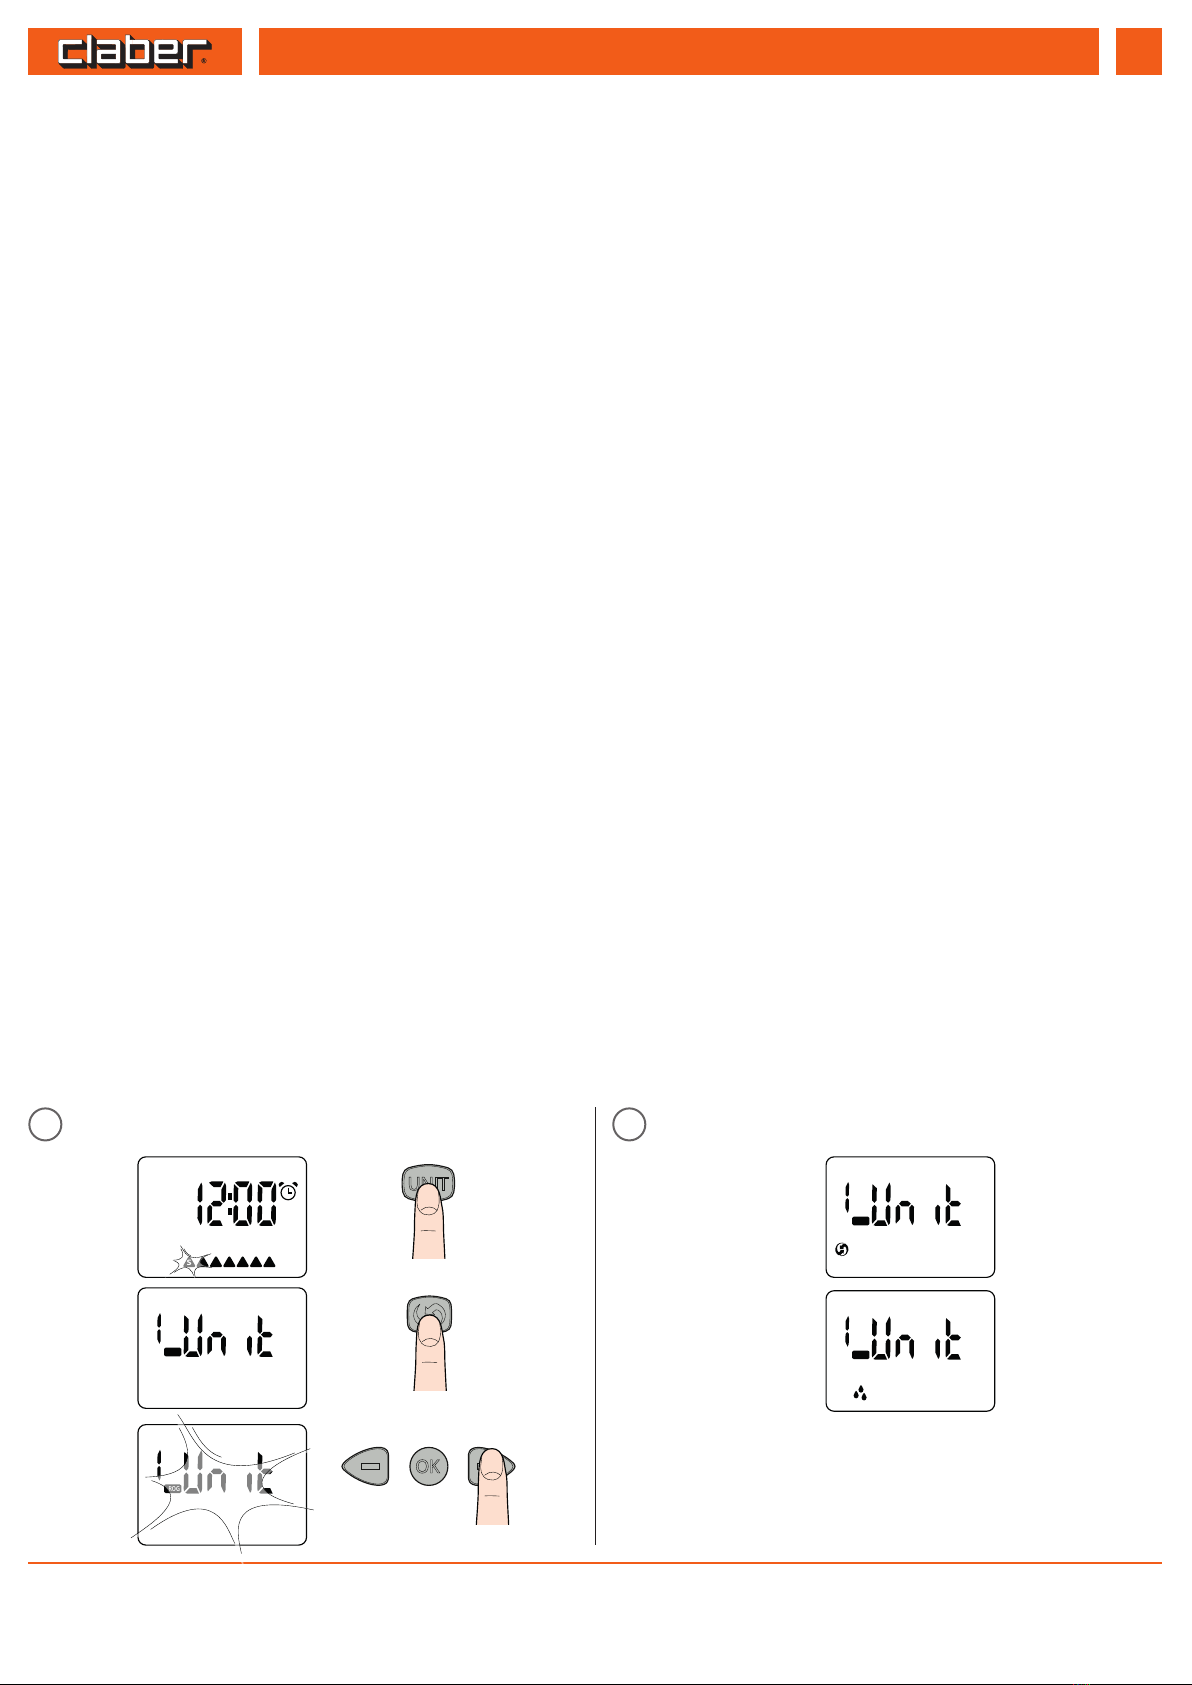
USO - Rain Sensor RF. Dalla pagina RAIN SENSOR premere il tasto OK: si accede alla attivazione/disattivazione del Rain Sensor RF (Sensore di Pioggia).
Con la pressione del tasto + si cambia lo stato da “YES”(sensore attivato) a“NO”(sensore disattivato) e viceversa. Confermare premendo il tasto OK.
USE - Rain Sensor RF. With the RAIN SENSOR page active press the button OK: this enables the option of activating or deactivating the RF Rain Sensor.
Pressing the button +, the option can be toggled between‘YES’(sensor activated) and‘NO’ (sensor deactivated). Conrm by pressing the button OK.
UTILISATION - Rain Sensor RF. Dans la page RAIN SENSOR appuyer sur la touche OK : pour accéder à l'activation/la désactivation du pluviomètre Rain
Sensor RF. L'appui sur la touche + fait basculer l'êtat de « YES » (pluviometre activé) à « NO » (pluviometre désactivé), et vice versa. Conrmer par OK.
GEBRAUCH - Rain Sensor RF. Auf der Seite RAIN SENSOR betätigen Sie die Taste OK-Taste: so gelangen Sie zur Aktivierung/Deaktivierung des RF-Rain
Sensors (Regensensors). Durch Drücken der Taste + wechseln Sie von„YES“ (Sensor aktiv) zu„NO“ (Sensor nicht aktiv) und umgekehrt. Bestätigen Sie durch
Drücken der OK-Taste.
USO - Rain Sensor RF. Desde la página RAIN SENSOR pulse la tecla OK: se accede a la página para activar y desactivar el sensor de lluvia RF. Pulsando la
tecla +, se cambia el estado de“YES”(sensor activado) a“NO” (sensor desactivado) y viceversa. Conrme pulsando la tecla OK.
IT
UK
FR
DE
ES
REMOTE CONTROL 15
Per Remote control 2 o 6 unità (codice): - For RF remote control 2 or 6 units (code): - Pour Radio commande RF 2 ou 6 unités (code): - Für 2 oder 6 Stationen
Fernbedienung (Art.): - Para Mando a distancia RF 2 o 6 unidades (código):
8347 - 8348
S M T W T F S
A
B B
A
B
A
B
A
B
A
B
A
14
15
OK
OK
1
3
2
4
5
1 2
USO - Controllo stato del Rain Sensor RF. Le informazioni relative allo stato del Rain Sensor RF si riferiscono al momento dell’ultima comunicazione tra il
Radiocomando RF e l’Unità RF. Per conoscere lo stato attuale di“pioggia” o “asciutto”del Rain Sensor RF, seguire la seguente procedura: premere il tasto
UNIT no a visualizzare la pagina di selezione dell’Unità RF abilitata al Rain Sensor RF (YES). Mantenendosi entro 10 m dall’Unità RF, premere il tasto RF del
Radiocomando RF, il display inizierà a lampeggiare e dopo pochi secondi si accenderà il simbolo RF per qualche istante. Al termine controllare la presenza
o meno del simbolo pioggia a display, come indicato di seguito:
- Spento: Sensore VUOTO oppure non attivo per l’Unità RF.
- Acceso sso: Sensore PIENO e attivo per l’Unità RF.
- Acceso lampeggiante: l’Unità RF non riceve più informazioni da oltre 24 ore dal Rain Sensor RF ed opera indipendentemente dal sensore stesso:
controllare le batterie del Rain Sensor RF e la corretta installazione del sensore.
Con sensore PIENO vengono interrotti eventuali programmi d’irrigazione e si previene che altri programmi partano in automatico, nché il simbolo
pioggia rimane acceso. È comunque possibile irrigare manualmente.
USE - Checking the Rain Sensor status. Information on the status of the RF Rain Sensor will reect the situation at the moment of the latest
communication between the RF Remote Control and the RF Unit. To establish the current‘rain’ or ‘dry’status of the RF Rain Sensor, proceed as follows:
press the button UNIT repeatedly to bring up the selection page of the RF Unit interlocked to the RF Rain Sensor (YES). Standing within 10 metres of the
RF Unit, press the RF button on the RF Remote Control; the display will start to blink, and after a few seconds the RF symbol will light up momentarily.
Now check to see whether the rain symbol appears in the display, as indicated below:
- O: Sensor cup EMPTY, or sensor not active on the RF Unit.
- Permanently alight: Sensor cup FULL and sensor active on the RF Unit.
- Blinking: RF Unit has received no information from the RF Rain Sensor for over 24 hours and is operating independently of the sensor. Check the
batteries of the RF Rain Sensor, and that the sensor is properly installed.
When the sensor cup is FULL, any watering programme in progress is suspended, and other programmes are prevented from starting up automatically
until the rain symbol remains permanently alight. It is still possible to operate the watering system manually.
UTILISATION - Contrôle de l'état du pluviomètre Rain Sensor RF. Les informations sur l'êtat du pluviomètre Rain Sensor RF se référent au moment de
la dernière communication entre la Radiocommande RF et l'unité RF. Pour connaître l'êtat actuel de « pluie » ou « sec » du pluviomètre Rain
Sensor RF, procéder comme suit : appuyer sur la touche UNIT jusqu'à acher la page de sélection de l'unité RF validée au pluviomètre Rain Sensor RF
(YES). Tout en se positionnant à 10 mètres maximum de l'unité RF, appuyer sur la touche RF de la Radiocommande RF. L'acheur commencera à clignoter
et, après quelques secondes, le symbole RF s'allumera un bref instant. Ensuite, contrôler la présence ou non du symbole « pluie » sur l'acheur, comme
indiqué ci-après:
- Éteint: Pluviomètre VIDE ou bien n'est pas activé pour l'unité RF.
- Allumé (lumière xe): Pluviomètre PLEIN et actif pour l'unité RF.
- Clignotante: l'unité RF ne reçoit plus d'informations depuis plus de 24 heures en provenance du pluviomètre Rain Sensor RF et fonctionne
indépendamment de celui-ci. Contrôlez les piles du Rain Sensor RF et la correcte installation du capteur.
Lorsque le pot du pluviomètre est PLEIN, les éventuels programmes d'arrosage sont interrompus et aussi longtemps que le symbole « pluie » reste
allumé (lumière xe) aucun autre programme ne pourra démarrer en automatique. L'arrosage manuel est toutefois possible.
IT
UK
FR
REMOTE CONTROL 16
Per Remote control 2 o 6 unità (codice): - For RF remote control 2 or 6 units (code): - Pour Radio commande RF 2 ou 6 unités (code): - Für 2 oder 6 Stationen
Fernbedienung (Art.): - Para Mando a distancia RF 2 o 6 unidades (código):
8347 - 8348
PROG
B
A
PROG
B
A
S M T W T F S
PROG
B
A
PROG
B
A
1
3
2
4
5
1 2

GEBRAUCH -Überprüfung des Status des RF-Rain Sensors. Die Informationen in Bezug auf den Status des RF-Rain Sensors beziehen sich auf den
Zeitpunkt der letzten Kommunikation zwischen der RF-Fernbedienung und dem RF-Gerät. Um zu erfahren, wie der aktuelle Status des RF-Rain Sensors ist
(„Regen“ oder„trocken“), durchlaufen Sie das folgende Verfahren: Betätigen Sie so lange die UNIT-Taste, bis Sie zur Auswahlseite des aktivierten RF-Geräts
oder RF-Rain Sensors gelangen (YES). Halten Sie sich innerhalb einer Distanz von 10 m von dem RF-Gerät auf und betätigen Sie die RF-Taste der
RF-Fernbedienung. Das Display beginnt zu blinken und ein paar Sekunden später leuchtet für einen Moment das RF-Symbol auf. Prüfen Sie am Ende das
Display wie folgt auf das Vorhandensein des Regensymbols:
- Aus: Sensor LEER oder nicht aktiv für das RF-Gerät.
- Durchgehend leuchtend: Sensor VOLL und aktiv für das RF-Gerät.
- Blinkend: Das RF-Gerät empfängt seit mehr als 24 Stunden keine Informationen vom RF-Rain Sensor mehr und arbeitet unabhängig vom Sensor.
Überprüfen Sie die Batterien des RF-Rain Sensors und die korrekte Installation des Sensors.
Ist der Sensor VOLL, werden eventuelle Bewässerungsprogramme unterbrochen und es wird verhindert, dass andere Programme automatisch starten,
solange das Regensymbol noch leuchtet. Die manuelle Bewässerung ist dennoch weiterhin möglich.
USO - Control del estado del sensor de lluvia RF. Las informaciones sobre el estado del sensor de lluvia RF se reeren al momento de la última
comunicación entre el mando a distancia RF y la unidad RF. Para conocer el estado actual (lluvia o seco) del sensor de lluvia RF: pulse la tecla UNIT hasta
visualizar la página de selección de la unidad RF habilitada al sensor de lluvia RF (YES). Manteniéndose a menos de 10 m de la unidad RF, pulse la tecla RF
del mando a distancia RF. La pantalla empieza a parpadear y al cabo de algunos segundos se enciende el símbolo RF por unos instantes. Luego, controle
si se visualiza o no el símbolo lluvia en la pantalla tal como se describe a continuación:
- Apagado: Sensor VACÍO o bien no activado para la unidad RF.
- Encendido jo: Sensor LLENO y activado para la unidad RF.
- Encendido parpadeante: la unidad RF no ha recibido ninguna comunicación del sensor en más de 24 y trabaja con independencia de este. Revise las
pilas del Rain Sensor RF y compruebe que el sensor esté correctamente instalado.
Con sensor LLENO se interrumpen los eventuales programas de riego y se impide que otros programas inicien de forma automática mientras el símbolo
lluvia permanezca encendido. En todo caso es posible regar manualmente.
DE
ES
REMOTE CONTROL 16
Per Remote control 2 o 6 unità (codice): - For RF remote control 2 or 6 units (code): - Pour Radio commande RF 2 ou 6 unités (code): - Für 2 oder 6 Stationen
Fernbedienung (Art.): - Para Mando a distancia RF 2 o 6 unidades (código):
8347 - 8348
PROG
B
A
PROG
B
A
S M T W T F S
PROG
B
A
PROG
B
A
1
3
2
4
5
1 2

REMOTE CONTROL 17
Per Remote control 2 o 6 unità (codice): - For RF remote control 2 or 6 units (code): - Pour Radio commande RF 2 ou 6 unités (code): - Für 2 oder 6 Stationen
Fernbedienung (Art.): - Para Mando a distancia RF 2 o 6 unidades (código):
8347 - 8348
USO - Test/Irrigazione manuale. Dalla pagina di TEST premere il tasto RF, la schermata lampeggia per alcuni secondi durante i quali si attiva la
comunicazione tra Radiocomando RF e l’Unità RF: alla ne appare una nuova schermata. Premere i tasti - e + per scegliere quale valvola attivare, premere
il tasto OK per attivarla per 5 minuti. A display appare il simbolo OK lampeggiante e si visualizza quanti minuti mancano alla ne dell’irrigazione manuale.
È possibile aumentare il tempo di irrigazione premendo il tasto +. L’elettrovalvola alla ne dei 5 minuti si chiude automaticamente e quindi si interrompe
l’irrigazione. Se si desidera interromperla anzitempo premere il tasto OK. Sul display appare la scritta“OFF”. Posizionarsi sulla pagina in cui viene
visualizzato TEST con i simboli OK e EXIT lampeggianti. Premendo il tasto OK si esce dalla modalità di TEST/manuale. Premendo il tasto + si ritorna alla
pagina di selezione delle Unità RF.
Entrando in modalità TEST si interrompono eventuali irrigazioni automatiche che riprenderanno all’uscita.
USE - Test/manual watering. With the TEST page active, press the RF button, the screen blinks for a few seconds while communication is established
between the RF Remote Control and the RF Unit: a new screen will then appear. Press the - and + buttons to select which valve will be activated, then
press OK to open it for 5 minutes. The OK symbol appears blinking in the display, together with the number of minutes remaining until the end of the
manual watering cycle. After 5 minutes have elapsed, the solenoid valve closes and the ow of water is shut o. To stop watering before the ve minutes
have elapsed, press the OK button. The message ‘OFF’ will appear in the display. Bring up the page that shows the message TEST accompanied by the OK
and EXIT symbols, both blinking. Press the OK button to exit TEST/manual mode. Pressing the + button, the RF Unit selection page reappears.
When TEST mode is accessed, any programmed watering cycles in progress will be interrupted temporarily, then resumed automatically.
UTILISATION - Test/arrosage manuel. Dans la page de TEST appuyer sur la touche RF, l'écran clignote pendant quelques secondes au cours desquelles
la communication entre la Radiocommande RF et l'unité RF s'établit : un nouvel écran surgit à la n. Appuyer sur les touches - et + pour choisir la vanne à
activer. Appuyer sur la touche OK pour l'activer pendant 5 minutes. Sur l'acheur apparaît le symbole OK qui clignote et le nombre de minutes qui
restent avant la n de l'arrosage manuel. L'électrovanne, au terme des 5 minutes, se ferme automatiquement et donc interrompt l'arrosage. Pour
interrompre avant l'arrosage, appuyer sur la touche OK. Sur l'acheur apparaît alors l'indication « OFF ». Se positionner sur la page où est achée
l'indication TEST avec les symboles OK et EXIT qui clignotent. Appuyer sur la touche OK pour quitter le mode de TEST/manuel. Appuyer sur la touche +
pour revenir à la page de sélection des unités RF.
L'accès au mode TEST interrompt momentanément les éventuels arrosages automatiques qui reprendront normalement après avoir quitté ce mode.
GEBRAUCH - Test/Manuelle Bewässerung. Drücken Sie das RF-Symbol auf der TEST-Seite, der Bildschirm blinkt für einige Sekunden, während die
Kommunikation zwischen RF-Fernbedienung und RF-Gerät anläuft. Am Ende erscheint ein neuer Bildschirm. Betätigen Sie die Tasten - und +, um das zu
aktivierende Ventil auszuwählen. Betätigen Sie die OK-Taste, um es für 5 Minuten zu aktivieren. Es erscheint das blinkende OK-Symbol auf dem Display
und es wird angezeigt, wie viele Minuten noch bis zum Ende der manuellen Bewässerung verbleiben. Durch Betätigen der Taste + können Sie die
Bewässerungszeit verlängern. Nach Ablauf der 5 Minuten schließt das Magnetventil automatisch und die Bewässerung wird unterbrochen. Drücken Sie
die OK-Taste, wenn Sie sie vorzeitig beenden möchten. Auf dem Display erscheint die Anzeige OFF. Gehen Sie auf die Seite, auf der TEST mit den
blinkenden Symbolen OK und Exit angezeigt wird. Durch Drücken der OK-Taste verlassen Sie den TEST-/manuellen Modus. Um auf die Seite für die
Auswahl des RF-Geräts zurückzukehren, drücken Sie die Taste +.
Durch Eintritt in den TEST-Modus wird eine eventuelle automatische Bewässerung unterbrochen, die dann beim Verlassen wieder aufgenommen wird.
USO - Test/riego manual. Desde la página TEST pulse la tecla RF, la página parpadea durante algunos segundos durante los cuales se activa la
comunicación entre el mando a distancia RF y la unidad RF: al nal se visualiza una nueva página. Pulse las teclas - y + para elegir qué válvula desea
activar y pulse la tecla para activarla por 5 minutos. En la pantalla se visualiza el símbolo OK parpadeante y cuántos minutos faltan para el nal del riego
manual. Una vez transcurridos los 5 minutos, la electroválvula se cierra automáticamente y el riego se interrumpe. Si se desea interrumpirlo antes, pulse la
tecla OK. En la pantalla se visualiza “OFF”. Acceda a la página en la cual se visualiza TEST con los símbolos OK y EXIT parpadeantes. Pulse la tecla OK para
salir del modo test/riego manual. Pulse la tecla + para volver a la página de selección de las unidades RF.
Al entrar en modo TEST se interrumpen los riegos autom ticos, que siguen cuando se sale de dicho modo.
IT
UK
FR
DE
ES
PROG
B
A
LINE
EXIT
A
LINE
OK
A
LINE
EXIT
A
OK
EXIT
1
3
2
4
6
5
7
8
1 2 3

REMOTE CONTROL 18
Per Remote control 2 o 6 unità (codice): - For RF remote control 2 or 6 units (code): - Pour Radio commande RF 2 ou 6 unités (code): - Für 2 oder 6 Stationen
Fernbedienung (Art.): - Para Mando a distancia RF 2 o 6 unidades (código):
8347 - 8348
USO - Trasmissione dei parametri di irrigazione e delle impostazioni alle Unità RF. Anché le irrigazioni avvengano secondo le impostazioni
eettuate con il Radiocomando RF, alla ne della programmazione è necessario trasmettere i nuovi parametri di irrigazione alle Unità RF per aggiornarle.
I led rossi lampeggianti sotto il numero dell’Unità indicano che si sono modicate delle impostazioni e che bisogna sincronizzare il Radiocomando RF con
l’Unità RF.
Portarsi con il Radiocomando RF a meno di 10 m dall’Unità RF da aggiornare. Premere il tasto RF del Radiocomando RF: il simbolo RF inizia a lampeggiare.
Al termine del lampeggio si avrà:
- scomparsa del simbolo RF : trasferimento avvenuto correttamente, i programmi di irrigazione dell’Unità RF saranno avviati automaticamente.
- simbolo RF acceso sso e simbolo ERR lampeggiante: trasferimento non riuscito, ripetere l’operazione avvicinandosi all’Unità RF.
USE - Transmission of watering parameters and settings to the RF Units. To make certain that watering occurs according to the settings made with
the RF Remote Control, having completed the programming steps, the new watering parameters must be transmitted to the RF Units to update them.
The red ashing lights under the Unit number, indicate that you have changed the settings and you need to synchronize the RF remote control with the
RF unit.
Take up a position with the RF Remote Control, ideally less than 10 metres from the RF Unit to be updated. Press the RF button on the RF Remote Control:
the RF symbol will start blinking. When the blinking stops, the display can appear with:
- the RF symbol no longer visible: transfer successful, the watering programmes of the RF Unit will be started automatically.
- the RF symbol permanently alight and the ERR symbol blinking: the operation has been unsuccessful and must be repeated nearer to the RF Unit.
UTILISATION - Transmission des paramétres d'arrosage et des présélections aux unités RF. Pour déclencher l'arrosage programmé avec la
Radiocommande RF, il est nécessaire, à la n de la programmation, de transmettre les nouveaux paramètres d'arrosage aux unités RF pour leur mise à jour.
Les feux clignotants rouges sous le numèro d'unité, indiquent que vous avez changé les réglages et vous avez besoin de synchroniser la télécommande
RF avec l'unité RF.
Se positionner avec la Radiocommande RF à au moins 10 mètres de l'unité RF à mettre à jour. Appuyer sur la touche RF de la Radiocommande RF : le
symbole RF commence à clignoter. Dès que le clignotement cesse, on a :
- disparition du symbole RF : le transfert s'est eectué correctement et les programmes d'arrosage de l'unité RF démarreront alors automatiquement.
- symbole RF allumé (lumière xe) et symbole ERR clignotant : le transfert a échoué et il faut alors répéter l'opération en approchant l'unité RF.
GEBRAUCH - Übertragung der Bewässerungsparameter und der Einstellungen an das RF-Gerät. Damit die Bewässerung nach den mit der
RF-Fernbedienung vorgenommenen Einstellungen abläuft, ist es notwendig, am Ende der Programmierung die neuen Bewässerungsparameter an die
RF-Geräte zu übertragen, um sie zu aktualisieren.
Die rot blinkenden LEDs unter der Gerätenummer zeigen an, dass Einstellungen geändert wurden und dass die RF-Fernbedienung mit dem RF-Gerät
synchronisiert werden muss.
Zum Aktualisieren begeben Sie sich mit der RF-Fernbedienung in einen Umkreis von weniger als 10 m von dem zu aktualisierenden RF-Gerät. Betätigen
Sie die RF-Taste der RF-Fernbedienung: Das RF-Symbol beginnt zu blinken. Sobald das Blinken aufgehört hat:
- erlischt das RF-Symbol: die Übertragung wurde erfolgreich durchgeführt, die Bewässerungsprogramme des RF-Geräts werden automatisch
durchgeführt werden.
- RF-Symbol leuchtet durchgehend und das ERR-Symbol leuchtet: die Übertragung wurde nicht erfolgreich durchgeführt. Gehen Sie näher an das
RF-Gerät heran und wiederholen Sie den Vorgang.
USO - Transmisión de los parámetros de riego y de las conguraciones a las unidades RF. Para que los riegos se ejecuten según lo congurado en
el mando a distancia RF, una vez efectuada la programación es necesario transmitir los nuevos parámetros de riego a las unidades RF para actualizarlas.
Las luces intermitentes de color rojo bajo el número de unidad, indican que ha cambiado la conguración y es necesario para sincronizar el mando a
distancia RF con la unidad RF.
Colóquese con el mando a distancia RF a menos de 10 m de la unidad RF que desea actualizar. Pulse la tecla RF del mando a distancia RF: el símbolo RF
empieza a parpadear. Cuando deja de parpadear puede suceder que:
- el símbolo RF deja de visualizarse: la transmisión se ha efectuado correctamente y los programas de riego de la unidad RF se iniciarán correctamente.
- el símbolo RF esté encendido de forma ja y el símbolo ERR parpadee: la transmisión ha fallado; repítala acercándose a la unidad RF.
IT
UK
FR
DE
ES
PROG
B
A
PROG
B
A
PROG
ERR
B
A
PROG
B
A
PROG
B
A
1
3
2
1 2
Other manuals for Aqua Wireless 8348
1
This manual suits for next models
1
Other claber Remote Control manuals


