Clarity INT9 A/D User manual

Clarity Hardware
INT9 A/D converter
HW ENG
Code/Rev.: M105/30G
Date: 30.1.2013
Phone: +420 251 013 400 DataApex Ltd.
Fax: +420 251 013 401 Petrzilkova 2583/13
clarity@dataapex.com 158 00 Prague 5
www.dataapex.com The Czech Republic

Sections of the manual connected only to the Clarity Full version are marked with the icon.
Clarity®, DataApex®and ®are trademarks of DataApex Ltd. Microsoft ®and Windows TM are
trademarks of Microsoft Corporation.
DataApex reserves the right to make changes to manuals without prior notice. Updated manuals can be
downloaded from www.dataapex.com.
Author: zte

INT9 A/D converter Table of Contents
Contents
1 INT9 acquisition card 1
1.1 A/D converter types in general 1
2 Requirements 3
3 Installation 4
3.1 The INT9 4
3.2 Standard cable for Clarity station 4
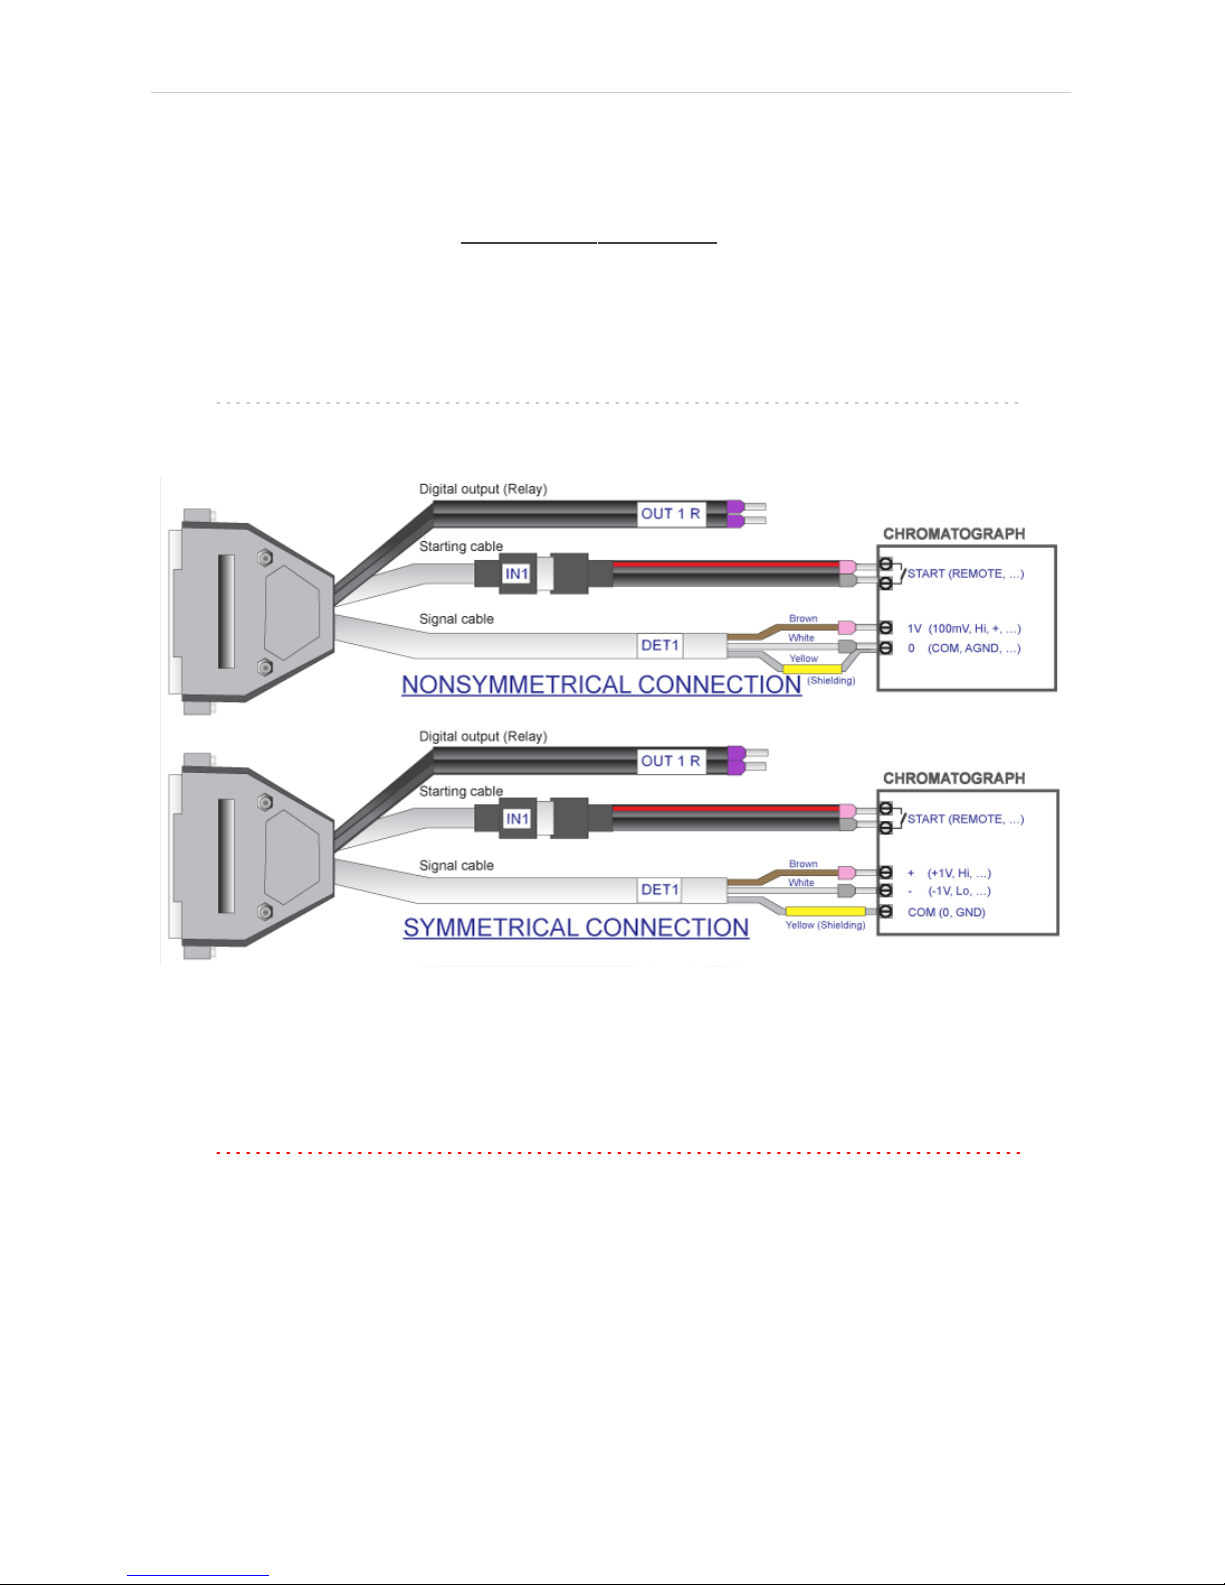
3.3 Connection with chromatograph 6
3.3.1 Connection of signal cables 6
3.3.2 Connection of starting cables 7
3.4 ClarityConfiguration 8
3.4.1 Measuring on multiple Instruments 10
3.4.2 Using multiple INT9 converters 11
4 Using the INT9 card 13
4.1 DataApex INT9 Setup 13
4.2 Method Setup 17
4.2.1 Method Setup - Acquisition 17
4.2.2 Method Setup - Measurement 19
4.3 Digital Inputs and Outputs 20
4.4 Device Monitor 21
5 Troubleshooting 22
5.1 Locate your problem 22
5.2 Problems with INT9 23
5.2.1 How to check the INT9 driver 24
5.3 Manual Installation 26
5.3.1 Installation and reinstallation in Windows 8, 7 or Vista 26
5.3.2 Installation and reinstallation in Windows XP 28
5.3.3 Reinstallation of drivers using the System Restore Point 32
5.3.4 Reinstallation of drivers in Windows 2000 33
5.3.4.1 Deleting incorrect *.INF files in the system 33
5.3.4.2 Installing the correct driver manually 34
5.4 Data Acquisition - non-functional 37
5.5 Data Acquisition - Simulated 39
6 Tables and Specifications 40
6.1 Description of the INT7 connector (Male) 40
6.2 Parameters of digital Inputs and Outputs 41
6.3 INT9 - CE Conformity Declaration 42
6.4 Technical data 43
- i -

Table of Contents Clarity Hardware
To facilitate the orientation in the INT9 A/D converter manual and Clarity chromatography
station, different fonts are used throughout the manual. Meanings of these fonts are:
Instrument (blue text) marks the name of the window, to which the text refers.
Open File (italics) describes the commands and names of fields in Clarity, parameters that can
be entered into them or a window or dialog name (when you already are in the topic describing
the window).
WORK1 (capitals) indicates the name of the file and/or directory.
ACTIVE (capital italics) marks the state of the station or its part.
The bold text is sometimes also used for important parts of the text and the name of the Clarity
station. Moreover, there are text sections written in format other than normal text. These sections are
formatted as follows:
Note: Notifies the reader of possibly interesting information.
Caution: Warns the user of possibly dangerous or very important
information.
▌ Marks the problem statement or trouble question.
Description: Presents any closer information on the problem, describes its causes etc.
Solution: Marks the response to the question, presents a procedure how to remove it.
- ii -

INT9 A/D converter 1 INT9 acquisition card
1 INT9 acquisition card
This manual describes the use of the INT9 A/D converter with the Clarity
software ver. 2.7 and later.
INT9 is an internal 24-bit A/D converter card that measures the voltages of
chromatographic and electrochemical detectors.
Fig 1: INT9
Brief technical overview
lUp to 4 dataacquisition channels on one card (one and two channel
versions are also available).
lThe channels are completely independent sigma delta integrating A/D
converters, used for processing positive and negative voltages.
l4 digital inputs.
l8 digital outputs. The first four are also designed as relay contacts.
lPCI Slot.
lExcellent reliability and temperature stability.
The INT9 card of integration converters is a modernized successor of the
PCI card INT7.
1.1 A/D converter types in general
Prior to collecting and processing the chromatographic signal by a
computer, the analog signal of the detector must first be converted to
digital form using an analog/digital (A/D) converter.
In principle, there are three types of A/D converters – sampling,
integrating and δΣ (Delta-Sigma) - with continuous integration). The INT9
card uses Delta-Sigma integration.
- 1 -

1 INT9 acquisition card Clarity Hardware
Advantages of the INT9 A/D converter
lNo loss of input signal during integration. There are no time delays during
which the converter fails to integrate the input signal.
lNo continuous servicing of the input analog switches, which would
otherwise cause errors (offset, noise).
lSubstantially smaller amounts of data entering the computer due to
individual data items already representing partial integrals.
- 2 -

INT9 A/D converter 2 Requirements
2 Requirements
The INT9 internal PCI A/D Converter can be used with the Clarity
software on PC’s using OSdescribed in Tab 1 on pg 3.
The PC must have free PCI slot for your INT9 card.
Note: Full size PCI 2.0, 32 bit PCI slot for 5V 32 bits half-length extension card is
required. Low profile or PCI Express slots cannot be used.
Tab 1: Hardware and Software Compatibility:
Software \
Windows
8
(incl. 64-bit)
7, Vista
(both 64-bit) 7, Vista XP 2000 98,
Me
Clarity
Clarity Lite
Yes
(from 4.0.3)
Yes
(from 3.0)
Yes
(from 2.5) Yes Yes
(until 3.0) No
CSW32 No No No No No No
- 3 -

INT9 A/D converter 3 Installation
3 Installation
Ensure that you have Administrator access rights in your Windows OS
before you proceed with the installation.
3.1 The INT9
lInstall Clarity software from the CDROM.
Caution: Install Clarity before inputting any devices.
The drivers were copied to your computer during the installation of the
Clarity software.
lPlug in the HW Key (described in the Getting Started manual).
lTurn off the PC.
lPlug the INT9 card into the PCI slot.
lStart the PC.
The drivers were installed automatically during the installation of the
Clarity software.
lThe driver is now installed, proceed to setup and wiring.
Note: When installing multiple INT9 cards, a PC restart is recommended after
the installation in order to prevent the reassignment of INT9 acquisition
channels between Clarity Instruments.
3.2 Standard cable for Clarity station
Fig 2: Cables for the Clarity station package
The standard Clarity station package with INT9 card includes a cable
composed of signal and starting cables for connecting the Clarity station
via the INT9 card to the chromatograph. The number of signal wires,
starting wires and digital output wires present corresponds to the number
of signals the INT9 card has - each signal on the card is accompanied by
- 4 -

3 Installation Clarity Hardware
a set of one signal wire, one starting wire and one digital output wire. The
2-channel INT9 card would thus have the cable with following parts:
Signal cables
Labeled DET1 and DET2, the cables are supplied as standard without
connectors [bare stripped and tinned endings – red (+), white (-) and
shielding (analogue ground)].
Starting (marker) cables
Labeled IN1 and IN2 , ended with CINCH connector (female). The
following cables can be connected to this CINCH connector:
lA cable terminated with free leads [red (+), shielding (digital ground)] for
direct connection to the chromatograph.
lA cable terminated with a button for cases where a starting contact is not
available and it is necessary to perform a manual start.
Both types of cable are supplied for each starting cable.
Digital output cables
Relay contacts labeled OUT1R and OUT2R, terminated with free leads.
These are used for synchronizing autosamplers without an AS Control
module in the ACTIVE Sequence or for controlling other devices.
At the converter end the cable is always terminated with a DB- 37F
connector (37-pin female connector).
- 5 -

INT9 A/D converter 3 Installation
3.3 Connection with chromatograph
Connect the cables according to one of the following diagrams in the Fig 3
on pg 6. Use the symmetrical connection only when you are sure that the
chromatograph/detector is equipped with a symmetrical output – it is
necessary to read through the instructions for the corresponding
chromatograph.
All current DataApex A/D Converters INT7,INT9,U-PAD,U-PAD2 and
Net-PAD use the same standard INT7 Connector.
Note: A description of the INT7 connector can be found in the chapter
"Tables and Specifications" on pg 40.
Fig 3: Connecting Clarity to chromatograph
3.3.1 Connection of signal cables
Signal inputs of the A/D converters are symmetrical: + (red), - (white) and
analogue ground (copper braiding).
Caution: Shielding must be connected. It serves not only as the shielding but also as
the analogue earth against which the measurement takes place. In the
case of asymmetrical output of a detector (only two connectors) shielding
must be connected to the white lead! No lead of the signal cable may
remain unconnected.
Try to connect to the detector output of the chromatograph with the largest
possible signal level, usually indicated in the chromatograph as
INTEGRATOR (signal approx. 1 V). The level of the signal on the output
marked RECORDER is usually only approx. 10 mV. For easier alterations
- 6 -

3 Installation Clarity Hardware
of the wiring, we supply a SV9 Terminal board with screw contacts for
INT7,INT9,U-PAD,U-PAD2 and Net PAD A/D converters.
Note: This SV9 Terminal Board is not suitable for applications with small
signals or with high electromagnetic interference. This is because the SV9
Terminal Board uses leads and screw contacts that are not shielded.
3.3.2 Connection of starting cables
Starting input reacts to a change of the TTL level (5 V / 0 V) or to a
connection by any contact (button, contact of relay).
The input implicitly reacts to a change from HIGH to LOW (or closing of a
contact). The input function may be altered by changing the Down option
to Up in the External Start/Stop section of the Method Setup -
Measurement dialog (accessible from the Instrument window using the
Method -Measurement command).
For schemes and hints describing the typical autosampler wiring, please
see the Connecting Autosamplers chapter of the Getting Started
Manual.
- 7 -

INT9 A/D converter 3 Installation
3.4 ClarityConfiguration
Fig 4: System Configuration
lStart the Clarity station by clicking on the icon on the desktop.
lInvoke the System Configuration dialog accessible from the Clarity
window using the System – Configuration... command.
lPress the Add… button (See Fig 4 on pg 8.) to invoke the Available
- 8 -

3 Installation Clarity Hardware
Control Modules dialog.
lYou can specify the searching filter to simplify the finding of the driver.
lSelect the INT9 and press the Add… button.
The DataApex INT9 Setup dialog will appear.
Fig 5: DataApex INT9 Setup
lEnter the detector names in Name fields for individual channels, set signal
units.
Note: A detailed description of this dialog can be found in the chapter
"DataApex INT9 Setup" on pg 13.
lPress the OK button.
The INT9 will appear in the Setup Control Modules list of the System
Configuration dialog.
lDrag and drop the INT9 icon from the Setup Control Modules list on the
left side of the System Configuration dialog to the desired Instrument tab
on the right side (or use the button to do so).
- 9 -

INT9 A/D converter 3 Installation
lSet the Ext. Start Dig. Input and Ready Dig. Output numbers for your
acquisition card according to the wires being used for synchronization.
Note: The configuration dialog of the INT9 card (DataApex INT9 Setup) can be
displayed any time by double-clicking on its icon or using the Setup button.
3.4.1 Measuring on multiple Instruments
When measuring on multiple instruments using only a single INT9 to
gather data, rather than dragging the entire INT9 icon from the Setup
Control Modules list , drag the individual detector signals (FID,UV-VIS in
this case) to separate Instruments . See Fig 6 on pg 10. The Instrument
to which the particular signal is connected is listed to the right of the
detector name in the Setup Control Modules section.
Fig 6: System Configuration – multiple instruments
Note: Each independent Clarity Instrument must have separate Ext. Start
Dig. Input and Ready Dig. Output pins configured according to the actual
wiring.
Note: A larger number of Instruments can be set than the amount you have
purchased. You will not be able to measure on the surplus Instruments
(indicated by a blue symbol of the curve on the tab), but you may use them
e.g. for “offline” preparation of methods.
- 10 -

3 Installation Clarity Hardware
3.4.2 Using multiple INT9 converters
When using multiple A/D cards, it will be necessary to add the INT9 card
again, repeating the entire procedure described in the chapter
"ClarityConfiguration" on pg 8. from Step 3.
Fig 7: System Configuration – multiple INT9s
Individual detectors from all cards can be assigned to multiple instruments
and combined together arbitrarily. In this example, all signals from INT9
A/D Card 1, as well as all signals from INT9 A/D Card 2 and one signal
(Pressure) from U- PAD2 are assigned to the Instrument 1 , while the
second signal (UV) from U-PAD2 is assigned to the Instrument 2 .
While there are several cards assigned to the same instrument, it is
necessary to select which card will be used for Ext. Start Dig. Input and
Ready Dig. Output signals .
All added A/D converters (e.g. INT9 ) must have their drivers properly
installed. There must be correct number of items in the Windows OS
Device Manager, otherwise you will not be able to add it in the System
Configuration dialog and configure its detectors to Instruments.
- 11 -

INT9 A/D converter 3 Installation
Fig 8: Device Manager in Windows 7 - two INT9 cards
Note: A maximum of four INT9 converters can be configured and used in
Clarity simultaneously.
- 12 -

INT9 A/D converter 4 Using the INT9 card
4 Using the INT9 card
There are generally two places for setting the parameters of the INT9 A/D
converter in Clarity:
lThe DataApex INT9 Setup dialog for setting the parameters that are set
with respect to the type of connected signal.
lThe Method Setup - Acquisition tab for setting the parameters related to
the type of analysis.
4.1 DataApex INT9 Setup
The DataApex INT9 Setup dialog sets the parameters of the INT9
converter and since it depends on the type of connected detector, it is not
going to be changed often.
Fig 9: DataApex INT9 Setup
Number of Channels
Indicates the number of data acquisition channels.
- 13 -

4 Using the INT9 card Clarity Hardware
Channel 1 (to 4)
For each channel of the INT9 A/D Card the name of the signal can be
edited in the Name field and the Set Units... button can be used to change
other signal parameters. Effects of these changes can be seen in other
fields of the respective Channel 1 (to 4) section.
Name
This field will be used to describe the signal in the Chromatogram
window.
Inversion of Signal
Inverts the polarity of the signal from the detector. This function can
also be used for easy correction of inversely connected wires.
Bipolar
Both positive and negative voltages will be measured. Unchecking the
Bipolar option will improve the resolution of the signal by 1 bit. On the
other hand, it will also restrict the measuring of negative signals (i.e.
below zero).
Set Units...
Invokes the Detector Units dialog.
Fig 10: Detector Units
lQuantity – Field for entering a name of the y-axis in the graph of the
measured signal.
lUnits – Field for entering the unit symbol, along with the prefix.
lCoefficient – Allows to enter the coefficient between the selected units
and mV (default).
lAutoprefix – Allows to enter the unit prefix. In graphs, units will be
scaled automatically, while in the tables, units with the prefix entered
will be used.
Synchronize Start with Digital Input
Maps the INT9 A/D converter channel to selected External Start
Digital Input. It enables faster and more accurate synchronization of
channels with the start signal. Especially for short analyses the
necessary time lags at the start of the acquisition are significant. When
measuring multi-detector chromatograms it will minimize the time shift
between detector signals and thus improve the detection of peaks.
- 14 -

INT9 A/D converter 4 Using the INT9 card
Note: Synchronize Start with Digital Input reflects the settings of the Contact
Closure/Opening of the External Start/Stop option in the Method Setup -
Measurement dialog.
Device Setup
This section allows to modify the naming of digital inputs and outputs and
change the mains Supply Frequency Suppression settings.
Digital Input Names
Allows to change the names of digital inputs.
Fig 11: Digital Input Names
Digital Output Names
Allows to change the names of digital outputs. These names will be
used in the Digital Output Control dialog in the chapter "Digital Inputs
and Outputs" on pg 20.
Fig 12: Digital Output Names
Supply Frequency
Allows to change the mains Supply Frequency Suppression. It is used
for suppressing the interference on the specified frequency level. This
setting influences the sampling frequency as well.
- 15 -

4 Using the INT9 card Clarity Hardware
Note: In most parts of Americas, the 60 Hz mains frequency is usual, while the
rest of the world tends to use 50 Hz mains frequency (pre- set as default).
The 50 Hz frequency is common in countries using 230V power supply,
while the 60 Hz is connected to the 117V power supply.
- 16 -
This manual suits for next models
1
Table of contents
Other Clarity Media Converter manuals
Popular Media Converter manuals by other brands

PCB Piezotronics
PCB Piezotronics Y422E36 Installation and operating manual

Siemens
Siemens ISOLATED MULTI-DROP SG-6048-01 Operator's manual

Cary Audio Design
Cary Audio Design Cinema 11v owner's manual

Magewell
Magewell ULTRA STREAM user manual

Danfoss
Danfoss VLT Micro Drive FC 51 Series operating instructions

Lynx
Lynx Aurora user manual