Clark-Reliance GL53 User manual

Section:
Bulletin:
Date:
Supercedes:
16633 Foltz Parkway, Strongsville, OH 44149 USA
Telephone: (440) 572-1500 Fax: (440) 238-8828
www.clark-reliance.com
World’s Leader in Boiler
Trim Instrumentation
Section: R500
Bulletin: R500.E178A
Date:3-17-06
Supercedes:E178A
GL53 Illuminator Installation
Instructions
All installation steps should be performed by a qualified technician and
should be executed in accordance with all applicable national and local
codes.

Section:
Bulletin:
Date:
Supercedes:
16633 Foltz Parkway, Strongsville, OH 44149 USA
Telephone: (440) 572-1500 Fax: (440) 238-8828
www.clark-reliance.com
World’s Leader in Boiler
Trim Instrumentation
Installation Instructions for Model GL-53 Water Gage Illuminators for
Tubular Glass Gages or Prismatic Gages
1. General Information
Model GL-53 Water Gage Illuminators are designed to improve the vision ofthe water
level, for plant personnel. If a tubular glass or prismatic type water gage is installed in
an area with adequate lighting, a gage illuminator may not be required. However, if
the water gage is to be viewed from a distance greater than 25 feet, then a gage
illuminator is recommended.
2. Installation
Model GL-53 illuminators are designed with a½” female NPT electrical conduit
connection. These illuminators must be installed vertically withthe conduit connection
located at the bottom. A flexible power cord can be temporarilyinstalled on the unit,
and used to test the unit. NOTE: Use caution when testing as the illuminator will
become very hot! This will enable the installer to optimize theilluminator location, with
respect to the gage. Then, a permanent power connection can be installed. Normally,
the illuminator will be installed parallel to the gage and aimedfrom the left or right
side (approximately 30°from center), to prevent obstructing the operator’s view of the
water gage.
If the illuminator is to be installed with a prismatic type water gage, one illuminator
can be used for up to two sections of size 9 glass or approximately 27 inches of water
gage viewing.
This illuminator can be installed outdoors.
3. Maintenance
There is no maintenance required, other than the occasional needto service the
lamp. For additional instructions, see form E178-A. As an option to extend lamp life,
we suggest an illuminator timer: model TPS-120 (for 120 VAC supply) or TPS-240
(for 240 supply). An illuminator timer provides up to 3 minutesof operation time, by
depressing a pushbutton. This results in extended lamp life, reduced power
consumption and maintenance. Consult C-R or your local representative for
additional details.
Page2
Section:
Bulletin:
Date:
Supercedes:
16633 Foltz Parkway, Strongsville, OH 44149 USA
Telephone: (440) 572-1500 Fax: (440) 238-8828
www.clark-reliance.com
World’s Leader in Boiler
Trim Instrumentation
Note: Make sure that the power is turned off to
the supply wiring before connecting the
illuminator.
Tools needed:
–Slotted Screwdriver
–1/2" Wrench
1. Open the illuminator housing by loosening
the three hex head cap screws on the end of the
unit that secures the Conduit/Lamp assembly in
place.
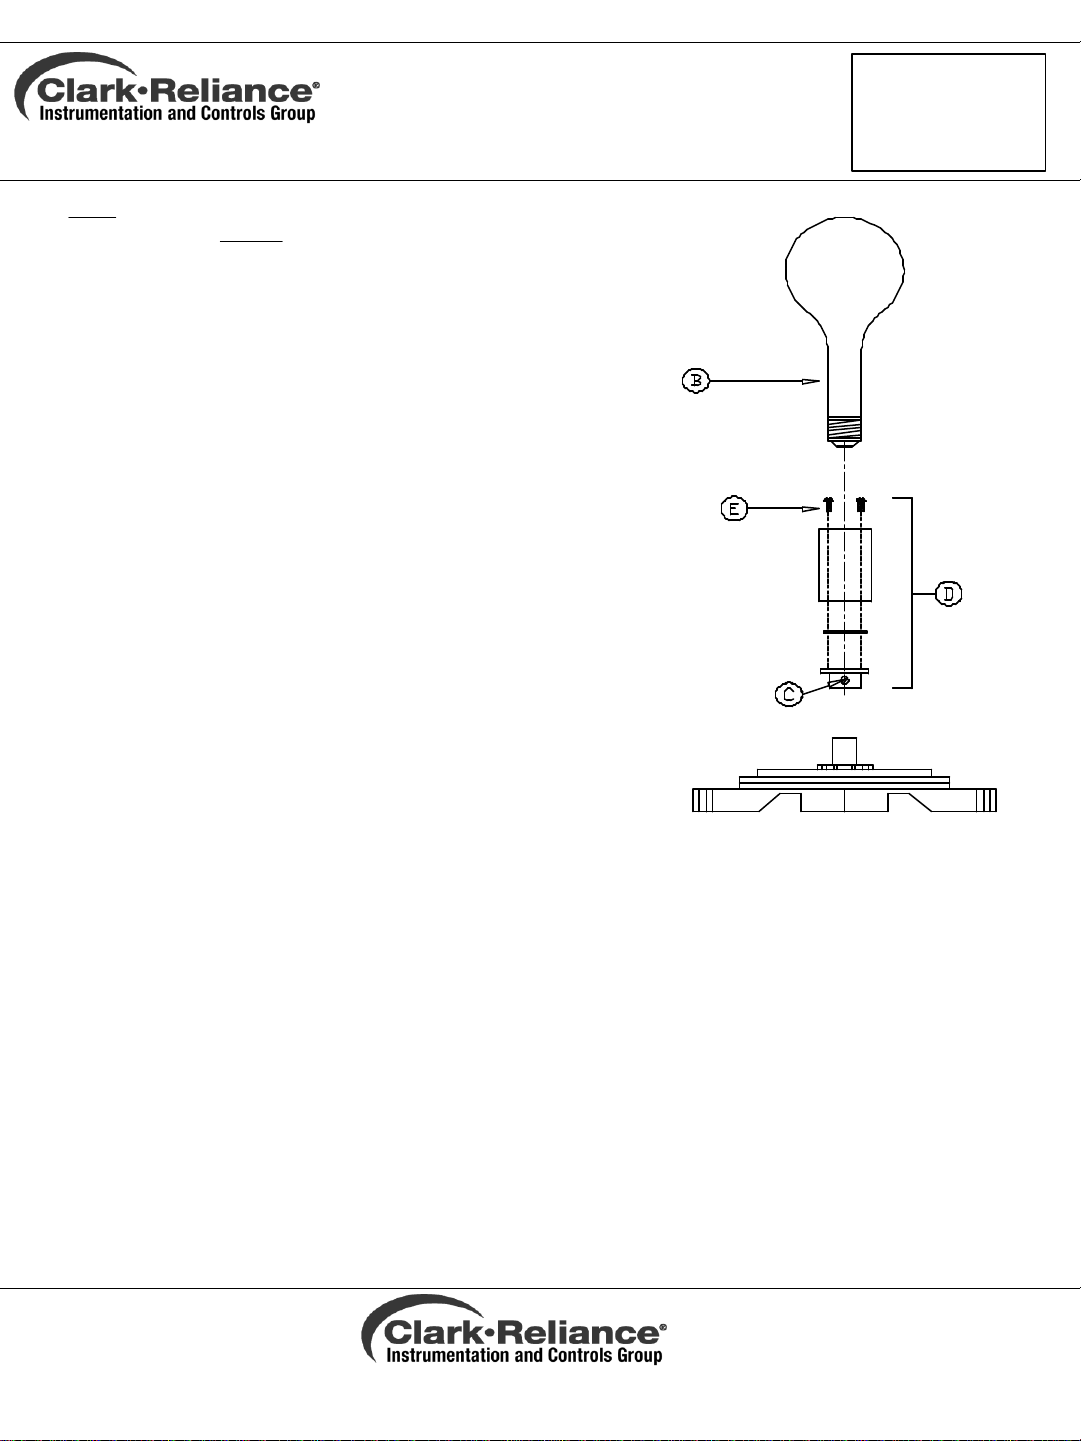
2. Carefully remove the assembly and remove
the Frosted Lamp (B) from the illuminator
housing and set aside. The lamp is 60W on 120
VAC models and 50W on 230VAC models.
3. Loosen the screw (C) from the side of the
lamp socket/conduit connector that holds the
assembly in place on the pipe nipple.
4. Take the lamp socket/conduit connector
assembly (D) off of the housing end piece and
set the housing aside.
5. Disassemble the lamp socket/conduit
connection assembly by removing the two
screws (E) from inside of the lamp socket. (Note
that there are two small washers on the
assembly screws. Do not lose these washers as
they are needed for re-assembling the
illuminator.)
7. Connect the black wire to the ‘gold’screw
terminal on the bottom of the lamp socket.
8. Connect the white wire to the ‘silver’screw
terminal on the bottom of the lamp socket.
9. Re-assemble the lamp socket/conduit
connector assembly using the same two screws
with washers inside of the lamp socket. Make
sure that the mounting plate is centered on the
lamp socket/conduit connector assembly.
10. Thread the lamp socket/conduit
connector assembly back into the bottom
of the pipe nipple and tighten the holding
screw.
11. Carefully screw the lamp into the
socket and re-assemble the bottom
assembly back onto the illuminator
housing (make sure that the gasket
between the bottom assembly and
housing is in place). Secure by tightening
the three hex head cap screws on the
bottom side of the housing.
12. Wire the illuminator to the 120 V.*
power supply. (*Unless lamp is for 230 V.
service)
Page3

Section:
Bulletin:
Date:
Supercedes:
16633 Foltz Parkway, Strongsville, OH 44149 USA
Telephone: (440) 572-1500 Fax: (440) 238-8828
www.clark-reliance.com
World’s Leader in Boiler
Trim Instrumentation
Page4
50W-250V FROSTED LAMPV13064
60W-120V FROSTED LAMPE32-24
LAMPSOCKETGL53-7R
DESCRIPTIONPART NUMBER
REPLACEMENT PARTS
Other Clark-Reliance Lighting Equipment manuals


Popular Lighting Equipment manuals by other brands


Lampo
Lampo Fari Solar LED Series instruction sheet

Aztec
Aztec LED PAR-48 RGBW User instruction manual

EMX Industries, Inc.
EMX Industries, Inc. BPE-50 operating instructions

Champlain
Champlain ACM-122 quick start guide

EVL
EVL PRO SCANNER 150-250 user manual

Honeywell
Honeywell BT0554FF0810 Use and care guide

PATONA
PATONA PREMIUM Series manual

Recom
Recom RACT09 Installation and operating instructions

Milwaukee
Milwaukee M18 HOSALC Original instructions

Larson Electronics
Larson Electronics GL-2051-F-M instruction manual

Chauvet Professional
Chauvet Professional COLORado 2 Zoom Tour Quick reference guide

Ultra
Ultra Firefly Low Voltage Lighting System installation guide