Claro CF 6031 User manual
CF 6031 USER MANUAL
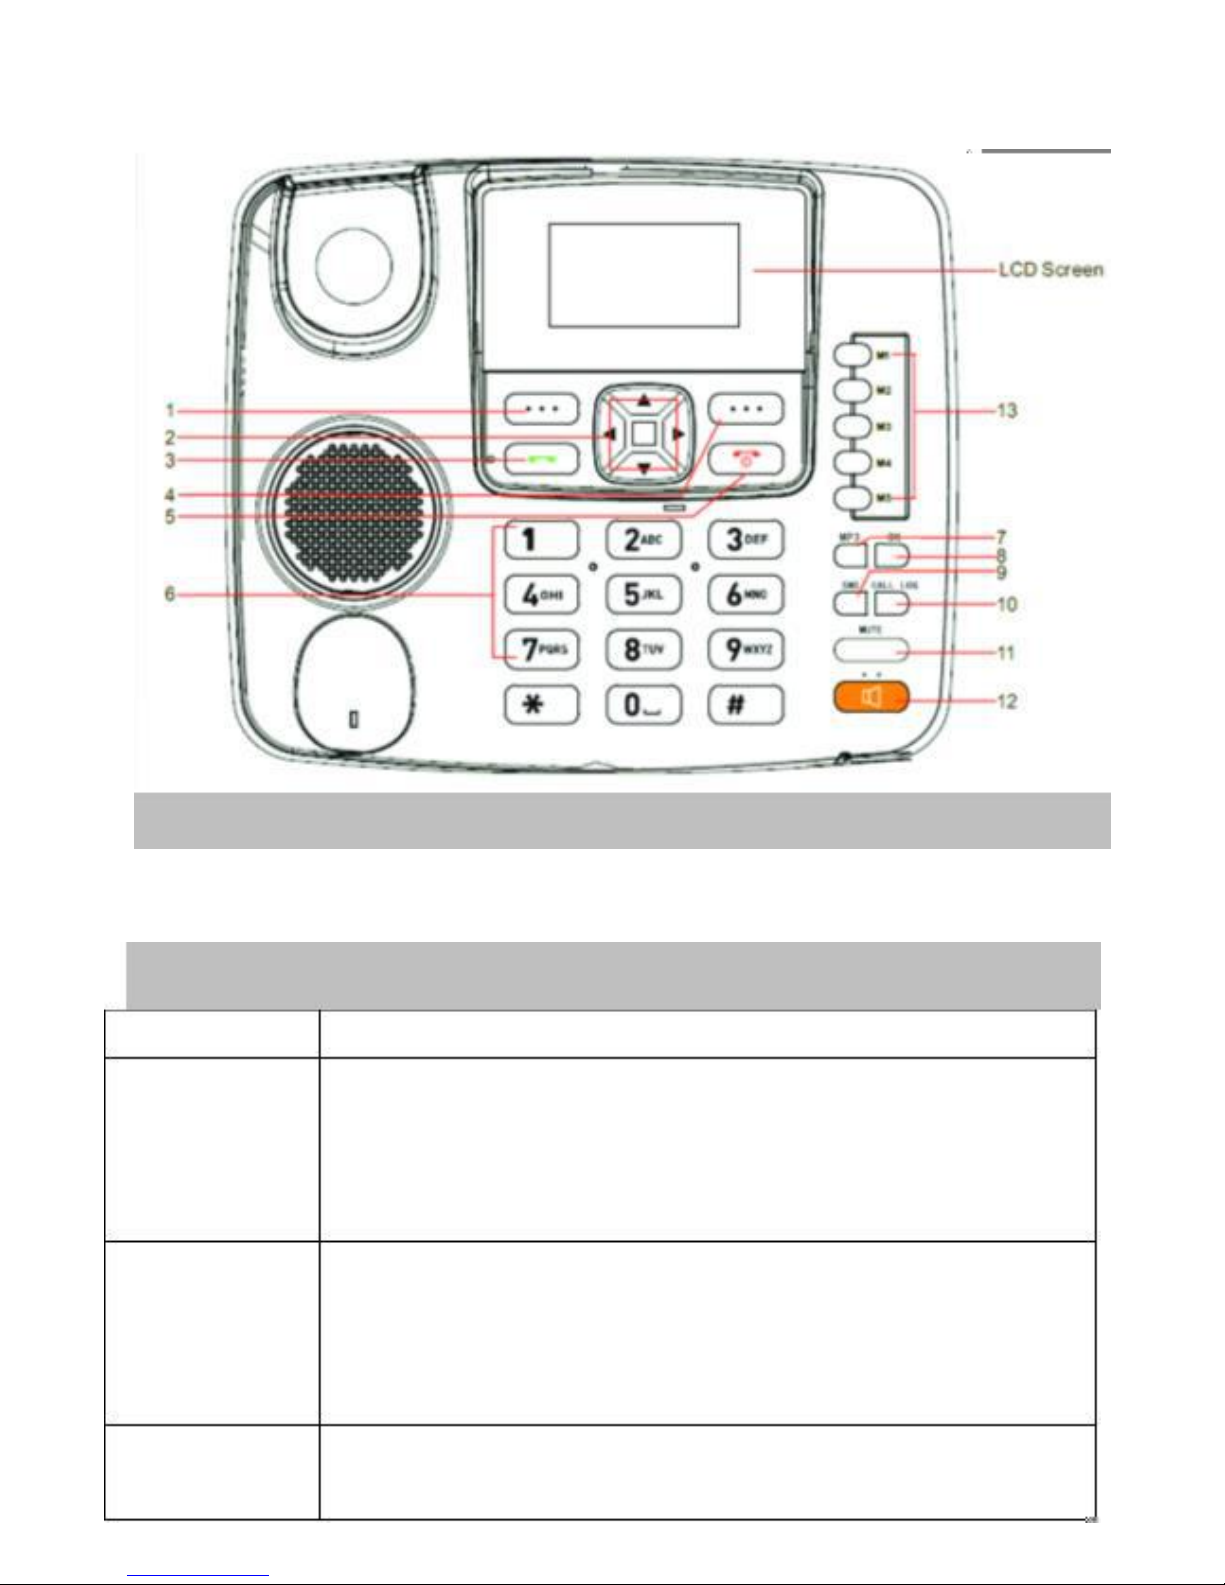
Front view
Picture is for reference only, it depends the phone you have.
Keys introduction
Keys
Function description
1.Main menu Press to go into the main menu in standby mode
Press it to access the sub-menu in non-standby mode or
execute the function indicated at the right bottom of
the display.
2.▲/▼/◄/►In standby mode,, ▲/▼ shortcut to calendar/alarm;
◄/►shortcut to message edit/profile.
In edit interface, it’s the cursor moving up, down, left
and right
3.Dial key
Make a call or answer an incoming call.
In standby mode, press this key to enter Dialed calls list.
1
4.Back/delete Press to enter contacts in standby mode.
Press to perform the function indicated at the right
bottom of the screen in non-standby mode.
Long press POWER key for on/off.
5.Power
on/off, End key Press to go back to the standby mode in any menu
6.1~9Numeric To input numbers and characters
Keys
7.MP3
In standby mode, press this key to enter MP3 player. # is
player,0 is pause,* is stop
8.OK
In standby mode, press to enter contacts menu. In
specific menu, press to execute function chosen, in
most of the case, same function as the OK button on
left bottom.
In certain menu, only this OK button works, details as
below:
8.1 voice mail server, press OK to dial
8.2
broadcast
message→option→settings→select
language, press OK to select.
8.3 application→alarm, press OK to set the alarm
ON/OFF
9.SMS
In standby state, press this button directly to message
menu
10.Call log
Shortcut to call log.
In the stand-by state, press this button to show the call
menu.
11.Mute
In the talking state, press this button to suspend talking
12.Hands-free Activate hands-free operation.
In the standby mode, press this button to make a call or
answer a call.
Press to end the conversation dialed by hands-free
button
13.M1-M5
You can assign the contact numbers as speed dial from
2
2.
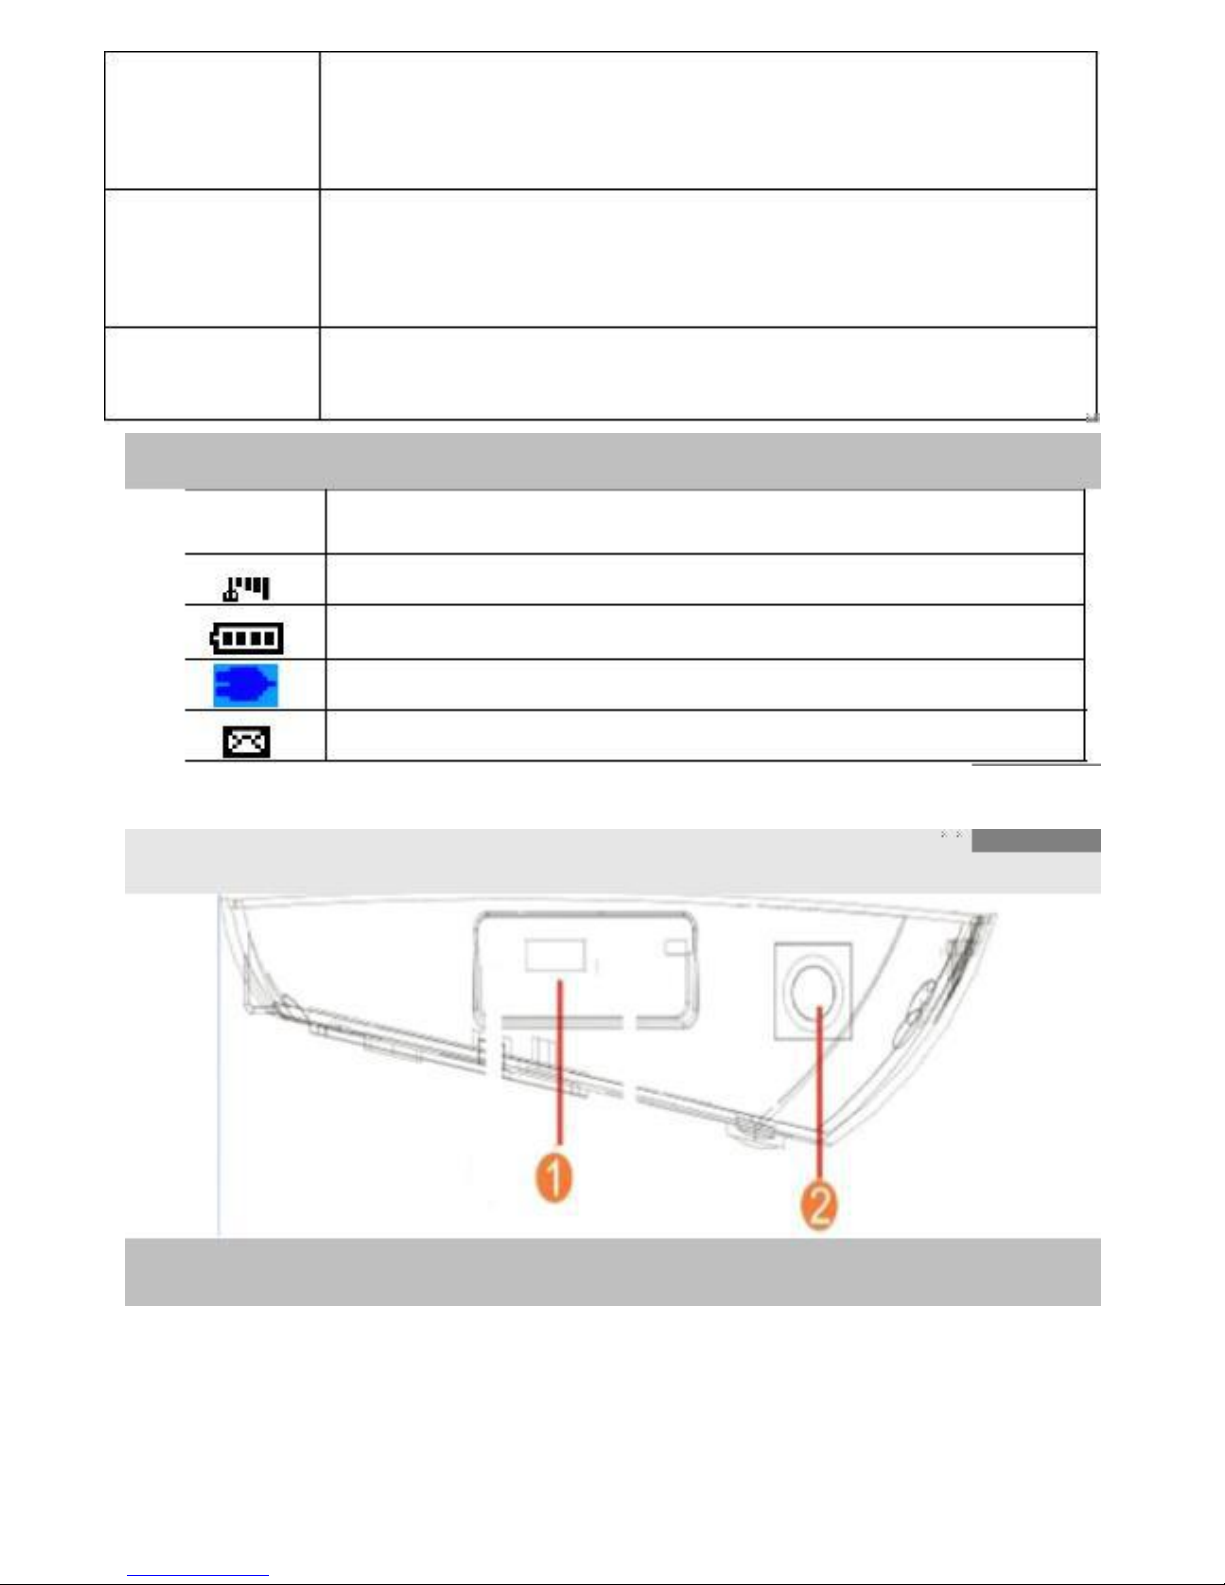
Antenna Connector
3
M1 to M5, so that in standby mode, when pressing
these buttons (M1 to M5), the numbers pre-defined
can be dialed out directly.
*
#
Press to switch among *, + in standby mode for dialing
No
Press to enter symbol in edit interface.
Long press to switch to silent mode in standby mode.
Press to switch input mode.
Interface icon
Icon
Explaination
Signal strength indicator
Battery life
Adapter connected
SMS
Instruction before use
2.1 Connectors on the Phone
1.
USB Port for connecting USB cable to the power adaptor or the
PC

3. Battery jack
4. SIM card Slot
5. Flash Card Slot
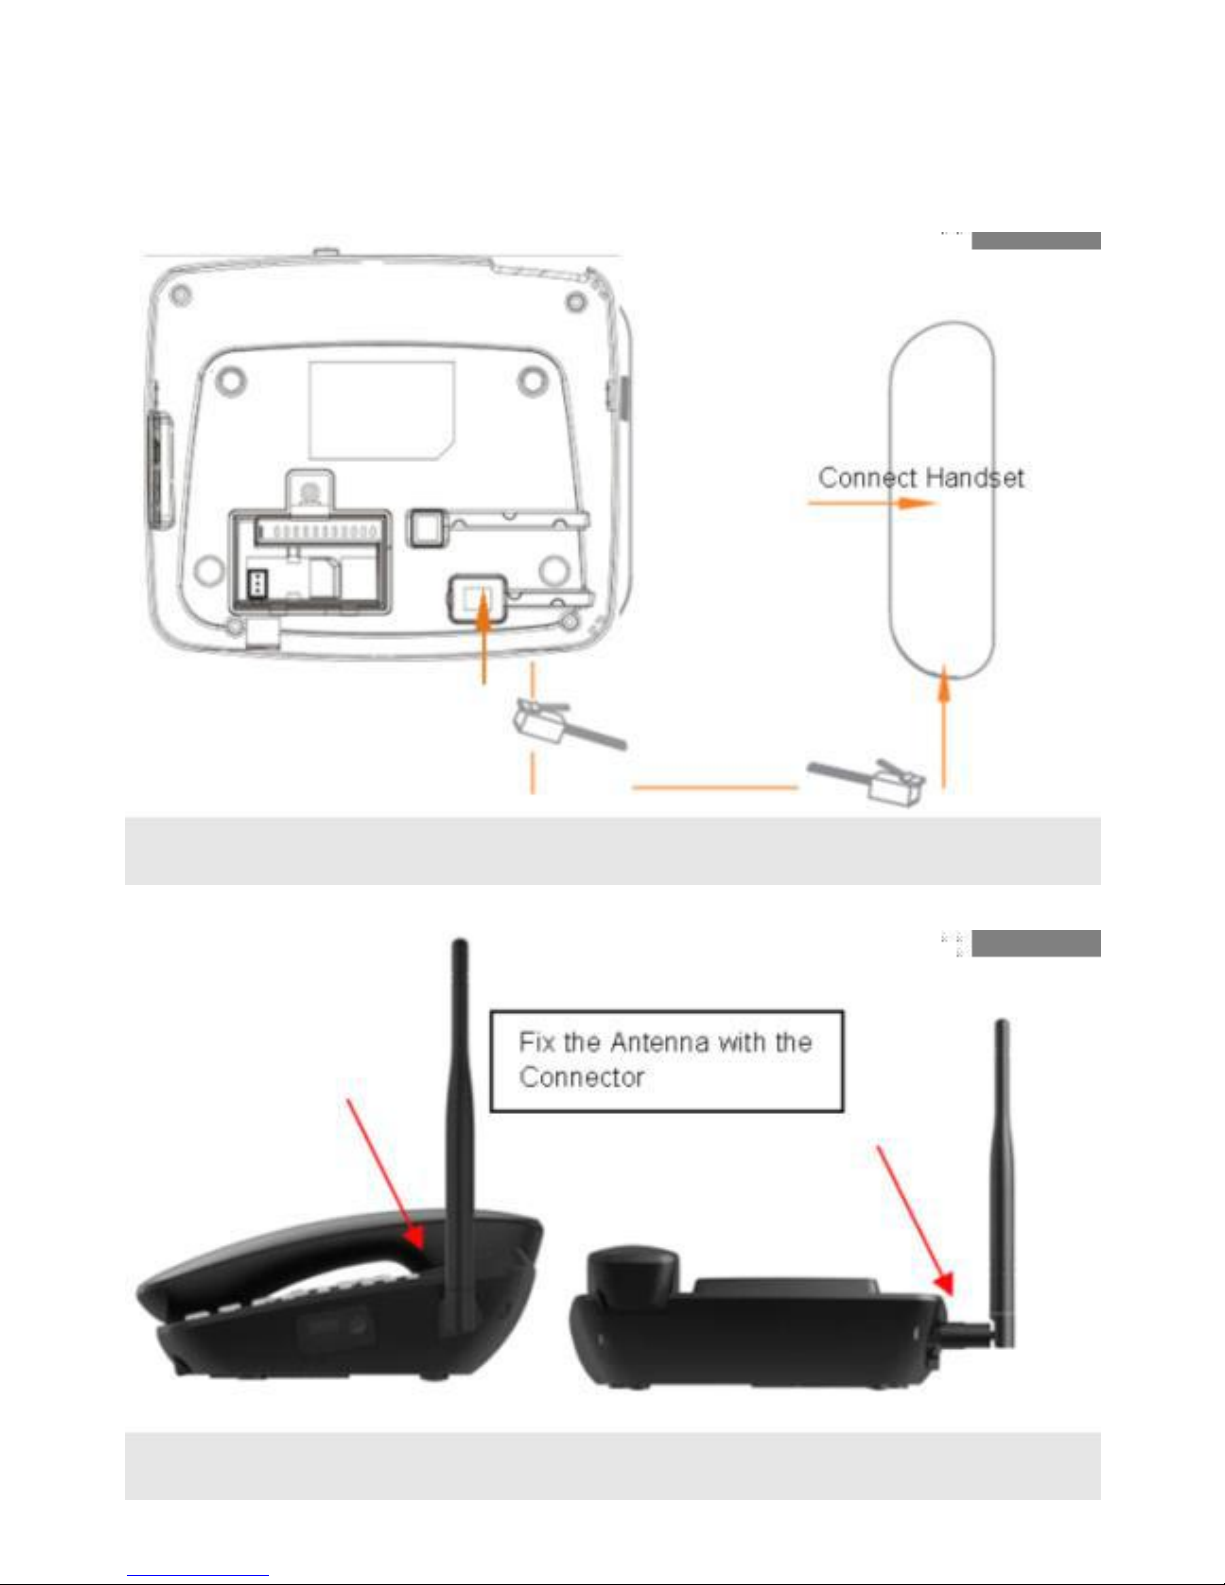
6. RJ9 handset cord Jack
2.2 Assemble battery
4
Caution: the adapter must be pull out and phone be off before battery
assembly, and pay attention to the battery positive and negative side .
2.3 Assemble the cord line
2.4 Assemble the antenna
5

Charging the battery by
adapter
When the battery is fixed to the phone according to 2.2, put one end
of the adapter to AC-Adapter Jack.
During charging, screen shows the battery charging icon, when the
battery is full, the charging icon will stop rolling.
Install SIM card
Always switch the phone off before removing or inserting SIM card.
Open the bottom cover of the battery. Remove the battery; slide the
SIM card into the SIM card slot. Make sure that the contact area of
the card is facing down, and the beveled corner matches with the SIM
card slot. Put in the battery and install the bottom cover.
Install SD card
Always switch the phone off before removing or inserting SD card.
Open the bottom cover of the battery. Remove the battery; open the
SD card slot and put the SD card into the slot, and then cover the slot.
Make sure that the contact area of the card is facing down, and the
beveled corner matches with the SIM card slot. Put in the battery and
install the bottom cover.
SD card is mainly for MP3. Please store the music into the SD card only.
The system disk “RE504” does not have extra room for music but only
the files for internet connection.
Operation
3.1 Making calls
6

3.4 Speaker Function
Press
key, can receive or make a call. Pick up the handset to
be talking by handset, when finish, return the handset to the phone.
When in a call, the user wants to use
key and put the handset back to the phone base.
3.5 Send
key, press the
After press the number, press
from the phone book, press
3.6 Adjust the talking volume
key. When checking the contact
key to dial out the number.
When in a call, press【◀▶】(VOL-/VOL+)to adjust the talking
7
Pick up the handset, when hear the dialing tone, press the phone
number, the number will accordingly display on the screen. Press
key to dial out the number. Or after 5 seconds, the number will
be dialed out automatically.
●After getting connected, the LCD will display the talking time, when
finish conversation, put the handset back to the phone base.
●When the subscriber is busy, press the right
key to abort it,
and press other number or press【REDIAL】key and redial the number.
When finish the conversation, put the handset back to the phone base,
or press the
key.
3.2 Receiving Calls
When somebody is incoming calls, the caller ID shall be displayed on
the LCD screen with ring, you can pick up the handset, or press the
hands-free key to talk. When finish the conversation, put the handset
back to the phone base, or press the hands-free key.
3.3 Redial
Press【REDIAL】key, the last dialed number shall be displayed,
then press
hands-free key or pick up the handset, or press
key to dial out the number.

volume, there are total 7 levels can be adjustable.
Menu
1 Press main menu in standby mode
2 Press▲/▼/◄/►,to choose menu
3 Press OK/soft key OK to enter the menu selected..
4 Press to enter sub-menu
There are two solutions to enter sub-menu.
Solution one: press ▲/▼ to choose sub-menu, press OK/soft key OK
to enter.
Solution two: press shortcut key to enter.
5 Press back to go back to last menu or exit
6 Press back or power to go back to standby mode
4.1 Contacts
Use the contacts function to create, search,delete contacts. In
standby mode, press right
key to start setting.
4.1.1Quick search:
The user can check contacts from the quick search.
When find the desire contact (Press【#】key to change the input
method), press the left
key to confirm and enter the sub-menu,
you can do the following setting:
1. View-check the contact
2. Create new contacts
3. Write message
4. Call-call the contact
5. Delete- delete the contact
6. Delete-delete multiple
7. Copy-Copy the contact to the phone or SIM
8. Others-
Speed dial / Own number/Service
8

4.1.2.2 Phonebook settings: Preferred storage/Speed dial/Memory
status/Copy contacts/Move contacts/Delete all contacts settings.
4.2 Messaging
Use the Messaging function to write, receive, and delete
messages. In standby mode, press【◀】key to start writing.
4.2.1 Write message:
In standby mode press【◀】key to enter writing the SMS, press
【MENU/OK】confirm input the message content.
1.
2.
3.
4.
Send to-the message will send out
Insert template- select a template
Save-Save the message as a draft
Exit
4.2.2 Inbox:
Go the Message menu, press【▲,▼】key to select the
INBOX.
Press【MENU/OK】, the LCD display the received
message.
Press【▲,▼】to select the message.
9
number/Memory status
Speed dial-We can assign the contact numbers as
speed dial from M1 to M5, so that in standby ode by
pressing directly the buttons (M1 to M5), we can call
to that number.
Own number-Show SIM card phone number
Service number-Can check the service number list
Memory status-Search SIM card and phone for the
amount of stored cord.
4.1.2 Options sub-menu
Press the left key, enter to the contacts options sub-menu.
4.1.2.1 Select: Add new contact to SIM or Phone

Press the left
can do following setting.
��
View: check the received message
�� Reply: reply the received message.
�� Delete: delete the message
��Delete all: delete all the message in the in-box
�� Forward: forward the message to others.
��Call : make a call to the sender
��
.Add sender to: Add to new contact/ Add
to existed to existed contact
Delete repeated numbers
��
4.2.3 Outbox:
Enter Message menu, press【▲,▼】key to select the outbox, press
to confirm. The LCD display the outbox message. Press
【▲,▼】key to select the desire message
left
Press left
to confirm and read this message. Press【▲,▼】can do
the following setting.
��
��
View: read the message
Resend: resend the message
��
Edit: edit the message, press left
can send out
Delete: delete the message
Delete all: delete all the message in
��
��
outbox
Note: the failure send message, and the not send out
and save message, the send and save message shall be
kept in outbox.
4.2.4 Drafts:
The message did not send but had been saved, shall be kept in draft
box.
After go to the Message menu, press【▲, ▼】key select the drafts,
10

press left
to go in. The phone shall display the draft message.
Press【▲,▼】key select the desire message, press left
to read
the message.
��
��
��
View: read the message
Delete: delete the message
Delete all: delete all the message in
drafts
��
Edit: edit the message, press left
can send out
4.2.5 Sentbox:The success sent message shall be kept in sent
messages option.
���
View: read the message
� � � Delete: delete the message
Delete all: delete all the message in
� ��
sentbox
���
Forward: forward the message to others.
4.2.6 Templates: Build-in 10 types of template. You can edit, send.
4.2.7 Voice mail server: setting the voicemail server
4.2.8 Broadcast message:Receive the broadcast messages.
4.2.9 SMS settings:
●Enter SMS sub-menu, press【▲, ▼】to select the SMS settings, press
left
to confirm and set as follow:
●Message center : go the message center to set the number.
●Message validity period: can set the message validity (can select
from one hour, 6 hours,12 hours, one day, three day, one week, the
validity may not proper, it depend on the network)
●Message Type: can set the message type (text, fax, page, email)
●Status report: turn on or off the status report
11

●Reply path: turn on or off the reply path
●Coding management: setting the coding
4.2.10 Message capacity
View the message of saved entries and maximum number of entries
capacity in phone and SIM.
4.3 Call logs
In standby mode, press【Call logs】key, or press left
select the call history.
key to
4.3.1Missed calls
The phone can record 20 group missed call, and record the call time
When the user got the missed call, the LCD display will display a
missed call enter. Press left
again can do following setting:
�View details: check the missed call
�Call: call it back
�Write message
�Add to contacts: save the number to the contacts
�Delete:delete the missed call number
�Delete all:delete all the missed calls
4.3.2 Dialed calls: the phone can save 20 group of dialed number.
Enter call history menu, press【▲,▼】to select the dialed number,
press left
to confirm.
4.3.3 Received call: the phone can save 20 group of received number.
Enter call history menu, press【▲,▼】to select the received number,
press left
to confirm.
4.3.4Delete All: can delete missed call, dialed call, received call, and
delete all.
4.3.5 Call timers:
Enter call logs menu, press【▲,▼】to select the call logs, press
【MENU/OK】to confirm, can do the following setting.
12

Note: the function needs support by the network service.
Call barred: Use the menu to set the call barring. It contains outgoing
calls, incoming calls, Cancel all, Change barring password. This
function requests network’s support. Please contact your operator for
details.
All incoming calls
13
�
�
Last call: view the last calling time
Received calls: view all the received number call
duration
�
�
Dialed calls: view all the dialed number call duration
Call history:Press it to check the call history
4.4 setting
Go the Settings menu, press【▲, ▼】key to select SETTING, press left
to confirm Model setting:
4.4.1Call settings:
Call divert: when you have miss call or some call you do not want to
answer. You can transfer the call to another number
Note: The function needs support by the network service.
● Call forwarding unconditional: transfer the call when no network or
cannot reach. To transfer the call to another number
●Call forwarding on busy: transfer the call when phone is busy.
●Call forwarding on no reply:transfer the call when you out of reach
the call
●Divert if unreachable: transfer the call when no network or cannot
reach. To transfer the call to another number
●Cancel all diverts:cancel the transfer setting
Note: some SIM cards do not support the transfer function
Call waiting: can active or cancel the call waiting function.
When active the call waiting function, when the user is in conversation,
at the same time third end call the party, the network shall awoke
then to waiting, after finish the current conversation, the waiting call
shall connect.

4.4.2 Phone setting :
Time and date: set the city, time and time format.
Language settings: press【▲,▼】key select English, or other
languages that was built in the device, press left
to confirm.
Post-dialing delay: You can setting off/1S/2S/3S/4S/5S/6S/7S/8S
Restore factory settings:press the left
original password). Press the left
and input 1234 (the
again, the phone shall restore
the factory setting. Then the contacts, call record, alarm, speed dialing
number shall be all removed.
4.4.3 Display
Contrast: the LCD contrast shall be from 1-15 levels. Press【◀,▶】
to change the contrast.
LCD backlight time setting(sec): when talking, the time of LCD
backlight off/ 5 secs/10secs/20secs
4.4.4Security:
PIN: PIN code is used to prevent illegal use of user’s SIM card. If your
phone has enabled PIN code protection, there will be prompt for
entering the PIN code. If the wrong PIN code is entered for three times,
the SIM card will be automatically locked. You have to enter PUK code
in order to unlock it. PIN code is related to SIM card instead of the
phone and is provided by your network service operator.
Power-on password:press the left
and select activate input
1234 (the original password). If you want to changed password can be
select modify.
Auto
keypad
lock:
You
can
setting
off/5secs/15secs/30secs/1min/5mins.
4.4.5
Network
type:Select
WCDMA
preferred/prefer
GSM/GSM/WCDMA.
4.4.6 Version: You can check the SW & HW version.
14
4.5 Profiles: In standby mode, press the left
profiles .Here you can personalize the tones.
key to go to
4.5.1 Ring settings: Set the caller & Message ringtone
Caller ringtone:13 group of incoming ring can be selected.
Message ringtone:6 group of message ring can be selected.
4.5.2 Adjust volume: you can set the volume of the ringtones of the
caller, call, power on/off, alarm, message
4.5.3 Ring type:Set the ringtone and silent.
4.5.4 Other alert rings: set key tone & Battery low alert & Power
ringtone.
4.6 MP3 player: enter MP3 player
You can also use the shortcut button
Press the right to return to the main menu. And, press the
to enter the options menu as below:
to enter the MP3 menu.
left
Play/Pause: or press
for stop.
for play, and
for pause,
Music list: display all songs list, and you can select one music to
play/return to play/permanently deleted/Details
Shuffle:Set activate and off
Repeat: You can set off or repeat all or repeat one
Settings:Set the regular or classic or odeum or jazz or rock or soft rock
Exit: exit MP3
Remarks: please store all musics to the SD card, insert the SD card in
advance for MP3.
4.6 Application:In standby mode, press the left
key shall enter
application menu. Here you can use the alarm function.
Alarm:Enter menu, press【▲,▼】key to select alarm, press left
to start setting.
Calendar:
You can check the calendar.
15

Calculator: Process the basic mathematical operations (press ◀▶
▲ ▼】to select “x /+ - x” ).
Band and Intensity: view the band & signal
Make a call
1 Make a call directly
Input phone number in standby mode.
Press call
Press back/power key to end a call or cancel a call.
2 Emergency call
Input emergency number, and press call (can execute without SIM
card)
3 Via call logs
Enter call logs menu, and select the record and press call.
Take a call
1 When there is an incoming call, press menu or handfree or take the
hand shank to answer the call.
2 In handfree mode, press hardfree key to end the call.
3 In non-hardfree conversation, hang up to end the call.
4 In any situation, press power to end the call.
Keylock
Keylock function can help protect your phone from unauthorized use.
Operation step: main menu→setting→security→auto keypad lock.
You can only make the emergency call or answer a call in keylock
mode.
unlock:press # then * to unlock.
Speed dial
You call make a call by long press speed dial key M1-M5, speed dial
16

setting is as follows:
contact→option→others→speed
empty,select and -edit
dial,
there
will
be
M1-M5
PIN & PUK code
PIN code
PIN code is used to prevent illegal use of user’s SIM card. If your
phone has enabled PIN code protection, there will be prompt
for
entering the PIN code. If the wrong PIN code is entered for three
times, the SIM card will be automatically locked. You have to enter
PUK code in order to unlock it. PIN code is related to SIM card instead
of the phone and is provided by your network service operator.
PUK code
PUK code, referring to personal unlock code, is used to unlock a SIM
card that is locked because of the wrong input of PIN code. If the
wrong input of PUK code exceeds ten attempts, the SIM card will lose
efficacy. PUK code is provided by network service operator. You can
ask your network service operator to change the new SIM card.
Switch input mode
In edit mode, interface shows current input marks, press # to switch.
Remarks:
In
edit
mode,
press
▲/▼/◄/►
to
move
cursor,▲/▼
uppage/downpage, press delete to delete text from right to left, long
press clear to delete all text.
press 0 for space
Press# to insert symbol, press▲/▼/◄/►to move cursor to select
symbol.
17

Input English/Espanol
In both modes, press number key to enter letter,letters can be spelled
to words according to letters entered.
Input numbers(123)
Under input “123” mode, press numbers directly.
Input symbol
Press
#
to enter related symbol .
Internet Connection
Connect the phone with the PC via the USB cable. There will be pop
up to remind you to choose between charging and U disk. Please
choose U disk. And then you can find the system disk RE504 in your PC.
Please follow the instructions file “readme”, use the DialUp_xsw
inside the disk to do the internet connection.
18
Enjoy Your Phone!

FCC Statement
This equipment has been tested and found to comply with the limits for a Class B digital
device, pursuant to part 15 of the FCC Rules. These limits are designed to provide
reasonable protection against harmful interference in a residential installation. This
equipment generates, uses and can radiate radio frequency energy and, if not installed
and used in accordance with the instructions, may cause harmful interference to radio
communications. However, there is no guarantee that interference will not occur in a
particular installation. If this equipment does cause harmful interference to radio or
television reception, which can be determined by turning the equipment off and on, the
user is encouraged to try to correct the interference by one or more of the following
measures:
—Reorient or relocate the receiving antenna.
—Increase the separation between the equipment and receiver.
—Connect the equipment into an outlet on a circuit different from that to which
the receiver is connected.
—Consult the dealer or an experienced radio/TV technician for help.
FCC Radiation Exposure Statement
This device complies with FCC radiation exposure limits set forth for an
uncontrolled environment and it also complies with Part 15 of the FCC RF Rules.
This equipment must be installed and operated in accordance with provided
instructions and the antenna(s) used for this transmitter must be installed to
provide a separation distance of at least 20 cm from all persons and must not be
co-located or operating in conjunction with any other antenna or transmitter.
End-users and installers must be provided with antenna installation instructions
and consider removing the no-collocation statement.
This device complies with Part 15 of the FCC Rules. Operation is subject to
the following two conditions:
(1) this device may not cause harmful interference, and
(2) this device must accept any interference received, including interference that
may cause undesired operation.
Caution!
Any changes or modifications not expressly approved by the party responsible for
compliance could void the user's authority to operate the equipment.


