Veria VERIA 8277B User manual

VERIA
User's guide
Videophone
Model: VERIA 8277B
Please read this manual carefully before use
and keep it in case of further need.

Content Page
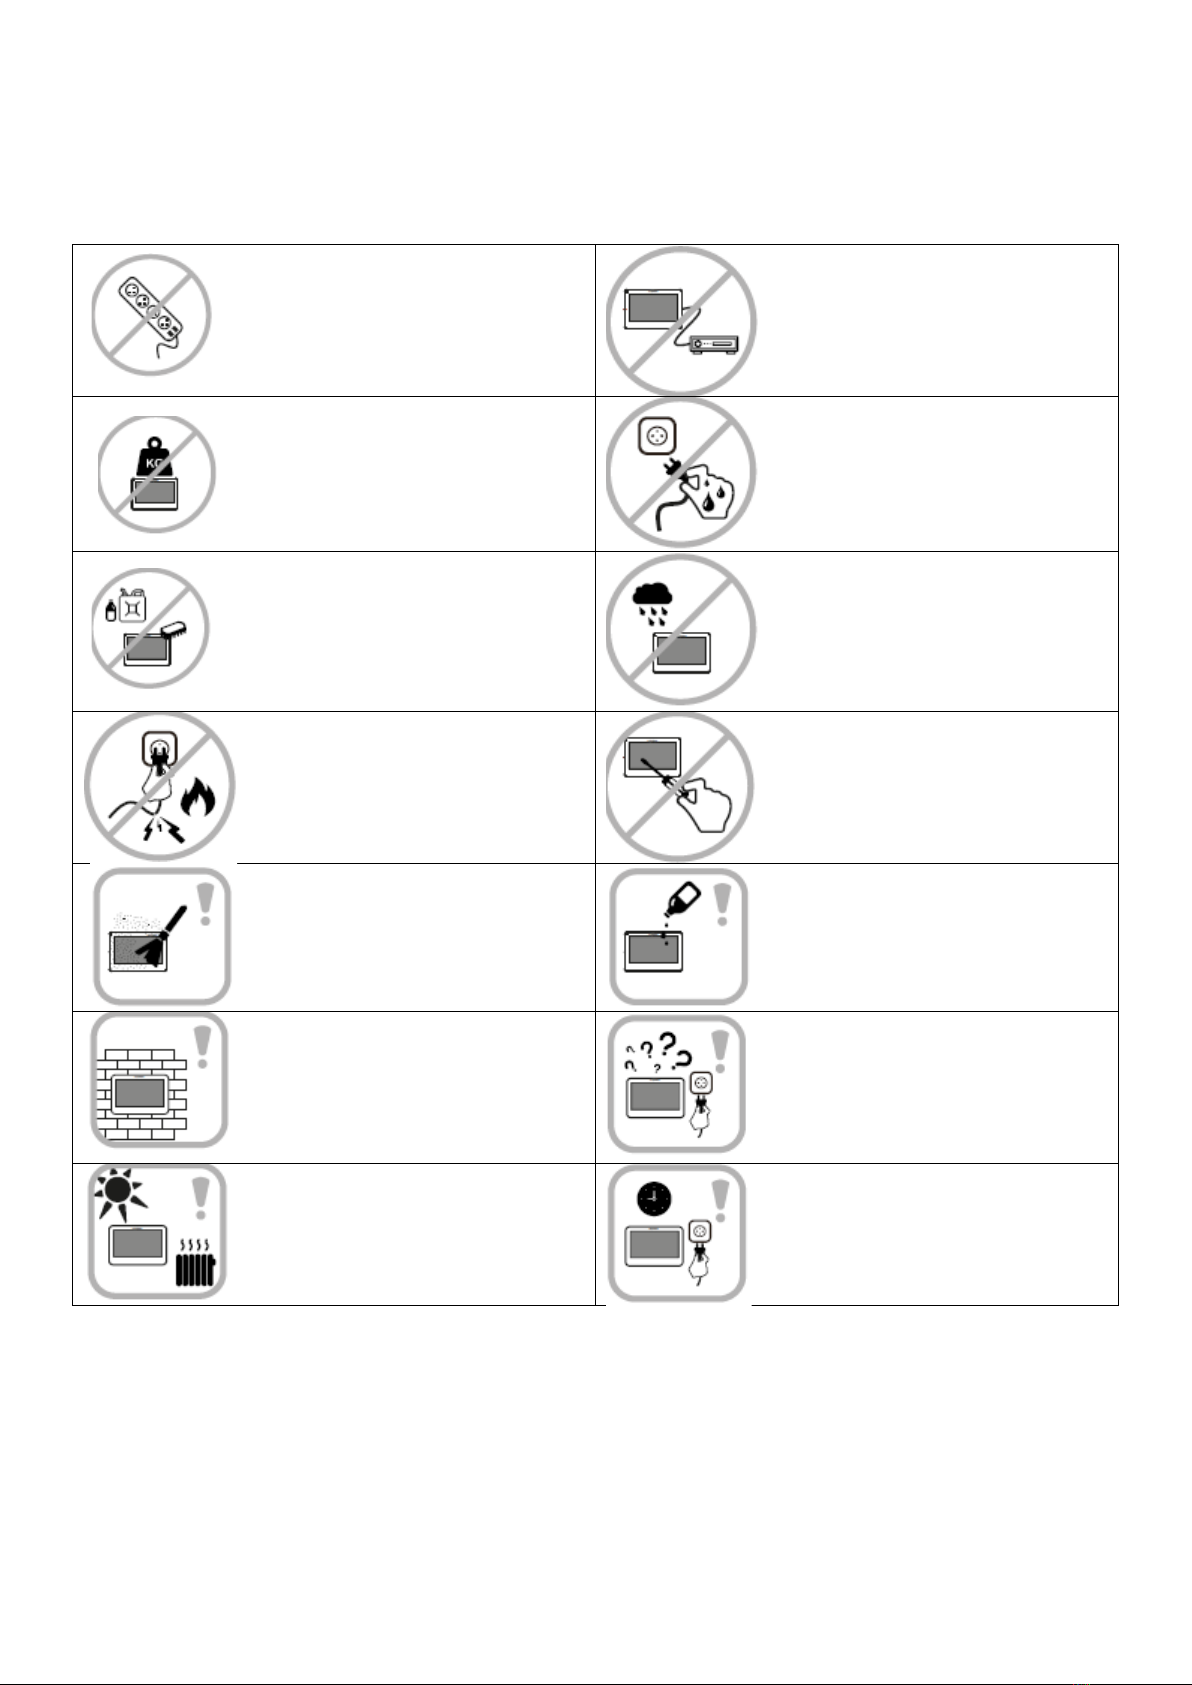
1. Warnings …………………........... ……………………………………………………………………………………………………………………….1
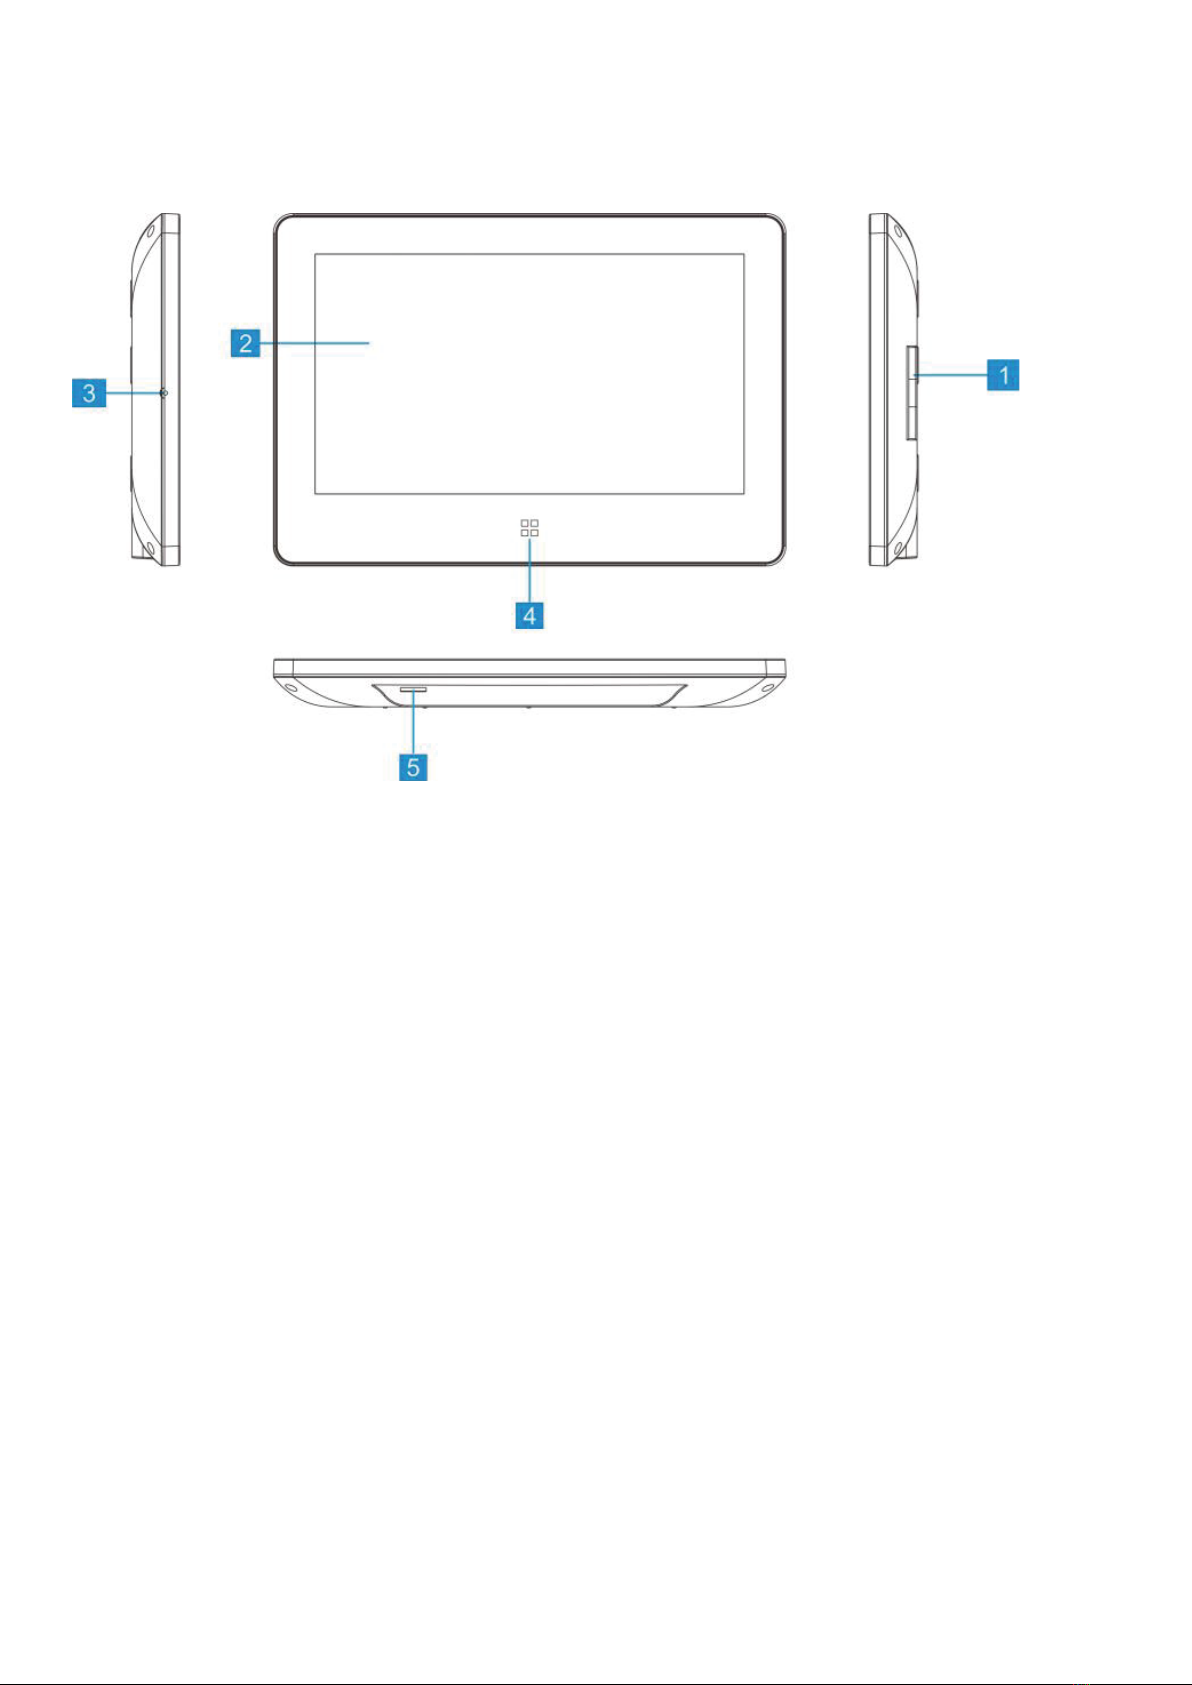
2. Function and description of the device ......... ……………………………………………………………………………………………... 2
3. Features and main functions .............. …………………………………………………………………………………………………………. 2
4. Contents of the package..................................................................................................................................... 2
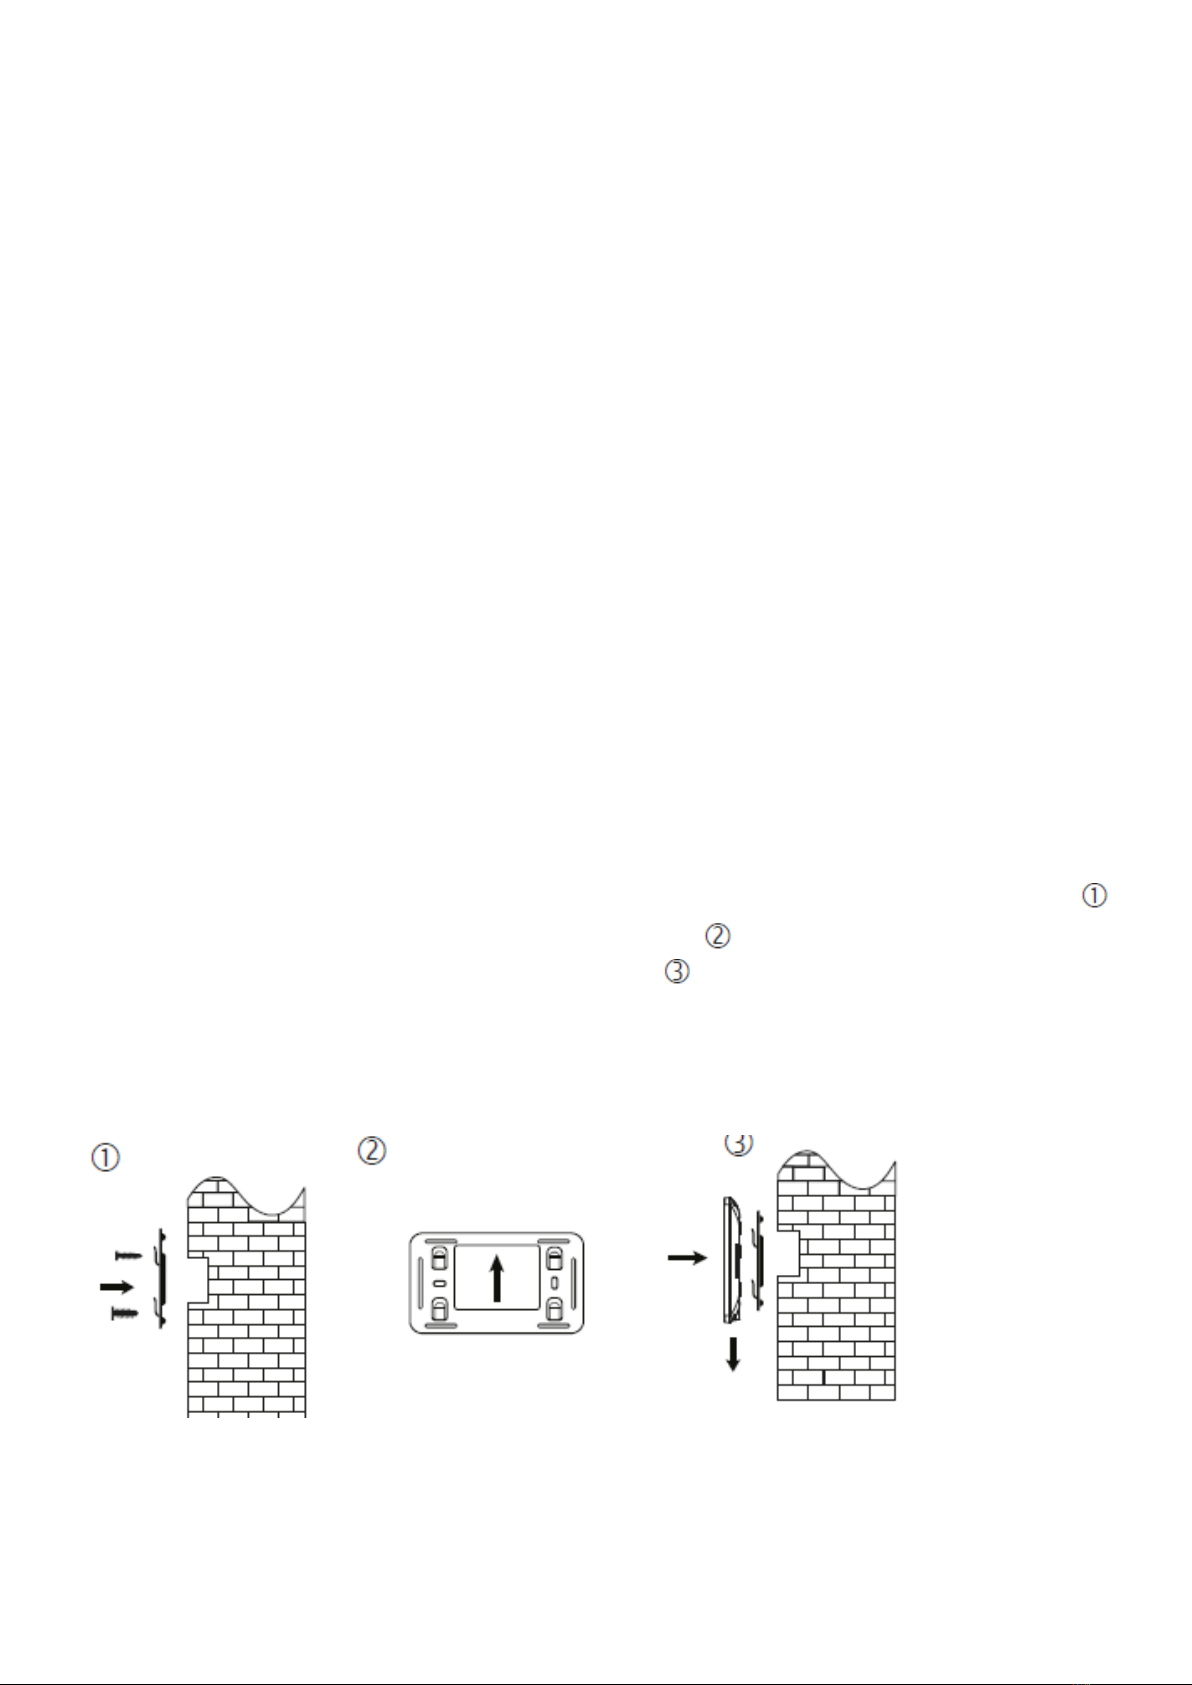
5. Installation ......................................................................................................................................................... 3
6. Technical specification....... .. .......................................................................................................................... . 4
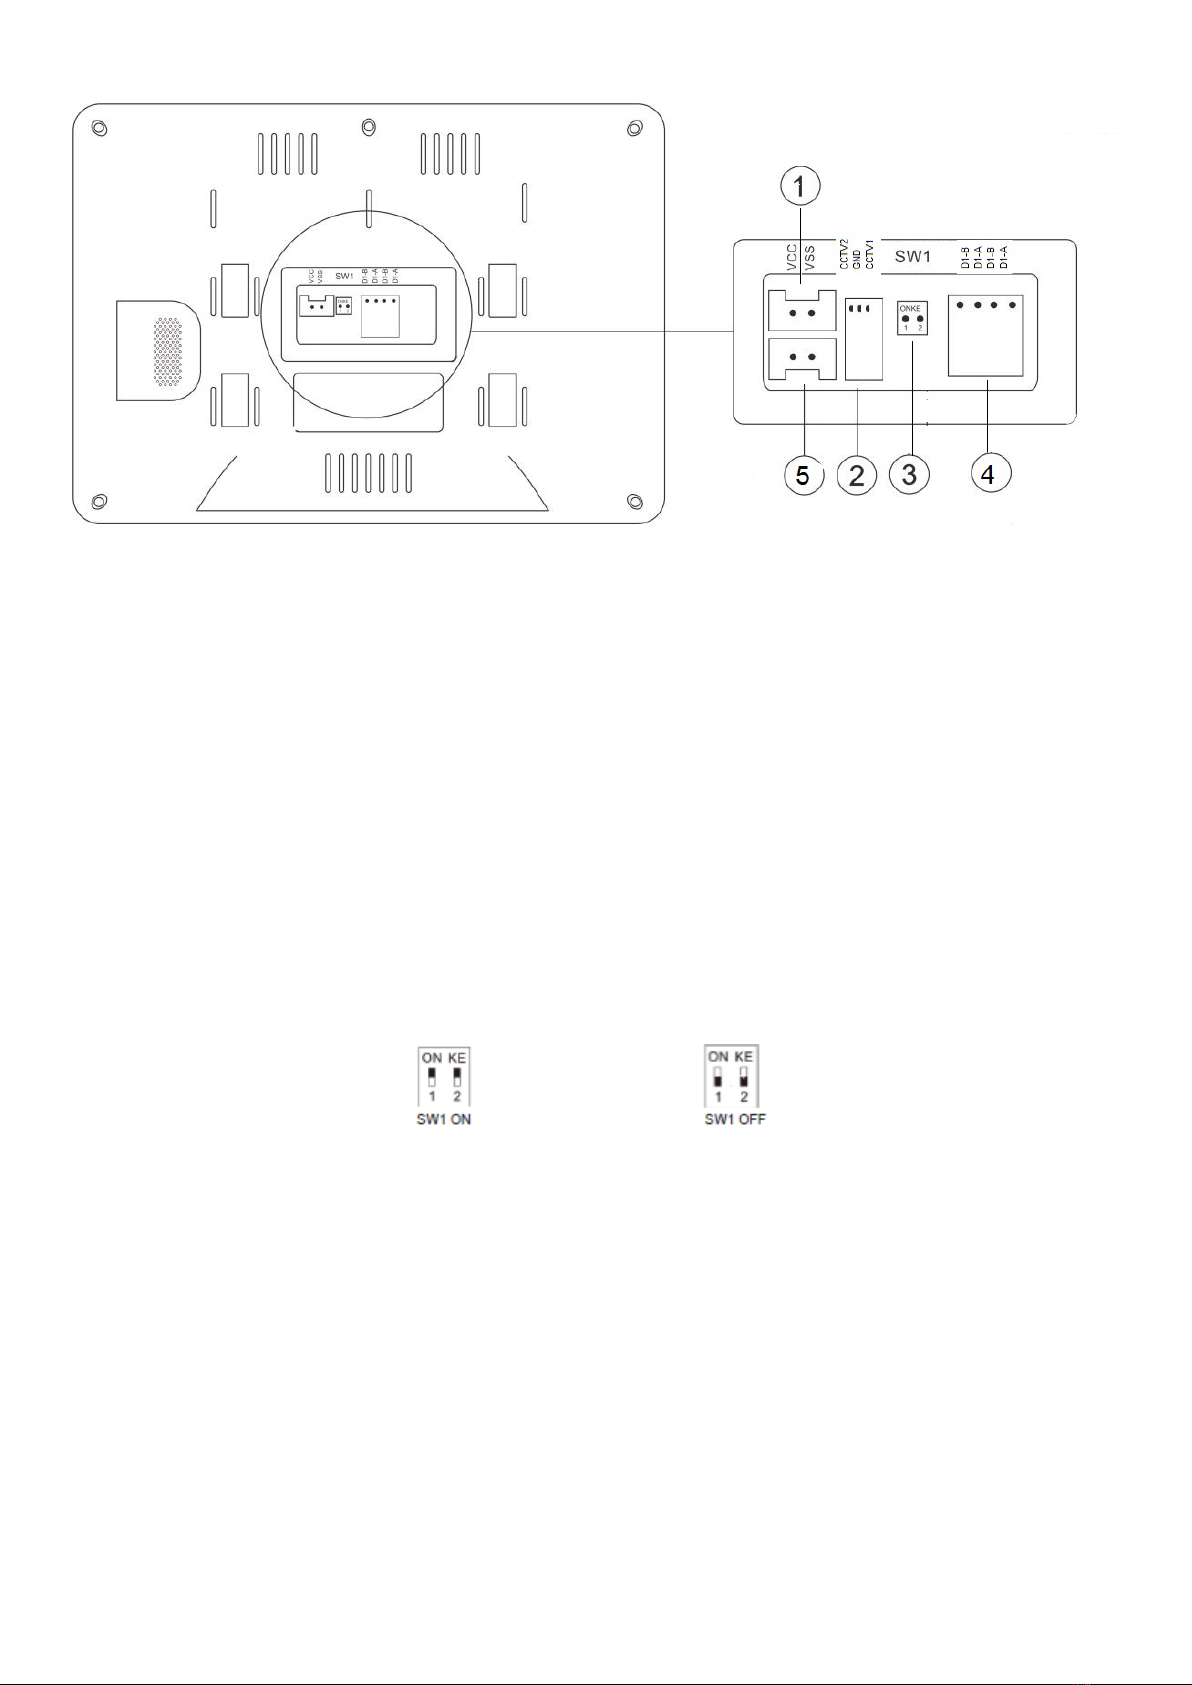
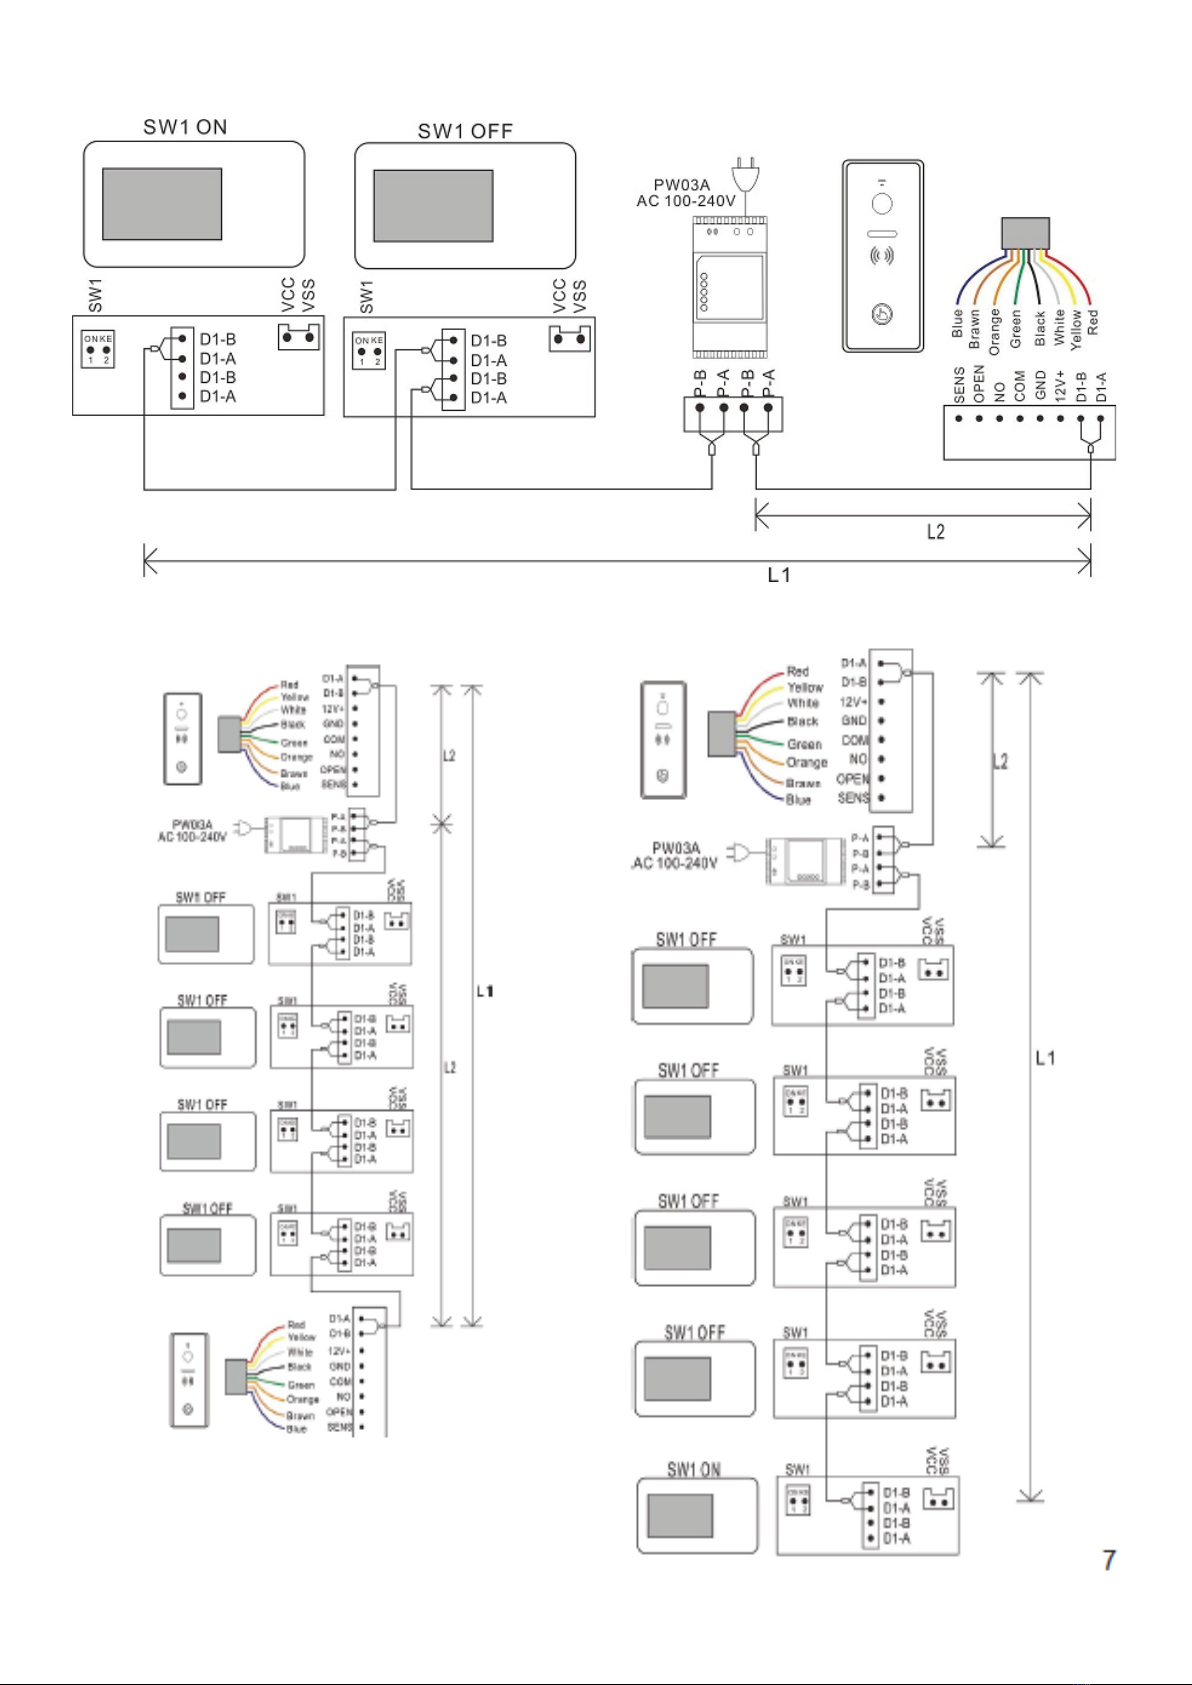
6. Possibilities of connection............. . ............................................................................................................ 5,6,7
6. External cameras........ ....................................................................................................................................... 8
6. Operating instructions.. ................................................................................................................................ . 9.10
7. Intercom function ........ …………………………………………………………………………………………………………………………….... 10
7. Adding the input station to the list of monitoring devices………………………………… .......................... ................. 10
8. EPTZ: Zoom function ................ …………………………………………………………………………………………………………………... 11
9. Function not to disturb ...................................................................................................................................... 11
10. Taking photographers and video recordings ................ …………………………………………………………………………...... 11
11. Viewing and deleting photographerii/video footage ............... ....................................................................... 11
12. Recording /Playback, Deleting audio files ................... .................................................................................... 11
13. Storage information .............. ……………………………………………………………………………………………………………………,. 12
14. Alarm function ................................................................................................................................................ . 12
15. DVR Function..................................................................................................................................................... 12
16. Backup of internal memory .......................................................................................................................... ... 12
17. Setting the ringtone ............... .......................................................................................................................... 13
18. System settings ...................... .. ……………………………………………………………………………………………………………………13
19. Setting the password ................... . ……………………………………………………………………………………………………………….13
20. Password protection list input stations................ .......... ……………………………………………………………………………….13
21. Setting the address of the room ............ .... ……………………………………………………………………………………………………14
22. Set the monitor name. ........................................................................................................................ ..... ……….14
23. Setting the name of the entry station......... ....... ……………………………………………………………………………………………14
24. Resetting the parameter of the system.......... ...... …………………………………………………………………………………………14
25. Setting the entry station........................... .... …………………………………………………………………………………………………14
26. Device number ............ ………………………………………………………………………………………………………………………………….14
27. Button address ................ ………………………………………………………………………………………………………………………………14
28. Private equipment ....... ... ………………………………………………………………………………………………………………………………15
29. Monitor............... . …………………………………………………………………………………………………………………………………………..15
30. Unlocked by monitor ................... .... ………………………………………………………………………………………………………………15
31. State of door lock .......... ..................................................................................................................................... 15
32. State of gate lock....... ... ………………………………………………………………………………………………………………………………….15
33. Type of outgoing man.......... ..... ………………………………………………………………………………………………………………………15
34. The status assigned from the device................... .......... ………………………………………………………………………………… 15
35. Condition of the elevator control....... .... …………………………………………………………………………………………………………15
36. Setting the security parameter vst. units............................................................................ .............. ………………..15
37. Temper state (safety button) ................... .......... …………………………………………………………………………………………….15
38. Check the condition of the door....... ..... ………………………………………………………………………………………………………….15
39. Adjusting the volume of the bell speaker............. ........... …………………………………………………………………………………15
40. Adjusting the camera angle of the input unit............... .............. ………………………………………………………………………16
41. Setting the password configuration of the door lock............... ............. ……………………………………………………………16
42. Setup mode..............................…………………………………………………………………………………………………………………………16
43. System settings, overview............. ........ ………………………………………………………………………………………………6,17,18,19

1. Warnings
Do not use multiple extension cords to
power the device. Otherwise, an elevated
temperature and a risk of fire may be
generated.
Do not connect the device to other
devices, otherwise it may become
permanently damaged.
Do not place, place heavy objects on the
device.
Do not connect the power cord to the
socket with wet or wet hands, there is a
risk of injury to the power supply.
current.
Do not use water or chemicals to clean the
outside of the device from dirt. Use a dry
cloth to prevent damage.
Do not install the device in a humid
environment. Failure to comply with
the prescribed operating conditions
may result in damage fromthe device,
injury to the property or fire.
Do not bend or unplug the power cord
from the mains by force. If it is damaged,
there is a risk of fire or electric shock.
Do not dismantle, repair or modify the
device yourself. Otherwise, there may
be a fire, injury to the el. current or
permanent damage to the device.
Ensure that dust or other solid particles
and impurities do not accumulate on
the surface of the device.
Prevent foreign particles and substances
from entering the device.
Install the device on a flat and stable
surface.
If the device is not working properly,
immediately disconnect the power from
the mains.
Do not install the device in places
exposed to direct sunlight and near heat
sources.
If you do not use the device for a long
time, disconnect it from the power
supply.

2. Features and description of the device
1. Speaker
2. LCD display
3. Microphone
4. Menu button, entry to the main menu
5. SD memory card slot
6. Turn on, turn off the monitor
3.Features and main functions
- Hands-free video intercom
- Digital signal transmission
- Clear interface with touch screen
- 2-wire connection without polarity, easy to connect
- Easy installation as with a conventional/traditional 2-wire analog system
- 256 photos and 16 video files can be stored on integrated memory
- H. 264 coding and decoding technology provides high-quality video
- DVR with face detection of motion detection and recording with dynamic frame rate
- EPTZ: Possibility to zoom in on the image
- Intercom function between monitors
- The user can name the monitor and the entrance station

4.Contents of the package
After receiving the device, first check that the visible damage to the packaging. However, if the device is
unpacked and deleted
protective packaging is visibly damaged, in no case the device or its do not use the components and
contact your dealer immediately.
Package contents:
- Monitor
- Wall mount
- Terminals
- Screw M3x20mm 2pcs
- Dowle 2pcs
- Power adapter
5. Installation
Note: For trouble-free videophone operation, please observe the following installation instructions.
Do not install the monitor:
• in a dusty environment to prevent dust from intrusion including other solid the ingredients and
substances to be used
• near heat sources or in a place exposed to the sun is over
• in the open air with high humidity and condensation of steam
• in the vicinity of strong sources of electromagnetic
• on unstable and uneven surfaces
To install:
Prepare a suitable cable according to the manufacture instructions for connecting individual
depending on their distance between the mand the end of the corresponding connectors. Select the height
of the monitor after the installed installation and fix the metal bracket with the Horizontally. Make sure
the console is properly positioned shown in the following figure. Connect the connectors to the
monitor and put it on the console by moving it downwards .
For installation, use suitable cables with two copper conductors, cross-section min. 0.5 mm². The cable
does not have to be shielded, use a protective tube during installation

For example cables:
CYH 2x0.5 mm², H03VVH2-F 2x0.5mm², JYTY-O 2x1mm². Installation can only be carried out by a person
who is and used for the installation of VERIA videophone systems.
6. Technical specification
N.O.
Item
Content
1
Display
Colour 7" LCD (800 x 400)
2
Intercom type
Hands free
2
Connection
2 - wire
4
Sound distortion
Less than 3%
5
Frequency response
400 - 3.5K
6
Wire length
Maximum 200 meters (details in the user manual of the
entrance station).
7
Audio
Digital signal (bidirectional)
8
Video
Digital signal (input)
9
Button
Touch
10
Internal calls
Supported
11
Extending monitors
Supported
12
Power
DC 24V
13
Consumption
4W max. 1.5W standby
14
Operating temperature
-10°C - +40°C
15
Storage temperature
-30°C - +60°C
16
Dimensions
185x127x17mm

Description of contacts:
(1) Power contact (DC24V/1A Max)
(2) Connection of analog CCTV 2x (models only: 8277, 8277-W)
(3) SW1SwitchNo: To adjust the contact of the2-wirebus.
Setting: Set the last monitor on the 2-wirebus to set the SW1 to the ON position.
Other SW monitors to off position
(4) 2 wire bus buses
(5) Connecting the outgoing button

6. Connectivity options
230V/24V DC adapter
1: 1x monitor, 1x access station


2x monitor, 1x entry station
4x monitor, 2x entry station 5x monitor, 1x entry station

Connection of external analog cameras.
Notice:
Always use a separate power supply for the cameras!

6. Operating instructions
Basic opera with touchscreen gestures.
(1) Touch Selection:Confirmation
(2) Scroll left: Return to the last menu
(3) Scroll up: Go to the next page
(4) Scroll down: Go to the previous page
Receiving calls:
Both the ring tone displays the visitor's image on the display and the Icon screen
It also displays the icons listed on the screen.
Icon
Function
Accept
Hang
Volume
Buy
Photograph
Buy
Video
Unlock gate
or door
View
or hide
icons on
the
screen
Press to answer the call and talk to the visitor. After the call is over press to hang up.
During a call:
Press to adjust the volume. Press to change the icon to a monitor microphone
switches off. Press to take a picture. Press to start or stop recording
Video:
Press to unlock the door lock, press to unlock the gate lock.
Main menu:
Press the "Home " button to enter the main system menu at any time.

This icon means that communication with the entry station is in place.
This icon means that there is no communication in the mail. Before the first
communication or if there is a communication problem, this icon will appear on the screen.
As soon as there is an "?" icon in the communication system with the input station, it
disappears.
This icon in white means that the micro SD card is in good condition.
This icon in red colour means that the micro SD card cannot be inserted.
This icon in green means the micro Sd card is required to format.
7. Intercom function
If you install more than one monitor in the same family, press the "call" icons in the main menu
you can perform the operations below.
(1) Internal call to another monitor:
Press the Dial icon on the Call menu, enter the address of the target room and press to make the call.
(2) To broadcast to other monitors:
Press the broadcast icon on the call menu. The screen shows all monitors that have the same room address
for broadcasting, you can select any monitor or all of them. Note: Even broadcasters cannot speak to
the broadcaster.
(3) Call history:
Press the recent icon in the call menu to view history. Press from the list of any call to make a call.
(4) Favorites:
Pressing and subduing any call in history will appear on the screen
The icon by confirming it, you can place the monitor in the favorite category. Press the favorite icon to
enter your favorites list and touch the selected name or number of your monitor to make a call.
To add an entry station to the list of monitoring devices:
Press the follow icon on the main menu. Pressing the control icon appears on the screen for all
input stations in the system by pressing the selected station to add it to the list of monitoring settings and
the icon with the name of the input station appears in the Watch menu and then press it to preview it. On
the Watch menu press and hold the input station icon, the icon will appear on the screen by
confirming it, you delete the input station from the system.
8. EPTZ: Zoom function
During a call or follow-up touch the location you want to see the image will return to normal in the next
location.
9. Do not disturb function
If you do not want to be disturbed by ring tones you can enable the do not disturb function.

Method 1:
Press the silent re-im icon on the main menu do not disturb is activated and the icon changes to .
Method 2:
Press the settings icon on the main menu to go to the submenu and settings
enable the "Silent" menu, and the icon in the main menu automatically changes to an icon .
10. Taking a photo and video
(1) Recording:
When talking or watching press the icon to view the image. Press the icon to start recording the video
recording, and the icon from red, press the icon again , stop recording and the icon returns from
five to white.
(2) Automatic recording:
Press the settings icon on the Main menu to go to the submenu and select Actions before calls"
There are 4 possible things:
- No action
- After you can see the photo
- Watch the video
- After editing the photo and video
11. Viewing and deleting photos/videos
Press the photo icon on the main menu to go to the picture list.
File and press the selected photo to view it. Press the icon or to view the previous or next photo.
Press the video icon on the main menu to go to the video list and press the selected video to start it by
pressing the icon or viewing the previous or subsequent video recording.
Pressing and deleting the selected photo or video will display an icon and confirm it to delete the file.
12. Record/Play, delete audio files
Recording audio files:
Press the Record Audio icon to see the recording menu. Press the No. you start recording, and the
icon changes to a green No. on the screen. Press the recording icon again to exit.
Play audio files.
All audio files are displayed on the right side of the screen. Press the selected audio file to play it. Users can
record audio also run files from the main menu:
If new audio files are uploaded, a number will be displayed in the upper-right corner of the sounds icon.
Press the Sounds icon to enter the audio list files and press the selected audio file to play it. Audio
files that are not played have an envelope icon next to the name.
Delete audio files.

Press the icon from the vuk a in the main menu, select "External Memory" or "Internal Memory" and
press and hold the selected file to display an icon and confirm that you will delete the file.
Note: To delete all photos/video recordings/audio files press the settings icon on the main menu select
delete menu and select delete all content from internal memory or delete all content from external
memory.
13. Storage information
Press the "Storage" icon in the main menu to see detailed storage information for external and internal
memory.
14. Alarm function
Press the "Settings" icon in the main menu and go to the "Alarm Clock" menu. You can adjust the alarm
volume and 6 alarm types as needed by the user.
When the alarm goes off, press the red alarm icon to turn it off, if you do not turn it off, it will start
Five in 1 minute and then automatically shuts down.
15. DVR Function
Press the settings icon in the main menu and go to the DVR settings menu. You can set the time for a
screen saver and 3 time windows. Choose one time window, enable it, set start time, end time, and
recording source. The DVR will start recording automatically as soon as it reaches the time of turning on
the recording.
Note:
(1) The DVR only records video recording without sound.
(2) A minimum 2G SD card is required to support DVR function, 16 GB recommended or 32 GB SD card.
(3) If motion is detected it is recorded at normal speed (approx. 25 to 30f/s),
if no movement is detected it is recorded at a higher speed (and 3f/s).
(4) If you set the start time and end time the same, the DVR function will work continuously.
16. Internal memory backup
To back up all uploaded files from internal memory to SD tab, press the Settings icon on the main menu,
select Backup internal memory, an icon will appear on the screen and it will be confirmed by a memory
backup.
17. Set the ringtone
Users can choose preset ringtones on the monitor or set your own mp3 files as ringtones.
Procedure:
Create the "eRingTone" folder on the micro SD card and copy the mp3 files to the folder.
Insert the micro SD card into the monitor, press the "Settings" icon in the main menu
select the "Ringtone Sound" menu, then select the ringtone to open the door or
in the intercom's ring tone and choose the desired mp3 file.
18. System settings
Set system time.
Press the settings icon in the main menu and select System Time".

Time format: Day/Month/Year/Hours/Minutes/Seconds, after setting, press set in the upper left corner of
the screen to confirm and save.
19. Password settings
Password for system settings and settings.
Press the "Settings" icon in the main menu and select the "Password Protection" menu.
3 protection modes are possible:
(1) Unprotected: No password required for all settings.
(2) Partial protection: You need to enter a password to set up your system. To access you do not need to
enter a password on the settings menu.
(3) Full protection: A password is required to enter system settings and settings.
Note:
(1) After selecting protection mode you can set 4 local password default password is: 0000)
(2) To confirm the password entry" # "icon, press "* " to cancel the input.
20. Password protection of the list of entry stations
If you enable any protection mode you must edit the the default password is "0" and you can set it as a
password for system settings.
Instructions:
Press the settings icon in the main menu, select "Device Configuration", then List of Input Stations " and
select the desired input station, go to "Edit ", enter the default password "0" and confirm with the " # "
icon. Select "Password settings" and set a new password with 1 to 8 numbers.
Note: If you are entering a password for the list of entry stations, you must enter a number that does not
have the first digit 0.
Reset Password:
(1) Reset your system password: If you forget your password to access system settings, follow these steps,
restart the monitor and go to settings.
After restarting the monitor a password is not required for the first entry into the settings. Go to the
Password Protection menu and set your password as needed.
(2) Reset the password for the entry station list: If you forget the password for the list of input stations
at one entry station, press and hold the reset button on the input station to reset it. Successful
confirmation of password reset is confirmed twice by beep.
21. Setting the room address
Press the settings icon in the main menu, go to the device configuration option, select the room address,
and set the address you need.
Note: (1) the room address has 8 digits, but if you are using internal calls, it must not be first digit set to 0
(2) For monitors installed in the same family, the room address must be set to the same Value. If you ring
the entry station, all monitors will ring at the same time and you can answer any one.
22. Set the monitor name
Each monitor can have its own name. Monitor names are selected only when you make an internal call.
Press the settings icon in the main menu, go to device configuration, and select the device name to change
the name of the monitor.

23. Set the name of the entry station
Press the settings icon in the main menu, select "device configuration ", then "List of entry stations "
and select the desired entry station, go to the "Edit" option, enter the correct password (the default
password is "0") and confirm with the "#" icon. Select the device name menu to change the name of the
entry station.
24. Reset some parameters in the system
Press the settings icon in the main menu to select the reset menu and select the parameters you want to
reset.
25. Setting up the entrance station:
Press the "settings" icon in the main menu, select "device configuration ", then "List of input stations " and
select the desired input station, go to "Edit ", enter correct password (default password is "0") and confirm
with the "#" icon. Here you can set all the parameters of the entrance station.
26. Device number
The device number is 8 digits, you can set any one. If there is more than 1 entry station in the system,
you must not use the same device number for 2 input stations.
27. Button address
By default, the address is button 1 and the default address of the monitor room is also 1.
After installation you can call the internal monitor. If you have changed the "room address" on the
monitor, you must also set a call target for the input station buttons.
Settings: Select the button 1 address menu in your input station settings and set the room address of the
monitor you want to call. After setting up, you can press the button at the entrance station to call monitors
with the room address set.
Note: If the button address is not set in the same way as the address of the target monitor, the monitor
can monitor the input station, but the input station cannot call the monitor.
28. Private equipment
If this feature is enabled, the input station can be set up as a private device for only one family. A private
entry station can only be monitored by this family and can only be called to this family.
29. Monitor
If this feature is enabled, the input station can be monitored by internal monitors. If you disable this
feature, the monitors will not monitor the input station.
30. Unlock with monitor
If this feature is enabled, you can unlock the door or gateway in the tracking state by pressing the "Unlock"
icon. If you disable this feature, you can unlock the door or gateway only when you make a call by pressing
the unlock icon.
31. State of the door lock
If you connect a door lock to the system, you must enable this function, set "Unlock time " and by lock type
"Unlock signal type" (normally open or normally closed).
32. The state of the gate lock

If you connect a gateway lock to the system, you must enable this feature, set "Unlock time " and by lock
type "Unlock signal type" (normally open or normally closed).
33. Type of outgoing button
Set the target of the outbound button control on the door or gateway, depending on the actual
installation. Press the exit button to open the door/gate lock.
34. Status assigned from the washing machine
Related information about the device will not be displayed until it is connected from the device to the
system.
35. Status of the elevator controller
You can enable/disable the elevator control function.
Note: This feature only works if an elevator control module is installed on the system.
36. Setting the security parameters of the input unit (depending on the type).
37. Tamper (protective contact when the cover is opened illegally) after activation of this function
a security contact will be activated in the input station, tamper and if someone tampers with the entrance
station an alarm will be triggered. The room number must also be set to receive the tamper alarm.
38. Check the condition of the door
If this function is enabled the system checks the door status after the longest opening time door. Set
"Magnetic Contact Type" according to door lock type (normally open or normally closed). Set "Longest
opening time". Once the door is open the entrance station will check their status for the longest opening
time set. If the door is not closed after the longest opening time set, a beep will sound from the entrance
station.
39. Adjust the volume of the bell speaker.
You can adjust the volume from 10% to 100% as needed.
40. Adjust the angle of view
You can set the angle of view for the entry station. Press the menu to set the angle of view from the entry
station. Touch the location on the screen where it wants to get closer.
Press the tracking icon to exit. Finally, tap the return icon in the upper-left corner of the screen and
press the confirm settings icon to save the settings. When it rings from the entrance station, the set image
appears.
41. Set a password to configure a door lock
The password can be up to 8 digits, the first digit must not be 0.
42. Setup mode
It is turned on by default. If enabled, you can set "Room Address" and "Floor" for monitors on the network.
If it is turned off at all entry stations network, you will not be able to change the address of any monitor. If
you don't want users to accidentally change the address of your monitors, turn off this feature on all input
stations after installation.
43. System settings

No
Settings
items
Item
Explanation
1
Set up sound
Still
Ringtone Sound
Ring time
Ring volume
Off by default. If enabled, the monitor will not
ring when it rings.
Repeat ringtone: If you turn off the monitor
when
ringing only once.
Door opening ringtone: Set the ringtone for
calls from vst. station.
Intercom ringtone: Set the ringtone for
an internal call.
Set the ring time (10-60 seconds).
Ringtone volume.
Monitor ringtone volume
2
Set the date and time
display in standby
mode
View information
about standby date
and time
It is turned off by default. You must enable this
feature if you want to use it.
3
Call actions
No action
Take a photo
Take a video
Take a photo and
video
When calling from vst. there will be no
automatic action on the station.
When calling from the entry station, photos are
taken automatically.
When you call from the input station, a video
recording is automatically made.
When calling from the entry station, both
photos and video recordings are automatically
taken.
4
Brightness
Low/Normal/High
Adjust the brightness of the screen
5
Alarm clock
Set an alarm
Alarm volume: Set 10- 100%
Alarm 1,2,3,4,5,6: You can set each alarm
separately.
Alarm status: Turn the alarm function on/off.
Alarm type: weekly/month/year/once. Date and
time: Set the alarm time. Format:
Day/Month/Year/Hours/Minutes.
Alarm ringtone: 8 tons to choose from.
Repeat weekly (An alarm must be set every
week).
Set which days to start the alarm.
6
Screen saver
Screen saver time
Set: Never/1/2/5/10/30 minutes.
7
DVR settings
1/2/3 time window
DVR function: On/off (alarm status)
Start time
End time
Recording Source: Select Recording Source
8
Password protection
Protection mode
Unprotected: No password required to enter
settings. Partial protection: A password is
required to enter system settings.
Full protection: You need to enter a password
to enter both settings and system settings.
9
System time
Format:
Day/Month/Year/
Hours/Minutes/
Seconds

10
Device configuration
The name of the
device.
Room address.
Call center.
The address of the
centre.
Floor.
List of monitoring
devices.
List of private entry
stations.
Add a monitoring
device.
Delete the monitoring
device.
Edit the monitor name.
Room address settings (one apartment/family
address must be the same).
If enabled, you can set the address of the
center.
You can set up any internal monitor as the
control center.
View a list of monitoring devices.
View a list of private entry stations.
11
List of entry stations
View
Edit: You must enter the correct password to
enter the input station settings.
Cancel
Button address: to set the target address of
button calls to the input station.
Private device: If enabled, you can only call or
be monitored by this family.
Run: Appears only after enabling "Private
Device". If enabled, a private entry station can
call this family.
Monitor: If enabled, internal monitors can
monitor this vst. unit.
Edit: to enter settings vst. the correct password.
Monitor unlock: If enabled, you can open the
door or gateway with the Unlock button in a
monitoring state.
Unlock time: optionally 0.8-30 seconds.
Door lock status: set the unlock time of the lock
and the type of signal for unlocking.
Table of contents
Other Veria Telephone manuals