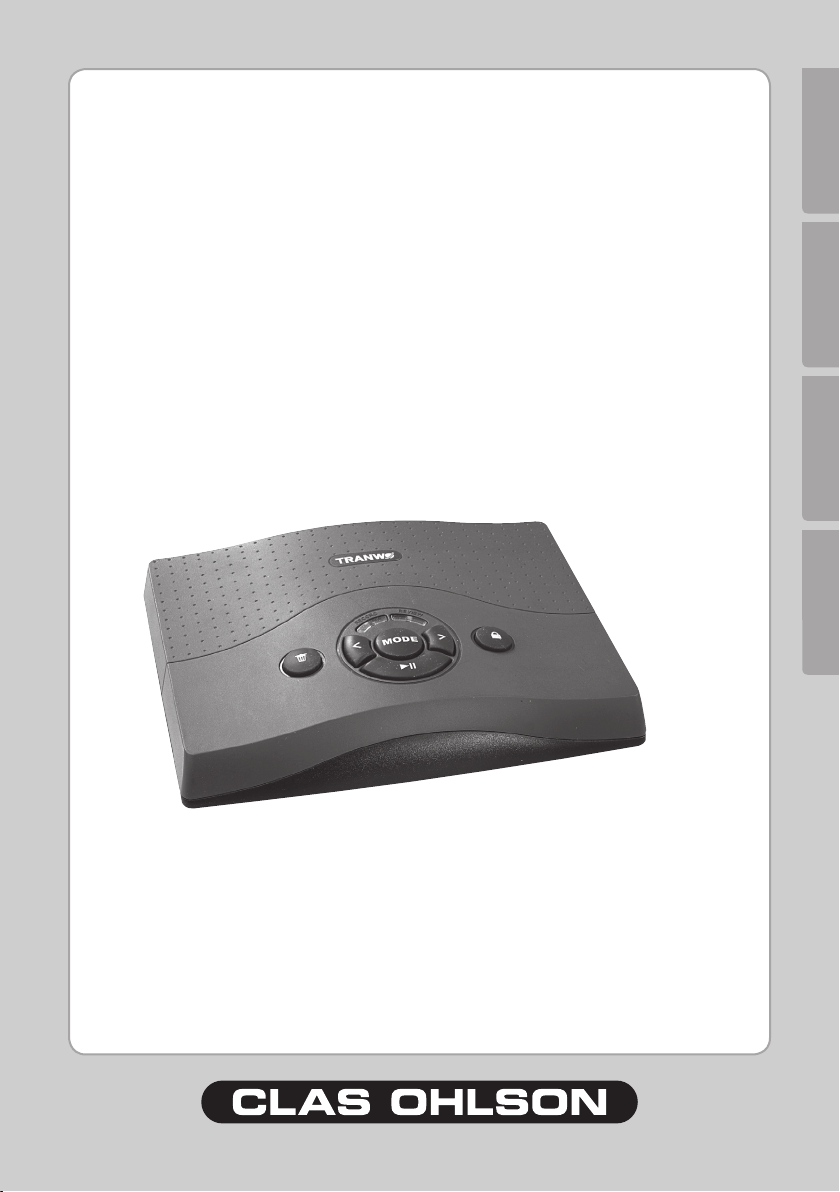
Clas Ohlson Tranwo C150 User manual

www.clasohlson.com
Recording Module
Inspelningsmodul
Innspillingsmodul
Tallennusmoduuli
Article number Model
18-2065 Tranwo C150
36-2390
ENGLISH SVENSKA NORSK SUOMI
Ver. 201010

2

3
ENGLISH
Recording Module
Art. no. 18-2065, 36-2390, model C150
Please read the entire instruction manual before using and save it for future use.
We apologise for any text or photo errors and any changes of technical data. If you
have any questions concerning technical problems please contact our Customer
Service Department.
Table of contents
Safety 3
Product description 3
Installation 5
How to use 7
Care and maintenance 13
Troubleshooting 14
Waste disposal 14
Specications 14
Safety
- The product is only to be repaired by qualied service staff
- The product is not to be dismantled or changed
- The product must not be placed so that it can fall into water or other uids.
Do not place any objects which contain uids on the product, i.e. a ower vase
or a can of pop.
- Do not cover the equipment. Sufficient ventilation, with a minimum distance of 15 cm
between the ventilation holes and the surrounding surfaces, is necessary to prevent
the equipment from becoming overheated.
- Do not place the appliance in a damp, dusty environment or where it can be subject
to strong vibrations.
- The ON-/OFF switch does not disconnect the appliance from the mains. To com-
pletely separate the appliance from the mains disconnect the plug from the socket.
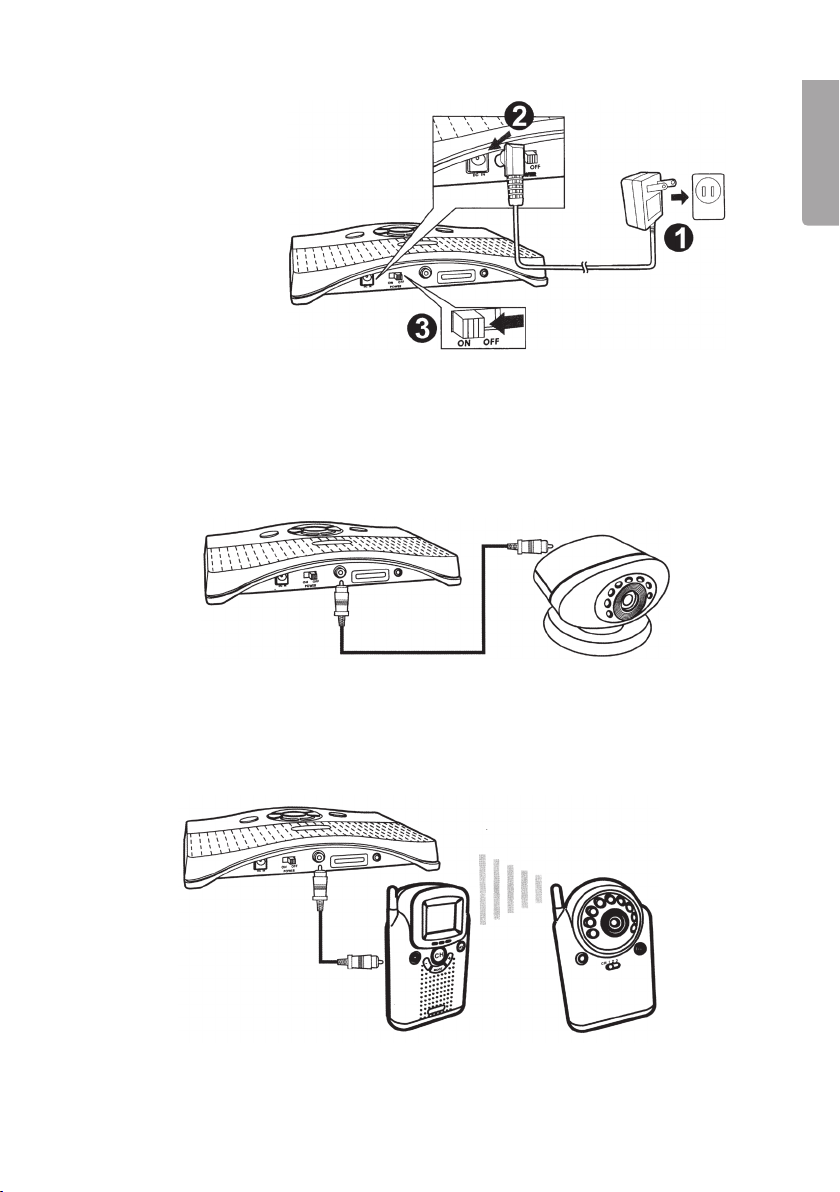
Product description
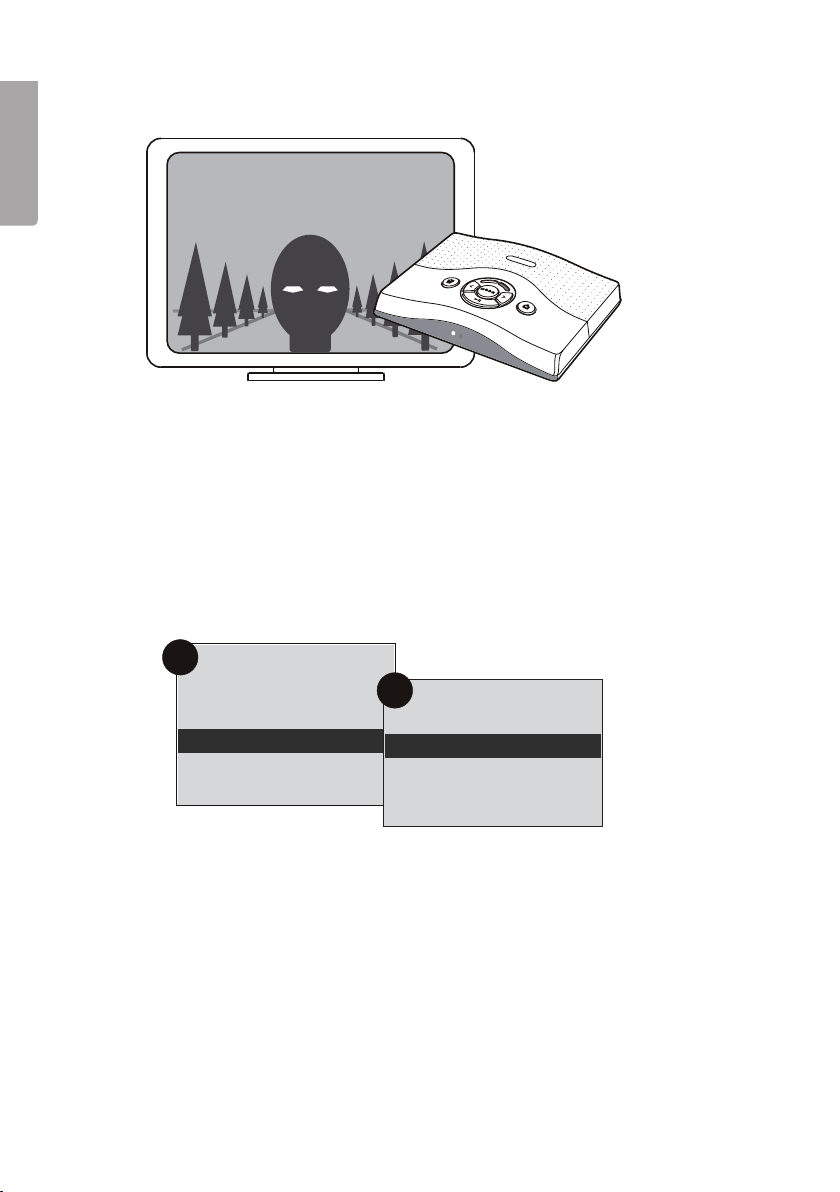
Recording Module for connecting to a surveillance camera. When someone moves in
front of the camera the module automatically records the sequence (without sound) for
from 5 to 60 seconds (adjustable).
- Built-in 16 Mb memory provides approx. 2½ minutes recording time.
- Space for SD memory (not included) which makes it possible to extend the recording
time considerably. 512 Mb provides approx. 70 minutes recording time.
- Compatible with cameras with RCA-plugs.
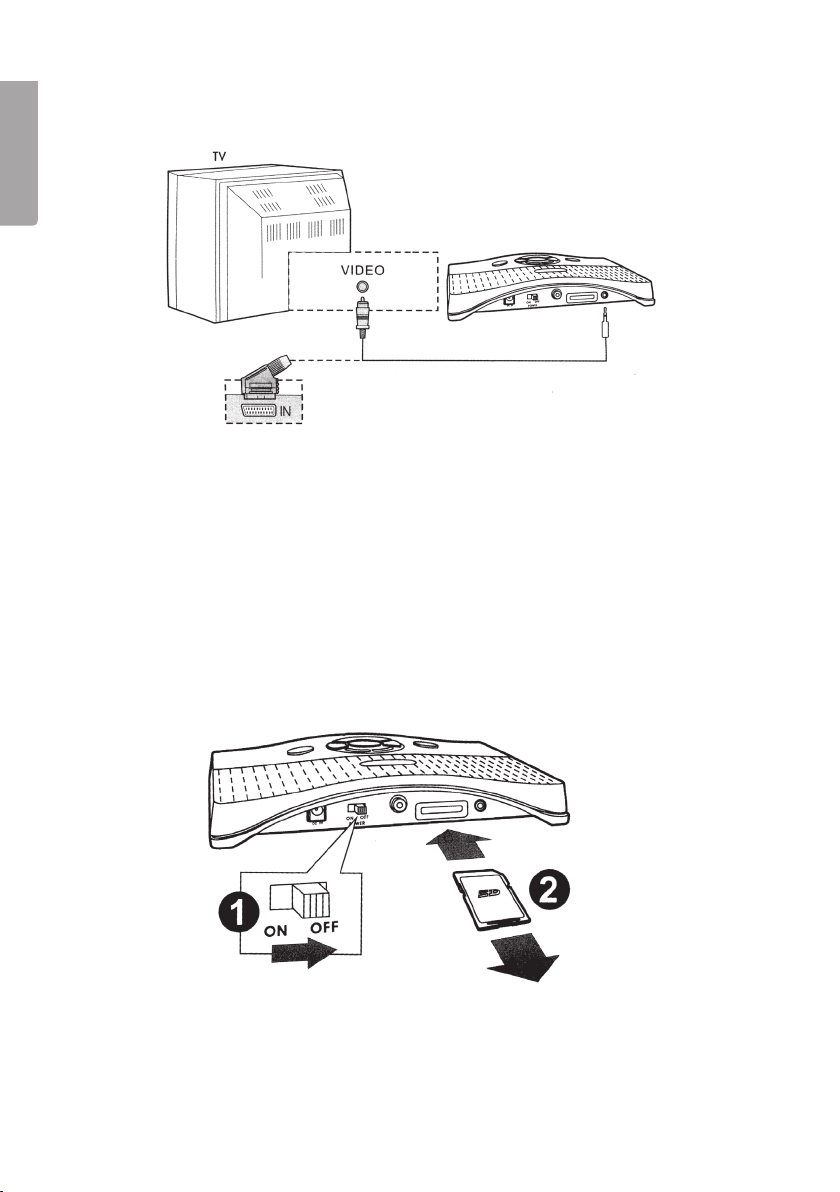
- Is delivered with an AC adaptor and scart cable for connection to a TV.

4
910
11 12
13
1
5
3
2
67
8
4
Fig. 1
ENGLISH
Buttons and functions
1. – Erases video clip
2. MODE
3. Indicator for standby/recording
4. Indicator for playback
5. < / > - Buttons for function choice
6. ►II – Starts or pauses the playback
7. Status indication
8. – Locks recorded video clips
9. DC IN - 12 V net adapter input
10. POWER ON/OFF - Switch
11. VIDEO IN – Video signal (RCA) input
12. Space for external memory card (SD)
13. VIDEO OUT – Video signal (e.g. TV)
output
Status indications - top side
Standby/Ready to record.
Playback recorded clips.
Settings position.
Status indications - front side
- Left indicator (green) on/blinks – New event
- Right indicator (red) is on – Memory full

5
ENGLISH
Installation
Connecting to the mains
1. Connect the net adaptor to a wall socket.
2. Connect the DC plug of the net adaptor to the output [ 9 ] on the back of the appliance.
3. Flip the switch [ 10 ] to ”ON”.
Connect the camera via cable
Connect a camera to the video input [ 11 ].
Connect the receiver of the wireless camera to the video input [11 ].
Connect a wireless camera

6
ENGLISH
Connecting to a TV
- Connect the supplied AV-cable to VIDEO OUT [13].
- Connect the SCART contact to a vacant SCART input on the TV.
Inserting an external memory card
Please note! Always switch off the appliance before inserting or removing a memory
card.
- Insert a SD memory card in the holder [ 12 ] according to gure.

7
SETTINGS
TIME
STORAGE
CLIP LENGTH
TIME SETTINGS
YEAR
MONTH
DAY
HOUR
MINUTE
SECOND
DISPLAY
2007
01
07
16
39
45
ON
OVERWRITE
SENSITIVITY
2007 01 26 15:26:24
Fig. 7
ENGLISH
How to use
Setting time and date
1. Press [ MODE ] twice until the dialogue box ”SETTINGS” appears.
2. Use the arrow keys [ < / > ] to choose ”TIME”. Conrm by pressing [ ►II ] once.
3. Set year using [ < / > ].
4. Press [ ►II ] to save and move on to set month.
5. Set year using [ < / > ]. Press [ ►II ] to save.
6. Repeat step 3 - 4 to set day, hours, minutes, seconds and date display on/off.
Standby
When the appliance is connected to the TV, and is on standby, the camera picture is
displayed on the TV together with the current date and time. The standby indicator is on
and the two indicator lights on the front of the appliance are off.

8
2007 01 26 15:28:35
RECORDING
Fig. 8
SETTINGS
TIME
STORAGE
CLIP LENGTH
1
CLIP LENGTH
5 SECONDS
10 SECONDS
2
OVERWRITE
SENSITIVITY 15 SECONDS
30 SECONDS
1 MINUTE
ENGLISH
Recording
The motion sensor detects if something moves within the sensor area and automatically
starts recording. The recording time can be adjusted to 5, 10, 15, 30 or 60 seconds.
(see recording settings). The left indicator lamp (green) on the front side of the appliance
is on when recording.
Recording settings
The default recording time is 5 seconds per sequence but can be altered to 60 seconds.
7. Press [ MODE ] twice until the dialogue box ”SETTINGS” appears.
8. Use the arrow keys [ < / > ] to choose ”CLIP LENGTH”. Conrm by pressing [ ►II ]
once.
9. Choose desired recording time. Conrm by pressing [ ►II ].
10. Press [ MODE ] or wait approx. 30 seconds to exit settings mode.

9
Fig. 10
FOLDER 005
07 / 01 / 0 1
14 : 34 :30
07 / 01 / 0 1
14 : 34 :30
07 / 01 / 0 1
14 : 40 :33
07 / 01 / 0 1
14 : 40 :33
07 / 01 / 0 1
14 : 56 :30
07 / 01 / 0 1
14 : 56 :30
07 / 01 / 0 1
14 : 40 :57
07 / 01 / 0 1
14 : 40 :57
07 / 01 / 0 1
14 : 35 :10
07 / 01 / 0 1
14 : 35 :10
07 / 01 / 0 1
14 : 37 :22
07 / 01 / 0 1
14 : 37 :22
07 / 01 / 0 1
15 : 55 :04
07 / 01 / 0 1
15 : 55 :04
07 / 01 / 0 1
16 : 27 : 11
07 / 01 / 0 1
16 : 27 : 11
07 / 01 / 0 1
14 : 44 :57
07 / 01 / 0 1
14 : 44 :57
PAGE 010 / 015
Fig. 11
ce
les clips
para
FOLDER 005
07 / 01 / 0 1
14 : 34 :30
07 / 01 / 0 1
14 : 34 :30
07 / 01 / 0 1
14 : 40 :33
07 / 01 / 0 1
14 : 40 :33
07 / 01 / 0 1
14 : 56 :30
07 / 01 / 0 1
14 : 56 :30
07 / 01 / 0 1
14 : 40 :57
07 / 01 / 0 1
14 : 40 :57
07 / 01 / 0 1
14 : 35 :10
07 / 01 / 0 1
14 : 35 :10
07 / 01 / 0 1
14 : 37 :22
07 / 01 / 0 1
14 : 37 :22
07 / 01 / 0 1
15 : 55 :04
07 / 01 / 0 1
15 : 55 :04
07 / 01 / 0 1
16 : 27 : 11
07 / 01 / 0 1
16 : 27 : 11
07 / 01 / 0 1
14 : 44 :57
07 / 01 / 0 1
14 : 44 :57
PAGE 010 / 015
ENGLISH
Playback
1. Press [ MODE ] once until recorded video clips are displayed as icons on the screen.
2. Use arrow keys [ < / > ] to choose desired video clip to display.
3. Press [ ►II ] to display chosen video clip.
4. To pause playback, press [ ►II ].
Press [ ►II ] again to resume playback.
Locking video clips (save)
Locking video clips prevents them from being unintentionally erased.
- Choose the video clip to be saved and press [ 8 ].
- Locked video clips are marked with a .

10
DELETE
37102310 . ASF
YES NO
Fig. 12
DELETE
37102310 . ASF
YES NO
Fig. 12
SETTINGS
TIME
STORAGE
CLIP LENGTH
STORAGE SETTINGS
INFO
DELETE UNLOCKED CLIPS
DELETE ALL
1
STORAGE SETTINGS
INFO
DELETE UNLOCKED CLIPS
DELETE ALL
COPY TO SD CARD
2
Fig. 14
OVERWRITE
SENSITIVITY
ENGLISH
Erasing video clips
Saved video clips can be erased at any time to make space for new video clips.
1. Choose the video clip to be erased.
2. Press the [ 1 ].
3. Choose ”YES” when given a choice to erase the video clip. Conrm by pressing
[ ►II ] once ].
Managing the storage space
The menu for managing the storage space (STORAGE) can appear different depending
on if an external memory card is being used or not.
- Without an external memory card menu no. 1 is displayed.
- With an external memory card menu no. 2 is displayed.

11
SETTINGS
TIME
STORAGE
CLIP LENGTH
STORAGE SETTINGS
INFO
DELETE UNLOCKED CLIPS
DELETE ALL
1
STORAGE SETTINGS
INFO
DELETE UNLOCKED CLIPS
DELETE ALL
COPY TO SD CARD
2
INFO
XX % FREE SPACE
3
Fig. 15
OVERWRITE
SENSITIVITY
SETTINGS
TIME
STORAGE
CLIP LENGTH
STORAGE SETTINGS
INFO
DELETE UNLOCKED CLIPS
DELETE ALL
1
STORAGE SETTINGS
INFO
DELETE UNLOCKED CLIPS
DELETE ALL
COPY TO SD CARD
2
ALL UNLOCKED CLIPS WILL BE DELETED
3DELETE UNLOCKED CLIPS
YES NO
Fig. 16
OVERWRITE
SENSITIVITY
ENGLISH
Display available memory
1. Press [ MODE ] twice until ”SETTINGS” is displayed on the screen.
2. Choose ”STORAGE” and conrm using [ ►II ].
3. Choose ”INFO” and conrm using [ ►II ]. Available memory is now shown on the
display.
Erasing several video clips
Erasing all unlocked video clips
1. Press [ MODE ] twice until ”SETTINGS” is displayed on the screen.
2. Choose ”STORAGE” and conrm using [ ►II ].
3. Choose ”DELETE UNLOCKED CLIPS” and conrm using [ ►II ].
4. Choose “YES” when given a choice to erase all unlocked video clips.
Conrm using [ ►II ].

12
SETTINGS
TIME
STORAGE
CLIP LENGTH
STORAGE SETTINGS
INFO
DELETE UNLOCKED CLIPS
DELETE ALL
1
STORAGE SETTINGS
INFO
DELETE UNLOCKED CLIPS
COPY TO SD CARD
DELETE ALL
2
ALL CLIPS WILL BE DELETED
3DELETE ALL CLIPS
YES NO
Fig. 17
OVERWRITE
SENSITIVITY
Please note! Always switch off the appliance before inserting or removing a memory
card.
1. Press [ MODE ] twice until ”SETTINGS” is displayed on the screen.
2. Choose ”STORAGE” and conrm using [ ►II ].
3. Choose ”COPY TO SD CARD” and conrm using [ ►II ].
Please note! This menu choice is displayed only if a SD memory is inserted.
4. Choose ”YES” when asked if all video clips are to be copied to the memory card.
5. Conrm using [ ►II ].
SETTINGS
TIME
STORAGE
CLIP LENGTH
1STORAGE SETTINGS
INFO
DELETE UNLOCKED CLIPS
DELETE ALL
COPY TO SD CARD
2
COPY ALL CLIPS TO SD CARD?
3COPY TO SD CARD
YES NO
Fig. 18
OVERWRITE
SENSITIVITY
ENGLISH
Erasing all video clips
1. Press [ MODE ] twice until ”SETTINGS” is displayed on the screen.
2. Choose ”STORAGE” and conrm using [ ►II ].
3. Choose ”DELETE ALL” and conrm using [ ►II ].
4. Choose “YES” when given a choice to erase all unlocked video clips. Conrm using
[ ►II ].
Copying video clips to the memory card

13
Please note!
Video clips which are stored on the internal memory can not be displayed if an external
memory card is inserted. The video clips must be copied to the memory card to be dis-
played.
Recording over video sequences
Activate the re-record function and record over video sequences.
1. Press [ MODE ] repeatedly until SETTINGS appears on the screen.
2. Select OVERWRITE and conrm by pushing [ ►II ].
3. Select ENABLE to permit the overwriting of old video sequences, or select
DISABLE to prevent old video sequences from being recorded over.
Adjusting the sensitivity of the recording module
You can adjust the sensitivity of the recorder starting when someone passes in front of
the camera.
1. Press [ MODE ] repeatedly until SETTINGS appears on the screen.
2. Select SENSITIVITY and conrm by pushing [ ►II ].
3. Select a level from HIGH, NORMAL and LOW. Conrm by pushing [ ►II ].
Care and maintenance
- Wipe with a soft, slightly damp cloth. Never use any cleaning agents nor strong
solvents.
ENGLISH

14
Troubleshooting
Problem Cause/Solution
The camera
picture is not
displayed.
- Make sure that the recording module, camera and TV are
correctly installed. (see gure 2, 3, 4, 5)
- Make sure that the appliance is switched on. Is the status light
on [3].
- Check the camera batteries (if it is battery powered).
Bad signal/inter-
ference
- If a wireless camera is being used, make sure that the camera
and the receiver are tuned into the same channel.
- Make sure that the camera and the receiver are within range
of one another.
- Interference can arise if a microwave oven is in the area
between the camera and the receiver. Switch off or move the
microwave oven.
- Check the camera batteries (if it is battery powered).
- Check that all cables are correctly inserted.
Disposal
Follow local ordinances when disposing of this product.
f you are unsure about how to dispose of this product contact your municipality.
Specifications
Video input Standard composite, CCTV compatible
Video output Standard composite
Motion sensor Built-in motion sensor
Memory 128 MB Mb built-in (ash), expandable with a
SD memory card (not included)
Power supply 12 V DC, 300 mA (net adaptor enclosed)
Size 210 x 155 x 40 mm
ENGLISH

15
SVENSKA
Inspelningsmodul
Nr 18-2065, 36-2390, modell Tranvo C150
Läs igenom hela bruksanvisningen före användning och spara den sedan för
framtida bruk. Vi reserverar oss för ev. text- och bildfel samt ändringar av tekniska
data. Vid tekniska problem eller andra frågor, kontakta vår kundtjänst (se adress-
uppgifter på baksidan).
Innehållsförteckning
Säkerhet 15
Produktbeskrivning 15
Installation 17
Användning 19
Skötsel och underhåll 25
Felsökningsschema 26
Avfallshantering 26
Specikationer 26
Säkerhet
- Produkten får endast repareras av kvalicerad servicepersonal
- Produkten får inte demonteras eller ändras
- Placera inte produkten så att den kan falla ner i vatten eller annan vätska. Ställ inte
några föremål som innehåller vätska på produkten, t.ex. blomvas eller läskedryck.
- Täck inte över anläggningen. Tillräcklig ventilation, med ett minsta avstånd på
15 cm mellan ventilationshålen och omgivande ytor, är nödvändig för att förhindra
att anläggningen blir för varm.
- Placera inte anläggningen i en fuktig, dammig miljö eller där det förekommer starka
vibrationer.
- ON-/OFF –strömbrytaren skiljer inte apparaten från nätet. För att fullständigt skilja
apparaten från nätet måste stickproppen dras ut ur nätuttaget.
Produktbeskrivning
Inspelningsmodul för inkoppling till övervakningskamera. När någon rör sig framför
kameran spelar modulen automatiskt in bildsekvenser (ej ljud) på 5 till 60 sekunder
(valbar tid).
- Inbyggt minne på 128 MB.
- Plats för SD-minne (medföljer ej) vilket ger möjlighet att förlänga inspelningstiden
betydligt. 512 MB ger cirka 70 minuter inspelningstid.
- Passar kameror med RCA-kontakter.
- Levereras med eliminator samt scartkabel för inkoppling till TV.

16
SVENSKA
910
11 12
13
1
5
3
2
67
8
4
Fig. 1
1. – Raderar videosekvens
2. MODE
3. Indikator för standby/inspelning
4. Indikator för uppspelning
5. < / > - Knappar för funktionsval
6. ►II – Startar eller pausar
avspelningen
7. Statusindikering
8. – Låser inspelade videosekvenser
9. DC IN - Ingång för 12 V nätadapter
10. POWER ON/OFF - Strömbrytare
11. VIDEO IN – Ingång för videosignal
(RCA)
12. Plats för externt minneskort (SD)
13. VIDEO OUT – Utgång för videosignal
(till ex. TV)
Knappar och funktioner
Statusindikeringar - ovansida
Standby/Redo för inspelning.
Uppspelning av inspelade klipp.
Inställningsläge.
Statusindikeringar – framsida
- Vänster indikator (grön) lyser/blinkar – Ny händelse.
- Höger indikator (röd) lyser med fast sken – Minnet fullt.

17
SVENSKA
Installation
Ansluta spänningen
1. Anslut nätadaptern till ett vägguttag.
2. Anslut nätadapterns DC-plugg till uttaget [ 9 ] på apparatens baksida.
3. Sätt strömbrytaren [ 10 ] i läge ”ON”.
Ansluta kamera – via kabel
Anslut en kamera till videoingången [ 11 ].
Ansluta trådlös kamera
Anslut den trådlösa kamerans mottagare till videoingången [ 11 ].

18
SVENSKA
Anslutning till TV-apparat
- Anslut den medföljande AV-kabeln till VIDEO OUT [ 13 ].
- Anslut SCART-kontakten till en ledig SCART-ingång på TV-apparaten.
- Sätt i ett minneskort av typen SD i hållaren [ 12 ] enligt bilden.
Sätta i externt minneskort
Obs! Stäng alltid av apparaten innan ett minneskort tas ur eller sätts i.

19
SVENSKA
SETTINGS
TIME
STORAGE
CLIP LENGTH
TIME SETTINGS
YEAR
MONTH
DAY
HOUR
MINUTE
SECOND
DISPLAY
2007
01
07
16
39
45
ON
OVERWRITE
SENSITIVITY
2007 01 26 15:26:24
Fig. 7
Användning
Ställa in tid och datum
1. Tryck 2 gånger på [ MODE ] tills dialogrutan ”SETTINGS” visas.
2. Använd pilknapparna [ < / > ] för att välja ”TIME”.
Bekräfta med ett tryck på [ ►II ].
3. Ställ in årtalet med [ < / > ].
4. Tryck på [ ►II ] för att spara och gå vidare för att ställa in månad.
5. Ställ in årtalet med [ < / > ]. Tryck på [ ►II ] för att spara.
6. Upprepa steg 3 – 4 för att ställa in dagar, timmar, minuter, sekunder samt
datumvisning på/av.
Standbyläget
När apparaten är inkopplad till TV-apparaten, och är satt i standbyläget, visas
kamerans bild på TV-skärmen tillsammans med aktuellt datum och tid.
Standbyindikatorn lyser medans de 2 indikatorlamporna på apparatens framsida
är släckta.

20
SVENSKA
2007 01 26 15:28:35
RECORDING
Fig. 8
SETTINGS
TIME
STORAGE
CLIP LENGTH
1
CLIP LENGTH
5 SECONDS
10 SECONDS
2
OVERWRITE
SENSITIVITY 15 SECONDS
30 SECONDS
1 MINUTE
Inspelningsläget
Rörelsedetektorn känner av om något rör sig inom avkänningsområdet och startar
automatiskt inspelningen. Inspelningens längd kan ändras mellan 5, 10, 15, 30
eller 60 sekunder. (se Inspelningsinställningar). Den vänstra indikatorlampan
(grönt sken) på apparatens framsida tänds när inspelning pågår.
Inspelningsinställningar
Förinställd inspelningstid är 5 sekunder per videosekvens men kan ändras upp till 60
sekunder.
7. Tryck två gånger på [ MODE ] tills dialogrutan ”SETTINGS” visas.
8. Använd pilknapparna [ < / > ] för att välja ”CLIP LENGTH”. Bekräfta med ett
tryck på [ ►II ].
9. Välj önskad inspelningstid. Bekräfta med ett tryck på [►II ].
10. Tryck på [ MODE ] eller vänta ca 30 sekunder för att gå ur inställningsläget.
Table of contents
Languages: