Clas Ohlson HF-618AE User manual

EnglishSvenskaNorskSuomi
Art.no. Model
38-3407 HF-618AE Ver. 200907
Stereo System
with Record Player
Musikanläggning med skivspelare
Musikkanlegg med platespiller
Ministereot ja levysoitin

2
English

3
English
CLASS 1
LASER PRODUCT
CAUTION
RISK OF ELECTRIC SHOCK
DO NOT OPEN
Stereo System with Record Player
Art. no 38-3407 Model HF-618AE
Please read the entire instruction manual before using the product and save it for future
reference. We reserve the right for any errors in text or images and any necessary changes
made to technical data. If you have any questions regarding technical problems please
contact Customer Services.
Safety
- The product should only be repaired by qualified service technicians.
- The product should not be taken apart or modified.
- Do not place the product where there is a risk of it falling into water or other types of
liquid. Do not place any objects which contain liquid on the product such as vases,
drinks, etc.
- Make sure that the electrical outlet the device is plugged into is easily accessible since
the plug is used to disconnect the device from the mains.
- Do not cover the product. Adequate ventilation with a distance of at least 15 cm
between ventilation holes and the surrounding area is necessary to prevent the device
from becoming too warm.
- Do not place the device in damp, dusty environments or where there are heavy vibrations.
- The standby switch on the front of the device does not disconnect the device from the
mains. To completely disconnect the device from the mains the plug has to be removed
from the socket.
- Prolonged exposure to high volume can damage your hearing.
Pay attention to these safety symbols
Caution: Do not open the casing! Certain
unprotected components within the product’s
casing carry dangerous currents. Contact with
these can lead to fire or give electric shocks.
Caution: Do not open the casing! Invisible laser beams can cause eye damage.
Do not look directly into the laser beam or look directly at it using an optical instrument.

4
English
1
2
34
56
78
9
10
11 12
13
14
15
16
17
18 19
20 21
22
23
24
25
26
27
28
29
30
31
32
33
34
37
36
35
Product description
Main unit

5
English
1. Lid
2. Display
3. Volume up/down
4. X-BASS – Extra bass reproduction
5. Standby indicator lamp
6. DUBBING – Speed selector for high
or normal speed cassette recording
7. ON/STANDBY – Standby switch
8. ■– Stops CD/USB/SD playback
9. [SOURCE] – Selects audio
[SOURCE]: CD/USB/SD
10. CD/USB/SD, TAPE, TUNER,
PHONO – Function selector:
11. I◄◄ – Press once to skip back a
track, hold down to rewind
12. REP/INTRO/RAN – Repeat/Intro/
Random playback
13. ●REC – Record button for
CD/USB/SD
14. Cassette door
15. Deck 1 control keys
a. ●– Record key
b. ► – Playback key
c. ◄◄ / ►► – Fast rewind / fast
forward key
d. ■▲ – Stop/Eject key
e. II – Pause key
16. CD door
17. USB – USB memory stick socket
18. FM stereo indicator
19. Headphone socket (3.5 mm stereo)
20. IR sensor for remote control
21. TUNING – Frequency adjusting knob
22. ►II – Starts/Pauses CD/USB/SD
playback
23. ▲ – Opens/closes CD door
24. AM/FM/FM-ST – Radio band selector
25. ►►I– Press once to skip to next track,
hold down to fast forward
26. FOLDER UP – Select MP3 catalogue/
folder
27. Cassette door
28. Deck 2 control keys
a. ►– Playback key
b. ◄◄ / ►► - Fast rewind / fast
forward key
c. ■▲ – Stop/Eject key
d. II – Pause key
29. Slot for SD/MMC memory card
30. Spindle adaptor
31. Tone arm lift lever
32. Speed control 33/45 rpm
33. Pickup needle holder
34. FM aerial
35. Speaker connection (right/left)
36. ”Auto stop” switch
37. Mains lead outlet

6
English
5
1 2
4
3
6
78
910
11 12
Remote control
1. FIND – Search function for track titles
and folders
2. INFO – Information about track titles
3. REC – Record button for CD/USB/SD
4. REP/INTRO/RAN – Repeat/Intro/
Random playback
5. PROGRAM – Programming button for
CD/USB/SD
6. ►II – Starts/Pauses CD/USB/SD playback
7. I◄◄ – Press once to skip back a track, hold
down to rewind.
►►I– Press once to skip to next track, hold
down to fast forward
8. ■– Stops CD/USB/SD playback
9. FOLDER ▲/▼ – Navigates folders for USB/SD/
CD (with MP3 or WMA files)
10. [SOURCE] – Selects audio [SOURCE]:
CD/USB/SD
11. VOLUME +/- – Increases/Decreases the volume
12. TS (Track Separation) – Divides a recording into
several files
Connections
Connecting the speakers
- Connect the right and the left speakers to the right (R) and left (L) speaker outlets (35)
on the back panel.
Connecting to the mains
1. Connect the mains lead to a wall socket. Check that the voltage (V), on the rating plate
on back of the device corresponds to your local electrical network (230 V AC, 50 Hz).
Ask for advice from your retailer or a service centre if that is not the case.
2. To shut off power completely pull the plug from the wall socket. The device should also
be unplugged during heavy thunderstorms to protect the stereo.

7
English
Operation
Listening to the radio
FM
1. Set the function selector (10) to the TUNER position.
2. Set the band selector to either the FM (mono) or FM-ST (stereo) position.
3. Tune in the desired station using the tuning knob (21).
4. Position the aerial (34) until the best reception is received.
5. Adjust the volume to the desired level with the volume control knob (3).
AM
1. Set the function selector (10) to the TUNER position.
2. Tune in the desired station using the tuning knob (21).
3. Adjust the volume to the desired level with the volume control knob (3).
Receiving the best reception
AM: The player has a built-in aerial for AM reception. Reception can be improved by
turning or moving the device.
FM: Position the wire aerial (34) in such a way that the best reception is received.
The aerial should be completely unravelled for the best reception.
Listening to records
1. Remove the stylus cover from the tone arm by
sliding it forward as shown in the diagram.
2. Set the function selector (10) to the PHONO
position to turn the record player on.
3. Place a record on the turntable. Some 45 rpm records have larger spindle holes.
In this case you will need to use the spindle adaptor (30).
4. Choose the appropriate speed for the record with the speed control (32).
5. Lift and hold the tone arm over the record. The turntable should begin to spin.
6. Carefully lower the tone arm at the beginning of the desired track.
7. Playback should now begin. Adjust the volume to the desired level with the volume
control knob (3).
8. Return the tone arm to the pickup holder when playback has finished. The turntable
should stop spinning.

8
English
N.B.
Some records end outside of the record player’s “auto-stop” – range. This means that
some records may stop playing even before finishing the last track. This can be remedied
by switching “Auto stop” (36) to the OFF position.
N.B. The record will continue spinning even after the last track has been played. To stop the
record set the “Auto stop” switch (36) to the ON position or set the function selector (10) to
any other position than PHONO.
Listening to a CD
1. Set the function selector (10) to the CD/USB/SD position.
2. Open the CD compartment by pressing [OPEN/CLOSE] (23).
3. Place a CD (Audio or CD-R/CD-RW containing MP3 files) with the label facing upwards
in the CD compartment.
4. Close the CD compartment by pressing [OPEN/CLOSE] (23).
5. After a moment, the track total will be shown in the display. If the disc contains MP3
or WMA files, you can browse through the folders using the [FOLDER UP] button (26).
Use I◄◄ and ►►Ito select a desired track in the chosen folder.
6. Press ►II (22) to start playback. The first track should begin playback.
7. Press ►II (22) again to temporarily stop playback. The current track number will flash in
the display. Press ►II (22) again to resume playback.
8. To stop playback, press and hold ■(8).
Selecting a different track
During playback or in pause mode use I◄◄ or ►►I(11, 25) to select another track.
1. Press ►►Ionce to reach the next track, or press repeatedly until the desired
track reached.
2. Press quickly on I◄◄ to return to the beginning of the current track. Press the required
number of times to return to a previous track.
Fast search
1. Press and hold I◄◄ or ►►Ito search for a section in a track. The CD will play at high
speed and low volume.
2. Release the button when you have reached the desired section. Normal playback
should now resume.
N.B.
- The sound quality of MP3 files can vary depending on the quality of the CD or recording.
- The time it takes for the device to load an MP3 disc usually takes longer than for a
regular CD.

9
English
Displaying titles (via the remote control)
- During playback of MP3 files, press the INFO button once on the remote to display
or hide the current track’s ID3 information.
- If no information is available for the track “NONE” or “UNKNOWN” will be shown
in the display.
Searching tracks by title (via the remote)
You can search for a track by title/name.
1. When stopped press the remote’s FIND button once.
2. Use I◄◄ and ►►| to browse the tracks by alphabetical order.
3. Press ►II (22) to start playback of the selected track.
Searching by folder (via the remote control)
You can search for a folder by title/name.
1. With playback stopped, press the remote control FIND button twice.
2. Use ▼and ▲to browse the folders in alphabetical order.
3. Press ►II (22) to start playback of the selected folder.
Repeated playback
- Press REP/INTRO/RAN (12) once or multiple times to repeat a track, album/folder
(only MP3) or an entire CD.
- The repeated playback symbol indicates which type of repeated playback
is activated.
Random playback
- Press [REP/INTRO/RAN] once or repeatedly to activate random playback. “RAN” will
start to flash in the display when the function is activated.
- Press once more on [REP/INTRO/RAN] or ■(STOP) to deactivate random playback.
Intro (plays the beginning of each track)
- To save time when searching for a track, the first 10 seconds of each track are played.
- Press [REP/INTRO/RAN] once or repeatedly to start playback with the intro function.
“INTRO” appears in the display when the function is activated.
N.B. The display can only show characters from the English alphabet.

10
English
Programmed playback (via the remote control)
Up to 32 tracks can be programmed in any chosen order.
1. Stop playback by pressing ■(STOP).
2. Press once on [PROGRAM] on the remote control. ”PROG”, both program number
and track number will be shown in the display.
3. Use I◄◄ or ►►Ito select a track for playback on the programmed playlist.
4. Confirm by pressing [PROGRAM] once. The track number will flash in the display.
5. Repeat steps 3 and 4 to programme in more tracks.
6. Press ►II (22) to start playing your list.
7. Press ■(STOP) to stop playback and clear the programme memory.
Playing MP3 or WMA files from a USB memory stick or
memory card
The device can play MP3 and WMA files from a USB memory stick or SD/MMC
memory card.
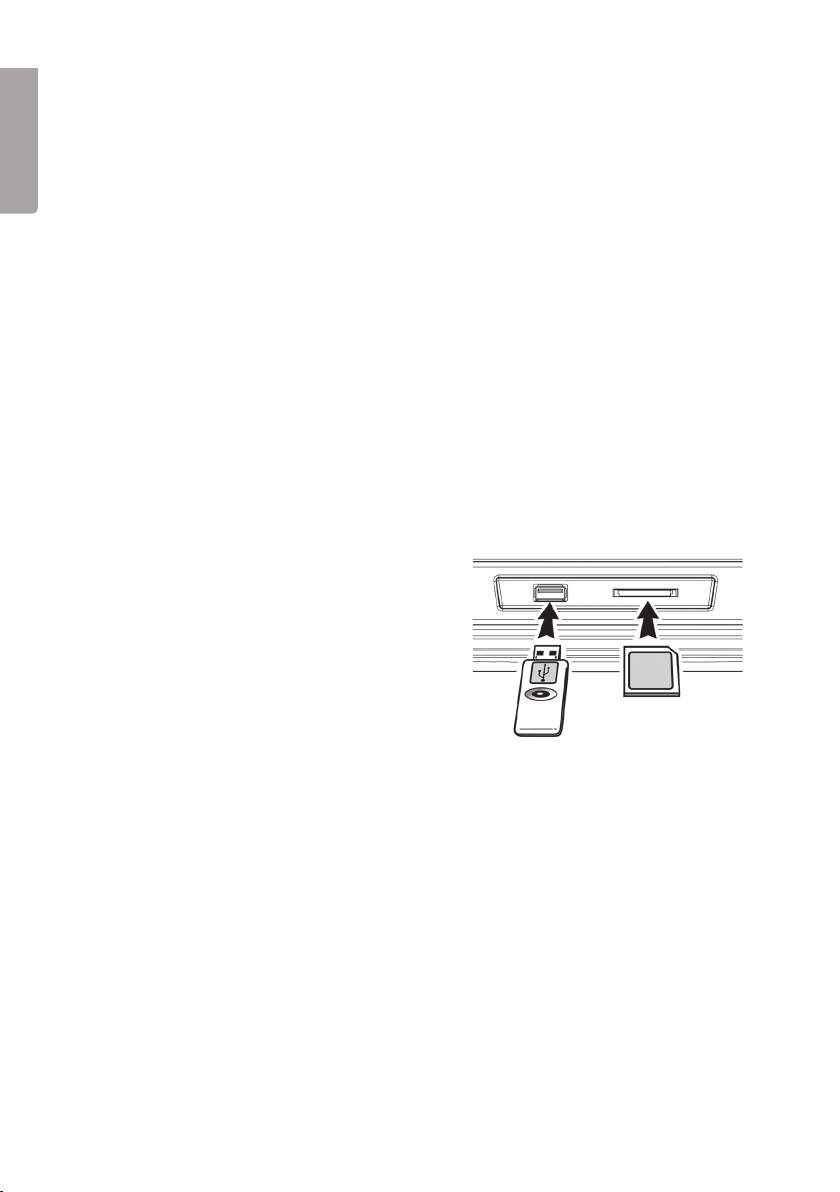
1. Insert a USB memory stick/memory card
according to the figure. Make sure to insert the
USB memory stick/memory card the right way
round to ensure that the connectors are not
damaged. Always push the USB memory stick/
memory card straight in without twisting.
2. Set the function selector (10) to the CD/USB/
SD position and push [SOURCE](9) to select
the USB (USB memory stick) or CARD
(memory card). The display will show the
selected [SOURCE], audio format and total
number of tracks.
3. After a moment, the track total will be shown in the display.
4. Press [FOLDER] (26) once or repeatedly to select a folder for playback. The name of the
folder will be shown in the display.
5. Use I◄◄ and ►►Ito select a desired track in the chosen folder.
6. Press ►II (22) to start playback.
7. Press ►II (22) again to temporarily stop playback. The current track number will flash in
the display. Press ►II (22) again to resume playback.
8. To stop playback, press and hold ■(8).

11
English
Using the cassette deck
1. Set the function selector (10) to the CD/USB/SD position.
2. Press ■▲ (STOP/EJECT) to open the cassette door.
3. Insert a tape and close the cassette door.
4. Press ►(PLAY) to start playback.
5. Press II (PAUSE) if you want to stop the tape temporarily. Press II again to resume
playback.
6. By pressing ◄◄ or ►►, you can fast forward or rewind the tape.
7. Press ■▲ (STOP/EJECT) to stop playback. The buttons are released automatically
when the tape comes to an end, unless the II (PAUSE) button is pushed in.
Recording onto cassette
General recording information
- Recording is allowed as long as it does not break copyright law or other rights owned
by a third party.
- The stereo automatically adjusts to the optimum recording level. It is impossible
to adjust an ongoing recording using the volume and X-BASS controls. The first
7 seconds and the last 7 seconds of the tape cannot be recorded on.
- In order to prevent a tape from being recorded over you can break one or both of the
tape’s recording tabs on top of the cassette. The side on which the recording tab is
removed cannot be recorded onto. Taping over the recording tab holes restores the
cassette’s recording capabilities.
Recording from radio to cassette
1. Set the function selector (10) to the TUNER position.
2. Select AM or FM using the radio band selector [24].
3. Press ■▲ (STOP/EJECT) to open cassette deck 1, insert the cassette you wish to
record onto and close the door.
4. Press both ●(RECORD) and ►[PLAY] simultaneously to begin recording.
5. Press II (PAUSE) if you wish to stop the recording temporarily.
Press II again to resume recording.
6. Press ■▲ to finish recording.

12
English
Recording from cassette to cassette
N.B. You can choose the recording speed using the [DUBBING] button [6].
1. Set the function selector (10) to the TAPE position.
2. Press ■▲ (STOP/EJECT) to open cassette deck 1, insert the cassette you wish to
record onto and close the door.
3. Press ■▲ (STOP/EJECT) to open cassette deck 2, insert the cassette you wish to copy
and close the door.
4. Press ►(PLAY) on cassette deck 2 and then press both ●(RECORD) and ►(PLAY)
simultaneously to begin the recording.
5. Press II (PAUSE) if you wish to stop the recording temporarily. Press II again
to resume recording.
6. Press ■▲ to finish recording.
Recording from CD/USB/memory card onto a cassette
1. Set the function selector (10) to the CD/USB/SD position.
2. Press ■▲ (STOP/EJECT) to open cassette deck 1, insert the cassette you wish
to record onto and close the door.
3. Start to play the audio [SOURCE] (CD/USB memory stick or memory card).
4. Press both ●(RECORD) and ►(PLAY)simultaneously to begin recording.
5. Press II (PAUSE) if you wish to stop the recording temporarily.
Press II again to resume recording.
6. Press ■▲ to finish recording.
Recording from record player to cassette
1. Set the function selector (10) to the PHONO position.
2. Press ■▲ (STOP/EJECT) to open cassette deck 1, insert the cassette you wish
to record onto and close the door.
3. Start playing the record.
4. Press both ●(RECORD) and ►(PLAY) simultaneously to begin recording.
5. Press II (PAUSE) if you wish to stop the recording temporarily. Press II again
to resume recording.
6. Press ■▲ to finish recording.

13
English
Recording to MP3 on a USB memory stick/memory card
Recording from CD to MP3
Preparations
- Insert a USB memory stick in the USB port or a memory card in the memory card
slot. N.B. If both a USB memory stick and a memory card are connected to the stereo
system at the same time, the USB memory stick will automatically be chosen as the
storage medium.
- Set the function switch (10) to the CD/USB/SD position and insert a CD to record from.
Recording a single track
1. Start playback of the CD track you want to record.
2. Press [REC] (13) to start recording.
3. Recording automatically stops when the track finishes.
Recording an entire CD
1. Press [REC] (13) to start recording.
2. The recording stops when the entire CD has been played. The device automatically
organises the tracks onto the USB memory stick/memory card.
Recording programmed tracks
1. Follow the instructions for programmed playback above.
2. Press ►II (22) to start playback.
3. When playback has begun, press and hold in [REC] (13) for 2 seconds.
Recording will now begin.
4. Recording automatically stops when the programme finishes.
Recording from the record player to MP3
Preparations
- Insert a USB memory stick in the USB port or a memory card in the memory card slot.
- Set the function switch (15) to the PHONO position and put on a record to record from.
Recording a single track or an entire record
1. Start playback of the track or tracks on the record which are to be recorded onto the
USB memory stick/memory card.
2. Press REC (13) to start recording. All tracks will be saved as one MP3 file until the
recording is stopped manually.

14
English
3. To divide the recording into several files, do the following: Press [TS] (on the remote
control) once to insert a pause and create a new file where the next track should begin
recording. Use the same procedure for all tracks you wish to have as a separately
recorded file. Every time a new file is created, the “PHONO” symbol will flash on the
display. N.B. This must be done during the recording process.
4. When you have recorded the desired tracks, press and hold [REC] (13) to stop recording.
Recording from cassette to MP3
Preparations
- Insert a USB memory stick into the USB port or a memory card in the memory card slot.
- Set the function selector (15) to the TAPE position and insert the cassette you wish to
record from.
Recording one song or an entire cassette
1. Start playback of the track or tracks on the cassette which are to be recorded onto the
USB memory stick/memory card.
2. Press [REC] (13) to start recording. All tracks will be saved as one MP3 file until the
recording is stopped manually.
3. To divide the recording into several files, do the following: Press [TS] (on the remote
control) once to insert a pause and create a new file where the next track should begin
recording. Use the same procedure for all tracks you wish to have as a separately
recorded file. Every time a new file is created, the “PHONO” symbol will flash on the
display. N.B. This must be done during the recording process.
4. When you have recorded the desired tracks, press and hold [REC] (13) to stop recording.
Copying from a USB memory stick to a memory card or vice versa
N.B. It is only possible to copy an entire MP3 file / track. It is not possible to record part of
a track/file.
Preparations
- Insert a USB memory stick into the USB port or a memory card in the memory card slot.
- Set the function selector (10) to the CD/USB/SD position.
The example below describes recording from memory card to USB memory stick.
a) Recording one track
1. Start playback of the memory card track that you wish to record onto the
USB memory stick.
2. Press [REC] (13) to start recording.
3. When the track has been completely recorded, recording stops automatically.

15
English
b) Recording all tracks
1. Set the [SOURCE] button to SD and insert the memory card that you wish to copy.
2. When all information on the card has been read, press [REC] (13) to start recording.
The and symbols will appear on the display during the copying process.
3. When the memory card has been completely recorded, recording stops automatically.
Setting the recording quality (via the remote control)
The recording quality for MP3s can be set between 32 and 256 Kbps. The highest quality
also produces a larger file.
1. Set the function selector (10) to the PHONO position.
2. Press the [INFO] button on the remote control. The display shows the current
recording quality.
3. Use I◄◄ and ►►Ito select the desired recording quality. Confirm by pressing [INFO].
Deleting files
Deleting a single file
1. Set the function selector (10) to the CD/USB/SD position and select USB or SD using
the [SOURCE] button.
2. Hold in the [INFO] button on the remote control for 3 seconds. The display shows
“DEL ---001”.
3. Use the I◄◄ and ►►Ibuttons to browse the files.
4. Press [REC] to select the file you wish to delete. The display will show “YES NO”.
5. Press I◄◄ or ►►Ito choose “YES” or “NO” and then confirm the deletion using [REC].
Deleting all files
1. Set the function selector (10) to the CD/USB/SD position and select USB or SD using
the [SOURCE] button.
2. Hold in the [INFO] button on the remote control for 3 seconds. The display shows
“DEL ---001”.
3. Hold in [INFO] on the remote control again. The display will show “FORMAT? Y/N”.
4. Press I◄◄ or ►►Ito choose “YES” or “NO” and then confirm the deletion using [REC].

16
English
Care and maintenance
To dust the stereo system, first disconnect it from the mains by pulling out the plug and
then wipe it using a soft duster and a mild detergent. Never use abrasive cleaning agents
or solvents.
Disposal
Follow local ordinances when disposing of this product. If you are unsure of how to dispose
of this product, please contact your municipality.
Specifications
Power supply 230 V AC, 50 Hz
Remote control batteries 2 x AAA/R03
Turntable speed 33/45 RPM
Size, main unit 305 x 415 x 375 mm
Size, speakers 200 x 360 x 195 mm

17
Svenska
CLASS 1
LASER PRODUCT
CAUTION
RISK OF ELECTRIC SHOCK
DO NOT OPEN
Musikanläggning med skivspelare
Art. nr 38-3407 Modell HF-618AE
Läs igenom hela bruksanvisningen före användning och spara den sedan för
framtida bruk. Vi reserverar oss för ev. text- och bildfel samt ändringar av
tekniska data. Vid tekniska problem eller andra frågor, kontakta vår kundtjänst
(se adressuppgifter på baksidan).
Säkerhet
- Produkten får endast repareras av kvalificerad servicepersonal.
- Produkten får inte demonteras eller ändras.
- Placera inte produkten så att den kan falla ner i vatten eller annan vätska.
Ställ inte heller några föremål som innehåller vätska på produkten, t.ex.
en blomvas eller dryck.
- Se till att vägguttaget som används sitter tillgängligt eftersom stickproppen på
apparatens nätsladd används som frånkopplingsanordning från nätet.
- Täck inte över anläggningen. Tillräcklig ventilation, med ett minsta avstånd på
ca 15 cm mellan ventilationshålen och omgivande ytor, är nödvändig för att förhindra att
anläggningen blir för varm.
- Placera inte apparaten i en fuktig, dammig miljö eller där det förekommer starka
vibrationer.
- Standbyomkopplaren på apparatens framsida skiljer inte apparaten från elnätet.
För att fullständigt skilja apparaten från elnätet måste apparatens stickpropp tas
ur vägguttaget.
- Långvarig exponering av hög ljudvolym från hörlurar kan orsaka skador på din hörsel.
Lägg märke till dessa säkerhetssymboler
Varning! Öppna inte höljet! Farlig spänning
finns oskyddat på komponenter inuti
produktens hölje, kontakt med dessa kan leda
till brand eller ge elektriska stötar.
KLASS 1 LASERAPPARAT
Varning! Öppna inte höljet! Osynlig laserstrålning som kan orsaka ögonskador.
Rikta inte blicken in mot strålen och titta inte direkt på den genom optiska instrument.

18
Svenska
1
2
34
56
78
9
10
11 12
13
14
15
16
17
18 19
20 21
22
23
24
25
26
27
28
29
30
31
32
33
34
37
36
35
Produktbeskrivning
Huvudenhet

19
Svenska
1. Lock
2. Display
3. Volymknapp upp/ned
4. X-BASS – Extra kraftig basåtergivning
5. Indikatorlampa för standby
6. DUBBING – Hastighetsväljare för
inspelning på kassettbandspelaren
7. ON/STANDBY – Standbyomkopplare
8. ■– Stoppar uppspelningen för
cd/usb/sd
9. [SOURCE] – Väljer musikkälla:
cd/usb/sd
10. CD/USB/SD, TAPE, TUNER, PHONO
– Funktionsväljare: cd/usb/sd,
kassettband, radio och LP-skiva
11. I◄◄ – Tryck för att gå till föregående
spår/håll in för snabbspolning bakåt
12. REP/INTRO/RAN – Repetition/intro/
slumpmässig uppspelning
13. ●REC – Inspelningsknapp för
cd/usb/sd
14. Kassettlucka
15. Kontroller för kassettdäck 1
a. ●– Startar inspelning
b. ►– Startar avspelningen
c. ◄◄ / ►► – Snabbspolning
bakåt/framåt
d. ■▲ – Stopp/Öppna kassettluckan
e. II – Pausar uppspelningen
16. Cd-lucka
17. USB - Anslutning för usb-minne
18. Indikatorlampa för FM-stereo
19. Hörlursuttag (3,5 mm stereo)
20. IR-sensor för fjärrkontroll
21. TUNING – Frekvensväljare
22. ►II – Startar/pausar uppspelningen
för cd/usb/sd
23. ▲– Öppnar/stänger cd-facket
24. AM/FM/FM-ST – Bandväljare
för radio
25. ►►I– Tryck för att gå till nästa spår/
håll in för snabbspolning framåt
26. FOLDER UP – Väljer mapp vid
mp3-uppspelning
27. Kassettlucka
28. Kontroller för kassettdäck 2
a. ►– Startar avspelningen
b. ◄◄ / ►► – Snabbspolning
bakåt/framåt
c. ■▲ – Stopp/Öppna kassettluckan
d. II – Pausar uppspelningen
29. SD/MMC – Anslutning för minneskort
30. Skivpuck
31. Lyftspak för tonarm
32. Varvtalsomkopplare 33/45 v/min
33. Pickup-hållare
34. FM-antenn
35. Anslutning för högtalare
(höger/vänster)
36. Omkopplare för ”Auto stop”
37. Uttag för nätsladd

20
Svenska
Fjärrkontroll
1. FIND – Sökfunktion för låttitlar och mappar.
2. INFO – Information om låttitel.
3. [REC] – Inspelningsknapp för cd/usb/sd.
4. REP/INTRO/RAN - Repetition/intro/
slumpmässig uppspelning.
5. PROGRAM – Programmeringsknapp för
cd/usb/sd.
6. ►II – Startar/pausar uppspelningen för
cd/usb/sd.
7. I◄◄ – Tryck för att gå till föregående spår/håll
in för snabbspolning bakåt.
►►I– Tryck för att gå till nästa spår/håll in för
snabbspolning framåt.
8. ■– Stoppar uppspelningen för cd/usb/sd.
9. FOLDER ▲/▼– Väljer mapp för usb/sd/cd
(med mp3- eller wma-filer).
10. [SOURCE] – Väljer musikkälla: cd/usb/sd.
11. VOLUME +/- – Höjer/sänker volymen.
12. TS (Track Separation) – Delar upp en
inspelning i flera filer.
5
1 2
4
3
6
78
910
11 12
Anslutningar
Anslutning av högtalare
- Anslut höger och vänster högtalare till höger (R) och vänster (L) högtalarutgång (35) på
apparatens baksida.
Anslutning till elnätet
1. Anslut nätsladden till ett vägguttag. Kontrollera att spänningen (V), som finns angiven
på märkskylten på baksidan av anläggningen är densamma som i ditt lokala elnät
(230 V AC, 50 Hz). Rådfråga återförsäljaren eller ett serviceställe om så inte är fallet.
2. För att helt stänga av strömmen, dra ur stickproppen ur vägguttaget. Dra även ur
stickproppen ur vägguttaget vid kraftiga åskväder för att skydda anläggningen.
Table of contents
Languages:
Other Clas Ohlson Stereo System manuals

Clas Ohlson
Clas Ohlson KW-1019iPH User manual

Clas Ohlson
Clas Ohlson KW-1009 User manual

Clas Ohlson
Clas Ohlson Z-789-PM3UCiA-UK User manual

Clas Ohlson
Clas Ohlson KS-3398F-UK User manual

Clas Ohlson
Clas Ohlson F71-UK User manual

Clas Ohlson
Clas Ohlson MDU156C-UK User manual

Clas Ohlson
Clas Ohlson KW-1021MP3USB User manual