Clearaudio Absolute phono User manual

User manual
Bedienungsanleitung
© clearaudio electronic GmbH, 2022-10 Made in Germany
absolute phono
Abb. ähnlich /
Pic. similar

User manual / Bedienungsanleitung
Page / Seite 2 © clearaudio electronic GmbH, 2022-10
User manual...............................2 - 8
Bedienungsanleitung.................9 - 15
Dear Clearaudio customer,
The Clearaudio
absolute phono
is the world‘s rst active headshell moving coil phonostage.
A tiny circuit board installed in the headshell of the tonearm amplies the highly sensitive moving
coil cartridge signal at its source: the output of the cartridge. As a result, the signal to noise ratio is
improved by approximately ten decibels across the entire audio bandwidth.
The
absolute phono
is designed and constructed without compromise. The sophisticated power
supply is located in a separate chassis to keep mains-borne interference to a minimum.
Power to the headshell-mounted amplication stage is routed from the power supply via the main
chassis. No relays or coupling capacitors are used in the signal path as they would otherwise
degrade the sound. In addition, hand-selected state-of-the-art non-magnetic Clearaudio Silver
Glimmer capacitors are used at key areas throughout the circuit where they further contribute to
the exceptional sound quality.
The
absolute phono
features two pairs of outputs: both balanced (XLR) and unbalanced (RCA).
To avoid interfering with each other each of these outputs has its own dedicated output driver stage.
For ease of use the
absolute phono
is equipped with a bright blue single multi-function switch for
‘On’, ‘O’, ‘Mute’ and ‘Standby’ modes. The
absolute phono
is suitable for all Clearaudio tonearms
and will be installed by Clearaudio in our factory in Erlangen, Germany.
The circuitry of the absolute phono is designed to work perfectly with any moving coil cartridge
from any manufacturer. This is ensured due to the sophisticated current amplication circuit which
eliminates the need to set the correct load resistance and load capacitance. The optimum operating
condition is always set automatically.
Clearaudio wish you the greatest of enjoyment with your new
absolute phono
.
Clearaudio electronic GmbH

User manual / Bedienungsanleitung
Made in Germany Page / Seite 3
Safety instructions
1. General information
Check the device for visible damage before using it for the rst time.
If the device is damaged, it should not be connected to the mains.
Also, never connect the device if it has been dropped or gotten wet, contact your dealer to have the
device inspected.
Never expose the device to rain or moisture.
Never touch the power cord of the device with wet hands.
For your own safety, regular visual inspections of any defective insulation on the connection cable
are also recommended. A damaged cable should be replaced immediately by a specialist!
Never pull on the power cable to unplug the device, but directly on the plug!
The inside of the device is maintenance-free, never open the housing or try to repair the device
yourself. This can also lead to loss of warranty.
If you do not operate the device for a longer period of time, we recommend disconnecting the
power supply from the mains.
Not suitable for children! Scope of delivery may contain small parts that can be swallowed.
2. Intended use
The
absolute phono
is a phono preamplier to amplify the signal of the phono cartridge.
The intended use of the
absolute phono
in accordance with the information provided in the user
manual only.
The power supply may only be operated with maximum permissible connection values according to
the technical data. Any other use or modication of this product is not intended.
3. Location of installation
The device should only be set up on leveled surfaces.
Avoid location with direct sunlight, temperature uctuations and high humidity. Likewise, avoid
placing electronic devices near heaters, heat lamps, or other devices that produce heat.
The device is designed for operation in heated rooms.
Never block the ventilation slots or cover the device with a cloth or similar.
No objects with an open ame may be placed on the device (burning candles or similar).

User manual / Bedienungsanleitung
Page / Seite 4 © clearaudio electronic GmbH, 2022-10
Phonostages provide a very high level of amplication, to address the fact that the electrical signal
generated by a phono cartridge is extremely low. As a result, phonostages are extremely sensitive,
which leads to the potential problem that high-frequency interference may also be amplied to
a point at which it becomes noticeable. Unfortunately it is not possible to completely protect the
sensitive phonostage circuitry from this interference without degrading its high delity performance.
Therefore care must be taken to position the phonostage away from sources of high frequency
interferences such as mobile phones, modems and powerline communication systems (PLC) in
which data is sent over the mains power network.
4. Overload
The product is designed to comply with all necessary safety regulations, however you should not
leave the device unattended under extreme loads.
5. Maintenance
Only use a soft cloth with a smooth surface for cleaning. Never use agressive cleaning detergent.
6. Health information
Permanently high volume can lead to various types of hearing damage. Use high volume responsibly!
7. Service
Duringtheguranteeperiod,the
absolutephono
mayonlyberepairedbythemanufacturer,otherweise
the warranty will become void.
All Clearaudio products should only be serviced by specialist retailer.
If despite the high production standard, a repair is necessary, the
absolute phono
must be sent to
Clearaudio through your dealer.
8. Transport
Always us the original packaging when transporting the Clearaudio
absolute phono
.
Be sure to pack the device exactly as it was shipped.
Safe transport is only guaranteed in the original packaging.
When packing, proceed in reverse as described for assembly.
9. Disposal
Do not dispose this product together with other waste.
WEEE Reg. No.: DE26004446
10. CE Marking
This electronic product corresponds to the applicable guidelines for obtaining the CE mark.

User manual / Bedienungsanleitung
Made in Germany Page / Seite 5
1. Installation and set-up
Before you begin, make sure that the tonearm is correctly installed on your turntable and is equipped
with the Clearaudio
absolute phono
headshell and Clearaudio Direct Silver Wire with the special
9–pin connector.
To proceed with installation and set-up, please see the rear panel of your Clearaudio
absolute
phono
.
Rear view:
Please proceed as follows:
1. Connect the special 9-pin connector from the tonearm to the input marked “input amplier”
and gently secure with the two locking screws. Please make sure that the screws are
properly tightened and thus the plug is securely connected.
2. Plug the RCA or XLR cable into the output sockets and connect them to your linestage
preamplier.
3. Connect the power supply provided to the socket marked “DC in”, “6V”, then connect this
power supply to your mains power supply.
4. Connect the power supply to the main power and switch the button to “I”.
Important: Please note that you may only use power supplies with a voltage of
6V DC!
1
2 2
3
4
Pic. 1: Rear view

User manual / Bedienungsanleitung
Page / Seite 6 © clearaudio electronic GmbH, 2022-10
5. Gently press the multi-function push-button on the front of the absolute phono. The blue
LED ring will ash approximately seven times and then glow steadily.
Your Clearaudio absolute phono is now ready to use and enjoy.
1.1. Mute and On / O modes
To select the mute-mode, briey tap the multi-function button on the front of the absolute phono.
The LED ring will ash quickly.
To return to normal operation, tap the button again, now the LED ring will glow steadily.
To switch the absolute phono o, press the button a little longer. At rst the LED ring ashes quickly
and then slower until it expires.
Please note:
Phonostages are devices designed to provide a very high level of amplication. This is necessary
because the electrical signal generated by a phono cartridge is extremely low (usually less than one-
thousandth of a volt). The job of the phonostage is therefore to accurately equalise the phono signal
and boost it to line level (measured in volts).
However, phonostages are by nature extremely sensitive, which leads to the potential problem that
high-frequency interference may also be amplied to a point at which it becomes noticeable.
Unfortunately it is not possible to completely protect the sensitive phonostage circuitry from this
interference without degrading its high delity performance. Therefore care must be taken
to position the phonostage away from sources of high frequency interference such as
mobile phones, modems and powerline communication systems (PLC) in which data is
sent over the mains power network.
5
Pic. 2: Front view

User manual / Bedienungsanleitung
Made in Germany Page / Seite 7
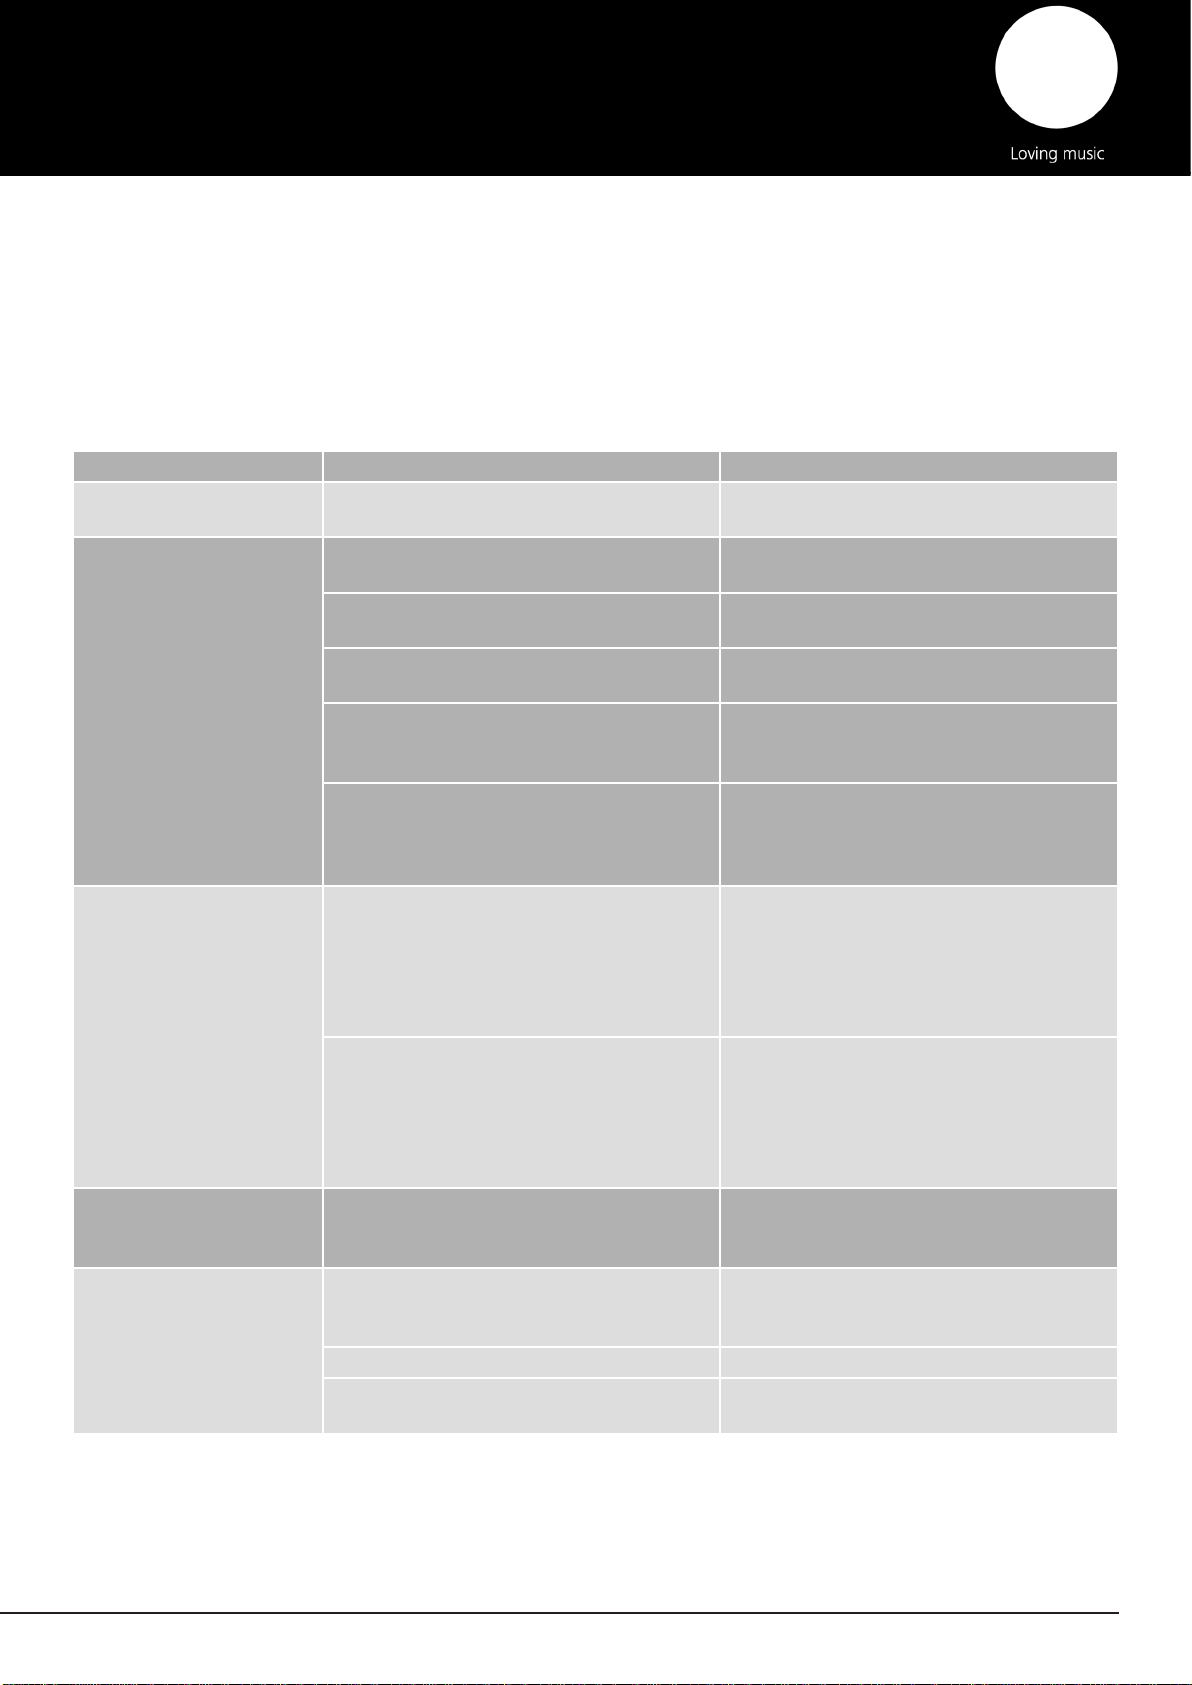
2. Troubleshooting
If you have a problem with your
absolute phono
, rst check the possible causes to rule out incorrect
operation.
If the error persists, please contact your dealer!
Never try to open the device and/or repair it yourself, this will void the warranty!
Error Cause Measure
Device does not work Is the power cord plugged in and the power
switch turned on? Check the connection.
No sound or
low volume?
Did you choose the right input? Check the connections of your hi
components.
Have you selected the correct operating
mode? Check the settings on the underside of the
phono stage.
Is the device in „mute“ mode or is the
volume set too low?
Check the volume setting of your device.
The connection cables are not properly
connected. Check the tonearm and cartridge
connections due the their respective user
manual.
Devices with a headphone output only:
Are the headphones still plugged in when
you are trying to play music through the
speakers?
Disconnect the headphones.
Hum or
noise
The ground cable is not connected or is
faulty. Connect the grounding cable from the
turntable/tonearm to the respective
grounding connection on the back of
the device. If there are several ground
connections, interrupt them one after the
other and check the sound quality again.
The device should not be operated in the
vicinity of high-frequency devices such as
mobile phones or modems or on power
supply systems used for data trac (PLC).
Make sure there is a minimum distance of
30cm between the power supply units of
any type and the MC preamplier or phono
preamplier. Powerlan adapters should not
be operated on the same socket as the
phono preamplier.
One channel quieter or
louder
The channels of an input are set dierently. Check the settings on the underside of the
phono stage. These must be carried out
identically for an input.
Remote control
does not work
The sensor of the phono stage is covered. Do not place any other objects in front of
the phono stage, as these could interfere
with reception.
You are out of range of the receiver. Get closer to the device.
The battery of the remote control is
exhausted. Replace the battery as described in this
user manual.

User manual / Bedienungsanleitung
Page / Seite 8 © clearaudio electronic GmbH, 2022-10
3. Technical data
Mode: MC mode
Amplication: 60dB
Input load: 500kΩ
THD: < 0.001%
Signal to noise ratio: 90dB (A-weighted)
Headroom: + 23dB
RIAA: RIAA standard, deviation less than 0.1dB
Channel seperation: 100dB
Output impedance: 64Ω (balanced XLR)
32Ω (unbalanced RCA)
Inputs: D-Sub
Outputs: unbalanced (RCA)
balanced (XLR)
Power consumption: Consumption in operation: 3.2 watts
O mode: 0.0 watts
Power supply: Switching power supply
Input: 100 - 265V AC / 50 - 60Hz
Total weight preamplier: Approx. 3.25kg
Total weight power supply: Approx. 3.20kg
Dimensions preamplier (W/D/H): Approx. 240 x 160 x 65mm
Dimensions preamplier (W/D/H): Approx. 9.45 x 6.30 x 2.56 inches
Dimensions power supply (W/D/H): Approx. 240 x 160 x 65mm
Dimensions power supply (W/D/H): Approx. 9.45 x 6.30 x 2.56 inches
Manufacturer's warranty: 5 years*
* Provided that the warranty card is correctly completed and returned to Clearaudio, or your product is registered
online at https://clearaudio.de/en/service/registration.php, within 14 days of purchase.

User manual / Bedienungsanleitung
Made in Germany Page / Seite 9
Sehr geehrte clearaudio-Kundin, sehr geehrter clearaudio-Kunde,
Mit
absolute phono
präsentiert clearaudio die weltweit erste Aktivlösung für alle Moving-Coil-
Tonabnehmer (MC). Durch die Verstärkung des Schallplattensignals direkt an der Quelle, also am
Tonabnehmer, mit Hilfe einer Platine, verbessert sich das Rauschverhältnis (Signal-to-Noise-Ratio)
im gesamten Audiobereich um rund zehn Dezibel.
Die speziell für
absolute phono
entwickelte RIAA - Hauptverstärkerstufe ist mit zwei Paar-Ausgängen
bewusst puristisch konstruiert. Um sich gegenseitig nicht zu beeinussen, nutzen sowohl der balancierte
XLR-Ausgang als auch der unbalancierte RCA (Cinch)-Ausgang separate Hochpegel-Ausgangstreiber.
Im Signalweg gibt es keine den Klang sonst verschlechternde Relais und Koppelkondensatoren.
Mit der Auslagerung des Netzteils werden Netzeinstreuungen auf ein Minimum begrenzt. Ebenfalls
aus eigener Produktion stammen die selektierten clearaudio Silberglimmer-Kondensatoren. Diese
weisen den geringsten Verlustfaktor aus, sind nicht-magnetisch und benden sich genau dort, wo
sie für die Klangqualität entscheidend sind.
Für die leichte Bedienbarkeit ist die RIAA - Hauptverstärkerstufe gezielt mit nur einem blau
beleuchteten Multifunktionstaster ausgestattet. Mit ihm lassen sich „On“ und „O“ anwählen sowie
die Stummschaltung / Mute aktivieren.
Die
absolute phono
kann in alle gängigen clearaudio Tonarme werksseitig eingebaut werden.
Die Schaltung von
absolutephono
ist so ausgelegt, dass sie in Verbindung mit einem MC-Tonabnehmer
eines beliebigen Herstellers optimal funktioniert. Dies wird durch die gewählte „Stromverstärkung –
Schaltung“ gewährleistet. Dadurch entfällt die Notwendigkeit einen optimalen Abschlusswiderstand
bzw. eine Abschlusskapazität für ein MC-System einzustellen bzw. zu suchen. Der optimale
Betriebszustand wird immer automatisch eingestellt.
Clearaudio wünscht Ihnen viel Vergnügen mit dem vinylen Klanggenuss in Live-Qualität.

User manual / Bedienungsanleitung
Page / Seite 10 © clearaudio electronic GmbH, 2022-10
Sicherheitshinweise
1. Allgmeines
Überprüfen Sie das Gerät vor der Inbetriebnahme auf vorhandene Schäden.
Ist das Gerät beschädigt, sollten Sie es nicht am Stromnetz anschließen!
Schließen Sie auch niemals das Gerät an, wenn es heruntergefallen oder nass geworden ist,.
Kontaktieren Sie Ihren Händler, um das Gerät überprüfen zu lassen.
Setzen Sie das Gerät niemals Regen oder Feuchtigkeit aus.
Das Netzkabel des Gerätes niemals mit feuchten oder nassen Händen anfassen.
Die regelmäßige Sichtkontrolle einer eventuell defekten Isolierung der Anschlussleitung ist darüber
hinaus zu Ihrer eigenen Sicherheit empfehlenswert. Eine beschädigte Zuleitung sofort vom Fachmann
auswechseln lassen!
Ziehen Sie niemals am Netzkabel, um das Gerät auszustecken, sondern direkt am Stecker!
Das Innere des Gerätes ist wartungsfrei, önen Sie niemals das Gehäuse oder versuchen Sie das
Gerät selbst zu reparieren. Dies kann zudem zu Garantieverlust führen.
Wenn Sie das Gerät längere Zeit nicht betreiben, empfehlen wir, das Netzteil vom Stromnetz zu
trennen.
Nicht für Kinder geeignet! Lieferumfang kann verschluckbare Kleinteile enthalten.
2. Bestimmungsgemäßer Gebrauch
Die
absolute phono
ist ein Phonovorvestärker zur Verstärkung des Tonabnehmer-Signals.
Der bestimmungsgemäße Gebrauch der
absolute phono
ist die Verwendung in Übereinstimmung mit
den in der Bedienungsanleitung bereitgestellten Informationen.
Das Netzteil darf dabei nur mit den maximal zulässigen Anschlusswerten, gemäß den technischen
Daten betrieben werden. Nicht bestimmungsgemäß ist jegliche andere Verwendung oder die
Modizierung des Netzteils.
3. Aufstellungsort
Das Gerät sollte nur auf ebenen Untergründen aufgestellt werden.
Vermeiden Sie Aufstellungsorte mit direkter Sonneneinstrahlung, Temperaturschwankungen sowie
hohe Luftfeuchtigkeit. Ebenso sollten Sie Elektrogeräte nicht in der Nähe von Heizungen, Heizlampen
oder anderen Geräten platzieren die Wärme produzieren. Das Gerät ist für den Betrieb in beheizten
Räumen ausgelegt.
Blockieren Sie niemals die Lüftungsschlitze oder decken Sie das Gerät mit einem Tuch oder ähnlichen
ab.
Auf dem Gerät dürfen keine Gegenstände mit oener Flamme aufgestellt werde (brennende Kerzen
o.Ä.).

User manual / Bedienungsanleitung
Made in Germany Page / Seite 11
Phonovorverstärker sind Geräte mit einer hohen Signalverstärkung, da die Spannung die der
Tonabnehmer des Plattenspielers liefert sehr niedrig ist (im Bereich von einigen mV).
Aus diesem Grund werden auch hochfrequente Störsignale wahrnehmbar verstärkt.
Eine vollständige Abblockung dieser Störsignale im Gerät würde die Audioeigenschaften
verschlechtern. Das hat zur Folge, dass hochfrequente Störungen, zum Beispiel aus dem 230 V Netz
bzw. 115 V Netz, die Klangqualität beeinträchtigen könnte.
Das Gerät sollte daher nicht in der Nähe von hochfrequenzerzeugenden Geräten wie z.B. Mobiltelefonen
oder Modems bzw. an Stromnetzen die für Datenverkehr genutzt werden (PLC), betrieben werden.
4. Überlastung
Das Produkt ist so konstruiert, dass es alle nötigen Sicherheitsbestimmungen einhält, dennoch
sollten Sie das Gerät bei extremer Belastung nicht unbeaufsichtigt lassen.
5. Pege
Verwenden Sie zur Reinigung nur ein weiches Tuch mit glatter Oberäche bzw. einen weichen Pinsel.
Verwenden Sie auf keinen Fall aggressives Reinigungsmittel.
6. Gesundheitshinweise
Dauerhaft hohe Lautstärke kann zu diversen Schädigungen des Gehörs führen.
Gehen Sie verantwortungsbewusst mit hohen Lautstärken um!
7. Service
• Die
absolutephono
darf während der Garantiezeit nur vom Hersteller repariert werden, ansonsten
erlischt der Garantieanspruch. Der Service für alle clearaudio Produkte sollte ausschließlich
beim Fachhändler erfolgen.
• Sollte trotz des hohen Fertigungsstandards eine Reparatur erforderlich werden, muss die
clearaudio
absolute phono
über Ihren Fachhandel an clearaudio eingeschickt werden.
8. Transport
• Beim Transport der clearaudio
absolute phono
stets die Originalverpackung verwenden. Achten
Sie darauf, das Gerät genau so zu verpacken, wie es ausgeliefert wurde. Nur in originalverpacktem
Zustand ist ein sicherer Transport gewährleistet. Beim Verpacken umgekehrt verfahren, wie bei
dem Aufbau und der Inbetriebnahme beschrieben.
9. Entsorgung
Dieses Produkt darf nicht zusammen mit Restmüll entsorgt werden.
WEEE Reg.Nr.: DE26004446
10. CE-Markierung
Dieses Elektronikprodukt entspricht den gültigen Richtlinien zur Erlangung des CE-Zeichens.

User manual / Bedienungsanleitung
Page / Seite 12 © clearaudio electronic GmbH, 2022-10
1. Inbetriebnahme
Bitte vergewissern Sie sich, dass der Tonarm - der auf Ihrem Laufwerk montiert ist – mit dem
werksseitig von clearaudio vorinstallierten
absolute phono
– Headshell und dem Anschlusskabel
(clearaudio Direct Silverwire mit 8 hochexiblen Silberleitungen) mit dem speziellen clearaudio
9-Pin-Stecker ausgestattet ist.
Zu weiteren Inbetriebnahme betrachten Sie zuerst die Rückseite der clearaudio
absolute phono
.
Rückansicht:
Bitte gehen Sie nun wie folgt beschrieben vor:
1. Verbinden Sie den speziellen clearaudio 9-Pol-Stecker vom Tonarm an die Buchse mit der
Beschriftung „input amplier“ und schrauben Sie diesen mit beiden Befestigungsschreiben
fest. Bitte achten Sie darauf, dass die Schrauben korrekt festgezogen sind und der Stecker
somit fest angeschlossen ist.
2. Schließen Sie Ihr Chinch bzw. XLR-Kabel an die jeweiligen Ausgangsbuchsen (Output)
und verbinden Sie diese mit Ihrem Vor-Verstärker.
3. Verbinden Sie das mitgelieferte Netzteil mit der DC – Buchse (DC in 6V) und verbinden
diesen erst danach mit dem Netzanschluss.
4. Verbinden Sie die absolute phono mit dem Stromnetz und schalten Sie den Schalter auf
„I“.
Wichtig: Bitte beachten Sie, dass Sie nur Netzteile mit einer Spannung von 6 V
DC verwenden dürfen!
1
2 2
3
4
Abb. 1: Rückansicht

User manual / Bedienungsanleitung
Made in Germany Page / Seite 13
Betätigen Sie nun den an der Vorderseite bendlichen Taster mit einem leichten Druck.
Der blaue LED-Ring fängt hierbei das Blinken an (ca. 7mal) und leuchtet anschließend
dauerhaft blau.
Die clearaudio
absolute phono
ist nun spielbereit.
1.1. Mute – und On / O – Modus
Um in den Mute-Modus zu gelangen, tippen Sie den Fronttaster einmal kurz an. Nun blinkt der blaue
LED-Ring ununterbrochen und schnell.
Um wieder in den Spielbetrieb zurück zu gelangen, tippen Sie den Taster nochmals kurz an.
Der LED-Ring blinkt wieder dauerhaft.
Um die
absolute phono
abzuschalten, halten Sie den Taster etwas länger gedrückt. Zuerst blinkt der
LED-Ring schnell und wird dann langsamer bis das Licht erlischt.
5
Abb. 2: Frontansicht

User manual / Bedienungsanleitung
Page / Seite 14 © clearaudio electronic GmbH, 2022-10
2. Fehlerbehebung
Sollten Sie ein Problem mit Ihrer
absolute phono
haben, überprüfen Sie zuerst mögliche Ursachen,
um eine Fehlbedienung auszuschließen.
Sollte der Fehler weiterhin bestehen, wenden Sie sich bitte an Ihren Händler!
Versuchen Sie niemals das Gerät zu önen und/oder selbst zu reparieren, dies führt zu
Garantieverlust!
Fehler Ursache Maßnahme
Gerät funktioniert
nicht Ist das Netzkabel am Stromnetz
angeschlossen und der Netzschalter
aktiviert?
Überprüfen Sie den Anschluss.
Keine Tonwiedergabe
bzw. niedrige
Lautstärke
Haben Sie den richtigen Eingang gewählt? Überprüfen Sie die Verbindungen Ihrer
Kette.
Haben Sie die richtige Betriebsart gewählt? Überprüfen Sie die Einstellungen auf der
Unterseite der Phonovorstufe.
Bendet sich die das Gerät im „mute“
Modus bzw. ist die Lautstäkre zu gering
eingestellt?
Überprüfen Sie Lautstärkeeinstellung Ihres
Gerätes.
Die Verbindungskabel sind nicht
ordnungsgemäß angeschlossen.
Überprüfen Sie die Verbindungen des
Tonarms und des Tonabnehmers anhand
der jeweiligen Bedienungsanleitung.
Nur bei Geräten mit Kopfhörerausgang:
Ist der Kopfhörer noch eingesteckt während
Sie versuchen Musik über Lautsprecher
auszugeben?
Schließen Sie den Kopfhörer ab.
Brumm- oder
Störgeräusche
Das Massekabel ist nicht angeschlossen
oder fehlerhaft.
Verbinden Sie das Erdungskabel vom
Plattenspieler/Tonarm mit dem jeweiligen
Erdungsanschluss auf der Rückseite des
Gerätes.
Sollten mehrere Masseverbindungen
bestehen, so unterbrechen Sie diese
nacheinander und prüfen Sie erneut die
Tonqualität.
Das Gerät sollte daher nicht in der Nähe
von Hochfrequenzerzeugenden Geräten wie
z.B. Mobiltelefonen oder Modems bzw. an
Stromnetzen die für Datenverkehr genutzt
werden (PLC), betrieben werden.
Sorgen Sie für einen Mindestabstand von
30 cm zwischen Netzteilen jeglicher Bauart
und MC-Vorstufe bzw. Phono-Vorverstärker.
Powerlan-Adaptersolltennichtanderselben
Steckdose wie der Phono-Vorverstärker
betrieben werden.
Ein Kanal leiser oder
lauter
Die Kanäle eines Eingangs sind
unterschiedlich eingestellt.
Überprüfen Sie die Einstellungen auf der
Unterseite der Phonovorstufe. Diese müssen
für einen Eingang identisch vorgenommen
werden.
Fernbedienung
funktioniert nicht
Der Sensor an der Phonovorstufe ist
verdeckt. Stellen Sie keine anderen Gegenstände
vor die Phonovorstufe, diese könnten den
Empfang stören.
Sie benden sich außer Reichweite des
Empfängers.
Gehen Sie näher an das Gerät heran.
Die Batterie der Fernbedienung ist leer. Tauschen Sie die Batterie, wie in dieser
Anleitung beschrieben, aus.

User manual / Bedienungsanleitung
Made in Germany Page / Seite 15
3. Technische Daten
Modus: MC-Betrieb
Verstärkung bei 1 kHz: 60 dB
Eingangsimpedanz: 500 kΩ
Klirrfaktor: < 0,001 %
Signal/Rauschabstand: 90 dB (A)
Übersteuerungsfestigkeit: + 23 dB
Schneidekennlinien-Entzerrung: RIAA - Standard, Abweichung max. 0,1 dB
Kanaltrennung: 100 dB
Ausgangswiderstand: 64 Ω (symmetrisch XLR)
32 Ω (asymmetrisch CINCH)
Eingänge: D-Sub
Ausgänge: asymmetrisch (CINCH)
symmetrisch (XLR)
Leistungsaufnahme: Im Betrieb: 3,2 Watt
Ausgeschaltet: 0,0 Watt
Spannungsversorgung: Spannungsversorgung mit Schaltnetzteil
Eingang: 100 - 265 V AC / 50 - 60 Hz
Gewicht Vorstufe: ca. 3,25 kg
Gewicht Netztteil: ca. 3,20 kg
Abmessungen Vorstufe (B/T/H): ca. 240 x 160 x 65 mm
Abmessungen Netzteil (B/T/H): ca. 240 x 160 x 65 mm
Herstellergarantie: 5 Jahre*
* Nur bei korrekt ausgefüllter und eingesandter Garantiekarte an clearaudio oder online registrierter Garantie innerhalb
von 14 Tagen (https://clearaudio.de/de/service/registration.php).

User manual / Bedienungsanleitung
Page / Seite 16 © clearaudio electronic GmbH, 2022-10
The full, extended warranty period for the
absolute phono
is 5 years. To receive this full Clearaudio warranty,
you must either complete and return the relevant section of the warranty registration card to Clearaudio, or
register your product online at https://clearaudio.de/en/service/registration.php, within 14 days of purchase.
Otherwise only the legal warranty of 2 years can be considered.
The full 5 year warranty can only be honoured if the product is returned in its original packing.
Um die volle clearaudio Garantie (für
absolute phono
5 Jahre) in Anspruch nehmen zu können, senden
Sie uns bitte die beigelegte Garantiekarte innerhalb von zwei Wochen korrekt und vollständig ausgefüllt zu
oder registrieren Sie die Garantie online unter https://clearaudio.de/de/service/registration.php, da sonst
nur die gesetzliche Gewährleistung von 2 Jahren berücksichtigt werden kann. Nur wenn das Produkt in der
Originalverpackung zurückgeschickt wurde kann clearaudio die Garantiezeit von 5 Jahren gewährleisten.
ENGLISH
WARRANTY
For warranty information, contact your local Clearaudio distributor.
RETAIN YOUR PURCHASE RECEIPT
Your purchase receipt is your permanent record of a valuable purchase. It should be kept in a safe place to be referred
to as necessary for insurance purposes or when corresponding with Clearaudio.
IMPORTANT
When seeking warranty service, it is the responsibility of the consumer to establish proof and date of purchase.
Your purchase receipt or invoice is adequate for such proof.
FOR U.K. ONLY
This undertaking is in addition to a consumer‘s statutory rights and does not aect those rights in any way.
FRANÇAIS
GARANTIE
Pour des informations sur la garantie, contacter le distributeur local Clearaudio.
CONSERVER L‘ATTESTATION D‘ACHAT
L‘attestation d‘achat est la preuve permanente d‘un achat de valeur. La conserver en lieu sur pour s‘y reporter aux ns
d‘obtention d‘une couverture d‘assurance ou dansle cadre de correspondances avec Clearaudio.
IMPORTANT
Pour l‘obtention d‘un service couvert par la garantie, il incombe au client d‘établir la preuve de l‘achat et d‘en corroborer
la date. Le reçu ou la facture constituent des preuves susantes.
DEUTSCH
GARANTIE
Bei Garantiefragen wenden Sie sich bitte zunächst an Ihren Clearaudio Händler. Heben Sie Ihren Kaufbeleg gut auf.
WICHTIG!
Die Angaben auf Ihrer Quittung erlauben uns die Identizierung Ihres Gerätes und belegen mit dem Kaufdatum die
Dauer Ihrer Garantie-Ansprüche. Für Serviceleistungen benötigen wir stets die Gerätenummer. Diese nden Sie auf dem
Typenschild auf der Rückseite des Gerätes oder auch in der beigefügten Garantie-Registrierkarte.
NEDERLANDS
GARANTIE
Voor inlichtingen omtrent garantie dient u zich tot uw plaatselijke Clearaudio.
UW KWITANTIE, KASSABON E.D. BEWAREN
Uw kwitantie, kassabon e.d. vormen uw bewijs van aankoop van een waardevol artikel en dienen op een veilige plaats
bewaard te worden voor evt, verwijzing bijv, in verbend met verzekering of bij correspondentie met Clearaudio.
BELANGRIJK
Bij een evt, beroep op de garantie is het de verantwoordelijkheid van de consument een gedateerd bewijs van aankoop
te tonen. Uw kassabon of factuurzijn voldoende bewijs.

User manual / Bedienungsanleitung
Made in Germany Page / Seite 17
ITALIANO
GARANZIA
L’apparecchio è coperto da una garanzia di buon funzionamento della durata di un anno, o del periodo previsto dalla
legge, a partire dalla data di acquisto comprovata da un documento attestante il nominativo del Rivenditore e la data di
vendita. La garanzia sarà prestata con la sostituzione o la riparazione gratuita delle parti difettose.Non sono coperti da
garanzia difetti derivanti da uso improprio, errata installazione, manutenzione eettuata da personale non autorizzato
o, comunque, da circostanze che non possano riferirsi a difetti di funzionamento dell’apparecchio. Sono inoltre esclusi
dalla garanzia gli interventi inerenti l’installazione e l’allacciamento agli impianti di alimentazione.
Gli apparecchi verranno riparati presso i nostri Centri di Assistenza Autorizzati. Le spese ed i rischi di trasporto sono a
carico del cliente. La casa costruttrice declina ogni responsabilità per danni diretti o indiretti provocati dalla inosservanza
delle prescrizio-ni di installazione, uso e manutenzione dettagliate nel presente manuale o per guasti dovuti ad uso
continuato a ni professionali.
ESPAÑOL
GARANTIA
Para obtener información acerca de la garantia póngase en contacto con su distribuidor Clearaudio.
GUARDE SU RECIBO DE COMPRA
Su recibo de compra es su prueba permanente de haber adquirido un aparato de valor, Este recibo deberá guardarlo
en un lugar seguro y utilizarlo como referencia cuando tenga que hacer uso del seguro o se ponga en contacto con
Clearaudio.
IMPORTANTE
Cuando solicite el servicio otorgado por la garantia el usuario tiene la responsabilidad de demonstrar cuándo efectuó la
compra. En este caso, su recibo de compra será la prueba apropiada.

User manual / Bedienungsanleitung
Page / Seite 18 © clearaudio electronic GmbH, 2022-10

User manual / Bedienungsanleitung
Made in Germany Page / Seite 19

clearaudio electronic GmbH
Spardorfer Straße 150
91054 Erlangen
Germany
Phone /Tel.: +49 9131 40300 100
Fax: +49 9131 40300 119
www.clearaudio.de
www.analogshop.de
info@clearaudio.de
Handmade in Germany
Clearaudio Electronic accepts no liability for any misprints.
Technical specications are subject to change or improvement without prior notice.
Product availability is as long as stock lasts.
Copies and reprints of this document, including extracts, require written consent from
Clearaudio Electronic GmbH, Germany.
Änderungen bleiben vorbehalten. Lieferbar solange Vorrat reicht. Für Druckfehler keine Haftung.
Irrtümer vorbehalten- Kopien und Abdrucke – auch nur auszugsweise – bedürfen der schriftlichen
Genehmigung durch die clearaudio electronic GmbH.
2022
© clearaudio electronic GmbH, 2022-10 Made in Germany
Other manuals for Absolute phono
2
Table of contents
Languages:
Other Clearaudio Phono Stage manuals