Phasemation EA-300 User manual

Owner’s Manual
EA-300
PHONO AMPLIFIER


3
Table of Contents
Safety Instructions...................................................................................................4
Usage Cautions.......................................................................................................5
Care of Equipment...................................................................................................5
Names and Functions..................................................................................6, 7, 8
Connections...........................................................................................................9
Trouble Shooting Guide..........................................................................................10
User Support.......................................................................................................11
Specifications.........................................................................................................11
Thank you for purchasing Phasemation product.
Read your Owner’s Manual thoroughly for proper operation before starting to
use your equipment.
Please keep your Owner’s Manual with caution.

4
Safety Instructions
Before starting
to use
In this owner’s manual and on the product, various pictures are used
to show our customers how to use Phasemation EA-300 safely and
properly in order to avoid the loss of our customer’s assets and to
protect our customers from harm.
SAFETY PRECAUTIONS
CAUTION
RISK OF ELECTRIC SHOCK
DO NOT OPEN
CAUTION:
TO REDUCE THE RISK OF ELECTRIC SHOCK, DO NOT REMOVE COVER (OR BACK).
NO USER-SERVICEABLE PARTS INSIDE. REFER SERVICING TO QUALIFIED SERVICE
PERSONNEL.
The lightning flash with arrowhead symbol, within an equilateral triangle, is intended to alert
the user to the presence of uninsulated “dangerous voltage” within the product’s enclosure
that may be of sufficient magnitude to constitute a risk of electric shock to persons.
The exclamation point within an equilateral triangle is intended to alert the user to the
presence of important operating and maintenance (servicing) instructions in the literature
accompanying the appliance.
WARNING:
TO REDUCE THE RISK OF FIRE OR ELECTRIC SHOCK, DO NOT EXPOSE THIS
APPLIANCE TO RAIN OR MOISTURE.
IMPORTANT SAFETY INSTRUCTIONS
1. Read these instructions.
2. Keep these instructions.
3. Heed all warnings.
4. Follow all instructions.
5. Do not use this apparatus near water.
6. Clean only with dry cloth.
7. Do not block any ventilation openings.
Install in accordance with the manufacturer’s instructions.
8. not install near any heat sources such as radiators, heat registers, stoves, or other apparatus (including amplifiers)
that produce heat.
9. Protect the power cord from being walked on or pinched particularly at plugs, convenience receptacles, and the
point where they exit from the apparatus.
10. use attachments/accessories by the manufacturer.
11.
Use only with the cart, stand, tripod, bracket, or table specified
specified
by the manufacturer, or sold with
the apparatus. When a cart is used, use caution when moving the cart/apparatus combination to
avoid injury from tip-over.
12. Unplug this apparatus during lightning storms or when unused for long periods of time.
13. all servicing to servicequalified personnel. Servicing is required when the apparatus has
been damaged in any way, such as power-supply cord or plug is damaged, liquid has been spilled
or objects have fallen into the apparatus, the apparatus has been exposed to rain or moisture, does not operate
normally, or has been dropped.
14.
Do
Only
Refer
Batteries shall not be exposed to excessive heat such as sunshine, or thefire like.
5
Usage Cautions
Care of Equipment
If the equipment is covered with dust or dirt, clean it with a soft cloth.
If the equipment is very dirty, put detergent which is thinned very well with water on a soft
cloth. Wring the cloth and wipe off the dust and dirt. Then clean with a dry soft cloth.
Never use chemical agents such as thinner, naphtha or alcohol when cleaning it.
If any of them is attached to the equipment, the silk printing can be flaked or the surface can
lose metal luster.
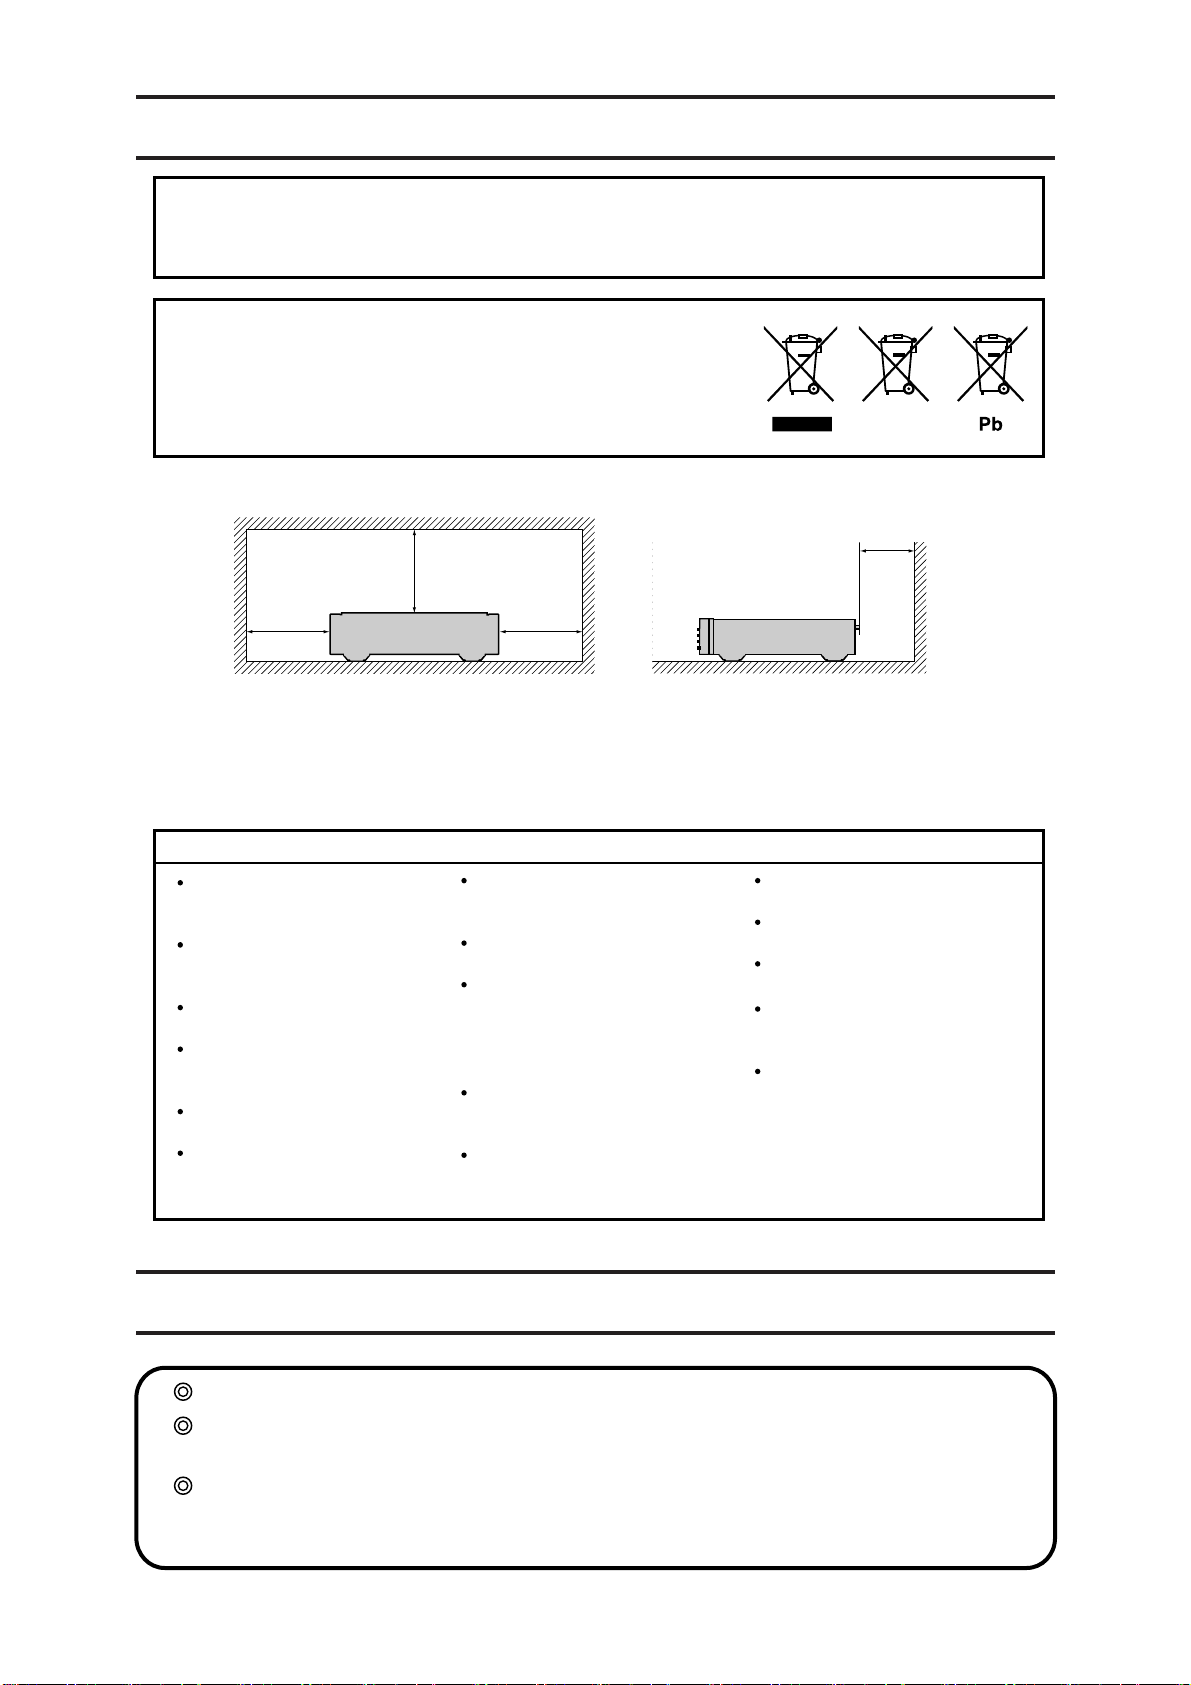
Cautions on installation
* *
*Wall
*
• More than 0.1 m is recommended.
• Do not place any other equipment on this unit.
* For proper heat dispersal, do not install this unit in a confined space,
such as a bookcase or similar enclosure.
CAUTION:
To completely disconnect this product from the mains, disconnect the plug from the wall socket outlet.
The mains plug is used to completely interrupt the power supply to the unit and must be within easy access by the user.
A NOTE ABOUT RECYCLING:
This product’s packaging materials are recyclable and can be reused. Please dispose of
any materials in accordance with the local recycling regulations.
When discarding the unit, comply with local rules or regulations.
This product and the supplied accessories constitute the applicable product
according to the WEEE directive.
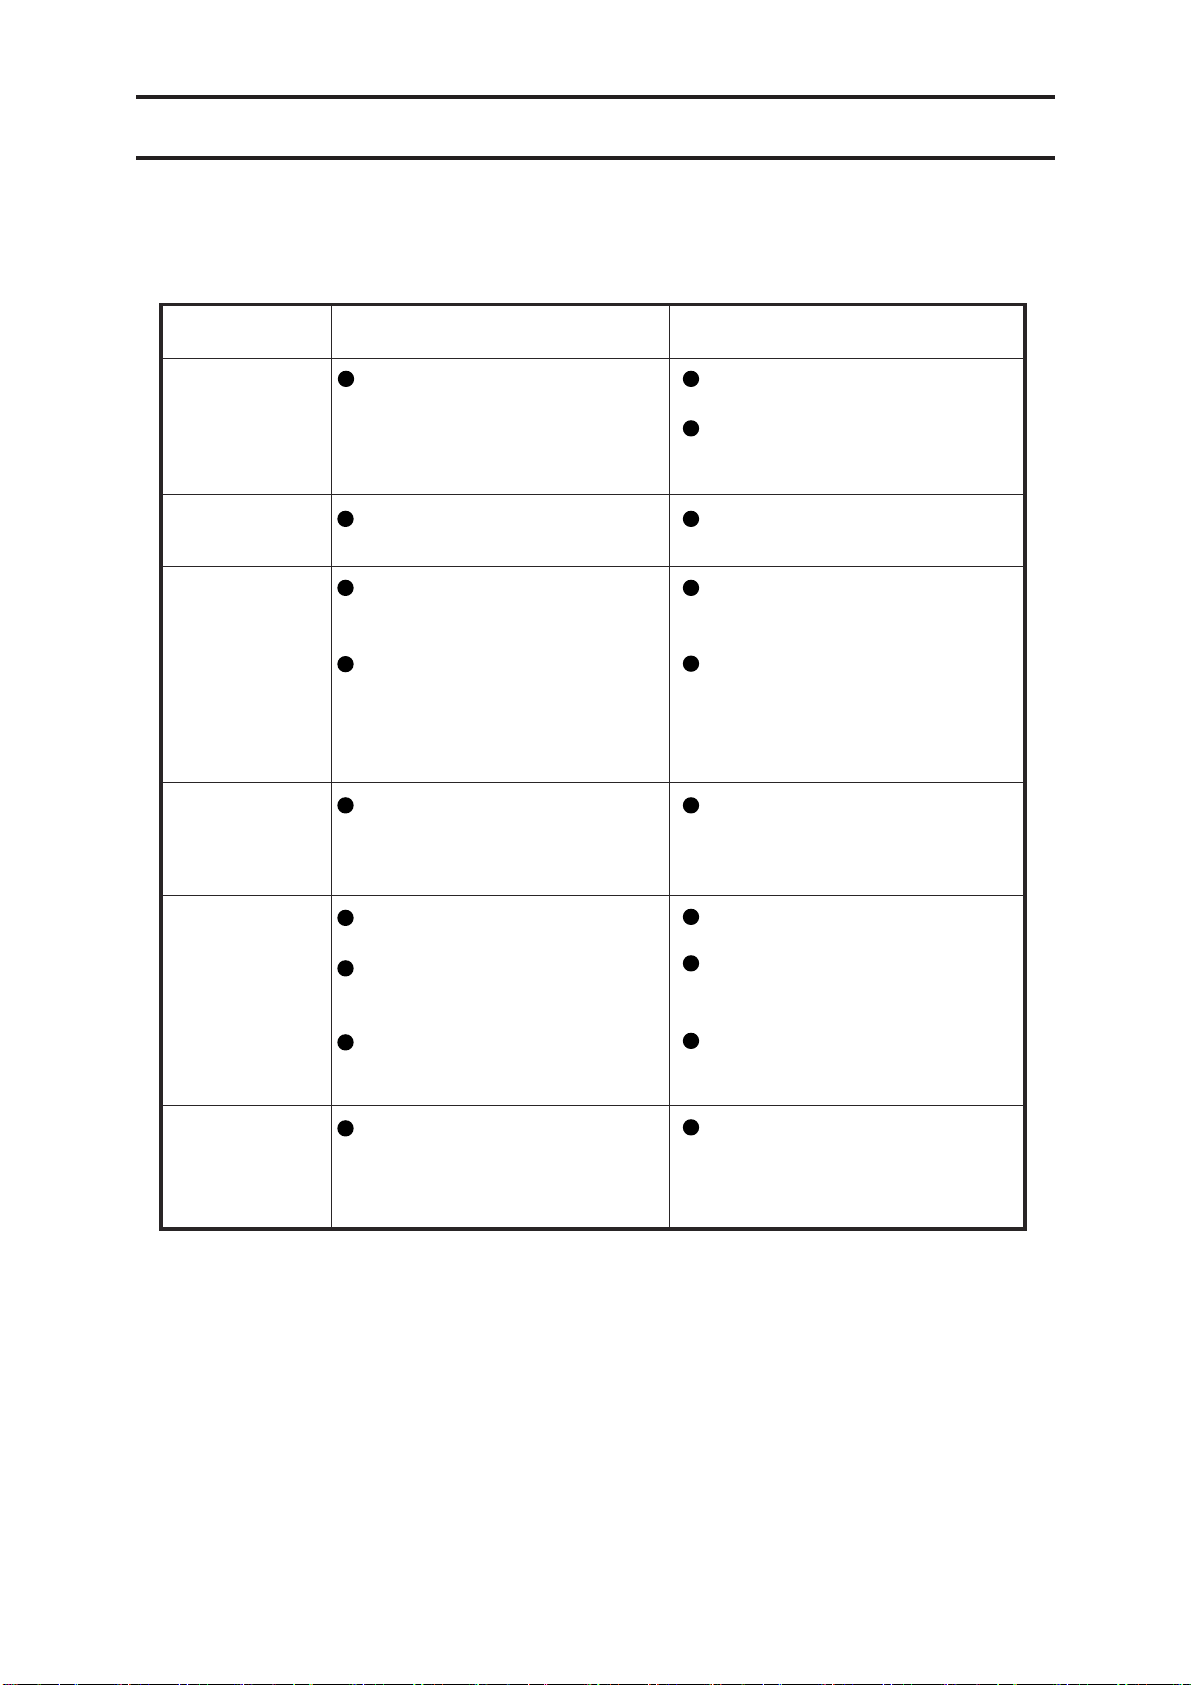
NOTE ON USE
WARNINGS
Avoid high temperatures.
Allow for sufficient heat dispersion
when installed in a rack.
Handle the power cord carefully.
Hold the plug when unplugging
the cord.
Keep the unit free from moisture,
water, and dust.
Unplug the power cord when not
using the unit for long periods
of time.
Do not obstruct the ventilation
holes.
Do not let foreign objects into
the unit.
Do not let insecticides, benzene,
and thinner come in contact with
the unit.
Never disassemble or modify the
unit in any way.
Ventilation should not be impeded
by covering the ventilation
openings with items, such as
newspapers, tablecloths or
curtains.
Naked flame sources such as
lighted candles should not be
placed on the unit.
Observe and follow local
regulations regarding battery
disposal.
Do not expose the unit to dripping
or splashing fluids.
Do not place objects filled with
liquids, such as vases, on the unit.
Do not handle the mains cord
with wet hands.
The equipment shall be installed
near the power supply so that the
power supply is easily accessible.
Do not keep the battery in a
place exposed to direct sunlight
or in places with extremely high
temperatures, such as near a
heater.

(1) (2) (7) (6) (5)(4) (3)
(1) POWER switch
The power supply can be turned on or off by pressing the POWER switch.
(2) POWER indicator
The POWER indicator lights up blue when the power supply is supplied.
The POWER indicator starts to flash immediately after turning the power on and it
keeps flashing until the circuits become stable operation; and an audio sound is not
outputted for the time.
(3) INPUT switch
The input signal can be selected by switching the INPUT switch between INPUT1 and
INPUT2.
(4) MODE switch
Set the MODE switch to the MC position when an MC cartridge is used.
Set it to the MM position for an MC cartridge outputting voltage more than 1.5mV.
Set it to the MM position when an MM cartridge is used.
Before switching it to MC or MM, the power supply must be turned off by pressing the
POWER switch or the volume of amplifier connected with the equipment must be
decreased.
(5) LOW CUT FILTER switch
When a bent record is played, an uncalled infrasonic signal which is not the audio
signal can be inputted to the phono amplifier, the diaphragms of speakers for low
frequency signal can be concussed, which can result in a risk of damaging the
speakers or distorting the sound.
In this case by switching this switch to “ON” position, the infrasonic signal can be
attenuated, which can weaken the above-described phenomenon.
Names and Functions
Front Panel

(6) PLAYBACK CURVE switch STEREO/MONO
• STEREO: RIAA curve for playing a stereo LP record
• MONO : MONO1 or MONO2 for playing a Monaural LP record
(7) PLAYBACK CURVE switch MONO1/MONO2
• MONO 1: Curve for playing a Monaural LP record
(For DECCA label and so on: FFRR)
• MONO 2: Curve for playing a Monaural LP record
(For Columbia label and so on)
Playback Equalizer Curve
Frequency
Playback Equalizer Curve Settings
Curve Turnover/Low limit Roll off
STEREO 500Hz/50Hz (+20dB) 75μs-2120Hz (–13.75dB at 10kHz)
MONO 1 500Hz/125Hz(+12 to12.5dB) 50μs-3000Hz (–10.5dB at 10kHz)
MONO 2 500Hz/100Hz(+14dB) 100μs-1590Hz (–16dB at 10kHz)
Note
A recording correction curve made by each label, which is not RIAA curve for
recording correction of uniform international standard, is applied for some LPs
pressed in the mid-1960. Two kinds of typical recording correction curves to
cope with this situation are adopted for this equipment.

Rear Panel
(8) (10) (9) (11)
(8) Phono Amplifier INPUT terminals
There are two systems, INPUT1 and INPUT2 for the input terminals.
Connect respective L and R wires from an analogue disc player.
(9) Phono Amplifier OUTPUT terminals
Connect the L and R OUTPUT terminals to input-terminals of equipment requiring line
level (150 to 250mV) such as AUX terminals of pre-amplifier.
(10) GND Terminal
Connect an earth cable from analogue disc player with the GND terminal.
(11) AC INLET
Connect the AC power cable of accessories to the AC INLET, and plug it in an outlet.
Caution
The L and R OUTPUT terminals must not be connected to input-terminals of
pre-amplifier having a built-in phono amplifier. Because the excessive current
will be generated, an audio sound will be distorted.
9W

9
Connections
Long slot
Side assigning
the circle
Circle
A circle is assigned on the one side of the plug
of AC power cable so that better quality sound
is reproduced by matching the power supply
polarity with other equipment.
This polarity may be different because of
house wiring for outlet or because of power
supply condition; however, generally the side
assigning the circle should be inserted to the
long slot of the outlet.
Plugging the plug of AC power cable in an outlet
AC Power Cable of Accessories
Pre-amplifier
Analogue Disc Player
Earth Cable
9W
10
Trouble Shooting Guide
Trouble Causes Measures
The power is not
supplied.
In case the equipment does not operate properly, check out the followings.
If it does not operate properly even after checking the advised points, endure to
disconnect the AC plug from the outlet and then contact the dealer.
The sound is not
heard.
Hum noise is
heard.
Sound is not
heard immediately
after turning the
power on.
Sound is
distorted.
When operating
the function
switch, the click
noise is heard.
The plug of AC power cable is
not plugged in completely.
The audio wires are not plugged
in completely.
The OUTPUT terminals of this
equipment are connected to the
input terminals for a phono
amplifier on the panel of the
pre-amplifier.
An MM cartridge is used, but the
MODE switch is set to MC1 or
MC2.
Some click tone is generated
because of switch principle.
Sound is not outputted until the
circuits become stable operation.
The audio wires are not plugged
in completely.
The earth cable from the
analogue disc player is not
connected.
A power supply transformer or
motor in other equipment is
installed near this equipment.
Insert the plug of AC cable into an
outlet firmly.
Firmly insert the outlet of AC
power cable into the AC inlet of
Power equipment.
Insert the audio wires completely.
Set the MODE switch to MM.
Before operating the switches, turn
the power of this equipment to
OFF or decrease volume of the
connected amplifier.
Please wait till the power indicator
will change from flashing to
lighting up.
Insert the audio wires completely.
Connect the earth cable com-
pletely.
Place this equipment apart from
the power supply transformer or
motor of other equipment.
Connect them to line level input
terminals (such as AUX) of pre-
amplifier.
Other manuals for EA-300
1
Table of contents
Other Phasemation Phono Stage manuals

Popular Phono Stage manuals by other brands

ANK
ANK L5 Construction manual

Musical Fidelity
Musical Fidelity M3X VINYL instruction manual

Pro-Ject Audio Systems
Pro-Ject Audio Systems Phono Box S3 B Instructions for use

Lehmannaudio
Lehmannaudio Black Cube Statement manual

T+A
T+A R 2000 Series user manual

Caledonian Audio
Caledonian Audio Phono Classique Assembly manual

Clearaudio
Clearaudio Absolute phono user manual

DSA
DSA Phono III user manual

Well Tempered Lab
Well Tempered Lab RIAA instruction manual

Pro-Ject Audio Systems
Pro-Ject Audio Systems Box Design Tube Box DS2 Instructions for use

Cary Audio Design
Cary Audio Design VT-500 owner's manual

ALLNIC AUDIO
ALLNIC AUDIO H-3000V owner's manual


