ClearVoice 50 User manual
THE FEATURE ORIENTED PHONE SYSTEM
FOR EVERY HOME
With exclusive Emergency Help System
you can Call-4-Help with a press of a button
Hear who is calling
before you decide to answer an incoming phone call*
Answer your phone and speak hands-free
even if you can’t get to the phone**
USER MANUAL ClearVoice 50™
ClearVoice 100™
ClearVoice 200™
1
4
GHI
7
PQRS
ABC
2
JKL
5
8
TUV
0
3
DEF
6
MNO
9
WXYZ
#
MENU
2
FLASH
HOLD
REDIAL
SPEAKER
LOUD
EXIT
A Quality Of Life Product
TM
CLIP
LOUD LOW
HANDSET
CALL
BACK
DELETE SCROLL
CALL#
AM
PM
CLIP
NEW
REPEAT
VOICE
Consumer Helpline 1-888-558-7420

1
TABLE OF CONTENTS
Important Safety Instructions ...........................................................................................................2
Safety Instruction for Batteries .........................................................................................................2
Installation Instructions .....................................................................................................................2
Important Notes ..................................................................................................................................3
FCC Wants You to Know.....................................................................................................................3
Service ................................................................................................................................................4
General Information ...........................................................................................................................4
AboutYour Unit...................................................................................................................................4
Location of Controls ..........................................................................................................................5
Installation ..........................................................................................................................................6
Where to install this feature-oriented telephone / Installing batteries / To replace the battery of
the remote pendant: ClearVoice 100™ and ClearVoice 200™ / Choose your location / Connecting
the ClearVoice 50, 100 or 200 / Wall Mounting
Special highlight Features.................................................................................................................8
Setting Up to Use All the Features of Your Unit ...............................................................................9
Setting the language / Setting the LCD contrast / Setting the TIME and DATE / Setting the
Tone/Pulse / Setting the Ringer Tone / Setting the Voice ON/OFF / Ringer Volume Control /
Handset Volume Control/Tone Receiving Adjustment
Using the Telephone.........................................................................................................................12
Dialling a Call / Pre Dialing a Call / Receiving a Call / Speaker Volume Control / Redial /
Pause / Hold / Flash / Hearing Aid Compatibility / Important Features of your telephone /
Phone Book / Storing up to 30 telephone numbers in the phone book including emergency nos.
to be called in an emergency / To review the Phone Book Memory / To dial the displayed
telephone number of Phone Book Memory / Recording/Editing/Deleting voice prompt of name
of phone book / To Edit the Phone Book Memory / To Delete the Phone Book Memory
Emergency Features ........................................................................................................................17
Emergency Help System / Emergency Message / Phone Book (Emergency Nos.) / To review
the Phone Book Memory / To dial and check a displayed emergency telephone number from the
Phone Book Memory / Recording/Editing/Deleting voice prompt of name of phone book / To
Edit the Phone Book Memory / To Delete the Phone Book Memory / To Store Numbers hotkey
and / To activate the Emergency Help System / Important Information about EmergencyHelp
System / Checking the Range of the Dual Wireless Help Pendant (CV 112)
The Caller ID .....................................................................................................................................24
Receiving a Call (the telephone can store up to 64 calls) / Viewing the Caller ID Memory / Erase
the Caller ID Memory / Call Back (Redial) from the Caller ID Memory / Copy from the Caller ID
to the Phone Book / Important Review
In Case of Difficulty ..........................................................................................................................26
Limited Ninety-Day Warranty ...........................................................................................................27

2
IMPORTANT SAFETY INSTRUCTIONS
When using your telephone equipment, basic safety precautions should always be followed to reduce
the risk of fire, electric shock and injury to persons, including the following:
1. Do not use this product near water, for example, near a bath tub, wash bowl, kitchen sink or laundry
tub, in a wet basement or near a swimming pool.
2. Avoid using a telephone (other than a cordless type) during an electrical storm. There may be a
remote risk of electric shock from lightning.
3. Do not use the telephone to report a gas leak in the vicinity of the leak.
4. Use only the power cord and batteries indicated in this manual. Do not dispose of batteries in a fire.
They may explode. Check with local codes for possible special disposal instructions.
5. Plug the adaptor to the socket-outlet that near the equipment and shall be easily accessible.
SAVE THESE INSTRUCTIONS
SAFETY INSTRUCTION FOR BATTERIES
CAUTION:
TO REDUCE THE RISK OF FIRE OR INJURY TO PERSONS, READ AND FOLLOW THESE
INSTRUCTIONS.
1. Use only 4 x AA alkaline battery. Pendant uses a 12V alkaline battery.
2. Do not dispose of the batteries in a fire. The cell may explode. Check with local codes for possible
special disposal instructions.
3. Do not open or mutilate the battery. Released electrolyte is corrosive and may cause damage to the
eyes or skin. It may be toxic if swallowed.
4. Exercise care in handling battery in order not to short the battery with conduction materials such as
rings, bracelets and keys. The battery or conductors may overheat and cause burns.
5. Do not attempt to recharge the battery identified for use with this product. The battery may leak
corrosive electrolyte or explode.
6. Do not attempt to rejuvenate the battery identified for use with this product by heating them. Sudden
release of the battery electrolyte may occur causing burns or irritation to eyes or skin.
7. When inserting battery into this product, the proper polarity or direction must be observed. Reverse
insertion of the battery can cause charging, and that may result in leakage or explosion.
8. Remove the battery from this product if the product will not be used for a long period of time (several
months or more) since during this time the battery could leak in the product.
9. Discard “dead” battery as soon as possible since “dead” battery are more likely to leak in a product.
10. Do not store this product, or the battery identified for use with this product, in high-temperature
areas. A battery that is stored in a freezer or refrigerator for the purpose of extending shelf like
should be protected from condensation during storage and defrosting.The battery should be stabilized
at room temperature prior to use after cold storage.
SAVE THESE INSTRUCTIONS
INSTALLATION INSTRUCTIONS
1. Never install telephone wiring during a lightning storm.
2. Never install telephone jacks in wet locations unless the jack is specifically designed for wet locations.
3. Never touch uninsulated telephone wires or terminals unless the telephone line has been disconnected
at the network interface.
4. Use caution when installing or modifying telephone lines.
NOTE: Refer to “FCC Wants You To Know” section before connection to telephone.

3
IMPORTANT NOTES
• The telephone portion of your dialer/message console has been tested and found to comply with
all applicable UL and FCC standards.
• This product is not a security system or an emergency service device.
• The manufacturer makes no claim as to the suitability of this product to perform as a life-saving
device. See section marked LIMITED NINETY DAY WARRANTY for full warranty conditions.
• The unit will not work through a switchboard,some phone systems that don’t always supply a
standard dial tone or phone systems that require a delay, (for example, some systems where you
must dial a number to get an outside line). For more information, call 1-888-558-7420.
FCC WANTS YOU TO KNOW
This equipment complies with Part 68 of the FCC rules and the requirements adopted by the ACTA. On
the bottom of this equipment is a label that contains, among other information, a product identifier in the
format US:AAAEQ##TXXXX. If requested, this number must be provided to the telephone company.
An applicable certification jacks Universal Service Order Codes (USOC) for the equipment is provided
(i.e., RJ11C) in the packaging with each piece of approved terminal equipment
The REN is useful to determine the quantity of devices you may connect to your telephone line and still
have all of those devices ring when your telephone number is called. In most, but not all areas, the sum
of the REN’s of all devices connected to one line should not exceed five (5.0). To be certain of the
number of devices you may connect to your line, as determined by the REN, you should contact your
local telephone company to determine the maximum REN for your calling area.
If your telephone equipment causes harm to the telephone network, the telephone company may
discontinue your service temporarily. If possible, they will notify you in advance. But if advance notice
isn’t practical, you will be notified as soon as possible.You will be informed of your right to file a complaint
with the FCC.
Your telephone company may make changes in its facilities, equipment, operations or procedures that
could affect the proper functioning of your equipment. If they do, you will be notified in advance to give
you an opportunity to maintain uninterrupted telephone service. If you experience trouble with this
telephone equipment, disconnect from the network until the problem has been corrected or until you
are sure that the equipment is not malfunctioning.
This equipment may not be used on coin service provided by the telephone company. Connection to
party lines is subject to state tariffs
Warning: Changes or modifications to this unit not expressly approved by the party responsible for
compliance could void the user’s authority to operate the equipment.
NOTE: This equipment has been tested and found to comply with the limits for a Class B digital device,
pursuant to Part 15 of the FCC Rules. These limits are designed to provide reasonable protection
against harmful interference in a residential installation. Some telephone equipment operate at
frequencies that may cause interference to nearby TV’s and VCR’s; to minimize or prevent such
interference, the base of telephone equipment should not be placed near or on top of a TV or VCR; and,
if interference is experienced, moving the telephone equipment farther away from the TV or VCR will
often reduce or eliminate the interference. However there is no guarantee that interference will not
occur in a particular installation. If this equipment does cause harmful interference to radio or television
reception, which can be determined by turning the equipment off and on, the user is encouraged to try
to correct the interference by one or more of the following measures:
• Reorient or relocate the receiving antenna.
• Increase the separation between the equipment and receiver.
• Connect the equipment into an outlet on a circuit different from that to which the receiver is
connected.

4
• Consult the dealer or an experienced radio TV technician for help.
a) A plug and jack used to connect this equipment to the premises wiring and telephone network must
comply with the applicable FCC Part 68 rules and requirements adopted by the ACTA. A compliant
telephone cord and modular plug is provided with this product. It is designed to be connected to a
compatible modular jack that is also compliant. See installation instructions for details.
b) NOTICE: If your home has specially wired alarm equipment connected to the telephone line, ensure
the installation of this telephone does not disable your alarm equipment. If you have questions about
what will disable alarm equipment, consult your telephone company or a qualified installer.
Telemergency Ltd.
200-16B2 13th Avenue
Ronkonkoma, N.Y. 11779
Telephone: (631) 467-6700
SERVICE
According to FCC regulations, this equipment, which has been certified and registered by the FCC,
may only be repaired by authorized persons. If repairs or adjustments are made by an unauthorized
person, the FCC certification may be voided. Should you encounter any problems, please call the toll-
free Consumer Helpline for assistance:
1-888-558-7420, 9:00 am - 4:30 pm (E.S.T.)
Any Questions?
STOP...don't take unit back to the store.
Call our toll-free number... 1-888-558-7420
Listen as our experts talk you through the problem
GENERAL INFORMATION
UNPACKING
This package contains:
• ClearVoice 50, 100 or 200
• Accessory: Wireless remote pendant CV111 (for ClearVoice 100™ only)
• Accessory: Wireless dual remote pendant CV112 ( for ClearVoice 200™ only)
• One Quick Instruction Guide
• One AC Adaptor
• One modular Line Cord
• User Manual/Warranty Information
If anything is missing or damaged, contact us at 1-888-558-7420. keep the package to transport unit.
For your reference keep a record of date of purchase and code number on the pendant. Please keep
the sales receipt for warranty reference.
Date of Purchase_______________________________
ABOUT YOUR UNIT
ClearVoice 50, 100 and 200 can be used as a standard telephone, dial a number from memory, dial a
number from its phone book, can let you listen to who is calling you if you have Caller ID service, use as
a standard speakerphone, use to Call-4-Help in an emergency, can be used as a speakerphone remotely
(optional on ClearVoice 50) even if you cant get to the phone plus much more. ClearVoice Models
50,100 and 200 can even offer full usage of these features for up to 12 hours of power failure(s).

5
1
4
GHI
7
PQRS
ABC
2
JKL
5
8
TUV
0
3
DEF
6
MNO
9
WXYZ
#
MENU
2
FLASH
HOLD
REDIAL
SPEAKER
LOUD
EXIT
A Quality Of Life Product
TM
CLIP
LOW LOUD
HANDSET
CALL
BACK
DELETE SCROLL
CALL#
AM
PM
CLIP
NEW
REPEAT
VOICE
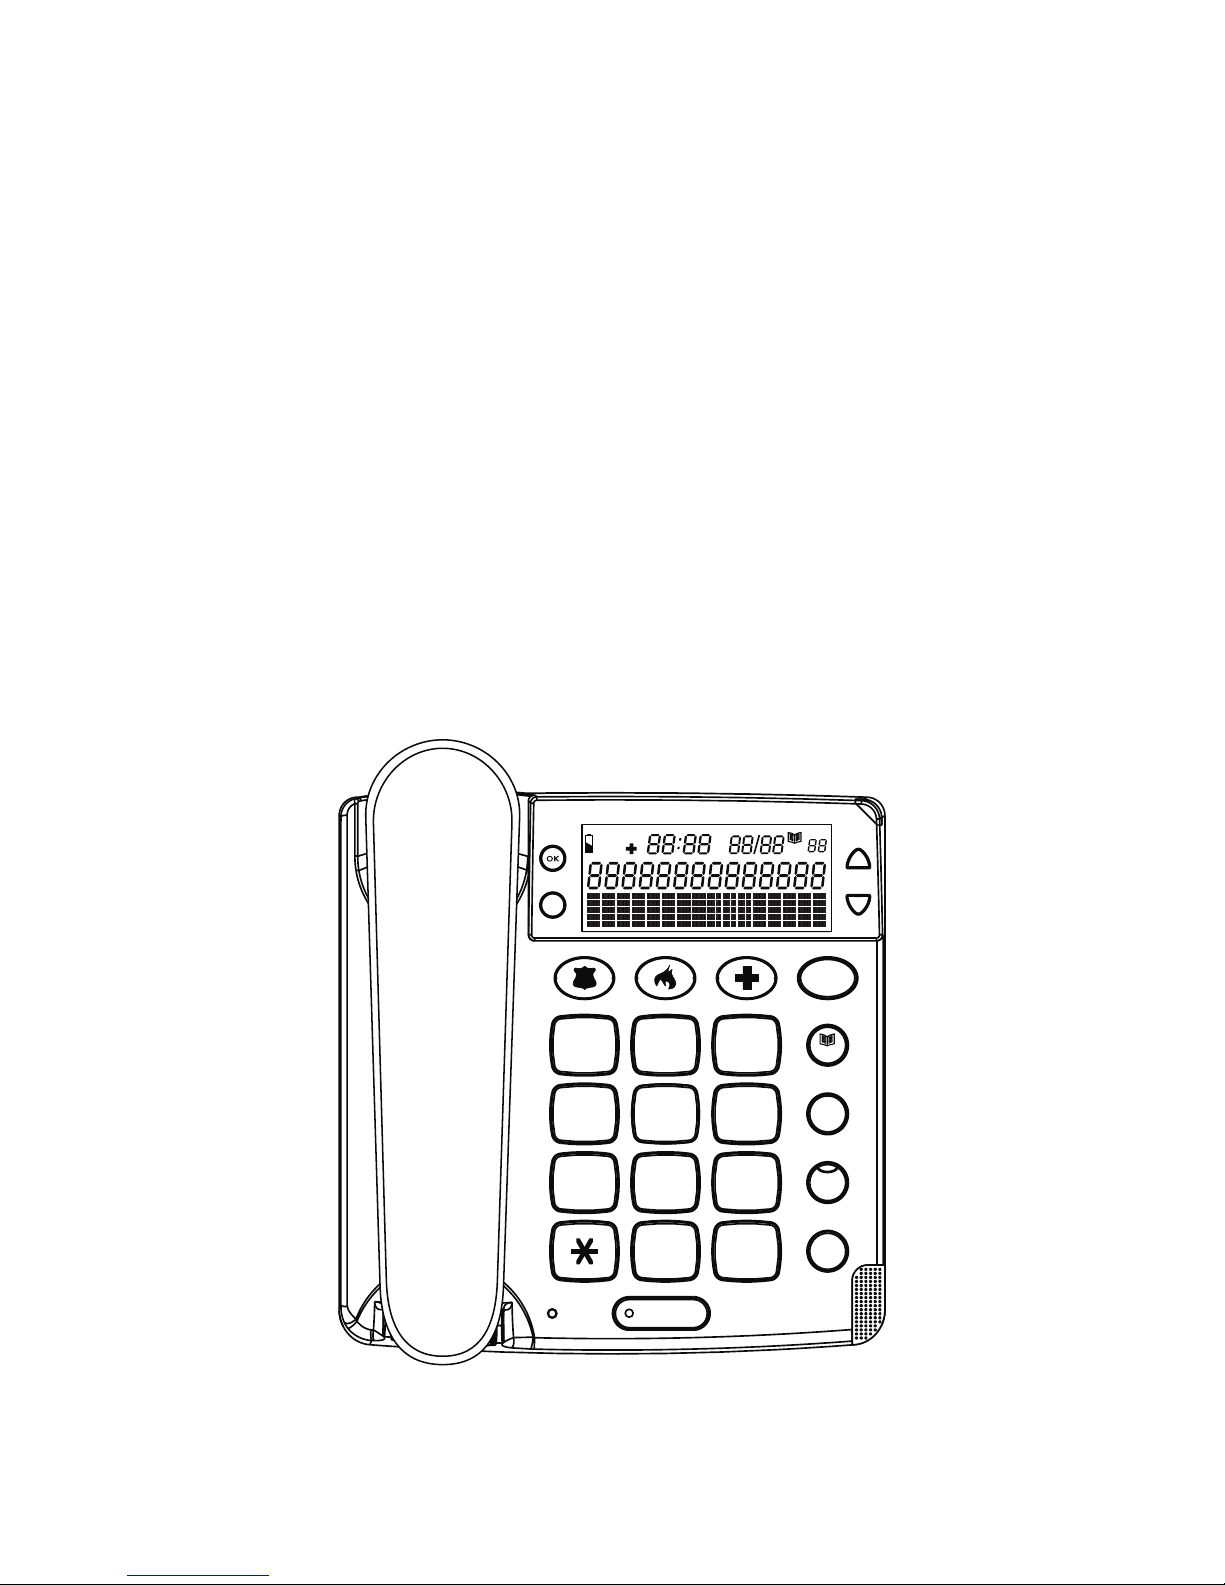
LOCATION OF CONTROLS
1. button
2. CALL BACK / OK button
3. DELETE button
4. Handset Holder
5. button
6. Speaker
7. Handset volume control
8. Dial keypad
9. Loud LED
10. Display
11. New Call LED
12. button
13. button
14. Ringer Hi/Mid/Lo switch
15. button
16. MENU button
17. Tone Hi/Lo switch
18. button
19. FLASH button
20. switch
21. HOLD button
22. REDIAL button
23. Ringer LED
24. SPEAKER button with LED
25. Pendant button
26. Pendant LED
OPTIONAL PENDANT
1
2
3
5
6
7
8
9
10
11
12
13
14
15
16
17
18
19
20
21
22
23
24
4
25
26

6
INSTALLATION
Where to install this feature-oriented telephone
When installing this feature-oriented telephone, consider that the unit should be placed in an area of
common use during the day and night time.
ClearVoice 200™ users should locate the phone within 10-15 feet line of sight from where user spends
a lot of time. The remote pick-up can be from a distance far greater than the 10-15 feet. This allows
users the remote speakerphone features of the unit plus remote activation of the Emergency Help
System™, for those who may not easily get to the telephone or are concerned with falling.
ClearVoice 100™ users should locate the phone within 10-15 feet from where they spend a lot of time.
This allows them to use the remote speakerphone features of the unit. ClearVoice 100™ users can
purchase the remote activation of the Telemergency Emergency Help System by calling the consumer
helpline @ 1-888 558-7420.
ClearVoice 50™ can purchase an optional accessory to include the remote features of each these units
remotely by calling the Consumer Helpline 1 888 558 7420.
Installing batteries
Your telephone requires four AA batteries (not supplied) if you wish to utilize all features during power
failures. During power failures, full functionality of the telephone is maintained for a total of a maximum
of 12 hours total power failure time. If you do not have batteries installed the basic phone function of
calling out and receiving a call can still be used.
Note: The telephone numbers in memory and the voice recordings are stored in non-volatile flash
memory which do not require battery backup.
Before opening the battery compartment, make sure the telephone is disconnected from the telephone
line and the 120V AC Adaptor is disconnected from the unit.
1. Use a flat-blade screwdriver to lift the battery compartment door.
2. Insert four AA alkaline batteries into the compartment as indicated by the polarity symbols.
3. Snap the battery compartment door back into place.
Note: If appears on the display or the display dims, replace the batteries with 4 new alkaline AA
batteries to assure maximum power failure time.
To replace the battery of the remote pendant: ClearVoice 100™ and ClearVoice
200™
The pendant is equipped with a pre-installed internal battery.
1. Use a screwdriver to remove the screw on the lower case of the pendant and remove the lower case.
2. Replace the 12V DC Alkaline battery with a fresh one.
3. Replace the lower case and secure it with the screw.
4. It is important that full functionality be checked out after replacing battery.

7
Choose your location
Your ClearVoice 50,100 or 200 must be placed on a hard surface and connected to both the telephone
wall jack and an AC power source. Allow at least one inch to the rear and four inches above the unit for
ventilation. If you have a ClearVoice 100 or 200, we suggest you locate it in a location within 10 feet of
where user spends much of his time.
For users of ClearVoice 100 or 200: You can activate the speakerphone on an incoming call of the
ClearVoice 100 or 200 remotely. You can typically speak form up to 10-15 feet from the phone which
should be in direct line of sight. Speaking louder can allow you to speak up to 20 feet, line of sight.
For users of ClearVoice 200: The ClearVoice 200 is supplied with a dual pendant which can activate the
speakerphone, but also can activate the emergency mode from a distance of up to 80 feet. This range
may be reduced by structural or environmental conditions.
For users of ClearVoice 50 and 100: You can purchase accessory(s) which can activate both the
speakerphone for incoming calls as well as activating the Emergency Help System.
To retain full operation of ClearVoice 50, 100 and 200, during power failures insert 4 AA batteries (not
included) into the battery compartment located at bottom of unit.You may do this by simply disconnecting
the AC adaptor from the power source, then removing the battery cover, connecting the batteries and
replacing the cover. Then immediately connect AC Adaptor to AC outlet to assure battery life is not
being affected. Note: The AA batteries should be alkaline.
Connecting the ClearVoice 50, 100 or 200:
1. A. Plug one end of the supplied telephone cord into the jack labeled TEL LINE located at the back of
the unit.
B. Plug the other end of the supplied modular cord into the telephone wall jack.
2. A. Plug the supplied power cord of the AC Adaptor into the jack labeled DC9V 200ma located on the
back of the unit.
B. Plug the other end of the power cord into an electrical outlet not controlled by a wall switch.
Wall Mounting
On a Wall Phone Plate
1. Press and lift out the handset holder. Rotate it 180°, and snap it into place so it will hold the handset
in place when the phone is mounted on the wall.
2. Insert the mounting bracket’s two tabs into the matching slots opposite the keyhole slot on the underside
phone’s base. Then press down and slide the bracket upward until the tabs snap into place.
3. Plug one end of the supplied short modular cord into the LINE jack at the back of the base.
4. Plug the cord’s other end into the wall plate jack, then align the base’s keyhole slots with the wall
plate studs and slide the phone downward to secure it.
On a Wall Without a Plate
To mount the phone directly on a wall, in addition to the preceding steps, you need two screws (not
supplied) with heads that fit into the keyhole slot on the bottom of the base.
1. Drill two holes 83mm apart (vertically). Then thread a screw into each hole, letting the heads extend
about 5mm from the wall.
2. Substitute the long modular cord for the short cord.

8
SPECIAL HIGHLIGHT FEATURES
The Phone that can tell you who is calling
The Phone that can answer a call remotely (ClearVoice 100 and 200 only)
The Phone that can get you emergency help with a press of a button
Talking Caller ID* – allows user to hear # calling or name
Remote Pickup** (Clearvoice 100 and 200) – allows user to answer incoming call remotely
Remote Speakerphone** (ClearVoice 100 and 200) – allows user to speak hands-free remotely up to
20 feet
Emergency Help System (EHS) – with a press of a button on unit can call emergency #s you entered.
Remote activation of Emergency Help System (EHS)***– CV112 pendant can activate the EHS from
a distance of up to 100 feet depending upon structural and environmental conditions
LCD display – shows last 64 nos. called, time and date and prompts to simplify usage
Voice Clarity (Amplified/tone control) – handset volume/tone adjust to improve clarity of call for
hearing impaired
Amplified Ringer – loud ringer
Phone Book memory – holds up to 30 telephone numbers in phone book memory..for general/important
#s and getting emergency help,
Big Button keypad – for easy dialing (for easy dialing and for those having difficulty seeing or using the
keypad). Hear the telephone digits being entered.
Easy to Use – Voice Prompts for easy programming.
*Caller ID service required **CV111 or CV112 pendant required ***CV112 pendant required

9
Please read this section prior to using the important features of your ClearVoice
50,100 or 200.
Symbols you should know:
OK is also used for CALL BACK
MENUis also used for EDIT
CLIP is also used for EXIT
SETTING UP TO USE ALL THE FEATURES OF YOUR UNIT
Note: Your unit has many VOICE PROMPTS to assist you
The following features can use Voice Prompts or prompts on the LCD display on your unit
Setting the LCD contrast
Setting the Time and Date
Settings for Tone /Pulse operation- preset to tone
Setting the Ringer Melody (select the type of sound of the Ringer)
Setting the language (English or Spanish)-preset to English
Setting the Voice ON/OFF (preset to Voice)
Ringer Volume Control
Handset Volume Control
Lets get started:
Important: In setting the following criteria, if there is a delay in programming a specific feature of more
than 60 seconds, your unit will reset. In that event please re-enter the section you are entering.
Setting the language
Note:This unit has a voice menu as well as a prerecorded emergency message that can display and/or
speak its messages in English or Spanish. Your unit is set to English. Skip this section if you wish to
continue usage in English by pressing EXIT button.
This telephone is able to write on the LCD and to give you a voice guide in two different languages. By
selecting the language the user will automatically select both the voice and the written LCD language.
1. Press and release the MENU button until LANGUAGE is shown.
2. Press the OK button, the display shows ENGLISH (for example)
3. Select the desired language using the or and confirm with OK button. Unit will say Language.
4. Press (Exit) button to exit this set-up mode.
Setting the LCD contrast (If LCD contrast is OK, press Exit button)
Depending on the viewing angle of the telephone, the user may want to adjust the LCD contrast:
1. Press and release the MENU button.The display shows LCD CONTRAST.
2. Press the OK button (located upper front left. The display shows the current contrast setting with
values between 1 and 5.
3. Press or (upper front right) and scroll until desired contrast to select the contrast level confirm
with OK button again. Unit will say TIME/DATE
4. Press (Exit) button to exit this set-up mode.

10
Setting the TIME and DATE
1. Press and release the MENU button until TIME/DATE is shown.
2. Press the OK button. The display shows ENTER TIME and the hour digit is flashing.
3. Select the current hour using the or and scroll to the present hour and confirm with OK button.
The minutes will now flash in the display.
4. Select the required minutes using the or and scroll to the present minute
Press the OK button.
The display now shows ENTER DATE and the month digit is flashing. .
5. Select the current month using the or and scroll to the present month and confirm with OK
button. The day will now flash in the display.
6. Select the current day using the or and scroll to the present date. Confirm with OK button. Unit
will say STORE NO. TO PHONE BOOK
7. Press (Exit) button to exit this set-up mode.
Important: If you have subscribed to Caller ID service, please note that some telecom providers, when
sending the Caller ID signal also send the time and date. In this case the telephone will automatically
set its internal clock.
Setting the Tone/Pulse
Important: Your unit is already preset to TONE. If you have a tone dialing phone and tone dialing
service, skip this step by pressing the Exit button.) If you have a rotary dialing system in your home,
follow these instructions.
1. Press and release the MENU button until TONE/PULSE is shown.
2. Press the OK button, the display shows TONE.
3. Select the TONE or PULSE by using the or and confirm with OK button. Unit will say TONE/
PULSE
4. Press (Exit) button to exit this set-up mode.
Setting the Ringer Tone
Note: Your unit is preset to a Ringer tone. (If you do not wish to change press the Exit Button)
To change..follow these steps.
1. Press and release the MENU button until RINGER TONE is shown.
2. Press the OK button, the display shows 1.
3. You can select ringer 1, 2, or 3 by using the or and confirm with OK button. Unit will say
LANGUAGE
4. Press (Exit) button to exit this set-up mode.

11
Setting the Voice ON/OFF
The telephone is factory preset with all voice features ON. (To exit, press Exit button)
Note:The volume of the voice features is regulated thought the slide switch located on the side of
unit
If the user does not wish to hear the voice prompts, this voice feature can be set to OFF. We suggest
that while programming you keep this feature ON.
1. Press and release the MENU button until VOICE is shown.
2. Press the OK button.
3. Using the or to select between VOICE ON or OFF and confirm with OK button. Unit will say
VOICE ON/OFF
4. Press (Exit) button to exit this set-up mode.
Note: User can use MENU key (or press or key) to switch between the menu functions.
User can press DELETE button to exit the set-up mode.
Ringer Volume Control
The ringer sound level can be adjusted by sliding the RINGER switch located on the side of the unit to
select high (HI), mid (MID) and low (LO) level.
The red bright LED on front of unit will flash with all incoming calls.
Handset Volume Control/Tone Receiving Adjustment
The HANDSET volume control located under the handset enables user to adjust the amplification of the
call which will also result in a more comfortable listening level. To turn on this amplifier after you pick up
the handset…press button on telephone for 1 second and release, LOUD LED display will now be lit.
Move handset volume control to desired amplification. Move TONE level, located on side of unit to
desired level.Your unit is now set to your desired level as long as the settings are kept. Each time you
hang the handset up, the amplifier will go OFF. Each time you pick up the handset, simply press the
button for 1 second to turn on the amplifier. To turn off amplifier and tone level simply press button for
1 second. LOUD LED will also go OFF.

12
USING THE TELEPHONE
Dialling a Call
1. Pick up the handset or press SPEAKER button (the speaker LED will light) and wait for a dial tone.
2. Press the keypad for the telephone numbers you wish to dial. The display will show the number that
you dialed on the keypad. If you dial a number over 14 digits long, it will show the last 14 digits only.
3. When you have completed your call, hang up the handset, or press SPEAKER button again.
It is possible to switch from a handset conversation to a speakerphone conversation pressing the
SPEAKER button and picking up or hanging up the handset accordingly.
Pre Dialing a Call
1. Dial on the keypad the telephone number.The telephone will voice the digits dialed (with voice option
ON). To correct a number press the DELETE button for each incorrect digit
2. Pick up the handset or press SPEAKER button
Receiving a Call
When you receive a call, the telephone rings, the Ringer LED flashes and the display shows the CALL#
and the caller telephone number, and will state the name of the caller if the number matches with a
name recorded in the phone book, if not, it will say the numbers of the calling party if available (Caller ID
service required)
This feature allows you to decide to pick up the phone or not depending on who is calling.
If you want to talk to the caller:
1. Pick up the handset or press SPEAKER button to answer the call.
2. At the end of the call, return the handset to the cradle or press SPEAKER button again to disconnect..
Receiving a Call/Speakerphone remotely (Models 100 and 200)
Picking up the handset will allow conversation to continue.
simply press the red button on the CV111 or CV112 pendant for 1 second to connect the call and
activate its speakerphone if you hear the phone, but can’t get to the telephone.
When you are near the speakerphone you can begin speaking to the caller without picking up the
handset.
To terminate the call, press the red button again for 1 second.
Note: A feature is include in this telephone to help protect you if you activated the speakerphone remotely
(wireless pendant), and forgot to disconnect the phone. In this way, the speakerphone can turn OFF.
After 15 minutes, the phone will beep for 7 seconds. If within these 7 seconds the called party presses
any numeric key on the phone, the unit will be kept in speakerphone mode conversation for 1 minute
continuously. If no numeric key on the phone is pressed during the 7 seconds, the telephone will deactivate
the speakerphone and return to standby mode unless you pick up your handset on the ClearVoice 100
or 200.
This convenience feature is particularly useful if you are sitting on a couch, busy doing something else,
can’t get to the phone on time and don’t want to miss the call.

13
Speaker Volume Control
You can adjust the speaker volume for a more comfortable listening level by sliding the switch.
This will also adjust the volume of the voice driven features. It is suggested to maintain the volume at
medium level.
Redial
Note: To redial the last number called
1. Lift the handset or press SPEAKER button.
2. Press the REDIAL button.
Noted: The last number dialed (up to 32 digits long) can be redialed.
Pause
You can insert a 3.6 seconds which will create a pause into dialing or storing a number into memory in
order to access custom services and possible short delays in getting dial tone.
Press REDIAL button at the desired point in number. Press REDIAL button again if an additional 3.6
seconds is needed.
Hold
To place a call on hold, press HOLD button. The hold indicator will light. To return to the call, press the
SPEAKER button (or lift the handset), the HOLD LED goes off.
Flash
Many special network services, such as Call Waiting, require a switch hook signal. The FLASH button
provides the electronic equivalent of a switch hook operation.
For example, if you subscribe to Call Waiting*, you can use this feature to answer another call on the
same line by pressing the FLASH button followed by 2 on the keypad. Press the FLASH button and
then press 1 to return to the first call.
• Please note that a subscription may be required to use these services.
Hearing Aid Compatibility
This unit is compatible with inductively coupled hearing aids.
Important Features of your telephone
Note:The telephone has features that can be very important and convenient to use.This telephone has
features that can be a substantial aid for those who are hearing and/or sight impaired, having the ability
to get help if there is an emergency in the home, letting you know who is calling, on incoming calls
answering and speaking to callers if desired, screening a call before answering, letting you know who
called with the ability to call back easily if desired.

14
PHONE BOOK
Note: The phone book allows you to enter, display, record the persons name and specify if this a
telephone no. that is to be called in the units Telemergency Emergency Help system.
To use the phone book, press button until the icon is displayed
Storing up to 30 telephone numbers in the phone book including emergency nos. to be called in
an emergency.
Note: It is important that up to 5 telephone nos. be reserved for the emergency function. See Emergency
Features in this User Manual. Therefore we suggest you enter up to 25 telephone numbers and names
in the General /Important Telephone Numbers.
Entering up to 25 telephone numbers and names:
Note: If you have a telephone system where it is beneficial to put a pause (P) before dialing a particular
digit press the REDIAL button and a 3.6 second pause will be created.This is also important if you are
using on a PABX or PBX where you insert a pause before and after entering 1,8 or 9,or other systems
where outside line dial tone can be delayed.
1. Press and release the MENU button until STORE NUMBER is shown.
2. Press the OK button. The cursor will flash in the first position.
3. Enter the required telephone number with a maximum of 22 digits using the number pad and confirm
with OK button, (both the erase feature and pause feature can be used when storing the telephone
number), For nos. to be called in an emergency insert a pause(P) before entering the emergency no.
4. Enter the required name with a maximum of 16 letters. Cursor shown as (I) is all the way on left side.
See Table 1 for details
5. Confirm with OK button. The display now shows EMERGENCY OFF.
6. Press OK button.
SAVED is shown and the unit announces “Name Recording for phone book”. That means the phone
number is stored only for a general phone dial out, but not for emergency’s call dial out.
To record voice (example ‘this is John’), hold down OK button, immediately speak clearly into microphone
after a beep and “VOICE” icon is flashing on LCD display.. Release the button when you finished or the
unit will stop recording after 3 seconds. The voice prompt will then be played automatically. [Recording
the Voice is necessary for the personalized talking Caller ID and talking phone book feature].
You can repeat step 2 to 6 to enter more numbers or press (Exit) button to exit.
How to enter names in the phone book
The number buttons are also inscribed with letters for entering the name. By repeatedly pressing the
appropriate button, upper case letters as well as numbers and special characters can be entered.
Overview: Note: In entering a name
Note:The numeric keys 1 thru # can be used as shown in Table I
1 space + & - / 1
2 A B C 2
3 D E F 3
4 G H I 4
5 J K L 5
6 M N O 6
7 P Q R S 7
8TUV8
9 W X Y Z 9
0 , . : ; ? 0
* ‘ @ ( ) *
# $ _ % ! #

15
Example:
To enter the name JIM. Press 5 button until Jis displayed…. ………..Wait 2 seconds
Press 4 button until I is shown………………. Wait 2 seconds
Press 6 button until Mis shown……………….Wait 2 seconds
TABLE I
Notes: Incorrect entries can be deleted with DELETE button. To do this, move the cursor the correct
position using or and then press DELETE button.
If you wish to place a pause in a telephone number…press redial button and a P will display
To review the Phone Book Memory
1. Press and release button, icon is shown.
2. Review the stored phone number by pressing or , or enter the initial letter of the name of the
person you wish to call using the number pad. After a short time, the display will show the first stored
telephone number with this initial letter, say the name and VOICE icon is shown if it was recorded, or
voice the telephone number.You can now search for further numbers under this letter by pressing .
Notes:
• If no telephone number is stored, the display will show EMPTY.
• After you view all the call in memory, the display will show END OF LIST.
• If a reviewed number is shown with icon on the LCD display.. that is one of the numbers that can
be dialed if the emergency help system (+) has been activated.
To dial the displayed telephone number of Phone Book Memory:
1. With the required telephone number showing on the display, press OK button, press OK again. The
telephone dials out the displayed telephone number automatically in speakerphone mode.
2. The display shows dialed out telephone number and counting timer.
OR
1. Pick up the handset or press SPEAKER button (the speaker LED will light) and wait for a dial tone.
2. Press and release button, icon is shown.
3. Review the stored phone number by pressing or
4. Press OK button, press OK button again
Recording / Editing / Deleting voice prompt of name of phone book
With caller ID service activated, when an incoming call is received, the unit will display and announce
the caller’s phone number. If the caller’s phone number is stored in the phone book, and caller’s name
will be displayed too.
If the voice prompt is recorded for this phone number, the unit will announce the voice prompt recorded
instead of the caller’s phone number.
1. Press and release the MENU button until the “NAME RECORDING” is shown.
2. Press the OK button. A list of the phone book entries will be display.
3. Press or to select the list you like to record a voice or name for it.
4. To record or edit the voice prompt, hold down OK button. Speak clearly into the microphone after a
beep and “VOICE” icon is flashing. Release the button when you finished or the unit will stop recording
after 3 seconds. The new voice prompt will then be played automatically.
To delete the voice prompt recorded, press DELETE button during the voice prompt is playing.
5. Repeat step 3 to 4 to edit or delete more entry or exit the set-up mode by pressing the button.

16
To Edit the Phone Book Memory
1. Press and release button, icon is shown.
2. Select the required location from the phone book by pressing or .
3. Press and hold MENU button for two seconds. The display will show EDIT?.
4. Press OK button, the first digit of the selected phone number will be flash.
5. You can move the cursor to the required position by pressing or . To delete the digit, press
DELETE button, or press any numeric key to replace the digit and confirm with OK button. Then the
display shows the flashing first letter of the name.
6. Move the cursor to the required position by pressing or To delete the letter, press DELETE
button, or press any numeric key to replace the name, and confirm with OK button, “EMERGENCY
ON or OFF” is shown.
7. If the display shows “EMERGENCY OFF”, and you want to change it as an emergency’s call dial out,
select “EMERGENCY ON “ by pressing or , and confirm with OK button, now “LOCATION” is
shown. Select the required location by pressing or and confirm with OK button, if the location is
in use, now display shows OVERWRITE?, confirm with OK, “SAVED!” is shown.
If you select “EMERGENCY OFF” and confirm with OK, “SAVED!” is shown.
8. You can repeat step 2 to 7 to edit more numbers or press to exit.
To Delete the Phone Book Memory
1. Press and release button, icon is shown.
2. Select the required location from the phone book by pressing or .
3.
To delete single memory
, press DELETE button once. The display will show the DELETE?. Press
DELETE button for 2 seconds. The telephone number and name will be deleted and the display will
now show another number from the phone book.
To delete all entire memory
, press and hold DELETE button until the display shows DELETE ALL?.
Press DELETE button for 2 seconds until EMPTY appears on the display.

17
EMERGENCY FEATURES
EMERGENCY HELP SYSTEM
This feature allows you to Call-4-Help from those people you would like called in an emergency.
For the Emergency Help System to be activated and also dial out the emergency telephone numbers
entered in the sequence you would like the telephone nos. called, requires that the telephone line
ClearVoice 50, 100, or 200 is connected to is ON HOOK(hung up) and all instructions in setting up have
been done.
Emergency Message
Two options are provided on the message:
A. Use the pre-recorded message “This is an emergency call, to accept this call press zero”. This
message will be played unless you decide to record your own message.
B. Your own recording (max. recording time 20 seconds).
This can be any message of your choice, but must always end with the phrase “to accept this call
press zero”
Example: There is a medical emergency at the home of John Smith at 123 Main Street, Apartment 4D,
please come @ once. To accept this call press zero.
To Record your own emergency message
1. Press and release the MENU button until the RECORD MESSAGE is shown.
2. Press and hold the OK button. Start your message directly after the signal tone and “VOICE” icon is
flashing. While recording, keep at a distance of 15 cm from the telephone so that you can speak
easily into the microphone on the upper side.
3. Release the OK button after you have finished your emergency message.
The message will now be played back automatically.
To Check the emergency message
You can check the emergency message at any time.
1. Press and release the MENU button until the CHECK MESSAGE is shown.
2. Then press the OK button to play back the message.
To Delete your own emergency message and revert to the pre-recorded message
If you have recorded your own message, you can delete this and by doing so revert to the pre-recording
message.
1. Press and release the MENU button until the CHECK MESSAGE is shown.
2. Then press the OK button to play back the message.
3. During the playback, press DELETE button.Your own message will be deleted and you will be using
the pre-recorded greeting.

18
PHONE BOOK (Emergency Nos.)
IMPORTANT: We suggest you enter up to 5 telephone nos.you would like to have called in an emergency
with just one (1) press of a button.
Note: The phone book allows you to enter, display, record the persons name and specify if this a
telephone no. that is to be called in the units Emergency Help System as well as the sequence in which
the telephone numbers will be called
To use the phone book and enter the telephone numbers to be called and the sequence of calling,
press button until the icon is displayed
Storing up to 5 telephone numbers in the phone book including emergency nos. to be called in
an emergency. (You may enter more or less. The total phone book allows you up to 30 telephone
numbers for convenient/Important and Emergency calling numbers)
Note: It is important that up to 5 or more telephone nos. be reserved for the emergency function. You
may want to duplicate the calling of 1 or more of the entered emergency nos. in the event a called no. is
busy or cannot be reached.
Entering up to 5 telephone numbers names and location (entering location 1 means that is the 1st
no. to be called,2 the 2nd etc.).Important: Enter telephone #'s, exactly as you would from where installed.
Note: You may have a telephone system where it is beneficial to put a pause (P) before dialing a
particular digit. Pressing the REDIAL button will create a 3.6 second pause (P).This is important if you
are using on a PABX or PBX system where you should put a pause(P) before and after entering 1,8 or
9, or using the Emergency Help System of this unit.
For PBX or PABX users, enter a pause(P) before and after entering a 1, 8 or 9 to get outside dial tone.
1. Press and release the MENU button until STORE NUMBER is shown.
2. Press the OK button. The cursor will flash in the first position.
3. Enter the required telephone number starting with a pause(P). Press REDIAL button to create a
pause(P) followed with a maximum of 21 digits using the number pad and confirm with OK button,
(both the erase feature and pause feature can be used when storing the telephone number)
4. Enter the required name with a maximum of 16 letters. Cursor shown as (I) is all the way on left side
of the LCD display.
See Table 1 for details
5. Confirm with OK button. The display now shows EMERGENCY OFF.
6. Scroll the or button to EMERGENCY ON
7. Press OK button to confirm.
Now “LOCATION” is shown. Select the required location by pressing or and confirm with OK
button, if the location you chose is in use, LCD display will show OVERWRITE?, confirm with OK or
select another location with or . Press the OK button and “SAVED!” is shown.
Note: Any telephone # entered that is to be used for emergency calling should be entered in the order
those phone numbers are to be called.
Selecting the correct location is very important because this feature determines in case of emergency
the sequence of the telephone numbers that will be dialed in the emergency feature. Location 1 will
be dialed first, then 2, then 3 etc.]
Important:: if you choose to overwrite a location, the previously stored number will be erased]
The unit announces “Name Recording for Phone book”, icon on LCD display is shown. That
means the phone number is stored for a general phone as well as a number that can be called in the
Emergency Help System.

19
To record the voice (example: John), hold down OK button, speak clearly into microphone after a
beep and “VOICE” icon is flashing. Release the button when you are finished, the unit will stop
recording after 3 seconds. The recorded name will then be played automatically. [Recording the
Voice is necessary for the personalized talking Caller ID and talking phone book feature]
8. Repeat step 2 to 6 to enter more emergency no, or press (Exit) button to exit.
How to enter names in the phone book
The number buttons are also inscribed with letters for entering the name. By repeatedly pressing the
appropriate button, upper case letters as well as numbers and special characters can be entered.
Overview: Note: In entering a name
Note:The numeric keys 1 thru # can be used as shown in Table I
1 space + & - / 1
2 A B C 2
3 D E F 3
4 G H I 4
5 J K L 5
6 M N O 6
7 P Q R S 7
8TUV8
9 W X Y Z 9
0 , . : ; ? 0
* ‘ @ ( ) *
# $ _ % ! #
Example:
To enter the name JIM. Press 5 button until Jis displayed…. ………..Wait 2 seconds
Press 4 button until I is shown………………. Wait 2 seconds
Press 6 button until Mis shown……………….Wait 2 seconds
TABLE I
Notes: Incorrect entries can be deleted with DELETE button.To do this, move the cursor by scrolling
or and then press DELETE button.
When you place a pause in a telephone number…press redial button and a P will display.
To review the Phone Book Memory (All telephone nos. including Emergency Nos.
and their location)
1. Press and release button, icon is shown.
2. Review the stored phone number by pressing or , or enter the initial letter of the name of the
person you wish to call using the number pad. After a short time, the display will show the first stored
telephone number with this initial letter, say the name and VOICE icon is shown if it was recorded, or
voice the telephone number.You can now search for further numbers under this letter by pressing .
Notes:
• If no telephone number is stored, the display will show EMPTY.
• After you view all the call in memory, the display will show END OF LIST.
• If you review a number shown with icon on the LCD display, that means the number can be an
emergency’s call dial out.
If no key is pressed for 60 seconds, the telephone will return to standby Caller ID mode.
This manual suits for next models
2
Table of contents


