Cleaver CSCPI154 User manual
MODELS:
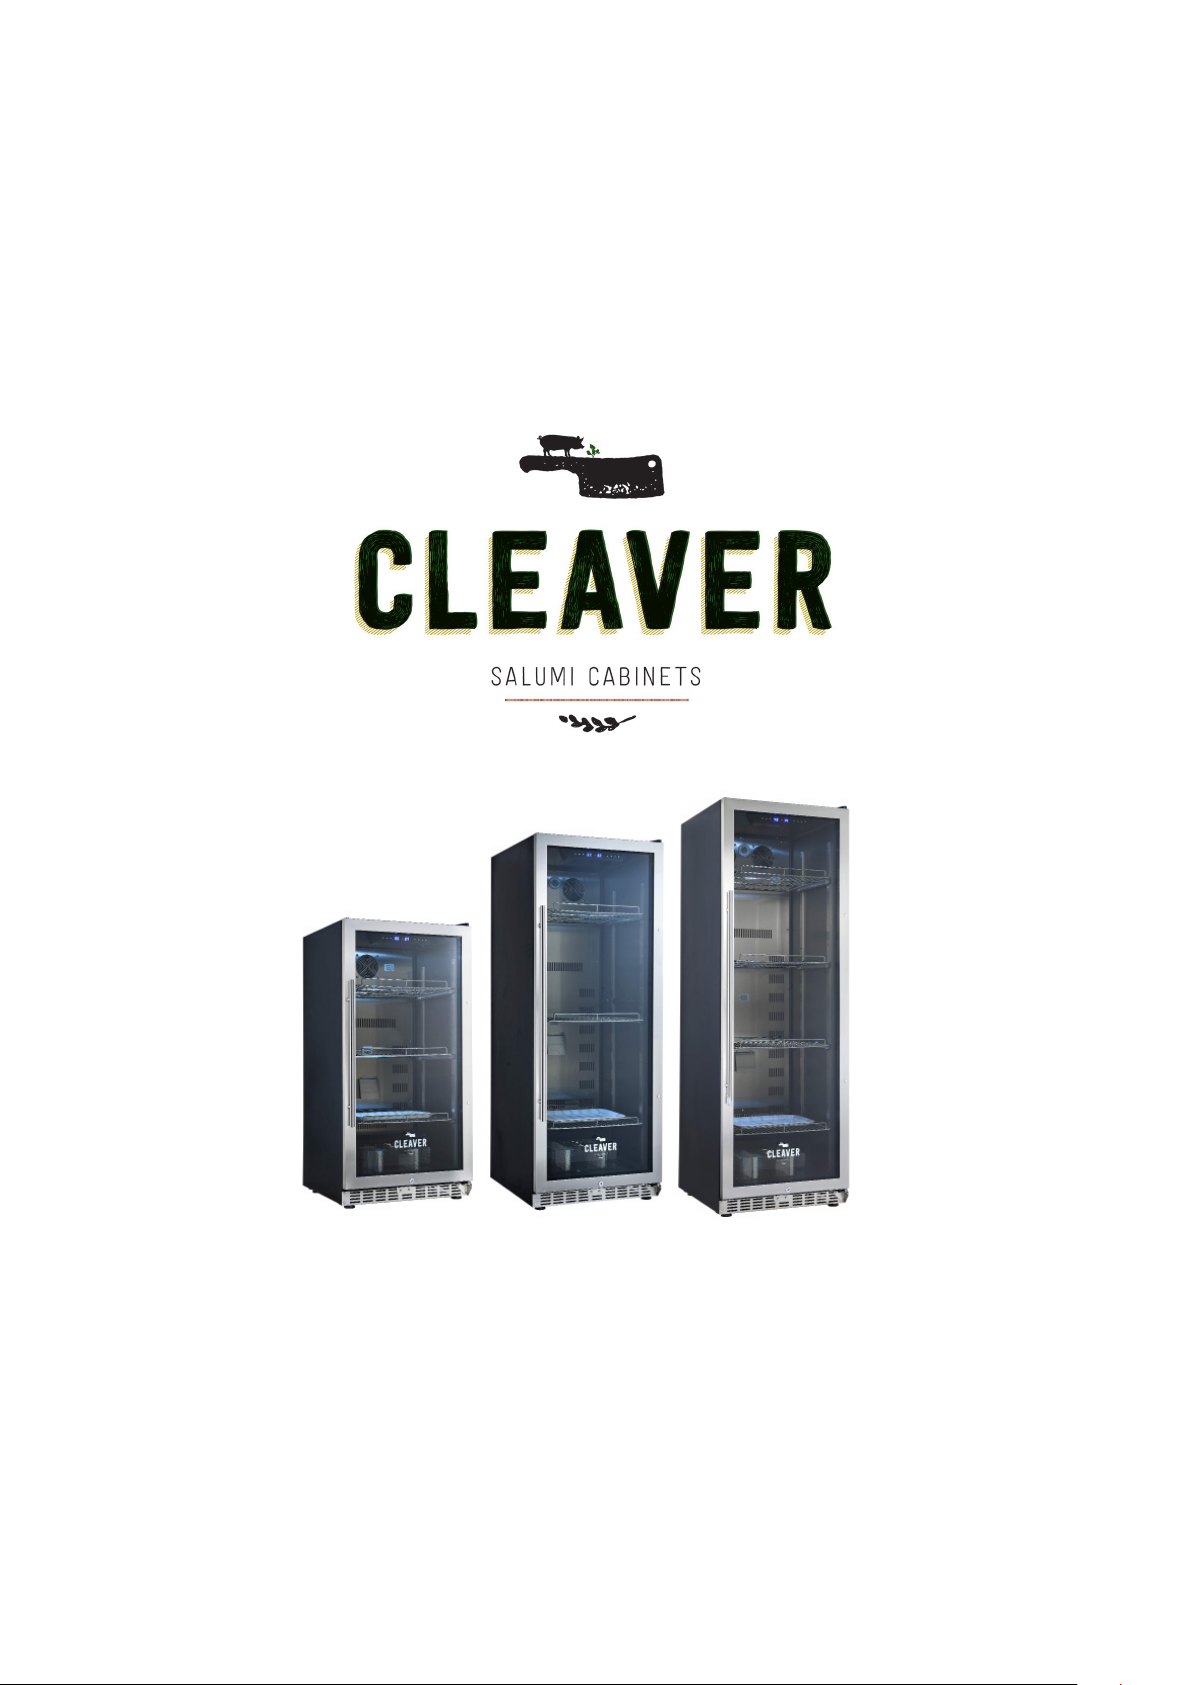
CSCPI154 - The Piglet
CSCWE240 – The Weaner PLUS
CSCBO360 – The Boar PLUS
CSCHO450 – The Hog PLUS
CSCCS450 – The Corkscrew
CSCWH760 - The Whole Hog
USER MANUAL
Important Information
for Operating Your Salumi Cabinet

2
Troubleshooting...
Any issues, concerns, feedback or quesons not answered here or in your manual.
Contact CLEAVER Arsan Appliances on:
0418 139 409 or sales@cleaversalumicabinets.com
Contents
1. Important Safety Notes ........................................................................ 3
2. Structure of Cabinets & Spare Parts ..................................................... 4
Some Points on Food Safety ............................................................. 4
3. Installaon & Set Up ............................................................................ 5
Before Using Your CLEAVER Salumi Cabinet .................................... 5
4. Cabinet Control Panel ........................................................................... 6
5. Recommended Sengs ...................................................................... 6
6. Cabinet Recommendaons - Salumi Curing ......................................... 7
Batch Sizes - Salami ........................................................................ 7
Casings - Salami .............................................................................. 7
Your First Batch................................................................................ 8
Hanging Your Meat.......................................................................... 8
7. Humidity in Your Cabinet - Salumi Curing ............................................. 9
De-Humidicaon.............................................................................. 9
Water/Humidity Discharge.............................................................. 10
Adding Humidity.............................................................................. 11
8. Dry Ageing ............................................................................................ 12
What is dry ageing?......................................................................... 12
Whatcuts can you dry age? ............................................................. 12
What is the ideal environment?....................................................... 12
Do you need to add a salt block to the cabinet?.............................. 12
How long should you dry age for? ................................................... 13
Preparing and cooking the nal product ......................................... 13
9. Care and Maintenance ......................................................................... 14
Cleaning Your Cabinet...................................................................... 14
Power Failure................................................................................... 14
Empty Time...................................................................................... 14
10. Troubleshoong: Too Much Meat ...................................................... 15
11. Troubleshoong.................................................................................. 16
12. Recipes ............................................................................................... 17
13. Technical Specicaons ..................................................................... 20
CLEAVER Salumi Cabinets is the registered trademark of CLEAVER Arsan Appliances.
42 Smith Street, Warragul, Victoria, Australia 3820

WARNINGS
To reduce the risk of re, electrical shock, failure or injury when using your cabinet,
please follow these basic precauons:
• Read all instrucons before using your CLEAVER Salumi Cabinet.
• WARNING: Do not use appliance for the storage of food other than as recommended in this
manual.
• These cabinets are not suitable for use as a refrigerator.
• WARNING: When posioning the appliance, ensure the supply cord is not trapped or damaged
• WARNING: Do not locate mulple portable socket-outlets or portable power supplies at the rear
of the appliance.
• WARNING: Keep venlaon openings, in the appliance enclosure or in the built-in structure, clear
of obstrucon.
• This appliance is not to be used by persons (including children) with reduced physical, sensory or
mental capabilies, or lack of experience and knowledge, unless they are under supervision or have
been given instrucon.
• This appliance should not be operated or cleaned by children. It is not a toy and children should be
le unsupervised around this appliance. Never allow children to operate, play with, or crawl inside
the cabinet.
• WARNING: Do not use electrical appliances inside the compartment(s) of the appliance, unless
they are the type recommended by the manufacture.
• Never clean appliance parts with ammable uids. The fumes can create a re hazard or
explosion.
• This appliance is intended to be used in household and similar applicaons such as; sta kitchen
areas in shops, oces and other working environments; farm houses and by clients in hotels, motels
and other residenal type environments; bed and breakfast type environments; catering and similar
non-retail applicaons.
• If your cabinet stops working, please call our service department or other related technicians
to check and repair. If the power cord is damaged, nd a professional technician or electrician to
replace cord.
• Never aempt to repair the cabinet yourself.
• Make sure that the plug is removed from socket while cleaning, moving or repairing.
• To avoid damage of door seal, please make sure the door is fully open when pulling out the
movable shelves.
• Never move cabinet with food or water inside.
• Place cabinet with its rear against a wall to prevent the compressor from being easily touched.
• Do not turn the cabinet on and o too frequently. Allow at least 5 minutes between reseng.
• WARNING: Flammable and explosive arcles should not be put in or near the cabinet, to avoid re
or explosion.
• WARNING: Do not damage the refrigerant circuit.
• WARNING: Do not use mechanical devices or other means to accelerate the defrosng process,
other than those recommended by the manufacturer
• Please dispose of old cabinets responsibly. Before you throw away your old cabinet: Remove the
door. Leave the shelves in original place so that children may not easily climb inside. Have a qualied
tradesperson de-gas the compressor. Dispose at registered waste staon or recyclers. DO NOT burn.
1. Important Safety Notes:
3

1
2
3
5
6
7
8
4
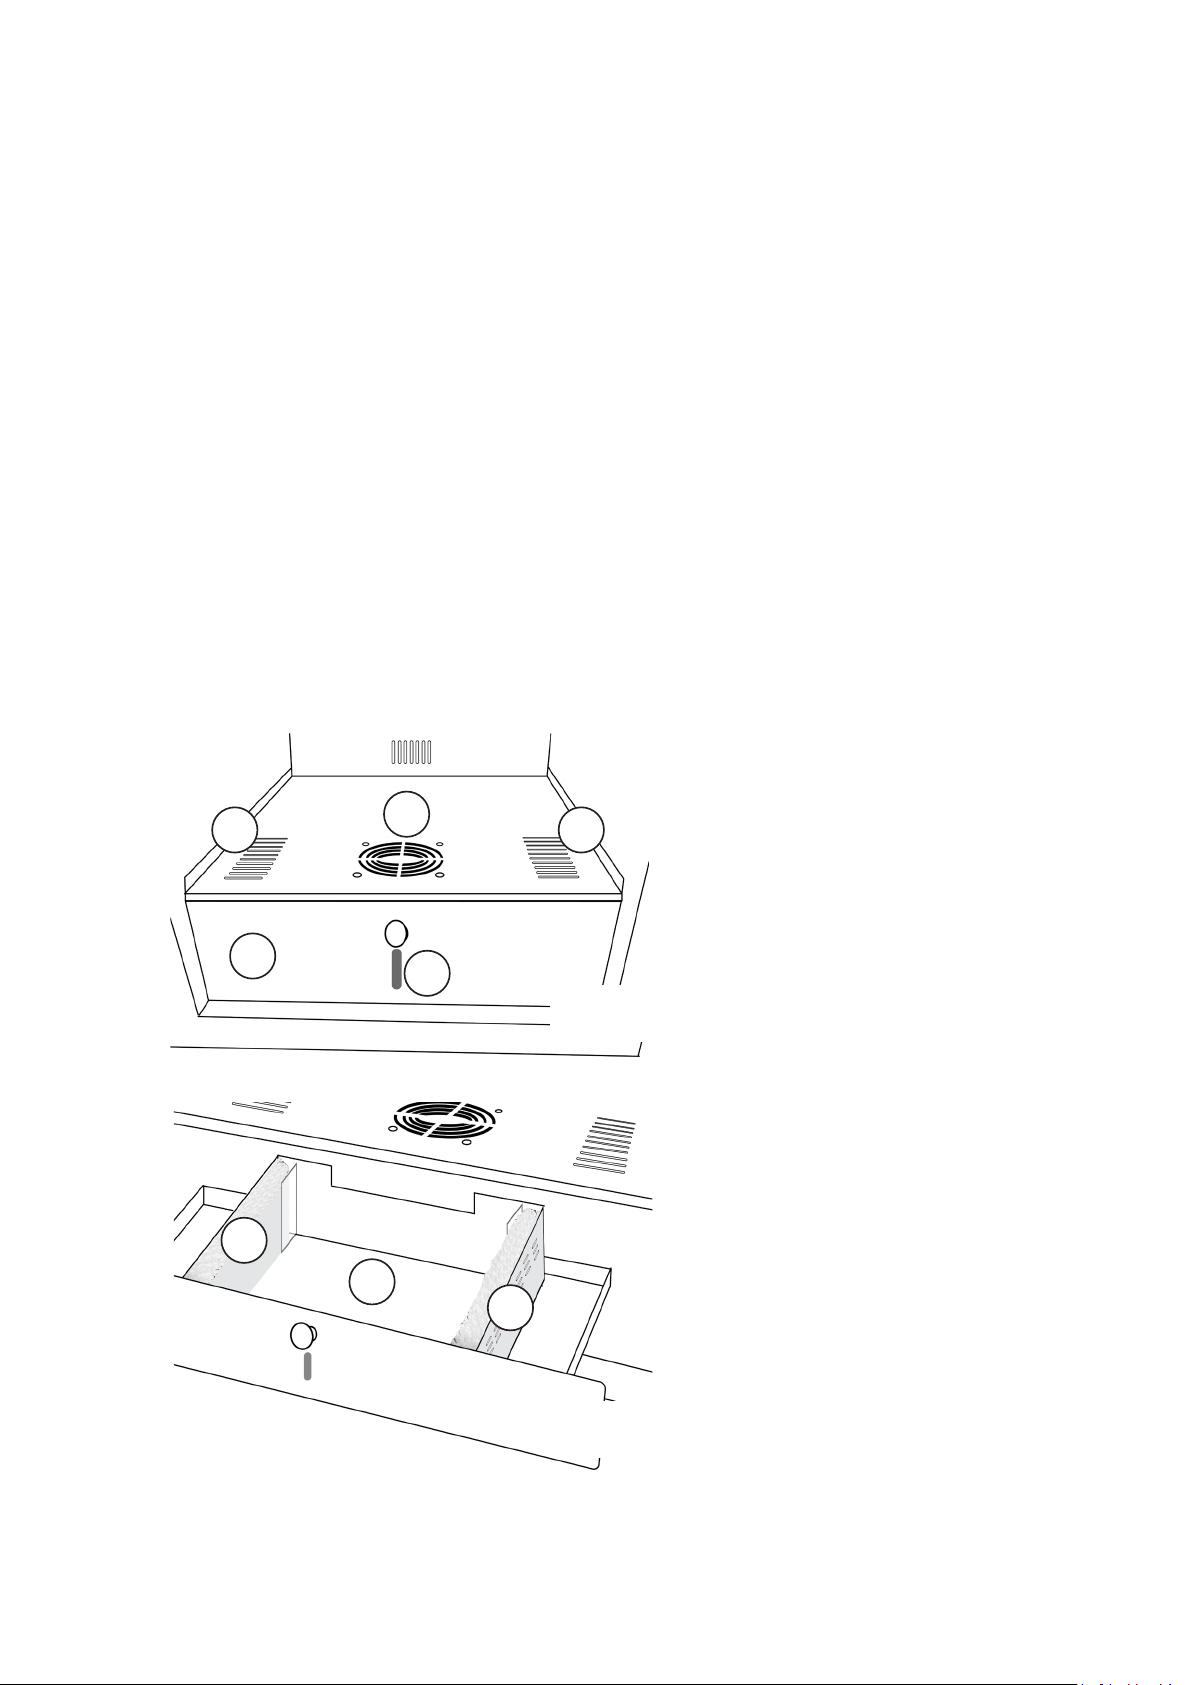
2. Structure of Cabinets & Spare Parts
① Control panel
② LED light (on control panel)
③ UV light
④ Venlaon fans
⑤ Heater fan and shield
⑥ Discharge tray (rear of cabinet)
⑦ Humidier and humidier
reserve (not included in The Piglet)
⑧ Latch hook and lock
⑨ Humidity and temperature
sensor
⑩ Carbon lter
Fig. 1:
Spare Parts
Included in your new CLEAVER Salumi Cabinet is:
• 20 x salami hooks
• 1m x drainage hose
• 4 x humidier lter pads (not included in The Piglet)
• 1 x prosciuo hanging bar
• 1 x white plasc drip tray/salt block tray
• 2 x cabinet keys
• CLEAVER User Manual
Some Points on Food Safety...
CLEAVER Salumi Cabinets are designed to create a consistent and
even environment for air curing & dry ageing meats. It remains your
responsibility to maintain proper hygiene, undertake correct bacterial
controls and monitoring the curing of your meats for spoilage.
CLEAVER takes no responsibility for spoilage caused by inadequate
eorts to adhere to safe curing processes.
Always approach the results of any cured & dry aged meats with
a sense of cauon. If in doubt of the safety of the meats for
consumpon, take the appropriate steps to dispose of the meat safely.
9
10
4

5
Installaon:
• Remove the exterior and interior packing.
• Locate the cabinet away from direct sunlight and sources of heat
(stove, heater etc.). Direct sunlight and heat sources may increase electrical
consumpon and excessive drying of your meat. Extreme cold ambient
temperatures may also cause the unit to perform poorly.
• Avoid locang the cabinet in wet/damp areas.
• The cabinet should be placed in a locaon that allows sucient heat
dissipaon from condenser unit. The back of the cabinet should not be place
rmly against a wall.
• If building into cabinetry, space should be provided on both sides, top
and rear of the cabinet to allow for sucient air circulaon.
- Top: minimum space 25mm
- Rear: minimum space 25mm
- Sides: minimum space 5mm
• Level your cabinet, adjusng the front and rear feet at the base.
Recommendaon: Slightly raise the front of the cabinet to assist with
drainage.
• Water removed from the cabinet is evaporated from discharge tray at the
rear of the cabinet. In regions of high humidity or when curing large batches,
the discharge tray can overow. To avoid this, install the drainage pipe,
supplied, into a waste or drain (Page 10, Fig. 7)
1. Unscrew the protecve grill at the rear of the cabinet.
2. Remove the exisng drainage pipe.
3. Feed new drainage pipe through large hole in the grill.
4. Fix pipe onto the drainage point with cable e.
5. Re-aach protecve grill.
6. Run pipe into drain or waste point no higher than 15cm o ground
level. Cut pipe to remove unused length.
Before Using Your CLEAVER Salumi Cabinet
• Before connecng to the power source, let the cabinet stand upright for
at least 3 hours. This will reduce the possibility of a malfuncon in the cooling
system from handling during transportaon.
• Clean the interior surface with lukewarm water and a so cloth.
3. Installation

6
① LIGHT Buon: Cabinet LED light control buon - on/o.
② Humidity Control UP: Increase humidity seng, max. 90%
③ Humidity Control DOWN: Decrease humidity seng, min. 60%
④ Humidity Display: Displays actual humidity level (at rest) and your
humidity seng (when ashing). The range of humidity is 60% to 90%.
⑤ RUN light: Indicator light of compressor working. While the compressor
operang, the red light is on. Refer to Humidity in your Cabinet (Page 9)
⑥ Temperature Display: Displays actual temperature (at rest) and your
temperature seng (when ashing). The range of temperature is 0oC to 25oC.
⑦ Temperature Control UP: Increase temperature seng, max. 25oC
⑧ Temperature Control DOWN: Decrease temperature seng, min. 0oC
⑨ UV Buon: Cabinet UV Light control buon - on/o.
⑩ ON/OFF buon: Power on and o buon.
Fig. 2
4. Cabinet Control Panel
5. Recommended Settings
^ Dry Ageing is not recommended in The Piglet.
* water may need to be added to the humidier if the cabinet is exposed to high
temperatures (30°C+) for periods of more than one day at a me.
Process/Funcon Temperature Humidity Water UV Light
Salumi - Fermentaon 22°C to 24°C 80% to 85% No No
Salumi - Curing 8°C to 11°C 72% to 76% No* No
Dry Ageing^ 1°C to 2°C 80% to 85% Yes Yes
Cheese Maturaon (Hard) 8°C to 14°C 75% to 85% Yes No
Fruit/Vegetable Storage 1°C to 10°C 80% to 90% Yes Yes/No
Wine Storage 12°C to 15°C 60% to 70% No No
The “PLUS” range of CLEAVER Salumi Cabinets will provide you with the
exibility of dierent sengs for dierent funcons.
7
Batch Sizes - Salami
CLEAVER Salumi Cabinets are designed for making and curing regular, smaller
batches of meat all year round, rather than one large cure once a year.
We suggest liming each batch size of salami to about half that of the cabinet‘s
maximum capacity. Mutliple batches can be cured at the same me, but we
recommend allowing 10 to 14 days between adding batches of salami to your
cabinet.
The addion on whole muscle cures like coppa, prosciuo, pancea etc, can be
made at anyme during the curing process.
Cabinet Maximum
Capacity
Suggested Maximum
Salami Batch Size
The Piglet 10 to 20kg 5 to 8kg
The Weaner 30 to 40kg 10 to 15kg
The Boar 50 to 60kg 20 to 25kg
The Hog 50 to 70kg 25 to 30kg
The Corkscrew 30 to 40kg 10 to 15kg
The Whole Hog 80 to 100kg 30 to 40kg
6. Cabinet Recommendations - Salumi
Casings - Salami
We recommend using natural or round-end collagen salami casings in your new
CLEAVER Salumi Cabinet.
Using the thicker, ed-end brous/cellulose casings may lead to case hardening
and hollowing in your salami.
We also recommend using a form of compression with any manufactured
casing, eg salami neng or cable es etc.
Casing Compression Suggest Temperature Suggested Humidity
Natural Not required 8°C to 11°C 72% to 76%
Round-End Dried/
Collagen
Neng/Cable Ties 8°C to 11°C 72% to 76%
Tied-End Fibrous/
Cellulose*
Neng/Cable Ties 8°C to 9°C 76% to 80%
* not recommended
Please note drying me can vary dependent on casing size (diameter) and
recipe.

8
6. Cabinet Recommendations - Salumi
Hanging Your Meat
The CLEAVER Salumi Cabinet shelves will hold up to 40kg of meat each. The
ner bars on each shelf will hold meat up to 2kg on each hook.
Heavier items, like prosciuo, should be hung o cross bars or the prosciuo
hanging bar, supplied, placed across the shelf to balance the weight.
Meat hanging in the cabinet should NEVER be allowed to touch and airow
space should always be maintained around any curing meat - Fig. 3 and 4.
The cabinets use a combinaon of cooling and heang to regulate humidity and
temperature. With larger quanes of fresh meat in the cabinet, the condenser
and heater will be more acve. We recommend leaving addional space around
the heater (Fig. 3) and regularly rotang your meat to encourage even curing.
(le) Hanging salami in The
Weaner and on the lower shelf in
The Boar and The Hog to allow for
the circulaon of air and prevent
excessive drying from the heater fan.
(right) Hanging salami on the top
shelf in The Boar and The Hog.
Your First Batch
We recommend a trial batch of salami to assist with nding the perfect sengs
to curing your recipe in your new CLEAVER Salumi Cabinet.
For your rst batch, start with a higher humidity seng - 72% to 76% - and a
temperature of 8oC to 10oC.
If you nd excessive mould growth starng to develop on your meat, simply
wipe o with a vinegar/water mix and lower the humidity seng by 1% to 2%.
If your cure is too fast and your meat develops case hardening, increase the
humidity seng by 1% to 2%.
Use the ideal seng determined through this process for future batches.
Repeat this process if you change casing types or make signicant alteraons to
your base recipe.
Fig. 3 Fig. 4
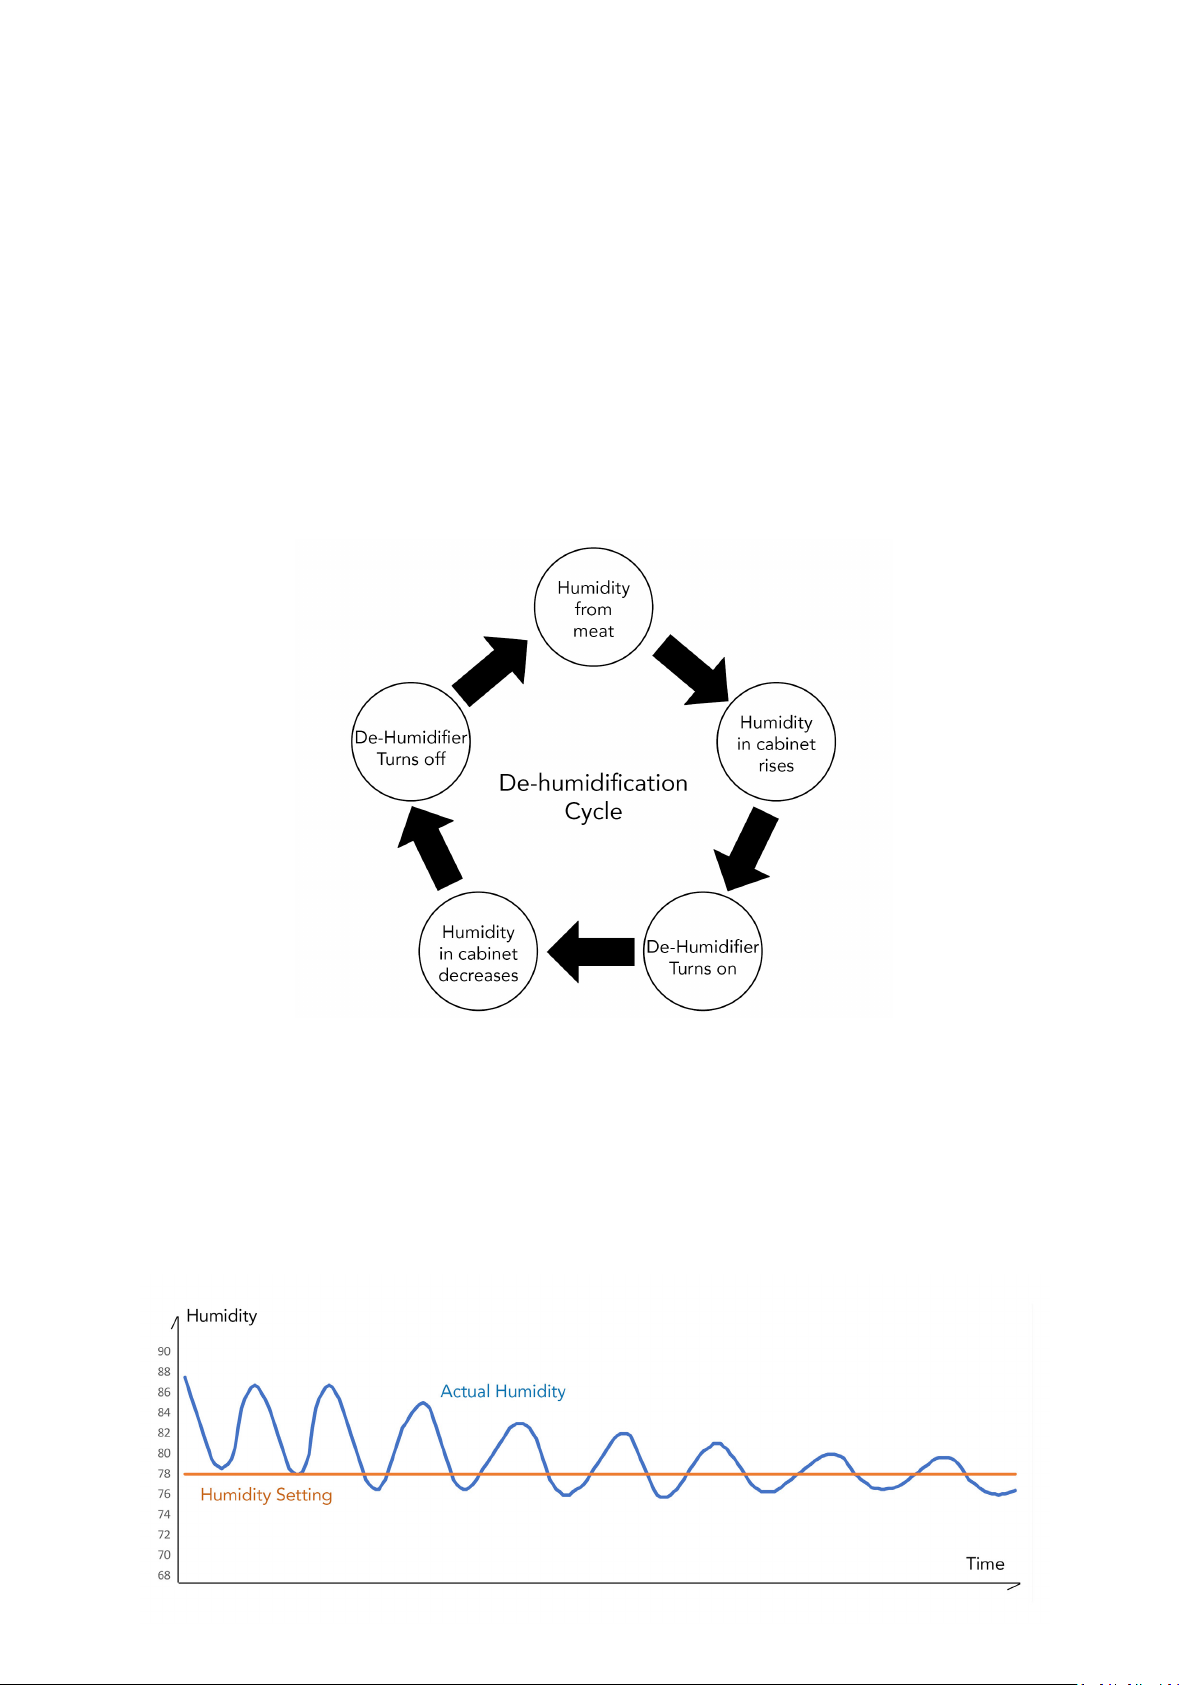
Figure 3:
De-Humicaon
Your CLEAVER Salumi Cabinet has been designed to help regulate the drying
process for cured meat. As your meat dries/cures, the moisture is expelled into
the cabinet which raises the relave humidity. As the humidity rises, the cabinet
will automacally start the de-humidicaon process and discharge the extra
moisture to the discharge tray at the rear of the cabinet. The de-humidicaon
process will then automacally turn o and the moisture from the meat will
again act to increase the relave humidity in the cabinet. This process connues
in cyclic fashion, Fig. 5.
Due the nature of humidity in the air and the large amount of moisture
provided to the environment by the meat in your cabinet, you will nd the
humidity will oscillate up and down around your seng. This is normal.
If you have just placed a batch of fresh meat into you cabinet, you will nd
the peaks of this oscillaon will be steeper and the frequncy between cycles
shorter, Fig. 6.
The most dramac changes in humidity generally take place in the rst one to
two weeks of a cure. This will sele down as your meat cures.
8. Humidity in Your Cabinet - Salumi
Fig. 5
Fig. 6
9
Water/Humidity Discharge
Larger batches of meat or high environmental humidity may cause the humidity
discharge tray (Figure 7, ④) to ll faster than it can evaporate. We recommend
monitoring (and emptying, if necessary) the discharge tray - accessible from the
rear of the cabinet.
The discharge pipe can be extended to a drainage or waste point:
1. Unscrew the protecve grill ① at the rear of the cabinet.
2. Remove the exisng drainage pipe ③.
3. Feed new drainage pipe through large hole in the grill ⑤.
4. Fix pipe onto the drainage point ② with cable e.
5. Re-aach protecve grill.
6. Run pipe into drain or waste point no higher than 15cm o ground level.
Cut pipe to remove unused length.
10
7. Humidity in Your Cabinet - Salumi
2
3
4
1
5
Fig. 7
11
7. Humidity in Your Cabinet - Salumi
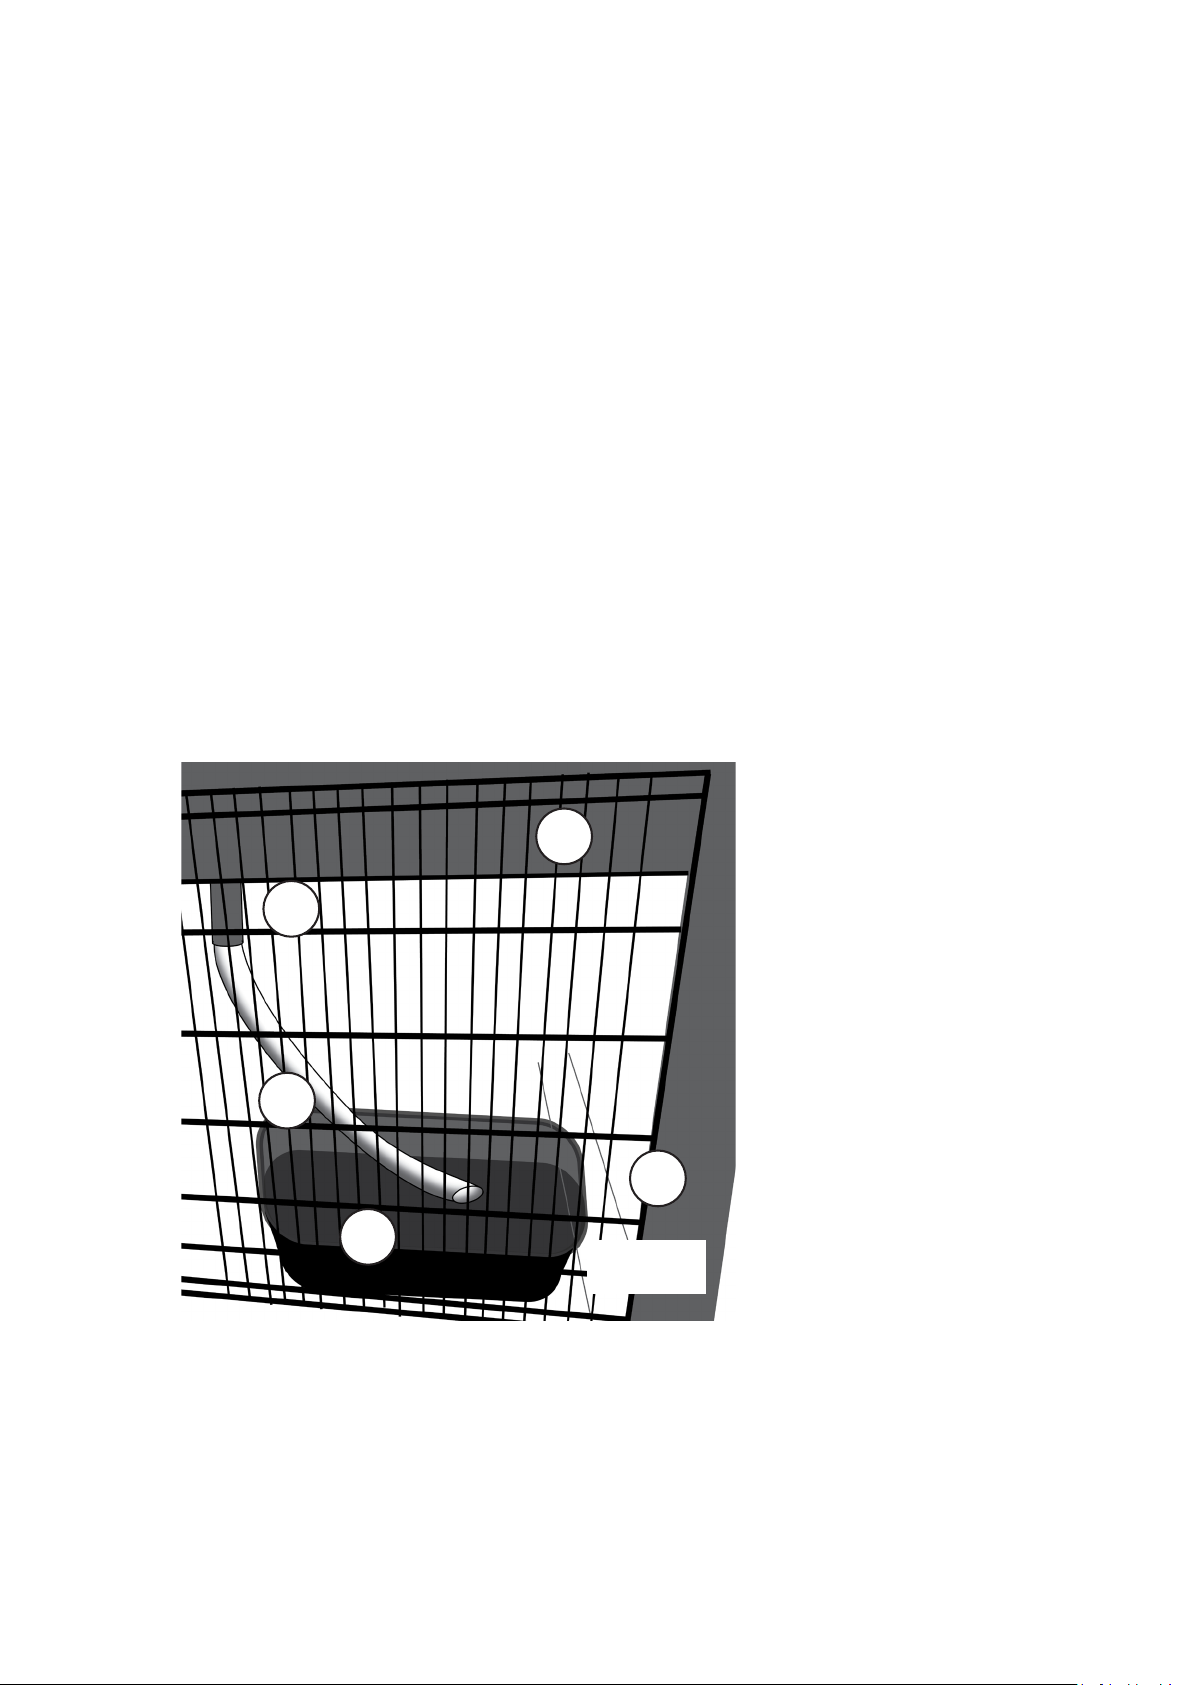
Adding Humidity
Addional humidity can be provided to the cabinet, if required, by adding water
to the humidier reservoir on the base of the cabinet.
The meat in your cabinet will provide most, if not all the humidity required
during the curing process. No water should need to be added to the humidier
while fresh meat (less than 3 weeks into the cure) is in the cabinet.
Addional humidity may be required towards the end of a cure of larger
muscles, eg prosciuo etc, if the humidity reading falls below the seng point.
Humidifer unit is not included in The Piglet model
Please note: the fan on the humidier will only turn on when the cabinet deems addional
humidity is required. If you have recently added fresh meat to the cabinet, this fan will not
operate.
5
6
6
Fig. 9
1
2
34
2
Fig. 8
① Humidity Fan
② Humidier Vents
③ Water Reservoir Drawer
④ Water Level Indicator
⑤ Water Reservoir/Tank
⑥ Humidier Filter Pads

12
8. Dry Ageing
What is dry ageing?
Dry ageing is a process of resng or storing whole cuts of meat, primarily beef
and venison in a controlled environment, designed to intensify avour and
promote tenderness.
When you age meat, the enzymes that are present in the meat will start to
break down the tough muscle bres that are present in the meat.
In addion, if you are dry ageing your steak the avour will improve over me
thanks to enzymac and bacterial acons, as well as oxidizaon of the fat on
the steak. As me goes on your steak will develop a deeper, beeer taste.
Eventually, the steak will begin to take on a pungent, cheese-like aroma as well.
The CLEAVER Salumi Cabinets PLUS are designed to provide the ideal
environment for geng the most out of your aged meats.
What cuts can you dry age?
The best meat for dry ageing beef and vension are large muscle or sub-primal
cuts on the bone like a striploin, ribeye or sirloin. Bones and fat layers are the
best way to protect the meat from drying out too much.
It’s not advisable to try dry-aging single steaks because you will lose too much
volume when cung o the outer, dried layer that you won’t be le with much.
The meat should be as freshly slaughtered as much as possible. We recommend
telling your butcher that you’re going to dry age so they can provide you with
the perfect cut.
Do not dry age meat which has been in stored in cryovac or frozen.
What is the ideal environment?
Process/Funcon Temperature Humidity Water UV Light
Dry Ageing 1°C to 2°C 80% to 85% Yes Yes
Do you need to add a salt block to the cabinet?
While the addion of salt blocks or rock salt to the dry ageing environment can
help with bacterial control and avour prole, they are not necessary in the
CLEAVER Salumi Cabinets PLUS range.
All the CLEAVER Salumi Cabinets PLUS range cabinets are ed with an
automac air purcaon system and UV light for bacterial control.

13
10. Dry Ageing
How long should you dry age for?
There is no exact age you should aim for - when it comes to dry ageing meat,
the length of me comes down to a personal preference. However, the length
you age your meat will determine the outcome of your nal cooked steak in
relaon to changes in tenderness and avour prole.
Age your meat for at least 14 days in order to noce any real changes. Anything
less is not long enough to allow the tougher ssues to break down or for the
avour to change.
Between 14 to 28 days you will start to noce a dierence in texture and
tenderness.
Past 28 days the avour will start to dramacally improve. As you approach 45
days of ageing you will begin to noce an intensity of the beefy avours and
nuness to the meat.
Aer 45 days your meat will begin to develop more pronounced funky smells
and avours, kind of like a mild snky cheese. At this age it starts to become a
personal preference. We recommend not ageing longer than 120 days.
Preparing and cooking the nal product
You have aged your meat to your desired level, now what?
Firstly, prepare the meat for cooking by removing the rind - the dark hard outer
shell that forms during ageing, the cap of fat and the bone.
It is important to remove all the rind at this stage as it will not soen during the
cooking process and will reduce your dining pleasure. Removing the bone is also
important as it is dicult to increase the temperature at the centre of the bone
to a food safe level. Carefully remove any areas on the surface or internal air
pockets which have grown any mould.
When you sear a steak, the surface area comes into contact with high heat
which kills o any bacteria. The middle of the steak is safe to keep rare, as it’s
sterile, and has never been exposed to bacteria.

14
9. Care and Maintenance
Cleaning Your Cabinet
• Your cabinet should be clean regularly and maintained to prevent
possible corrison and any build up of mould and bacteria.
• Turn o the power, unplug the appliance, and remove all items including
shelves and rack.
• Wash the inside surfaces with warm water and a mild detergent.
• Wash the shelves with a mild detergent soluon.
• Wring excess water out of the sponge or cloth when cleaning area of the
controls, or any electrical parts.
• Wash the outside cabinet with warm water and mild liquid detergent.
Rinse well and wipe dry with a clean so cloth.
• Every 3 months, clean the humidity discharge tray (page 10). This is not
necessary if you have installed the addonal drainage pipe to an external
drain or waste point.
- Remove power lead from power point.
- Pull cabinet forward to access rear of the cabinet.
- Remove the protecve grill.
- Empty discharge tray using a cloth and bucket.
- Thoroughly wipe clean tray and evaporaon element.
Power Failure
• Most power failures are corrected within a few hours and will not aect
the temperature of your cabinet if you minimise the number of mes the
door is opened. If the power is going to be o for a longer period of me, you
need to take the proper steps to protect your contents.
Empty me
• For longevity of your cabinet, ideally you should keep your cabinet
running at all mes. If running it empty, adjust sengs to 13°C and 80%
humidity for maximum eciency and minimum power usage.
• If the cabinet will not be used for several months, remove all items and
turn o the appliance. Clean and dry the interior thoroughly so as to reduce
odours and mould. Leave the door open slightly all the me if necessary.
Check for any rodent damage to the wiring at the back of the cabinet before
turning back on.

15
To get the best results from your new CLEAVER Salumi Cabinet we recommend
using the batch sizes listed under Batch Sizes (Secon 6 - page 7)
Extra large batches of meat - parcularly salami - will produce signicant
amounts of moisture and can lead to the following issues:
• Overowing of the humidity discharge tray
• Higher humidity levels
• Irregularly curing
• Evaporator freezing and stopping the curing process.
If you have inadvertently added an extra large batch of meat to your cabinet
please follow these steps to ensure your cabinet will complete the curing
process eecvely:
• If possible, remove some of the meat and hang in a suitable locaon for 7 to
10 days before re-adding it to the cabinet.
• Completely empty all water from the humidifier reservoir and remove wet
humidification pads.
• Adjust the sengs to 8°C and 80% humidity
• Turn the cabinet OFF for 1 to 2 hours each evening to allow addional
defrost me. Leave the door closed during these periods.
• Moniter the discharge tray at the rear of the cabinet to prevent overowing.
• Moniter humidity reading on the control panel. You should see it moving up
and down in cycles, as described in Secon 7 (Page 9, Figure 6).
• If the humidity reading remains constant on 94-95% RH and “Run” light
(Page 5, Figure 2) remains on, please contact our service team immediately.
10. Troubleshooting: Too Much Meat

16
11. Troubleshooting
PROBLEM POSSIBLE CAUSE
The red “Run” light remains constantly on. • Please call service immediately.
Cabinet is not cold enough. • Check the temperature control seng.
• External environment may require a higher seng.
• The door is opened too oen.
• The door is not closed completely.
• The door gasket does not seal properly.
• Turn unit o at the powerpoint for 20 minutes to
reset. Turn on and set temperature.
• Sensor or condensor failure. Please call service
immediately.
Turns on and o frequently. • The room temperature is hoer than normal.
• A large amount of contents has been added to the
cabinet.
• The door is opened too oen.
• The door is not closed completely.
• The temperature control is not set correctly.
• The door gasket does not seal properly.
Vibraons. • Check to assure that the cabinet is on level
The cabinet seems to make too much noise. • The raling noise may come from the ow of the
refrigerator, which is normal.
• As each cycle ends, you may hear gurgling sounds
caused by the ow of refrigerator in your cabinet.
• Contracon and expansion of the inside walls may
cause popping and crackling noises.
• The cabinet is not level.
Water leaking out from under the cabinet. • Humidity discharge tray is overowing (page 10).
• A large amount of contents has been added to the
cabinet.
• Humidity level is set too low.
• Excess humidity in cabinet. Empty water from
humidier reservoir.
• Install addional drainage pipe to an external
waste or drain point.
Excessive mould growth or scky surface on meat. • Humidity level is set too high.
• Excess humidity in cabinet. Empty water from
humidier reservoir.
If you have any quesons or have an error not outlined above,
please call our service team on 0418 139 409 immediately to
discuss.

17
12. Recipes
Calabrese Salami
INGREDIENTS - per kilogram of meat
80% lean pork
20% pork fat (1/3 hand cut)
30g ne sea salt (or 27.5g ne sea salt
and 2.5g curing salt #2)
7g sweet paprika
5g dovme biber (Turkish pepper)
1.5g fennel seed
1g cinnamon ground
0.75g peppercorn, crushed
5g white sugar or dextrose, oponal
30mL chilled red wine, oponal
Pinch of starter culture, if using
Salami Casings
See page 19 for more salami
suggesons
METHOD
1. Grind the pork and fat together, using a
medium blade.
2. On a large table combine meat with salt,
spices, sugar and cultures (if using) and
massage/knead unl meat becomes scky.
3. Fry a lile of the mixture to test for spices and
seasoning. It should taste a lile salty - this is
crical for the curing process.
4. Using a mincer with the sausage lling
aachment or sausage cannon, pipe meat into
casings.
Oponal: Wipe down with vinegar and olive oil
to prevent excessive mould growth.
5. If fermenng, hang in your CLEAVER Salumi
Cabinet at 22oC to 24oC and 80% RH for 24
hours.
6. Air dry the salami in your CLEAVER at 8oC to
10°C and 72% to 76% RH unl at least 30%
weight loss is achieved.
Pork Coppa
INGREDIENTS
Pork collar bu (pork neck/scotch)
Salt
Coppa spice (see below)
Elasc butchers neng
Red wine
Olive oil
Coppa spices - equal parts
Fennel seeds
Sweet paprika
Cracked black pepper
Chilli akes
METHOD
1. Place the coppa in a non-corrosive container
then rub enough salt in to massage and
marinate, approx. 1 cup per 2kg of meat.
2. Place covered into your CLEAVER Salumi
Cabinet.
3. Massage in the salt a few mes over 24 hours.
4. Wash o the salt, then pat dry with paper
towel, wash with red wine, massage with olive
oil, roll in coppa spice.
5. Double net with the elasc neng to get a nice
ght product.
6. Air dry the coppa at in your CLEAVER at 8oC
to 10°C and 72% to 76% RH unl at least 30%
weight loss is achieved.
You should be able to feel the progress of the
meat rming over me. Once you are happy
that the coppa is very rm remove neng and
use a rm brush to remove any excess spices.
7. Slice paper thin enjoy!

18
12. Recipes
Prosciuo
INGREDIENTS
1 whole leg of pork
10kg ossy salt
0.3% Curing salt No. 2 (weight of leg)
Food grade container large enough for leg
Wine, oponal
Cracked black pepper
Lard: pork fat & rice our
METHOD
1. Trim the leg to remove loose meat, fat and skin.
2. Trim around and expose ball joint of leg.
3. Oponal: Remove the troer and hock.
4. Weigh the leg and record.
5. Massage the leg extensively to remove all the excess
blood from inside the meat and arteries.
6. Rub the exposed meat with a mixture of Curing Salt
and a few cups of salt. Work the mixture well into all
exposed surfaces and close to the bone. Work the
mixture into the exposed area of the hock.
7. Cover the base of your salng container with a layer
of salt.
8. Place the leg onto the salt, cut side down at a slight
angle and cover completely with remaining salt.
9. Place a weight on the leg and cover the container.
10. Store the container in a dark cool place for
approximately 1 day per kilogram of meat.
11. Aer salng period is complete, remove the meat
from salt and brush o all excess salt. You can wash
in water or wine at this stage too.
12. Air dry the salami in your CLEAVER at 8oC to
10°C and 72% to 76% RH unl at least 30%
weight loss is achieved.
Note: Exposed meat will dry out faster than the
meat covered by the rind. To avoid the prosciuo
drying out too quickly, cover the exposed meat with
a mixture of lard and cracked black pepper.
13. Air dry for a long as you can, however the product
should be ready in around 6 months.

19
12. Recipes
Salami Suggesons
SALAMI PICANTE
70% lean pork shoulder
30% pork back fat (⅓ hand diced)
30g ne sea salt (or 27.5g ne sea salt and
2.5g curing salt #2)
4g Kampot black pepper, cracked
4g crushed chilli akes
5g fennel seeds
70mL chilled red wine
FENNEL + TOKAY
70% lean pork shoulder
30% fat (⅓ hand diced)
30g ne sea salt (or 27.5g ne sea salt and
2.5g curing salt #2)
7g fresh wild fennel seeds
1.5g dried garlic akes
4.25g Kampot red peppercorns, cracked
1g cinnamon
50ml tokay
Why not try your own avours or some these suggestions (per 1kg of meat)
SALAMI VENISON
65% lean vension
10% lean pork shoulder
25% pork back fat (⅓ hand diced)
30g/kg ne sea salt (or 27.5g ne sea salt
and 2.5g curing salt #2)
2.5g Kampot white pepper, cracked
3.5g coriander seeds, crushed
1.75g juniper berries, crushed
1g mace, ground
SAUCISSON SEC SALAMI
75% lean pork
25% pork fat (½ hand diced)
30g ne sea salt (or 27.5g ne sea salt and
2.5g curing salt #2)
3.5g Kampot black pepper, cracked
3.5g quatre epice
0.5g nutmeg, ground
DRIED CHORIZO
70% lean pork shoulder
30% pork back fat (⅓ hand diced)
25g ne sea salt
2.5g curing salt #2
10g sweet paprika
10g smoked paprika
10g Turkish pepper (biber)
2g Kampot black pepper, cracked
0.5g cloves, ground
2g dried garlic akes, crushed
50mL white wine
SALAMI DUCK L’ORANGE
40% lean duck meat
40% lean pork shoulder
20% pork back fat (⅓ hand diced)
30g ne sea salt (or 27.5g ne sea salt and
2.5g curing salt #2)
0.5g cardamom seeds, ground
0.5g ve spice
1g mace, ground
3g Kampot white peppercorns, crushed
6mL Triple Sec Liqueur
27.5g pistacchio, crushed
1 orange, zested

13. Technical Specifications
The Piglet The Weaner
PLUS
The Boar
PLUS
The Hog
PLUS
The Whole
Hog
The
Corkscrew
Height
(mm) 820 1225 1625 1805 2012 1805
Width
(mm) 595 595 595 595 820 595
Depth
(mm) 595 595 680 680 740 680
Net Weight
(kg) 55 70 85 98 155 103
Volume (L) 154 240 380 450 760 440
Temp Range
(°C) 5 to 25°C0 to 25°C0 to 25°C0 to 25°C0 to 25°C↑5 to 25°C
↓5 to 25°C
Humidity
Range
(% RH)
60 to 90% 60 to 90% 60 to 90% 60 to 90% 60 to 90% ↑65%
↓60 to 90%
Salami Batch
Size (kg) up to 8kg up to 15kg up to 25kg up to 30kg up to 40kg up to 15kg
Bole
Capacity -----60
Rated
Current (A) 0.5A 0.6A 0.7A 0.9A 0.9A 0.9A
Rated Power
(V) 70W 80W 130W 150W 150W 150W
Sound (db) 43 43 45 45 45 45
CLEAVER Salumi Cabinets is a Trademark of CLEAVER Arsan Appliances Pty Ltd
42 Smith Street, Warragul VICTORIA 3820
This manual suits for next models
5
Table of contents
Other Cleaver Commercial Food Equipment manuals

Popular Commercial Food Equipment manuals by other brands


Diamond
Diamond AL1TB/H2-R2 Installation, Operating and Maintenance Instruction

Salva
Salva IVERPAN FC-18 User instructions

Allure
Allure Melanger JR6t Operator's manual

saro
saro FKT 935 operating instructions

Hussmann
Hussmann Rear Roll-in Dairy Installation & operation manual

Cornelius
Cornelius IDC PRO 255 Service manual

Moduline
Moduline HSH E Series Service manual

MINERVA OMEGA
MINERVA OMEGA DERBY 270 operating instructions

Diamond
Diamond OPTIMA 700 Installation, use and maintenance instructions

Diamond
Diamond G9/PLCA4 operating instructions

Cuppone
Cuppone BERNINI BRN 280 Installation

Arneg
Arneg Atlanta Direction for Installation and Use