CLEBO-HD AOD-2301 User manual

ABOUT MANUAL
Before installing and using the camera, please read this manual carefully.
Be sure to keep it handy for future reference.
Megapixel HD-SDI
Outdoor Dome Camera
CLEBO-HD AOD-2301
CLEBO-HD AOD-2301 IR
05212012

2
PRECAUTIONS
FCC COMPLIANCE
WARNING : Changes or modifications are not expressly approved by the manufacturer.
Do not open or modify.
Do not open the case except during maintenence and installation,
for it may be dangerous and can cause damages.
Do not put objects into the unit.
Keep metal objects and flammable substances from entering the camera.
It can cause fire, short-circuits, or other damages.
Be careful when handling the unit.
To prevent damages, do not drop the camera or subject it to shock or vibration.
Do not install near electric or magnetic fields.
Protect from humidity and dust.
Protect from high temperature.
Be careful when installing near the ceiling of kitchen or a boiler room,
as the temperature may rise to high levels.
Cleaning :
To remove dirt from the case, moisten a soft cloth with a soft detergent solution and wipe.
Mounting Surface :
The material of the mounting surface must be strong enough to support the camera.
This equipment has been tested and found to comply with the limits for a Class B
digital device, pursuant to part 15 of the FCC rules. These limits are designed to
Provide reasonable protection against harmful interference. when the equipment is
operated in a residential environment. This equipment generates, uses, and radiates
radio frequency energy; and if it is not installed and used in accordance with the
instruction manual, it may cause harmful interference to radio communications.

3
Table of Contents
Introduction
Installation
Camera OSD Menu and Glossary
Troubleshooting
Specifications
Features
Parts and Descriptions
Dimensions
Included Accessories
Easy Installations
Insstallation
Connecting to Monitor
4
5
6
7
8
9~13
14
17-28
29
30
Adjusting the camera lens 15
3Axis Gimbal Adjustment 16

4
FEATURES*
Sony 1/2.8” CMOS Sensor
Highest Resolution 2.1 Megapixels
720P / 1080P Mode selectable
4x Auto-Focus 3.5~16mm Lens
Double Shutter WDR (Wide Dynamic Range) at 15fps Settings
70ft Range IR with Intelligent Camera Sync (CLEBO-HD AOD-2301 IR)
Electronic Day and Night (CLEBO-HD AOD-2301)
True Day and Night (CLEBO-HD AOD-2301 IR)
AGC / BLC / AWB
3D DNR (3D Digital Noise Reduction)
D-Zoom (1~112 level)
HL Mask (High Light Masking)
Mirror Image Control
Programmable Privacy Zone (24) & Motion Detection
White defecet cancellation (DEFECT DET)
12VDC Support Only
Secondary Video-BNC Output
IP68 Certified (Waterproof)
5
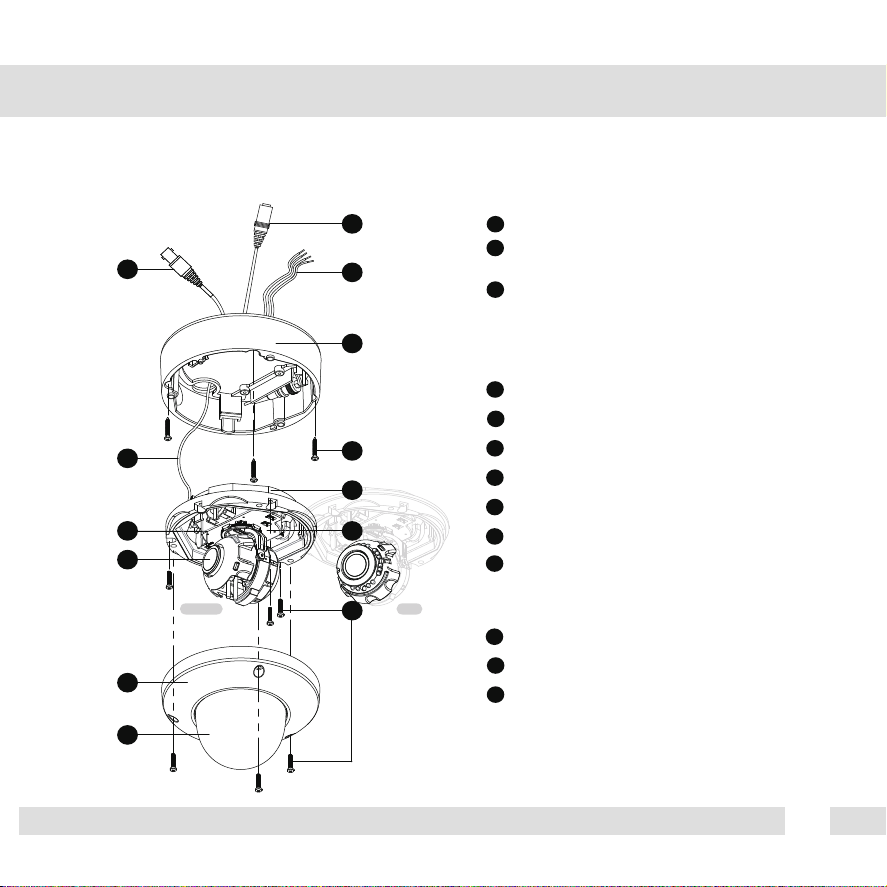
PART & DESCRIPTIONS*
2
3
9
8
5
13
10
6
7
1
12
11
4
1
Lens
3
RS485, Alarm
2
Power input Connctor
12VDC Voltage
Yellow (485+)
Black (485-)
White (Alarm 1)
Red (Alarm 2)
4
BNC (HD-SDI)
11
2nd Video Connector
5
Camera Control Board
12
Safety Wire
6
Bubble
7
Upper Case
8
Flush Mount Case
9
Surface Mount Case
10
Assembly Screws
#8 - 32 x 0.75
13
Mounting Screws
w/o IR IR

6
DIMENSIONS IN MILLIMETERS(INCHES)*
Flush Mount
Surface Mount (I) Indoor, (V) Vandalproof
101
137
17
28
54
98,8
121
118,8
139
36
29
53,8
121

7
INSTALLATION*
Included with Outdoor Dome Camera
1. User Manual
2. Mounting Template
3. Second Video Jack
4. Three (3) Screws and Three (3) Dry Wall Anchors
5. L-Wrench
6. TORX-T20 Bolt
7. TORX-T20 Wrench
1234
567

8
EASY INSTALLATION*
9
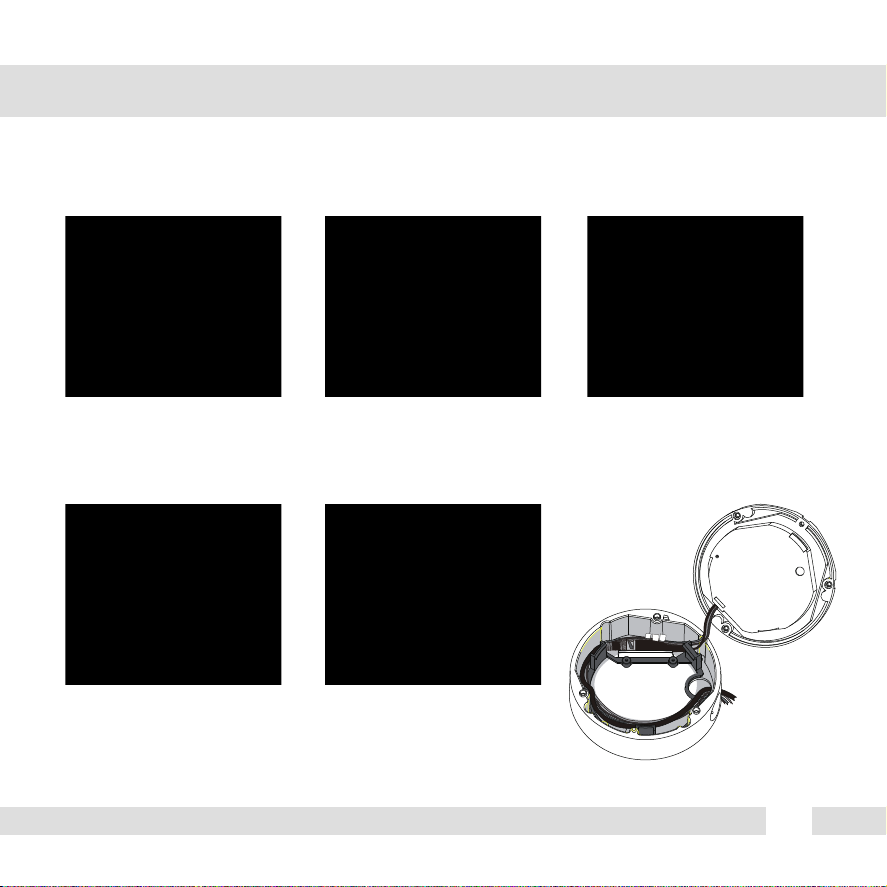
SURFACE MOUNT INSTALLATION INSTRUCTIONS*
DC12V
AC24V
UTP
RS485
1. Use the camera’s mounting
template or your camera to
mark the holes as required.
2. Drill holes into the drywall and
insert the drywall mounts into
the holes.
3. Pull wires through and make
connections.
If you need to keep the wiring within the
within the camera
housing, refer to the diagram below.
4. Mount the surface mount
base (junction box) to the
wall.
5. Snap the camera module onto
the base by aligning the red
and black markings on the
base and the camera module.
10
6. Secure the three (3) assembly
screws.
7. Adjust the camera’s position
by using the 3-Axis Gimbal.
8. Tighten the three locking
screws with the L-Wrench
to secure the cover dome
over the camera.
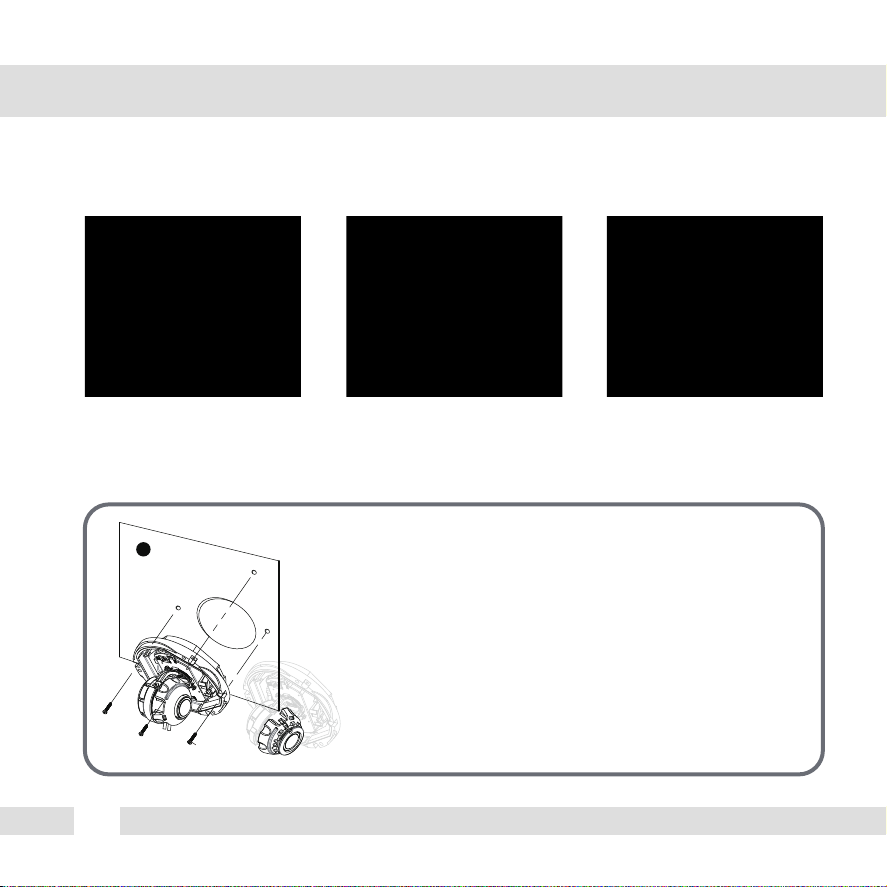
Flush Mount Installation
For a flush mount housing, remove the surface mount base
(junction box). Cut a large hole on a flat surface for the top part
of the flush mount base. Use the three screws fixed to the base
to secure it to the surface of the wall or ceiling.
Follow steps 6 through 8 of the Surface Mount Installation
Instructions to complete the installation.
3
ST4X35

11
WALL MOUNT INSTALLATION INSTRUCTIONS*
1. Verify all parts are in the box.
2. Insert the wires from the
camera through the wall
mount housing.
3. Use the mounting template to
make pilot holes. Use the dry
wall anchors and woods screws
to attach the assembly.
4. Attach the camera’s surface
mount base (junction box) to
the wall mount.
5. Connect all cables and snap
the camera module onto the
base.
6. Adjust the camera and
secure the dome cover over
the camera module.

12
PENDANT MOUNT INSTALLATION INSTRUCTIONS*
1. Verify all parts are in the box.
2. Attach the top shield to the
pendant mount.
3. Run all necessary cables
from the ceiling to the mount.
4. Use the mounting template
to make pilot holes. Use the
dry wall anchors and wood
screws to attach the assembly
to the wall.
5. Connect all cables and verify
camera is operating properly. 6. Attach the camera to the
ceiling mount and secure the
dome cover properly.

13
CORNER MOUNT INSTALLATION INSTRUCTIONS*
1. Verify all parts are in the box.
2. Attach the two compression fittings to the
corner bracket.
3. Attach the wall mount bracket to the corner
mount using the machine screws. 4. Mount the camera assembly to the corner of
the wall, using wall mount anchors and
machine screws.

14
CONNECTING TO MONITORS*
15
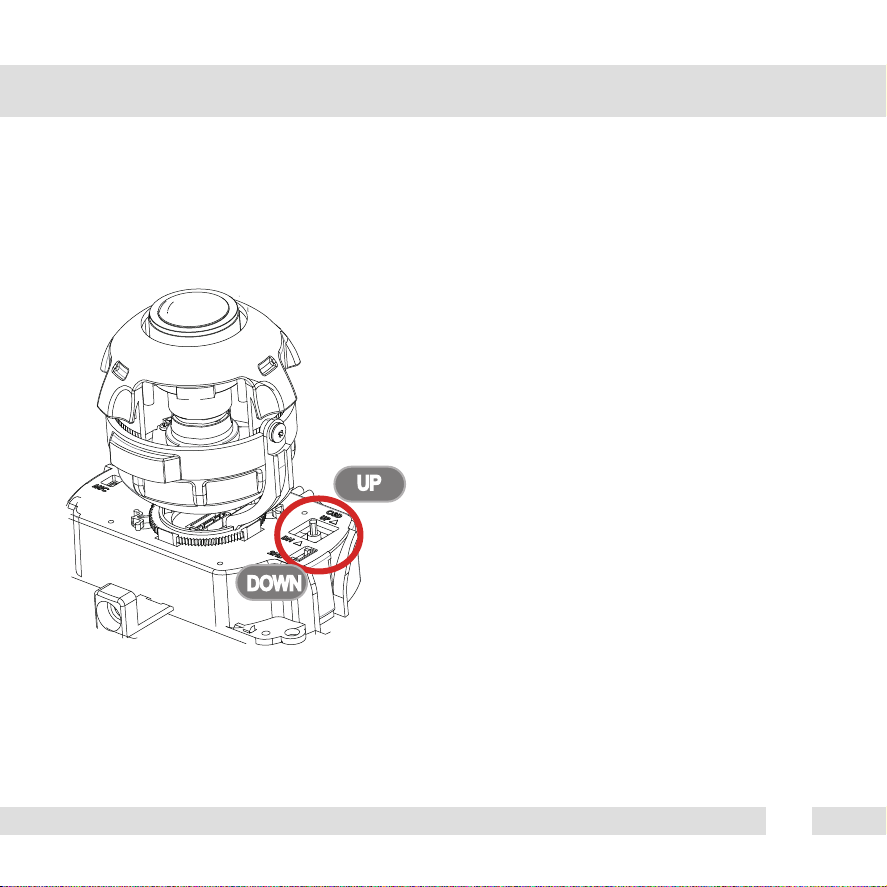
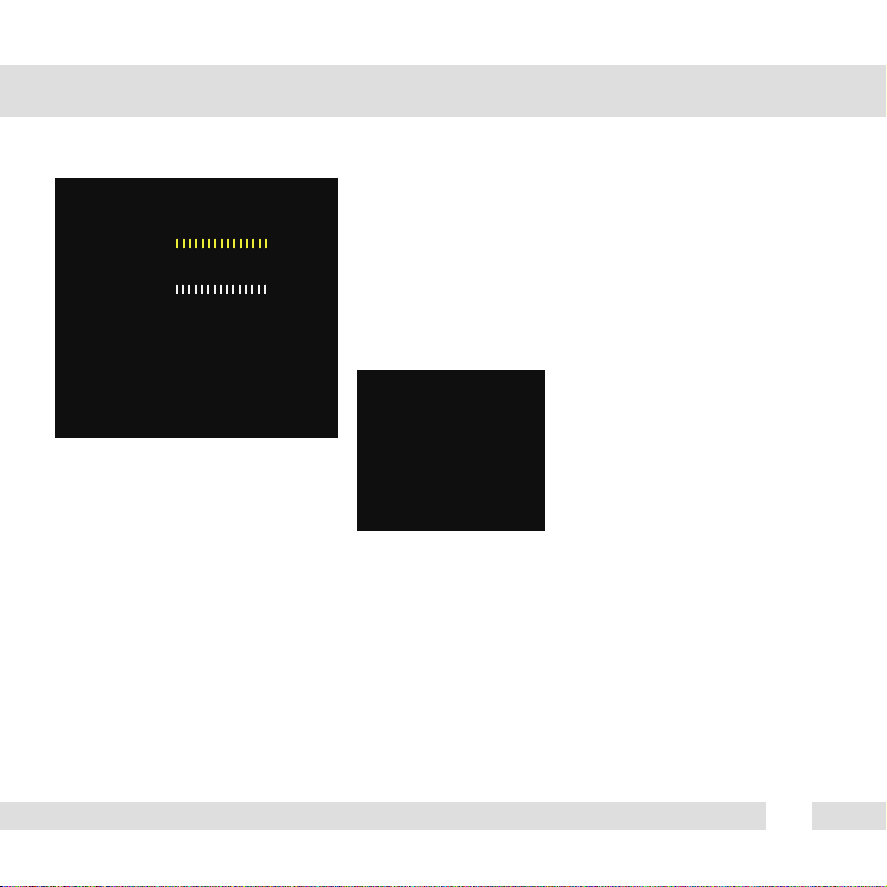
ADJUSTING THE CAMERA LENS*
Adjusting Auto Focus Lens
If pushing the OSD joystick to ‘UP’,
the lens will start zoom-in.
If pushing the OSD joystick to ‘DOWN’,
the lens will start zoom-out.
If you keep pushing the joystick,
zoom in/out will be continuously operated.
When you find the right angle, take off
your finger from the joystick and wait.
The focus will be automatically adjusted.
UP
DOWN
16
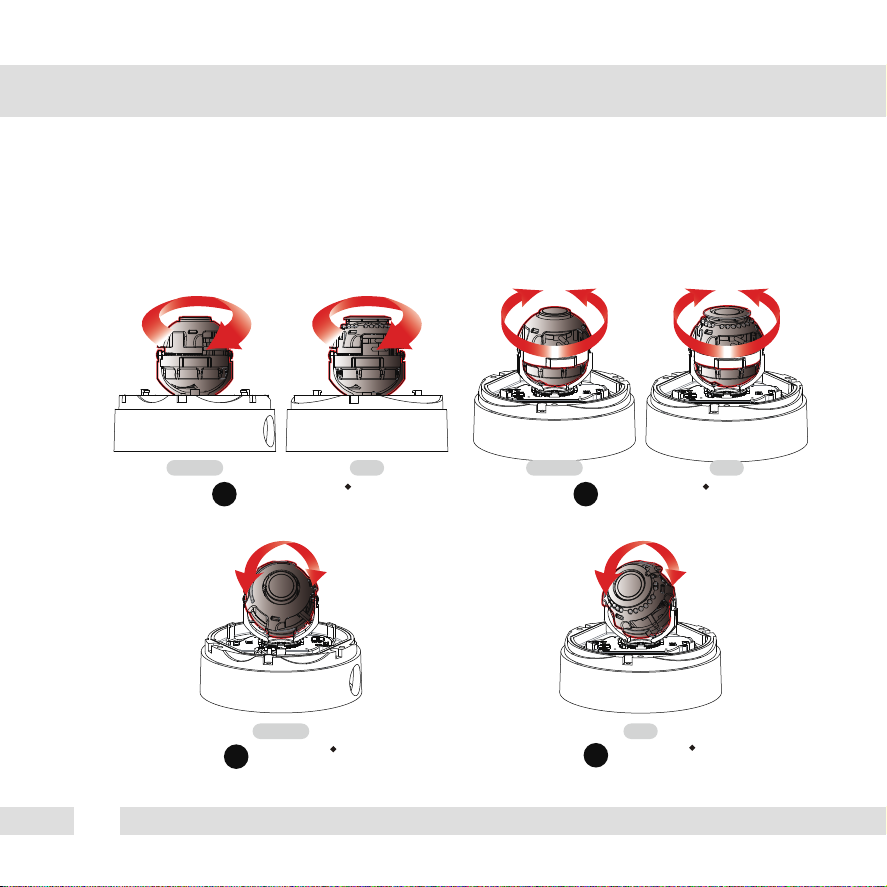
ADJUSTING THE 3-AXIS GIMBAL*
The Gimbal mechanism yields maximum rotation and placement as show below.
1Rotation 360 3Panning 360
NO IR IR NO IR IR
2Tilting 90
NO IR
4Tilting 82
IR

17
MODULE OSD MENU*
PROPERTY EXPOSURE LENS
FUNCTION IMAGE WDR/BLC
DAYNIGHT SET UP EXIT
CAMERA ID
0~255
TITLE
DISPLAY
NON, ID,, TITLE
PROTOCOL
PELCO-D, NADATEL
BAUDRATE
9600, 2400bps
RETURN
DZOOM
0~112
AWB
AUTO, AUTO_H, AUTO_L, PRESET,
MANUAL, AUTO-ext
PRIVACY
ON, OFF
DNR
OFF, LOW, MIDDLE, HIGH
MOTION
ON, OFF
RETURN
BRIGHTNESS
0~20
SHUTTER
AUTO, MANUAL(Indoor, Deblur120,
Deblur240, Outdoor)
DSS
OFF, x2, x3, x4
AGC
0~20
RETURN
LENS TYPE
MANUAL, DC, AF
MODE
OUTDOOR,INDOOR/FLK,Deblur120,Deblur240
OPTIC ZOOM TELE, WIDE
FOCUS MODE MANUAL, AUTO
FOCUSING FAR, NEAR
TIMER OFF, 1~10min
TDN SYNC OFF, ON
RETURN
CHROMA 0~20
SHARPNESS 0~10
MIRROR ON, OFF
FLIP ON, OFF
E-Edge ON, OFF
HLMASK ON, OFF
CONTRAST LOW, NORMAL, HIGH
HUE CONTROL R-GAIN, B-GAIN
RETURN
DETECT DET ON, OFF
2.0M MODE 1080P, 720P
720P MODE 60/50FPS, 30/25FPS
LANGUAGE ENG, GER, CHN
TDN TEST TEST OFF, TEST ON
FACTORY SET YES, NO
FREQ 60Hz, 50Hz
TYPE DOME, BOX, BULLET
FW_LOCK ON,OFF
RETURN
MAX DR OFF, ON
MODE OFF, BLC, WDR
WDR_WGT 0~9
BLC OSD OFF, ON
BLC POS-X 0~20
BLC POS-Y 0~20
BLC SIZ-X 0~20
BLC SIZ-Y 0~20
RETURN
TDN MODE
AUTO, COLOR, BW, LED
BW to C
0~9
C to BW
0~9
CDS SET
BW Low, BW High
RETURN
EXIT
No Save, Yes Save
RETURN

18
PROPERTY
1 PROPERTY
CAMERAID
TITLE(1-)
DISPLAY
PROTOCOL
BAUDRATE
RETURN
0
NONE
PELCO-D
9600 BPS
CAMERA ID
You can define the camera ID no. from 0~2550~255
(1-)
DISPLAY You can select whether displaying Camera ID and TITLE or not.NONE, ID, TITLE
PROTOCOL If using Nadatel HD-SDI DVR, select the protocol NADATEL.PELCO-D, NADATEL
BAUDRATE
RETURN
9600 is the default. There are 2 choices - 9600 and 2400bps.9600,2400bps
TITLE After setting the camera ID, you also can make the
title for each camera ID no. Title is total 8 figures
with number and alphabets.
Let me make the title name HDSDI123.
TITLE (1-H) H
TITLE (2-D) HD
TITLE (3-S) HDS
TITLE (4-D) HDSD
TITLE (5-I) HDSDI
TITLE (5-1) HDSDI1
TITLE (6-2) HDSDI12
TITLE (8-3) HDSDI123
1 PROPEARTY
CAMERAID
TITLE(1-H)
DISPLAY
PROTOCOL
BAUDRATE
RETURN
1
HDSDI123
NONE
PELCO-D
9600BPS
19
EXPOSURE
2 EXPOSURE
BRIGHTNESS
SHUTTER
DSS
AGC
RETURN
AUTO
OFF
10
20
BRIGHTNESS
You can adjust the brightness.
Higher number means brighter images.
The default is 10.
0~20
SHUTTER It’s a defualt. Shutter speed is adjusted properly.
Shutter speed is selectable from 1/30 ~ 1/60000 but
it’s related to the menu LENS-MODE.
AUTO
MANUAL
DSS (Digital Slow Shutter)
The default is OFF.
If better sensitivity is required, choose x2,3,or 4.
OFF, x2, x3, x4
AGC (Auto Gain Control)
Auto Gain Control automatically adjusts the video gain to enhance picture
brightness in low light conditions.The higher number means better sensitivity.
The default is 20.
0~20
RETURN
SHUTTER
LEVEL
RETURN 1/30
If LENS MODE is OUTDOOR, shutter
speed is adjustable from
1/30~1/60000.
If LENS MODE is INDOOR/FLK,
shutter speed is fxied with 1/30.
If LENS MODE is DEBLUR120, shutter
speed is adjustable from 1/30~1/120.
If LENS MODE is DEBLUR240, shutter
speed is adjustable from 1/30~240.

20
LENS
3 LENS
LENSTYHPE
MODE
OPTICZOOM
FOCUSMODE
TIMER
TDN SYNC
RETURN
AFLENS
DEBLUR120
T W
AUTO
OFF 00:00
OFF
LENS TYPE
AF LENS
DC LENS
MANUAL
AF mode is supported for Auto Focus Lens.
DC mode is supported for Auto-iris Varifocal lens.
Manual mode is supported for Manual iris or Fixed
board lens.
3 LENS
LENS TYHPE
MODE
OPTIC ZOOM
FOCUSMODE
TIMER
TDN SYNC
RETURN
DCLENS
DEBLUR120
If DC or Manual mode is selected, some
menu can’t be controlled - OPTIC ZOOM,
FOCUS MODE, TIMER, TDN SYNC.
It offers full range of eletric shutter speed from 1/30~1/60000.
It fixes shutter speed with 1/30. It can avoid color rolling problem.
It offers electric shutter speed from 1/30~1/120.
It offers electric shutter speed from 1/30~1/240.
Zoom Range is adjustable from Tele to Wide.
MODE
OPTIC ZOOM
OUTDOOR
INDOOR/FLK
DEBLUR120
DEBLUR240
Both DEBLUR120, DEBLUR240 helps to avoid motion blur at still image.
This manual suits for next models
1
Table of contents
Other CLEBO-HD Security Camera manuals

Popular Security Camera manuals by other brands

Reolink
Reolink Argus user manual

Arecont Vision
Arecont Vision SurroundVideo Omni AV12176DN-08 installation manual

GRASS VALLEY
GRASS VALLEY CameraMan 3e Installation and operation manual

D-Link
D-Link DCS-3716 Quick installation guide

Lorex
Lorex F461AQ Series quick start guide

Eyeris
Eyeris ERM-L3360P Installation and operating instruction manual


